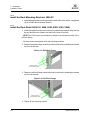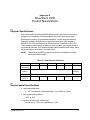
1
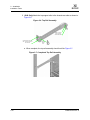
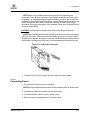
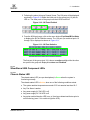
Q
Simplify
SilverStorm 9000
Hardware Installation Guide
D000024-000 Rev. A
Page i
SilverStorm 9000 Hardware Installation Guide
Page ii
Q
D000024-000 Rev. A
Q
SilverStorm 9000 Hardware Installation Guide
Information furnished in this manual is believed to be accurate and reliable. However, QLogic Corporation assumes no
responsibility for its use, nor for any infringements of patents or other rights of third parties which may result from its use.
QLogic Corporation reserves the right to change product specifications at any time without notice. Applications described
in this document for any of these products are for illustrative purposes only. QLogic Corporation makes no representation
nor warranty that such applications are suitable for the specified use without further testing or modification. QLogic
Corporation assumes no responsibility for any errors that may appear in this document.
No part of this document may be copied nor reproduced by any means, nor translated nor transmitted to any magnetic
medium without the express written consent of QLogic Corporation.
Linux is a registered trademark of Linus Torvalds.
Microsoft and Windows are registered trademarks and Windows Server is a trademark of Microsoft Corporation.
Red Hat and all Red Hat-based trademarks are trademarks or registered trademarks of Red Hat, Inc.
SUSE is a registered trademark of Novell, Inc.
All other brand and product names are trademarks or registered trademarks of their respective owners.
Document Revision History
Rev. A, 08/01/07
D000024-000 Rev. A
Page iii
SilverStorm 9000 Hardware Installation Guide
Q
© 2007 QLogic Corporation. All rights reserved worldwide.
First Published: March, 2007
Printed in U.S.A.
QLogic Corporation, 26650 Aliso Viejo Parkway, Aliso Viejo, CA 92656, (800) 662-4471 or (949) 389-6000
Page iv
D000024-000 Rev. A
Q
SilverStorm 9000 Hardware
Section 1
Introduction
1.1
1.2
1.3
1.3.1
1.3.2
Intended Audience . . . . . . . . . . . . . . . . . . . . . . . . . . . . . . . . . . . . . . . . . .
License Agreements . . . . . . . . . . . . . . . . . . . . . . . . . . . . . . . . . . . . . . . . .
Technical Support. . . . . . . . . . . . . . . . . . . . . . . . . . . . . . . . . . . . . . . . . . .
Availability . . . . . . . . . . . . . . . . . . . . . . . . . . . . . . . . . . . . . . . . . . . . . .
Contact Information . . . . . . . . . . . . . . . . . . . . . . . . . . . . . . . . . . . . . . .
Section 2
Installation
2.1
2.1.1
2.2
2.2.1
2.2.2
2.3
2.3.1
2.3.2
2.3.3
2.3.4
2.3.5
2.3.6
2.3.7
2.3.8
Planning the Installation . . . . . . . . . . . . . . . . . . . . . . . . . . . . . . . . . . . . . .
Cable Requirements . . . . . . . . . . . . . . . . . . . . . . . . . . . . . . . . . . . . . .
Installation Tasks Checklist . . . . . . . . . . . . . . . . . . . . . . . . . . . . . . . . . . .
Tools and Equipment Required . . . . . . . . . . . . . . . . . . . . . . . . . . . . . .
Check the Installation Site . . . . . . . . . . . . . . . . . . . . . . . . . . . . . . . . . .
Installation Tasks . . . . . . . . . . . . . . . . . . . . . . . . . . . . . . . . . . . . . . . . . . .
Mounting Hardware Kit Contents: . . . . . . . . . . . . . . . . . . . . . . . . . . . .
Mark the Rack . . . . . . . . . . . . . . . . . . . . . . . . . . . . . . . . . . . . . . . . . . .
Install the Rack Mounting Brackets: 9024-FC . . . . . . . . . . . . . . . . . . .
Install the Rack Rails (9024-CU, 9020, 9040, 9080, 9120, 9240) . . . .
Install the Rail Hat Sections (9024, 9020 and 9040) . . . . . . . . . . . . . .
Rack-Mount the Switch . . . . . . . . . . . . . . . . . . . . . . . . . . . . . . . . . . . .
Installing the Switch Fascia . . . . . . . . . . . . . . . . . . . . . . . . . . . . . . . . .
Hot Swapping Components . . . . . . . . . . . . . . . . . . . . . . . . . . . . . . . . .
Appendix A
SilverStorm 9000Product Specifications
A.1
A.2
A.3
A.4
A.5
A.6
Physical Specifications . . . . . . . . . . . . . . . . . . . . . . . . . . . . . . . . . . . . . .
Environmental Specifications . . . . . . . . . . . . . . . . . . . . . . . . . . . . . . . . . .
Cooling and Thermal management: 9024-CU . . . . . . . . . . . . . . . . . . . . .
Cooling and Thermal management (9020, 9040, 9080, 9120, 9240) . . .
Power Specifications . . . . . . . . . . . . . . . . . . . . . . . . . . . . . . . . . . . . . . . .
Configuration Restrictions . . . . . . . . . . . . . . . . . . . . . . . . . . . . . . . . . . . .
Appendix B
Safety and Regulatory Compliance Information
B.1
B.1.1
B.1.2
B.1.3
B.1.4
B.1.5
B.1.6
B.1.7
Safety Information . . . . . . . . . . . . . . . . . . . . . . . . . . . . . . . . . . . . . . . . . .
Statement 1: . . . . . . . . . . . . . . . . . . . . . . . . . . . . . . . . . . . . . . . . . . . . .
Statement 2: . . . . . . . . . . . . . . . . . . . . . . . . . . . . . . . . . . . . . . . . . . . . .
Statement 3: . . . . . . . . . . . . . . . . . . . . . . . . . . . . . . . . . . . . . . . . . . . . .
Statement 4: . . . . . . . . . . . . . . . . . . . . . . . . . . . . . . . . . . . . . . . . . . . . .
Statement 5: . . . . . . . . . . . . . . . . . . . . . . . . . . . . . . . . . . . . . . . . . . . . .
Statement 6: . . . . . . . . . . . . . . . . . . . . . . . . . . . . . . . . . . . . . . . . . . . . .
Statement 7: . . . . . . . . . . . . . . . . . . . . . . . . . . . . . . . . . . . . . . . . . . . . .
D000024-000 Rev. A
1-1
1-1
1-2
1-2
1-3
2-1
2-2
2-3
2-3
2-3
2-4
2-4
2-5
2-6
2-6
2-7
2-9
2-11
2-26
A-1
A-1
A-2
A-2
A-4
A-5
B-1
B-1
B-1
B-2
B-2
B-3
B-3
B-3
Page v
SilverStorm 9000 Hardware Installation Guide
B.2
Page vi
Q
Regulatory Compliance Information . . . . . . . . . . . . . . . . . . . . . . . . . . . .
B-5
D000024-000 Rev. A
Section 1
Introduction
This manual describes the hardware installation and initial configuration tasks
for the SilverStorm™ 9000 series that includes:
❥
The SilverStorm 9024 24-port InfiniBand switch
❥
The SilverStorm Multi-Protocol Fabric Director (MPFD) series:
❑
SilverStorm 9020
❑
SilverStorm 9040
❑
SilverStorm 9080
❑
SilverStorm 9120
❑
SilverStorm 9240
This manual is organized as follows:
Section 1 describes the intended audience and technical support.
Section 2 describes the hardware installation and initial configuration tasks.
Appendix A provides product specification information.
Appendix B provides product safety and regulatory information.
1.1
Intended Audience
This manual is intended to provide network administrators and other qualified
personnel a reference for hardware installation and initial configuration for the
switches.
1.2
License Agreements
Refer to the QLogic Software End User License Agreement for a complete listing
of all license agreements affecting this product.
D000024-000 Rev. A
1-1
1 – Introduction
Technical Support
Q
1.3
Technical Support
Customers should contact their authorized maintenance provider for technical
support of their QLogic switch products. QLogic-direct customers may contact
QLogic Technical Support; others will be redirected to their authorized maintenance
provider.
Visit the QLogic support Web site listed in Contact Information for the latest firmware
and software updates.
1.3.1
Availability
QLogic Technical Support for products under warranty is available during local
standard working hours excluding QLogic Observed Holidays.
1-2
D000024-000 Rev. A
Q
1 – Introduction
1.3.2
Contact Information
Support Headquarters
QLogic Corporation
12984 Valley View Road
Eden Prairie, MN 55344-3657
USA
QLogic Web Site
www.qlogic.com
Technical Support Web Site
support.qlogic.com
Technical Support Email
[email protected]
Technical Training Email
[email protected]
North American Region
Email
[email protected]
Phone
+1-952-932-4040
Fax
+1 952-974-4910
All other regions of the world
QLogic Web Site
D000024-000 Rev. A
www.qlogic.com
1-3
1 – Introduction
Technical Support
1-4
Q
D000024-000 Rev. A
Section 2
Installation
This section describes how to install and configure for first-time use:
❥
The SilverStorm 9000 switches in a network environment.
2.1
Planning the Installation
The 9000 is designed to be installed in an existing 19-inch equipment rack or server
rack.
NOTE:
These chassis are designed for a four-post server cabinet. They should
not be mounted in a two-post telco cabinet.
Racks should conform to conventional standards. Use the American National
Standards Institute (ANSI)/Electronic Industries Association (EIA) standard
ANSI/EIA-310-D-92 and International Electrotechnical Commission (IEC) 297
Racks should meet the following mechanical recommendations:
❥
Four-post, 19" rack to facilitate easy maintenance
❥
Universal mounting rail hole pattern identified in IEC Standard 297
❥
Mounting holes flush with the rails to accommodate the chassis
NOTE:
Operation is subject to the following condition:
Rack Enclosure Door Panels - This unit radiates radio frequency energy
and was tested for FCC Part 15 compliance in a suitable rack enclosure,
providing the means to confine radiated emissions. Construction of the
rack enclosure may consist of mesh screen or perforations, and should
include top, side, and front and rear door panels.
Use a rack grounding kit and a ground conductor that is carried back to
earth or to another suitable building ground. Ground the equipment rack
to earth ground.
Provide enough room to work on the equipment. Clear the work site of any
unnecessary materials. Make sure the equipment will have enough
clearance for front and rear access.
D000024-000 Rev. A
2-1
Q
2 – Installation
Planning the Installation
2.1.1
Cable Requirements
2.1.1.1
Cable Distances
When planning the location of the switches, consider the distance limitations for
signaling, EMI, and connector compatibility. It is recommended that the user does
not exceed specified transmission rate and distance limits.
NOTE:
Building and electrical codes vary depending on the location. Comply with
all code specifications when planning the site and installing cable.
When running cable to the equipment, consider the following:
❥
Do not run cables where they can be stepped on or rolled over.
❥
Be sure cables are intact with no cuts, bends, or nicks.
❥
If the user is making a cable, ensure that the cable is properly crimped.
❥
Provide proper strain relief for standard IB cables.
❥
Support cable using a cable manager mounted above connectors to avoid
unnecessary weight on the cable bundles.
❥
Bundle cable using velcro straps to avoid injuring cables.
❥
Keep all ports and connectors free of dust.
❥
Untwisted Pair (UTP) cables can build up Electrostatic Discharge (ESD) charges
when being pulled into a new installation. Before installing category 5 UTP
cables, discharge ESD from the cable by plugging it into a port on a system that
is not powered on.
❥
When required for safety and fire rating requirements, plenum-rated cable can
be used. Check the local building codes to determine when it is appropriate to
use plenum-rated cable, or refer to IEC standard 850.
2.1.1.2
Uninterruptible Power Supply
Consider the following when selecting Uninterruptible Power Supply (UPS)
equipment:
❥
The minimum amperage requirements for a UPS:
❥
2-2
Calculate VA (Volt-Amps): Locate the voltage and amperage requirements
for each piece of equipment (usually located on a sticker on the back or bottom
of the equipment). Multiply the numbers together to get VA.
D000024-000 Rev. A
Q
2 – Installation
❥
Add the VA from each piece of equipment together to find the total VA
requirement. Then add 30% to determine the minimum amperage
requirements for the UPS.
❥
Transition time (the time necessary for the UPS to transfer from utility power to
full-load battery power).
❥
The longest potential time period the UPS might be required to supply backup
power.
❥
Whether or not the UPS unit also provides online protection.
2.2
Installation Tasks Checklist
To perform the actual switch installation, the site implementation engineer must
perform the following tasks, which are detailed in this section.
CAUTION! Be sure to review the safety information before starting the installation
and during the installation process (refer to Appendix B).
1. Check the installation site to verify the installation of cabinet power feeds, rails,
and grounding.
2. Unpack the equipment and inspect for any shipping damage. Any shipping
damage should be reported to the shipping company.
3. Verify that the equipment shipped matches the packing list.
4. Mark the rack and install the mounting rails.
5. Physically install the switch in the rack.
2.2.1
Tools and Equipment Required
❥
An ESD wrist strap
❥
A #2 Phillips screwdriver
❥
Pen (felt-tip) to mark the mounting holes
2.2.2
Check the Installation Site
The switches are designed to be installed in an existing server cabinet (not a telco
cabinet), where it can be mounted in a standard equipment rack.
Be sure of the following:
❥
The cabinet has a full earth ground to provide reliable grounding.
❥
There is enough room to work on the equipment.
❥
The equipment will have enough clearance for front and rear access.
D000024-000 Rev. A
2-3
Q
2 – Installation
Installation Tasks
❥
The IB cables can be accessed easily.
❥
Water or moisture cannot enter the switch.
❥
The ambient temperature stays between 50° - 113°F (5° - 45° C).
❥
Cabinet doors do not interfere with front-to-back air flow.
The cabinet should have its own switchable power distribution. If the switch has two
power supplies, it is suggested that a cabinet with dual power distribution units is
used.
It is recommended that cabinet anti-tip devices are used. This is especially true if
installing or removing a switch in the upper half of the cabinet when the lower half
is empty.
2.3
Installation Tasks
The following is an overview of the installation tasks detailed in this section:
1. If applicable, remove the doors of the rack.
2. Mark the rack, allowing the applicable amount of vertical space to install each
switch.
3. Install the hat rail sections (9024, 9020 and 9040).
4. Install the bottom support rails (9024, 9020, 9040, 9080, 9120 and 9240).
5. Rack mount the switch.
6. Install the top support rails (9240).
7. If applicable, replace the rack’s doors.
NOTE:
The mounting kit hardware contains all of the necessary parts for installing
and mounting the switches into a rack. These kits are intended for use in
cabinets with a depth ranging from 28 - 34 inches. A support shelf capable
of supporting the rated weight of the 9240 may be used in place of rails.
For specific product weights refer to Table A-1 in Appendix A.
2.3.1
Mounting Hardware Kit Contents:
2.3.1.1
9024-FC
❥
2-4
Kit Mounting Brackets containing:
❥
One pair (left and right) of rack mounting brackets
❥
#6-32 flat head screws
D000024-000 Rev. A
Q
2 – Installation
❥
Kit Mounting Hardware 3/8” Square Hole containing:
❥
10/32” x 0.375” pan-head Phillips screws
❥
Caged nut adapters for square-holed racks
2.3.1.2
9024-CU, 9020 and 9040
❥
❥
Kit Mounting Rails containing:
❥
One pair of bottom support rail assemblies
❥
One pair of hat rail assemblies
Kit Mounting Hardware 3/8” Square Hole containing:
❥
10/32” x 0.375” pan-head Phillips screws
❥
Caged nut adapters for square-holed racks
2.3.1.3
9080, 9120 and 9240
❥
❥
Kit Mounting Rails containing:
❥
One pair (left and right) of bottom support rail assemblies
❥
One pair of top support rail assemblies (9240 only)
❥
Two heyclips (9080 and 9120)
❥
Four heyclips (9240 only)
Kit Mounting Hardware 3/8” Square Hole containing:
❥
10/32” x 0.375” pan-head Phillips screws
❥
Caged nut adapters for square-holed racks
2.3.2
Mark the Rack
Allow enough vertical space in the rack for each specific switch installation.
1. Determine the location on the rack of the bottom of the switch.
2. Mark the upper (if applicable) and lower mounting positions on the vertical rails
on the front of the rack.
3. Mark the upper (if applicable) and lower mounting positions on the vertical rails
on the back of the rack.
NOTE:The front flange of the rail (chassis port side) has two holes, which
correspond to the bottom two holes on the front flange.
D000024-000 Rev. A
2-5
Q
2 – Installation
Installation Tasks
2.3.3
Install the Rack Mounting Brackets: 9024-FC
1. Install the appropriate mounting bracket to each side of the switch, using three
(3) #6-32 flat head screws per bracket
2.3.4
Install the Rack Rails (9024-CU, 9020, 9040, 9080, 9120, 9240)
1. Install the caged nuts into the 2 back holes (chassis leaf module side) and the
top and bottom holes (chassis fan side) in the front of the rack.
NOTE:The 2 front holes should match up with the top and bottom holes of the
rail front flange.
All holes should correspond to the rail mounting positions.
2. Fasten the rail back flange (chassis port side) to the rack by installing two screws
into the rail and rack.
Figure 2-1. Rail Back Flange
Install 2 screws to
top and bottom holes
3. Fasten the rail front flange (chassis fan side) to the rack by installing two screws
into the rail and rack.
Figure 2-2. Rail Front Flange
Install 2 screws to
top and bottom holes
4. Tighten all rail mounting screws.
2-6
D000024-000 Rev. A
Q
2 – Installation
Install the second rail on the other side of the rack by repeating steps 1 through 3.
2.3.5
Install the Rail Hat Sections (9024, 9020 and 9040)
The 9024, 9020 and 9040 have hat rails that are attached to the sides of the switch
and slide into the rack rails.
2.3.5.1
Install the Hat Rails: 9024-CU
NOTE:
Make certain to install the hat rails to the correct side of the switch. The
switch rails have specific left and right part numbers:
❥
Left switch rail: #200595
❥
Right switch rail: #200594
Two additional ways to ensure that the rails are mounted on the correct side(s) of
the switch:
❥
Make certain that the hat section is always on top
1. Using the provided hardware, attach three (3) recessed-hex screws to the three
holes in the rail, and to the corresponding holes in the switch.
2. Repeat for other rail.
2.3.5.2
Install the Hat Rails: 9020
The 9020 has left (marked "Front Left") and right (marked "Front Right") hat rail
sections that are attached to the switch with five (5) screws as shown in in figure 2-3.
Figure 2-3. Installing 9020 Hat Rails
D000024-000 Rev. A
2-7
Q
2 – Installation
Installation Tasks
2.3.5.3
Install the Hat Rails: 9040
The hat rails on the 9040 can be used on either side of the switch and are attached
with 4 screws. The hat rail has 8 holes: 4 correspond to the left side of the chassis
and 4 correspond to the right. When installing the hat rails, make certain that the
top of the rail is installed the same on both sides (rail is marked with "TOP") as
shown in figure 2-4.
Figure 2-4. Installing 9040 Hat Rails
Secure each hat section to the side of the 9040. Make
certain the top of the hat rail is installed correctly.
2-8
D000024-000 Rev. A
Q
2 – Installation
2.3.6
Rack-Mount the Switch
To install the switch into the rack, perform the following steps:
1. Clear the area of any unnecessary materials.
2. Attach the clip of the ESD wristband (strap) to bare metal on the cabinet. Put
the wristband around one wrist with the metal button against the skin.
3. Lift the switch and from the front of the cabinet, slide it onto the rails. The fans
and power supplies are on the front of the chassis; leaf/VIC modules are to the
rear.
CAUTION! Never lift the switch with the handles on the spine modules, leaf
modules, power supplies, and fan trays. These handles are not
designed to support the weight of the switches.
4. On each side of the chassis, install a screw and caged nut for each hole in the
chassis sheet metal.
Figure 2-5. Secure the Chassis to the Rack
Install 1 screw and
caged nut into each
hole in the chassis
sheet metal
D000024-000 Rev. A
2-9
Q
2 – Installation
Installation Tasks
5. (9240 Only)Attach the top support rails to the chassis rear side as shown in
Figure 2-6:
Figure 2-6. Top Rail Assembly
Install 1 screw into
each hole in the
chassis sheet metal
Connect the top rail to rack
with 1 screw and caged nut
into each hole
Install the
heyclip
here
a. When complete, the top rail assembly should look like Figure 2-7:
Figure 2-7. Completed Top Rail Assembly
2-10
D000024-000 Rev. A
Q
2 – Installation
6. Using two screws, install the lower mounting bracket to the rail assembly and
chassis as shown in Figure 2-8.
Figure 2-8. Install the Lower Mounting Bracket and Heyclip
Install the
heyclip here
Install the lower rear
mounting bracket to the rail
assembly and chassis
7. Install the heyclip to the rail assembly.
8. If applicable, reinstall the chassis fascia(s).
9. Tighten all screws.
2.3.7
Installing the Switch Fascia
To install the switch fascia(s):
1. On the switch fan side, insert the notches on the top of the fascia into the two
slots on the chassis frame. Snap the bottom of the fascia in place.
2.3.7.1
Installing the Modules (9020, 9040, 9080, 9120 and 9240)
NOTE:
The purchased configuration for the SilverStorm 9000 is shipped fully
populated. Follow these steps when it becomes necessary to install or
replace spine modules and leaf modules.
1. Remove the necessary management modules/blanks, spine modules/blanks ,
leaf modules, virtual I/O cards (VICs) and blanks. For detailed instructions,
please refer to the section “Removing a Module or Blank” on page 2-12.
NOTE:
D000024-000 Rev. A
If the user is only adding additional modules, remove only the blank(s)
for the slot(s) to be populated. These will not be replaced.
2-11
Q
2 – Installation
Installation Tasks
2. When placing the spine modules and leaf modules/VICs into chassis slots, the
following recommendations apply:
a. Spine Modules — It is recommended that the spine module(s) be installed
into:
❑
9120 and 9240 Lower Hemisphere: Slot 1 for managed. For redundant
management, populate slots 1 and 2 with management-capable spines.
Use slot 3 for unmanaged.
❑
9240 Upper Hemisphere: Slot 5 for managed. For redundant management,
populate slots 5 and 6 with management-capable spines. Use slot 4 for
unmanaged.
b. Leaf Modules/VICs — Modules should be populated beginning with slot 1,
then slot 2, then slots 3 through x respectively.
3. To install a module or filler, hold it so that the ejector handles are on the bottom
4. Pull the handles out to extend them. Slide the module into the appropriate slot
of the chassis until it makes contact with the backplane. As the module seats
in the chassis, the handles will begin to close.
5. Push the handles in to fully close.
NOTE:
Be sure that all cards are fully inserted in their respective chassis slots,
and that the handles are in the locked position. This prevents accidental
removal, provides proper grounding for the system, and helps to seat the
bus connectors in the backplane receptacles.
2.3.7.2
Removing a Module or Blank
The handles are self-locking. To unlock, push up on the handles to disengage from
the lock notch. Then gently pull the handles out and slide the module out of the slot.
NOTE:
If removing, but not replacing a module, remember to replace with a
module blank. All slots must be either populated with a module or have
blanks for EMI and thermal integrity.
2.3.7.3
Connect Equipment to the Ports and Power On the System
1. Connect a Category 5 or 6 (Cat 5/6) Ethernet cable to one of the RJ-45
connectors on the switch. Connect the other end of the Cat 5/6 to the OOB LAN
workstation.
2. Connect the switch to IB-enabled hosts using 4X-to-4X IB or IB/Fiber Optic
cables.
2-12
D000024-000 Rev. A
Q
2 – Installation
NOTE:Make sure all cables latch securely into the corresponding port
connectors. If the IB cable connector is not properly oriented to fit onto the port
receptacle (i.e., while attempting to insert the cable in the port), do not twist the
connector to achieve the correct orientation. Instead, reach back a few feet on the
cable, and twist the bulk cable to allow the connector to rotate to the proper
orientation. Doing this prevents all of the rotational forces from acting right at the
connector terminations.
CAUTION! It is important to provide strain relief for the IB cable connector.
NOTE:When handling IB connectors, make certain to remove the connectors by
pulling on the center of the lanyard only as shown in Figure 2-9. below. Pulling
abruptly on the lanyard, or pulling on only one side of the lanyard will prevent the
latch/unlatch operation from occurring, and could damage or break the lanyard.
Figure 2-9. 4X IB Cable Connector
3. Connect FVICs to Fibre Channel devices using Fibre Optic cables.
2.3.7.3.1
Connecting Power
1. Provide strain relief for the power cable(s).
NOTE:Be certain that the power cords are firmly seated into the AC power inlets..
2. If necessary, replace the fascias over the switch fans.
3. Connect the power cables to an AC power outlet.
4. When the switch is plugged into an AC power outlet:
D000024-000 Rev. A
2-13
Q
2 – Installation
Installation Tasks
a. The system powers up.
b. The fans start.
c. The system performs a power-on self test (POST).
5. The switch, power supply, and fan LEDs light up.
2.3.7.4
Bringing Up the System For the First Time
2.3.7.4.1
Start-up Procedures
1. Power up the switch.
2. From its flash image on the spine module CMU, the switch begins its boot
process.
NOTE:If the spine module RS-232 port is connected to a terminal emulation
program, the user will be able to view the switch boot process. Be certain to use
a null-modem/crossover serial cable for the console port. The settings for the
terminal emulation device should be:
❥
8 data bits
❥
no parity bits
❥
1 stop bit
❥
57600 baud
❥
Use VT100 emulation.
❥
Flow control = XON/XOFF
3. Verify the IP address with the command line interface (CLI) command
showChassisIpAddr command. The system returns the information similar
to the following:
Chassis IP Address: 192.168.100.9 Net mask: 255.255.240.0
2.3.7.4.2
Changing the Switch IP Address and Default Gateway via the CLI
The command line interface (CLI) can be accessed via Telnet, SSH, or through the
switch RS-232 serial ports.
1. Connect null-modem/crossover serial cables to the RS-232 ports of the switch.
If using a terminal emulation device, the settings should be:
2-14
❥
8 data bits
❥
no parity bits
D000024-000 Rev. A
Q
2 – Installation
❥
1 stop bit
❥
57.6K baud
❥
Use VT100 emulation.
❥
Flow control = XON/XOFF
NOTE:
If using the RS-232 port, skip to Step 5. Steps 2 through 4 are for those
users accessing the switch via Telnet or SSH.
2. If using Telnet or SSH, access the switch with the following command:
open 192.168.100.9
3. The system prompts for a user name. In order to change the IP address and
default gateway, the user must be logged in as the administrator. At the prompt
enter:
adm in
4. The system prompts for a password. At the prompt enter:
adm inpass
The system responds with:
W elcom e to the <SWITCH> CLI.Type 'list'for the listof
com m ands.
5. To change the switch default IP address enter:
setChassisIpAddr -h ipaddress -m netM ask
where -h ipaddress is the new IP address in dotted decimal (i.e.,
xxx.xxx.xxx.xxx) format, and -m netMask is the new subnet mask in dotted
decimal (i.e., xxx.xxx.xxx.xxx) format.
6. To change the switch default gateway IP address enter:
setD efaultRoute -h ipaddress
where -h ipaddress is the new default gateway IP address in dotted decimal
(i.e., xxx.xxx.xxx.xxx) format.
7. To to exit the CLI enter:
logout
2.3.7.4.3
Updating Management Spine IP Addresses in a Redundant Management
Configuration (9080, 9120, 9240)
Each managed spine must have a unique IP address that is different than the
chassis IP address of the switch. Therefore, a redundantly-managed switch will
have multiple unique IP addresses. For example the 9120 and 9240 IP addresses
are:
D000024-000 Rev. A
2-15
Q
2 – Installation
Installation Tasks
9012 and 9240 Lower Hemisphere
❥
Chassis: 192.168.100.9
❥
Spine 1: 192.168.100.11
❥
Spine 2: 192.168.100.12
9240 Upper Hemisphere
❥
Chassis: 192.168.100.10
❥
Spine 5: 192.168.100.13
❥
Spine 6: 192.168.100.14
It is necessary for each managed spine to have a unique IP address for the following
reasons:
❥
Unique IP addresses are used when sending syslog messages from a managed
spine to a syslog server.
❥
Gives the user the ability to ping each management spine separately.
❥
If the IP addresses are not unique, collisions will occur, causing IP operations
to fail.
To update the IP address on a managed spine, do the following:
1. Ensure that the spine module is connected to a COM port on a serial terminal
device via the RS-232 port.
2. Get to a [boot]: prompt by following Step a or b.
a. If the managed spine is running, enter the following command at the console:
rebootnow
Then press Enter.
b. If the managed spine is not running, power on the switch.
3. When the system displays image1 or image2, press the Spacebar to interrupt
the auto load sequence before the counter expires (within 5 seconds).
4. At the [boot]: prompt type the following:
spineip <N EW IP AD D RESS> <G ATEW AY IP AD D RESS>
Then press Enter.
2-16
D000024-000 Rev. A
Q
2 – Installation
5. At the [boot]: prompt enter reboot, and press Enter. Upon reboot the
managed spine will display information similar to the following:
U nified BootM anager For The T3 Platform .
Im age D ate: Jan 19 2006,15:03:31
Checking L2 functionality...
BCM 1125
L2 caches initialized and invalidated
CPU 0 caches initialized
Initialized SM BU S Channels
SPD Checksum ok.
M EM _SEL = 0x00000007
CPU _REV = 0x00000001_112421FF
CPU speed = 400 M H z
IO Bridge 0,1 speed = 133,200 M H z
M em ory size = 128 M B
M C1 Configured for 128M SO D IM M ,CAS=2,100 M H z
Configured M em ory Size = 0x08000000
ChannelInterleave Bit= 0
N um ber ofM em Channels = 1
Testing m em ory
M em ory tests pass
CPU 0 flushing caches
L2 flush com plete
Starttype = 0xBFC006A0
Jum ping to rom Start
Initializing H yperTransportbus
H yperTransportinitialization com pleted
rintfM BO X connectinterrupt_source=28 vector=62 status=0
PrintfM BO X intEnable status=0
Found IntelStrata Flash 128 M Bit(0x8918).
M ounted raw file system on device /im age1.(size=6291456 bytes)
M ounted raw file system on device /im age2.(size=6291456 bytes)
M ounted raw file system on device /dum p0.(size=1048576 bytes)
M ounted flash file system on device /rfa1.(size=2097152 bytes)
D000024-000 Rev. A
2-17
Q
2 – Installation
Installation Tasks
U nified BootM anager
[1]im age1
[2]im age2
CPU :Broadcom BCM 1125
VxW orks Version:5.4
bootdevice
:icspkg0
processor num ber
:0
hostnam e
:hom e
file nam e
:/im age1
ineton ethernet(e):<N EW IP AD D RESS>
ineton backplane (b):
hostinet(h)
:192.168.100.1
gateway inet(g) :
user (u)
:ftp
ftp password (pw)(blank = use rsh):ftp
flags (f)
:0x0
targetnam e (tn) :
startup script(s) :
other (o)
:sbe
Loading package from flash device /im age1 ...
BootSystem
= <SW ITCH >
BootIm age Inform ation:
Product
= <SW ITCH >
BSP
= t3
Version
= 4.1.0.0.9
Com pressed Im age Size = 3616523 bytes
m d5
= 46086777be1b5bae45140a440425b915
vxW orks Im age Type = loadable
Com puted m d5
= 46086777be1b5bae45140a440425b915
m d5 values m atch!
11088736
elapsed tim e = 4636(ticks)
2-18
D000024-000 Rev. A
Q
2 – Installation
Starting at0x80010000...
sysI
REG S
BO O T
Initializing H yperTransportbus
H yperTransportinitialization com pleted
Found IntelStrata Flash 128 M Bit(0x8918).
M ounted raw file system on device /im age1.(size=6291456 bytes)
M ounted raw file system on device /im age2.(size=6291456 bytes)
M ounted raw file system on device /dum p0.(size=1048576 bytes)
M ounted flash file system on device /rfa1.(size=2097152 bytes)
N etwork configuration requested.
cliEnabled=1
sbe0 speed=100 fullD uplex=0 flowControl=0
sbe1 speed=100 fullD uplex=1 flowControl=0
NOTE:
The command spineip changes the IP address for image1 and image2
on each managed spine.
2.3.7.5
Enabling 12X Ports (9024 and 9080)
Users can enable 12X ports with the following CLI commands:
❥
ismChassisSet12x: Enables all external ports for 12x. This command has the
following syntax:
ismChassisSet12x <enable12xBit>
The option enable12xBit can be either 1 (enable) or 0 (disable).
For example:
ismChassisSet12x 1
enables 12X on all external ports.
NOTE:Enabling all external ports for 12X may cause some latency issues. It is
recommended that users enable 12X only for the specific ports they need.
❥
ismPortSet12x: Manually enables ports for 12X on a port-by-port basis.This
command has the following syntax:
ismPortSet12x <portName> <enable12xBit>
D000024-000 Rev. A
2-19
Q
2 – Installation
Installation Tasks
Using this command to enable external ports is detailed in the following section.
NOTE:Using any of these commands without a 1 or 0 displays the current values
for the port(s).
2.3.7.5.1
Enabling External Ports
Enabling 12X ports is achieved by combining three, 4X ports into a group. With the
CLI command ismPortSet12x, the user enables each port (one at a time) of a
group to create the 12X port. For example, to create a 12X port using ports 16
through 18, do the following:
NOTE:Ports are combined in groups of three, sequentially. For example, each
9024 has the following possible combinations:
❑
Ports 1 through 3
❑
Ports 4 through 6
❑
Ports 7 through 9
❑
Ports 10 through 12
❑
Ports 13 through 15
❑
Ports 16 through 18
❑
Ports 19 through 21
❑
Ports 21 through 24
1. Log into the CLI as admin.
2. Enable port 16 with the command:
ismPortSet12x Cable16 1.
and press Enter.
3. Enable ports 17 and 18 using same command as above, changing the port
number each time (i.e., Cable17, Cable18, etc.).
NOTE:If spaces are used in the portName syntax (e.g., Cable 5), it must
bounded by quotes (i.e., “Cable 5”).
4. Reboot the chassis to activate the changes.
2-20
D000024-000 Rev. A
Q
2 – Installation
5. Following the reboot, bring up Chassis Viewer. The 12X ports will be displayed
as shown in Figure 2-10 where the initial port for the group (port 16) has its
LED on. The other ports of the group have their LEDs turned off.
Figure 2-10. 12X Ports Enabled
6. From the 9024 main page, click on the menu buttons Port Stats/IB Port Stats
to displays the IB Port Statistics screen. The 12X port (for combined ports 16
through 18) is displayed as shown in Figure 2-11:
Figure 2-11. 12X Port Statistics
The first port of the group (port 16) is shown as active and Up, while the other
two ports in the group are displayed as down and Disabled.
2.3.7.6
SilverStorm 9000 Component LEDs
2.3.7.6.1
Chassis Status LED
The chassis status LED (one per hemisphere) is Green when the system is
functioning normally.
The chassis status LED is Amber when one of the following conditions exists:
❥
The system ambient temperature exceeds 52 C but remains less than 60 C.
❥
Any Fan Alarm is amber.
❥
Any power supply AC OK LED is off.
❥
Any power supply DC OK LED is off
❥
Any spine module Attention LED is on, or it has been determined that a spine is
not functioning (even if it is unable to light the LED).
D000024-000 Rev. A
2-21
Q
2 – Installation
Installation Tasks
❥
Any leaf module Attention LED is on, or it has been determined that a leaf is not
functioning (even if it is unable to light the LED).
The chassis status LED is Red when the system can no longer function properly
and indicates one of the following conditions:
❥
The system ambient temperature exceeded 60 degrees C.
❥
No functional fan trays are present.
❥
No functional spines are present.
❥
No functional leaves are present.
The chassis status LED is off when:
❥
There are no functional power supplies present.
❥
There are no management cards in the system
❥
AC power has been removed from the system.
2.3.7.6.2
Subnet Manager Agent (SMA) LED
There is a single SMA LED associated with each hemisphere of the system. This
LED is Blue if Fabric Manager license is installed and enabled on this switch or if
Subnet Manager is running anywhere else in the fabric.
2.3.7.6.3
RJ45 LEDs
The RJ45 connectors have two LEDs, Act and 100. The 100 LED is Green when
a 100Mbps link is connected. The Act LED is Green when an Ethernet link has
been established, and blinking when the link is active.
2.3.7.6.4
Fan LEDs
Fan LEDs indicate the following status(es):
❥
❥
Green indicates that the fan is functioning properly.
Amber indicates that the following warning condition exists:
❥
❥
2-22
A single fan failure when the rotation speed is less than 4000 RPM or greater
than 10950 RPM.
Red indicates a possible problem, including:
❥
The fan tray is not responding to commands for configuration and
temperature-related operations.
❥
A fan is not responding to commands for temperature and speed related
operations.
D000024-000 Rev. A
Q
2 – Installation
❥
The fan speed has fallen below the minimum allowed RPM for a fan.
Each power supply has two LEDs: DC OK and AC OK. Following are the status
definitions for each.
DC OK
❥
Green indicates that DC power is normal.
❥
Off indicates a DC power failure or no DC power is present.
AC OK
❥
❥
Green indicates that AC power is normal.
Off indicates a AC power failure or no AC power is present.
2.3.7.7
Module LEDs (9020, 9040, 9080, 9120 and 9240)
2.3.7.7.1
Leaf Module/FVIC/EVIC IB Port LEDs
Each module IB port has a Blue IB link status LED that provide the following
indications:
❥
On - the logical link is up (port is in the Active state).
❥
Off - the physical link is down (port is in the Down state).
2.3.7.7.2
Module Status LED
The status LED indicates one of the following conditions:
❥
Steady Green - the module is operating normally.
❥
Blinking Green - LED test state.
❥
Off - module is in the removable state.
2.3.7.7.3
Module Attention LED
The Attention LED indicates one of the following conditions:
❥
Off - the system functioning normally.
❥
Steady Amber - the system requires some attention, which could indicate one
of the following conditions:
❥
The switch temperature is at a warning level on the module.
❥
The switch silicon temperature is at a warning level (approximately 90 degrees
C).
D000024-000 Rev. A
2-23
Q
2 – Installation
Installation Tasks
❥
❥
DC voltages on the board are slightly out of tolerance (12V Bulk, 5V, 3.3V,
1.8V, VBIO are all monitored).
❥
The module can no longer function properly. The system will take the
appropriate actions to ensure that no damage is done to its components.
Blinking Amber (once every four seconds) - LED test state.
For each FVIC Fibre Channel port, the Activity (ACT) and Quality (QUAL) LEDs
indicate:
Activity (ACT) LEDs:
❑
Blinks ON for each transmit or receive on the port.
Quality (QUAL) LEDs:
❑
Constant - no errors.
❑
Blink slowly - receiver bit errors are detected.
❑
Blink fast - low signal-to-noise ratio (SNR) close to an error condition.
❑
Off when an auto-negotiation is in progress or an error condition exists.
2.3.7.8
FVIC Fibre Channel Port LEDs (9020, 9040, 9080, 9120 and 9240)
2.3.7.9
Link/Activity
The green Link/Activity LED will blink indicating
■
Fibre Channel IO activity on the port. The LED is off when a link is down.
2.3.7.10
Fault
The Fault LED is a solid Amber LED indicating:
■
A fault condition related to the Fibre Channel connection for a specific port. The
Fault LED will be on if a problem is detected in either the Fibre Channel controller
or in the small form factor pluggable (SFP) optical transceiver for a specific port.
2.3.7.11
EVIC Ethernet Port LEDs (9020, 9040, 9080, 9120 and 9240)
2.3.7.12
Link
The Link LED is a solid Green LED indicating
2-24
D000024-000 Rev. A
Q
2 – Installation
■
That the Ethernet port has successfully established a link. The LED is off when
a link is down.
2.3.7.13
Activity (TX/RX)
The Activity LED is a Green LED indicating:
■
There is link activity on an Ethernet port. The LED is off when there is no link
activity.
2.3.7.13.1
Spine/Management Module Management LEDs
Each spine module has three management LEDs:
❥
Capable:
❥
❥
❥
❥
❥
Green indicates that the spine slot supports management.
Off indicates that the spine slot does not support management.
Stat:
❥
Green indicates that a management board is present.
❥
Off indicates that no management board is present.
Act:
❥
Green indicates that management board is in the active mode. In a
redundantly-managed system, this would indicate the master spine.
❥
Off indicates that the management board is in the standby mode (if the STAT
LED is Green). In a redundantly-managed system, if the Capable LED is also
Green, this would indicate the slave spine.
DDR (Spine Module Only):
❥
Green indicates that the switch is capable of running at DDR speeds.
❥
Off indicates that the switch is not capable of running at DDR speeds (i.e.,
SDR only).
2.3.7.13.2
Activating/Deactivating the Embedded Fabric Manager
If the embedded (FM) has been purchased, it requires a license key to activate it
via Chassis Viewer. The license key information is contained in an envelope marked
"Fabric Manager License". This envelope is packed in the box with the switch. For
detailed information on adding a license key, refer to the section "License Keys;
Key Administration" in the SilverStorm 9000 Users Guide. For information on
activating the Fabric Manager, refer to the section "QuickSilver Fabric Manager
Control" in the SilverStorm 9000 Users Guide.
D000024-000 Rev. A
2-25
Q
2 – Installation
Installation Tasks
NOTE:For systems with redundant management, the user must add the License
Key and start the Fabric Manager for each managed spine in the chassis (each
managed spine will have a separate license key). The first spine in each
hemisphere to be activated will be the master Fabric Manager, the second will be
the slave Fabric Manager.
2.3.7.14
Shut Down Procedures
In order to shut down the switch:
1. Power down the switch by removing the power cords from the AC power inlets.
2.3.8
Hot Swapping Components
2.3.8.1
Hot Swapping Leaf/VIO and Spine Modules
NOTE:
❥
Following are the general guidelines for hot swapping leaf and spine
modules:
Hot swap one module at a time, allowing the chassis to completely update it
before hot-swapping the next module. The module update is complete when it
becomes visible within the Chassis Viewer GUI. Listed below are the
approximate times to fully update each module type:
❥
Spines modules: up to 4 minutes
❥
Leaf/VIO modules: up to 2 minutes
A general recommendation is to hot swap beginning with leaf modules, then VIO
cards, then spine modules with the managed spine(s) being last.
❥
When a management spine is hot swapped, the rest of the chassis will continue
to move packets without interruption.
CAUTION! Be certain that the managed spine to be hot swapped is at the that same
firmware level as all other components in the switch. A hot swap of a
managed spine with another firmware level will cause a disruptive
reboot.
❥
There is no need to reboot the chassis when replacing either a spine or leaf
module.
1. Remove the module by pushing up on the handles to disengage from the lock
notch. Once the handles are disengaged, gently pull the handles out and slide
the module out of the slot.
2. To install a module, hold it so that the ejector handles are on the bottom.
2-26
D000024-000 Rev. A
Q
2 – Installation
3. Pull the handles out to extend them. Slide the module into the appropriate slot
of the chassis until it makes contact with the backplane. As the module seats
in the chassis, the handles will begin to close.
4. Push the handles in to fully close.
2.3.8.2
Hot Swapping the Fan Unit
1. Loosen the captive panel screw.
2. Pull the panel screw down to partially disengage the unit.
3. Slowly pull the unit. The unit will disengage from the connector.
4. Carefully slide the fan out until it is completely removed from its slot.
To install a fan unit:
1. Place the unit into the slot. Slowly slide the fan unit in until it engages into the
connector.
2. Using the panel screw, push up to re-engage the unit.
3. Tighten the captive panel screw.
2.3.8.3
Hot Swapping Power Supplies
Power supplies can be hot swapped without powering down the switch. To replace
a power supply:
1. Loosen the captive panel screw.
2. Pull the panel screw down to partially disengage the unit.
3. Slowly pull the unit. The unit will disengage from the connector.
4. Carefully slide the power supply out until it is completely removed from its slot.
To install a power supply:
1. Place the unit into the slot. Slowly slide the power supply in until it engages into
the connector.
2. Using the panel screw, push up to re-engage the unit.
3. Tighten the captive panel screw.
D000024-000 Rev. A
2-27
2 – Installation
Installation Tasks
2-28
Q
D000024-000 Rev. A
Appendix A
SilverStorm 9000
Product Specifications
A.1
Physical Specifications
All products within the 9024 and 9000 Multi-protocol Fabric Director series are
designed to be installed in industry-standard 19-inch four-post server racks.
Racks should conform to conventional standards. Use the American National
Standards Institute (ANSI)/Electronic Industries Association (EIA) standard
ANSI/EIA-310-D-92 and International Electrotechnical Commission (IEC) 297.
These racks are commercially available in various depths. It is recommended to
use rack with minimum of 36" depth to facilitate cable installation and routing. Other
physical attributes are shown in the table below.
NOTE:
The 9000 series MPFD products should not be installed in two-post
telecommunication racks.
Table A-1. 9000 Physical Attributes
Model #
9024
9240
9120
9080
Height (rack
units/inches)
1U/1.75"
14U/24.5"
7U/12.25"
7U/12.25"
Depth (without
cables)
4U/7"
25 3/4" (654mm)
Width
Max weight
(lb./kg.)
9040
9020
2U/3.5"
21"
(533mm)
17.32" (440mm)
20/9
175/80
100/45
90/41
60/27
32/15
A.2
Environmental Specifications
❥
Operating temperature:
5° - 45°C at sea level, altitude derating 1°C per 300m to 2,400m
❥
Non-operating temperature:
-35°C to 65°C
❥
Relative humidity (non-condensing):
Operating 5% - 85%; Non-operating 5% - 90%
D000024-000 Rev. A
A-1
Q
Cooling and Thermal management: 9024-CU
A.3
Cooling and Thermal management: 9024-CU
Table A-2. 9024 Product Configurations
Model #
❥
9024
Maximum
InfiniBand
Ports
24
Fan Trays
2
Power
Supplies
2
Cooling:
Air cooled with a hot plug fan tray
Four fans per tray, 40mm, 12VDC
Front-to-back airflow
Active thermal performance monitoring switch board via IBML links
❥
Power Supply:
Two redundant, hot plug supplies
90/264 VAC operation
65W max power per supply
Input:
90–264V AC, 47–63Hz, 1 Phase, 2.2A max current at 100VAC
Inrush Current:
33A @ 115VAC (25×C cold start)
16.5A @ 230VAC (25×C cold start)
Power Factor 0.95
Two IEC 320 connectors for independent AC inputs
A.4
Cooling and Thermal management (9020, 9040, 9080, 9120, 9240)
All products 9000 MPFD series use the same fan tray modules and share the same
thermal management attributes listed below. The quantity of fan tray modules used
in each system is defined in the following table:
A-2
D000024-000 Rev. A
Q
Table A-3. 9000 Product Configurations
Model #
9240
9120
9080
9040
9020
Maximum
InfiniBand
Ports
288
144
96
48
22
Maximum
Leaf Modules
24
12
8
4
1
Maximum
Spine
Modules
(9040, 9080,
9120, 9240)
6
3
2
1
0
Fan Trays
8
4
4
2
2
Power
Supplies
12
6
6
4
2
Management
Modules
(9020)
0
0
0
0
2
❥
Fan Tray:
Hot plug with two axial, brushless, 12V fans per Fan Tray
❥
Chassis airflow:
Front-to-back
❥
Power supply airflow:
Power supplies intake air from a pressurized chamber inside a chassis and
exhaust to the front of a chassis. In the 9020, exhausted air from power
supplies is then routed to the back of a chassis through a return duct integrated
into a front fascia.
❥
Thermal management:
Temperatures of all major heat producing components are continuously
monitored by system management modules. Fan speed is monitored and
automatically adjusted by system management modules to maintain
appropriate temperatures of major heat producing components. Monitoring
is performed via a two wire I2C interface to each Fan Tray.
D000024-000 Rev. A
A-3
Q
Power Specifications
A.5
Power Specifications
All products within the 9000 MPFD series use a common switching power supply.
System power attributes are shown in the table below. Power supplies are hot
pluggable and N+1 redundant.
Table A-4. System Power Attributes
Model #
9240
9120
9080
9040
9020
Maximum # of
Power
Supplies
12
6
6
4
2
2
2
Maximum
output per
supply
350 Watts
Input voltage
90-264 VAC autoranging
Input
frequency and
phase
50/60 Hz, 1 Phase
Maximum
current per
supply
4 Amps
Power Factor
correction
95%
Power Inlet
connector
# of Power
Inlets
Power Cord
connector
IEC320-C14
4
2
2
IEC320-C13
The 9120, 9080, 9040 and 9020 systems have two independent AC inputs and one
common DC output. Each AC input supplies power to half of the power supplies.
In a 9240 system there are two independent DC outputs, which are labeled as
hemispheres (see figure A-1). The lower hemisphere is powered by the lower 6
supplies and the upper hemisphere is powered by the upper 6 supplies. There are
four independent AC inputs: two in each hemisphere. Each AC input within a
A-4
D000024-000 Rev. A
Q
hemisphere supplies AC power to half of the power supplies in a hemisphere, the
same as with the 9020 through 9120 systems.
Figure A-1. SilverStorm 9240 Hemispheres
Upper
Hemisphere
Spine 6 (Managed)
Spine 5 (Managed)
Spine 4 (Unmanaged)
Spine 3 (Unmanaged)
Spine 2 (Managed)
Spine 1 (Managed)
Lower
Hemisphere
A.6
Configuration Restrictions
The 9000 MPFD series systems are highly configurable. Maximum configurations
are shown in Table A-3. Additional configuration restrictions are documented in this
section.
The maximum number of Virtual I/O Controllers (VICs) per switch is shown in
Table A-5:
Table A-5. Maximum Virtual I/O Controllers
Model #
Maximum
number of
Virtual I/O
Controllers
(VICs)
D000024-000 Rev. A
9240
9120
9080
9040
9020
8 (4 per
hemisphere)
4
4
4
2
A-5
Q
Configuration Restrictions
The number of power supplies required to support continuous operation depends
upon the system configuration and whether DC and AC redundancy is desired.
While DC redundancy is supported for all valid configurations, AC redundancy is
limited. The maximum AC redundancy configurations for the 9120 and 9240 are
displayed in Table A-6:
Table A-6. 9120 and 9240 per Hemisphere
Maximum Configurations: 9120 and
9240 (per hemisphere)
Model #
IB only
A-6
IB and EVIC IB, EVIC and IB and FVIC
FVIC
Spine
modules
3
3
3
3
IB Leaf
modules
12
4
6
8
EVIC
0
4
2
0
FVIC
0
0
2
4
D000024-000 Rev. A
Appendix B
Safety and Regulatory Compliance Information
This section provides regulatory compliance, safety and electromagnetic
compatibility (EMC) information for the 9024 and 9000 MPFD series products.
B.1
Safety Information
B.1.1
Statement 1:
Disconnect Device - This unit may have more than one power cord. To reduce the
risk of electrical shock, disconnect all power cords before servicing unit.
B.1.1.1
Anweisung 1:
Gerät trennen - Diese Komponente verfügt möglicherweise über mehrere
Netzkabel. Trennen Sie alle Netzkabel bevor Sie die Komponente warten, um die
Gefahr eines elektrischen Schlags zu vermeiden.
B.1.2
Statement 2:
Chassis Lifting - Use safe practices when lifting. Use only the handles provided on
the chassis to prevent damage to the chassis and components.
NOTE:
D000024-000 Rev. A
Use a team of people appropriate to the weight of each specified product
and in conjunction with applicable guidelines. Whenever possible, use a
mechanical lift.
B-1
Safety Information
Q
B.1.2.1
Anweisung 2:
Anheben des Gehäuses - Lassen Sie Sicherheit beim Anheben des Gehäuses
walten. Verwenden Sie nur die am Gehäuse befindlichen Griffe beim Anheben, um
Schaden am Gehäuse und den Komponenten zu vermeiden.
ANMERKUNG: Setzen Sie jeweils dem Gewicht jedes angegebenen Produkts und
den Richtlinien entsprechend genügend Leute ein. Verwenden
Sie, wenn möglich, einen mechanischen Aufzug.
B.1.3
Statement 3:
Energy Hazard - To reduce risk of electric shock, keep hands and fingers out of the
power supply bays and backplane areas.
B.1.3.1
Anweisung 3:
Gefahr vor elektrischem Schock - Um der Gefahr vor elektrischem Schock
vorzubeugen, halten Sie Hände und Finger den Netzteilschächten und der
Rückwand fern.
B.1.4
Statement 4:
Laser Radiation - certain optical products may emit laser radiation. Removing covers
could result in exposure to hazardous laser radiation. Radiation may be emitted
from connectors or fiber optic cables.
B.1.4.1
Anweisung 4:
Laserstrahlung - manche optischen Produkte geben Laserstrahlung ab. Beim
Entfernen der Abdeckungen können Sie möglicherweise gefährlicher
Laserstrahlung ausgesetzt werden. Laserstrahlung kann von Anschlüssen oder
Faseroptikkabeln abgegeben werden.
B-2
D000024-000 Rev. A
Q
B.1.5
Statement 5:
No User Serviceable parts - Hazardous energy levels may be present inside power
supplies and circuit card modules. Do not remove covers.
B.1.5.1
Anweisung 5:
Wartung nur durch Fachmann möglich - Gefährlich hohe Stromstärken sind in
Netzteilen und in den Modulen der Busleiterplatte vorhanden. Entfernen Sie die
Abdeckungen nicht.
B.1.6
Statement 6:
Equipment Installation - Only qualified personnel should be allowed to install,
remove or replace chassis or modules.
B.1.6.1
Anweisung 6:
Geräteinstallation - Die Installation, Entfernung oder Erneuerung von Gehäuse und
Modulen sollte nur durch Fachpersonal erfolgen.
B.1.7
Statement 7:
Adding or Replacing Modules - These modules are intended only for installation in
SilverStorm 9000 Series MPFD base units. Always install blanks when removing
an active module. They prevent exposure to energy hazards inside the unit, contain
EMI, and maintain cooling air balance in the chassis.
D000024-000 Rev. A
B-3
Safety Information
Q
B.1.7.1
Anweisung 7:
Hinzufügen oder Austauschen von Modulen - Diese Module sind für die Installation
in MPFD-Grundeinheiten der SilverStorm 9000 Serie vorgesehen. Installieren Sie
stets leere Module, wenn Sie ein aktives Modul entfernen. Diese verhindern, dass
Stromgefahr im Innern der Einheit entsteht, enthalten Störstrahlung und sorgen für
den Kühlungsausgleich im Gehäuse.
B-4
D000024-000 Rev. A
Q
B.2
Regulatory Compliance Information
Country or region
Regulatory Compliance Statements
US - FCC
FCC Part 15 Class A
This device complies with part 15 of the FCC rules.
Operation is subject to the following two conditions:
(1) This device may not cause harmful interference, and
(2) this device must accept any interference received,
including interference that may cause undesired operation.
Canada -ICES
This Class A digital apparatus complies with Canadian ICES-003
Cet appareil numerique de la classe A est conforme a la norme
NMB-003 du Canada
European Directives
Products with the CE Marking are compliant with the 89/336/EEC
and 73/23/EEC directives, which include the safety and EMC
standards listed.
Japan
Type
Regulatory Compliance Standards
Safety
UL 60950-1:2003 CSA C22.2 No. 60950-1-03
IEC/EN 60950-1:2003
EMC
FCC Part 15 Class A1.
ICES-003 Class A
IEC/CISPR 22:1997 & EN55022:1998 Class A + A1:2000,
A2:2003
IEC/CISPR 24:1997 & EN55024:1998 Class A + A1:2001,
A2:2003
VCCI Class A
AS/NZS CISPR 22:2002 Class A
EN61000-3-2:2001, EN61000-3-3 A1:2001
EN61000-4-2:2001, EN61000-4-4:2001, EN61000-4-6:2001
EN61000-4-3:2002, EN61000-4-5:2001, EN61000-4-8:2001
EN61000-4-11:2001
1
For frequencies above 1Ghz, systems require installation in a four-post server
rack with front and rear perforated metal doors in order to assure radiated emissions
compliance. For detailed information, refer to “Physical Specifications” on page 1.
D000024-000 Rev. A
B-5
Regulatory Compliance Information
B-6
Q
D000024-000 Rev. A