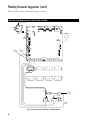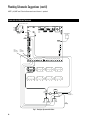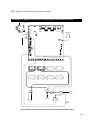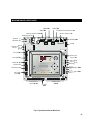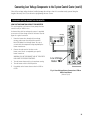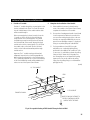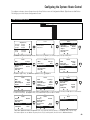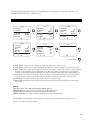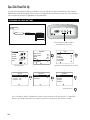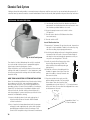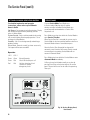
1
Installation and Configuration Manual
1
Important Notices
SAFETY PRECAUTIONS
FCC STATEMENT
The Warnings, Cautions, and Notes contained in this
manual have the following significance.
WARNING
Maintenance or operating procedures and
techniques that may result in personal injury,
illness, or death if not carefully followed.
CAUTION
Maintenance or operating procedures and techniques
that may result in damage to equipment and/or minor to
moderate personal injury if not carefully followed.
NOTE:
Maintenance or operating procedures and techniques or
information considered important enough to emphasize.
WARNING
During pregnancy, soaking in hot water may
cause damage or injury to the fetus.
Limit spa use to 10 minutes at a time.
This equipment has been tested and complies with the
limits for a Class B digital device, pursuant to Part 15 of
the FCC rules.
These limits are designed to provide reasonable
protection against harmful interference in a
residential installation.
This equipment generates, uses and can radiate radio
frequency energy. Correct installation and proper use
greatly reduce the likelihood of harmful interference to
radio communications, although it does not diminish the
possibility entirely.
If harmful interference is detected when turning the
equipment off and on, the user is encouraged to try to
correct the interference by one or more of the following
measures: (1) Re-orient or relocate the receiving antenna;
(2) Increase the separation between the equipment and
the receiver; or (3) Connect the equipment into an outlet
on a different circuit from the one to which the receiver
is connected.
The user is cautioned that changes and modifications
made to this equipment without the approval of the
manufacturer could void the user’s authority to operate
this equipment.
PREVENT DROWNING
Spa heat speeds up effects of alcohol, drugs or
medicine, and can cause unconsciousness.
Leave spa immediately if uncomfortable or sleepy.
PREVENT CHILD DROWNING
Water attracts children.
Keep unsupervised children away from pool and
spa by installing a safety gate or cover.
2
SAVE THESE INSTRUCTIONS
Important Water Safety Instructions
When installing and using this Control System, basic safety precautions should always be followed, including those
listed below:
READ & FOLLOW ALL INSTRUCTIONS
The effects of hyperthermia include:
Unawareness of impending hazard.
Failure to perceive heat.
Failure to recognize the need to exit the spa.
Physical inability to exit the spa.
Unconsciousness resulting in a danger of drowning.
DANGER - To reduce the risk of drowning from hair
or body entrapment, assure that the suction fittings,
skimmers and main drains in the spa or pool connected to
this Control System are approved for the application.
DANGER - To reduce the risk of injury, do not remove
the suction fittings or main drain covers. Never operate
the spa or pool if these covers are broken or missing.
WARNING - Risk of Accidental Drowning. Extreme
caution must be exercised to prevent unauthorized
access by children. To avoid accidents, ensure that
children cannot use the spa or pool to which this Control
System is connected unless they are closely supervised
at all times.
WARNING - To reduce the risk of injury:
E. The use of alcohol, drugs, or medication can greatly
increase the risk of fatal hyperthermia.
F.
Leave the spa immediately if nausea, dizziness or
headaches occur. Immediately cool the body by taking
a cool shower or by applying cold towels or ice packs.
If the symptoms persist, seek medical attention.
G. The use of alcohol, drugs, or medication before or
during spa use may lead to unconsciousness with the
possibility of drowning.
A. The water in a spa to which the Control System is
connected should never exceed 104°F (40°C). Water
temperatures between 100°F (38°C) and 104°F (40°C)
are considered safe for a healthy adult. Lower water
temperatures are recommended for young children
and when spa use exceeds 10 minutes.
I.
B. Since excessive water temperatures have high
potential for causing fetal damage during the early
months of pregnancy, pregnant or possibly pregnant
women should limit spa water temperatures to
100°F (38°C).
Occasional users of the spa should be made aware
of these important Safety Instructions.
C. Before entering a spa, the user should measure the
water temperature with an accurate thermometer
since the tolerance of water temperature-regulating
devices vary.
D. Prolonged immersion in water hotter than 104°F
(40°C) may cause hyperthermia. Hyperthermia occurs
when the internal body temperature reaches a level
several degrees above normal body temperature of
98.6°F (37°C). The symptoms of hyperthermia include
dizziness, fainting, drowsiness, lethargy, and an
increase in the internal temperature of the body.
H. Obese persons and persons with a history of heart
disease, low or high blood pressure, circulatory
system problems, or diabetes should consult a
physician before using a spa.
Persons using medication should consult a physician
before using a spa since some medication may induce
drowsiness or may affect heart rate, blood pressure,
and circulation.
WARNING: People with infectious diseases should
not use a spa or pool.
WARNING: To avoid injury, exercise care when entering
and exiting a spa or pool.
WARNING: Do not use a spa immediately following
strenuous exercise.
CAUTION: Maintain water chemistry to provide safe
bathing environment.
SAVE THESE INSTRUCTIONS
3
Important Electrical Safety Instructions
When installing and using this Control System, basic safety precautions should always be followed, including those
listed below:
READ & FOLLOW ALL INSTRUCTIONS
1.
DANGER - Risk of electric shock. Before
making any electrical connections, make certain that
the Main Power breaker from the house breaker box
has been turned off.
2.
DANGER - Risk of Electric Shock. Do not
permit any electric appliance, such as a light,
telephone, radio, or television within 5' (1.5m) of a
pool or spa.
3.
WARNING - All electrical work must be
performed by a qualified electrician and must
conform to all national, state, and local codes.
4.
Do not install or service this equipment if
precipitation is present or imminent.
5.
Install the System Control Center in an area that is
not subject to flooding.
6.
Install the System Control Center and all other high
voltage components at least 5' (1.5m) from the inside
wall of the pool or spa. Canadian installations must
be installed at least 3 meters from the inside wall of
the pool or spa.
7.
8.
9.
4
A terminal marked “GROUND” is provided within
the System Control Center enclosure. To reduce the
risk of electrical shock, connect this terminal to the
grounding terminal of the electric supply panel with
a continuous green insulated copper wire equivalent
in size to the circuit conductors supplying this
equipment, but no smaller than #12 AWG.
A bonding wire connector is provided on the outside
of the System Control Center to accommodate the
connection of a min. #8 AWG solid copper conductor
(#6 AWG in Canada) between this unit and the local
common bonding grid in the spa and pool area.
Additionally, any metal equipment, metal ladders,
metal enclosure of electrical equipment, metal water
pipe, or conduit within 5' of the unit or within 5' of
the pool (3 meters in Canada) must be connected to
the bonding wire connector.
The electrical supply circuit connected to the
System Control Center must be equipped with a
suitably rated disconnect device - a circuit breaker, a
GFCI circuit breaker, switch or other device capable
of opening all ungrounded conductors in the supply
circuit. This disconnect must be installed at least
5' from the pool or spa, but be within sight of and
readily accessible to the user.
10. This Control System provides the temperature
regulation for the pool and spa. The heater that is
connected to the control center must have its own
safety circuit that includes high temperature
limit switch(es).
11.
A suitably rated circuit breaker or a GFCI circuit
breaker, must be installed in the electrical supply
circuit connected to the System Control Center. This
circuit breaker may also provide the disconnect
function referenced in item 9 if it meets the sight
and accessibility criteria.
12. This control system is provided with an Integral
Ground-Fault Circuit Interrupter for the underwater
lighting circuit. It is located on the right side of the
control enclosure under a Weather-Tite cover.
This GFCI must be tested before each use of the pool
or spa. To test the GFCI, follow the following steps:
1. Turn on the underwater pool lighting circuit.
2. Press the ‘RESET’ button fully.
3. Check the underwater lights to be sure they
are illuminated.
4. Press the ‘TEST’ button in order to trip the GFCI.
The ‘RESET’ button will pop out and the
underwater lights will go out.
5. Press the ‘RESET’ again and the underwater lights
will again be illuminated.
If this GFCI fails to operate in this manner, there is
a ground current flowing indicating the possibility
of an electric shock. Disconnect the power until
the fault has been identified and corrected. Do
not use the pool or spa until these problems
have been corrected.
SAVE THESE INSTRUCTIONS
Table of Contents
This manual assumes that the Poolux Control System has been installed and configured according to this
Installation Manual.
Important Notices . . . . . . . . . . . . . . . . . . . . . . . . . . . . . . . . . . . . . . . . . . . . . . . . . . . . .2
Important Water Safety Instructions . . . . . . . . . . . . . . . . . . . . . . . . . . . . . . . . . . . . . . . . . .3
Important Electrical Safety Instructions . . . . . . . . . . . . . . . . . . . . . . . . . . . . . . . . . . . . . . . .4
Table Of Contents . . . . . . . . . . . . . . . . . . . . . . . . . . . . . . . . . . . . . . . . . . . . . . . . . . . . .5
Diagrams . . . . . . . . . . . . . . . . . . . . . . . . . . . . . . . . . . . . . . . . . . . . . . . . . . . . . . . . . .8
Poolux System Overview . . . . . . . . . . . . . . . . . . . . . . . . . . . . . . . . . . . . . . . . . . . . . . . . 10
Poolux Specifications . . . . . . . . . . . . . . . . . . . . . . . . . . . . . . . . . . . . . . . . . . . . . . . . . . 11
Electrical . . . . . . . . . . . . . . . . . . . . . . . . . . . . . . . . . . . . . . . . . . . . . . . . . . . . . . . . 11
Dimensions . . . . . . . . . . . . . . . . . . . . . . . . . . . . . . . . . . . . . . . . . . . . . . . . . . . . . . 11
Package Content . . . . . . . . . . . . . . . . . . . . . . . . . . . . . . . . . . . . . . . . . . . . . . . . . . . . . 12
Plumbing Schematic Suggestions . . . . . . . . . . . . . . . . . . . . . . . . . . . . . . . . . . . . . . . . . . . 13
Pool/spa System. . . . . . . . . . . . . . . . . . . . . . . . . . . . . . . . . . . . . . . . . . . . . . . . . . . . 13
Pool/spa System With Pump Operated Pool Cleaner. . . . . . . . . . . . . . . . . . . . . . . . . . . . . . . . . 14
Pool/spa System With Pressure Cleaner, Solar, Jet Pump, Blower & Water Feature . . . . . . . . . . . . . . . 15
Pool/spa System With Valve-controlled Cleaner . . . . . . . . . . . . . . . . . . . . . . . . . . . . . . . . . . . 16
Pool/spa System With Pressure Cleaner (Valved), Jet Pump, Blower & Water Feature . . . . . . . . . . . . . . 17
Pool/spa System With Solar . . . . . . . . . . . . . . . . . . . . . . . . . . . . . . . . . . . . . . . . . . . . . 18
Pool Only System Or Spa Only System (No Booster) . . . . . . . . . . . . . . . . . . . . . . . . . . . . . . . . . 19
Pool Only System With Solar, Cleaner Pump And Water Feature Pump. . . . . . . . . . . . . . . . . . . . . . . 20
Pool Only System With Valve-operated Cleaner & Pump-driven Water Feature . . . . . . . . . . . . . . . . . . 21
Spa Only System With Jet Pump, Spa Blower & Pump-driven Water Feature . . . . . . . . . . . . . . . . . . . 22
Mounting The System Control Center . . . . . . . . . . . . . . . . . . . . . . . . . . . . . . . . . . . . . . . . . 23
The Poolux Control System . . . . . . . . . . . . . . . . . . . . . . . . . . . . . . . . . . . . . . . . . . . . . . . 24
Inside The System Enclosure . . . . . . . . . . . . . . . . . . . . . . . . . . . . . . . . . . . . . . . . . . . . . 24
Main Controller Circuit Board . . . . . . . . . . . . . . . . . . . . . . . . . . . . . . . . . . . . . . . . . . . . . 25
System Control Center Wiring . . . . . . . . . . . . . . . . . . . . . . . . . . . . . . . . . . . . . . . . . . . . . 26
Routing Of The Wires . . . . . . . . . . . . . . . . . . . . . . . . . . . . . . . . . . . . . . . . . . . . . . . . . 26
Connecting System Control Center To Main Electrical Panel . . . . . . . . . . . . . . . . . . . . . . . . . . . . 26
Bonding The System Control Center . . . . . . . . . . . . . . . . . . . . . . . . . . . . . . . . . . . . . . . . . 26
Circuit Breaker Installation . . . . . . . . . . . . . . . . . . . . . . . . . . . . . . . . . . . . . . . . . . . . . . 27
Control Electronics Power Connection . . . . . . . . . . . . . . . . . . . . . . . . . . . . . . . . . . . . . . . . 27
5
Table of Contents
Connecting High Voltage Components To The System Control Center . . . . . . . . . . . . . . . . . . . . . . 28
General Requirements For High Voltage Equipment Wiring . . . . . . . . . . . . . . . . . . . . . . . . . . . . . 28
Pumps . . . . . . . . . . . . . . . . . . . . . . . . . . . . . . . . . . . . . . . . . . . . . . . . . . . . . . . . . 29
Underwater Lights . . . . . . . . . . . . . . . . . . . . . . . . . . . . . . . . . . . . . . . . . . . . . . . . . . . 29
Connecting Low Voltage Components To The System Control Center . . . . . . . . . . . . . . . . . . . . . . 30
Valves . . . . . . . . . . . . . . . . . . . . . . . . . . . . . . . . . . . . . . . . . . . . . . . . . . . . . . . . . 30
Valve Actuators . . . . . . . . . . . . . . . . . . . . . . . . . . . . . . . . . . . . . . . . . . . . . . . . . . . . 30
Optional Fill Valve . . . . . . . . . . . . . . . . . . . . . . . . . . . . . . . . . . . . . . . . . . . . . . . . . . . 30
Fireman’s Switch Connection For Heater . . . . . . . . . . . . . . . . . . . . . . . . . . . . . . . . . . . . . . . 31
Temperature Sensors . . . . . . . . . . . . . . . . . . . . . . . . . . . . . . . . . . . . . . . . . . . . . . . . . . 32
Water Temperature Sensor Installation . . . . . . . . . . . . . . . . . . . . . . . . . . . . . . . . . . . . . . . 32
Freeze Protection Feature . . . . . . . . . . . . . . . . . . . . . . . . . . . . . . . . . . . . . . . . . . . . . . . 32
Air Temperature Sensor Installation (On A Building Or Structure) . . . . . . . . . . . . . . . . . . . . . . . . . . 32
Air Temperature Sensor Installation (In The Sytem Enclosure) . . . . . . . . . . . . . . . . . . . . . . . . . . . 33
To Install An Optional Solar Sensor (Not Provided) . . . . . . . . . . . . . . . . . . . . . . . . . . . . . . . . . 33
To Install An Optional Filter Pressure Sensor (Not Provided). . . . . . . . . . . . . . . . . . . . . . . . . . . . . 33
Locating And Installing The Spa-side Control Panel . . . . . . . . . . . . . . . . . . . . . . . . . . . . . . . . 34
To Install Spa-side Control Panel . . . . . . . . . . . . . . . . . . . . . . . . . . . . . . . . . . . . . . . . . . . 34
Installations Through A Vertical Wall. . . . . . . . . . . . . . . . . . . . . . . . . . . . . . . . . . . . . . . . . 35
Installing Spa-side And Optional Dolphin Base Transceiver Modules . . . . . . . . . . . . . . . . . . . . . 37
pH/ORP/Conductivity . . . . . . . . . . . . . . . . . . . . . . . . . . . . . . . . . . . . . . . . . . . . . . . . . . 38
Installation Of Sensors . . . . . . . . . . . . . . . . . . . . . . . . . . . . . . . . . . . . . . . . . . . . . . . . 38
Calibration And Care . . . . . . . . . . . . . . . . . . . . . . . . . . . . . . . . . . . . . . . . . . . . . . . . . 38
Optional Chlorine Generation Cell Installation . . . . . . . . . . . . . . . . . . . . . . . . . . . . . . . . . . . 40
Expansion Controller Connection . . . . . . . . . . . . . . . . . . . . . . . . . . . . . . . . . . . . . . . . . . . 42
Dip Switch Settings . . . . . . . . . . . . . . . . . . . . . . . . . . . . . . . . . . . . . . . . . . . . . . . . . . . 43
Start Up: Configuration Parameters . . . . . . . . . . . . . . . . . . . . . . . . . . . . . . . . . . . . . . . . . . 44
Default Settings And Configurations . . . . . . . . . . . . . . . . . . . . . . . . . . . . . . . . . . . . . . . . . 44
Configuration Parameters . . . . . . . . . . . . . . . . . . . . . . . . . . . . . . . . . . . . . . . . . . . . . . . 44
Device Configuration . . . . . . . . . . . . . . . . . . . . . . . . . . . . . . . . . . . . . . . . . . . . . . . . . 45
Filter Pumps . . . . . . . . . . . . . . . . . . . . . . . . . . . . . . . . . . . . . . . . . . . . . . . . . . . . . . 45
Heaters . . . . . . . . . . . . . . . . . . . . . . . . . . . . . . . . . . . . . . . . . . . . . . . . . . . . . . . . 45
Devices . . . . . . . . . . . . . . . . . . . . . . . . . . . . . . . . . . . . . . . . . . . . . . . . . . . . . . . . 45
Devices That Are Pre-defined . . . . . . . . . . . . . . . . . . . . . . . . . . . . . . . . . . . . . . . . . . . . . 45
6
Table of Contents
Configuring The System: Step 1 - Training The First Wireless Panel . . . . . . . . . . . . . . . . . . . . . . 46
Configuring The System: Step 2 - Entering Configuration Mode . . . . . . . . . . . . . . . . . . . . . . . . . 47
Configuring The System: Adding A Device . . . . . . . . . . . . . . . . . . . . . . . . . . . . . . . . . . . . . 48
Configuring The System: Heater Control . . . . . . . . . . . . . . . . . . . . . . . . . . . . . . . . . . . . . . . 49
Configuring The System: Configuring A Solar Heater . . . . . . . . . . . . . . . . . . . . . . . . . . . . . . . 50
Configuring The System: Exiting Configuration Mode . . . . . . . . . . . . . . . . . . . . . . . . . . . . . . . 51
System Information . . . . . . . . . . . . . . . . . . . . . . . . . . . . . . . . . . . . . . . . . . . . . . . . . . . 52
Setting Day And Time . . . . . . . . . . . . . . . . . . . . . . . . . . . . . . . . . . . . . . . . . . . . . . . . . . 53
Setting Filter Cycles . . . . . . . . . . . . . . . . . . . . . . . . . . . . . . . . . . . . . . . . . . . . . . . . . . . 54
Heater Settings . . . . . . . . . . . . . . . . . . . . . . . . . . . . . . . . . . . . . . . . . . . . . . . . . . . . . . 56
Setting Display Preferences . . . . . . . . . . . . . . . . . . . . . . . . . . . . . . . . . . . . . . . . . . . . . . 57
Renaming Devices . . . . . . . . . . . . . . . . . . . . . . . . . . . . . . . . . . . . . . . . . . . . . . . . . . . . 58
Assigning Panel LEDs . . . . . . . . . . . . . . . . . . . . . . . . . . . . . . . . . . . . . . . . . . . . . . . . . . 59
Creating Scenes . . . . . . . . . . . . . . . . . . . . . . . . . . . . . . . . . . . . . . . . . . . . . . . . . . . . . 60
Vacation Mode . . . . . . . . . . . . . . . . . . . . . . . . . . . . . . . . . . . . . . . . . . . . . . . . . . . . . . 62
Chemistry . . . . . . . . . . . . . . . . . . . . . . . . . . . . . . . . . . . . . . . . . . . . . . . . . . . . . . . . . 63
Device Timeout. . . . . . . . . . . . . . . . . . . . . . . . . . . . . . . . . . . . . . . . . . . . . . . . . . . . . . 64
Check Alerts . . . . . . . . . . . . . . . . . . . . . . . . . . . . . . . . . . . . . . . . . . . . . . . . . . . . . . . 65
Spa-side Panel Set Up . . . . . . . . . . . . . . . . . . . . . . . . . . . . . . . . . . . . . . . . . . . . . . . . . 66
Optional Dolphin Remote Set Up. . . . . . . . . . . . . . . . . . . . . . . . . . . . . . . . . . . . . . . . . . . . 67
Poolux Wireless Panel Cradle Installation Option . . . . . . . . . . . . . . . . . . . . . . . . . . . . . . . . . 68
Faults . . . . . . . . . . . . . . . . . . . . . . . . . . . . . . . . . . . . . . . . . . . . . . . . . . . . . . . . . . . 69
Alerts. . . . . . . . . . . . . . . . . . . . . . . . . . . . . . . . . . . . . . . . . . . . . . . . . . . . . . . . . . . . 69
Chemical Tank System . . . . . . . . . . . . . . . . . . . . . . . . . . . . . . . . . . . . . . . . . . . . . . . . . 70
The Service Panel . . . . . . . . . . . . . . . . . . . . . . . . . . . . . . . . . . . . . . . . . . . . . . . . . . . . 72
Poolux Service Control Panel Features . . . . . . . . . . . . . . . . . . . . . . . . . . . . . . . . . . . . . . . . 73
Optional Chlorine Generator Control . . . . . . . . . . . . . . . . . . . . . . . . . . . . . . . . . . . . . . . . . 74
Service Mode . . . . . . . . . . . . . . . . . . . . . . . . . . . . . . . . . . . . . . . . . . . . . . . . . . . . . 74
Replacement Poolux Parts List . . . . . . . . . . . . . . . . . . . . . . . . . . . . . . . . . . . . . . . . . . . . 75
7
Diagrams
Fig. 1 Poolux System Overview . . . . . . . . . . . . . . . . . . . . . . . . . . . . . . . . . . . . . . . . . . . . 10
Fig. 2 Pool/spa System . . . . . . . . . . . . . . . . . . . . . . . . . . . . . . . . . . . . . . . . . . . . . . . . . 13
Fig. 3 Pool/spa System with Pump Operated Pool Cleaner . . . . . . . . . . . . . . . . . . . . . . . . . . . . 14
Fig. 4 Pool/spa System with Pump Operated Cleaner, Solar, Jet Pump, Blower andPump-driven Water
Feature. . . . . . . . . . . . . . . . . . . . . . . . . . . . . . . . . . . . . . . . . . . . . . . . . . . . . . . 15
Fig. 5 Pool/spa System with Valve-controlled Cleaner . . . . . . . . . . . . . . . . . . . . . . . . . . . . . . 16
Fig. 6 Pool/spa System with Valve-controlled Cleaner, Jet Pump, Spa Blower and Pump-driven Water
Feature. . . . . . . . . . . . . . . . . . . . . . . . . . . . . . . . . . . . . . . . . . . . . . . . . . . . . . . 17
Fig. 7 Pool/spa System with Solar . . . . . . . . . . . . . . . . . . . . . . . . . . . . . . . . . . . . . . . . . . 18
Fig. 8 Pool Only System or Spa Only System (No Booster) . . . . . . . . . . . . . . . . . . . . . . . . . . . . 19
Fig. 9 Pool Only System with Solar, Cleaner Pump and Water Feature Pump . . . . . . . . . . . . . . . . . 20
Fig. 10 Pool Only System with Valve-operated Cleaner & Pump-driven Water Feature . . . . . . . . . . . 21
Fig. 11 Spa Only System with Jet Pump, Spa Blower & Pump-driven Water Feature . . . . . . . . . . . . . 22
Fig. 12 System Control Center Wiring . . . . . . . . . . . . . . . . . . . . . . . . . . . . . . . . . . . . . . . . 24
Fig. 13 System Control Center Main Panel. . . . . . . . . . . . . . . . . . . . . . . . . . . . . . . . . . . . . . 25
Fig. 14 Circuit Breaker Installation & Suitable Listed Breakers . . . . . . . . . . . . . . . . . . . . . . . . . 27
Fig. 15 Control Electronics Power Connection & Field Wiring to Circuit Breaker. . . . . . . . . . . . . . . 27
Fig. 16 High Voltage Relay Wiring: 120V & 240V . . . . . . . . . . . . . . . . . . . . . . . . . . . . . . . . . . 28
Fig. 17 240V Rated Equipment Connections . . . . . . . . . . . . . . . . . . . . . . . . . . . . . . . . . . . . . 28
Fig. 18 120V Rated Equipment Connections . . . . . . . . . . . . . . . . . . . . . . . . . . . . . . . . . . . . . 28
Fig. 19 Two-speed Filter Pump Example . . . . . . . . . . . . . . . . . . . . . . . . . . . . . . . . . . . . . . . 29
Fig. 20 Fill Valve, TB12 Location on System Control Center Board . . . . . . . . . . . . . . . . . . . . . . . . 30
Fig. 21 Low Voltage Heater Connection to TB3 on Main Panel Board. . . . . . . . . . . . . . . . . . . . . . 31
Fig. 23 Outside Building Location Option for the Air Temperature Sensor . . . . . . . . . . . . . . . . . . . 32
Fig. 24 System Control Center Location Mount Option . . . . . . . . . . . . . . . . . . . . . . . . . . . . . . . 33
Fig. 25 Acceptable Location of Spa-side Control Panel . . . . . . . . . . . . . . . . . . . . . . . . . . . . . . 34
Fig. 26 Acceptable Routing of PVC Conduit Through a Vertical Wall . . . . . . . . . . . . . . . . . . . . . . 35
Fig. 27 Mounting the Spa-Side Control Panel . . . . . . . . . . . . . . . . . . . . . . . . . . . . . . . . . . . . 36
Fig. 28 Preferred “Unobstructed” Pool and Spa Receiver Location with Insteon . . . . . . . . . . . . . . . 37
Fig. 29 Chlorine Generator Cell Location in Plumbing . . . . . . . . . . . . . . . . . . . . . . . . . . . . . . . 41
Fig. 30 Chlorine Cell Cord Wiring . . . . . . . . . . . . . . . . . . . . . . . . . . . . . . . . . . . . . . . . . . . 41
Fig. 31 DIP Switch Setting Configurations . . . . . . . . . . . . . . . . . . . . . . . . . . . . . . . . . . . . . . 43
Fig. 32 Poolux Wireless Panel. . . . . . . . . . . . . . . . . . . . . . . . . . . . . . . . . . . . . . . . . . . . . 46
8
Diagrams
Fig. 33 “S1” Switch and DIP Switches . . . . . . . . . . . . . . . . . . . . . . . . . . . . . . . . . . . . . . . . 47
Fig. 34 Acid Tank System. . . . . . . . . . . . . . . . . . . . . . . . . . . . . . . . . . . . . . . . . . . . . . . . 70
Fig. 35 Service Display Panel Button Functions--Quick Overview. . . . . . . . . . . . . . . . . . . . . . . . 73
Fig. 36 Service Display Panel, Pool Control . . . . . . . . . . . . . . . . . . . . . . . . . . . . . . . . . . . . . 74
GLOSSARY
FIP:
NPT:
Female Iron Pipe Connection
National Pipe Tapered threads Standard, FIP, MIP
There are two types:
Tapered Pipe:
1) A female straight thread fitting or slip joint connection
may be attached to a tapered male thread, as long as a
gasket or seal is included into the female fitting design. A
thread sealant alone will not seal. In this case, a thread
sealant may actually interfere with proper installation,
causing the joint to leak.
Tapered pipe threads do not need a gasket or cone seal,
but a thread sealant must be applied to the male
threads only, before the joint is assembled. Use care to
avoid getting sealant inside of the pipe. Tapered thread
joints seal better as they are tightened. This makes them
ideal for leak free iron pipe joints.
2) Female tapered threads. Although you may use a
sealant for female tapered thread, the fitting may not seal
if it is attached to a male straight thread like a faucet or
toilet connection.
NPS:
National Pipe Straight Threaded Standard, IPS
9
Poolux System Overview
Insteon
Transceiver
Wireless
Transceiver
Dolphin RF
Receiver
Pool
Expansion Com Monitor/
pH/ORP Boxes Ports Technician Wireless
Conductivity (4 Max) (A,B,C) Panel Transceiver
}
Temperature
Sensors
Water
Air
Solar
Service Panel
}
Filter Pressure Sensor
Lights #1
Lights #2
3 Aux Inputs
Dolphin RF
120V GFCIProtected
Dimmable
Low Voltage Heater Control
}
24V
Actuators
Pool/Spa Suction &
Return Valves 1-6
High Voltage Relays
Filter Pump & Aux 1 - 7
GFCI for lights
Chlorinator Cell
Circuit Breaker
Subpanel
Note: Removable enclosure door not shown for clarity.
240 VAC
Power
Available
Panels
IMPORTANT: THE WIRELESS PANEL
MUST BE CHARGED AT THE BEGINNING
OF INSTALLATION IN ORDER FOR IT TO
BE AVAILABLE FOR CONFIGURATION.
Wireless
Spa-Side
Pool Dolphin™II
Floating Remote
Fig. 1 Poolux System Overview
CAUTION: THE EQUIPMENT AND CONTROLS SHALL BE LOCATED NOT LESS THAN 3 METERS HORIZONTALLY
FROM THE POOL/SPA.
ATTENTION: MAINTENIR UNE DISTANCE MINIMALE, M ESUREE DANS UN PLAN HORIZONTAL, DE 3 M ENTRE
LA CUVE DE RELAXATION ET LES APPAREILS ET COMMANDES.
10
Poolux Specifications
ELECTRICAL
Power Requirements
120/240VAC, 50/60 HZ, 80 AMPS MAX
Outputs
6 - Motorized Valve Actuators 24 VAC, 0.75A max
8 - 30 AMP Relays
2 - Dimmable Light Circuits - 120 VAC, 8.3A max (1000W) each, GFCI protected
1 - Fill Valve 24 VAC, 0.5A max (in place of valve actuator #6)
1 - Low Voltage Relay - (dry contact 24VAC; 1.0A max)
Optimal Outputs, 1 Chlorine Generator Cell
Standard Inputs
Air Temperature/Freeze Sensor
Master Control Panel (RF)
Water Temperature Sensor
Optional Inputs
Conductivity Sensor
Dolphin Remote Control Panels for Pool and Spa
Filter Pressure Sensor
Insteon Transceiver
ORP Sensor
pH Sensor
Solar Sensor
Spa-side Control Panel
DIMENSIONS
System Control Center 22.2”H x 17” W x 4.75”D; 33 lbs.
11
Package Content
BEFORE INSTALLING THE POOLUX SYSTEM:
•
DETERMINE THAT YOU HAVE EVERYTHING NECESSARY TO COMPLETE THE INSTALLATION.
•
FIND A SUITABLE MOUNTING LOCATION FOR THE SYSTEM CONTROL CENTER, RECEIVERS AND PANELS.
•
PLAN AND DETERMINE WHERE COMPONENTS WILL BE PLUMBED.
•
PLAN WIRE RUNS AND WIRING CONNECTIONS.
WHAT IS INCLUDED:
System Control Center
w/ECOmatic
WHAT IS NOT INCLUDED:
(P/N# 53691)
(P/N# 54210)
Wireless Panel
(P/N# 53963)
w/charging base and wall adapter
Wireless Transceiver
(P/N# 53696)
Valve Actuators
(P/N# 40499)
10’ Air Temp Sensor
(P/N# 23427)
25’ Water Temp Sensor
(P/N# 23428)
ECOmatic ESC 24/36/48 Chlorine
(on systems w/optional chlorine generators)
Cell (P/N# 71004)
Cable (P/N# 7114 4)
User’s (Operation) Manual
(P/N# 40628)
Installation Manual
(P/N# 40627)
Circuit Breakers
None are included with the Poolux.
See inside of door for suitable breakers.
Wire
Wire/conduit for 100A service from house
main electrical panel to the System
Control Center.
Wire/conduit for filter pump and other high
voltage loads.
Wire for bonding.
Expansion Box
None are included with control.
Cable for the expansion box. (Available at any
home center.)
Dolphin™ II Pool Remote Control (P/N# 54186)
Dolphin™ RF Transceiver
(P/N# 53770)
Miscellaneous
ACCESSORIES AVAILABLE FOR PURCHASE:
Mounting hardware (screws, etc.) for
mounting system and control panels.
Spa-Side (4-button) Panel
w/100’ cable
(P/N# 53695)
Valve, actuator, and solar sensor for solar
control option.
75’ Solar Temp Sensor
(P/N# 23429)
pH Sensor
(P/N# 30292)
ORP Sensor
(P/N# 30315)
Conductivity Sensor
(P/N# 27622)
Filter Pressure Sensor, 100 psig
(P/N# 30807)
Expansion Control Center
(P/N# 53692)
Additional Valve Actuators
(P/N# 40499)
12
Additional cable for the solar sensor may be
required. (This two wire cable is available at
any home center.)
Plumbing Schematic Suggestions
NOTE: pH/ORP and Chlorine Generator board shown is optional
POOL/SPA SYSTEM
CONDUCTIVITY SENSOR LOCATION
A
B
GND
9V
A
B
9V
GND
A
TB4
J5
TB5
F1
9V
5V
AIR
J9
SOLAR
J2
CHLORINE GENERATOR
(OPTIONAL)
ICSP
ECOMATIC
J10
V+
IN
GRD
PRESSURE
AUX INPUTS
TB2
CHLORINE
GENERATOR
CONTROL
TB1
IN1+
IN1-
J33
CAL
AIR
FILTER
PRESSURE
(OPTIONAL)
24VAC IN
J32
FUSE 4A 250V
WATER
SOLAR
B
A
B
TB5
J1
WIRELESS
TRANSCEIVER
COM C
TB5
TEMP
SENSORS
J8
POOL MON/
TECH PANEL
COM A
TB5
TEMP
SENSORS
WATER
9V
GND
DIGITAL
ANALOG
J7
J11
CHEMICAL
AUTOMATION
(OPTIONAL)
GND
ORP
COM PORTS
COM B
EXPANSION BOX
9V
POC MODULES
COND ORP PH
pH
IN2+
J12
IN2IN3+
RUN
LT1
J13
LT2
J14
DOLPHIN
RF
S1
SETUP
WHT
J31
FROM GFCI LOAD
IN3-
S2
DIP SWITCH
TB11
TB3
LIGHT 2
VAL 2 FILTER PUMP
RETURN ONLY
LIGHT 1
TB10
VAL 1 FILTER PUMP
SUCTION ONLY
LOW
VOLTAGE
HEATER
1
FILL VALVE
Val 1
Val 2
J23
J24
Val 3
J25
Val 4
J26
Val 5
J27
Val 6
Rel 1 Rel 2 Rel 3 Rel 4 Rel 5 Rel 6 Rel 7 Rel 8
J28
J15
J16
J17
J18
J19
J20
J21
J22
TB12
0
Filter
Pump
1
0
2
4
6
8
2
Relay 5
1
0
8
2
0
2
4
6
Relay 2
1
0
6
8
2
Relay 6
1
0
8
2
4
4
6
Relay 3
1
0
6
8
2
Relay 7
1
0
8
2
4
4
6
Relay 4
4
1
6
8
Relay 8
1
4
6
8
Filter
Pump
Filter
Heater
Line Voltage
Heater *
* Note: Heater shown
as wired “Hot”
Spa
Drain/
Skimmer
Pool Drain/
Skimmer/
Vacuum Line
Spa
Return
Pool
Return
Heater
Low Voltage
Control Wire
Fig. 2 Pool/spa System
13
Plumbing Schematic Suggestions (cont’d)
NOTE: pH/ORP and Chlorine Generator board shown is optional
POOL/SPA SYSTEM WITH PUMP OPERATED POOL CLEANER
CONDUCTIVITY SENSOR LOCATION
A
B
GND
9V
A
B
9V
A
GND
A
B
B
TB5
TB5
9V
5V
AIR
J9
SOLAR
J2
CHLORINE GENERATOR
(OPTIONAL)
ICSP
ECOMATIC
J10
V+
IN
GRD
PRESSURE
AUX INPUTS
TB2
CHLORINE
GENERATOR
CONTROL
TB1
IN1+
IN1-
J33
CAL
AIR
FILTER
PRESSURE
(OPTIONAL)
TB4
J5
F1
J8
24VAC IN
J32
FUSE 4A 250V
WATER
SOLAR
WIRELESS
TRANSCEIVER
COM C
TB5
TEMP
SENSORS
J1
POOL MON/
TECH PANEL
COM A
TB5
TEMP
SENSORS
WATER
9V
GND
DIGITAL
ANALOG
J7
J11
CHEMICAL
AUTOMATION
(OPTIONAL)
GND
ORP
COM PORTS
COM B
EXPANSION BOX
9V
POC MODULES
COND ORP PH
pH
IN2+
J12
IN2IN3+
RUN
LT1
J13
LT2
J14
DOLPHIN
RF
S1
SETUP
WHT
J31
FROM GFCI LOAD
IN3-
S2
DIP SWITCH
TB11
TB3
LIGHT 2
VAL 2 FILTER PUMP
RETURN ONLY
LIGHT 1
TB10
VAL 1 FILTER PUMP
SUCTION ONLY
LOW
VOLTAGE
HEATER
1
FILL VALVE
Val 1
Val 2
J23
J24
Val 3
J25
Val 4
J26
Val 5
J27
Val 6
Rel 1 Rel 2 Rel 3 Rel 4 Rel 5 Rel 6 Rel 7 Rel 8
J28
J15
J16
J17
J18
J19
J20
J21
J22
TB12
0
Filter
Pump
1
0
2
4
6
8
2
Relay 5
1
0
8
2
0
2
4
6
Relay 2
1
0
6
8
2
Relay 6
1
0
8
2
4
4
6
Relay 3
1
0
6
8
2
Relay 7
1
0
8
2
4
4
6
Relay 4
4
1
6
8
Relay 8
1
4
6
8
Filter
Pump
Filter
Heater
Line Voltage
Heater *
* Note: Heater shown
as wired “Hot”
Cleaner
Pump
Spa
Drain/
Skimmer
Pool Drain/
Skimmer/
Vacuum Line
Spa
Return
Pool
Return
Pool
Cleaner
Fig. 3 Pool/spa System with Pump Operated Pool Cleaner
14
Heater
Low Voltage
Control Wire
NOTE: pH/ORP and Chlorine Generator board shown is optional
POOL/SPA SYSTEM WITH PRESSURE CLEANER, SOLAR, JET PUMP, BLOWER & WATER FEATURE
CONDUCTIVITY SENSOR LOCATION
A
B
GND
9V
A
B
9V
GND
TB5
9V
5V
AIR
J9
SOLAR
J2
CHLORINE GENERATOR
(OPTIONAL)
ICSP
ECOMATIC
J10
V+
IN
GRD
PRESSURE
AUX INPUTS
TB2
CHLORINE
GENERATOR
CONTROL
TB1
IN1+
IN1-
J33
CAL
FILTER
PRESSURE
(OPTIONAL)
TB4
J5
F1
J8
AIR
SOLAR
A
TB5
J1
24VAC IN
J32
FUSE 4A 250V
WATER
WATER
WIRELESS
TRANSCEIVER
COM C
TB5
TB5
TEMP
SENSORS
POOL MON/
TECH PANEL
COM A
B
A
B
J7
TEMP
SENSORS
CHEMICAL
AUTOMATION
(OPTIONAL)
9V
GND
DIGITAL
ANALOG
J11
GND
ORP
COM PORTS
COM B
EXPANSION BOX
9V
POC MODULES
COND ORP PH
pH
IN2+
J12
IN2IN3+
RUN
LT1
J13
LT2
J14
DOLPHIN
RF
S1
SETUP
S2
LIGHT 1
TB10
TB11
TB3
LIGHT 2
VAL 2 FILTER PUMP
RETURN ONLY
DIP SWITCH
VAL 1 FILTER PUMP
SUCTION ONLY
WHT
J31
FROM GFCI LOAD
IN3-
LOW
VOLTAGE
HEATER
1
FILL VALVE
Val 1
Val 2
J23
J24
Val 3
J25
Val 4
J26
Val 5
J27
Val 6
Rel 1 Rel 2 Rel 3 Rel 4 Rel 5 Rel 6 Rel 7 Rel 8
J28
J15
J16
J17
J18
J19
J20
J21
J22
TB12
0
Filter
Pump
1
0
2
4
6
8
2
Relay 5
1
0
8
2
0
2
4
6
Relay 2
1
0
6
8
2
Relay 6
1
0
8
2
4
4
6
Relay 3
1
0
6
8
2
Relay 7
1
0
8
2
4
4
6
Relay 4
4
1
6
8
Relay 8
1
4
6
8
Solar
(Future)
Aux
Pump
Spa Jet
Pump
Filter
Pump
Spa
Blower
Filter
Heater
Line Voltage
Heater *
* Note: Heater shown
as wired “Hot”
Cleaner
Pump
Water
Feature
Pool
Drain/
Skimmer
Spa
Air
Injectors
Spa
Jets
Spa
Drain/
Skimmer
Spa
Drain/
Skimmer
Pool Drain/
Skimmer/
Vacuum Line
Spa
Return
Pool
Return
Pool
Cleaner
Heater
Low Voltage
Control Wire
Fig. 4 Pool/spa System with Pump Operated Cleaner, Solar, Jet Pump, Blower and
Pump-driven Water Feature
15
Plumbing Schematic Suggestions (cont’d)
NOTE: pH/ORP and Chlorine Generator board shown is optional
POOL/SPA SYSTEM WITH VALVE-CONTROLLED CLEANER
CONDUCTIVITY SENSOR LOCATION
A
B
GND
9V
A
B
9V
TB5
9V
5V
AIR
J9
SOLAR
J2
CHLORINE GENERATOR
(OPTIONAL)
ICSP
ECOMATIC
J10
V+
IN
GRD
PRESSURE
AUX INPUTS
TB2
CHLORINE
GENERATOR
CONTROL
TB1
IN1+
IN1-
J33
CAL
FILTER
PRESSURE
(OPTIONAL)
TB4
J5
F1
J8
AIR
SOLAR
GND
TB5
J1
24VAC IN
J32
FUSE 4A 250V
WATER
WATER
WIRELESS
TRANSCEIVER
COM C
TB5
TEMP
SENSORS
CHEMICAL
AUTOMATION
(OPTIONAL)
A
TB5
TEMP
SENSORS
POOL MON/
TECH PANEL
COM A
B
A
B
J7
J11
9V
DIGITAL
ANALOG
GND
GND
ORP
COM PORTS
COM B
EXPANSION BOX
9V
POC MODULES
COND ORP PH
pH
IN2+
J12
IN2IN3+
RUN
LT1
J13
LT2
J14
DOLPHIN
RF
S1
SETUP
WHT
J31
FROM GFCI LOAD
IN3-
S2
DIP SWITCH
TB11
TB3
LIGHT 2
VAL 2 FILTER PUMP
RETURN ONLY
LIGHT 1
TB10
VAL 1 FILTER PUMP
SUCTION ONLY
LOW
VOLTAGE
HEATER
1
FILL VALVE
Val 1
Val 2
J23
J24
Val 3
J25
Val 4
J26
Val 5
J27
Val 6
Rel 1 Rel 2 Rel 3 Rel 4 Rel 5 Rel 6 Rel 7 Rel 8
J28
J15
J16
J17
J18
J19
J20
J21
J22
TB12
0
Filter
Pump
1
0
2
4
6
8
2
Relay 5
1
0
8
2
0
2
4
6
Relay 2
1
0
6
8
2
Relay 6
1
0
8
2
4
4
6
Relay 3
1
0
6
8
2
Relay 7
1
0
8
2
4
4
6
Relay 4
4
1
6
8
Relay 8
1
4
6
8
Filter
Pump
Filter
Heater
Line Voltage
Heater *
* Note: Heater shown
as wired “Hot”
Spa
Drain/
Skimmer
Pool Drain/
Skimmer/
Vacuum Line
Spa
Return
Pool
Pool
Cleaner Return
Fig. 5 Pool/spa System with Valve-controlled Cleaner
16
Heater
Low Voltage
Control Wire
NOTE: pH/ORP and Chlorine Generator board shown is optional
POOL/SPA SYSTEM WITH PRESSURE CLEANER (VALVED), JET PUMP, BLOWER & WATER FEATURE
CONDUCTIVITY SENSOR LOCATION
A
B
GND
9V
A
B
9V
TB5
9V
5V
AIR
J9
SOLAR
J2
CHLORINE GENERATOR
(OPTIONAL)
ICSP
ECOMATIC
J10
V+
IN
GRD
PRESSURE
AUX INPUTS
TB2
CHLORINE
GENERATOR
CONTROL
TB1
IN1+
IN1-
J33
CAL
FILTER
PRESSURE
(OPTIONAL)
TB4
J5
F1
J8
AIR
SOLAR
GND
TB5
J1
24VAC IN
J32
FUSE 4A 250V
WATER
WATER
WIRELESS
TRANSCEIVER
COM C
TB5
TEMP
SENSORS
CHEMICAL
AUTOMATION
(OPTIONAL)
A
TB5
TEMP
SENSORS
POOL MON/
TECH PANEL
COM A
B
A
B
J7
J11
9V
DIGITAL
ANALOG
GND
GND
ORP
COM PORTS
COM B
EXPANSION BOX
9V
POC MODULES
COND ORP PH
pH
IN2+
J12
IN2IN3+
RUN
LT1
J13
LT2
J14
DOLPHIN
RF
S1
SETUP
WHT
J31
FROM GFCI LOAD
IN3-
S2
DIP SWITCH
TB11
TB3
LIGHT 2
VAL 2 FILTER PUMP
RETURN ONLY
LIGHT 1
TB10
VAL 1 FILTER PUMP
SUCTION ONLY
LOW
VOLTAGE
HEATER
1
FILL VALVE
Val 1
Val 2
J23
J24
Val 3
J25
Val 4
J26
Val 5
J27
Val 6
Rel 1 Rel 2 Rel 3 Rel 4 Rel 5 Rel 6 Rel 7 Rel 8
J28
J15
J16
J17
J18
J19
J20
J21
J22
TB12
0
Filter
Pump
1
0
2
4
6
8
2
Relay 5
1
0
8
2
0
2
4
6
Aux
Pump
Relay 2
1
0
6
8
2
Relay 6
1
0
8
2
4
4
6
Spa Jet
Pump
Relay 3
1
0
6
8
2
Relay 7
1
0
8
2
4
4
6
Relay 4
4
1
6
8
Relay 8
1
4
6
8
Filter
Pump
Spa
Blower
Filter
Heater
Line Voltage
Heater *
* Note: Heater shown
as wired “Hot”
Water
Feature
Pool
Drain/
Skimmer
Spa
Air
Injectors
Spa
Jets
Spa
Drain/
Skimmer
Spa
Drain/
Skimmer
Pool Drain/
Skimmer/
Vacuum Line
Spa
Return
Pool
Pool
Cleaner Return
Heater
Low Voltage
Control Wire
Fig. 6 Pool/spa System with Valve-controlled Cleaner, Jet Pump, Spa Blower and
Pump-driven Water Feature
17
Plumbing Schematic Suggestions (cont’d)
NOTE: pH/ORP and Chlorine Generator board shown is optional
POOL/SPA SYSTEM WITH SOLAR
CONDUCTIVITY SENSOR LOCATION
A
B
9V
A
B
9V
GND
A
B
GND
A
B
TB4
J32
J5
TB5
TB5
F1
9V
5V
AIR
J9
SOLAR
J2
CHLORINE GENERATOR
(OPTIONAL)
ICSP
ECOMATIC
J10
V+
IN
GRD
PRESSURE
AUX INPUTS
TB2
CHLORINE
GENERATOR
CONTROL
TB1
IN1+
IN1-
J33
CAL
AIR
SOLAR
FILTER
PRESSURE
(OPTIONAL)
24VAC IN
COM C
FUSE 4A 250V
WATER
J8
WIRELESS
TRANSCEIVER
TB5
TEMP
SENSORS
J1
POOL MON/
TECH PANEL
COM A
TB5
TEMP
SENSORS
WATER
9V
GND
DIGITAL
ANALOG
J7
J11
CHEMICAL
AUTOMATION
(OPTIONAL)
GND
ORP
COM PORTS
COM B
EXPANSION BOX
9V
POC MODULES
COND ORP PH
pH
IN2+
J12
IN2IN3+
RUN
LT1
J13
LT2
J14
DOLPHIN
RF
S1
SETUP
WHT
J31
FROM GFCI LOAD
IN3-
S2
DIP SWITCH
TB11
TB3
LIGHT 2
VAL 2 FILTER PUMP
RETURN ONLY
LIGHT 1
TB10
VAL 1 FILTER PUMP
SUCTION ONLY
LOW
VOLTAGE
HEATER
1
FILL VALVE
Val 1
Val 2
J23
J24
Val 3
J25
Val 4
J26
Val 5
J27
Val 6
Rel 1 Rel 2 Rel 3 Rel 4 Rel 5 Rel 6 Rel 7 Rel 8
J28
J15
J16
J17
J18
J19
J20
J21
J22
TB12
0
Filter
Pump
1
0
2
4
6
8
2
Relay 5
1
0
8
2
0
2
4
6
Relay 2
1
0
6
8
2
Relay 6
1
0
8
2
4
4
6
Relay 3
1
0
6
8
2
Relay 7
1
0
8
2
4
4
6
Relay 4
4
1
6
8
Relay 8
1
4
6
8
Solar
(Future)
Filter
Pump
Filter
Heater
Line Voltage
Heater *
* Note: Heater shown
as wired “Hot”
Spa
Drain/
Skimmer
Pool Drain/
Skimmer/
Vacuum Line
Spa
Return
Fig. 7 Pool/spa System with Solar
18
Pool
Return
Heater
Low Voltage
Control Wire
NOTE: pH/ORP and Chlorine Generator board shown is optional
POOL ONLY SYSTEM OR SPA ONLY SYSTEM (NO BOOSTER)
CONDUCTIVITY SENSOR LOCATION
A
B
GND
9V
A
B
9V
A
FUSE 4A 250V
B
GND
A
9V
B
TB4
J5
TB5
9V
5V
AIR
J9
SOLAR
J2
CHLORINE GENERATOR
(OPTIONAL)
ICSP
ECOMATIC
J10
V+
IN
GRD
TB2
CHLORINE
GENERATOR
CONTROL
TB1
IN1+
IN1-
J33
PRESSURE
AUX INPUTS
IN2+
J12
IN2IN3+
RUN
LT1
J13
LT2
J14
DOLPHIN
RF
S1
SETUP
WHT
J31
FROM GFCI LOAD
IN3-
S2
DIP SWITCH
LIGHT 1
TB10
TB11
TB3
LIGHT 2
FILTER
PRESSURE
(OPTIONAL)
24VAC IN
J32
F1
J8
AIR
SOLAR
WIRELESS
TRANSCEIVER
COM C
TB5
TB5
J1
POOL MON/
TECH PANEL
COM A
TB5
TEMP
SENSORS
WATER
9V
GND
GND
DIGITAL
ANALOG
J7
TEMP
SENSORS
WATER
CHEMICAL
AUTOMATION
(OPTIONAL)
COM PORTS
COM B
EXPANSION BOX
J11
CAL
ORP
POC MODULES
COND ORP PH
pH
LOW
VOLTAGE
HEATER
1
FILL VALVE
Val 1
Val 2
J23
J24
Val 3
J25
Val 4
J26
Val 5
J27
Val 6
Rel 1 Rel 2 Rel 3 Rel 4 Rel 5 Rel 6 Rel 7 Rel 8
J28
J15
J16
J17
J18
J19
J20
J21
J22
TB12
0
Filter
Pump
1
0
2
4
6
8
2
Relay 5
1
0
8
2
0
2
4
6
Relay 2
1
0
6
8
2
Relay 6
1
0
8
2
4
4
6
Relay 3
1
0
6
8
2
Relay 7
1
0
8
2
4
4
6
Relay 4
4
1
6
8
Relay 8
1
4
6
8
Filter
Pump
Filter
Heater
Line Voltage
Heater *
* Note: Heater shown
as wired “Hot”
Pool Drain/
Skimmer/
Vacuum Line
Pool
Return
Heater
Low Voltage
Control Wire
Fig. 8 Pool Only System or Spa Only System (No Booster)
19
Plumbing Schematic Suggestions (cont’d)
NOTE: pH/ORP and Chlorine Generator board shown is optional
POOL ONLY SYSTEM WITH SOLAR, CLEANER PUMP AND WATER FEATURE PUMP
CONDUCTIVITY SENSOR LOCATION
A
B
GND
9V
A
B
9V
GND
A
B
9V
A
FUSE 4A 250V
B
GND
TB4
J5
TB5
9V
5V
AIR
J9
SOLAR
J2
CHLORINE GENERATOR
(OPTIONAL)
ICSP
ECOMATIC
J10
V+
IN
GRD
PRESSURE
AUX INPUTS
TB2
CHLORINE
GENERATOR
CONTROL
TB1
IN1+
IN1-
J33
FILTER
PRESSURE
(OPTIONAL)
24VAC IN
J32
F1
J8
AIR
SOLAR
WIRELESS
TRANSCEIVER
COM C
TB5
TB5
J1
POOL MON/
TECH PANEL
COM A
TB5
TEMP
SENSORS
WATER
9V
GND
DIGITAL
ANALOG
J7
TEMP
SENSORS
WATER
CHEMICAL
AUTOMATION
(OPTIONAL)
COM PORTS
COM B
EXPANSION BOX
J11
CAL
ORP
POC MODULES
COND ORP PH
pH
IN2+
J12
IN2IN3+
RUN
LT1
J13
LT2
J14
DOLPHIN
RF
S1
SETUP
WHT
J31
FROM GFCI LOAD
IN3-
S2
DIP SWITCH
LIGHT 1
TB10
TB3
LIGHT 2
TB11
LOW
VOLTAGE
HEATER
1
FILL VALVE
Val 1
Val 2
J23
J24
Val 3
J25
Val 4
J26
Val 5
J27
Val 6
Rel 1 Rel 2 Rel 3 Rel 4 Rel 5 Rel 6 Rel 7 Rel 8
J28
J15
J16
J17
J18
J19
J20
J21
J22
TB12
0
Filter
Pump
1
0
2
4
6
8
2
Relay 5
1
0
8
2
0
2
4
6
Relay 2
1
0
6
8
2
Relay 6
1
0
8
2
4
4
6
Relay 3
1
0
6
8
2
Relay 7
1
0
8
2
4
4
6
Relay 4
4
1
6
8
Relay 8
1
4
6
8
Solar
(Future)
Aux
Pump
Filter
Pump
Filter
Heater
Line Voltage
Heater *
* Note: Heater shown
as wired “Hot”
Pool Drain/
Skimmer/
Vacuum Line
Water
Feature
Pool
Drain/
Skimmer
Cleaner
Pump
Pool
Return
Pool
Cleaner
Heater
Low Voltage
Control Wire
Fig. 9 Pool Only System with Solar, Cleaner Pump and Water Feature Pump
20
NOTE: pH/ORP and Chlorine Generator board shown is optional
POOL ONLY SYSTEM WITH VALVE-OPERATED CLEANER & PUMP-DRIVEN WATER FEATURE
CONDUCTIVITY SENSOR LOCATION
A
B
GND
9V
A
B
9V
A
GND
A
B
TB4
J5
FUSE 4A 250V
TB5
F1
9V
5V
AIR
J9
SOLAR
FILTER
PRESSURE
(OPTIONAL)
24VAC IN
J32
J2
CHLORINE GENERATOR
(OPTIONAL)
ICSP
ECOMATIC
J10
V+
IN
GRD
PRESSURE
AUX INPUTS
TB2
CHLORINE
GENERATOR
CONTROL
TB1
IN1+
IN1-
J33
CAL
AIR
SOLAR
WIRELESS
TRANSCEIVER
COM C
TB5
TB5
J1
J8
POOL MON/
TECH PANEL
COM A
TB5
TEMP
SENSORS
WATER
9V
B
J7
TEMP
SENSORS
WATER
CHEMICAL
AUTOMATION
(OPTIONAL)
GND
DIGITAL
ANALOG
J11
GND
ORP
COM PORTS
COM B
EXPANSION BOX
9V
POC MODULES
COND ORP PH
pH
IN2+
J12
IN2IN3+
RUN
LT1
J13
LT2
J14
DOLPHIN
RF
S1
SETUP
WHT
J31
FROM GFCI LOAD
IN3-
S2
DIP SWITCH
LIGHT 1
TB10
TB3
LIGHT 2
TB11
LOW
VOLTAGE
HEATER
1
FILL VALVE
Val 1
Val 2
J23
J24
Val 3
J25
Val 4
J26
Val 5
J27
Val 6
Rel 1 Rel 2 Rel 3 Rel 4 Rel 5 Rel 6 Rel 7 Rel 8
J28
J15
J16
J17
J18
J19
J20
J21
J22
TB12
0
Filter
Pump
1
0
2
4
6
8
2
Relay 5
1
0
8
2
0
2
4
Aux
Pump
6
Relay 2
1
0
6
8
2
Relay 6
1
0
8
2
4
4
6
Relay 3
1
0
6
8
2
Relay 7
1
0
8
2
4
4
6
Relay 4
4
1
6
8
Relay 8
1
4
6
8
Filter
Pump
Filter
Heater
Line Voltage
Heater *
* Note: Heater shown
as wired “Hot”
Pool Drain/
Skimmer/
Vacuum Line
Water
Feature
Pool
Drain/
Skimmer
Pool
Cleaner
Pool
Return
Heater
Low Voltage
Control Wire
Fig. 10 Pool Only System with Valve-operated Cleaner & Pump-driven Water Feature
21
Plumbing Schematic Suggestions (cont’d)
NOTE: pH/ORP and Chlorine Generator board shown is optional
SPA ONLY SYSTEM WITH JET PUMP, SPA BLOWER & PUMP-DRIVEN WATER FEATURE
CONDUCTIVITY SENSOR LOCATION
A
9V
A
GND
B
B
9V
A
GND
A
B
TB4
J5
FUSE 4A 250V
TB5
9V
5V
AIR
J9
SOLAR
J2
CHLORINE GENERATOR
(OPTIONAL)
ICSP
ECOMATIC
J10
V+
IN
GRD
PRESSURE
AUX INPUTS
TB2
CHLORINE
GENERATOR
CONTROL
TB1
IN1+
IN1-
J33
CAL
FILTER
PRESSURE
(OPTIONAL)
24VAC IN
J32
F1
J8
AIR
SOLAR
WIRELESS
TRANSCEIVER
COM C
TB5
TB5
J1
POOL MON/
TECH PANEL
COM A
TB5
TEMP
SENSORS
WATER
9V
B
J7
TEMP
SENSORS
WATER
CHEMICAL
AUTOMATION
(OPTIONAL)
GND
DIGITAL
ANALOG
J11
GND
ORP
COM PORTS
COM B
EXPANSION BOX
9V
POC MODULES
COND ORP PH
pH
IN2+
J12
IN2IN3+
RUN
LT1
J13
LT2
J14
DOLPHIN
RF
S1
SETUP
WHT
J31
FROM GFCI LOAD
IN3-
S2
DIP SWITCH
LIGHT 1
TB10
TB3
LIGHT 2
TB11
LOW
VOLTAGE
HEATER
1
FILL VALVE
Val 1
Val 2
J23
J24
Val 3
J25
Val 4
J26
Val 5
J27
Val 6
Rel 1 Rel 2 Rel 3 Rel 4 Rel 5 Rel 6 Rel 7 Rel 8
J28
J15
J16
J17
J18
J19
J20
J21
J22
TB12
0
Filter
Pump
1
0
2
4
6
8
2
Relay 5
1
0
8
2
0
2
4
6
Aux
Pump
Relay 2
1
0
6
8
2
Relay 6
1
0
8
2
4
4
6
Spa Jet
Pump
Relay 3
1
0
6
8
2
Relay 7
1
0
8
2
4
4
6
Relay 4
4
1
6
8
Relay 8
1
4
6
8
Filter
Pump
Spa
Blower
Filter
Heater
Line Voltage
Heater *
* Note: Heater shown
as wired “Hot”
Spa
Drain/
Skimmer
Water
Feature
Pool
Drain/
Skimmer
Spa
Air
Injectors
Spa
Jets
Spa
Drain/
Skimmer
Spa
Return
Heater
Low Voltage
Control Wire
Fig. 11 Spa Only System with Jet Pump, Spa Blower & Pump-driven Water Feature
22
Mounting the System Control Center
IMPORTANT:
PLEASE READ THE FOLLOWING MOUNTING CONSIDERATIONS BEFORE INSTALLING THE SYSTEM
CONTROL CENTER
The System Control Center is contained in a rainproof
enclosure. It is suitable for indoor or outdoor mounting. It
should mount on a flat vertical wall and MUST be positioned
so that the conduit knockouts are located at the bottom of
the enclosure. Also it is important that it is not mounted
in a confined space. The four sides need to remain free of
obstructions so that the system can dissipate heat from the
inside of the enclosure.
ATTENTION: POSITIONING THE ENCLOSURE WITH
THE KNOCKOUTS LOCATED AT THE SIDE OR TOP OF
THE ENCLOSURE MAY ALLOW WATER TO ENTER THE
SYSTEM AND CAUSE DAMAGE TO THE SYSTEM AND/OR
CREATE AN ELECTRICAL SHOCK HAZARD.
The System Control Center should be located as close as
possible to the pumps, heater, valves and sensors that are
required to be connected to it. Be sure that the system
and all other electrical components are at least 5’ (3m for
Canada) from the edge of the pool or spa. When selecting
the mounting position, plan how the 1” rigid conduit carrying
the power to the System Control Center will be routed. Also
plan for the routing of the flexible conduit that will run to
the pumps, lights and heater. Remember to consider the
length of the sensor wires & valve wires when selecting
the final location. The cell cord for the chlorine generator
is 10’ long, the cable length on the Air Temperature Sensor
is 10’ long and the Water Temperature Sensor is 25’ long.
They must reach connector receptacles located inside the
system. Additionally, the location selected should have clear
access in front of the system to permit the owner or service
personnel to stand in front of the System Control center
unobstructed by other equipment.
ATTENTION: BE SURE THE LOCATION CHOSEN FOR THE
SYSTEM CONTROL CENTER ALLOWS UNOBSTRUCTED
ACCESS TO THE GFCI PROTECTING THE UNDERWATER
LIGHT CIRCUIT. THE GFCI IS LOCATED ON THE RIGHT
SIDE OF THE BOX.
MOUNTING THE SYSTEM CONTROL CENTER
The Main System Control Center is a Permanently
Connected Control.
After selecting a location with the mounting
considerations (on this page), and any requirements
of national, state or local codes in mind, mount
the enclosure.
If the mounting substrate will allow, mount the System
Control Center by driving mounting screws through the
holes provided in the brackets at the top and the bottom
of the enclosure and into the wall.
If wall anchors must be used, hold the System Control Center
enclosure in position and mark the hole pattern on the wall.
Drill and set the anchors; fasten the enclosure with screws.
Be sure to position the Main Control Center level and square
for a neat installation.
After mounting the System Control Center, open the
enclosure door and remove the six screws securing the
interior cover to access the connections to the electrical
components. The enclosure door can be removed
for ease of wiring. To remove the door, open it wide
enough to clear the edge of the enclosure and then lift
straight up.
23
The Poolux Control System
The System enclosure includes a number of features that are often considered optional like dimmable
incandescent lighting. Other features like the fill valve are unique. The integration of the optional chlorine
generation capablility rounds out the super-capable Poolux controller from Balboa.
INSIDE THE SYSTEM ENCLOSURE
Optional Chemical
Sensor
Conductivity Link
1
1
A
9V
A
GND
1
TB4
J32
1
1
J5
1
TB5
CAL
TB5
TEMP
SENSORS
24VAC IN
COM C
B
B
GND
A
1
TB5
WIRELESS
TRANSCEIVER
POOL MON/
TECH PANEL
1
COM A
B
B
A
9V
GND
1
J7
FUSE 4A 250V
ORP
GND
DIGITAL
ANALOG
COND ORP PH
J11
9V
COM PORTS
COM B
EXPANSION BOX
pH
9V
POC MODULES
TB5
AIR
J9
9V
5V
J1
Optional
Chlorine Gen.
Transformer
F1
WATER
1
J8
SOLAR
J2
ICSP
J10
1
V+
1
J33
TB2
TB1
On
1
System Control
1
IN1+
Winter Mode
Stand By
D36
IN1IN2+
IN2-
Off
J12
1
IN3+
Max
Select
J13
LT2
1
DOLPHIN
RF
Pool Control
RUN
J14
Min
FROM GFCI LOAD
J31
S1
SETUP
2
Cell Output
Sanitization
TB10
S2
LIGHT 1
Mode
LCD Contrast
J4
1
1
DIP SWITCH
Main Board
Transformer
WHT
Flow
LT1
Operation
IN3-
CHLORINE GEN.
CONTROL
IN
GRD
PRESSURE
AUX INPUTS
J6
IA
LIGHT 2
RY
RY
IA
RY
AU
XIL
AU
XIL
AU
XIL
IA
RY
IA
RY
AU
XIL
IA
IA
AU
XIL
AU
XIL
IA
AU
XIL
1
LT2 LT1
LOW
VOLTAGE
HEATER
1
FIL
TE
R
TB3
RY
RY
TB11
Force Filter
TB12
J23
1
J24
1
J25
1
J26
1
J27
1
J28
J15
1
0
Relay 1
1
0
Filter Pump
2
0
2
4
6
8
2
Relay 5
1
0
8
2
4
6
J16
1
VALVE 1 VALVE 2 VALVE 3 VALVE 4 VALVE 5 VALVE 6 1
1
J17
J18
1
J19
1
J20
1
J21
1
1
Chlorine Gen. Fuse
J22
1
FILL VALVE RELAY 1 RELAY 2 RELAY 3 RELAY 4 RELAY 5 RELAY 6 RELAY 7 RELAY 8
Relay 2
4
6
Relay 6
4
6
1
0
8
2
1
0
8
2
Relay 3
4
6
1
0
8
2
1
0
8
2
Optional Devices
Relay 7
7 Relays
4
6
Relay 4
4
1
6
8
Relay 8
1
4
6
Light Fuses
8
GFCI for Light
(Test and Reset
Outside Box)
Equipment
Ground Bar
Circuit Breaker
Subpanel
Control Power
Terminal Block
Equipment
Ground Bar
Bonding Lug
(Outside Box)
Low Voltage
Raceway
ECOmatic Cell
Terminal Block
Line 1
Hot
Neutral Connections
Line 2
Hot
Main
Ground Lug
High Voltage Entry
14 Holes on Bottom
of Enclosure
Fig. 12 System Control Center Wiring
24
MAIN CONTROLLER CIRCUIT BOARD
COM B TB7
COM A TB6
COM C TB8
Pool Monitor/Technician Panel J32
Expansion Controller COM TB5
Wireless Transceiver J5
Conductivity Sensor
1
A
B
GND
1
TB5
24VAC IN TB4
1
9V
A
B
9V
GND
24VAC IN
COM C
TB4
J32
1
J5
1
1
TB5
CAL
TB5
WATER
FUSE 4A 250V
1
WIRELESS
TRANSCEIVER
POOL MON/
TECH PANEL
1
COM A
A
GND
J7
B
A
B
9V
GND
ANALOG
C54
DIGITAL
COND ORP PH
1
TB5
1
J8
9V
5V
AIR
J9
SOLAR
J10
J2
ICSP
1
1
J33
TB2
TB1
On
1
System Control
1
IN1+
Winter Mode
Stand By
D36
IN1IN2+
Operation
Pool Control
RUN
Select
TB10
S2
J4
1
J6
IA
AU
XIL
Load
J24
1
J25
1
J26
1
J27
1
J28
1
VALVE 1 VALVE 2 VALVE 3 VALVE 4 VALVE 5 VALVE 6 1
Suction/Return
Valves J23-J28
Light 2 TB11
LT2 LT1
1
TB12
J23
Light 1 TB10
Neutral
LIGHT 2
RY
RY
IA
RY
AU
XIL
IA
IA
AU
XIL
AU
XIL
IA
AU
XIL
RY
RY
RY
RY
IA
IA
AU
XIL
AU
XIL
FIL
TE
R
TB3
LOW
VOLTAGE
HEATER
Force Filter
1
GFCI
Load
TB11
1
Low Voltage
Heater TB3
Load
1
DIP SWITCH
LCD Contrast
J12 LT1
J13 LT2
J14 WHT
Neutral
LIGHT 1
Mode
DIP Switches S2
J13
Max
LT2
1
DOLPHIN
RF
S1
SETUP
Min
Sanitization
J14
J31
Setup/Run S1
2
Cell Output
WHT
Flow
FROM GFCI LOAD
IN3-
Chlorine Gen.
Control J33
J12
IN3+
Dolphin RF J31
Off
1
LT1
IN2-
CHLORINE GEN.
CONTROL
IN
GRD
PRESSURE
AUX INPUTS
Aux Inputs TB1
Fuse F1
F1
J1
V+
Pressure TB2
J11
ORP
TEMP
SENSORS
Temperature Water J8
Air J9
Sensors
Solar J10
COM PORTS
COM B
EXPANSION BOX
pH
9V
POC MODULES
Chemical pH
Automation ORP
J15
1
J16
1
J17
1
J18
1
J19
1
J20
1
J21
1
J22
1
FILL VALVE RELAY 1 RELAY 2 RELAY 3 RELAY 4 RELAY 5 RELAY 6 RELAY 7 RELAY 8
Fill Valve
TB12
Auxillary Relays
J15-J22
Fig. 13 System Control Center Main Panel
25
System Control Center Wiring
THE SYSTEM CONTROL CENTER IS A PERMANENTLY CONNECTED CONTROL.
ROUTING OF THE WIRES
The high voltage and low voltage wiring must be run
separately, never sharing the same conduit or installed in the
same compartment. The high voltage wires must be copper
conductors sized for the required equipment current draw.
NOTE: All of the electrical wiring methods and materials
used to complete the electrical installation of the Balboa
Poolux must be in accordance with the National Electrical
Code or the Canadian Electric Code, as well as any local
electrical codes in effect at the time of installation.
The selection of electrical materials required to accomplish
this installation and the installation of the Poolux System
must be accomplished by, or be under the direct supervision
of a qualified electrician.
See IMPORTANT ELECTRICAL SAFETY INSTRUCTIONS,
PAGE 4.
CONNECTING SYSTEM CONTROL CENTER TO
MAIN ELECTRICAL PANEL
The System Control Center contains a circuit breaker subpanel that is rated for a 100A service connection. Branch
circuit protection and a means to disconnect the AC power
must be installed in the AC main lines prior to the System
Control Center.
Run the conduit from the Power Supply Panel of the house
to the System Control Center. There are two (2) knockouts
on the bottom of the enclosure for 1” conduit. Pull the
appropriately rated conductors (L1, L2, Neutral and Ground)
and connect them to the line terminals in the System Control
Center per Fig. 12 System Control Center Wiring.
DO NOT HOOK UP THE CONDUCTORS TO THE HOUSE POWER
SUPPLY PANEL UNTIL ALL ELECTRICAL CONNECTIONS FOR
ALL LOADS (MOTORIZED VALVES, HEATERS, PUMPS, LIGHTS,
ETC.) HAVE BEEN COMPLETED.
This will assure that all conductors are not energized during
the installation.
BONDING THE SYSTEM CONTROL CENTER
A bonding bar is provided on the bottom right corner on the
outside of the System Control Center enclosure below the
GFCI. This is for connecting to the local common bonding
grid in the area of the pool and spa. It is suitable for use
with either #8 AWG or #6 AWG copper wire. Use the gauge
appropriate to the code requirements in your area.
26
CIRCUIT BREAKER INSTALLATION
CONTROL ELECTRONICS POWER CONNECTION
The circuit breaker sub-panel has space for up to 8 single
position or 4 double position circuit breakers. The installer
is responsible for providing circuit breakers of appropriate
ratings. See the table below for a list of the approved
breakers that can be used. This information is also located on
a label inside the enclosure door.
The System Control Center requires 120VAC power to operate
the control electronics and the chlorine generator. Wire the
2-position terminal block to an installer supplied 120VAC
breaker with a 20A maximum rating. See below.
The two 10 AMP dimmable 120VAC light circuits are also
powered through this connection. The neutral connection is
factory pre-wired from the GFCI to the neutral bar.
SUITABLE LISTED BREAKERS
Manufacturer
Single
Cutler-Hammer BR
Murray
MP-T
Siemens
QP
Square D
HOM
Thomas & Betts TB
Double Twin
BR
MP-T
QP
HOM
TB
Quad
GFCB Filler Plates
BRD
BRD GFCB
MH-T MH-T MP-GT
QT
QT
QPF
HOMT HOMT HOM
TBBD TBBQ
GFB
BRFP
LX100FP
QF3
HOMFP
FP-1C-TB
Fig. 14 Circuit Breaker Installation & Suitable Listed
Breakers
Factory pre-wired
2
4
6
8
2
4
6
8
2
4
6
8
OFF
8
ON
6
field wired
Field installed 20amp max breaker
Fig. 15 Control Electronics Power Connection & Field Wiring to Circuit Breaker
27
Connecting High Voltage Components to the System Control Center
GENERAL REQUIREMENTS FOR HIGH VOLTAGE EQUIPMENT WIRING
1.
Check to see that all equipment motors have
built-in thermal protection before installing.
2.
Pull appropriately sized wires for each piece of
equipment from the equipment to the enclosure.
3. Each piece of equipment requiring high voltage should
have its own high voltage relay. If using one relay for
more than one piece of equipment, make sure that the
total current draw of all equipment on the relay does not
exceed the current rating of the circuit.
4.
240V-rated Equipment: Wire the line power to the two
line terminals of the relay and the equipment to the two
adjacent load terminals.
VALVE 1 VALVE 2 VALVE 3 VALVE 4 VALVE 5 VALVE 6 1
FILL VALVE RELAY 1 RELAY 2 RELAY 3 RELAY 4 RELAY 5 RELAY 6 RELAY 7 RELAY 8
240 VAC
Load
ON
OFF
ON
5. Connect the equipment to the local common
bonding grid.
OFF
Connect the equipment ground to the equipment ground
bars inside the System Control Center.
6. Wire the relay to the Breaker(s).
7.
Wire the relay to the equipment.
High Voltage Relay Connections
Eight (8) high voltage relays are located in the high voltage
compartment of the System Control Center. One relay (Relay
#1) is dedicated to controlling the filter pump. The remaining
seven relays are general purpose and can be assigned
as required.
The high voltage relays are of the double pole type. They
make and break each leg of a 240 VAC circuit.
Fig. 17 240V Rated Equipment Connections
120V-rated Equipment: Wire the power to a line
terminal and the equipment to an adjacent
load terminal.
Note: Neutral can be broken with the relay if desired
by using the empty line and load terminals on the relay.
240 VAC
Line 1
Line 2
Load to
Device
120 VAC
Load
120 VAC
ON
OFF
Line
Neutral Bar
Load to
Device
Contact Ratings Not to Exceed 30 Amps
Fig. 16 High Voltage Relay Wiring: 120V & 240V
28
Fig. 18 120V Rated Equipment Connections
Connecting High Voltage Components to the System Control Center (cont’d)
PUMPS
UNDERWATER LIGHTS
Filter Pump
Relay #1 is configured by default for use with a single-speed
pump. While this function can be moved to another relay
during system configurations, it is rarely practical to do so.
The System Control Center has two (2 - 10AMP) onboard triac controlled outputs for underwater lighting as
a standard feature. The light outputs can be individually
programmed for either on/off or dimmable operation.
A factory wired GFCI located on the right side of the
enclosure protects these outputs. The GFCI is located under
the weather proof door that allows easy access to the TEST
and RESET buttons. The light circuits are also individually
fused for added protection. Each output is capable of
controlling up to 1000W of 120VAC lighting.
Two-speed Pumps
The Balboa Poolux Control Center is capable of being
configured to control one or more two-speed pumps. Two
high-voltage relays are required for each two-speed pump.
See the figure below for the required wiring connections.
The relays used must also be assigned during the system
configuration. (Relay 4 is the default high speed relay for a
two speed filter pump.)
Bring the wires from the lights into the high voltage
compartment. Connect the ground wire from the lights to
the grounding bar near the GFCI. Connect the light wires
to terminal block TB10 for the LIGHT1 circuit or to terminal
block TB11 for the LIGHT2 circuit. These terminal blocks
are located on the circuit board near the Main Board
Transformer as shown in Fig. 12 & FIG. 13. (The wires must
pass through the holes in the compartment wall that line up
with each of the terminal blocks.
F
All Other Pumps
WH
If the filter pump is a two-speed pump, Relay #1 controls
the low speed. A second high-voltage relay is used for
controlling the high-speed winding of the pump.
TB10
LIGHT 1
Neutral
Load
1
All other pumps are connected to the System Control Center
as any high voltage component. Be sure not to exceed the
maximum ratings of the high-voltage relays.
Light 1 TB10
TB11
LIGHT 2
Neutral
1
Load
Connect the Load
(Black) wire to Pin 1 of
the terminal block.
LT2 LT1
21
Light 2 TB11
Connect the Neutral
(White) wire to Pin 2 of
the terminal block.
J22
1
AY 7 RELAY 8
Fig. 19 Two-speed Filter Pump Example
0
2
0
2
Relay 1
1
0
6
8
2
Relay 5
1
0
8
2
4
4
6
Relay 2
1
0
6
8
2
Relay 6
1
0
8
2
4
4
6
Relay 3
1
0
6
8
2
Relay 7
1
0
8
2
4
4
6
Relay 4
4
1
6
8
Relay 8
1
4
6
8
Filter Pump High
Filter Pump Low
Filter Pump Common
Filter Pump Ground
/&&
/.
/&&
/.
29
Connecting Low Voltage Components to the System Control Center
IMPORTANT:
Route all low voltage wiring through the cable slot on the bottom left side of the enclosure into the low voltage
raceway. Never mix high voltage and low voltage wires/cables in the same conduit or compartment.
VALVES
VALVE ACTUATORS
OPTIONAL FILL VALVE
The System Control Center is capable of controlling six (6)
24VAC valve actuators. Run the valve actuator cable into
the low voltage raceway. For pool/spa installations, Valve 1
and Valve 2 have dedicated functions. Connect the valve for
the SUCTION side to connector J23 (Valve 1) and connect
the valve for the RETURN side to connector J24 (Valve 2).
Any additional valve actuators can be connected to the
remaining connectors J25-J28. These are general purpose
valve outputs whose function can be assigned during system
configuration and setup.
The two-position terminal block TB12 labeled “Fill Valve”
is provided to allow easy connection of a 24VAC irrigation
valve. This function will need to be enabled during
configuration and setup. (Refer to Fig. 13.)
If you use this output, you cannot use Valve 6 output at J28
since they share the same internal relay.
1
y
Winter Mode
D36
Stand By
Off
Operation
Select
Control of additional valve actuators is possible with
installation of an Expansion Control Center. See separate
manual for details.
30
J13
LT2
TB10
LIGHT 1
Mode
LCD Contrast
1
J4
1
J6
LIGHT 2
RY
RY
RY
AU
XIL
IA
AU
XIL
IA
RY
RY
RY
AU
XIL
IA
AU
XIL
IA
AU
XIL
IA
AU
XIL
IA
AU
XIL
IA
FIL
TE
R
RY
TB11
1
4. Store any excess cable in the low voltage compartment.
Remember to check the synchronization of the valves
as outlined in the basic plumbing schematic when
the system is powered up. See pages 9-18 for valve
installation locations.
J14
Pool Control
RUN
TB3
3. Insert the connectors at the ends of the cables into the
marked receptacles along the bottom of the printed
circuit board.
Max
FROM GFCI LOAD
S1
S2
2. Continue the cable through the low voltage compartment
and over the top of the low voltage
compartment partition.
Min
Sanitization
1
1
Force Filter
LT2 LT1
1. Route the cables along the pipes that support the
Motorized Diverter Valves as directly as possible to the
nearest wall. Use tie-wraps to secure the cable to the
plumbing. Continue to route the cable to the System
Control Center by neatly securing the cable to the wall
and through the cable entry slot provided on the bottom
left of the Poolux Control Center.
2
Cell Output
WHT
J31
CONNECTING MOTORIZED DIVERTER VALVES
(ALSO OPTIONAL POOL FILL VALVE)
LT1
J12
1
Flow
CHLOR
CON
This feature allows a manual pool fill with a timer function.
TB12
J23
1
J24
1
J25
1
J26
1
J27
1
J28
1
VALVE 1 VALVE 2 VALVE 3 VALVE 4 VALVE 5 VALVE 6 1
J15
1
J16
1
J17
1
J18
1
J19
1
J20
1
J21
1
J22
1
FILL VALVE RELAY 1 RELAY 2 RELAY 3 RELAY 4 RELAY 5 RELAY 6 RELAY 7 RELAY 8
Fig. 20 Fill Valve, TB12 Location on System
Control Center Board
Connecting Low Voltage Components to the System Control Center (cont’d)
After all low voltage wiring has been installed, arrange the wiring so that it is somewhat evenly spaced along the
length of the entry slot. Secure the wires by tightening the two screws.
FIREMAN’S SWITCH CONNECTION FOR HEATER
LOW VOLTAGE CONTROL CIRCUIT FOR HEATERS
IN3+
This section applies to all heaters or heat pumps that have
control circuitry of 24VAC or less.
IN3J31
ON
LIMIT
THERMOSTAT
TB3
Turn the heater thermostat(s) to the maximum setting.
4.
Turn the heater switch to the ON position.
5.
If provided, set the heater selector switch to HIGH or
to SPA.
S2
1
3.
RUN
OFF
PRESSURE
Connect the other ends of the wires to the
heater control circuit as required by your specific
heater instructions.
WARNING: DO NOT DISCONNECT ANY OF THE HEATER
HIGH-LIMIT OR PRESSURE SWITCHES.
S1
SETUP
DIP SWITCH
2.
Route the heater wires through the low voltage
raceway and connect the two-position terminal
block TB3 labeled ‘Low Voltage Heater’. Be sure to
use wire with the temperature rating required by the
heater manufacturer.
HEATER
GAS VALVE
CONTROL
1.
1
DOLPHIN
RF
An internal relay with low voltage dry contacts is provided
to connect to the low voltage control of the heater. See the
figure for a typical connection.
Low Voltage
Heater TB3
J23
1
J24
1
VALVE 1 VALVE 2
Fig. 21 Low Voltage Heater Connection to TB3 on
Main Panel Board
(Refer to Fig. 13)
31
Temperature Sensors
The Pool System uses high quality 30K ohm thermistor type temperature sensors. Two sensors are provided (one for
Air and one for Water). If this control is used with a solar heating system, an optional solar sensor must be purchased
separately.
WATER
TEMPERATURE
SENSOR INSTALLATION
TO
INSTALL
THE WATER TEMPERATURE
SENSOR
ATTENTION: The water temperature sensor is 25’ long. Consider the sensor mounting locations BEFORE mounting the
System Control Center.
1/4 x 1/8 FIP threaded bushing
Fig. 22 Pump Head and Exploded View of Sensor Cable InstallaNote: Some major brands of pumps (Jandy, for example) may have different threads and may not be compatible with
this configuration. Also, a proper “T” configuration may need to be installed in the plumbing ahead of the heater.
FREEZE PROTECTION FEATURE
Freeze control is initiated when the air temperature falls to 34˚F - 40˚F (user selectable). Freeze control turns on the
filter pump in pool mode for 30 minutes, then continues running the filter pump in spa mode for 30 additional minutes.
This is repeated as long as the air or water temperature is at (or reaches) the preselected temperature. The user can
disable the air freeze function.
Note: This feature is designed to protect the pool equipment in the event of unforeseen or unseasonable freezing
conditions. It is not intended to take the place of proper winterizing procedures.
AIR TEMPERATURE SENSOR INSTALLATION (ON A BUILDING OR STRUCTURE)
1.
Locate the Air Temperature Sensor so that it will be
exposed to the outside ambient temperature but not
influenced by direct sunlight. If the System Control
Center is located in a building, route the sensor cable
through the wall of the building.
2.
Secure the sensor with the clip and screw provided.
Avoid attaching the Air Temperature Sensor to
any surface that gets hotter than the ambient
air temperature.
3.
Note: The air temperature sensor is 10’ long. Consider the sensor
mounting locations BEFORE mounting the System Control Center.
32
Run the sensor cable back to the low-voltage
compartment of the System Control Center and plug
the connector into the 2-pin header J9 labeled AIR.
Fig. 23
Outside Building Location
Option
for the Air Temperature Sensor
WARNING: DO NOT USE 10K OHM SENSORS OR OTHER MANUFACTURER’S SENSORS WITH THIS CONTROL.
INCORRECT TEMPERATURE READINGS WILL RESULT.
AIR TEMPERATURE SENSOR INSTALLATION (IN THE SYTEM ENCLOSURE)
1.
If the System Control is not installed in a building and
is otherwise not influenced by direct sunlight, the
temperature sensor can be mounted to the bottom of
the enclosure.
2.
In the low-voltage raceway, remove the knockout
located next to the low-voltage cable slot, then install
the Liquid-Tite connector.
3.
Loosen, but do not remove the sealing nut from the
connector. Insert the Air Temperature Sensor into the
Liquid-Tite connector and tighten the sealing nut.
4.
Plug the Air Temperature Sensor connector into the
2-pin header labeled AIR.
5.
Fig. 24 System Control Center Location Mount Option
Neatly bundle the excess sensor cable into
the low-voltage raceway and secure with the
tie wrap supplied.
TO INSTALL AN OPTIONAL SOLAR SENSOR (NOT PROVIDED)
1.
If an optional solar heating sensor is purchased, install the solar sensor near the solar panels.
2.
Run the sensor cable back to the low-voltage compartment of the System Control Center and plug the connector into the
2-pin header J10 labeled SOLAR.
TO INSTALL AN OPTIONAL FILTER PRESSURE SENSOR (NOT PROVIDED)
1.
If an optional electronic filter pressure sensor is purchased, screw the sensor into the “tee” near the pressure
dial indicator.
2.
Run the sensor cable back to the low-voltage compartment of the System Control Center and plug the connector into the
3-pin terminal block TB2 labeled PRESSURE using the following table:
CONNECTION LABEL
+V
IN
GND
WIRE COLOR
RED
WHITE
BLACK
33
Locating and Installing the Spa-Side Control Panel
LOCATION GUIDELINES: The Spa-side Control Panel is hereafter referred to as the “Panel", and should be carefully
planned and installed during the initial pool/spa construction. This will allow for important steps to be completed before
the concrete or gunite is placed.
TO INSTALL SPA-SIDE CONTROL PANEL
Planning Is Essential: The specific Panel location needs to be determined ahead of time and planned. Also, the
PVC conduit along with any pulling elbow or junction boxes as required to route the Panel cable to the System
Control Center needs to be in place. If the Panel is installed after the pool/spa construction has been completed, the
installation must fulfill the intent of these instructions.
1.
Determine the exact location of the Panel.
WARNING: IT IS IMPORTANT TO POSITION THE
PANEL SO THAT IT CANNOT BE SUBMERGED AT
ANY TIME!
2.
Provide an unobstructed flat surface.
CAUTION: ANTICIPATE WHAT THE WATER LEVEL WILL BE
WHEN PLANNING INSTALLATION
Water level can rise by as much as 6 inches, depending
upon the size and shape of the spa, as well as the
number of people in the spa at any given time.
The Panel can be located on the deck next to the spa
or on a vertical wall of the spa. Be sure the location
selected provides an unobstructed flat surface that is
at least 4" high x 8" wide upon which the Panel can be
mounted. The 1” conduit that receives the Panel will
protrude from the middle of the area.
Occasional splashing is permissible so long as the
water can drain off the Panel. While the Panel is
designed to get wet, constant water contact MUST
be avoided.
This provision needs to be deliberately planned during
the placement of the concrete/gunite and during the
installation of tile and coping stone, etc. This is the
area required on the final finished surface for mounting
the Panel.
Remember: The water level in a spill-over type spa will depend upon which direction the valves are facing.
Fig. 25 Acceptable Location of Spa-side Control Panel
34
INSTALLATIONS THROUGH A VERTICAL WALL
3.
Provide a 1" conduit.
4.
Provide a 1" conduit through the concrete/gunite at the
location selected for the Panel. The Panel will extend
into the inside diameter of the conduit and the cable
will be routed through it.
Before concrete/gunite is placed, securely fasten the
1" conduit so that it will remain in position during
the placement of the concrete/gunite. The conduit
should be long enough to extend at least 6" beyond
the finished inside surface and 6" beyond the rough
outside surface of the concrete/gunite. This will allow
the conduit to be cut flush with the final finished
surface on the inside and extend beyond the rough
outside surface.
Important: The 1" conduit must be positioned and
adequately fastened so that it will be perpendicular
both horizontally and vertically to the finished surface.
This is extremely important for a successful installation
of the Panel. Additional conduit will be added to the 1"
stub-out to reach the System Control Center.
Complete the Installation of the Conduit
A. Before additional concrete is placed over the
route of the conduit to the System Control Center,
complete the installation of the conduit.
B.
Be sure that all underground conduit is positioned
in well compacted soil below the concrete. Also
use care when making the glue joints to be sure
that they are watertight. Additionally, do not use
more than two 90 degree sweeps in a single pull.
Doing so may make pulling the cable difficult.
C.
For long conduit runs (over 100') it may be
advisable to use a watertight pulling fitting
positioned in the middle of the conduit run. If this
is necessary, it is advisable to elevate the pulling
fitting at least 6" above the finish grade from
the surrounding area to avoid potential flooding.
Important: Do not cut the cable at the pulling
fitting. Use the pulling fitting as an intermediate
pulling point only.
(cont’d)
1/2" PVC CONDUIT
DECK
1" PVC CONDUIT
FINISHED SPA WALL
MUST BE ENOUGH DISTANCE TO
PREVENT CONTINUOUS WATER
CONTACT WITH THE PANEL
Fig. 26 Acceptable Routing of PVC Conduit Through a Vertical Wall
35
Locating and Installing the Spa-Side Control Center (cont’d)
5.
Cut the excess 1" conduit flush with the final
finished surface.
After all finish work has been completed (plaster, tile,
coping stone, deck finished, etc.), cut the 1" conduit
flush with the finished surface. Sawing the conduit
will not produce a flush surface, so grind, sand, or file
as necessary. After cutting flush, deburr the inside
diameter of the conduit.
6.
Pull the panel cable through the conduit.
An electrician's fish is required for pulling the wire
through the conduit. For long pulls, wire lubricant
is recommended.
Push the fish from the System Control Center to the
Panel location. After the fish has exited the conduit at
the Panel location, fasten the cable to the fish.
8.
Mount the panel.
Dry fit the Panel against the mounting surface to be
sure there are no high points that need to be removed.
Clean the mating surfaces and then apply a bead
of silicone adhesive. Remove the masking from the
double sided adhesive strips. Carefully push the extra
6" to 8" of cable into the conduit as you position the
Panel. Seat the Panel into the silicone, being sure it is
level or square or parallel with surrounding surfaces.
Peel backing off adhesive strips. Push the Panel firmly
against the mounting surface so that the adhesive
strips grasp firmly to the mounting surface. The
adhesive strips will hold the Panel in position while the
silicone cures.
ADHESIVE STRIPS
With one person pulling the cable and one person at
the Panel location assuring that no kinks or knots occur,
pull the cable through the conduit and into the low
voltage compartment of the System Control Center.
ATTENTION: If the cable on the spa panel is not long
enough to reach the System Control Center, do not add
length to the cable by splicing additional cable onto
the cable; obtain a spa panel with a cable that is long
enough to reach.
7.
Make the final connection.
Route the cable to the top of the printed circuit board to
the 4-position terminal blocks labeled COM A,
COM B, and COM C. The panel may be connected to any
one of these terminal blocks. After allowing for a small
service loop, cut off the excess cable. Remove
1” to 2” of the cable jacket and strip 1/4” of the
insulation off of the four wires. Connect the wires
to one of the terminal blocks using the following
wire table.
POSITION
9V
A
B
GND
36
SILICONE
SEALANT
HERE
WIRE COLOR
RED
GREEN
WHITE OR YELLOW
BLACK
Fig. 27 Mounting the Spa-Side Control Panel
Installing Spa-Side and Optional Dolphin Base Transceiver Modules
GUIDELINES FOR INSTALLING THE RF MODULES
1. Position both receivers away from any cables (such as
power lines, extension cords, cable lines, and
phone lines).
2. Mount the RF Module far away from large metallic
objects (such as fences, aluminum siding, metal piping,
and rain gutters).
3. Be sure there are no metal objects between the
transceiver and the wireless, in-home panel or between
the receiver and the pool/spa (for Dolphin use).
4. Position the receiver so that the arrow is
pointing upward.
5. Position as high off the ground as possible:
Make sure the RF Modules give you the proper range
before mounting permanently. The closer an RF module
is mounted to the ground, the less range it will have.
6. Important: Clear line of sight between the transceiver
and the wireless, in-home panel provides the best range
(performance). (For Dolphin Use: Clear line of sight
between the receiver and the pool/spa provides the
best range.)
7. CAUTION: With these noted tips in mind, experiment
by placing receiver(s) in different places to find the
best range before permanently mounting the receiver(s)
to the wall. The performance/range may vary from site
to site.
SPA-SIDE RF BASE TRANSCEIVER MODULE
INSTALLATION
1. Mount the transceiver module in a vertical position with
the molded arrow pointing up.
2. Run the cable back to the low-voltage compartment of
the Poolux Control Center and plug the
connector into the 6-pin connector J5 labeled
WIRELESS TRANSCEIVER.
DOLPHIN RF RECEIVER MODULE INSTALLATION
1. Mount the receiver module in a vertical position with the
molded arrow pointing up.
2. Run the cable back to the low-voltage compartment of
the Poolux Control Center and plug the connector into
the 6-pin connector J31 labeled DOLPHIN RF.
Suitable “unobstructed” receiver installation
Insteon
Fig. 28 Preferred “Unobstructed” Pool and Spa Receiver Location with Insteon
37
pH/ORP/Conductivity
pH, ORP and Conductivity sensors are mandatory when a chlorine generator is being used. These reading will allow the
control to generate chlorine, adjust pH, and deliver alerts when chemistry is out of the desired ranges.
INSTALLATION OF SENSORS
1.
Splice in one reducing tee for each sensor (pH, ORP
and Conductivity) with pipe dimensions as required by
existing pool plumbing. Sensors should be located after
the filter and before the heater or electrolytic chlorine
generator. Each sensor requires 1/2 inch NPT female
pipe threads and should be positioned approx. 45°
from vertical.
2. Sensors are shipped with caps to protect the active
portion of the sensor. Remove the caps and install
the sensors into the plumbing by HAND TIGHTENING
ONLY. (See “Dislodging air from within the pH
bulb tip” below.) Keep the sensor caps for long-term
storage or winterizing of the sensors. Sensors should
not be exposed to freezing conditions.
3. Route sensor wiring into the bottom left side of the
enclosure. Maintaining drip-loops at each sensor and
service loops inside the enclosure.
4.
5.
6.
7.
38
CALIBRATION AND CARE
The display on the panel will show the actual pH reading in
the body of water. Add any necessary chemicals to insure
that the pH sensor reading remains between 7.2 and 7.8 pH.
Requirement: Use a test kit no less than once a month
to verify pH calibration and optimal ORP readings.
Note: ORP readings are affected by the following factors:
water temperature, total dissolved solids, cyanuric acid
(stabilizer conditioner), and alkalinity.
CALIBRATION PROCEDURE
1.
2.
3.
Ensure the pH sensor is installed and enabled.
Place the pH sensor into a 7.0 pH reference solution
at 75°F and allow the sensor to sit a minimum of
15 minutes.
Connect the J9 CAL jumper to both pins. This jumper
is located on the upper left-hand corner of the
sensor board.
Turn system power on.
Observe the yellow LED calibration status indicator.
This LED is identified as D7, located on the upper
left-hand corner of the sensor board. When the LED
begins to flash, remove the J9 CAL jumper then
wait for the LED to stop flashing. When the LED
stops flashing, turn the system power off.
Reinsert the pH sensor into the sensor tee and verify
the readings with a known pH measurement
technique (i.e., chemical reagents or test strips).
Repeat steps 1-5 as required for calibration.
Connect pH, ORP and Conductivity sensors to the
appropriate connections on the sensor board (P/N
22857). The ORP sensor is identified by a black colored
boot with ORP in white lettering. Insert the connector
into the J2 connector on the sensor board in the
upper right corner. Twist the connector approximately
90° to lock. Insert the pH sensor connector (white
boot with pH in black lettering) into the J1 connector
on the sensor board. Finally, insert the small square
black connector of the Conductivity sensor into the
J7 connector.
4.
5.
Enable installed sensors and disable uninstalled
sensors using the jumpers located on the bottom lefthand side of the sensor board. Connecting the jumpers
between the two-pin locations enable sensor readings,
and removing the jumper disables the sensors.
CARE AND MAINTENANCE OF SENSORS
Press the four (4) nylon stand-offs into the sensor
board (PN 22857) and position it over the connector
J11, located in the upper left corner of the Poolux
Board (P/N 22890). After ensuring proper alignment
and that the J11 connections slide easily into the
connector, press the four (4) stand-offs into the control
board. Continue pressing until the sensor board snaps
into position.
Continue to the calibration procedure (if required).
6.
7.
Unpacking
Remove the sensor from its package and check that it is
undamaged. If damaged, contact the manufacturer for
replacement. Most sensors are rugged in design, but some
are fragile. Care should be taken when unpacking and
handling all electrodes.
Preparations for use
All sensors are shipped with a wetting cap covering the
electrode end. Gently remove the wetting cap from the
electrode by unscrewing the cap from the sensor body, then
slide the cap and o-ring off of the electrode body. Save the
cap for future long-term storage. Some sensors are shipped
with slide-on caps that are simply pulled off.
CALIBRATION AND CARE (CONT)
Dislodging air from within the pH bulb tip
Winterization
During shipping or storage, the electrolyte within the
sealed pH bulb tip may have been replaced by entrained air
bubbles. This may cause erroneous readings. To dislodge
the air and to force the electrolyte back into the pH bulb tip,
grasp the electrode near the cable end (but not the cable
itself), and swing it downwards through an arc.
1.
Electrode Cleaning
Slow response or erroneous readings may occur if the
electrode is not kept clean.
Light films are often easily removed using a squirt bottle or
the water jet from a faucet. If this is not successful, then
wiping with a soft, wet cloth is the best choice.
Coatings of grease and oil are best removed with a
detergent solution or a solvent that will not attack the
body of the sensor. A soft toothbrush can be used with
the detergent in removing stubborn coatings. Methanol
and isopropyl alcohol are good choices as solvents. Avoid
using acetone, MEK, THF, or trichloroethane, as they will
irreparably harm the sensor.
Hard coatings, like calcium or lime scale are best removed
with a solvent appropriate for the particular coating. A 5%
solution of Hydrochloric Acid (HCI) would be a good choice
for the calcium scale. If unsure of the proper solvent to
remove a hard mineral coating, alternate between a 5% HCI
and a 4% Sodium Hydroxide (NaOH) for 10 minutes each.
After treating the electrode with these strong acids or bases,
rinse the electrode with water and soak it in pH 4 buffer for
at least 1/2 hour.
The platinum or gold sensing tip of an ORP electrode should
be cleaned just like a pH electrode. The surface can also be
cleaned with an abrasive as a last resort. Gently scour the
platinum with a 600 grit wet emery cloth or preferably a 1-3
micron alumina polishing powder.
Important: Good laboratory practices should be
observed. Protective gloves and safety glasses should be
worn while handling any solvents or chemicals. If you are
unsure of the proper technique for handling a chemical or
of its hazardous properties, it is best to discard the used
electrode and purchase a new one, eliminating the risk
of danger.
2.
3.
4.
5.
6.
Disconnect the sensor connectors from the sensor
board located in the system control.
Carefully remove the sensors from the plumbing.
Reinsert the electrode into the wetting cap and fill
cap with pool water.
Install plugs in the plumbing in place of the sensors.
Store the sensors at room temperature.
When reinstalling the probe, refer back to
“Preparation for use” under the of the “Care and
Maintenance of Sensors” section (previous page).
INTERPRETING PH/ORP READINGS
Suggested water chemistry should be maintained as
close as possible to the following readings:
Alkalinity: 100 ppm
Total Dissolved Solids (TDS): 500 ppm (3500 w/salt
for chlorine generator)
pH: 7.2 - 7.8
1. To check the measured pH and/or ORP readings, run
the filter pump for at least 5 minutes. Press the DOWN
arrow button on the Service Panel to view the readings.
Continuing to press the DOWN button will toggle the
display through the available chemical sensor readings.
2. Once water chemistry has been adjusted, note ORP
reading (mV). This reading can be used to indicate
proper water chemistry in your installation. If the
ORP reading changes dramatically, adjust the water
chemistry accordingly.
3. Millivolt reading should be between 500-750 mV. (Note:
The Poolux display does not display mV.)
4. If ORP reading falls outside of suggested range, adjust
water chemistry accordingly.
Note: ORP readings are affected by the following
factors: water temperature, total dissolved solids,
cyanuric acid, and alkalinity.
39
Optional Chlorine Generation Cell Installation
In conjunction with the chemical sensors, the chlorine generator cell can help minimize the management and use of
liquid or solid chlorine products.
INSTALLATION OF THE ELECTROLYTIC CELL
THE CHLORINE GENERATOR OPTION CONTAINS:
Factory-installed control electronics with display
(installed in the System Control Center)
ESC24/36/48 Chlorine Generator Cell
Chlorine Generator Cell Cord
INSTALLATION SUMMARY
This is a quick guide as to how the chlorine generator cell
should be installed. Refer to the following pages for detailed
instructions and helpful hints.
1. Install the Chlorine Generator Cell into the return line,
downstream from all other equipment. The cell must be
horizontal with the inlet and outlet pointing down. The
water flow direction through the cell housing should be
“flowing away from the Cell Head”. Inlet and outlet piping
is to be a minimum of 6” in length (to provide for easy
cell housing replacement if this becomes necessary in
the future). Refer to the following pages for details.
2. Connect the cell to System Control Center.
Other considerations regarding cell locations
When correctly installed, the Cell will produce
sanitizer only when water is flowing through it – and,
obviously, the sanitizer is carried in the water to wherever
the water is being directed. So, if there is a spa attached
to the pool, be sure to locate the Cell in the line carrying
water to the pool/spa, preferably before (upstream from)
the valve which directs water flow to the pool and/or spa
– and not after (downstream from) the valve in the line
labeled SPA ONLY.
If there is a solar heater attached to the pool, locate the
Cell so that it has water flowing through it whenever the
filter pump is operating regardless of whether water is
flowing through the solar heater panels.
Installing the cell housing
Once the correct location for the Cell has been established, the Cell Housing can be installed into the plumbing. The clear plastic Cell Housing is PVC compatible, so
use ordinary PVC solvent (glue) to attach the Cell Housing
to the pipework. Remove the Cell from the Cell Housing before attempting to install the Cell Housing.
3. Add salt to the pool water. Quantity of salt required
(pounds) = gallons of water x 0.0275. Refer to the startup section regarding type of salt and how to dissolve.
IMPORTANT: The Cell Housing must be installed
as follows:
Choosing the cell location
*
The location in which the Cell is to be installed is
important. The Cell must be located as follows:
Cell Housing must be installed in a
HORIZONTAL position.
*
Water flow should be in the direction indicated by
the ARROW on the clear plastic Cell Housing (in the
direction flowing away from the Cell head).
*
The Inlet and outlet pipes must be pointing vertically
DOWN, to form an inverted ‘U’ configuration with the
Cell Housing.
*
The vertical inlet and outlet PVC piping must be a
minimum of 6” in length (refer Sketches 3a, 3b)
*
The ‘Cell Housing’ shall be free standing and not
secured to any rigid backing surface (such as a wall).
*
Installation should allow easy removal and
replacement of the cell from the housing.
* In the return-to-pool line (the pipe carrying filtered
water back to the pool)
* AFTER (down-stream from) all other equipment
(filter, heater, etc.). Contact your ECOmatic Dealer for
instructions if the ‘Cell’ cannot be located AFTER all
other equipment.
* Locate the Cell so that the cell cord can reach the Cell
from the System Control Center location.
* The Cell cord must be at least 5 feet from the inside
walls of the pool/spa (at least 5 feet from the nearest
water in the pool/spa, 3 meters in Canada).
40
Water Flow
Connecting the cell cord to the cell
In most cases (for 1.5” and 2” PVC) the total water flow can
be directed through the Cell Housing as shown in Sketch
3a) without significantly affecting the flow rate and/or backpressure on the filter, etc. However, if flow rate is a concern
(high horse-power pump, large diameter piping, etc.), the
‘Cell’ can be installed on a by-pass (as shown in Sketch 3b).
Note the need for a valve to ensure a good flow of water
through the cell.
1. Reinstall the cell back into the cell housing.
Helpful HINT: When attaching the Cell Housing into the
pipework, attach the inlet and outlet pipes to the Cell
Housing FIRST – and then connect that assembly to the rest
of the pipework (Refer Sketch #2). The inlet and outlet pipes
should be pushed in, twisted, and held firmly in place until
the PVC solvent holds. Note: While making these joints,
hold the Cell Housing horizontally, with the inlet and outlet
pointing down, so that the liquid PVC solvent does not run
into the Cell Housing where it will look unsightly through the
clear plastic.
Connecting the cell to the system control center
Helpful HINT: Copper Pipes? Use PVC ‘Flow-Lock’ fittings
(compression fittings) for easy connection of PVC to
copper pipes.
2. Install the BLUE connector from the cell power cord
onto the threaded bolt with the blue ring on the back of
the cell.
3. Install the two BLACK connectors from the cell power
cord onto the rods with the black fittings on the back of
the cell.
1. Run the cell cord back to the System Control Center.
2. Connect the stripped wires of the cell cord to the 3position terminal block just inside the entrance of the
low-voltage raceway. The BLACK wires can be connected
to either terminal marked black. The BLUE wire is
connected to the terminal marked blue.
This completes installation of the chlorine cell. Important
information on initial operation of the chlorine generator will
be found in the start-up section in this manual.
Black
Blue
Black
Low Voltage
Raceway
Cell Cord
Fig. 30 Chlorine Cell Cord Wiring
Ball Valve
Fig. 29 Chlorine Generator Cell Location in Plumbing
41
Expansion Controller Connection
This section only includes instructions on connecting the Expansion Controller(s) to the System Control Center.
A single installation may utilize up to four expansion boxes.
INSTALLATION OF AN EXPANSION BOX
1. Install the Expansion Controller following the
installation instructions that are included with it.
2. Run 4-conductor cable through the low-voltage raceway
from the System Control Center to the Expansion
Control Center. The 4-conductor cable wire size should
be 18 to 22AWG.
3. On the System Controller side, the wires connect to the
4-pin terminal block TB5 labeled EXPANSION BOX. The
wire connections use a 1-to-1 scheme. Record the wire
colors used in the table below:
CONNECTION LABEL
9V
A
B
GND
WIRE COLOR
4. On the Expansion Controller side, the wires connect to
the 4-pin terminal block TB1. Connect the wires to the
block, matching the wire colors to the terminal labels as
you recorded in the table above.
42
DIP Switch Settings
BEFORE Powering Up the System
IDENTIFY THE DEFAULT CONFIGURATION THAT MOST CLOSELY MATCHES THE PLUMBING AND EQUIPMENT INSTALLED.
DIP SWITCH SETTINGS
Set The Dip Switch Settings On The Circuit Board As Shown.
When looking at the DIP switches on the Service Panel, the ON position is to the right.
1.
POOL/SPA COMBINATION
4.
Filter Pump
Heater
2 Separate Lights
Auxiliary
Filter Pump
Heater
Lights for Pool and Spa
Auxiliary
2 Valve Actuators
2.
POOL ONLY
Filter Pump
Heater
2 Separate Lights
Auxiliary
3.
SPA ONLY
5.
SPILLOVER
Filter Pump
Heater
Lights for Pool and Spa
Auxiliary
2 Valve Actuators
POOL AND SPA ARE
SEPARATE BODIES OF WATER
SINGLE-PLUMBED
Filter Pump
Heater
Lights for Pool and Spa
Auxiliary
2 Valve Actuators
Fig. 31 DIP Switch Setting Configurations
NOTE: To add additional equipment or customize the settings, please read the default settings and configuration parameters
listed on the following pages prior to configuration.
43
Start Up: Configuration Parameters
Read over the Configuration Parameters to familiarize yourself with the configuration definitions and options for the
Poolux System.
DEFAULT SETTINGS AND CONFIGURATIONS
DEFAULT SETTINGS
CONFIGURATION PARAMETERS
Filter Cycles
All Disabled
Chemistry
pH
ORP
TDS
7.2 to 7.8
500 to 800
1000 to 8000
Pool Set Temperature
80°F
Spa Set Temperature
100°F
Pool Mode Heat
Disable
Spa Mode Heat
Disable
Spa Filter Heat
Disable
Spa Panel Button Map
Light 1, Light 2
DEFAULT SETTINGS
Pool Light (dimmable)
Triac 1
Spa Light (dimmable)
Triac 2
Filter Pump
Relay 1
Heater (millivolt control)
Relay 10
Aux 1
Relay 2
Mode: specifies which system mode the device is allowed
to operate in. Choices are Pool, Spa, and Both. Spillover
Mode is included with Pool Mode.
Device Type: Relay, Valve, or Triac (Light 1 and 2 connectors).
Maximum Speed: choices are Disable, On/Off, and
High/Low/Off for Relay and Valve devices; Disable, On/Off,
and High/Low/Off and Hi/Med/Low/Off for Triac devices.
For 2-speed Relay and Valve devices, Output 1 is turned on
for low speed, Output 2 for high speed. The two outputs are
never turned on together.
Output 1: set to Internal for devices connected to the main
control board, External for devices connected to an
Expansion Box.
Expansion Boxes: 0 for an Internal device, 1, 2, 3, or 4 to
specify an Expansion Box (# set by rotary switch in the
Expansion Box).
Device No.: specifies which Relay, Valve, or Triac to use.
2 valve actuators if required
DIP Switch Configuration (see page 39)
version 6 (dual-plumbed) isn’t implemented yet
Freeze Protect: if set to ‘Enable,’ the device will be turned
on when the air temperature drops below freezing.
Relays: on the main control board, relays are numbered
from 1 to 10. Relay 9 is the Chlorine Generator Control
relay, and Relay 10 is the Low Voltage Heater relay. In an
Expansion Box, relays are numbered from 1 to 8.
Valves: valves are numbered from 1 to 6 on the main control
board, 1 and 2 in an Expansion Box. If the valve is set to
“enable,” the device will be turned off whenever the suction
and return valves move.
Triacs: 1 is Light 1, 2 is Light 2.
Output 2, Expansion Boxes, and Device No: these are
only used for Relay and Valve devices set to a
Maximum Speed.
44
Start Up: Configuration Parameters (cont’d)
The configuration settings will automatically be set to operate according to a default specified by the DIP switch settings
prior to Start Up. Settings other than Day/Time and Filter Settings do not need to be configured for operation but should
be set for user preference. Configuration instructions for these items are not included in the Operation Manual.
DEVICE CONFIGURATION
FILTER PUMPS
DEVICES
Most configurations have a single filter pump, configured
as Filter Pump 1. A two-water-body, two-pump system has
two filter pumps, with Filter Pump 1 being the pool pump and
Filter Pump 2 the spa pump.
There are two types of devices: Pre-defined and Auxiliary.
Pre-defined devices have specific behaviors associated
with them and must be properly selected and configured
to operate correctly. Auxiliary devices are simple On/Off or
two-speed devices.
HEATERS
The system can support four types of heaters:
DEVICES THAT ARE PRE-DEFINED
1. Gas
2. Electric Resistive (ER)
3. Heat Pump
4. Solar
Pool Light, Spa Light: these are preconfigured to the
Light 1 and Light 2 triacs on the controller board, but can be
reassigned to any relay, valve, or triac.
Heaters are added to the system by configuring the
Heater 1, Heater 2, Heat Pump, Solar Valve, and Solar Boost
Pump devices.
Heater 1 is the main heater in the system. It can be Gas,
ER, or a Heat Pump. In a two-water-body two-pump system
Heater 1 is the pool heater.
Heater 2 is the spa heater in a two-water-body two-pump
system. It can be Gas, ER, or a Heat Pump.
Heat Pump is used to add a secondary Heat Pump in
addition to the main heater.
NOTE: If the Heat Pump is the main heater in the system,
it must be configured as Heater 1, not Heat Pump.
Filter Pump 1: this is automatically assigned to Relay 1.
If the pump is two-speed the second connection can be
assigned to any other relay on the main board.
Heater 1: can be assigned to either the Low Voltage Heater
relay or any large relay for 120 volt systems.
Filter Pump 2, Heater 2: these only apply to the two-waterbody two-pump configuration where there are two-filterpumps and heaters. They are not automatically assigned.
Cleaner: controls an automatic pool cleaner. For a suctionside cleaner, Cleaner must be assigned to the cleaner valve.
For a pressure-side cleaner, assign Cleaner to the boost
pump relay.
In-floor Cleaner: the activation valve for an in floor cleaner.
Solar Valve and Solar Boost Pump must be configured as
required to support a solar heat system. (See Page 46.)
In-floor Cleaner Boost Pump: the optional booster pump for
an in-floor cleaner.
NOTE: The solar heat system is only applicable to the pool
and cannot be used with a Spa Only system or on the Spaside of a two water body two pump system. In systems
containing both a pool and a spa, solar heat is only used
when the system is in Pool mode.
Pool Fill: valve used to add water to the pool or spa.
Chlorine Generator: preassigned to the Chlorine Generator
Control relay.
Note: In Heater display, Heater 2 will not show if it’s
not configured.
45
Configuring the System: Step 1 - Training the First Wireless Panel
The Main Menu Screen options shown may be displayed in a different order on your control and will only appear if
available on your system.
BASIC PANEL FUNCTIONS
Mode-Pool
Arrow Left
Arrow Up
Pool Temp
Pool Light
7 LEDs correspond to the 7 items
on the left side of the display .
They light to indicate operation or alert.
Spa Light
Arrow Right
Air Temp
Filter Pump
Heater
Arrow Down
10/09/06 Pool Set 80F
Monday
12:42 PM
Alert/Error
Select
Fig. 32 Poolux Wireless Panel
IMPORTANT: The first thing you must do before making changes to the configuration is to create
communication between the system and the panel by “Training” the panel as described below:
TRAINING THE WIRELESS PANEL
The system should be powered up. You will need to be standing in front of the System Box within reach of the
Service Panel within the box.
1. From the Home Display Screen (Mode-Pool/Spa highlighted) on the Wireless Panel, Arrow Right.
2. Scroll down the Main Menu to highlight Setup. Arrow Right.
3. Scroll down the Setup Menu to highlight Wireless Setup. Arrow Right.
4. Be sure “Add Me” is highlighted.
5. On the Service Panel in the System Box, press the Network button.
6. On the Service Panel, use the Up and/or Down buttons until “Add Device” appears on the Service Panel Display.
7. With “Add Me” highlighted on the Wireless Panel, press the Select button on the Wireless Panel and a prompt
should appear for steps 8 and 9 below.
8. With “Add Device” showing on the Service Panel, press “Select” on the Service Panel.
9. Press the Select button on the Wireless Panel again. “Panel Added” will appear briefly on the Wireless Panel and
then revert to the Home Screen “Adding... OK” will appear on the Service Panel display. The Service Panel display
will revert to “Automatic Mode” after a short time. Repeat if the attempt to add the panel is not successful.
1
Mode Pool
2
Pool Temp
Pool Light
Spa Light
Filter Pump
Heater
Air Temp
10/09/06 Pool Set 80F
Monday 12:42 PM
Alert / Error
(Display Screen)
46
3
Main Menu
Device Control
Scenes / Timer
Heater
Chemistry
Mode
Setup
Setup
Pool
Setup
Filter Cycles
Panel LEDs
Wireless Setup
Rename Devices
Reorder Devices
Day and Time
4
Wireless Setup
Me
dd Me
Add Device
Remove Meeless Setup
Add Device
Add Device
Remove Device
Network ID
D9FE
Panel ID
0040
Left Arrow to Exit.
Configuring the System: Step 2 - Entering Configuration Mode
To Configure the System, move the SetUp-Run switch (S1) on the circuit board to the SetUp position.
The system will enter configuration mode. (The first wireless panel must be trained prior to use.
See previous page.)
SYSTEM CONFIGURATION
CONFIGURATIONMODE
ENTERING
Read page 45 regarding default configurations and
DIP switch settings. Verify that the DIP switch
settings reflect your equipment configuration.
If they are correct, move on to the next screen.
If the DIP switches do not reflect your
equipment configuration:
1. Correct the DIP switch settings, then
2. Move the SetUp-Run switch back to Run, then back
to SetUp again.
When the S1 switch is moved from Run to Setup, the
following occurs;
Fig. 33 “S1” Switch and DIP Switches
a. The relay resets in the Service Box.
Refer to Fig. 13
b. The service Panel will read SETUP MODE.
c. The handheld wireless panel will go into Configuration
Mode and will momentarily show menu 1 (below) as it
initializes for configuration.
1
!
Entered
Config Mode, Wait..
3
2
Configuration
Pool Only
Spa Only
Pool - Spa Combo
Spillover
Two Water Body Single Plumbed
Two Water Body Dual Plumbed
Expansion Boxes
D3
Off
On
Off
On
Off
On
D2
Off
Off
On
On
Off
Off
D1
Off
Off
Off
On
On
On
Verified Setup?
No
Yes
0
Verify S2 dip switches on the
PoolControl and press ‘Select’
button on the Panel.
Panel display will indicate
that the system is entering
configuration mode.
Verify DIP switch settings match
your equipment.
Yes
No
Exit from Configuration
Change S1 to RUN position on
the PoolControl and press
‘select’ button on the Panel
You may be reminded to reset
the S1 switch on the Pool Control
to continue.
47
Configuring the System: Adding a Device
To add an auxiliary jet pump to the spa, go to the setup device screen in configuration mode (see page 43 on how to
enter configuration mode). Once Setup is verified, a “Setup Devices” screen will appear.
Scroll down to an unassigned “Aux Device”; right arrow to “Add Device.”
ADDING A DEVICE
Setup Devices
ADDING A DEVICE AT-A-GLANCE
Add Device
Auxiliary 1
Mode
Device Type
Maximum Speed
Output 1
Expansion Boxes
Device No.
Output 2
Expansion Boxes
EXAMPLE: ASSIGNING A BOOSTER
PUMP TO THE SPA
Device No.
Freeze Protect
Valves
Rename Device
1
2
Setup Devices
3
Setup Devices
Filter Pump
Assigned
Solar Valve
Unassigned
Pool Light
Assigned
Solar Pump
Unassigned
Spa Light
Assigned
Heat Pump
Unassigned
Heater
Assigned
Unassigned
Aux Device 1Infloor
Cleaner
Cleaner
Unassigned
Aux Device 2
Unassigned
Pool Fill
Unassigned
Aux Device 3
Unassigned
4
Scroll Down
Aux Device 1
Mode
Device Type
Maximum Speed
Output 1
Expansion Boxes
Device No.
Aux Device 1
Add Device
Delete Device
Edit Device
5
6
Aux Device 1
Aux Device 1
Pool + Spa
Unassigned
Disable
External
-----
Mode
Device Type
Maximum Speed
Output 1
Expansion Boxes
Device No.
Pool + Spa
Relay
Disable
External
-----
Mode
Device Type
Maximum Speed
Output 1
Expansion Boxes
Device No.
Pool + Spa
Relay
On/Off
External
-----
(4) Mode: Pool + Spa; (5) Device Type: Relay; (6) Maximum Speed: On/Off for a single-speed pump
7
Aux Device 1
Aux Device 1
Mode
Device Type
Maximum Speed
Output 1
Expansion Boxes
Device No.
9
8
Pool + Spa
Relay
On/Off
Internal
-----
Mode
Device Type
Maximum Speed
Output 1
Expansion Boxes
Device No.
Pool + Spa
Relay
On/Off
Internal
Unassigned
---
Aux Device 1
Mode
Device Type
Maximum Speed
Output 1
Expansion Boxes
Device No.
Spa
Relay
On/Off
Internal
Unassigned
2
(7) Output 1: Internal (unless through the expansion box); (8) Expansion Boxes: Unassigned; (9) Device No: Set to relay
socket that booster pump is wired to (2-8)
10
Aux Device 1
Output 2
Expansion Boxes
Device No.
Freeze Protect
Valves
Rename Device
48
NA
NA
--Enable
Disable
Output 2: Normally N/A. Output 2 is required for any 2 speed pump.
Device No. (None selected)
Freeze Protect: Enabled
Valves: Disabled
Rename: To Rename Device Panel
Configuring the System: Heater Control
To configure a heater, choose Heater from the Setup Devices menu in Configuration Mode. Right Arrow to Add Device.
This brings you to the Heater Configuration Screen.
CONFIGURING A HEATER
CONFIGURING A HEATER AT-A-GLANCE
Setup Devices
Heater
Add Device
Mode
Device Type
Maximum Speed
Output 1
Expansion Boxes
Device No.
Output 2
Expansion Boxes
Device No.
Freeze Protect
Valves
Cooling Time
Rename Device
3
2
1
Heater
Heater
Setup Devices
Mode
Device Type
Maximum Speed
Output 1
Expansion Boxes
Device No.
Add Device
Delete Device
Edit Device
Filter Pump
Assigned
Pool Light
Assigned
Spa Light
Assigned
Heater
Unassigned
Cleaner
Unassigned
Pool Fill
Unassigned
Pool+Spa
Unassigned
Disable
External
(3) Mode: Pool, Spa or Pool+Spa. Mode can be set to Spa Mode if you winterize your pool/spa combination.
4
6
5
Heater
Mode
Device Type
Maximum Speed
Output 1
Expansion Boxes
Device No.
Heater
Heater
Pool+Spa
Relay
Disable
External
Mode
Device Type
Maximum Speed
Output 1
Expansion Boxes
Device No.
Pool+Spa
Relay
On/Off
External
Mode
Device Type
Maximum Speed
Output 1
Expansion Boxes
Device No.
Pool+Spa
Relay
On/Off
Internal
(4) Device Type: Relay; (5) Maximum Speed: On/Off; (6) Output 1:
8
7
Heater
Mode
Device Type
Maximum Speed
Output 1
Expansion Boxes
Device No.
9
Heater
Pool+Spa
Relay
On/Off
Internal
Unassigned
Mode
Device Type
Maximum Speed
Output 1
Expansion Boxes
Device No.
Heater
Pool+Spa
Relay
On/Off
Internal
Unassigned
3
Output 2
Expansion Boxes
Device No.
Freeze protect
Valves
CoolingTime
External
Disable
Disable
30 Sec.
(7) Expansion Boxes: Unassigned, none needed; (8) Device No.’s: 2-8, or 10 will match the relay number (No. 9 is reserved for
a Chlorine Generator); (9) Output 2: N/A, only needed when Expansion box is utilized
10
11
Heater
Output 2
Expansion Boxes
Device No.
Freeze protect
Valves
CoolingTime
12
Heater
External
Disable
Disable
30 Sec.
Output 2
Expansion Boxes
Device No.
Freeze protect
Valves
CoolingTime
Heater
External
Rename Device
Enable
Disable
7 min.
(10) Freeze protect & Valves Assignment: N/A, only used with Auxiliary devices; (11) Cooling Time: Set how long
the heater requires to cool before the pump shuts off. (12) Scrolling down, the last menu is Rename Devices.
49
Configuring the System: Configuring a Solar Heater
Solar heating can be added in conjunction with a gas heater or as a stand-alone heater.
CONFIGURING A SOLAR HEATER
CONFIGURING A HEATER
AT-A-GLANCE
Setup Devices
Solar Valve
Add Device
Mode
Device Type
Maximum Speed
Output 1
Expansion Boxes
Device No.
Output 2
Expansion Boxes
Device No.
Freeze Protect
Valves
Drain Time
Rename Device
1
2
Setup Devices
Setup Devices
3
Filter Pump
Assigned
Solar Valve
trttrtttrtr
Unassigned
Pool Light
Assigned
Solar Pump
Unassigned
Spa Light
Assigned
Heat Pump
Unassigned
Heater
Assigned
Aux Device 1
Unassigned
Cleaner
Unassigned
Unassigned
Pool Fill
Unassigned
Aux Device 2
Aux Device 3
Heater
Add Device
Delete Device
Edit Device
Unassigned
(1-2) In the Setup Devices menu, scroll down to Solar Valve. Right click to Add Device (menu 3).
6
5
4
Solar Valve
Mode
Device Type
Maximum Speed
Output 1
Expansion Boxes
Device No.
Pool
Unassigned
Disable
External
Solar Valve
Solar Valve
Mode
Device Type
Maximum Speed
Output 1
Expansion Boxes
Device No.
Pool
Valve
Disable
External
Mode
Device Type
Maximum Speed
Output 1
Expansion Boxes
Device No.
Pool
Relay
On/Off
External
(4) Mode: Pool; (5) Device Type: Valve; (6) Maximum Speed.: On/Off
8
7
Solar Valve
Mode
Device Type
Maximum Speed
Output 1
Expansion Boxes
Device No.
Pool
Relay
On/Off
Internal
Unassigned
9
Solar Valve
Mode
Device Type
Maximum Speed
Output 1
Expansion Boxes
Device No.
Pool
Relay
On/Off
Internal
Unassigned
3
Solar Valve
Output 2
Expansion Boxes
Device No.
Freeze protect
Valves
Drain Time
External
Disable
Disable
0 Min.
(7) Output 1: Internal unless powered by an Expansion Box; (8) Device No.: 3-6; will match Valve number; (9) Output 2:
Internal except when Expansion Box
10
Drain Time: Set how long the valve stays open to let it drain
Freeze protect and Valves Assignment: N/A, only used with Auxiliary devices
If there is a booster pump, set up the solar pump in the same way as above.
The solar pump option is directly under the Solar Valve option in the Setup
Device menu.
50
Solar Valve
Output 2
Expansion Boxes
Device No.
Freeze protect
Valves
Drain Time
External
Disable
Disable
4 Min.
Configuring the System: Exiting Configuration Mode
After Configuration is complete, left arrow to exit configuration and enter Automatic Mode.
EXIT CONFIGURATION
1
2
Setup Devices
Filter Pump
Assigned
Pool Light
Assigned
Spa Light
Assigned
No
Heater
Assigned
Yes
Cleaner
Unassigned
Pool Fill
Unassigned
Left Arrow from Setup Device
Screen to Exit Configuration Mode.
Want to exit?
Arrow Down then Select to Exit.
3
!
Exit from Configuration
Change S1 to RUN position on
the Pool Control and press
‘select’ button on the Panel
Panel display will prompt you
to move the SetUp-Run Switch
back to Run.
5
4
Config Setup
Panel Reset..
After moving Switch to Run,
Press Select.
Mode Pool
Panel display will indicate
a reset and will turn off
automatically.
Pool Temp
Pool Light
Press Select to turn Panel back on.
Spa Light
Filter Pump
Heater
Air Temp
10/09/06 Pool Set 80F
Monday 12:42 PM
Alert / Error
Automatic Mode Main Screen
will Display.
51
System Information
Your system information (accessories and settings) can be viewed within a few screens, beginning with the Check
Configuration menu (Menu 4 below). The basic equipment installed is shown: 1) Pool and/or Spa, 2) Expansion Boxes,
and 3) other features (menus 5 and 6). The menus may appear different depending on your accessories.
CONFIGURATION
CONFIGURATION AT-A-GLANCE
Pool Light
Air Temp
Filter Pump
10/09/06 Pool Set 80F
Monday 12:42 PM
Alert / Error
Heater
Device Control
Scenes / Timer
Heater
Chemistry
Mode
Vacation Mode
Pool
(Main Menu)
3a
3b
Setup
Check Alerts
Setup
Setup
(Display Screen)
Day and Time
Vacation Mode
Filter Cycles
Spa Panel
Dolphin
Panel LEDs
Main Menu
Main Menu
Pool Temp
Spa Light
2b
2a
1
Mode Pool
Setup
Device Timeout
Display
Version Info.
Check Config.
Restore Names
4
Check Config.
Config. Mode
Expansion Boxes
Device Details
Pool + Spa
0
(Setup Screen Menu)
5a
5b
Device Details
Device Details
Pool Light
Spa Light
Filter Pump
Heater
Pool Fill
Chlorine Gen.
Auxiliary 1
Auxiliary 2
Auxiliary 3
Suction Valve
Return Valve
6
Auxiliary 1
Mode
Device Type
Maximum Speed
Output 1
Expansion Boxes
Device No.
Pool + Spa
Triac
H/M/L/Off
Internal
Unassigned
3
(Device Detail Menu)
(3b) Check Config: Right Arrow to see your system configuration. If this information does not accurately reflect your
preferences or current equipment, please contact a qualified service representative.
SOFTWARE VERSION OF THE WIRELESS PANEL
Software Version information is available via the Wireless Panel “Setup” Menu (3b) under “Version Info.”
(Right Arrow). This information is useful when making a service call.
52
Left Arrow
to Exit.
Setting Day and Time
Day of the week and AM/PM settings cannot be set separately. Day of the Week changes automatically according to
the date input, and the AM/PM setting is changed with the hour setting.
SETTING DAY AND TIME
SETTING DAY AND TIME AT-A-GLANCE
Main Menu
Day and Time
Setup
Mode Pool
Pool Temp
Pool Light
Air Temp
Spa Light
Filter Pump
Heater
3
2
1
10/09/06 Pool Set 80F
Monday 12:42 PM
Alert / Error
(Display Screen)
Setup
Main Menu
Device Control
Scenes / Timer
Heater
Chemistry
Mode
Setup
Setup
Pool
Filter CyclesDay and Time
Panel LEDs
Wireless Setup
Rename Devices
Reorder Devices
Day and Time
(Main Menu)
4
Set Time & Date
Set Time
Set mm/dd/yy
Day of the Week
09 50 AM
10/ 09 / 06
Monday
(4) Set Time: When Set Time is highlighted, hour will
automatically blink. Arrow Up or Down to change and Select
to set. Minutes will automatically blink. Arrow Up or Down to
change and Select to set.
Scroll down if the month, date, or year has to be set.
5
Set Time & Date
Set Time
Set mm/dd/yy
Day of the Week
09 50 AM
10 / 19 / 05
Wednesday
(5) Set Month, Date and Year: When Set mm/dd/yy is highlighted, press Select to
change; the month will blink. Arrow Up or Down to change, and Select to set; the date
will blink. Arrow Up or Down to change, and Select to set; the year will blink. Arrow Up
or Down to change and Select to set. The day of the week is set automatically.
Left Arrow to Exit.
53
Setting Filter Cycles
Filter Cycle settings are very configurable and can make use of multiple times during a given day, as well as different
programming for different days.
SETTING FILTER CYCLES
SETTING FILTER CYCLES AT-A-GLANCE
Main Menu
Setup
Filter Cycles
Setup
Disable
Filter 1
Filter Timers
Filter 2
Filter 3
Enable
Mode
Pool
Days to Run
Spa
All Days
Timer 1 Start
Filter 4
Weekends
Timer 1 Stop
High
Weekdays
Pump Speed
Low
Sunday
Timer 2
Disable
Monday
Timer 2 Start
Enable
Tuesday
Timer 2 Stop
High
Wednesday
Pump Speed
Low
Thursday
Friday
Saturday
1
2
Pool Temp
Mode Pool
Pool Light
Air Temp
Spa Light
Filter Pump
10/09/06 Pool Set 80F
Monday 12:42 PM
Alert / Error
Heater
(Display Screen)
Main Menu
Device Control
Scenes / Timer
Heater
Chemistry
Mode
Setup
Filter 2
Disabled
Filter 3
Disabled
Filter 4
Disabled
Setup
Pool
6
5
Filter Setup
Disabled
Setup
Filter Cycles
Panel LEDs
Wireless Setup
Rename Devices
Reorder Devices
Day and Time
(Main Menu)
4
Filter 1
3
Filter 1 Setup
Filter 1 Setup
Filter Timers
Mode
Days to Run
Timer 1 Start
Timer 1 Stop
Pump Speed
Enabled
Pool
12:00 AM
12:00 AM
High
Filter
Mode
Days to Run
Timer 1 Start
Timer 1 Stop
Pump Speed
Enabled
Pool
12:00 AM
12:00 AM
High
7
Filter 1 Setup
Filter
Mode
Days to Run
Timer 1 Start
Timer 1 Stop
Pump Speed
Enabled
Pool
12:00 AM
12:00 AM
High
(5) Filter: Press Select to turn Enable or Disable.
(6) Mode: Press Select to choose Mode, Pool or Spa.
(7) Days to Run: Right Arrow.
(Continued on Next Page)
54
SETTING FILTER CYCLES
8b
8a
Filter 1 Setup
All Days
Weekends
Weekdays
Sunday
Monday
Tuesday
Filter 1 Setup
Enable
On1
On
On
On
OOn
On
On 1
Wednesday
Thursday
Friday
Saturday
You will be given a choice of weekly or daily
options to set up your filters for operation.
Left Arrow to Exit.
(Filter 1 Setup Menu)
10
9
Filter 1 Setup
Filter
Mode
Days to Run
Timer 1 Start
Timer 1 StopStop
Pump Speed
Enable
Pool
Filter Time 1 Start
Enter Time 12: 00 AM
12:00 AM
12:00 AM
High
The hour will blink. Arrow Up or Down to set the
hour for the first filter cycle to begin. Press Select
to save. The minutes will blink automatically.
Change the minutes in the same way. Press
Select to save and Arrow Left to return to the
previous screen.
Scroll down to “Timer 1 Stop” and repeat the above steps to set a filter cycle stop time.
Left Arrow to Exit.
11
Filter 1 Setup
Filter
Mode
Days to Run
Timer 1 Start
Timer 1 Stop
Pump Speed
Enabled
Pool
Scroll down to Pump Speed. Press Select to choose
the desired pump speed for Filter Cycle 1.
12:00 AM
12:00 AM
High
12
Filter 1 Setup
Timer 2
Timer 2 Start
Timer 2 Stop
Pump Speed
Disable
12:00 AM
12:00 AM
High
For a Second Filter Cycle
Press Select to enable or disable a second run time for Filter Cycle 1.
If enabled, Arrow Down and set Start Time 2 and Stop Time 2 in the same way
described above for Start Time 1 and Stop Time 1.
Program additional filter cycles in the same way.
Left Arrow to Exit.
Two Separate Bodies of Water Using the Same Equipment
If you have two totally separate bodies of water that share the same equipment, configure Filter #2 for Spa.
55
Heater Settings
Actual operation of various heating devices can be configured using this menu.
HEATER SETTINGS
Main Menu
HEATER SETTINGS AT-A-GLANCE
Heater
Set Pool Temp
Set Spa Temp
Enable
Heater
Disable
Enable
Disable
Heat Pump
Heat in Filter
Pool Mode Heat
Spa Mode Heat
Enable
Solar Heat
Disable
Spa Filter Heat
Enable
Polling
Set Polling
Disable
Manaul
Disable
Enable
Disable
2
1
Pool Temp
Mode Pool
Pool Light
Air Temp
Spa Light
Filter Pump
10/09/06 Pool Set 80F
Monday 12:42 PM
Alert / Error
Heater
Main Menu
Device Control eater
Scenes / Timers
Heaterevice Control
Mode
Setup
Vacation Mode
Pool
Of f
(Display Screen)
3
Pool
80˚F
Temp
83˚F
100˚F
Disable
Disable
Disable
Set Pool Temp
Set Spa Temp
Heater
Heat Pump
Pool Mode Heat
4
Pool
Temp
Spa Filter Heat
80˚F
Heater: Press Select to enable or disable the heater.
Heat Pump: Press Select to enable or disable a heat pump.
Pool Mode Heat: Press Select to choose between:
heat in filter - heat during filter cycles only
polling - to measure temperature of water at intervals; heat to set temperature
disable - do not heat
manual - heat upon manual command
(4) Spa Mode Heat: Press Select to enable or disable heat in Spa Mode.
Solar Heat: Press Select to enable or disable solar heat.
Disable
Left Arrow to Exit
56
(3) Set Pool and Spa Temp: Press Select then Arrow Up or Down to set temperature. Press
Select to enter.
Spa Filter Heat: Press Select to enable or disable the heater during spa filter cycles.
Setting Display Preferences
Configuration of the wireless panel LCD is controlled using these menus.
DISPLAY SET UP
DISPLAY SET UP AT-A-GLANCE
Main Menu
Display
Setup
Backlight (min)
Sleep Time (min)
Assign Display2
Key Tone
LCD Contrast
1
2
Pool Temp
Mode Pool
Main Menu
Device Control
Scenes / Timer
Heater
Chemistry
Mode
Setup
Pool Light
Air Temp
Spa Light
Filter Pump
10/09/06 Pool Set 80F
Monday 12:42 PM
Alert / Error
Heater
3
3b
Setup
Setup
Dolphinay and Time
Displaylphin
Version Info.
Restore Names
Check Config.
(Continue Scrolling
Down)
Left Arrow to Exit.
Pool
(Main Menu)
(Display Screen)
Filter CyclesDay and Time
Panel LEDs
Wireless Setup
Rename Devices
Reorder Devices
Day and Time
Setup
4
Display
Backlight (Min)
Sleep Time (Min)
Assign Display2
Key Tone
LCD Contrast
10
10
Pool Temp
Off
(4) Backlight: Press Select then Arrow Up or Down to set
time that wireless panel will stay lit after a button press.
Sleep Time: Press Select then Arrow Up or Down to set time
that wireless panel will stay on before going into sleep mode
to conserve battery.
Assign Display2: You can choose to display Pool Temp, Spa
Temp, pH reading, ORP reading, TDS reading, Filter PSI, Solar
Temperature, or Air Temperature as the second display on the
wireless panel. Press Select to change.
Key Tone: Press Select to turn keypad tone on or off.
LCD Contrast: Press Select to set LCD contrast on the
wireless display.
57
Renaming Devices
Devices can be renamed to personal preference. For instance, Aux Device 1 can easily be renamed “Waterfall” and will
then be shown that way on the control. Names are stored in the main control system.
RENAMING DEVICES
RENAMING DEVICES AT-A-GLANCE
Main Menu
Setup
Rename Devices
Pool Light
Air Temp
Filter Pump
10/09/06 Pool Set 80F
Monday 12:42 PM
Alert / Error
Heater
3
Setup
Main Menu
Pool Temp
Spa Light
Keyboard Screen
2
1
Mode Pool
(Choose Device)
Device Control
Scenes / Timers
Heater
ModeModeodessfgsfs
Setupode
Vacation Mode
Pool
Po
Off
(Display Screen)
Rename Devices
In Rename Device, scroll to the
available device and Arrow Right.
5
ABC
A
B
C
D
E
F
Exit
G
H
I
J
K
L
Save
M
N
O
P
Q
R Clear
S
T
U
V
W
X
Back
Y
Z
1
2
3
4
Shift
5
6
7
8
9
0 Space
Left Arrow to Exit.
58
Reorder Devices
Day andTime
Right Arrow to Rename Device.
4
Filter Pump
Pool Light
Spa Light
Heater
Aux Device 1
Filter Cycles
Panel LEDs
Wireless Setup
Rename Devices
Arrow to the chosen letter, then press
Select. Continue until the completed new
name for the Device is in the top window.
Arrow to “Save,” then press Select.
Display will revert to Device Control
screen with new name displayed.
Assigning Panel LEDs
The LEDs to the left of the display can be reassigned to devices that are considered most important for that particular
control panel. This is helpful for monitoring the on/off state of these devices without reading the display.
ASSIGNING PANEL LEDs
ASSIGNING PANEL LEDs AT-A-GLANCE
Main Menu
Setup
Panel LEDs
LED 1
thru 7
Device List
Scene List
Mode
Chemistry
Unassigned
1
2
Pool Temp
Mode Pool
Pool Light
Air Temp
Spa Light
Filter Pump
10/09/06 Pool Set 80F
Monday 12:42 PM
Alert / Error
Heater
3
Main Menu
Device Control
Scenes / Timers
Heater
ModeModeodessfgsfs
Setupode
Vacation Mode
Setup
Pool
P
Off
Filter Cycles
Panel LEDs
Wireless Setup
Rename Devices
Reorder Devices
Day and Time
(Display Screen)
4
Panel LEDs
LED 1Pool LightMode
LED 2
Pool Light
LED 3
Spa Light
LED 4
Filter Pump
LED 5
Heater
LED 6
Cleaner
5
LED Assignment
Device List
Scene List
Mode
Unassigned
You may choose, for example, equipment that you would like to associate with
“LED 1” (Menu 4), and its related assigned functions. In this case, Arrow Right
highlights the “LED Assignment” list (Menu 5).
6
LED Assignment
Filter Pump
Pool Light
Spa Light
Heater
Aux Device 1
Left Arrow to Exit
From the Device List, Right Arrow to the specific device listed in Menu 6. Arrow
Down to the equipment you wish to assign. Press Select.
Note: When a piece of equipment is assigned to a panel LED light, from the Display Screen you can turn that
equipment on and off or scroll through the options simply by highlighting that item, using the Up/Down arrow keys,
and pressing Select.
59
Creating Scenes
Scenes are used to assign one or more devices to a preset timer. For example, a scene named “Evening” could be
created that turns on a pool or spa light, and an auxiliary device such as a waterfall at the same time each evening.
CREATING SCENES
CREATING SCENES AT-A-GLANCE
Off
On
Main Menu
Scenes / Timers
Scene 1
Select Devices
Scene 2 -20
Scene Timeout
Timers
Timer 1 Start
All Days
Timer 1 Stop
Weekends
Days to Run
Weekdays
Timer 2 Start
Sunday
Timer 2 Stop
Monday
Days to Run
Pool Temp
Pool Light
Air Temp
Spa Light
Filter Pump
10/09/06 Pool Set 80F
Monday 12:42 PM
Alert / Error
Heater
(Display Screen)
Rename Scene
Thursday
Run in Vacation
Yes
Friday
Clear Scene
No
Saturday
Main Menu
Scene Control
Mode
Heater
Chemistry
Device Control
Scenes / Timers
Wireless Setup
Pool
(Main Menu)
5
Scene 1
60
Wednesday
No
3
4
Select Devices
Scene Timout
Timers
Timer 1 Start
Timer 1 Stop
Days To Run
Yes
2
1
Mode Pool
Scene 1
12
Disable
12:00 AM
12:00 AM
Tuesday
Allow Heat
Select Devices
Scene Timout
Timers
Timer 1 Start
Timer 1 Stop
Days To Run
12
Disable
12:00 AM
12:00 AM
Scene 1
Scene 2
Scene 3
Scene 4
Scene 5
Scene 6
On
Unused
Unused
Unused
Unused
Unused
A scene can also be manually turned on or off. If multiple devices are assigned to a scene, they will turn on or off
simultaneously when the scene is turned on or off.
6
7
Scene 1
Scene 1
Select Devices
Scene Timout
Timers
Timer 1 Start
Timer 1 Stop
Days To Run
12
Disable
12:00 AM
12:00 AM
Select Devices
Scene Timout
Timers
Timer 1 Start
Timer 1 Stop
Days To Run
9
Scene 1
12
Disable
12:00 AM
12:00 AM
Select Devices
Scene Timout
Timers
Timer 1 Start
Timer 1 Stop
Days To Run
10
Scene 1
Select Devices
Scene Timout
Timers
Timer 1 Start
Timer 1 Stop
Days To Run
8
12
Disable
12:00 AM
12:00 AM
12:00 AM
11
Scene 1
Scene 1
Timer 2 Start
Timer 2 Stop
Days To Run
Allow Heat
Rename Scene
Run In Vacation
12
Disable
12:00 AM
12:00 AM
12:00 AM
Clear Scene
No
No
Left Arrow to Exit
(3) Scene Control: Scene will show as Unused until set up. Press Select to turn Scene On or Off.
(4) Select Devices: Right Arrow to show list of equipment available. Press Select to link device to scene (menu not shown).
(5) Scene Timeout: Press Select. The hours will flash, waiting for your changes. Then Arrow Up or Down to set Scene timeout
in hours (1 to 12). The default is 12 hours. Press Select to set. (Note: The Timeout is the length of time a Scene will run if
turned on manually and not turned off.) (6) Timers: Press Select to Enable or Disable Scene running at designated times.
(7) Timer 1 Start: Press Select, then Arrow Up or Down to set time for Scene to begin. As the hour flashes, press the Arrow
Up/Down key. Press Select. As the minute flashes, press the Arrow Up/Down key. Press Select. Arrow Left to Exit.
(8) Timer 1 Stop: Press Select, then Arrow Up or Down to set time for the Scene to end.
(9) Days to Run: Right Arrow, then Press Select for each day you want the Scene to run automatically at the set time. Left
Arrow to Exit.
Menu 10:
(10a) Timer 2 Start, Timer 2 Stop, and Days to Run. Repeat steps 7-9.
(10b) Allow Heat: Press Select to designate whether heat should run during Scene.
(10c) Rename Scene: Right Arrow to name or rename the programmed Scene.
(10d) Run in Vacation: Press Select to Enable or Disable the Scene while in Vacation Mode.
(11) Clear Scene: (Scroll down past “Run In Vacation”) Press Select to clear a programmed Scene. Confirm Yes or No.
Repeat for any other Scenes that are created.
61
Vacation Mode
Vacation Mode is used to disable scene timers when going on vacation. Each scene has an option in its setup called
“Run in Vacation.” If set to Yes, the scene timers will continue to operate even though Vacation Mode is turned on or off.
VACATION MODE
VACATION MODE AT-A-GLANCE
Main Menu
Vacation Mode
1
Mode Pool
Pool Temp
Pool Light
Spa Light
Filter Pump
Heater
Air Temp
10/09/06 Pool Set 80F
Monday 12:42 PM
Alert / Error
(Display Screen)
62
2
Main Menu
Device Control
Scenes / Timer
Heater
Chemistry
Mode
Vacation Mode
Setup
Pool
On
Vacation Mode will appear within
the Main Menu. (Depending on
your installed accessories, Vacation
Mode may not appear on the first
Main Menu Screen. In that case,
Scroll Down.)
Once Vacation Mode is Highlighted,
Select to turn On or Off.
Chemistry
High and Low Limits for each chemistry reading has been set by the manufacturer. If the chemistry sensor reading is outside the
present limits, an alert will flash on the Main Menu Screen. Default limits can be changed to your preference.
CHEMISTRY
CHEMISTRY SETTINGS AT-A-GLANCE
Main Menu
Chemistry
Set High ORP
Set Low ORP
Set High pH
Enable
Set Low pH
Set High TDS
Ecomatic
Disable
Set Low TDS
ORP threshold
Enable
Chlorine Gen.
Extend Filter Cycle
Disable
Chemical Feeder
Chemical Feeder
Enable
Duration in min
Disable
1
2
Pool Temp
Mode Pool
Main Menu
Pool Light
Air Temp
Spa Light
Filter Pump
10/09/06 Pool Set 80F
Monday 12:42 PM
Alert / Error
Heater
Mode
Heater
Chemistry
Device Control
Scenes / Timers
Wireless Setup
(Display Screen)
(Main Menu)
3
pH
7.5
ORP mV
710
Set High ORP
Set LOW ORP
Set High pH
Set Low pH
Set High TDS
4
TDS ppm
pH
2400
7.5
800
650
7.9
7.2
4000
TDS ppm
ORP mV
2400
710
Set Low TDS
Chlorine Gen.
5
2000
6
pH
ORP mV
TDS ppm
7.5
710
2400
Set Low TDS
Chlorine Gen.
Pool
2000
Ecomatic Setup
Chlorine Gen.
Set ORP Level
Extend filter
POC Control
Enable
700
Disable
Off
(3-4) Chemistry High and Low
Limits: High and Low Limit defaults
have been set by manufacturer.
However, if you prefer different limits,
you may change them by pressing
Select (as shown), then Arrow Up or
Down to change. Press Select again
to save.
(5-6) Chlorine Generator: If you have
an optional ECOmatic attached to
your system, Right Arrow on Chlorine
Gen. (shown) to access the ECOmatic
Setup. Press Select to Enable or
Disable the Chlorine Gen., Extend
Filter, or POC Control (if available). The
ORP level is changed by highlighting
Set ORP Level. Select. When flashing,
change the ORP level value with the
UP or Down key. Press Select to set.
Left Arrow to Exit.
63
Device Timeout
A Device Timeout is the length of time a device will run if turned on manually and not turned off.
DEVICE TIMEOUT
DEVICE TIMEOUT AT-A-GLANCE
Main Menu
Setup
1
Mode Pool
Pool Light
Air Temp
Filter Pump
10/09/06 Pool Set 80F
Monday 12:42 PM
Alert / Error
Heater
Pool Fill 30 min
2
Pool Temp
Spa Light
Device Timeout
3
Main Menu
Device Control
Scenes / Timer
Heater
Chemistry
Mode
Setup
Setup
Pool
Setup
Filter Cycles
Panel LEDs
Device Timeout
Rename Devices
Dolphin
Day and Time
(Display Screen)
4
Device Timeout
Pool Fill
30 min
(4) Device Timeout: Timeout options will appear in the Device Timeout list. Press Select, then Arrow Up or Down to change
the length of time to run, or Off. Select to save.
Left Arrow to Exit.
64
Check Alerts
CHECK ALERTS
CHECK ALERTS AT-A-GLANCE
Main Menu
Check Alerts
1
Pool Temp
Mode Pool
Pool Light
Air Temp
Spa Light
Filter Pump
Heater
10/09/06 Pool Set 80F
Monday 12:42 PM
Alert / Error
(Display Screen)
2a
2b
Main Menu
Main Menu
Device Control
Scenes / Timer
Heater
Chemistry
Mode
Setup
Check Alerts
Setup
Setup
Pool
(Main Menu)
3
!
Alerts & Errors
If there is no error, this pop-up screen will appear.
No ALERTS
4
Alerts & Errors
Check Air Sensor
If there is an error, the recommended action will appear on the display.
In this case, the Air Sensor connector needs attention (became disconnected
or malfunctioned).
Check Air Sensor
Left Arrow to Exit.
65
Spa-Side Panel Set Up
You may choose the equipment that you would like to associate with the first two Spa Panel buttons. The Temp and
Mode buttons cannot be reassigned. Choose the piece of equipment from the Device List, then press Select when the
piece of equipment you desire is highlighted as illustrated below.
ASSIGNING SPA PANEL BUTTONS
ASSIGNING SPA PANEL BUTTONS AT-A-GLANCE
Main Menu
Light
Setup
Spa Panel
Aux
Temp
Pool
Spa
Spa Panel Btn 1
Spa Panel Btn 2
Spa Panel Btn 3
Spa Panel Btn 4
First two buttons can be assigned to
the equipment of your choice.
Pool Temp
Mode Pool
Pool Light
Air Temp
Spa Light
Filter Pump
10/09/06 Pool Set 80F
Monday 12:42 PM
Alert / Error
Heater
3
2
1
Main Menu
Device Control
Scenes / Timers
Heater
ModeModeodessfgsfs
Setupode
Vacation Mode
Pool
Off
P
Setup
Spa Panel
Dolphincation Mode
Displayclesnel
Version Info.ersion Info.olphin
Restore Names
Check Config.
Scroll down in the Setup Menu to Spa Panel
(Display Screen)
5
4
Spa Setup
Spa Panel Btn 1
Pool Light
Spa Panel Btn 2
Spa Light
Spa Panel Btn 3
Temp
Spa Panel Btn 4
Mode
Spa Buttons
Device List
Scene List
Unassigned
6
Spa Buttons
Heater
Spa Light
Filter Pump
Pool Light
Aux Device 1
Left Arrow to Exit.
In this case (Menu 6), Heater is highlighted. Press Select to assign the Heater for the “Spa Panel Btn 1” as requested in
Menu 4. In this example, Select returns you to Menu 4, and confirms reassignment of Spa Panel Btn 1 to Heater.
66
Optional Dolphin Remote Set Up
You must designate the equipment that you would like the Jet and the Aux buttons to operate from the Dolphin
Remote. Choose the piece of equipment from the Device List, then press Select when the piece of equipment you
desire is highlighted as illustrated below.
ASSIGNING DOLPHIN REMOTE BUTTONS
ASSIGNING DOLPHIN REMOTE BUTTONS AT-A-GLANCE
Main Menu
Dolphin
Setup
Dolphin Jet
Dolphin Aux 1
Dolphin Aux 2
Dolphin Aux 3
Dolphin Address
2
1
Pool Temp
Mode Pool
Main Menu
Device Control
Scenes / Timer
Heater
Chemistry
Mode
Setup
Pool Light
Air Temp
Spa Light
Filter Pump
10/09/06 Pool Set 80F
Monday 12:42 PM
Alert / Error
Heater
Jets Button
Aux Buttons
(Display Screen)
Setup
Pool
(Main Menu)
3a
3b
Setup
Setup
Filter CyclesDay and Time
Panel LEDs
Insteon Devices
Wireless Setup
Day and Time
Spa Panel
Dolphin
Display
Device Timeout
Version Info.
Rename Devices
Reorder Devices Dolphin Address (Menu 4):
See Dolphin Remote Operation
Manual regarding Pool Addressing.
Verify that the code set in the
Dolphin Remote matches the
number designated on the
Wireless Panel.
(Setup Menu)
4
5
Dolphin Setup
Dolphin Buttons
Dolphin Jet
Unassigned
Dolphin Aux 1
Unassigned
Dolphin Aux 2
Unassigned
Dolphin Aux 3
Unassigned
Dolphin Address
Assigned
Device List
Scene List
Unassigned
1
Left Arrow to Exit.
The Dolphin has predefined buttons
for Lights 1 & 2, Filter Pump, and
Heater. Arrow Right within the
Dolphin Buttons “Device List” menu
on the wireless panel.
The Device List will allow:
1) Cleaner Pump Activation.
The system determines the
proper cleaner to activate,
2) an Aux Device, numbers 1 - 41,
3) an Aux Valve, numbers 1 - 14.
67
Poolux Wireless Panel Cradle Installation Option
The Wireless Panel comes with a charging cradle that can be installed on a wall inside the home for a convenient
display while charging. Installing the cradle is not necessary to charge the panel; it can be charged independently from
the cradle with the charge cord.
INSTALLING THE WIRELESS PANEL CRADLE
The cradle must be mounted in a location where it receives a strong signal at all times. Check to see that the panel receives
a strong signal in the location you are considering prior to installation by holding the panel against the wall and checking the
signal there. This will ensure that if a noteworthy problem occurs at the pool, the panel will be able to alert
the homeowner.
1.
Find a suitable location for mounting the cradle. The location should be convenient for the homeowner and near an
electrical outlet.
Avoid mounting the cradle near the following:
A. heat sources
B. areas of excessive moisture (such as a bathroom)
C. television sets and other electronic equipment
D. cordless telephones
E. personal computers
F. microwave ovens
G. electric motors
H. other wireless devices
2.
Mount the cradle with the included mounting hardware as follows:
A. For sheetrock or plaster:
1.
2.
3.
4.
5.
Hold the cradle on the wall in its desired location.
With a pencil, mark a dot on the wall in the center of each mounting hole.
Drill two 3/16” holes (1/2” to 3/4” deep) in the wall where the dots are located.
Insert the plastic anchors into the two holes. Tap the anchors with a hammer until only the round head shows.
Hold the cradle over the anchors and secure by screwing the two screws into the anchors.
B. For wood surfaces:
1.
2.
3.
4.
3.
Hold the wall bracket on the wall in its desired location.
With a pencil, mark a dot on the wall in the center of each mounting hole.
Drill two 3/32” holes (1/2” to 3/4” deep) in the wall where the dots are located.
Hold the cradle over the drilled holes and secure by screwing the two screws into the holes.
Using the Wireless Panel Cradle
A. Plug the charge cord into the bottom of the cradle and into an electrical outlet.
B. Set the wireless panel in the cradle. It will snap into place, and is held magnetically.
C. Press the Select button on the wireless panel to wake up the wireless panel if the display is blank.
D. When the wireless panel is not in use, placing it on the cradle will ensure that it stays fully charged, has a good
signal, and can alert the homeowner to any problems in the pool.
NOTE: Whenever the wireless panel is on the cradle or connected to the charge cord, the display will not sleep and will remain on.
68
Faults
A Fault is an indication of a serious error that can affect the operation of the pool system. One of the following
messages will blink on the lower right side of the Wireless Pool Control display when a fault occurs.
FAULT MESSAGES AND MEANINGS
AIR SENSOR FAULT
The Air Temperature Sensor has failed or has been disconnected.
WATER SENSOR FAULT
The Water Temperature Sensor has failed or has been disconnected.
SOLAR SENSOR FAULT
The rooftop temperature sensor has failed or has been disconnected.
pH SENSOR FAULT
The pH Sensor has failed or has been disconnected.
ORP SENSOR FAULT
The ORP Sensor has failed or has been disconnected.
TDS SENSOR FAULT
The Conductivity Sensor has failed or has been disconnected.
POC FAULT
The Pool Controller has lost communication with the POC board.
Alerts
An Alert will appear on the display during a change in System status, or when System levels are out of user-specified
limits. One of the following messages will blink on the lower right side of the Wireless Poolux display when the System
is bringing an Alert to your attention.
ALERT MESSAGES AND MEANINGS
AIR SENSOR FREEZE
The air temperature has reached the preselected 34°F - 40°F set by the user.
The Filter Pump & devices configured to be freeze protected will turn on.
WATER SENSOR FREEZE
The water temperature has reached the preselected 34°F - 40°F set by the user.
The Filter Pump & devices configured to be freeze protected will turn on.
CHEMICAL FEEDER PURGE
The Chemical Feeder is purging (15 seconds). The Filter Pump will not shut off
while this is occurring.
SOLAR PANEL DRAINING
The Solar Valve is being held open to allow the solar panels to drain. The Filter Pump
will be held off while this occurs.
pH LOW
The pH of the water is below the user-specified low limit.
pH HIGH
The pH of the water is above the user-specified high limit.
ORP LOW
The ORP of the water is below the user-specified low limit.
ORP HIGH
The ORP of the water is above the user-specified high limit.
TDS LOW
The TDS of the water is below the user-specified low limit.
TDS HIGH
The TDS of the water is above the user-specified high limit.
DIRTY FILTER
The water pressure is above the dirty filter detection threshold.
69
Chemical Tank System
Having a chemical tank provides a convenient way to dispense acid into your pool or spa to maintain the proper pH. A
chemical tank system also reduces overall maintenance time for the owner, and optimizes the pool chemistry over time.
INSTALLING THE ACID FEED TANK
3. If not already installed, install the bracket and slide the
pump motor into the bracket from the top. Secure it with
the hardware provided. Add the rain cover.
4. Ensure the pump’s motor on-off switch is in the
OFF position.
5. Turn the motor switch to ON. Observe the rollers
turn continuously.
6. Turn the switch to OFF.
Install The Suction Line
7. Remove the 4” diameter fill cap from the tank. Inspect that
the tank is free from debris. Debris in the tank may clog
the filter resulting in poor pump performance.
Fig. 34 Acid Tank System
The chemical solution (diluted muriatic acid) is contained
in a tank outside of the pool and is pumped through the
injection port after the spa bypass system.
Proper installation, such as the placement of the tank and
routing of the tube, is important. It is also important to take
all necessary precautions working with acid and installing
electrical wiring.
ACID TANK & INJECTOR SYSTEM INSTALLATION
Note: You should be qualified to install the electrical wiring
in accordance to all local, state, and federal guidelines.
Before starting, verify that: 1) you have a good electrical
grounding system, 2) check for the feasibility of installation,
especially if an injector port is provided or whether you’ll
have to install one, 3) make sure that the acid injector is
after the spa bypass system, and 4) that you have all of the
materials on hand before starting.
1. Locate a suitable location for the tank and a point of
injection within 10 feet of the tank. AVOID flooded
suction installations.
2. Once a location has been determined, verify that proper
voltage(s) can be supplied to the system with a proper
grounding-type receptacle. Verify the voltage of the
control circuit receptacle using a voltmeter or multimeter.
70
8. Uncoil the poly tubing and insert it through the grommet
mounted on the front wall of the tank. Feed enough of
the tube into the tank through the grommet so that you
can pull it out through the 4” fill hole.
9. Install the suction filter. Remove the collet
from the filter by turning it CCW. (The
collet and filter mate with bayonet type
locking slots.)
3”
10. Slide the collet onto the tubing until the
shoulder is approx. three inches from the
end of the tube (as shown). Reattach the
filter onto the collet.
11. From the outside of the tank, carefully
pull the tubing outwards. Pull out enough
of the tube to have the tip of the filter
suspended two to three inches (2” - 3”) from the bottom
of the tank. Note: Do not allow the weighted filter to rest
on the bottom of the tank.
Suspend the filter 2” to
3” from the bottom
INSTALLING THE ACID FEED LINES (CONT)
12. Once the filter is suspended at the proper height,
route the outside tubing to the motor to determine
how much is to be cut off when inserted into the
suction (“In”) side of the motor. Note: the recessed
“IN” and “OUT” ports for the tubes in the motor are
approx 3/4” deep. Note: Do not install the tubing
with tight radius bends, kinks, or without slack.
13. Using a sharp utility knife, cut the tubing square. If
necessary, deburr the tube.
14. Slide the connecting nut over the tubing with the
female threads facing the cut end of the tubing.
Slide the ferrule onto the tube 1/2” to 3/4”, having
the beveled end of the ferrules facing the pump as
shown.
Install The Discharge Line
16. In the same manner with the discharge tubing, install the
nut threads and the beveled end of the ferrule facing the
motor. Insert the tube into the motor pump “OUT” port
about 3/4” and finger tighten.
17. Shut off water in the pool or spa circulation system, and
bleed off any system pressure.
18. Locate a suitable point for the acid flow of injection;
make sure that the acid injector is after the spa bypass
system. If there is no 1/2” or 1/4” NPT female fitting at
the location, one will have to be provided.
15. Insert the tubing approximately 3/4” into the motor
pump “IN” port (labeled on the motor housing).
Finger tight only. Do not use Teflon tape. Do not
use pliers. Do not use pipe dope.
Example of Injector Assembly
To Pump
19. Install the injection fitting or injection check valve. Wrap
the MNPT end of the fitting with 2 to 3 wraps of thread
seal tape.
20. Install the MNPT end of the fitting into the FNPT point
of injection. Hand tighten only. Trim extension tip as
required to put the tip directly in the flow of water.
Filling The Tank With An Acid Solution
21. To create the acid dilution, always introduce water into
the tank first, then add acid to water. Never reversed!
Mix the ratio per manufacturer’s guidelines.
22. Turn on the water system and allow it to reach operating
pressure. Check the entire system for leaks.
23. After a suitable amount of time dosing, verify your
application with test equipment.
71
The Service Panel
Operation controls and displays for the Poolux and an optional chlorine generator are found on the Service Panel inside
of the Poolux System Box. The Chlorine Generator control and display are located on the top portion of the panel, and
the Poolux and display are located on the bottom portion of the panel.
POOLUX SERVICE CONTROL PANEL
Access to the Poolux Service Control Panel
The Poolux Service Control Panel (or “Control Panel”
henceforth) offers direct access to the pool functions and
accessories. The Control Panel controls most (but not all)
of the functions that the Wireless Panel will: change start
and stop times, manually turn accessories on and off, and
so on. This is especially useful to service personnel as the
Control Panel:
1. Provides Access to Pool Accessories without the
Wireless Panel.
This is useful for service personnel who intend to
work on the pool, spa, or Control Panel, yet do not
have access to the Wireless Panel.
2. Acts as a Lock-out Device.
It manually stops all functions of any accessories
connected. In Service Mode, it breaks the link from the
Wireless Panel. A person (for example, from inside the
house) can not resume or activate accessories while the
Control Panel “Service Mode” has been activated.
BUTTON FUNCTIONS ON THE SERVICE CONTROL
PANEL
The following mode functions are viewed in the gray LCD
Pool Control window.
c) Service Time-out: Same as Service Mode, but has a
preset time that can be adjusted from 30 minutes to
4 hours. After that time has elapsed, the control will
default into Automatic mode. To toggle for more (or less)
hours before it resumes to Automatic mode, press the Up
(or Down) arrow on the Control Panel.
Network Button
In Automatic mode, shows “RF NETWORK: D9FE ADD
DEVICE” (D9FE is simply the identification number that
matches the Wireless Panel).
Select Button
Select button corresponds to the Select Button on the
Wireless Panel. Instead of menus, the Control Panel UP and
Down buttons will step through the functions each time the
buttons are pressed.
Force Filter Button
A convenient way to start a filtration cycle without having
to access other menu options is by pressing the Force Filter
button. Once pressed, it activates the filtration cycle until
the regular OFF CYCLE time has been reached. For example,
if the Force Filter button is pressed at 2:00 a.m., and the
filter cycle is set to run from 8:00 a.m. to 3:00 p.m., the filter
will run until the designated OFF time of 3:00 p.m.
Mode Button
CHLORINE GENERATOR
The mode button has three settings that are toggled
every time you press the Mode button. The modes are:
The upper half of the Service Control Panel shows the
Chlorine Generator functions. Once activated, the user can
regulate the amount of time the generator runs by adjusting
the dial. The dial is based on a six minute timer. The
corresponding times of the generator cycling ON and OFF
within the six minutes can be determined as follows:
a) Automatic: The Service Control center is working with
the preset functions designed to regulate your pool/
spa: pumps, filters, chemistry analysis (pH/ORP), freeze
protection, and timing of lights. You can only use your
Wireless Panel when it is in Automatic mode.
b) Service Mode - Device Control: Shuts off all functions
and accessories connected to the Control Panel. Will
stay off until manually resumed. Maintenance can then
be performed. By pressing the Up and Down buttons, the
status is shown on accessories. The wireless panel will
display “Entered Service Mode”.
72
Min: 0% setting x 6 min. = timer is off.
25% settling x 6 min. = 1.5 min. on / 4.5 min. off.
50% setting x 6 min. = 3 min. on / 3 min. off.
75% setting x 6 min. = 4.5 min. on / 1.5 min. off.
100% setting x 6 min. = 6 min. on (continuous running).
POOLUX SERVICE CONTROL PANEL FEATURES
Mode Button
1. “Automatic” Mode.
2. “Service Mode Device Control” shuts off all
accessories until “Automatic Mode” is resumed.
3. “Service Time-out” shuts off accessories for the
specified time limit shown, and “Automatic” Mode will
resume automatically after the time has elapsed.
Chlorine Generator Timer Dial
On
Flow
System Control
Winter Mode
Stand By
1:00
Off
1
Operation
2
Cell Output
Min
Max
Sanitization
Pool Control
Select
Mode
AR
Y
AR
Y
AR
Y
AR
Y
AU
XI
LI
AU
XI
LI
AU
XI
LI
AR
Y
AR
Y
AU
XI
LI
AU
XI
LI
AU
XI
LI
AU
XI
LI
FI
LT
ER
AR
Y
LCD Contrast
Force Filter
Network Button
Toggles to show the mode within
the LCD “Pool Control” panel.
Example: “Automatic” or “RF Network:
Add Device”.
Force Filter Button
Manually starts the Filter
Pump and shuts it off at
the preset OFF Time.
Select Button
Works the same as the
four directional buttons
and Select Button on the
Wireless Panel.
Fig. 35 Service Display Panel Button Functions--Quick Overview
73
The Service Panel (cont’d)
OPTIONAL CHLORINE GENERATOR CONTROL
For detailed explanation and operation
instructions, please refer to your ECOmatic
Owner’s Guide.
Cell Output: Factory preset and self-monitoring. Display
will fluctuate around 100 when producing sanitizer
unless in Winter Mode.
System Control: Varies sanitizer production by turning
cell on and off during filtration pump operation. Set at
maximum for full production.
Stand By: Unit is functioning normally and waiting to
produce sanitizer.
Winter Mode: Electronic control for winter season only.
Cell output will fluctuate around 85.
Operation:
SERVICE MODE
To enter Service Mode, Press Mode once.
In Service mode, all devices shut off, and the
wireless controller is disabled. Service Mode stays
on until manually terminated unless a Service Time
Out period is set.
Press Mode at any time from within the Service Mode to
enter Service Time Out.
When Service Time Out is actuated, the system stays in
Service Mode for the time specified and then switches to
Automatic Mode without a manual button press.
After the Service Time Out period has elapsed, all
automatic control functions will resume. Devices turned
on manually prior to entering Service Mode will not
resume in Automatic Mode.
L ED 1 L ED 2
Green
Green
Red
Green
Red
Red
Normal Operation
Check Salt level/Inspect cell
Unit has shut down. If unit
continues to operate,
damage may result.
Press Mode twice from within the Service Mode to enter
Automatic Mode immediately.
A filter cycle can be initiated manually at any time by
pressing Force Filter on the bottom right of the service
panel. The pool will shut off at the end of the upcoming
filter cycle.
Fig. 36 Service Display Panel,
Pool Control
74
Replacement Poolux Parts List
COMPONENT . . . . . . . . . . . DESCRIPTION
40499 . . . . . . . . . . . . . . . . Actuator 24VA
53963 . . . . . . . . . . . . . . . . Panel Pool Display
54186 . . . . . . . . . . . . . . . . Dolphin II Pool
53770 . . . . . . . . . . . . . . . . Dolphin RF Receiver
71004 . . . . . . . . . . . . . . . . ECS24/36/48 Cell
71111 . . . . . . . . . . . . . . . . Replacement Cell Housing
23427 . . . . . . . . . . . . . . . . Kit Sensor, 10FT AIR POOLUX BAL
23428 . . . . . . . . . . . . . . . . Kit Sensor, 25FT, WTR POOLUX BAL
53980 . . . . . . . . . . . . . . . . KIT pH/ORP Sensor
53692 . . . . . . . . . . . . . . . . System Pool EXP Control
75
balboa instruments, inc.
1382 bell avenue
tustin, ca 92780
www.balboa-instruments.com
76
t 714-384-0384
f 714-384-0338
pn: 40627_A
February 12, 2007