1
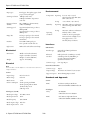
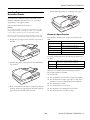
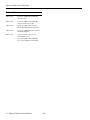
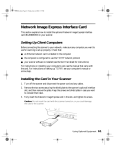
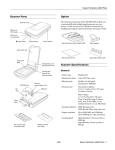
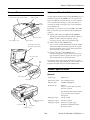
Epson GT-2500 and GT-2500 Plus
Scanner Parts
Option and Bundled Software
Automatic document feeder (ADF)
The Epson Network Image Express Card (B12B808393) is preinstalled in the Epson GT-2500 Plus. It is an option for the
Epson GT-2500. The network card lets you use your scanner
over a network without having to connect the scanner to a
server PC. For details on using the card, see the manual that
comes with the card.
Paper support
Edge
guides
Depending on your scanner version (GT-2500 or GT-2500
Plus), your scanner may come with the following additional
software:
❏ Captiva® ISIS® driver (GT-2500 and GT-2500 Plus)
The Image and Scanner Interface Specification (ISIS) is a
flexible, modular standard for acquiring, viewing,
converting, printing, and storing document images.
Control panel
Transportation lock
Power button
❏ Adobe® Acrobat® (GT-2500 Plus only)
Lets you create and share Adobe PDF documents reliably
and securely. PDF files accurately represent the original
document. Includes robust tools for sharing information
and commenting on electronic files.
Underside of automatic
document feeder (ADF)
❏ ScanSoft® PaperPort® (GT-2500 Plus only)
Document management software that lets you scan your
paper documents and then organize, file, edit, copy, fax,
and e-mail them from one convenient screen.
Document table
To learn more about your software, check the user’s guides
included with them. Captiva ISIS driver, Adobe Acrobat, and
PaperPort all include electronic manuals in PDF format.
Error
light
Scanner Specifications
General
Start button
Ready light
Scanner type
Flatbed color
Photoelectric device
Color CCD line sensor
Effective pixels
10,200 × 14,040 pixels
Document size
Flatbed:
8.5 × 11.7 inches (216 × 297 mm)
US letter or A4 size
Automatic Document Feeder (ADF):
8.5 × 14 inches (216 × 356 mm)
US legal size
Optional interface
card slot
DC power inlet
ADF cable
USB connector
7/06
ADF paper input
Face-up loading
ADF paper output
Face-down ejection
ADF paper capacity
50 sheets of 75 g/m2 paper;
maximum total thickness under
0.2 inches (5 mm)
Epson GT-2500 and GT-2500 Plus - 1
Epson GT-2500 and GT-2500 Plus
Paper types
Bond paper, fine-quality paper, check
paper, and recycled paper
Scanning resolution
1200 dpi (main scan)
1200 dpi with Micro Step Drive™
(sub scan)
Output resolution
(flatbed)
50 to 4800 (in 1 dpi increments),
7200, and 9600 dpi
Scanning speed
Approximately 0.4 msec per line at
300 dpi B/W
Approximately 1.2 msec per line at
300 dpi color
Image data
16 bits per pixel per color internal
16 bits per pixel per color external
(maximum)
Interface
One USB 2.0 Hi-speed port
One optional network card slot
Light source
White cold cathode fluorescent lamp
Environmental
Temperature Operating 41 to 95 °F (5 to 35 °C)
(when scanning with ADF: 50 to
90 °F (10 to 32 °C)
Storage
Humidity
Width: 18.4 inches (468 mm)
Depth: 15.6 inches (395 mm)
Height: 7.9 inches (200 mm)
Weight
Approx. 22 lb (10 kg)
Operating 10 to 80%, without condensation
(when scanning with ADF: 20 to
80%)
Storage
Operating
conditions
10 to 85%, without condensation
Ordinary office or home
conditions. Avoid operating the
scanner in direct sunlight, near a
strong light source, or in
extremely dusty conditions.
Interfaces
USB Interface
Mechanical
Dimensions
–13 to 140 °F (–25 to 60 °C)
Electrical
Interface type
Universal Serial Bus Specification
Revision 2.0
Electrical
standard
Full Speed mode (12 Mbits per second)
and Hi-Speed mode (480 Mbits per
second) of Universal Serial Bus
Specification Revision 2.0.
Connector type
One Type B port
Network Card Interface
Note:
Check the label on the AC adapter or on the back of the scanner for
voltage information.
Scanner
Connector type
50 pin
Output voltage
DC 24.0 to 26.4 V DC 4.75 to 5.25 V
Supported option
Network Image Express Card
Input voltage
DC 24 to 26.4 V
Rated voltage
DC 24 V
Standards and Approvals
Rated current
1.4 A
Scanner
Power consumption
43 W operating with ADF
25 W operating without ADF
15 W stand-by mode
5 W sleep mode
EMC
AC Adapter
AC Adapter (A371B)
Rated input voltage
AC 100 to 120 V
Rated input current
0.8 A
Rated frequency
50 to 60 Hz
Rated output voltage DC 24 V
Rated output current 1.4 A
2 - Epson GT-2500 and GT-2500 Plus
FCC Part 15 Subpart B Class B
CAN/CSA-CEI/IEC CISPR 22 Class B
7/06
Safety
UL 60950-1
CAN/CSA C22.2 No. 60950-1
EMC
FCC Part 15 Subpart B Class B
CAN/CSA-CEI/IEC CISPR 22 Class B
Epson GT-2500 and GT-2500 Plus
Then slide the edge guides over to the edge of the paper.
Loading Documents in the Automatic
Document Feeder
You can load up to 50 sheets of paper in the ADF (a stack
thickness of 0.2 inches [5.0 mm] or less). See “Document
Specifications” to the right for details.
Only load sheets that are all the same size.
Caution:
Do not feed photographs or valuable original artwork into the ADF.
Misfeeding may wrinkle or damage the original. Scan high-quality
color or halftone documents on the document table instead.
Document Specifications
Remove any documents from the document table and make sure
there is no dust on the glass before loading documents in the ADF.
The table below listed the sizes of paper you can load in the
ADF.
1. Extend the paper support at the end of the output tray on
the ADF.
Paper name
Size
Letter
8.5 × 11 inches (215.9 × 279.4 mm)
A4
8.3 × 11.7 inches (210 × 297 mm)
Legal
8.5 × 14 inches (215.9 × 355.6 mm)
B5
7.2 × 10.1 inches (182 × 257 mm)
A5
5.9 × 8.3 inches (148.5 × 210 mm)
Load only documents that meet the following specifications in
the ADF:
2. Slide the edge guides on the input tray of the ADF all the
way outward.
Size
Width: 5.9 to 8.5 inches (148.5 to 215.9 mm)
Length: 5.9 to 14 inches (148.5 to 355.6 mm)
Weight
60 to 105 g/m2
Paper type
High-quality bond paper
Make sure your documents meet the following conditions
before loading them into the ADF:
❏ The ink is dry.
❏ The document has no holes and is not ripped or wrinkled.
❏ The document has no staples, paper clips, or other objects
attached to it; these may damage the feeder mechanism.
❏ The document has no folds.
❏ The document has no cut-out areas.
3. Place your document in the input tray with the printed side
facing up and the top edge facing into the feeder. Slide the
paper into the feeder until it meets resistance.
❏ The document is not a multipart form or bound.
❏ The document has no rear carbon coating.
7/06
Epson GT-2500 and GT-2500 Plus - 3
Epson GT-2500 and GT-2500 Plus
3. If you are scanning multiple documents or photos at once,
position each one at least 0.8 inches (20 mm) away from the
others.
Placing Originals on the Document
Table
1. Open the ADF.
4. Close the ADF gently so that your original does not move.
2. Place your document or photo on the document table, face
down on the glass. Make sure the top of the document or
photo is against the upper left corner of the document table.
Note:
Always keep the document table and the underside of the ADF clean.
See page 9 for instructions.
Do not leave photos on the document table for an extended period of
time as they may stick to the glass.
4 - Epson GT-2500 and GT-2500 Plus
7/06
Epson GT-2500 and GT-2500 Plus
You see the Office Mode window:
Scanning Using the Start Button
To start a basic scan, press the ] Start button on the scanner.
Your computer automatically starts Epson Scan in Office
Mode. From Epson Scan, you can select scan settings, and then
scan and save your image to a file on your computer. See the onscreen User’s Guide for details on using the ] Start button.
Scanning Using Epson Scan
If you want to scan a document and save it directly to a file, you
can start Epson Scan as a “standalone” program.
For instructions on using Office Mode, see the on-screen
User’s Guide.
1. Place your original document on the scanner. See one of
these sections for instructions:
❏ If you are scanning using the ADF, load your document
as described on page 3.
If the Mode setting in the upper right corner of the window is
set to Professional Mode, you see a different Epson Scan
settings window. For instructions on using Professional Mode,
see the on-screen User’s Guide.
Note:
Do not open the ADF while you are scanning or you will see an
ADF error message and paper feeding will stop.
Scanning to a PDF File
❏ If you are scanning from the document table, place your
document or photo as described on page 4.
You can scan multiple pages of a document using the ADF and
save them as one PDF file on your computer. Epson Scan
displays an editing page so you can view the pages as you scan
them and reorder, rotate, or delete them as necessary. You can
also scan one page at a time on the document table and save it as
a PDF file.
2. Do one of the following to start Epson Scan:
Windows®:
Double-click the EPSON Scan icon on your desktop.
Or select Start > All Programs or Programs > EPSON
Scan > EPSON Scan.
Note:
If you are scanning from Adobe Acrobat 7 on a Macintosh® system,
you may not be able to use the ADF to scan multiple pages. Use the
document table to scan your pages individually, or scan multiple
pages using Epson Scan as described on page 6.
Mac OS X:
Open the Applications folder and click the EPSON Scan
icon.
3. Epson Scan starts in Office Mode the first time you open it.
If necessary, click the arrow in the Mode box at the top
right of the Epson Scan window and select Office Mode.
7/06
Epson GT-2500 and GT-2500 Plus - 5
Epson GT-2500 and GT-2500 Plus
5. Click the arrow in the Auto Exposure Type list and select
your original document type; either Document or Photo.
1. Place your original document on the scanner. See one of
these sections for instructions:
❏ If you are scanning using the ADF, load your document
as described on page 3.
6. Click the arrow to open the Image Type list and select the
detailed image type you are scanning:
Note:
Do not open the ADF while you are scanning or you will see an
ADF error message and paper feeding will stop.
❏ If you are scanning from the document table, place your
document as described on page 4.
2. Do one of the following to start Epson Scan:
Windows:
Double-click the EPSON Scan icon on your desktop.
Or select Start > All Programs or Programs > EPSON
Scan > EPSON Scan.
Image Type setting
Type of image you are scanning
48-bit Color
Color photo that you may want to modify
in a 48-bit image-editing program
24-bit Color
Color photo
Color Smoothing
Color graphics, such as a chart or graph
16-bit Grayscale
Black-and-white photo with many shades
of gray
8-bit Grayscale
Black-and-white photo with just a few
shades of gray
Black & White
Document with black text and/or line art
7. Click the arrow next to the Resolution list and select the
number of dots per inch at which you want to scan. See the
table below for some guidelines:
Mac OS X:
Open the Applications folder and click the EPSON Scan
icon.
3. If the Mode setting in the top right of the Epson Scan
window is not set to Professional Mode, click the arrow in
the box and select Professional Mode.
What you will do with the scanned
image
Suggested scan
resolution
Send via e-mail, upload to web, view only
on the screen
96 to 150 dpi
Print, convert to editable text (OCR)
300 dpi
Fax
200 dpi
8. Click the Scan button to scan your document pages.
9. The File Save Settings window appears:
Select PDF as the file type setting. The current Paper Size,
Orientation, Margin, and Compression setting are
displayed below it.
4. If you are scanning using the ADF, select ADF - Singlesided or ADF - Double-sided as the Document Source
setting.
If you are scanning one page on the document table, select
Document Table.
6 - Epson GT-2500 and GT-2500 Plus
7/06
Epson GT-2500 and GT-2500 Plus
13. You see the Editing Page window displaying thumbnail
images of each scanned page:
10. If you need to change any of the current PDF settings, click
the Options button. You see the EPSON PDF Plug-in
Settings window:
Select the settings that match your document and click OK.
You return to the File Save Settings window.
If you want to include all the document pages in your PDF
file as they currently look, go to step 14.
11. When you are finished selecting file settings, click OK.
Epson Scan scans your pages and displays this window:
If you want to include only some of the pages, click the
odd pages or
even pages icons, or click the individual
pages you want to include.
If you want to rotate or delete pages, click the pages or use
the
odd pages,
even pages, or
all pages icon to
select the pages. Then click the left or
right rotate
icon to rotate them or the
delete icon to delete them.
Note:
The
delete icon is not available when all document pages are
selected.
14. When you have finished editing your document pages, click
OK. Your document is saved in a PDF file in the location
you selected.
12. If you have finished scanning your document and want to
view thumbnail images of the scanned pages, click Done
and go to step 13.
15. Click Close to exit Epson Scan.
If you need to load or place more pages for scanning, click
Add page. Then load or place your originals and click
Scan. When you are finished, click Done and go to step 13.
If you have finished scanning and want to save the file
without editing the pages, click Save File and go to step 15.
7/06
Epson GT-2500 and GT-2500 Plus - 7
Epson GT-2500 and GT-2500 Plus
Home Mode
Converting Scanned Documents into
Editable Text
❏ Select Magazine, Newspaper, or Text/Line Art as the
Document Type.
❏ Select Black&White or Color as the Image Type.
You can scan a document and convert the text into data that
you can edit with a word processing program. This process is
called OCR (Optical Character Recognition). To scan and use
OCR, you need to use an OCR program, such as Adobe
Acrobat.
❏ Choose Printer or Other as your Destination setting.
❏ Preview and select your scan area. See the on-screen
User’s Guide for instructions.
Professional Mode
❏ Select ADF - Single-sided, ADF - Double-sided, or
Document Table as the Document Source.
OCR Software Limitations
OCR software cannot recognize handwritten characters, and
certain types of documents or text are difficult for OCR
software to recognize, such as:
❏ Select Document as the Auto Exposure Type.
❏ Select Black&White, 24-bit Color, or 48-bit Color as
the Image Type.
❏ Items that have been copied from other copies
❏ Select 300 dpi as the Resolution.
❏ Faxes
Note:
If the characters in your text are not recognized very well, you
can improve recognition by adjusting the Threshold setting. See
the on-screen User’s Guide for instructions.
❏ Text with tightly spaced characters or line pitch
❏ Text that is in tables or underlined
❏ Cursive or italic fonts, and font sizes less than 8 points
5. Click Scan. Your document is scanned, processed into
editable text, and opened in your OCR program window.
Scanning Using an OCR Program
Follow these steps to scan and convert text using an OCR
program. See your OCR program documentation for detailed
instructions.
6. Follow the instructions in OCR program Help to edit and
save your document.
1. Place your original document on the scanner. See one of
these sections for instructions:
Reading the Scanner Lights
❏ If you are scanning using the ADF, load your document
as described on page 3.
The scanner lights indicate the scanner status.
Note:
Do not open the ADF while you are scanning or you will see an
ADF error message and paper feeding will stop.
❏ If you are scanning from the document table, place your
document as described on page 4.
Ready light
Error light
Meaning
On
Off
Ready to scan images.
Flashing
Off
Initializing or scanning.
On
On
A command error has occurred.
Flashing
Flashing
A fatal error has occurred.
2. Start your OCR program.
If an error occurs, the scanner stops operating and the Ready
and Error lights flash. This indicates one of the following
problems:
3. Start your OCR program’s scan function. Epson Scan starts
in the last mode you used.
4. Select your scan settings as follows, depending on the mode
you are using:
❏ The scanner is not connected to your computer properly or
your software is not fully installed. See the Start Here sheet
that came with your scanner for instructions on installing
the scanner software and connecting the scanner to your
computer.
Office Mode
❏ Select Auto Detect, ADF - Single-sided, ADF Double-sided, or Document Table as the Document
Source.
❏ The scanner transportation lock is locked. Slide the lock to
the unlock position. See the Start Here sheet that came with
the scanner for instructions.
❏ Select Black&White or Color as the Image Type.
❏ Select 300 dpi as the Resolution.
8 - Epson GT-2500 and GT-2500 Plus
7/06
Epson GT-2500 and GT-2500 Plus
After trying these solutions, turn off the scanner using its power
button, then turn it back on. If the Ready and Error lights are
still flashing:
Caution:
Do not press the glass surface of the document table with any
force.
❏ The scanner may be malfunctioning.
Be careful not to scratch or damage the glass surface of the
document table, and do not use a hard or abrasive brush to clean it.
A damaged glass surface can decrease the scan quality.
❏ The scanner lamp may need to be replaced (not a userreplaceable part).
❏ The ADF may be malfunctioning.
Never use alcohol, thinner, or corrosive solvent to clean the
scanner. These chemicals can damage the scanner components
and the case.
Cleaning the Scanner
Be careful not to spill liquid into the scanner mechanism or
electronic components. This could permanently damage the
mechanism and circuitry.
New :For a single scanner
To keep your scanner operating at its best, clean it periodically
using the following procedure.
Do not spray lubricants inside the scanner.
1. Turn off the scanner using its power button.
Never open the scanner case.
2. Unplug the AC adapter cord from the scanner.
3. Clean the outer case with a cloth dampened with mild
detergent and water.
Transporting the Scanner
4. If the glass surface of the document table gets dirty, clean it
with a soft dry cloth. If the glass surface is stained with
grease or some other hard-to-remove material, use a small
amount of glass cleaner and a soft cloth to remove it. Do
not apply cleaner directly to the glass; apply it to the cloth
and then clean the glass. Wipe off any remaining moisture.
Before transporting the scanner for a long distance or storing it
for an extended period of time, you need to lock the scanner’s
carriage to prevent damage.
Make sure that no dust builds up on the surface of the
document table. Dust can cause spots in your scanned
images.
2. When the Ready light is green, turn off the scanner using
it’s power button.
1. Plug in the scanner, connect it to your computer, turn on
the scanner using its power button, and wait until the lights
stop flashing.
3. On the side of the scanner, slide the transportation lock to
the locked position to secure the scanner carriage.
5. If the underside of the ADF gets dirty, clean it as described
in step 4. Also be sure to clean the left side of the document
table.
Underside of
a
the ADF
Left side
of the
b
document
table
4. Attach the protective materials, then repack the scanner in
its original box or a similar box that fits the scanner snugly.
7/06
Epson GT-2500 and GT-2500 Plus - 9
Epson GT-2500 and GT-2500 Plus
Related Documentation
CPD-21597
Epson GT-2500 and GT-2500 Plus
Start Here sheet
CPD-21598
Epson GT-2500 and GT-2500 Plus
Notices and Warranty booklet
CPD-21599
Epson GT-2500 Scanner Software
CD-ROM (English/French/Spanish)
CPD-21662
Epson GT-2500 Plus Scanner Software
CD-ROM (English)
CPD-21821
Notice for Windows XP x64 Users
(GT-2500 Plus only)
—
Epson GT-2500 and GT-2500 Plus
User’s Guide (HTML on CD-ROM)
10 - Epson GT-2500 and GT-2500 Plus
7/06