1
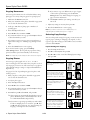
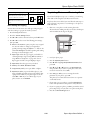
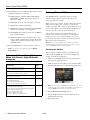
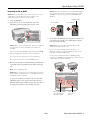
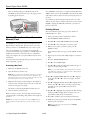
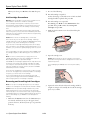
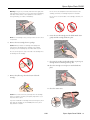
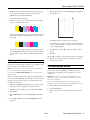
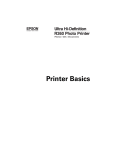
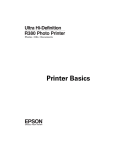
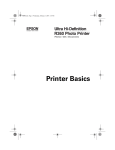
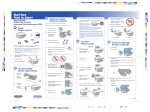
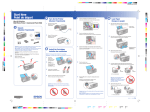
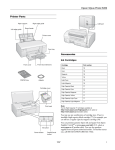
Epson Stylus Photo RX580
AC inlet
Product Parts
Sheet feeder
Feeder guard
Paper
support
Document cover
Edge guide
LCD
screen
Control
panel
USB port
Tray lever
Front tray
Front tray extensions
Document
table
CD/DVD tray
Memory
card
slots
EXT. I/F USB port
®
(for PictBridge or
USB storage devices)
Scanner unit
Infrared port
Copy a photo or document
View and print photos on memory card; scan to card;
print an index sheet; print from an index sheet;
play a slide show of photos on card
Cartridge cover
Display 1 or 9 photos;
crop or zoom a photo
Stop printing or
copying; cancel
settings
Check ink status; replace ink cartridges;
maintain the RX580; adjust CD/DVD print position;
backup photos; restore default settings;
make PictBridge or Bluetooth® settings
Print on CD/DVDs;
reprint or restore photos;
print photo greeting cards
11/06
Epson Stylus Photo RX580 - 1
Epson Stylus Photo RX580
Epson Media
Accessories
Ink Cartridges
Cartridge
Part number
Black
78 (T078120)
Cyan
78 (T078220)
Magenta
78 (T078320)
Yellow
78 (T078420)
Light Cyan
78 (T078520)
Light Magenta
78 (T078620)
High-Capacity Black
77 (T077120)
High-Capacity Cyan
77 (T077220)
High-Capacity Magenta
77 (T077320)
High-Capacity Yellow
77 (T077420)
High-Capacity Light Cyan
77 (T077520)
High-Capacity Light Magenta
77 (T077620)
Paper name*
Size
Part number
Epson Ultra Premium
Photo Paper Glossy
Borderless 4 × 6 inches
S041934
Letter (8.5 × 11 inches)
S041935
Borderless 4 × 6 inches
S041808
S041727
Epson Ultra Premium
Glossy Photo Paper
Epson Premium Photo
Paper Glossy
Borderless 5 × 7 inches
S041464
Borderless 8 × 10 inches
S041465
Letter (8.5 × 11 inches)
S041286
S041667
Borderless 4 × 6 inches
S041982
Letter (8.5 × 11 inches)
S041331
Epson Photo Paper Glossy Borderless 4 × 6 inches
S041809
Letter (8.5 × 11 inches)
S041141
S041649
S041271
Letter (8.5 x 11 inches)
S041405
Letter (8.5 × 11 inches)
S041586
Epson Premium
Presentation Paper Matte
Borderless 8 × 10 inches
S041467
Letter (8.5 × 11 inches)
S041257
Epson Matte Paper
Heavyweight
Legal (8.5 × 14 inches)
S041067
Epson Premium
Presentation Paper Matte
Double-sided
Letter (8.5 × 11 inches)
S041568
Letter (8.5 × 11 inches)
S041062
Epson Iron-on Cool Peel
Transfer paper
Letter (8.5 × 11 inches)
S041153
Epson Photo Quality Self
Adhesive Sheets
A4 (8.3 × 11.7 inches)
S041106
Epson Premium Glossy
Photo Paper
Epson Premium Photo
Paper Semi-gloss
Epson Premium
Semigloss Photo Paper
Epson Glossy Photo Paper
Caution: To ensure good results, use genuine Epson cartridges
and do not refill them. Other products may cause damage to your
RX580 not covered by Epson’s warranties.
Epson Ultra Premium
Photo Paper Luster
Don’t use an ink cartridge beyond the expiration date on the
package.
Epson Premium Luster
Photo Paper
Note: Try the High-Capacity 77 cartridges available at
http://www.epson.com/highcapacity (U.S. sales) or
http://www.epson.ca (Canadian sales).
Epson Bright White Paper
Epson Premium Bright
White Paper
Epson Double-sided Matte
Paper
Epson Presentation Paper
Matte
Epson Photo Quality Ink
Jet Paper
*
2 - Epson Stylus Photo RX580
11/06
Availability of paper types varies by location
Epson Stylus Photo RX580
Product Specifications
Printing
Printing method
On-demand ink jet
Ink Configuration Six individual ink cartridges in black,
cyan, magenta, yellow, light cyan, and
light magenta
Scanning
Scanner type
Flatbed color
Photoelectric
device
CIS
Effective pixels
10,200 × 14,040 pixels at 1200 dpi
Document size
US letter size or A4 (8.5 × 11.7 inches)
Scanning
resolution
1200 dpi (main scan)
2400 dpi (sub scan)
Mechanical
Paper feed
Friction
Paper path
Sheet feeder, top entry
CD/DVD tray, front entry
Sheet feeder
capacity
Output resolution 50 to 4800, 7200, and 9600 dpi
(50 to 4800 dpi in 1 dpi increments)
Scanning speed
1200 dpi B/W:
Approximately 10 msec per line
1200 dpi Color:
Approximately 28 msec per line
About 120 sheets
Dimensions
Storage
Printing
Weight
Width: 17.7 inches (450 mm)
Depth: 16.3 inches (414 mm)
Height: 8.3 inches (210 mm)
Width: 17.7 inches (450 mm)
Depth: 21.0 inches (534 mm)
Height: 11.1 inches (281 mm)
Image data
8 bits per pixel per color external
(maximum)
Light source
Ink Cartridges
Black, cyan, magenta, yellow, light cyan
light magenta
Cartridge life
Within 6 months after opening package,
at 77 °F (25 °C)
Dimensions
(W × D × H)
Storage
temperature
Freezing
temperature*
*
Rated Voltage
100-120 V Model 220-240 V Model
Input voltage range*
AC 90 to 132 V
Rated frequency range
50 to 60 Hz
Input frequency range
49.5 to 60.5 Hz
Rated current
0.6 A
(max. 1.2 A)
Power
consumption
0.5 × 2.7 × 1.9 inches
(12.7 × 68.0 × 47.0 mm)
–4 to 104 °F (–20 to 40 °C) (installed)
-22 to 104 °F (–30 to 40 °C) (packing
storage)
1 month at 104 °F (40 °C)
3.2 °F (–16 °C)
RGB three color LED
Electrical
18.3 lb (8.3 kg) without ink cartridges
Colors
16 bits per pixel per color internal
*
AC 198 to 264 V
0.3 A
(max. 0.6 A)
ISO/IEC10561
Letter Pattern
Approx. 16 W
Low power
mode
Approx 5.5 W
Sleep mode
Approx. 2.5 W
Approx. 2.7 W
Power off
mode
Approx. 0.2 W
Approx. 0.3 W
Check the label on the back of the RX580 for its voltage.
Environmental
Temperature
Ink thaws and is usable after approximately 3 hours at
77 °F (25 °C)
Caution: To ensure the best results, use genuine Epson cartridges
and do not refill them. Other products may cause damage to your
RX580 not covered by Epson’s warranties. Don’t use an ink
cartridge beyond the expiration date on the package.
11/06
Operation
50 to 95 °F (10 to 35 °C)
Storage
–4 to 104 °F (–20 to 40 °C)
1 month at 104 °F (40 °C)
Epson Stylus Photo RX580 - 3
Epson Stylus Photo RX580
Humidity (without condensation)
A
The minimum top margin is 0.12 inch (3.0 mm).
Operation
20 to 80% RH
B-L
The minimum left margin is 0.12 inch (3.0 mm).
Storage
5 to 85% RH
B-R
The minimum right margin is 0.12 inch (3.0 mm).
C
The minimum bottom margin is 0.12 inch (3.0 mm).
D-L
The minimum left margin is 0.20 inch (5.0 mm).
D-R
The minimum right margin is 0.20 inch (5.0 mm).
E
The minimum bottom margin is 0.79 inch (20.0 mm).
Interfaces
USB 2.0 Hi-Speed (Device Class for computers), based on
Universal Serial Bus Specifications Revision 2.0; 480Mbps
USB 2.0 Hi-Speed (Mass Storage Class for external storage
devices)
Bluetooth® Ver. 2.0+EDR (option)
IrDA Ver. 1.3
* When you print with the borderless feature, print quality may
decline in the expanded area. Before printing large jobs using the
borderless setting, print a single sheet to confirm printout quality.
Note: Always load paper into the sheet feeder with the short edge
first. Load envelopes flap edge left with the flap side down.
Safety Approvals
Memory Cards
Safety standards
UL 60950-1
CAN/CSA-22.2 No.60950-1
EMC
FCC part 15 Subpart B class B
CAN/CSA-CEI/IEC CISPR 22 Class B
Compatible memory cards:
Slot
Type of Card
Top slot
xD-Picture Card™
xD Picture Card Type M
xD-Picture Card Type H
™
MagicGate Memory Stick
MagicGate Memory Stick Duo*
Memory Stick™
Memory Stick Duo™*
™
Memory Stick PRO
Memory Stick PRO Duo™*
MultiMediaCard
™
SD Memory Card
SDHC Memory Card
™
miniSD card*
miniSDHC card*
microSD card*
microSDHC card*
Bottom slot
CompactFlash
™
Microdrive
Paper
Paper
Type
Specifications
Single sheets
Plain bond
paper or special
paper
distributed by
Epson
Thickness: 0.003 to 0.004 inch (0.08
to 0.11 mm) for plain bond paper
Plain bond
paper
Weight: 20 lb to 24 lb (75 g/m² to 90
g/m²)
Envelopes
Weight: 17 lb to 24 lb (64 g/m² to 90
g/m²) for plain bond paper
Printable area
Normal
Borderless*
* User-supplied adapter required
Envelopes
4 - Epson Stylus Photo RX580
11/06
®
Epson Stylus Photo RX580
Memory card slots:
CF Type II card slot
Compatible with CF+ and CompactFlash
Specification 3.0 cards
Memory Stick/Memory
Stick PRO card slot
Compatible with Memory Stick Standard
version 1.42-00 or Memory Stick Standard
Memory Stick PRO Format Specifications
version 1.02-00 cards
SD/MMC card slot
Compatible with SD Memory Card
Specifications / PART1. Physical Layer
Specification Version 2.0 cards and
MultiMediaCard Standard Version 4.1 cards
xD-Picture card Slot
Compatible with xD-Picture card, Card
Specification Version 1.20 Type M and
Type H cards
Voltage requirements
3.3 v
Maximum current is 500mA
Memory card image file requirements:
Compliant with DCF version 1.0 or 2.0
File format
JPEG or TIFF, DOS FAT (FAT 12 or 16, one partition)
taken with a DCF version 1.0 or 2.0 compliant digital
camera
Supports Exif version 2.21
80 × 80 pixels to 9200 × 9200 pixels
Number of files
Up to 999
❏ Load the printable side face-up. It’s often brighter or whiter
than the other side.
❏ Always load the short edge first, even when printing in
landscape mode.
❏ Load letterhead or preprinted paper into the RX580 top
edge first.
❏ If you experience paper feeding problems, try loading fewer
sheets.
❏ If you’re using special paper, follow the instructions that
came with it.
Copying Without a Computer
Media format
Image size
❏ Don’t load paper above the arrow mark on the left edge
guide. Make sure the paper is under the tabs on the left and
right edge guides.
Placing the Original on the Glass
1. Open the document cover and place your original
face-down on the glass, in the upper left corner.
Paper Loading Guidelines
You can load up to 120 sheets of plain paper. You can load the
following number of sheets of Epson special media:
Paper type
Loading
capacity
Epson Presentation Paper Matte
Epson Photo Quality Ink Jet Paper
100 sheets
Epson Bright White Paper
Epson Premium Bright White Paper
80 sheets
Epson Ultra Premium Photo Paper Glossy
Epson Ultra Premium Glossy Photo Paper
Epson Premium Photo Paper Glossy
Epson Premium Glossy Photo Paper
Epson Premium Photo Paper Semi-gloss
Epson Premium Semigloss Photo Paper
Epson Photo Paper Glossy
Epson Glossy Photo Paper
Epson Premium Presentation Paper Matte
Epson Matte Paper Heavyweight
Epson Premium Presentation Paper Matte Double-sided
Epson Double-sided Matte Paper
Epson Ultra Premium Photo Paper Luster
Epson Premium Luster Photo Paper
20 sheets
Epson Iron-on Cool Peel Transfer paper
Epson Photo Quality Self Adhesive Sheets
One sheet
2. Close the document cover gently so that your original
doesn’t move.
Caution: Never open the document cover beyond where it stops
and do not place heavy objects on top of the RX580.
If you need to press the document flat while you copy it, do not
press too hard and be careful not to move it.
Note: If you need to copy a thick or large document, you can
remove the document cover. Just open it and pull it straight up.
When you are done, replace the document cover by inserting the
tabs back into the slots.
11/06
Epson Stylus Photo RX580 - 5
Epson Stylus Photo RX580
❏ If you want to copy on a different size or type of paper,
or select other special settings, press the x Print
Settings button. See “Print Settings for Copying” on
page 7 for more information.
Copying Documents
You can copy documents in color or black and white, using
plain paper or a variety of Epson papers for special projects.
1. Make sure the RX580 is turned on.
2. Place your document on the glass as described on page 5. Be
sure to close the document cover.
❏ The RX580 remembers your settings, even after you
turn it off.
7. Adjust any settings as necessary, then press OK.
3. Load up to 120 sheets of plain paper or 20 sheets of
specialty paper.
8. Press the x Start button to start copying.
4. Press the Copy mode button.
Note: If you want to restore the color in faded photos, see
“Reprinting Photos and Restoring Color” on page 7.
5. Press l or r to choose Color or B&W.
6. If you want more than one copy, press the Copies + button
to select the number you want.
Selecting Copy Settings
7. If you want to resize your copy, print on special paper, or
adjust other settings, see “Selecting Copy Settings” on the
right.
You can select special settings for copying on various sizes and
types of paper, reducing or enlarging your original, or other
types of copies. The settings you select will be saved, even after
you turn off the RX580.
8. Press the x Start button to start copying.
Layout Settings for Copying
If you need to cancel copying, press the y Stop/
Clear Settings button. Do not pull out paper that is being
1. Press the Copy mode button.
printed; it will be ejected automatically to the front tray.
Note: The copies may not be exactly the same size as the original.
2. Press d to select Layout, then press r.
3. Press u or d to select one of the following layout settings,
then press OK.
Copying Photos
Layout Setting for Copying
You can copy a photograph on 4 × 6, 5 × 7, 8 × 10, or
8.5 × 11-inch paper. You can easily resize your photo to fit on
any size paper you want to use. The easiest way to copy photos
(using default settings) is using 4 × 6 Epson Premium Photo
Paper Glossy.
Border
Copies your original with a standard
3-mm margin.
Borderless
Copies your photo all the way to the
edges of the paper (on Epson photo
papers only). Your image is slightly
expanded and cropped to fill the page.
See page 2 for a list of special Epson papers for photos and
creative projects.
1. Place your photo on the glass as described on page 5. Be
sure to close the document cover.
CD/DVD Copy
Copies onto a CD or DVD. See your
printed Basics Guide for more
information.
2. Load your photo paper.
3. Press the Copy mode button.
4. Press l or r to choose Color or B&W.
5. If you want more than one copy, press the Copies + button
to select the number you want.
Wallet Copy
Makes wallet-sized copies of your
original; 9 copies on letter-sized paper
or as many will fit on smaller sheets.
6. Press d, then press r, select Photo, and press OK.
❏ These settings are automatically selected when you copy
photos: Borderless prints, automatically sized to fit on
4 × 6-inch Premium Photo Paper Glossy.
2-up Copy
Copies two letter-size originals onto
one sheet. After the first original is
scanned, you place the second one on
the glass. Then both originals are
copied on one sheet of paper.
❏ If you want to copy using a special layout, such as white
borders or multiple photos on one sheet, press d, then
press r and select your layout. See “Layout Settings for
Copying” on the right for more information.
6 - Epson Stylus Photo RX580
11/06
Result
Epson Stylus Photo RX580
Layout Setting for Copying
Result
Reprinting Photos and Restoring Color
Repeat Copy
Prints a photo at actual size as many
times as it will fit on one sheet.
If you have faded photos (up to 5 × 7 inches), you can bring
them back to life using the Color Restoration feature.
Repeat-4
Prints a photo four times on one
sheet.
For photos that are not faded, you can follow the same steps to
crop and resize your pictures or even change a color photo to
black and white.
Print Settings for Copying
1. Place one or two photos on the scanner glass in the
direction shown, making sure they are at least 1/4 inch apart
and 1/4 inch from the edges of the glass.
You can choose from various sizes and types of Epson paper
and other settings to get just the results you want.
1. Press the Copy mode button.
2. Press the x Print Settings button.
3. Press u or d to select a menu item, then press the r button.
4. Press u or d to select one of the following print settings,
then press OK.
1/4 inch
❏ Zoom: Select Actual to print your photo at its original
size. You can reduce or enlarge your original by a
specific percentage using the Copies + or – buttons. Or
select Auto Fit Page for borderless printing and resizing
the image to fit standard paper sizes.
1/4 inch
1/4 inch
❏ Paper Type: Select the type of paper you loaded. See
“Selecting the Paper Type Setting When You Print or
Copy Without a Computer” on page 8 for a list of
Epson papers and the corresponding Paper Types.
2. Load your photo paper.
❏ Paper Size: Select the paper size you loaded.
4. Press l or r to highlight Reprint/Restore Photos, then
press OK.
❏ Quality: Select Draft, Standard or Best.
❏ Copy Density: Make your copies darker or lighter.
❏ Expansion: When you print borderless photos, your
image is slightly expanded and cropped to fill the sheet
of paper. If too much of your photo edges are cut off,
select Mid or Min. If you see a white edge on your
photo, leave it set on Standard.
3. Press the Specialty Print button.
5. Press r, use the u or d buttons to set Restoration On,
then press OK. (If you want to reprint photos that don’t
need color restoration, choose Off).
6. Press OK again. When you see a message about the
placement of your photos, press OK.
The photo(s) are scanned and restored. You see a preview
on the LCD screen.
7. If you want to crop your photo, press the Display/Crop
button and adjust the size and position of the yellow box.
8. If you’re copying two photos, press r to preview the second
photo. Repeat step 7 if you want to crop the second photo.
9. Press the x Print Settings button.
11/06
Epson Stylus Photo RX580 - 7
Epson Stylus Photo RX580
10. Press u or d to choose from the settings listed below, then
press r. Press OK when you are done.
❏ Paper Type: choose Prem. Glossy, Ultra Glossy,
Photo Paper, or Matte, depending on the type of
paper you’re using.
❏ Paper Size: choose the size of the paper you loaded.
❏ Layout: choose Border or Borderless.
❏ Quality: this setting can’t be changed from Standard
when you are reprinting or restoring photos.
❏ Color Effect: choose Off (to print in color) or B&W (to
print in black and white).
❏ Expansion: When you print borderless photos, your
image is slightly expanded and cropped to fill the sheet
of paper. If too much of your photo edges are cut off,
select Mid or Min.
11. Press the x Start button to print your photo or photos.
Note: If you need to cancel printing, press the y Stop/
Clear Settings button.
Selecting the Paper Type Setting
When You Print or Copy Without a
Computer
Printing CDs and DVDs
Your RX580 includes a special tray that lets you print
customized text, graphics, and photos directly on any
ink jet-printable CD or DVD.
When you use your computer, the Epson Print CD software
makes it easy to import your own photos, add text, and
modify your designs with a variety of special effects. You can
print on both regular 12-cm and 8-cm CDs and DVDs. See
your on-screen User’s Guide for more information.
You can also print photos and designs without using a
computer. You can either scan a photo (or other printed
image) and copy it onto the CD or DVD, or you can use
photos from your camera’s memory card. See your printed
Basics Guide for more information.
Caution: Use only ink jet-printable CDs and DVDs for printing.
Thermal-printable and regular CDs and DVDs should not be used
with your RX580; otherwise the ink may smear.
Cleaning the Rollers
Before you print on CDs or DVDs, you should clean the
rollers inside the RX580. You can do this by feeding and
ejecting several sheets of plain paper.
1. Make sure your RX580 is turned on and several sheets of
letter-size plain paper are loaded.
2. Make sure there are no documents on the document table.
For this paper
Select this
setting
Epson Premium Photo Paper Glossy
Epson Premium Glossy Photo Paper
PremGlossy
Epson Ultra Premium Photo Paper Glossy
Epson Ultra Premium Glossy Photo Paper
UltraGlossy
Epson Photo Paper Glossy
Epson Glossy Photo Paper
Photo Paper
Plain paper
Epson Bright White Paper
Epson Premium Bright White Paper
Epson Iron-on Cool Peel Transfer Paper
Plain Paper
Epson Premium Presentation Paper Matte
Matte
Epson Matte Paper Heavyweight
Epson Premium Presentation Paper Matte Double-sided
Epson Double-sided Matte Paper
Epson Presentation Paper Matte
Epson Photo Quality Ink Jet Paper
Epson Photo Quality Self Adhesive Sheets
3. Press the Copy button. You see the following LCD screen:
Note: If you don’t use your RX580 for several minutes, the LCD
screen turns off to save energy. If this happens, you may have to
press the Copy button twice to see the screen above.
4. Press the y Stop/Clear Settings button.
5. Press the Copies + button four times. The LCD screen
should indicate five copies.
6. Press the x button.
8 - Epson Stylus Photo RX580
11/06
Epson Stylus Photo RX580
Inserting a CD or DVD
Caution: Make sure you always use the small CD/DVD adapter
when you print on 8-cm CDs or DVDs and that the CD or DVD
and adapter lie flat on the tray; otherwise the RX580 may be
damaged.
Caution: Make sure the data, music, or video is burned on your CD
or DVD before you print. Otherwise, dirt or scratches on the
surface may cause errors when you burn the data.
CD/DVD adapter
1. Turn your RX580 on.
2. Open the front cover, then set the front tray to the
CD/DVD position by pushing the tray lever down.
12-cm CD/DVD
8-cm CD/DVD
4. Gently insert the CD/DVD tray along the base of the front
tray until the arrow marks on the CD/DVD tray and the
front tray match each other.
Caution: Make sure both sides of the CD/DVD tray slide
underneath the tabs on the front tray.
Caution: Before you move the tray lever, make sure no paper or
other objects are on the front tray and the front tray is not
extended.
Be sure to insert the CD/DVD tray while the power is on.
Otherwise, automatic print position adjustment may not take
place after inserting the CD/DVD tray.
If you’ve just turned the RX580 on, make sure the green P On
light has stopped flashing before you move the tray lever.
Do not insert the CD/DVD tray while the RX580 is printing;
otherwise, your RX580 may be damaged or the surface of the CD
or DVD may become dirty or scratched.
Do not touch the front tray when you move the tray lever.
Do not move the tray lever while the RX580 is printing.
3. Place the CD or DVD on the CD/DVD tray with the white
or printable side face-up. Make sure the disc lies flat in the
tray.
Note: Use one CD/DVD at a time.
Caution: Before you position the CD or DVD, make sure that no
foreign particles or substances are on the CD/DVD tray, as these
may damage the disc’s data side.
To print on a small CD or DVD (8-cm), place the small
CD/DVD adapter on the tray first, then place the CD or
DVD inside the adapter. Make sure the tabs on the edge of
the adapter fit squarely into the molding of the tray.
Make sure the CD/DVD
tray slides under the
tab (on both sides)
11/06
Make sure the
arrow marks
match
Epson Stylus Photo RX580 - 9
Epson Stylus Photo RX580
After you finish printing on a CD/DVD, remove the
CD/DVD tray and set the front tray to the paper position
by pushing up the tray lever.
If your RX580 is connected to a computer running Windows
2000 or XP, never turn off the RX580 or disconnect the USB
cable when a memory card is inserted; you may lose photos on
the card.
On a Macintosh, always drag the memory card icon on the
desktop into the trash to eject the card before you turn off the
RX580 or unplug the USB cable. Otherwise, you may lose
photos on the card.
Printing Photos
The View and Print option lets you preview and choose
individual photos to print.
Printing Photos from Your Camera’s
Memory Card
1. Insert your memory card as described on the left.
2. Press the Memory Card mode button.
3. Press l or r to select View and Print, then press OK.
The RX580 lets you print color photos directly from your
digital camera’s memory card; just insert it into one of the
memory card slots on the RX580 and you’re ready to print.
The color and lighting in your images are automatically
corrected. You can also crop your photos, manually adjust the
brightness and contrast, and correct red eyes—all without
using your computer! See your printed Basics Guide for more
information.
You can use the cards and image file types shown in “Memory
Cards” beginning on page 4.
Inserting the Card
4. Press l or r to choose the photo you want to print.
5. When you see a photo you want to print, press the
Copies + button.
If you want more than one copy, press the Copies + button
again.
6. Repeat steps 4 and 5 for each additional photo you want to
print.
7. Press the x Print Settings button.
8. Press r to choose Paper Type.
9. Press u or d to select the setting that matches the type of
paper you loaded, then press OK.
1. Make sure the RX580 is turned on.
Note: See “Selecting the Paper Type Setting When You Print or
Copy Without a Computer” on page 8 for a list of Epson papers
and the corresponding Paper Types.
2. Open the memory card slot cover.
Caution: If your card requires an adapter, make sure you insert it
into the adapter before you insert it in the slot. Otherwise, the
card may get stuck in the slot. Do not insert more than one card
at a time, and do not force the card into the slot.
3. Make sure the memory card access light is off and that no
cards are in any of the slots, then insert your card into the
correct slot. See page 4 for details.
The memory card access light flashes and then stays on.
4. Close the memory card slot cover.
When you want to remove the card, make sure the memory
card access light is not flashing, then pull the card straight out
of its slot.
Caution: Do not remove the card or turn off the RX580 while the
memory card access light is flashing; you may lose photos on the
card.
10. Press d to highlight Paper Size, then press r to display a
list of sizes. Press u or d to choose your paper size, then
press OK.
11. Press d to highlight Layout, then press r to display a list of
layouts. Press u or d to choose your layout option, then
press OK. See your printed Basics Guide for more
information.
12. Press d or u to highlight other settings in the Print Settings
list, then press r to display the list of options. See your
printed Basics Guide for more information.
13. Press OK to confirm your print settings and selections.
14. Make sure you have paper loaded, then press the x Start
button to print your photos.
Note: If you need to cancel printing, press the y Stop/
Clear Settings button.
10 - Epson Stylus Photo RX580
11/06
Epson Stylus Photo RX580
You see a window like this one:
To select photos for printing, you can also view multiple
photos at once on the LCD screen, print an index sheet, or use
your camera’s DPOF function (if supported by your camera).
See your printed Basics Guide for more information.
You can also print all of the photos on your memory card at
once or print all of the photos taken on specific dates. See your
printed Basics Guide for more information.
Printing From Other Devices
You can print photos by directly connecting a PictBridge- or
USB DIRECT-PRINT™-compatible digital camera or
mobile phone, or a data storage device such as a USB flash
drive. See your printed Basics Guide for more information.
If your mobile phone, PDA, or other device supports infrared
transmission, you can send your photos to the RX580 and
print them wirelessly. See your printed Basics Guide for more
information.
Using the optional Epson Bluetooth Photo Print Adapter, you
can also print wirelessly from a Bluetooth-enabled PDA,
mobile phone, or computer. For more information, see the
on-screen User’s Guide.
To see the part numbers for the ink cartridges currently
installed in your RX580, click Information.
❏ Macintosh OS X: Open the Applications folder and select
EPSON Printer Utility2. Select SP RX580 Series in the
printer list, click OK, and select EPSON StatusMonitor.
You see a window like this one:
Replacing an Ink Cartridge
When you print with low or expended ink cartridges, you see
a message on the LCD screen telling you which cartridges are
low or expended.
You’ll also see a message on your computer screen telling you
which cartridge is low or expended.
When a cartridge is more than six months old, you may need
to replace it if printouts don’t look their best. If the quality
doesn’t improve after cleaning and aligning the print head,
you can replace the cartridge even if it is not expended.
Checking the Ink Supply
To check the ink supply, do one of the following:
Click a cartridge image to display information about the
cartridge.
❏ Using the buttons on the RX580: Press Setup, press l or
r to select Ink Cartridge Status, then press OK.
❏ Windows: Double-click the icon on your taskbar (in the
lower right corner of your screen).
You see a screen showing the status of the ink cartridges:
11/06
Epson Stylus Photo RX580 - 11
Epson Stylus Photo RX580
When you’re done, press l or r to select OK, then press
OK.
2. Do one of the following:
❏ If an ink cartridge is expended:
Look at the message on the LCD screen to find out which
cartridge should be replaced, then press OK.
Ink Cartridge Precautions
Warning: Keep ink cartridges out of the reach of children. Do not
allow children to drink from or handle the cartridges.
❏ If an ink cartridge is not expended:
Press Setup, press l or r to select Maintenance, then
press OK. Then press u or d to select Change Ink
Cartridge, and press OK.
The ink cartridges are designed to contain any excess ink and
prevent leakage. Careful handling is recommended, however. Do
not touch the supply port of the ink cartridge or its surrounding
area.
If ink gets on your hands, wash them thoroughly with soap and
water. If ink gets in your eyes, flush them immediately with water.
If discomfort or vision problems continue after a thorough flushing,
see a doctor immediately.
3. Make sure the document cover is closed, then lift up the
scanner unit.
Caution: Don’t remove the cartridge label, or ink will leak.
Don’t remove the green IC chip from the cartridge. Installing a
cartridge without an IC chip can damage the RX580. Avoid touching
the green IC chip, as this can damage the ink cartridge.
If you remove an ink cartridge temporarily, protect the ink supply
port on the bottom of the cartridge from dirt and dust. Place it in a
small box, or, if you have the original packaging, return it to its own
box.
Store ink cartridges in the same environment as the RX580. Stand
the cartridges upright; the label identifying the color should be on
top.
4. Open the cartridge cover.
Note: You cannot continue printing or copying with one ink
cartridge expended, even if the other cartridges still contain ink.
Before printing, replace the expended cartridge.
Caution: Never attempt to open the cartridge cover while the
print head is moving; wait until the cartridges have moved to the
replacement position.
This RX580 uses ink cartridges equipped with IC chips that monitor
the amount of ink used by each cartridge. Cartridges are usable
even if they are removed and reinserted. Some ink is consumed
each time cartridges are inserted, however, because the RX580
automatically checks their reliability.
To avoid damaging the RX580, never move the print head by
hand.
If you remove a cartridge that is low (for which you have received
an “Ink low” message) and you temporarily install a new cartridge
in its place, you cannot reuse the low cartridge.
Ink is consumed during the following operations: print head
cleaning, self-cleaning (performed when the RX580 is turned on),
and ink charging (when an ink cartridge is installed).
Removing and Installing Ink Cartridges
Note: Do not open ink cartridge packages until you are ready to
install the ink. Cartridges are vacuum packed to maintain reliability.
Caution: Leave the expended cartridge installed until you have
obtained a replacement, or the ink remaining in the print head
nozzles may dry out. To ensure the best results, use genuine Epson
ink cartridges and do not refill them. Other products may cause ink
spills or other damage to your RX580 not covered by Epson’s
warranty.
5. Squeeze the tab at the back of the used cartridge and lift it
straight out. Dispose of it carefully. Don’t take the cartridge
apart or try to refill it.
1. Make sure the RX580 is turned on, the CD/DVD tray is
not inserted, and the front tray is in the paper (lower)
position. If it is not, lift the tray lever up to reposition the
front tray.
12 - Epson Stylus Photo RX580
11/06
Epson Stylus Photo RX580
Do not remove the transparent seal from the bottom of the
cartridge; otherwise, the cartridge may become unusable.
Warning: If ink gets on your hands, wash them thoroughly with
soap and water. If ink gets in your eyes, flush them immediately
with water. If discomfort or vision problems continue after a
thorough flushing, see a doctor immediately.
Note: If an ink cartridge is low, you may continue to use it until it
is expended.
Do not remove or tear the label on the cartridge; otherwise, ink
will leak.
8. Lower the new ink cartridge into the holder. Push down
gently until the cartridge clicks into place.
6. Remove the new cartridge from its package.
Caution: Always install an ink cartridge immediately after
removing the old cartridge. If the cartridge is not installed
promptly, the print head may dry out and be unable to print.
Do not touch the green IC chip on the side of the cartridge. This
can damage the ink cartridge.
9. If you need to replace another ink cartridge, repeat steps 5
through 8 before continuing with step 10.
10. Close the cartridge cover and press it until it clicks into
place.
7. Remove the yellow tape from the bottom of the ink
cartridge.
11. Close the scanner unit.
Caution: You must remove the yellow tape from the cartridge
before you install it; otherwise, print quality may decline or you
may not be able to print.
If you have installed an ink cartridge without removing the yellow
tape, take the cartridge out of the RX580, remove the yellow
tape, and then reinstall it.
11/06
Epson Stylus Photo RX580 - 13
Epson Stylus Photo RX580
12. Press OK.
Checking the Print Head Nozzles
The RX580 begins charging the ink delivery system and the
message “Charging Ink. Please Wait” appears on the LCD
screen.
1. Make sure the RX580 is turned on but not printing, and no
warnings or errors are displayed on the LCD screen.
After about one minute, the message “Ink cartridge
replacement is complete” appears on the LCD screen.
3. Press the Setup button.
2. Make sure letter-size plain paper is loaded in the RX580.
4. Press l or r to select Maintenance, then press OK.
Caution: Do not turn off the RX580 during ink charging or you’ll
waste ink.
5. Press u or d to select Nozzle Check, then press OK.
Do not insert the CD/DVD tray until ink charging is complete.
6. Press the x Start button.
Note: If you had to replace an ink cartridge during copying, the
documents or photos on the document table may have moved
slightly when you opened and closed the scanner unit. To ensure
copy quality, after ink charging is finished, press the y Stop/
Clear Settings button to cancel the job that is copying and start
again.
7. The nozzle check pattern prints:
Print head does
not need to be
cleaned:
Print head needs
to be cleaned:
Cleaning the Print Head
If your printouts are unexpectedly light or faint, or you notice
light or dark bands across your printout, you may need to
clean the print head. This unclogs the nozzles so they can
deliver ink properly.
8. If there are no gaps or lines, the print head does not need to
be cleaned. Press OK to return to the Maintenance menu.
If there are gaps or lines, or the test patterns are faint, follow
the steps in “Cleaning the Print Head” below to clean the
nozzles.
Note: Print head cleaning uses ink, so clean the print head only
when print quality declines (for example, if you see lines in your
printout or colors are incorrect or missing).
Before you clean the print head, check the print head nozzles to
confirm that the print head needs to be cleaned. This saves ink. For
more information, see “Checking the Print Head Nozzles” on the
right.
If error messages indicating ink expended or ink low appear on the
LCD screen, you cannot clean the print head. Replace the
appropriate ink cartridge first.
Caution: If you don’t use your RX580 often, it is a good idea to print
a few pages at least once a month to maintain good print quality.
Before you check the print head nozzles or clean the print
head, make sure the CD/DVD tray is not inserted in the
RX580, and make sure the front tray is in the paper (lower)
position. If it is not, lift the tray lever up to reposition the front
tray.
Cleaning the Print Head
1. Make sure the RX580 is turned on but not printing, and no
warnings or errors are displayed on the LCD screen. (If
error messages indicating ink expended or ink low appear
on the LCD screen, you need to replace a cartridge as
described on page 11.)
2. Press the Setup button.
3. Press l or r to select Maintenance, then press OK.
4. Press u or d to select Head Cleaning, then press OK.
5. Press the x Start button.
Cleaning takes several seconds. The message “Print head
cleaning in progress. Please wait” appears on the LCD
screen.
Caution: Never turn off your RX580 while the message “Print
head cleaning in progress. Please wait” appears on the LCD
screen. You may damage it.
Do not insert the CD/DVD tray until cleaning has finished.
14 - Epson Stylus Photo RX580
11/06
Epson Stylus Photo RX580
6. When the message “Print head cleaning complete” appears
on the LCD screen, make sure paper is loaded in the
RX580, then press the x Start button.
6. Press the x Start button. Your RX580 prints an alignment
sheet like this one:
The nozzle check pattern prints.
7. If there are no gaps or lines (as shown below), press OK to
return to the Maintenance menu.
If there are still gaps or lines, or the test patterns are faint (as
shown below), click the x Start button to clean the print
head again.
The alignment sheet contains four sets of squares.
7. Look at the printed squares in set #1 to determine which
one is the most even, with no streaks or lines. You may have
to use a magnifying glass.
If you don’t see any improvement after cleaning four times,
turn the RX580 off and wait for at least 6 hours. This allows
any dried ink to soften. Then, try cleaning the print head
again.
8. Press r, then press u or d to select the number for that
square.
9. Press OK.
10. Press d to select the next set, then repeat steps 7 through 9.
Aligning the Print Head
11. When you’ve finished making your selections for each of
the four sets, press OK.
If your printouts look grainy or blurry, or you see light or dark
lines, you may need to align the print head.
Transporting the RX580
Note: You may also see lines in your printouts if your cartridges are
low on ink or you need to clean the print head.
Do not press the y Stop/Clear Settings button while printing an
alignment sheet.
Before you align the print head, make sure the CD/DVD tray
is not inserted in the RX580, and make sure the front tray is in
the paper (lower) position. If it is not, lift the tray lever up to
reposition the front tray.
1. Make sure the RX580 is turned on but not printing, and no
warnings or errors are displayed on the LCD screen.
2. Make sure letter-size plain paper is loaded in the RX580.
3. Press Setup.
If you need to ship your RX580, you must prepare it for
transportation by packing it in its original box or one of a
similar size.
Caution: When storing or transporting the RX580, do not tilt it,
stand it up vertically, or turn it upside down. Otherwise, ink may
leak from the cartridges.
Leave the ink cartridges installed. Removing the cartridges can
dehydrate the print head and may prevent the RX580 from printing.
1. Remove all paper from the sheet feeder.
2. Turn the RX580 off.
3. Remove any memory cards installed in the memory card
slots.
4. Use the l or r button to select Maintenance, then press
OK.
5. Use the u or d button to select Head Alignment, then
press OK.
11/06
Epson Stylus Photo RX580 - 15
Epson Stylus Photo RX580
4. Lift up the scanner unit and make sure the print head is in
the home (far right) position.
Related Documentation
CPD-22267R1
Epson Stylus Photo RX580 Start Here
CPD-22269
Epson Stylus Photo RX580 Basics Guide
CPD-22268R1
Epson Stylus Photo RX580 CD-ROM
with on-screen User’s Guide
5. Close the scanner unit.
6. Unplug the power cord from the outlet, then disconnect the
USB cable from your computer.
7. Close the paper support, the front tray, and front cover.
8. Repack the RX580 in the box, using the protective materials
that came with it.
Keep the RX580 level as you transport it.
After transporting the RX580, plug it in, turn it on, and test
it. If you notice a decline in print quality, clean the print head
as described on page 14; if output is grainy or blurry, align the
print head as described on page 15.
16 - Epson Stylus Photo RX580
11/06