1
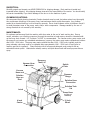
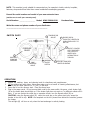
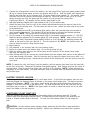
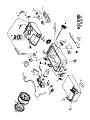
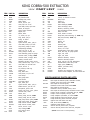
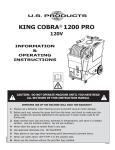
KING COBRA® 500
120V
INFORMATION
&
OPERATING
INSTRUCTIONS
DO NOT OPERATE THE MACHINE UNTIL YOU HAVE READ
ALL SECTIONS OF THE INSTRUCTIONS
IMPROPER USE OF THE MACHINE WILL VOID THE WARRANTY
1. Always use a defoamer when foaming occurs to prevent vacuum motor damage.
2. Keep machine from rain and snow, extremes in temperatures, and store in a
heated location. Use the machine indoors. Do not use outdoors.
3. Do not let the pump run dry.
4. Use approved chemicals only. NO SOLVENTS.
5. Wear gloves or use rags when removing quick disconnects to prevent burns.
December 5, 2005
IMPORTANT SAFETY INSTRUCTIONS
This machine is only suitable for commercial use, for example in hotels, schools,
hospitals, factories, shops and offices other than normal residential housekeeping
purposes.
When using any electrical appliance, basic precautions should always be followed,
including the following:
NOTE: Read all instructions before using this machine.
WARNING!
To reduce the risk of fire, electric shock, or injury:
• Do not leave the machine unattended when it is plugged in. Unplug the unit from
the outlet when not in use and before servicing.
• To avoid electric shock, do not expose to rain or snow. Store, and use, indoors.
• Do not allow to be used as a toy. Close attention is necessary when used near
children.
• Use only as described in this manual. Use only the manufacturer’s recommended
attachments.
• Never add water over 130º F/54º C to the solution tank.
• Do not use with damaged cord or plug. If the machine is not working as it
should, has been dropped, damaged, left outdoors or dropped into water, return it
to a service center.
• Do not pull by the cord, use the cord as a handle, close a door on the cord, or pull
the cord around sharp edges or corners. Do not run the machine over the cord.
Keep the cord away from heated surfaces. To unplug, grasp the plug, not the cord.
• Do not handle the plug, the cord or the machine with wet hands.
• Extension cords must be 12/3 and no longer than 50 feet. Replace the cord or
unplug immediately if the ground prong becomes damaged.
• Do not put any object into openings. Do not use with any opening blocked; keep
free of dust, lint, hair, and anything that may reduce air flow.
• Keep loose clothing, hair, fingers, and all parts of body away from openings and
moving parts.
• Do not pick up anything that is burning or smoking, such as cigarettes, matches,
or hot ashes, or any health endangering dusts. Do not use to pick up flammable
or combustible liquids such as gasoline or use in areas where they may be
present.
• Turn off all controls before unplugging.
• Use extra care when cleaning on stairs.
• Connect to a properly grounded outlet only.
• Liquid ejected at the spray nozzle could be dangerous as a result of its
temperature, pressure, or chemical content.
INSPECTION:
Carefully unpack and inspect your KING COBRA-500 for shipping damage. Each machine is tested and
inspected before shipping. Any shipping damage incurred is the responsibility of the carrier. You should notify
the carrier immediately if you notice damage to the box or to the machine or parts.
CLEANING SOLUTIONS:
We recommend liquid cleaning chemicals. Powder chemicals may be used, but unless mixed very thoroughly
they could cause a build-up in the pump, lines, heat exchanger and/or quick disconnects. Any problem
caused by a chemical build-up is not covered by warranty. Use a neutral cleaner with a pH between 6 and 9
to avoid premature wear of the pump, seals, and/or other components. Damage caused by the use of
strong chemicals is not covered by the warranty.
MAINTENANCE:
For optimum performance flush the machine with clear water at the end of each working day. Once a
month, minimum, run a flushing compound through the machine to break up any mineral or chemical buildup that may have formed. U.S. Products “X-1500” is recommended. The vacuum motor, pump motor, and
the pump do not require any scheduled maintenance; however, the motors may require replacement brushes
after 1000 - 1500 hours. The pump may require rebuild kits after 1000 - 1500 hours, typically, and the
pump unloader valve may need to be replaced after approximately 1000 - 1500 hours of use.(refer to
machine part list for numbers). Clean the body with an all purpose detergent, and protect it with an
automobile interior polish. Lubricate the wheels, castors, and quick disconnects with an all purpose silicone
spray.
Vacuum Hose
Connection
Recovery
Tank Lid
Switch
Plate
Vacuum
Hose and
Solution
Hose on
Reel
Pressure
Gauge
Solution Hose
Connection
Solution Tank
Lid
Latch
S
CT
U
OD
PR
.
S
U.
4 inch
Castor
Dump Hose
(on rear of
machine)
10 Inch
Wheel
NOTE: This machine is only suitable for commercial use, for example in hotels, schools, hospitals,
factories, shops and offices other than normal residential housekeeping purposes.
Record the serial number and model of your new extractor here:
(and be sure to mail your warranty card)
Serial Number: __________________ Model: KING COBRA-500
Purchase Date:_____________
Write the name and phone number of your distributor:
_____________________________________
SWITCH PLATE
5 TEMPERATURE
ADJUST
7
4
PUMP
PRESSURE
ADJUST
TURNS THE HEATER ON
WHEN GREEN LIGHT IS
NOT ON
1
PRESSURE
GAUGE
INDICATES
SPRAYING
PRESSURE
2 BYPASS SWICH.
3 VACUUM
ON/OFF
SWITCH
CIRCUIT LOCATOR
LIGHT INDICATES
TWO CIRCUITS.
HEATER WILL
AUTOMATICALLY
TURN ON
6 RED LIGHT INDICATES
HEATER IS HEATING
OPERATION
1
2
3
4
Inspect the machine, hoses, and cleaning tools for cleanliness and completeness.
Fill the solution tank with water. Using warm water may be a benefit in cleaning effectiveness, but
do not use hot water (above 130° F / 54°C) in the tank.
Screw the lid on the recovery tank. Close the dump hose.
Plug in the power cords. Do not connect both cords to the same outlet; the green, circuit locator light
(1) on the switch plate should light up. If the locator light does not come on, try different outlets until it
does. If you are certain the cords are on separate circuits, turn the Bypass switch (2) on.
CAUTION: using the Bypass switch (2) when the cords are on the same circuit may cause the
breaker in the wall to trip. NOTE: the receptacle on the left (viewed from behind the machine) powers
the heater.
The red light (6) will turn on only when the heat exchanger is actively heating.
REFER TO THE DIAGRAMS ON THE PREVIOUS PAGE
5
6
7
8
9
10
11
12
13
14
Connect the priming/siphon hose to the machine, turn the pump ON by turning the pump pressure knob
(4) up to increase pump speed, and turn the vacuum switch (3) on. Hold the rubber ‘cork’ against the
vacuum inlet hose barb on the recovery tank. The pump should prime between 20 - 60 seconds. Watch
the water flow into the recovery tank through the clear lid. When the water is clear (no air in it) and
flowing strongly, turn both the pump and the vacuum off, and remove the priming hose.
Priming may take 20 - 60 seconds, and the solution tank should be full.
Add liquid cleaning chemical, with a pH between 6 and 9, to the solution tank.
Attach the spray hose (from the reel) to the solution quick disconnect and the vacuum hose to the
hose barb on the recovery tank. Pull the hoses out from the reel. Attach the other ends of the hoses
to the cleaning tool.
Set the temperature knob (5) to the desired heat setting. Allow the heat exchanger two minutes to
reach operating temperature. The red light (6) will go out when the heater has reached operating
temperature. NOTE: the red light will be on nearly all the time as you clean.
Turn the pump on by setting the pressure adjust knob to the desired spraying pressure (0 - 500 PSI).
Read the spraying pressure at the pressure gauge (7) while spraying. NOTE: when you let off the
trigger on the wand, the pressure gauge reading will drop to 0 psi; however, the spraying pressure will
remain at the level to which you have set it. Turn the vacuum on (3). NOTE: the vacuum motor will
start up slowly to prevent a large current surge.
Begin cleaning.
Use defoamer in the recovery tank any time foaming occurs.
Monitor the water level in the solution tank. Do not let the pump run dry.
When the solution tank gets low, turn off the pump and the vacuum, fill the solution tank, empty
and clean the recovery tank.
When finished with the job, remove any unused solution from the solution tank, and run a few gallons of
clean water through the system. Drain the recovery tank by placing the dump hose over a drain, or a
bucket, and removing the cap. Disconnect the hoses from the cleaning tool, and reel them up onto the
hose spool.
NOTE: To remove the reel, with hoses, from the machine, pull the vacuum hose loose from the hose barb
on the front of the tank. Disconnect the solution hose quick coupling. Push Vacuum hose into the center of
the hose spool. Grasp the spool from either side, and lift it off the machine. NOTE: before servicing any
component in the base cabinet, the hoses and spool must be removed from the machine before the tanks
can be lifted open.
ELECTRIC CIRCUIT LOCATOR
This unique, patented system is operated by a solid state circuit. It will inform the operator when the two
cords are plugged into separate circuits by turning on the green, circuit locator light. This helps to prevent
tripping circuit breakers. NOTE: if the green, circuit locator light does not illuminate when the cords are
plugged in, then both cords are on the same circuit. Try other outlets with one of the cords until you get
the locator light to come on. NOTE: if the bypass switch is turned on when both cords are on the same
circuit, the breaker in the wall may trip.
ELECTRONIC FLOAT SHUT-OFF
When the recovery tank is full, the electronic float switch will turn the vacuum motor off. This will
prevent water from entering the vacuum motor. The float may not work properly if the float filter rod
is dirty or if there is heavy foam in the tank. To reset, turn the Vacuum switch off, and empty the
tank.
CAUTION: to avoid vacuum motor damage, always make sure the float filter is clean and that it
can travel freely before you operate the machine. Always use a defoamer any time foam is present.
81
37
5
82
TO
4
EM
IT
7
6
46
9
10
15
3
19
11
2
12
23
1
51A
50
20
14
16
51
52
47
17
77
53
46
M
E
IT
TO
21
18
8
TO ITEM 69
48
22
54
53
24
55
49
27
25
56
60
44
46A
28
29
61
58
64
41
63
45
42
46
33
32
31
59
62
43
65
1
78
120V
8/12/2005
67
71
75A
75
73
71A
39
36
34
68
0
KC-50
-240V
66
U. S. PRODUCTS
69
38
76
74
72
35
70
KING COBRA-500 EXTRACTOR
120V
ITEM PART No
1
2
3
4
5
6
7
8
9
10
11
12
14
15
16
17
18
19
20
21
22
23
24
25
27
28
29
31
32
33
34
35
36
37
38
39
41
42
43
44
45
46
46A
47
48
49
50
51
51A
805
901B
HKCR-1
1088
178
925
164
91
945D
92A
216
168
211
950C
97
223
165
1147
950D
946
FP348D
FP411
913
913A
959
926
1136
907
1148
2086
1074
1060C
1060B
156
207A
2026
CWKC-BLK
1146
45
1144
1062
1057B
VKCR-1
1131
948B
949B
FP361
FP362
FP225
FP225A
2B1
2014
2018
2015
PART LIST
DESCRIPTION
Chain, lid, 8”
Lid, solution tank
Holding Tank, white
Glide, teflon
Screw, 6-32 X 1/2”
Hose, 3/8” I.D. X 24”
Hose barb, brass, 3/8” hose
Elbow, 90 degree
Valve, pump unloader
Nipple, S/S
Elbow, brass
“T”, brass, 1/4 p.t.
Plug, brass, 1/4 p.t.
Pump, no motor
Reducer, brass
Quick connect, male, 1/8 p.t.
Hose barb, brass, 1/2” hose
Cap screw, pump to motor
Cam/bearing assembly
Hose, 1/2” I.D. X 18”
Hose, pump to heater, 12”
Hose assembly, pump to gauge
Vacuum motor, 3-stage, 120V
Vacuum motor, 3-stage, 240V
Gasket, vacuum motor
Manifold, vacuum motor mount
Hose, vacuum inlet, 1-1/2” X 24 “
Hose barb, for vacuum hose
Screw, 8-32 X 1”
Lid, vacuum, with ring
Gasket, lid
Plug, drain hose
Hose, drain, 1-1/2” X 24”
Hose clamp
Filter, pump inlet
Float switch
Cord wrap, Black
Pipe, 6.85”, S/S
Quick connect, male, 1/4 p.t.
Rubber sleeve, 1/2” ID X 5”
Receptacle, power cord
Power cord, 25 ft, 3/12, yellow
Vacuum tank, white
Elbow, PVC
Motor, pump, DC out, 120V
Motor, pump, DC out, 240V
PCB, pump motor speed, 120V
PCB, pump motor speed, 240V
PCB, vacuum control, 120V
PCB, vacuum control, 240V
Screw, 6-32 X 2-1/4”
Fan, cooling, 120V
Fan, cooling, 240V
Guard, fan
ITEM
52
53
54
55
56
58
59
60
61
62
63
64
65
66
67
68
69
70
71
71A
72
73
74
75A
75
76
77
78
81
82
240V
PART No.
DESCRIPTION
908A
928
BKCR-BLK
905
176
FP348
FP349
455
---918
FP348A
FP336
923B*
910
2084
27A
943B
951B
28
FP399
248
78B
228
FP345
FP346
248
FP347
78
FP351
1128
FP350B
FP350A
Latch, draw, rubber
Louver, 3”, includes 3 screws
Base, black
Castor, 4”
Hose clamp
Heat exchanger, 120V
Heat exchanger, 240V
Bracket, mounting, heater
See miscellaneous Parts and Kits
Plate, heat sink
Hose, heater to outlet
Snap track, PCB mounting, 4”, 120V only
PCB, circuit sensor, 120V only
Axle, 21”
Wheel, 10”
Axle cap
Switch plate
Pressure gauge
Screw, #4 X 3/8”
Potentiometer, with cable, pump
Knob, blue top, for pump speed
Light, red, 120V
Light, red, 240V
Switch & actuator, vacuum
Switch & actuator, bypass
Knob, red top, for heat adjustment
Potentiometer, with wires, heat
Light, green, 120V only
Gasket, (#1043A X 84”)
Label, KC-500
Pressure line complete, 25’ with swivel
Vacuum hose complete, 25’ with swivel cuff
MISCELLANEOUS PARTS AND KITS
FP194C
FP194A
FP226C
FP226A
FP409
FP422
FP410
950CP
250
SYP500
*923
FP350C
FP350
Heat repair kit includes probe, thermistor control,
thermal cutout and circuit board 120V
Heat repair kit includes probe,
thermistor control and circuit board 120V
Heat repair kit includes probe,
thermistor control, thermal cutout, 240V
Heat repair kit includes probe, thermistor control, 240V
Pump & motor complete, w/unloader 500 psi, 120V
Pump & motor complete, 500 psi, 240V
Pump complete w/unloader, no motor 120V
Pump rebuild kit, valves and O-rings, 500 psi
Pump rebuild kit, piston and seals, 300/500
Syphon hose and rubber cork assy
PCB, circuit sensor, 120V only
(Machines made before 7-22-05)
Vacuum hose & pressure line, complete
Vacuum hose & pressure line with reel, complete
(NOTE: Items in kits not sold separately.)
4/11/2006
KING COBRA® 500
120V
SPECIFICATIONS:
Rotomolded Body:
Vacuum:
VAC Shutoff:
Pump:
Waterlift:
Heat:
Heater:
Wand:
Weight:
Lifetime Warranty
7.2” 3-stage
Electronic
Positive displacement, fully adjustable 0-500 psi
140”
Fully adjustable 145º to 212º F
2000 Watts
Stainless steel, double bend, twin tip for 500 psi
122 lbs.
208-772-0573 • 800-257-7982 • FAX: 208-772-0577
Coeur d’Alene, Idaho
VISIT US AT: http://www.usproducts.com