1
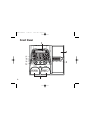
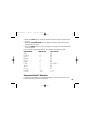
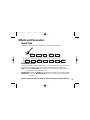
BP200 Manual
9/26/01
3:21 PM
Page 1
MODELING
BASS
PROCESSOR
User’s
Guide
BP200 Manual
9/26/01
3:21 PM
Page 2
Warning
For your protection, please read the following:
Water and Moisture: Appliances should not be used near water
(e.g. near a bathtub, washbowl, kitchen sink, laundry tub, in a wet
basement, or near a swimming pool, etc.) Care should be taken so
that objects do not fall and liquids are not spilled into the enclosure
through openings.
These symbols are internationally accepted symbols that warn of potential
hazards with electrical products.The lightning flash means that there are
dangerous voltages present within the unit.The exclamation point indicates
that it is necessary for the user to refer to the owners manual.
These symbols warn that there are no user serviceable parts inside the unit.
Do not open the unit. Do not attempt to service the unit yourself. Refer all
servicing to qualified personnel. Opening the chassis for any reason will void
the manufacturer’s warranty. Do not get the unit wet. If liquid is spilled on
the unit, shut it off immediately and take it to a dealer for service.
Disconnect the unit during storms to prevent damage.
Electromagnetic Compatibility
Operation is subject to the following conditions:
•This device may not cause harmful interference.
•This device must accept any interference received, including interference that may cause undesired operation.
•Use only shielded interconnecting cables.
•Operation of this unit within significant electromagnetic fields should
be avoided.
Power Sources: The appliance should be connected to a power
supply only of the type described in the operating instructions or as
marked on the appliance.
Grounding or Polarization: Precautions should be taken so that
the grounding or polarization means of an appliance is not defeated.
Power Cord Protection: Power supply cords should be routed so
that they are not likely to be walked on or pinched by items placed
upon or against them, paying particular attention to cords at plugs,
convenience receptacles, and the point where they exit from the
appliance.
Servicing: To reduce the risk of fire or electrical shock, the user
should not attempt to service the appliance beyond that described in
the operating instructions. All other servicing should be referred to
qualified service personnel.
For units equipped with externally accessible fuse receptacle: Replace fuse with same type and rating only.
BP200 Manual
9/26/01
3:21 PM
Page 3
DECLARATION OF CONFORMITY
Manufacturer’s Name:
Manufacturer’s Address:
DigiTech
8760 S. Sandy Parkway
Sandy, Utah 84070, USA
declares that the product:
Product name:
BP200
Note: Product name may be suffixed by the letters EU, JA, NP and UK.
Product option:
all (requires Class II power adapter that conforms
to the requirements of EN60065, EN60742, or equivalent.)
conforms to the following Product Specifications:
Safety:
IEC 60065 (1998)
EMC:
EN 55013 (1990)
EN 55020 (1991)
Supplementary Information:
The product herewith complies with the requirements of the Low Voltage Directive 72/23/EEC and the EMC Directive
89/336/EEC as amended by Directive 93/68/EEC.
DigiTech / Johnson
President of Harman Music Group
8760 S. Sandy Parkway
Sandy, Utah 84070, USA
Date: September 14,2001
European Contact:
Your local DigiTech / Johnson Sales and Service Office or
Harman Music Group
8760 South Sandy Parkway
Sandy, Utah 84070 USA
Ph: (801) 566-8800
Fax: (801) 568-7573
BP200 Manual
9/26/01
3:21 PM
Page 4
Warranty
We at DigiTech are very proud of our products and back-up each one we sell with the following warranty:
1.The warranty registration card must be mailed within ten days after purchase date to validate this warranty.
2. DigiTech warrants this product, when used solely within the U.S., to be free from defects in materials and workmanship
under normal use and service.
3. DigiTech liability under this warranty is limited to repairing or replacing defective materials that show evidence of defect,
provided the product is returned to DigiTech WITH RETURN AUTHORIZATION, where all parts and labor will be covered
up to a period of one year. A Return Authorization number may be obtained from DigiTech by telephone.The company shall
not be liable for any consequential damage as a result of the product's use in any circuit or assembly.
4. Proof-of-purchase is considered to be the burden of the consumer.
5. DigiTech reserves the right to make changes in design, or make additions to, or improvements upon this product without
incurring any obligation to install the same on products previously manufactured.
6.The consumer forfeits the benefits of this warranty if the product's main assembly is opened and tampered with by anyone
other than a certified DigiTech technician or, if the product is used with AC voltages outside of the range suggested by the
manufacturer.
7.The foregoing is in lieu of all other warranties, expressed or implied, and DigiTech neither assumes nor authorizes any person to assume any obligation or liability in connection with the sale of this product. In no event shall DigiTech or its dealers
be liable for special or consequential damages or from any delay in the performance of this warranty due to causes beyond
their control.
NOTE:The information contained in this manual is subject to change at any time without notification. Some information contained in this manual may also be inaccurate due to undocumented changes in the product or operating system since this
version of the manual was completed.The information contained in this version of the owner's manual supersedes all previous versions.
BP200 Manual
9/26/01
3:21 PM
Page 5
Table of Contents
Introduction . . . . .
Included Items . . . . .
Front Panel . . . . . . . .
Rear Panel . . . . . . . .
Connecting the BP200
Mono Operation . . .
Stereo Operation . . .
.
.
.
.
.
.
.
.
.
..
..
.
.
.
.
.
.
.
.
.
.
.
.
.
.
.
.
.
.
.
.
.
.
.
.
.
.
.
.
.
.
.
.
.
.
.
.
.
.
.
.
.
.
.
.
.
.
.
.
.
.
.
.
.
.
.
.
.
.
.
.
.
.
.
.
.
.
.
.
.
.
.
.
.
.
.
.
.
.
.
.
.
.
.
.
.
.
.
.
.
.
.
.
.
.
.
.
.
.
.
.
.
.
.
.
.
.
.
.
.
.
.
.
.
.
.
.
.
.
.
.1
.1
.2
.4
.5
.5
.6
Modes and Functions . . . . . . . . . . . . . . . . . .8
Performance Mode . . . . . . . . . . . . . . . . . . . . . .8
Edit Mode . . . . . . . . . . . . . . . . . . . . . . . . . . . . .9
Store Mode . . . . . . . . . . . . . . . . . . . . . . . . . .10
Bypass Mode . . . . . . . . . . . . . . . . . . . . . . . . .12
Tuner Mode . . . . . . . . . . . . . . . . . . . . . . . . . .12
Rhythm Trainer . . . . . . . . . . . . . . . . . . . . . . . .14
Expression Pedal . . . . . . . . . . . . . . . . . . . . . . .14
Assigning A Parameter . . . . . . . . . . . . . . . . . .14
Expression Pedal Calibration . . . . . . . . . . . . .15
Factory Reset . . . . . . . . . . . . . . . . . . . . . . . . .16
Effects and Parameters
Signal Path . . . . . . . . . . . .
Fretless / Wah . . . . . . . . .
Compressor . . . . . . . . . . .
Amp/Stompbox Models . .
EQ . . . . . . . . . . . . . . . . . .
.
.
.
.
.
.
.
.
.
.
.
.
.
.
.
.
.
.
.
.
.
.
.
.
.
.
.
.
.
.
.
.
.
.
.
.
.
.
.
.
.
.
.
.
.
.
.
.
.
.
.
.
.
.
.
.
.
.
.
.
.
.
.
.
.
.
.
.
.
.
.
.
.
.
.
.
.
.
.
.
.
.
.
.
.17
.17
.17
.18
.18
.19
Cabinet - Gate
Effects . . . . . .
Chorus . . . . .
Flanger . . . . .
Phaser . . . . .
Envelope Filter
Vibrato . . . . .
Octavider . . .
SynthTalk™ .
Pitch Shift . . .
Detune . . . . .
Whammy™ .
Delay . . . . . .
Reverb . . . . .
.
.
.
.
.
.
.
.
.
.
.
.
.
.
.
.
.
.
.
.
.
.
.
.
.
.
.
.
.
.
.
.
.
.
.
.
.
.
.
.
.
.
.
.
.
.
.
.
.
.
.
.
.
.
.
.
.
.
.
.
.
.
.
.
.
.
.
.
.
.
.
.
.
.
.
.
.
.
.
.
.
.
.
.
.
.
.
.
.
.
.
.
.
.
.
.
.
.
.
.
.
.
.
.
.
.
.
.
.
.
.
.
.
.
.
.
.
.
.
.
.
.
.
.
.
.
.
.
.
.
.
.
.
.
.
.
.
.
.
.
.
.
.
.
.
.
.
.
.
.
.
.
.
.
.
.
.
.
.
.
.
.
.
.
.
.
.
.
.
.
.
.
.
.
.
.
.
.
.
.
.
.
.
.
.
.
.
.
.
.
.
.
.
.
.
.
.
.
.
.
.
.
.
.
.
.
.
.
.
.
.
.
.
.
.
.
.
.
.
.
.
.
.
.
.
.
.
.
.
.
.
.
.
.
.
.
.
.
.
.
.
.
.
.
.
.
.
.
.
.
.
.
.
.
.
.
.
.
.
.
.
.
.
.
.
.
.
.
.
.
.
.
.
.
.
.
.
.
.
.
.
.
.
.
.
.
.
.
.
.
.
.
.
.
.
.
.
.
.
.
.
.
.
.
.
.
.
.
.
.
.
.
.
.
.
.
.
.
.
.
.
.
.
.
.
.
.
.
.
.
.
.
.
.
.20
.21
.21
.21
.22
.22
.22
.23
.23
.23
.24
.24
.25
.25
Appendix . . . . . . . . . . . . . . . . . . . . . . . . . . .26
Specifications: . . . . . . . . . . . . . . . . . . . . . . . . .26
Preset List . . . . . . . . . . . . . . . . . . . . . . . . . . .27
BP200 Manual
9/26/01
3:21 PM
Page 1
Introduction
The BP200 gives you the flexibility and power to produce sonic creations never before thought
possible. To become better acquainted with the BP200, we recommend you go through this
User’s Guide with your BP200 in front of you.
Included Items
Before you get started, please make sure that the following items have been included:
• BP200
• PS0913B Power Supply
• User’s Guide
• Warranty Card
The utmost care was taken while your BP200 was being manufactured. Everything should
be included and in perfect working order. If anything is missing, contact the factory at once.
Please help us become acquainted with you and your needs by completing your warranty
card. Thank you!
1
BP200 Manual
9/26/01
3:21 PM
Page 2
Front Panel
SLApin
2
BP200 Manual
9/26/01
3:21 PM
Page 3
1. FOOT SWITCHES - Navigate through all 80 presets. When pressed together, they bypass
the current preset. When pressed together and held,Tuner mode is entered.
2. AMP TYPE, GAIN, MASTER LEVEL Knobs - Adjusts the effect parameters in Edit Mode
and adjust Amp Type, Gain, and Master Level in Performance Mode, and select Pattern,Tempo,
and Rhythm Level in Rhythm mode.
3. SELECT button - Enters and exits Edit Mode. Successive presses will navigate through all
the effect rows.
4. RHYTHM button - Turns on and off the Rhythm Trainer function.
5. EFFECTS MATRIX - Lists all effect parameters available for editing. The LEDs next to
each effect will light when the effect is on in a preset. The LEDs also serve as a reference
when using the BP200’s Tuner.
6. DISPLAY - Provides information for all the BP200’s different functions.
7. EXPRESSION PEDAL - Controls the BP200's parameters in real time.
8. STORE button - Stores or copies presets to User preset locations.
3
BP200 Manual
9/26/01
3:21 PM
Page 4
Rear Panel
1. INPUT - Connect your instrument to this jack.
2. JAM-A-LONG - Connect the headphone output of your CD, tape, or MP3 player to this
1/8” stereo jack to practice along with you favorite music.
3. OUTPUT - The BP200’s output is a TRS (tip, ring, sleeve) Stereo output that is used for
both mono and stereo applications. Connect one end of a single mono instrument cable, or
a TRS stereo “Y” cord to this jack, and the other end to an amplifier, mixer, or recording
device’s input(s).
4. HEADPHONE - Connect a pair of stereo headphones to this jack.
5. POWER - Connect only the DigiTech PS0913B power supply to this jack.
4
BP200 Manual
9/26/01
3:21 PM
Page 5
Connecting the BP200
The BP200 can be connected in several different ways.The following diagrams show a few possible options. Before connecting the BP200, make sure the power to your amplifier is turned off.
The BP200 should also be powered off or unplugged.
Mono Operation
Bass Amp Input/Effect Return
Output
Input
SLApin
1. Connect your bass to the BP200’s Input.
2. Connect a single mono instrument cable from the BP200’s Output to the amplifier’s
instrument input, or a power amp’s line input.
5
BP200 Manual
9/26/01
3:21 PM
Page 6
Stereo Operation
Bass Amp Input/Effect Return
Stereo 'Y'
Cord
TRS Stereo Output
Instrument Input
SLApin
6
1. Connect your bass to the BP200’s Input.
2. Connect a TRS stereo “Y” cord to the BP200’s Stereo Output.
3. Connect one end of the “Y” cord to an amplifier, mixer channel, or power amp input.
4. Connect the second end of the “Y” cord to another amplifier, mixer channel, or power
amp output.
BP200 Manual
9/26/01
3:21 PM
Page 7
Note: If connecting to a mixing console, set the pan controls of the mixer hard
left and right, and be sure to use the BP200’s Cabinet Modeling. See page 20
for more information on selecting Cabinet Modeling.
7
BP200 Manual
9/26/01
3:21 PM
Page 8
Modes and Functions
Performance Mode
The BP200 initially powers up in performance mode. While in Performance mode, the
BP200's buttons, knobs, and footswitches function as follows:
SELECT Button - Enters Edit Mode. Successive presses move to the next row of effects
in the Matrix. If this button is pressed after the Expression LED lights, you return to
Performance mode. Press and hold this button to exit Edit mode.
STORE Button - Enters Store Mode.
AMP TYPE, GAIN, and MASTER LEVEL Knobs - These knobs control the Amp Type,
Gain, and Master Level of the current preset.
FOOT SWITCHES - The 2 foot switches navigate up and down through the BP200's
presets. Press both footswitches simultaneously to access Bypass mode. Press and hold
these together to access the Tuner mode. When a preset is selected the first three letters of the preset name followed by a space and preset number are shown in the display.
After one second, the full preset name is displayed.
RHYTHM Button - Turns on an off the Rhythm Trainer. When the Rhythm Trainer is
active, the AMP TYPE knob selects the Rhythm pattern, the GAIN knob changes the
Rhythm Tempo, and the MASTER LEVEL knob changes the Rhythm Level.
EXPRESSION PEDAL - Controls the selected preset’s parameter that is assigned to
it.
8
BP200 Manual
9/26/01
3:21 PM
Page 9
Edit Mode
The BP200 lets you create your own presets, and modify existing presets. To create your
own preset, do the following:
1. Select a User or Factory Preset.
2. Press the SELECT button. The Matrix’s first effect row LED begins flashing.
3. Modify the parameters in the selected row using the AMP TYPE, GAIN, and
MASTER LEVEL knobs. When changes are made, the Store LED lights, and an abbreviated parameter name with a space followed by a two digit parameter value is displayed.
To move to the next effect in the Matrix, press the SELECT button again.
4. Press the STORE button to save your changes. See page 10 for more information on
storing presets.
SLApin
Use Select Button
to Select Effect
Amp Type
Knob
Adjusts Left
Column
Gain Knob
Adjusts Center
Column
Master Level
Knob
Adjusts Right
Column
9
BP200 Manual
9/26/01
3:21 PM
Page 10
Store Mode
After modifying a preset, you must store your settings to one of the 40 User Preset locations. Do the following to store changes, or store a preset to a different location:
1. Press the STORE button. The STORE LED begins blinking off and on and the first
character of the name flashes.
2. Use the AMP TYPE knob or either footswitch to change the character. Use the
GAIN knob to move to the next character to the left or right in the name.
SLApin
1. Press Store
Characters in Display
Flash Individually
2. Use Knobs to
Name Preset
10
BP200 Manual
9/26/01
3:21 PM
Page 11
3. Press the STORE button again. A three letter abbreviation of the preset name and the
preset number is displayed.
4. Select a new preset location (if desired) using the UP or DOWN footswitches or the
MASTER LEVEL knob. Only presets 1-40 can be overwritten.
5. Press the STORE button a final time to store your changes. STORED followed by the
current preset name is displayed.
SLA 20
3. Press Store Again
Preset Number Flashes
5. Press Store Again
Saves Preset to BP200
4. Select Destination
with Footswitches
Note: The SELECT and RHYTHM buttons abort the Store Mode.
11
BP200 Manual
9/26/01
3:21 PM
Page 12
Bypass Mode
The BP200 can be bypassed so only a clean, unprocessed bass signal is heard. To bypass
the BP200, do the following:
1. Press both footswitches simultaneously. Bypass appears in the display.
2. Press either of the footswitches again to return to Performance mode with all edits in
tact.
Note: the SELECT, RHYTHM, and STORE buttons, and the AMP TYPE,GAIN,
and MASTER LEVEL knobs are disabled in Bypass mode.
Tuner Mode
The tuner in the BP200 lets you quickly tune or check the tuning of your bass. To access
the Tuner do the following:
12
1. Press and hold both foot switches until TUNER appears in the display.
2. Begin playing and the note appears in the display. The Matrix LED’s indicate whether
the note is sharp (red LED’s lit above the green CABINET-GATE LED ) or flat (red
LED’s lit below the green CABINET-GATE LED). When the note is in tune, only the
green CABINET-GATE LED is lit.
3. Press the SELECT button to select the tuning reference (A=440, A=Ab, A=G, A=Gb)
4. Rotate the AMP TYPE, GAIN, and MASTER LEVEL knobs to change the tuning
reference in semitone steps. This setting is maintained until changed by the user or a
factory reset is performed.
BP200 Manual
9/26/01
3:21 PM
Page 13
5. Press either of the 2 foot switches to exit the Tuner mode, and returns you to the last
mode used.
Display Shows
Note Played
Top LEDs Indicate
Note is Sharp
tuner
Green LED Indicates
Note is In Tune
Bottom LEDs Indicate
Note is Flat
Note:The STORE and RHYTHM buttons are disabled in Tuner mode. The
EXPRESSION PEDAL returns sound to the signal and acts as bypass volume.
13
BP200 Manual
9/26/01
3:21 PM
Page 14
Rhythm Trainer
The BP200 includes 31 sampled drum patterns that may be used to develop a good sense
of timing. To use the Rhythm Trainer, do the following:
1. Press the RHYTHM button.
2. Rotate the AMP TYPE knob to select 1 of the 30 patterns available.
3. Rotate the GAIN knob to set the pattern tempo (40-240BPM).
4. Rotate the MASTER LEVEL knob to adjust the rhythm playback level (0-99).
5. Press the RHYTHM button again to exit the Rhythm Trainer. All rhythm settings are
maintained until the BP200 is powered off.
Note: Press the SELECT button to return to Edit Mode. Press the STORE
button to return to Store Mode. Press either footswitch to return to
Performance Mode with the Rhythm Trainer playback still enabled.
Expression Pedal
Assigning a Parameter
The BP200 includes a built-in Expression pedal. The Expression pedal is used to control many of the BP200’s effect parameters in real time. To assign a parameter to the
Expression pedal, do the following:
1. Select a User or Factory Preset.
2. Press the SELECT button until the Matrix’s last effect row LED begins flashing.
3. Rotate the AMP TYPE knob to select the parameter the pedal will control.
14
BP200 Manual
9/26/01
3:21 PM
Page 15
4. Rotate the GAIN knob to adjust the minimum value the expression pedal reaches
(toe up).
5. Rotate the MASTER LEVEL knob to adjust the maximum value the expression
pedal reaches (toe down).
6. Press the STORE button to store your changes. See page 10 for more information
on storing presets.
Here is a list of the parameters that can be assigned to the expression pedal:
PARAMETER
MIN VALUE
MAX VALUE
WAH
1
99
A GAIN
0
99
AMPLVL
0
99
AMOUNT
1
99
EFFLVL
0
99
WHAMMY
0
99
FBACK
1
99-R-HOLD
DLYLVL
0
99
DECAY
1
99
REVLVL
0
99
VOLPRE
****
****
VOLPST
****
****
Expression Pedal Calibration
It is important to calibrate your expression pedal for it to function properly. To calibrate the expression pedal, do the following:
15
BP200 Manual
9/26/01
3:21 PM
Page 16
1. Power up unit while pressing the UP footswitch until TOE dn is displayed.
2. Rock the Expression pedal forward (toe down position).
3. Press a footswitch, until TOE up is displayed.
4. Rock the Expression pedal forward (toe up position).
5. Press a footswitch again to complete calibration.
Note: If error is displayed, an error has occurred in the calibration and all
steps must be repeated. This calibration procedure does not erase user
presets.
Factory Reset
This function resets the BP200 to its original factory settings. This procedure erases all
custom user presets, and recalibrates the Expression Pedal. To complete a factory reset,
do the following:
Attention: ALL user defined presets will be lost if this function is performed!
1. Disconnect the power supply from the BP200.
2. Press and hold the SELECT button while connecting the power supply.
3.When rst ? displays, release the button and press the STORE button. rEset displays and the BP200 is reset.
Once a factory reset has been completed, it is required to calibrate the Expression Pedal.
Follow steps 2-5 of the calibration procedure outlined in the previous section.
16
BP200 Manual
9/26/01
3:21 PM
Page 17
Effects and Parameters
Signal Path
The BP200 is comprised of the following effect modules linked as follows:
Fretless/
Wah
Cabinet
Modeling
Noise Gate
Compressor
Volume
Pedal - Pre
Whammy
Effects
Bass Amp/
Stompbox
Modeling
Delay
EQ
Reverb
Volume
Pedal - Post
Fretless / Wah
The fretless simulator creates a fretless bass sound with a fretted bass. The wah effect is
controlled by an Expression pedal and makes the bass sound as if it’s saying “Wah”.
Type - Rotate the AMP TYPE knob to select one of the following: OFF, Fretless1-3, Cry
Wah, Boutique Wah, and Full Range Wah.
Fret Amount - Rotate the GAIN knob to change the character of the fretless simulator.
Fret Attack - Rotate the MASTER LEVEL knob to set the attack time of the fretless
simulator.
Note: Fret Amount and Fret Attack do not function when a Wah is selected.
17
BP200 Manual
9/26/01
3:21 PM
Page 18
Compressor
A Compressor is used to increase sustain, and prevent the signal from clipping the input
of the other effects.The compressor threshold is a fixed setting.
Amount - Rotate the AMP TYPE knob to increase the amount of compression (OFF,
1-99).
Comp Gain - Rotate the GAIN KNOB to increase the compression level (1-6)
Crossover - Rotate the MASTER LEVEL knob to adjust the compressor crossover
frequency. Signals below this frequency are compressed (50Hz, 63Hz, 80Hz,
100Hz, 125Hz, 160Hz, 200Hz, 250Hz, 315Hz, 400Hz, 500Hz, 630Hz, 800Hz,
1.0KHz, 1.25KHz, 1.6KHz, 2.0KHz, 2.5KHz, 3.15KHz, & Full Range).
Amp/Stompbox Models
Selects the amp to be used for the preset. Choices are as follows:
Rock Amp rock - Model based on an Ampeg SVT
Ash Down ashdwn - Model based on an Ashdown ABM-C410H
Bass Man basman - Model based on a Fender Bassman
Solar 200 solar - Model based on a Sunn 200S
Stellar stella - Model based on a SWR Interstellar Overdrive
British britsh - Model based on a Trace-Elliot Commando
Bomber bomber - Model based on an Ampeg B-15
Hi Wattage hiwatg - Modeled based on an Hiwatt 50
Bogey Man boogmn - Model based on an Mesa/Boogie Bass 400+
18
BP200 Manual
9/26/01
3:21 PM
Page 19
Basic basic - Model based on an SWR Basic Black
Dual Show dualsh - Model based on an Fender Dual Showman
DigiFuzz dgfuzz - DigiTech Fuzz
Guydrive guydrv - Model based from a Guyatone OD-2
Muff Fuzz muffuz - Model based from a Big Muff Pi
Sparkle sparkl - Model based from a Voodoo Labs Sparkledrive
DS Dist dsdist - Model based from a Boss DS-1 Distortion
Marshall® is a registered trademark of Marshall Amplification Plc. Vox® is a registered trademark of Korg UK.
Hiwatt, Fender, Ashdown, Sunn, Ampeg, SWR,Trace-Elliot, Mesa/Boogie, Guyatone, Electro Harmonix,Voodoo Labs,
and Boss are trademarks of their respective companies and are in no way associated with DigiTech.
Type - Rotate the AMP TYPE knob to select the type of Amp/Stompbox model.
Gain - Rotate the GAIN knob to adjust the amount of gain for the selected model (1-99)
Level - Rotate the MASTER LEVEL knob to control the preset level for the selected
model (0-99).
EQ
Equalization is a useful tool used to shape the tonal response of the bass signal.The EQ is
a 3-band EQ consisting of Bass, Mid and Treble. The frequency centers for each band may
vary depending on the model selected in order to optimize their usability.
Bass - Rotate the AMP TYPE knob to adjust the boost/cut of the Bass Frequency (+/12dB).
Midrange - Rotate the GAIN knob to adjust the boost/cut of the Mid Frequency (+/12dB).
Treble - Rotate the MASTER LEVEL knob to adjust the boost/cut of the Treble
Frequency (+/-12dB).
19
BP200 Manual
9/26/01
3:21 PM
Page 20
Cabinet - Gate
The Cabinet Modeling simulates different types of miked speaker cabinets. There are six
cabinet types. The Silencer Noise Gate eliminates noise when you are not playing. The
Auto Swell gate has 9 attack settings for automatically fading in the bass signal. The
Cabinet choices are as follows:
1x15
1x18
2x15
4x10
4x10
8x10
– Based on an Ampeg Portaflex 1x15 cabinet
– Based on an Acoustic 360 1x18 cabinet
- Based on an Sunn 200S 2x15 cabinet
- Based on an Fender Bassman 4x10 cabinet
H - Based on an Eden 4x10 w/horn cabinet
- Based on an Ampeg SVT 8x10 cabinet
Ampeg, Acoustic, Sunn, Fender, and Eden are trademarks of their respective companies and are in no way associated
with DigiTech.
Cabinet - Rotate the AMP TYPE knob to select one of 6 cabinet types .
Gate Type - Rotate the GAIN knob to select the gate type (Off, Silncr, or Swel 1-9).
Gate Thresh - Rotate the MASTER LEVEL knob to select the Noise Gate’s threshold, higher settings are higher thresholds (1-40).
20
BP200 Manual
9/26/01
3:21 PM
Page 21
Effects
The Effects row has several effects to choose from: Off, Chorus, Flanger, Phaser, Vibrato,
Octavider, SynthTalk™, Envelope Filter, Pitch, Detune, and Whammy™. When the Effects
row is selected, the following settings apply:
Type - Selects the type of effect used in the EFFECTS module.
Amount - Controls different aspects of effects depending on the type selected.
Level - Controls Level, Depth, or Mix depending on type selected.
Note: Only one of the effects in this row can be used at a time.
Chorus
A chorus adds a short delay to your signal. The delayed signal is modulated in and out
of tune and mixed back with the original signal to create a thicker sound.
Amount - Rotate the GAIN knob to simultaneously adjust the effect’s speed and
depth (1-99).
Effect Level - Rotate the MASTER LEVEL knob to adjust chorus the level (1-99).
Flanger
A flanger uses the same principle as a chorus but uses a shorter delay time and adds
regeneration (repeats) to the modulating delay. This results in an exaggerated up and
down sweeping motion of the effect.
Amount - Rotate the GAIN knob to simultaneously adjust the effect’s speed and
depth (1-99).
Effect Level - Rotate the MASTER LEVEL knob to adjust the flanger level (1-99).
21
BP200 Manual
9/26/01
3:21 PM
Page 22
Phaser
A phaser splits the incoming signal, and changes the phasing of the signal. The signal
is then taken in and out of phase and mixed back in with the original signal. As the
phasing changes, different frequencies get cancelled resulting in a warm twisting
sound.
Amount - Rotate the GAIN knob to simultaneously adjust the phaser speed and
depth (1-99).
Effect Level - Rotate the MASTER LEVEL knob to adjust the phaser level (1-99).
Envelope Filter
The Envelope Filter is a dynamic Wah effect that alters your sound based upon how
hard you play.
Amount - Rotate the GAIN knob to adjust the amount of input signal (sensitivity)
required to trigger the Envelope effect (1-99).
Effect Level - Rotate the MASTER LEVEL knob to adjust the mix of the
Envelope effect (0-99).
Vibrato
A vibrato effect modulates the pitch of the incoming signal at an even rate.
Amount - Rotate the GAIN knob to adjust the speed at which the pitch modulates (1-99).
Effect Level - Rotate the MASTER LEVEL knob to adjust the depth of the modulation (0-99).
22
BP200 Manual
9/26/01
3:21 PM
Page 23
Octavider
The Octavider effect creates a smooth tracking unison note one octave below the
note being played.
Amount - Has no function when Octavider is used.
Effect Level - Rotate the MASTER LEVEL knob to adjust the level of the
Octavider effect (0-99).
SynthTalk™
SynthTalk™ is exclusive to DigiTech. It appears to make your bass speak based upon
the attack or how hard you strike the strings.
Amount - Rotate the GAIN knob to select one of the ten different synth voices
(Vox 1- Vox 10).
Effect Level - Rotate the MASTER LEVEL knob to adjust the the input signal
(sensitivity) required to trigger SynthTalk™ (0-99).
Pitch Shift
The pitch shifting copies the incoming signal, shifts the pitch of the copy to a different
note, and then mixes it back with the original signal. This gives the illusion that two
basses are playing different notes at the same time.
Amount - Rotate the GAIN knob to select the interval of the shifted pitch (+/-12
semitones).
Effect Level - Rotate the MASTER LEVEL knob to control the mix level of the
shifted pitch (0-99).
23
BP200 Manual
9/26/01
3:21 PM
Page 24
Detune
A detuner makes a copy of the original signal, takes the copied signal slightly out of
tune, and mixes the two signals back together. This gives the illusion that two guitars
are playing the same part together.
Amount - Rotate the GAIN knob to adjust the amount of detune (+/-24 cents).
Effect Level - Rotate the MASTER LEVEL knob to control the mix of the
detuned note (0-99).
Whammy™
Whammy is an effect that uses an Expression Pedal to bend the pitch of the incoming signal, or add a bendable harmony with the original signal. As the pedal is moved,
the note is bent either up or down.
Amount - Rotate the GAIN knob to select the type of pitch bend.
Whammy (no Dry Signal)
1OCTUP (1 octave above)
2OCTUP (2 octaves above)
2NDDWN (a second below)
REV2ND (a second below reversed pedal
action)
4THDWN (a fourth below)
1OCTDN (an octave below)
2OCTDN (2 octaves below)
DIVBOM (Dive Bomb)
Harmony Bends (Dry Signal Added)
M3>MA3 (a minor third to a Major third)
2NDMA3 (a second above to a Major third
above)
3RD4TH (a third above to a fourth above)
4TH5TH (a fourth above to a fifth above)
5THOCT (a fifth above to an octave above)
HOCTUP (one octave above)
HOCTDN (one octave down)
Effect Level - Rotate the MASTER LEVEL knob to adjust the volume of the
Whammy (0-99).
24
BP200 Manual
9/26/01
3:21 PM
Page 25
Delay
Delay records a portion of the incoming signal, and plays it back a short time later.The
recording can repeat just once or several times.
Type/Level - Rotate the AMP TYPE knob to select one of the following: Mono 1-9,
Analog 1-9, and Ping Pong 1-9, and Spread 1-9. (1-9 are varying delay levels).
Delay Time - Rotate the GAIN knob to select the delay time (10ms - 990ms, 1sec 2sec).
Delay Feedback - Rotate the MASTER LEVEL knob to adjust the amount of feedback
(repeats) (0-99, RHold).
Reverb
Using reverb in recorded program material gives the listener a sense that the material is
being performed in an actual room or hall.This similarity to actual acoustic spaces makes
reverberation a useful tool in recorded music.
Reverb Type - Rotate the AMP TYPE knob to select 1 of 10 reverb effects, or Off .
REV OF = Reverb Off
STUDIO = Studio
ROOM = Wood Room
CLUB = Club
PLATE = Plate
HALL = Hall
AMPTHE = Amphitheater
CHURCH = Church
GARAGE = Parking Garage
ARENA = Arena
SPRING = Spring
Decay - Rotate the GAIN knob to adjust the reverb decay time (1-99).
Reverb Level - Rotate the MASTER LEVEL knob to adjust the reverb level (0-99).
25
BP200 Manual
9/26/01
3:21 PM
Page 26
Appendix
Specifications:
Input: 1/4” TS
Jam-A-Long: 1/8” Stereo TRS
Output: 1/4” Stereo TRS
Headphone: 1/8” Stereo TRS
A/D/A: 24 bit Delta Sigma
Power Supply: 9 VAC, 1.3A (PS0913B)
Power Consumption: 6.8 Watts
Memory: 40 User/40 Factory
Effects: Fretless Simulator,Wah, Compressor, 16 Bass Amp/Stompbox Models, 3 band
EQ, Noise Gate, Cabinet Modeling, Chorus, Flange, Phaser, Envelope Filter,
Vibrato, Octavider, SynthTalk™, Detune, Pitch Shift,Whammy™, Delay, and
Reverb.
Rhythm Trainer: 31 Patterns
Dimensions: 8.5” L x 10” W x 2.25” H
Weight: 3 lbs.
26
BP200 Manual
9/26/01
3:21 PM
Page 27
Preset List
Number
1/41
2/42
3/43
4/44
5/45
6/46
7/47
8/48
9/49
10/50
11/51
12/52
13/53
14/54
15/55
16/56
17/57
18/58
19/59
20/60
Preset Name
Punch Bass
Crunch
Growl
Grit Bass
Beefy
Slappin
Rockin'
Jazzy
Smooth
Spank
Fretless
Dirt Bass
Octave Fuzz
Grind
Synthlike
Sweep
Phat
Standup
Funken
Pick It
Display Name
Punch
crunch
growl
gritty
beefy
slapin
rockin
jazzy
smooth
spank
nofret
dirt
octfuz
grind
synth
sweep
phat
stndup
funken
pickit
Number
21/61
22/62
23/63
24/64
25/65
26/66
27/67
28/68
29/69
30/70
31/71
32/72
33/73
34/74
35/75
36/76
37/77
38/78
39/79
40/80
Preset Name
Auto Wah
Phased
Comp Clean
Chorus
Traced
Amped
Sunny
Solo
Bright
Dark
Studio
Tight
Big Butt
Fat Fuzz
Fuzz Phase
Vibro
Vintage
B- Man
Strings
Space
Display Name
autowa
phased
cmpcln
chorus
traced
amped
sunny
solo
bright
dark
studio
tight
bigbut
fatfuz
fuzfaz
vibro
vintag
b-man
strngs
space
27
BP200 Manual
Notes:
28
9/26/01
3:21 PM
Page 28
BP200 Manual
9/26/01
3:21 PM
Page 29
Notes:
29
BP200 Manual
9/26/01
3:21 PM
Page 30
DigiTech
8760 S. Sandy Parkway, Sandy, Utah 84070
PH (801) 566-8800 FAX (801) 566-7005
International Distribution
8760 S. Sandy Parkway, Sandy, Utah 84070 USA
PH (801) 566-8800 FAX (801) 566-7005
DigiTech and BP200 are trade marks of the
Harman Music Group Inc.
Copyright the Harman Music Group
Printed in the USA 9/2001
Manufactured in the USA
BP200 Owners Manual 18-1315-A
Please visit DigiTech on the World Wide Web at:
http://www.digitech.com
A Harman International Company