1
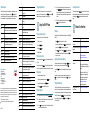
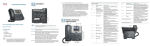
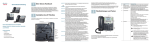
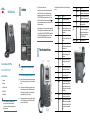
Quick Start Guide
1
Installation
STEP 5 Connect your phone to the network:
•
•
Using an Ethernet Connection—Insert the Ethernet cable into the slot
marked “SW” (4). Insert the other end of the Ethernet cable into the
appropriate device on your network, such as a network switch. The
Cisco SPA 525G/525G2 provides a second Ethernet port (3). You can
connect a PC to this port to provide network access to the PC. (Note: This
option is only available when phone is connected to the network via the
wired Ethernet connection.)
Refer to the following table for identification of your IP phone’s hardware
features.
#
Phone Feature
Description
14
Speaker button
Push to turn the speaker on or off. When
the speaker is on, the button glows green.
#
Phone Feature
Description
15
Headset button
1
Handset
Pick up to answer or place calls.
Push to turn the headset on or off. When
the headset is on, the button glows green.
2
Speaker
Speaker for phone.
16
Keypad
3
Message Waiting
Indicator
When lit red, you have a new voice mail
message. When lit flashing red, you have
an incoming call or the phone’s firmware is
being updated.
Use to dial phone numbers, enter letters,
and choose menu items.
shown
below
USB 2.0 host port
4
LCD Screen
Typically displays date and time, phone
station name, line extensions, and softkey
options.
Accepts USB memory device to play MP3
files on the phone or to upload security
certificates for wireless authentication.
Can also be used to charge devices
(Cisco SPA 525G2 model).
not shown
Headset port
Accepts wired headsets.
Using a Wireless Connection—Your phone has a built-in wireless adapter.
You must unplug the Ethernet connection before configuring Wi-Fi. See the
Cisco Small Business IP Phone SPA 525G/525G2 (SIP) User Guide or the
Cisco Unified Communications Manager Express for the Cisco Small
Business IP Phone 525G/525G2 User Guide for more information.
2
Phone Hardware Features
5
Line keys
Indicates phone line status. Consult your
User Guide for an explanation of line colors
and what they mean.
6
Softkey buttons
Press a softkey button to perform the
action shown on the label on the LCD
screen above.
7
Navigation button
Press an arrow to scroll left, right, up, or
down through items shown on the LCD
screen.
8
Select button
Press the check mark button to select an
option or menu item on the screen.
9
Messages button
Press to access voice mail (must be set up
by your phone administrator).
10
Hold button
Press to place a call on hold.
11
Setup button
Press to access a menu to configure
features and preferences (such as your
directory and speed dials), access your
call history, and set up functions (such as
call forwarding).
12
Mute button
Press to mute or unmute the phone. When
phone is muted, the button glows red.
13
Volume button
Press + to increase the volume and - to
lower the volume of the handset, headset,
speaker (when the handset is off hook), or
ringer volume (when the handset is on
hook).
Cisco Small Business SPA IP Phone
CAUTION
Model SPA 525G/SPA 525G2
Package Contents
•
IP telephone
•
Desk Stand
•
RJ-45 Ethernet Cable
•
Setup CD-ROM
•
Quick Start Guide
NOTE
The features available on your phone depend on the
type of system to which your phone is connected.
Contact your system administrator if you have questions
about phone features.
Do not insert a telephone line cord into the port marked
“AUX” (1).
STEP 1 Turn the phone over to expose the ports on the back of the unit.
STEP 2 Insert one end of the phone cord into slot marked with a phone symbol
(5). Insert the other end into the jack at the bottom of the handset (not
shown).
STEP 3 (Optional) Connect the desk stand by lining up the tabs on the desk
stand with the slots on the back of the phone. Slide the bottom tabs
into the slots and lightly press down on the top of the desk stand. It
should easily slide into the top slots. Do not force.
STEP 4 If you are using an external power source, plug one end of the power
cord into the building’s power source and insert the other end of the
power cord into the phone base (2).
Softkey Buttons
Button
Function
Using Keypad Shortcuts
The softkey buttons on your phone display may vary depending on your phone
system setup. Press the right navigation button or the More softkey button to
view additional softkey buttons. Following is a partial listing of softkey buttons
that may be available on your phone, depending on your phone system.
Delete
Deletes an entire item (for example, a number from the Call
History list).
Dial
Dials a number.
Use the keypad to enter the number of the menu or sub-menu item. For
example, to reach the Call History menu, press the Setup button and enter 2.
Menus and options may vary depending on the phone system.
Directory/dir
Provides access to your personal and corporate phone
directory.
Button
Function
DND/DnD
BXfer
Performs a blind call transfer (transferring a call without
speaking to the party to whom you are transferring the call.)
Do Not Disturb; prevents incoming calls from ringing your
phone.
Edit
Opens an item so that you can edit numbers or letters, or
enable or disable a feature.
Call Rtn
3
Using Your SPA IP Phone
Placing or Answering Calls
Returns the last missed call by dialing the number that called
you.
EditDial
CFwdAll
Forwards all calls to a specified number.
Forward/cfwd
Change
Opens a menu so that you can change the properties for an
item (for example, change a ring tone).
GrPickup/
GPickUp
Allows you to answer a call ringing on an extension by
discovering the number of the ringing extension.
•
Clear
Deletes an entire text/number field.
Hold
Places a call on hold.
Clr DND
Clears Do Not Disturb.
More
Accesses additional softkeys.
Conf/Confrn
Initiates a conference call.
Option
confLx
Conferences active lines on the phone together.
Enters a sub-menu and when pressed multiple times, shows
all of the choices in that sub-menu.
Putting a Call on Hold
DelChar
Deletes the last number or letter.
Park
Puts a call on hold a call at a designated “park” number. The
call is active until you unpark it, or the caller disconnects.
To put a call on hold, press the Hold button. A series of beeps indicates the call
is on hold.
Edits a number before dialing.
Forwards calls coming to your phone.
Must be configured by your Phone Administrator.
Americas Headquarters
Cisco Systems, Inc.
170 West Tasman Drive
San Jose, CA 95134-1706
USA
http://www.cisco.com
Tel: 408 526-4000
800 553-NETS (6387)
Fax: 408 527-0883
Cisco, Cisco Systems, the Cisco logo, and the Cisco Systems logo are registered trademarks or
trademarks of Cisco Systems, Inc. and/or its affiliates in the United States and certain other
countries. All other trademarks mentioned in this document or Website are the property of their
respective owners. The use of the word partner does not imply a partnership relationship
between Cisco and any other company. (0705R)
© 2008 Cisco Systems, Inc. All rights reserved.
Printed in the USA on recycled paper containing 10% postconsumer waste.
78-18837-02
Paste
Using the navigation button, highlight an item and press
Paste to place the item you copied.
Pickup/PickUp
Allows you to answer a call ringing on another extension by
entering the extension number.
Play
Plays an item (for example, a ring tone).
Redial
Displays a list of recently dialed numbers.
Resume
Resumes a call that is on hold.
Save
Saves your changes.
Scan
Scans for wireless networks or Bluetooth devices.
Select
Selects the highlighted item on the LCD screen.
Transfer/Trnsfer Performs a call transfer.
Unpark
Disconnects a parked call.
View
Displays more information about a selected item.
xferLx
Transfers an active line on the phone to a called number.
To place or answer a call, do one of the following tasks:
STEP 4 To transfer the call without waiting for the other person to answer,
press Transfer/Trnsfer after the call begins to ring and hang up. If you
hang up before the second call rings, the transfer fails and the first call
is disconnected. If you misdial, press the line button again to receive a
dial tone.
STEP 5 To transfer after speaking privately to the other person, press Transfer/
Trnsfer at any time during the conversation.
Redialing
Depending on your phone model and phone system setup, use one of the following
methods:
Pick up the receiver.
•
Press Redial to dial that last number that you called.
•
Press the Speaker button.
•
•
Press the Headset button.
To redial a recently-called number, press Redial, select the number from the
list, and then press Dial. (Available on some phone systems.)
•
Press a line button.
To resume the call, press the Resume soft key or the flashing red line button for
the call. If you have multiple calls, all calls are put on hold except the active call.
Ending a Call
•
Press the Setup button and then select Call History. You can then select any
list, such as Missed Calls or Received Calls, and you can press Dial to call
any number on the list.
Adjusting Call Volume and Muting
To adjust the volume while you are on a call, press + on the Volume button to
increase the volume, or press - to decrease the volume. Press Save.
•
If you are using the handset, hang up.
•
If you are using the speakerphone, press the Speaker button.
•
If you are using the headset, press the Headset button.
Setting Do Not Disturb
•
Press the End Call soft key, if available on your phone.
STEP 1 During an active call, or a call on hold, press Transfer/Trnsfer.
STEP 2 Either enter the number to which you want to transfer the call or use the
directory to choose a number.
STEP 3 Press Dial (on some phone systems). The call is placed on hold and a
new line is opened to dial the number.
To access voicemail, press the Messages button on your phone. Your system
administrator should configure your phone with the correct voicemail number
so that pressing the Messages button automatically dials your voicemail
system.
4
Where to Go From Here
Resource
Location
Cisco Small Business Support
Community
www.cisco.com/go/smallbizsupport
Cisco Small Business Support and www.cisco.com/go/smallbizhelp
Resources
Phone Support Contacts
www.cisco.com/en/US/support/
tsd_cisco_small_business
_support_center_contacts.html
Cisco Small Business Firmware
Downloads
www.cisco.com/go/smallbizfirmware
Pressing the Volume button while not on a call adjusts the volume of the phone’s
ringer.
To mute the phone microphone, speaker, or headset microphone, press the
Mute button on the phone. The button lights red. Press the Mute button again to
unmute.
Transferring Calls
Accessing Voicemail
Use the Do Not Disturb feature to prevent incoming calls from ringing your
phone. If you have voice mail configured, incoming callers immediately reach
voice mail. If voice mail is not configured, callers hear a busy signal or message.
To set Do Not Disturb, press the DND/DnD softkey on your phone. Depending
on your phone system, either press the Clr DND softkey or the DnD softkey to
turn Do Not Disturb off.
Select a link to download firmware for
Cisco Small Business Products. No login is
required.
Downloads for all other Cisco Small
Business products, including Network
Storage Systems, are available in the
Download area on Cisco.com at
www.cisco.com/go/software
(registration/login required).
Cisco Small Business SPA 500
Series IP Phones
www.cisco.com/go/spa500phones