1
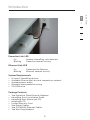
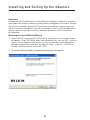
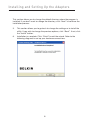
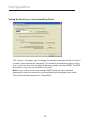
Powerline Turbo
Ethernet Adapter
User Manual
F5D4071
Table of Contents
1.
Introduction . . . . . . . . . . . . . . . . . . . . . . . . . . . . . . . . . . . . . 1
Features . . . . . . . . . . . . . . . . . . . . . . . . . . . . . . . . . . . . . . . . 1
Product Specifications . . . . . . . . . . . . . . . . . . . . . . . . . . . . . 2
System Requirements . . . . . . . . . . . . . . . . . . . . . . . . . . . . . 3
Package Contents . . . . . . . . . . . . . . . . . . . . . . . . . . . . . . . . 3
2.
Installing and Setting Up the Adapters. . . . . . . . . . . . . . . . . 4
3.
Configuration . . . . . . . . . . . . . . . . . . . . . . . . . . . . . . . . . . . . 8
Diagnose Powerline Network . . . . . . . . . . . . . . . . . . . . . . . . 8
Setting Up Security on a Local HomePlug Device . . . . . . . 10
Setting Up Security on a Network HomePlug Device . . . . . 11
4.
Information . . . . . . . . . . . . . . . . . . . . . . . . . . . . . . . . . . . . 14
fc2
Introduction
®
The installation of the Adapter only requires that a 10/100Mbps
network adapter is installed on the computers. This makes the
Powerline Turbo Ethernet Adapter compatible with any device,
including Mac, Windows, and UNIX machines.
For security, all HomePlug devices are equipped with 56-bit DES
encryption. The private home power grid plus encryption makes
HomePlug significantly more secure than competing technologies.
The Powerline Turbo Ethernet Adapter provides the best solution for
no-new-wires home networking. With easy plug-and-play installation,
and the reliability of HomePlug Ethernet’s products, the Powerline
Turbo Ethernet Adapter is the best solution for high-speed networking.
Features
• Up to 85Mbps* bandwidth over standard home power lines
• Estimated range of 300m in wall power lines
• HomePlug signal easily passes through circuit breaker
• 56-bit DES encryption ensures data security
• Encryption completed by hardware, without sacrifice to bandwidth
• Uses IEEE 802.3 computer interface
• Plug-and-play installation
• HomePlug Powerline Specification 1.0 Turbo-compliant
1
1
2
3
4
section
Thank you for purchasing the Powerline Turbo Ethernet Adapter (the
Adapter). Most people don’t enjoy buying long and expensive Ethernet
cables or pulling the cables from one place to another, but the Adapter
offers one of the easiest ways to enjoy home or small-business
networking. Users can now experience a total network solution with
the Adapter. The Powerline Turbo Ethernet Adapter operates on the
HomePlug Powerline Specification 1.0 Turbo standard, providing up to
85Mbps* bandwidth over home AC wiring. Since the home power lines
are the most pervasive medium in households with multiple outlets in
every room, the Adapter allows multiple home desktop and notebook
computers to be networked to share an Internet connection, printers,
and files, and play games without any additional wiring.
Introduction
Product Specifications
Computer Interface: IEEE 802.3/802.3u
Operating Temperature: 32–104 degrees F (0–40 degrees C)
Storage Temperature: -4–176 degrees F (-20–80 degrees C)
Humidity: Max. 5%–90% (non-condensing)
Typical Operating Range: Up to 300m in wall power lines
* The standard transmission rate—85Mbps—is the physical data rate.
Actual data throughput will be lower.
2
Introduction
2
3
4
Powerline Link LED
On
Blinking
Another HomePlug unit detected
Powerline network activity
®
Ethernet Link LED
On
Blinking
Connected to Ethernet
Ethernet network activity
System Requirements
•
•
•
•
•
At least 2 HomePlug devices
Available Ethernet port on each computer or network
Available power outlet
Standard home powerline wiring
CD-ROM drive
Package Contents
•
•
•
•
•
•
•
•
Two Powerline Turbo Ethernet Adapters
HomePlug Quick Installation Guide
HomePlug User Manual (on CD)
Installation CD
Limited Warranty Card
Two Power Cables
Two CAT5/RJ45 Ethernet Cables
Two Wall Plug Adapters
3
section
1
Installing and Setting Up the Adapters
Overview
Installation of the Powerline Turbo Ethernet Adapter takes only minutes
and does not require setting up long wires throughout the house. Simply
install the included software CD and after installation, physically plug
the unit into the computer and the wall outlet. Users have the option to
adjust security functions and the network platform once installation
is complete.
Running the InstallShield Wizard
1. Insert the CD into your CD-ROM drive and wait for the setup screen
to appear. If the CD-ROM does not automatically run the CD, click on
“Start” in the bottom left corner of your screen (for most Microsoft
Windows operating systems) and go to “Run”. Type in: “(CD Drive
Letter):\eth\setup.exe” and click “OK”.
2. Once the software loads, the following dialog box will appear:
4
Installing and Setting Up the Adapters
3. Click “Next” to continue the installation:
1
3
4
4.Please enter the user name and organization information. The “Install this
application for” option is applicable to circumstances in which multiple
logins are applied. For example, if you only want to allow yourself access to
that particular account, then select “Only for me”. If you don’t have multiple
accounts or you want to allow all users to access the utility, choose “Anyone
who uses this computer (all users)”. Then, click “Next” to continue.
5
section
2
Installing and Setting Up the Adapters
This section allows you to change the default directory where the program is
installed. If you don’t want to change the directory, click “Next” to continue the
installation process.
5.
This section allows you to go back to change the settings or to install the
utility. If you wish to change the previous options, click “Back”. If not, click
the “Install” button.
6.
Installation is complete. Click “Finish” to exit the wizard. Refer to the
following diagrams to set up your hardware connections.
6
Installing and Setting Up the Adapters
1
Hardware Setup
3
4
1.
Plug your network cable into the computer’s RJ45 network adapter port.
2.
Plug the other end of your network cable into the RJ45 port located at
the back of the Adapter. re Setup
3.
Plug the power cable into the power connector at the back of
the Adapter.
4.
Plug the power plug of your power cable directly into a power outlet in
the wall.
NOTE: Do not plug the device into a UPS or power strip with surge protection.
The Adapter has its own power filter for protection against surges.
7
section
2
ardware Setup
Configuration
Overview
The Adapter uses 56-bit DES encryption to block access from the outside. The
key is set by using the HomePlug Configuration Utility on the CD. By default, the
protection is enabled. However, it is recommended that you change the default
network password. All your HomePlug devices must use the same network password
in order for the computers to be networked. Make sure that all devices are loaded
with the same network password.
Diagnose Powerline Network
Part 1: Diagnose a Local HomePlug Device
Double-click the “Belkin HomePlug Utility” icon on your desktop to open
the utility shown in the screen below.
ardware Setup
The “Main” tab shows the HomePlug units that are connected to the current
computer and other devices on the network. It also tells you the MAC address of
each device. It lets you refresh the window, if you change devices, and also allows
you to connect to different networks if multiple units are connected to
your computer.
Note: If the link quality is poor, and appears red, or the MAC address of any of
the units connected to this computer appears to be all 0s, then you may have a
defective unit. Please contact technical support.
8
Configuration
1
Part 2: Diagnose a Network HomePlug Device
The “Main” tab shows all the other HomePlug units on your powerline network.
It represents them by MAC address, and also shows the available bandwidth to
each unit (units farther away from the current computer might have a lower data
rate). If you add or subtract units from your home network, you might want to
re-scan, by clicking the “Scan” button. This will re-scan the network and refresh
with any changes.
Note: Only units with the same network password will appear; please verify
that they all have the same network password (case-sensitive).
Note: If a unit shows a MAC address of all 0s, this unit may not have a solid
connection, or may not connect at all. If this is the case, please contact
technical support.
Note: If there are units in your home that do not appear in this network scan,
unplug and re-plug all devices (only do this with the units that do not appear in
the network screen). If the problem persists, move the unit closer to this current
unit (adjacent plugs in the same wall socket is preferred). If the problem still
persists and that unit still does not appear on the network, then the unit may be
defective and you will need to contact technical support. Otherwise, if you view
the unit working, distance might be the only issue.
The networked HomePlug devices can be renamed by selecting the device and
clicking “Rename”.
9
2
3
4
section
Note: If you do not see ANY units in the device status, and there is a device
connected to your computer, try unplugging and re-plugging all devices. Also
make sure that the cable connecting your computer to the HomePlug device is
the right type and is working correctly. If everything seems to be correct, and
you do not see anything in the “Device” window, try rebooting your computer. If
the problem still persists, please contact technical support.
Configuration
Setting Up Security on a Local HomePlug Device
The “Privacy” tab allows you to change the network password to the unit that is
currently connected to this computer. This network password encrypts all data
that is sent from this unit using 56-bit data encryption standard (DES). The DES
encryption is very secure and difficult to crack.
Note: Every unit on your home network MUST have the same network
password in order for connectivity to be established throughout your home.
The default network password is “HomePlug”.
10
Configuration
Setting Up Security on a Network HomePlug Device
1. The “Privacy” tab allows users to use one primary computer to control the
network password of all units on the home network.
11
2
3
4
section
2. You will have to go back to the “Main” tab first to enter the DEK (Device
Encryption Key) for each networked HomePlug device. Select the device and
click “Enter Password”.
1
Configuration
3. In the following window, enter the DEK located on the bottom of each device into
the “Password” field.
ardware Setup
4. You can change the password for all networked devices from one computer using
this utility, instead of changing the password individually.
Note: The DEK is unique for EACH HomePlug device. To use this utility, you
will need to input the DEK for each unit.
5. The network password can be changed on all devices on which DEKs have been
entered. On the “Privacy” tab, simply change the private network name (network
password) and click “Set all devices”.
12
Configuration
1
Diagnostics
2
4
This page provides diagnostics information for your HomePlug network. It also
allows you to create, email, and print a report of this information.
Technical Support
You can find technical support information at www.belkin.com/networking or
www.belkin.com. If you want to contact technical support by phone,
please call:
US: 877-736-5771
800-223-5546 ext. 2263
310-898-1100 ext. 2263
UK: 0845 607 77 87
Australia: 1800 235 546
New Zealand: 0800 235 546
Singapore: 65 64857620
Europe: www.belkin.com/support
13
section
3
ardware Setup
Information
FCC Statement
DECLARATION OF CONFORMITY WITH FCC RULES FOR
ELECTROMAGNETIC COMPATIBILITY
We, Belkin International, Inc., of 501 West Walnut
Street, Compton, CA 90220, declare under our sole
responsibility that the product,
F5D4071
to which this declaration relates,
complies with Part 15 of the FCC Rules. Operation is
subject to the following two conditions: (1) this device
may not cause harmful interference, and (2) this device
must accept any interference received, including
interference that may cause undesired operation.
Caution: Exposure to Radio Frequency Radiation.
The radiated output power of this device is far below the FCC radio frequency
exposure limits. Nevertheless, the device shall be used in such a manner that the
potential for human contact during normal operation is minimized.
When connecting an external antenna to the device, the antenna shall be placed in
such a manner to minimize the potential for human contact during normal operation.
In order to avoid the possibility of exceeding the FCC radio frequency exposure
limits, human proximity to the antenna shall not be less than 20cm (8 inches) during
normal operation.
Federal Communications Commission Notice
This equipment has been tested and found to comply with the limits for a Class
B digital device, pursuant to Part 15 of the FCC Rules. These limits are designed
to provide reasonable protection against harmful interference in a residential
installation.
This equipment generates, uses, and can radiate radio frequency energy. If this
equipment does cause harmful interference to radio or television reception, which
can be determined by turning the equipment off and on, the user is encouraged to
try and correct the interference by one or more of the following measures:
• Reorient or relocate the receiving antenna.
• Increase the distance between the equipment and the receiver.
• Connect the equipment to an outlet on a circuit different from that to which the
receiver is connected.
• Consult the dealer or an experienced radio/TV technician for help.
14
Information
1
Modifications
The FCC requires the user to be notified that any changes or modifications to this
device that are not expressly approved by Belkin International, Inc., may void the
user’s authority to operate the equipment.
2
3
This device complies with the essential requirements of the R&TTE Directive
1999/5/EC. The following test methods have been applied in order to prove
presumption of conformity with the essential requirements of the R&TTE Directive
1999/5/EC:
4
- EN60950-1:2001 A11:2004
Safety of Information Technology Equipment
Česky [Czech]
[Jméno výrobce] tímto prohlašuje, že tento [typ zařízení] je ve shodě
se základními požadavky a dalšími příslušnými ustanoveními směrnice
1999/5/ES.
Dansk [Danish]
Undertegnede [fabrikantens navn] erklærer herved, at følgende udstyr
[udstyrets typebetegnelse] overholder de væsentlige krav og øvrige
relevante krav i direktiv 1999/5/EF.
Deutsch
[German]
Hiermit erklärt [Name des Herstellers], dass sich das Gerät [Gerätetyp]
in Übereinstimmung mit den grundlegenden Anforderungen und den
übrigen einschlägigen Bestimmungen der Richtlinie 1999/5/EG befindet.
Eesti [Estonian]
Käesolevaga kinnitab [tootja nimi = name of manufacturer] seadme
[seadme tüüp = type of equipment] vastavust direktiivi 1999/5/EÜ
põhinõuetele ja nimetatud direktiivist tulenevatele teistele asjakohastele
sätetele.
English
Hereby, [name of manufacturer], declares that this [type of equipment]
is in compliance with the essential requirements and other relevant
provisions of Directive 1999/5/EC.
Español
[Spanish]
Por medio de la presente [nombre del fabricante] declara que el [clase
de equipo] cumple con los requisitos esenciales y cualesquiera otras
disposiciones aplicables o exigibles de la Directiva 1999/5/CE.
Ελληνική
[Greek]
ΜΕ ΤΗΝ ΠΑΡΟΥΣΑ [name of manufacturer] ΔΗΛΩΝΕΙ ΟΤΙ
[type of equipment] ΣΥΜΜΟΡΦΩΝΕΤΑΙ ΠΡΟΣ ΤΙΣ ΟΥΣΙΩΔΕΙΣ
ΑΠΑΙΤΗΣΕΙΣ ΚΑΙ ΤΙΣ ΛΟΙΠΕΣ ΣΧΕΤΙΚΕΣ ΔΙΑΤΑΞΕΙΣ ΤΗΣ
ΟΔΗΓΙΑΣ 1999/5/ΕΚ.
Français
[French]
Par la présente [nom du fabricant] déclare que l’appareil [type d’appareil]
est conforme aux exigences essentielles et aux autres dispositions
pertinentes de la directive 1999/5/CE.
Italiano [Italian]
Con la presente [nome del costruttore] dichiara che questo [tipo di
apparecchio] è conforme ai requisiti essenziali ed alle altre disposizioni
pertinenti stabilite dalla direttiva 1999/5/CE.
15
section
Europe – EU Declaration of Conformity
Information
Latviski
[Latvian]
Ar šo [name of manufacturer / izgatavotāja nosaukums] deklarē, ka [type
of equipment / iekārtas tips] atbilst Direktīvas 1999/5/EK būtiskajām
prasībām un citiem ar to saistītajiem noteikumiem.
Lietuvių
[Lithuanian]
Šiuo [manufacturer name] deklaruoja, kad šis [equipment type] atitinka
esminius reikalavimus ir kitas 1999/5/EB Direktyvos nuostatas.
Nederlands
[Dutch]
Hierbij verklaart [naam van de fabrikant] dat het toestel [type van toestel]
in overeenstemming is met de essentiële eisen en de andere relevante
bepalingen van richtlijn 1999/5/EG.
Malti [Maltese]
Hawnhekk, [isem tal-manifattur], jiddikjara li dan [il-mudel tal-prodott]
jikkonforma mal-ħtiġijiet essenzjali u ma provvedimenti oħrajn relevanti li
hemm fid-Dirrettiva 1999/5/EC.
Magyar
[Hungarian]
Alulírott, [gyártó neve] nyilatkozom, hogy a [... típus] megfelel a
vonatkozó alapvetõ követelményeknek és az 1999/5/EC irányelv egyéb
elõírásainak.
Polski [Polish]
Niniejszym [nazwa producenta] oświadcza, że [nazwa wyrobu] jest
zgodny z zasadniczymi wymogami oraz pozostałymi stosownymi
postanowieniami Dyrektywy 1999/5/EC.
Português
[Portuguese]
[Nome do fabricante] declara que este [tipo de equipamento] está
conforme com os requisitos essenciais e outras disposições da Directiva
1999/5/CE.
Slovensko
[Slovenian]
[Ime proizvajalca] izjavlja, da je ta [tip opreme] v skladu z bistvenimi
zahtevami in ostalimi relevantnimi določili direktive 1999/5/ES.
Slovensky
[Slovak]
[Meno výrobcu] týmto vyhlasuje, že [typ zariadenia] spĺňa základné
požiadavky a všetky príslušné ustanovenia Smernice 1999/5/ES.
Suomi [Finnish]
[Valmistaja = manufacturer] vakuuttaa täten että [type of equipment
= laitteen tyyppimerkintä] tyyppinen laite on direktiivin 1999/5/EY
oleellisten vaatimusten ja sitä koskevien direktiivin muiden ehtojen
mukainen.
Svenska
[Swedish]
Härmed intygar [företag] att denna [utrustningstyp] står I
överensstämmelse med de väsentliga egenskapskrav och övriga
relevanta bestämmelser som framgår av direktiv 1999/5/EG.
16
Information
Belkin International, Inc., Limited Lifetime Product Warranty
What this warranty covers.
Belkin International, Inc. (“Belkin”) warrants to the original purchaser of this Belkin
product that the product shall be free of defects in design, assembly, material,
or workmanship.
What the period of coverage is.
What will we do to correct problems?
Product Warranty.
Belkin will repair or replace, at its option, any defective product free of charge
(except for shipping charges for the product).
What is not covered by this warranty?
All above warranties are null and void if the Belkin product is not provided to
Belkin for inspection upon Belkin’s request at the sole expense of the purchaser,
or if Belkin determines that the Belkin product has been improperly installed,
altered in any way, or tampered with. The Belkin Product Warranty does not
protect against acts of God such as flood, lightning, earthquake, war, vandalism,
theft, normal-use wear and tear, erosion, depletion, obsolescence, abuse, damage
due to low voltage disturbances (i.e. brownouts or sags), non-authorized program,
or system equipment modification or alteration.
How to get service.
To get service for your Belkin product you must take the following steps:
1. Contact Belkin International, Inc., at 501 W. Walnut St., Compton CA
90220, Attn: Customer Service, or call (800)-223-5546, within 15 days of the
Occurrence. Be prepared to provide the following information:
a. The part number of the Belkin product.
b. Where you purchased the product.
c. When you purchased the product.
d. Copy of original receipt.
2. Your Belkin Customer Service Representative will then instruct you on how to
forward your receipt and Belkin product and how to proceed with your claim.
17
2
3
4
section
Belkin warrants the Belkin product for the lifetime of the product.
1
Information
Belkin reserves the right to review the damaged Belkin product. All costs of shipping
the Belkin product to Belkin for inspection shall be borne solely by the purchaser. If
Belkin determines, in its sole discretion, that it is impractical to ship the damaged
equipment to Belkin, Belkin may designate, in its sole discretion, an equipment
repair facility to inspect and estimate the cost to repair such equipment. The
cost, if any, of shipping the equipment to and from such repair facility and of such
estimate shall be borne solely by the purchaser. Damaged equipment must remain
available for inspection until the claim is finalized. Whenever claims are settled,
Belkin reserves the right to be subrogated under any existing insurance policies the
purchaser may have.
How state law relates to the warranty.
THIS WARRANTY CONTAINS THE SOLE WARRANTY OF BELKIN. THERE ARE
NO OTHER WARRANTIES, EXPRESSED OR, EXCEPT AS REQUIRED BY LAW,
IMPLIED, INCLUDING THE IMPLIED WARRANTY OR CONDITION OF QUALITY,
MERCHANTABILITY OR FITNESS FOR A PARTICULAR PURPOSE, AND SUCH
IMPLIED WARRANTIES, IF ANY, ARE LIMITED IN DURATION TO THE TERM OF
THIS WARRANTY.
Some states do not allow limitations on how long an implied warranty lasts, so the
above limitations may not apply to you.
IN NO EVENT SHALL BELKIN BE LIABLE FOR INCIDENTAL, SPECIAL, DIRECT,
INDIRECT, CONSEQUENTIAL OR MULTIPLE DAMAGES SUCH AS, BUT NOT
LIMITED TO, LOST BUSINESS OR PROFITS ARISING OUT OF THE SALE OR USE
OF ANY BELKIN PRODUCT, EVEN IF ADVISED OF THE POSSIBILITY OF SUCH
DAMAGES.
This warranty gives you specific legal rights, and you may also have other rights,
which may vary from state to state. Some states do not allow the exclusion or
limitation of incidental, consequential, or other damages, so the above limitations
may not apply to you.
18
Information
1
2
3
19
section
4
Powerline Turbo
Ethernet Adapter
Belkin Tech Support
US: 877-736-5771
800-223-5546 ext. 2263
310-898-1100 ext. 2263
UK: 0845 607 77 87
Australia: 1800 235 546
New Zealand: 0800 235 546
Singapore: 65 64857620
Europe: www.belkin.com/support
Belkin International, Inc.
501 West Walnut Street
Los Angeles, CA 90220, USA
310-898-1100
310-898-1111 fax
Belkin Ltd.
4 Pioneer Avenue
Tuggerah Business Park
Tuggerah, NSW 2259, Australia
+61 (0) 2 4350 4600
+61 (0) 2 4350 4700 fax
Belkin B.V.
Boeing Avenue 333
1119 PH Schiphol-Rijk, The Netherlands
+31 (0) 20 654 7300
+31 (0) 20 654 7349 fax
Belkin Ltd.
Express Business Park, Shipton Way
Rushden, NN10 6GL, United Kingdom
+44 (0) 1933 35 2000
+44 (0) 1933 31 2000 fax
© 2007 Belkin International, Inc. All rights reserved. All trade names are registered trademarks of respective
manufacturers listed. Windows and Windows Vista are either registered trademarks or trademarks of
Microsoft Corporation in the United States and/or other countries.
P75595