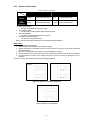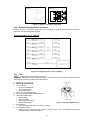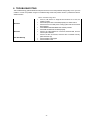
1
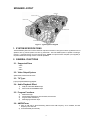
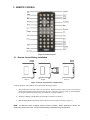
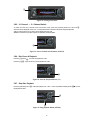
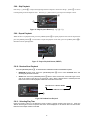
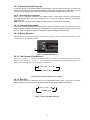
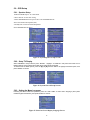
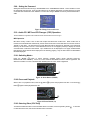
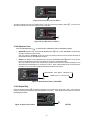
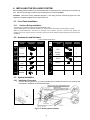
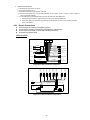
IN-DASH AUDIO / VIDEO SYSTEM
USER / INSTALLATION MANUAL
MODEL PAV-8000D
0
TABLE OF CONTENTS
TABLE OF CONTENTS.................................................................................................................................................................... 1
LIST OF TABLES................................................................................................................................................................................ 4
WARNINGS .......................................................................................................................................................................................... 5
SPEAKER LAYOUT .......................................................................................................................................................................... 6
1. SYSTEM SPECIFICATIONS............................................................................................................................................. 6
2. GENERAL FUNCTIONS.................................................................................................................................................... 6
2.1.
Supported Discs............................................................................................................................................................. 6
2.2.
Video Output System ................................................................................................................................................... 6
2.3.
TV Type: .......................................................................................................................................................................... 6
2.4.
Audio Playback Effect ................................................................................................................................................. 6
2.5.
Program Functions........................................................................................................................................................ 6
2.6.
AM/FM Tuner................................................................................................................................................................ 6
3. REMOTE CONTROL........................................................................................................................................................... 7
3.1.
Remote Control Battery Installation ......................................................................................................................... 7
4. FRONT PANEL...................................................................................................................................................................... 8
5. BASIC OPERATION ............................................................................................................................................................ 8
5.1.
Powering System On .................................................................................................................................................... 8
5.2.
Mute Control.................................................................................................................................................................. 8
5.3.
Mode Switch................................................................................................................................................................... 8
5.4.
Volume Control.............................................................................................................................................................. 9
5.5.
Displaying and Setting Time...................................................................................................................................... 9
5.5.1
Set Time.................................................................................................................................................................. 9
5.5.2
System Setup ......................................................................................................................................................... 9
5.6.
Select BASS, TREBLE, BALANCE and PLAYBACK Mode .......................................................................10
5.6.1
Bass and Treble Control...................................................................................................................................10
5.6.2
Balance and Fader Control..............................................................................................................................10
5.6.3
Sound Effect Control ........................................................................................................................................10
5.6.4
Loudness Control...............................................................................................................................................10
5.7.
Radio Tuner Operation................................................................................................................................................11
5.7.1
Select Tuner Function ........................................................................................................................................11
5.7.2
Select Band...........................................................................................................................................................11
5.7.3
Searching Stations...............................................................................................................................................11
5.7.3.1
Auto-Search Station.......................................................................................................................................11
5.7.3.2
Manual Se arch Station ..................................................................................................................................11
5.7.4
Preset Stations......................................................................................................................................................11
5.7.5
Storing Preset Stations......................................................................................................................................12
5.7.6
Scan Preset Stations...........................................................................................................................................12
5.7.7
Select Local-Distant Control...........................................................................................................................12
5.8.
DVD Player Operation...............................................................................................................................................12
5.8.1.
Lowering the Front Panel (Disc Insertion) ..................................................................................................13
5.8.2.
Disc loading in....................................................................................................................................................13
5.8.3.
Disc Eject .............................................................................................................................................................13
5.8.4.
Closing the Front Panel....................................................................................................................................13
5.8.5.
2.1 Channel — 5.1 Channel Switch..............................................................................................................14
5.8.6.
Disc Pause & Playback.....................................................................................................................................14
5.8.7.
Stop Disc Playback............................................................................................................................................14
5.8.8.
Skip Playback.....................................................................................................................................................15
5.8.9.
Repeat Playback.................................................................................................................................................15
5.8.10.
Random/Scan Playback....................................................................................................................................15
5.8.11.
Selecting Play Time...........................................................................................................................................15
5.8.12.
Selecting Subtitle Language............................................................................................................................16
5.8.12.1
Selecting Audio Language ........................................................................................................................16
5.8.13.
Selecting Camera Angle ...................................................................................................................................16
5.8.14.
Muting Operation...............................................................................................................................................16
5.8.15.
Fast Forward & Fast Reverse..........................................................................................................................16
5.8.16.
Slow Play .............................................................................................................................................................16
5.9.
OSD Setup.....................................................................................................................................................................17
5.9.1.
Speaker Setup .....................................................................................................................................................17
5.9.2.
Setup TV Display...............................................................................................................................................17
1
5.9.3.
Setting the Menu Language .............................................................................................................................17
5.9.4.
Selecting the Audio Language ........................................................................................................................18
5.9.5.
Selecting a Subtitle Language ........................................................................................................................18
5.9.6.
Selecting a TV Type..........................................................................................................................................18
5.9.7.
Setting the PARENTAL Preference...............................................................................................................18
5.9.8.
Setting the Password .........................................................................................................................................19
5.10.
Audio CD / MP3 and CD Changer (CDC) Operation ...................................................................................19
5.10.1.
Switching Modes................................................................................................................................................19
5.10.2.
Pause and Playback...........................................................................................................................................19
5.10.3.
Selecting Discs (CDC Only)...........................................................................................................................19
5.10.4.
Random / Scan....................................................................................................................................................20
5.10.5.
Repeat Play..........................................................................................................................................................20
6. INSTALLING THE PAV-8000D SYSTEM...................................................................................................................21
6.1.
Front Panel Installation..............................................................................................................................................21
6.1.1.
Cautions During Installation...........................................................................................................................21
6.2.
Accessories and Hardware ........................................................................................................................................21
6.3.
System Installation......................................................................................................................................................21
6.3.1
Installation Procedure .......................................................................................................................................21
6.3.2
Electric Connections.........................................................................................................................................22
6.3.3
Speaker Connections .........................................................................................................................................23
6.3.4
Optional Power Amplifier Connection.........................................................................................................24
6.3.5
Fuse........................................................................................................................................................................24
7. NOTES ON DISCS..............................................................................................................................................................24
8. TROUBLESHOOTING......................................................................................................................................................25
9. SPECIFICATION .................................................................................................................................................................26
WARRANTY.......................................................................................................................................................................................27
NOTES ..................................................................................................................................................................................................28
2
LIST OF FIGURES
Figure 1. Typical Speaker Diagram------------------------------------------------------------------------------------------------------------- 6
Figure 2. Remote Control-------------------------------------------------------------------------------------------------------------------------- 7
Figure 3. Remote Control Battery Replacement -------------------------------------------------------------------------------------------- 7
Figure 4. Front Panel -------------------------------------------------------------------------------------------------------------------------------- 8
Figure 5. Mute Control----------------------------------------------------------------------------------------------------------------------------- 8
Figure 6. Mode Switch------------------------------------------------------------------------------------------------------------------------------ 8
Figure 7. Volume Control -------------------------------------------------------------------------------------------------------------------------- 9
Figure 8. Displaying and Setting Time -------------------------------------------------------------------------------------------------------- 9
Figure 9. Setting Time ------------------------------------------------------------------------------------------------------------------------------ 9
Figure 10. System Setup --------------------------------------------------------------------------------------------------------------------------- 9
Figure 11. System Playback Mode Setup----------------------------------------------------------------------------------------------------10
Figure 12. (SEL/LOC) Button-------------------------------------------------------------------------------------------------------------------10
Figure 13. MODE Selection Button-----------------------------------------------------------------------------------------------------------11
Figure 14. BAND Selection Button -----------------------------------------------------------------------------------------------------------11
Figure 15. Auto-Search ----------------------------------------------------------------------------------------------------------------------------11
Figure 16. Preset Stations Select Buttons----------------------------------------------------------------------------------------------------12
Figure 17. Preset Station Scan Button (AS/PS ENTER)--------------------------------------------------------------------------------12
Figure 18. Select Local-Distant Control Button (SEL/LOC)--------------------------------------------------------------------------12
Figure 19. Front Panel Release Button -------------------------------------------------------------------------------------------------------13
Figure 20. Disc loading----------------------------------------------------------------------------------------------------------------------------13
Figure 21. Disc loading----------------------------------------------------------------------------------------------------------------------------13
Figure 22. Closing Front Panel------------------------------------------------------------------------------------------------------------------14
Figure 23. Stereo Channel Switch Button (4/2-6CH)------------------------------------------------------------------------------------14
Figure 24. Pause & Playback Button ( I I )--------------------------------------------------------------------------------------------------14
Figure 25. Stop playback Button (6/STOP)-------------------------------------------------------------------------------------------------14
Figure 26. Skip Playback Buttons ([? ? |] / [ |? ? ]) --------------------------------------------------------------------------------------15
Figure 27. Repeat Playback Button (5/REPT) ---------------------------------------------------------------------------------------------15
Figure 28. Random/Scan Playback------------------------------------------------------------------------------------------------------------15
Figure 29. Audio Mute Button ------------------------------------------------------------------------------------------------------------------16
Figure 30. Fast Forward & Fast Reverse Speeds ------------------------------------------------------------------------------------------16
Figure 31. Slow Speed Disc Playback--------------------------------------------------------------------------------------------------------16
Figure 32. System Speaker Setup Screens---------------------------------------------------------------------------------------------------17
Figure 33. System Speaker Setup Screens---------------------------------------------------------------------------------------------------17
Figure 34. System General Setup Screens ---------------------------------------------------------------------------------------------------17
Figure 35. Select On Screen Display Language Screen---------------------------------------------------------------------------------17
Figure 36. Menu Language Screen ------------------------------------------------------------------------------------------------------------18
Figure 37. Preferred Subtitle Language Screen--------------------------------------------------------------------------------------------18
Figure 38. Select TV Type Screen -------------------------------------------------------------------------------------------------------------18
Figure 39. PARENTAL Preference Screen Display --------------------------------------------------------------------------------------18
Figure 40. Change Password Screen ----------------------------------------------------------------------------------------------------------19
Figure 41. Mode Button (MODE) --------------------------------------------------------------------------------------------------------------19
Figure 42. Pause Button (11) --------------------------------------------------------------------------------------------------------------------19
Figure 43. Previous Disc Select (1/DISC-)--------------------------------------------------------------------------------------------------20
Figure 44. Next Disc Select (1/DISC+) ------------------------------------------------------------------------------------------------------20
Figure 45. Random\Scan Button (3/P.MODE) ---------------------------------------------------------------------------------------------20
Figure 46. Repeat Play Button (5/REPT)----------------------------------------------------------------------------------------------------20
Figure 47. Mounting Bracket Installation ---------------------------------------------------------------------------------------------------21
Figure 48. Cables Connection Diagram A ---------------------------------------------------------------------------------------------------22
Figure 49. Cables Connection Diagram B---------------------------------------------------------------------------------------------------22
Figure 50. Speaker Connection Diagram A -------------------------------------------------------------------------------------------------23
Figure 51. Incorrect Connection----------------------------------------------------------------------------------------------------------------23
Figure 52. Speaker Connection Diagram B -------------------------------------------------------------------------------------------------24
Figure 53. Wiring Diagram for Power Amp lifier -----------------------------------------------------------------------------------------24
3
LIST OF TABLES
Table 1. System Setup Values -------------------------------------------------------------------------------------------------------------------10
Table 2. Installation Hardware ------------------------------------------------------------------------------------------------------------------21
Table 3. Speaker Connections-------------------------------------------------------------------------------------------------------------------23
Table 4. Troubleshooting Table -----------------------------------------------------------------------------------------------------------------25
4
INTRODUCTION
Congratulations on your purchase of the AUDIOVOX PAV-8000D IN-DASH AUDIO / VIDEO SYSTEM.
The PAV-8000D is designed to give you and your family many years of video entertainment in the
mobile environment.
Please read the directions that follow to familiarize yourself with the product and
to ensure that you obtain the best results from your equipment.
WARNINGS
•:• Do not use any solvents or cleaning materials when cleaning the LCD
•:• Do not use any abrasive cleaners, they may scratch the LCD.Use only a lightly dampened lint free
cloth to wipe the screen if it is dirty.
•:• When not in use remove and store faceplate in supplied case.
•:• To reduce the risk of fire and electric shock do not expose the system to moisture.
•:• The product is a Class 1 Laser product and will emit visible or invisible hazardous laser radiation. Do
not open unit or defeat interlocks.
•:• Do not open the covers, refer servicing to qualified personnel only.
•:• Parking in direct sunlight can cause the interior temperature to rise to extreme levels, when this
happens allow the interior temperature to cool down before operating the system.
•:• The PAV-8000D System is designed to be installed in the vehicles with a Negative (-)12V Ground
Battery System
•:• If the power supply to the system is interrupted/disconnected , the user programmed preset memory
settings will be lost and the system will return to the factory default settings.
•:• Do not put anything other than discs into the disc slot.
•:• When leaving the car, be sure to eject the disc and store in its case.
5
SPEAKER LAYOUT
CENTER SP
FRONT LEFT SP
REAR LEFT SP
FRONT RIGHT SP
REAR LEFT SP
SUBWOOFER SP
Figure 1. Typical Speaker Diagram
1. SYSTEM SPECIFICATIONS
The PAV-8000D system has 5 channel low level outputs that consists of Two (2) Front & Two (2) Rear Surround
Speakers, One (1) Center Speaker and One (1) Subwoofer. The PAV-8000D system is capable of creating a
perfect 5.1 Channel DOLBY Surround Sound effect. NOTE: An optional Power Amplifier (not supplied) is
required to obtain the full-range of the 5.1 Channel capabilities.
2. GENERAL FUNCTIONS
2.1. Supported Discs
• DVD
• CD
• MP3
2.2. Video Output System
System AUTO , NTSC and PAL switch
2.3. TV Type:
[4.3] or [16.9] selectable during playback.
2.4. Audio Playback Effect
1)
2)
Dolby AC-3 DTS dual-MPEG output;
PRO LOGIC and DOWNMIX output.
2.5. Program Functions
1)
2)
3)
4)
Multi-Visual angle
Fast Forward, Fast Reverse, Slow Forward, Slow Reverse
Programmable Auto-Memory
Multi-language selective output
2.6. AM/FM Tuner
1) Store 18 FM and 12 AM broadcasting stations while FM Frequency: 87.5~108MHz; and AM
Frequency: 530-1720 KHz.
2) Tune automatically and manually.
6
3. REMOTE CONTROL
Figure 2. Remote Control
3.1. Remote Control Battery Installation
A
B
Step #1
Step #2
Step #3
Figure 3. Remote Control Battery Replacement
To replace the battery in the Remote Control, perform the following procedure
1.
Place the Remote Control face down on a flat surface. Hold the Remote Control in place using one hand
and with the other hand insert a fingernail into the grove of the spring catch (A in Step 1), insert thumbnail
into the groove Battery Holder (B in Step 1) and slide out. (see Step #1, Figure 3.)
2.
Install one “CR2025” Lithium Battery into the holder. (see Step #2, see Figure 3.)
3.
Slide the Battery Holder back into the remote control until it clicks in place (see Step #3, Figure 3.)
NOTE: The Remote Control is shipped without the battery installed. Before attempting to operate the
system using the Remote Control, you must install the battery as described in the procedure above.
7
4. FRONT PANEL
2 3
4
bt cl
bu
1
5
bs
6
br
7 8 9 bl bm bn bo bp bq
Figure 4. Front Panel
1.
2.
3.
4.
5.
6.
7.
8.
9.
10.
11.
Open/Close Front Panel Button and Eject Disc
Band Select Button (BAND)
Display (DISP) Button
Channel /Selection UP/Next Button
Channel /Selection Down /Previous Button
Select Local Distance Control Button (SEL/LOC)
Mute Control /Power (ON/OFF) Button
Preset 1 / Previous Disc Select (1/DISC-) Button
Preset 2 / Next Disc Select (2/DISC+) Button
Preset 3 / Random/Scan Playback (3/P.MODE) Button
12.
13.
14.
15.
16.
17.
18.
19.
Preset 4 / 2.Channel —5.1 Channel Switch (4/2 -6CH)
Button
Preset 5 / Repeat Playback (5/RPT) Button
Preset 6 / Stop playback (6/STOP) Button
Pause & Playback Button
Mode Switching Button
Angle Select/Direction (DOWN) Button
Direction (RIGHT) Button
Direction (LEFT) Button
AS/PS ENTER Button
5. BASIC OPERATION
5.1. Powering System On
7
Press the Power ON/OFF( ) button
to turn the PAV-8000D System Power ON. Press and hold the (
button for 2 Sec. to turn the system Power OFF
NOTE: This button
7 is also used to MUTE the audio sound.
5.2. Mute Control
When the unit is on, momentarily press the Mute Button (
unit will exit the MUTE mode.
) button
7?to mute the sound; Press it again, the
7
Figure 5. Mute Control
5.3. Mode Switch
bq
Press the ( MODE) button
to switchbetween the different modes if a CD or DVD is loaded. If a CD Changer
(CDC) is used with the system, the MODE button will also be used to switch to CDC mode.
bq
Figure 6. Mode Switch
8
)
5.4. Volume Control
Rotate the (SEL/LOC) knob
6
to Increase (Right) or Decrease (Left) the volume.
6
Figure 7. Volume Control
5.5. Displaying and Setting Time
3
To display the current Time on the LCD Screen, Press the [DISP] button , when the unit’s in “standby” state,
indicated time on LCD will be current time. NOTE: in “standby” state, current time is automatically indicated
on LCD; in other modes, press this key to display the time.
3
AM 12:45
Figure 8. Displaying and Setting Time
5.5.1
Set Time
3
To set HOUR S and MINUTES and to switch between them Press and Hold the [DISP] button
for 2 Seconds
to enter the Time Set Mode. Once in this mode, press the switch to toggle between Hour and Minute settings .
Press the [? ? |] button
4?to increase time.
5
Press the [||? ? ]
5
button to decrease time.
4
3
Figure 9. Setting Time
5.5.2
System Setup
To enter the System Setup Mode, Press and Hold the [DISP] button for 2 Seconds. Press the [? ? |] a
?nd the
[ |? ? ] ?
buttons select setup item, use [DISP] button to toggle between values and enter.
4
3
5
Figure 10. System Setup
9
Table 1. System Setup Values
Setup Item:
1 Clock Mode
2 Panel Detachable
3 Beep
4 Clock Display
5 Light In
6 LCD Flash Mode
7 LCD Contrast
Range
12H/24H
ON/OFF
ON/OFF
ON/OFF
ON/OFF
0~14
0~7
Default Value
12H
OFF
ON
ON
ON
14
2
5.6. Select BASS, TREBLE, BALANCE and PLAYBACK Mode
Press the (SEL/LOC) button
6
to select the Audio modes as shown is the following sequence:
SOUND NORMAL à VOL à BASS à
6
LOUDNESS ß FADER ß BAL ßTRE
Figure 11. System Playback Mode Setup
5.6.1
Bass and Treble Control
Once either Bass or Treble is selected, rotate the (SEL/LOC) knob
the Bass/Treble.
6
to Increase (Right) or Decrease (left)
6
Figure 12. (SEL/LOC) Button
5.6.2
Balance and Fader Control
6?to select Left & Right Balance mode. Once in the Balance mode, rotate the
(SEL/LOC) knob 6 ?to balance between the Left and Right speakers. Press the (SEL/LOC) button 6 again
to select the fader mode . Once in the Fader mode, rotate the (SEL/LOC) b utton 6 ?to balance between the
Press the (SEL/LOC) button
Front and Rear speakers
5.6.3
Sound Effect Control
Press the (SEL/LOC) button
(SEL/LOC) knob
6?to select the SOUND Effect.
Once in SOUND Effect mode, rotate the
6?to switch between the different sound effects as shown is the following sequence:
NORMAL à FLAT à JAZZ à ROCK à CLASSIC à PO P
5.6.4
Loudness Control
Press the (SEL/LOC) b utton
6?to select Loud then rotate the knob to switch the Loudness control ON and OFF.
10
5.7. Radio Tuner Operation
5.7.1
Select Tuner Function
Press the [MODE] button
bq and select Radio mode.
bq
Figure 13. MODE Selection Button
5.7.2
Select Band
Press the [BAND] button
2
to select the band desired in the sequence shown below.
2
AM1à AM2àFM1àFM2à FM3à
Figure 14. BAND Selection Button
5.7.3
Searching Stations
5.7.3.1 Auto-Search Station
When a Band is selected, Press the [ ? ? |] Forward directional
4 or the [|? ? ] Backward directional button
5?to enter the Station Auto -Search mode in the direction desired .
function, press either the [? ? |] Forward directional
and the current frequency (station) will be displayed .
To stop searching during the Auto-S earch
4 or the [|? ? ] Backward directional button 5
4
again
5
Figure 15. Auto-Search
5.7.3.2 Manual Search Station
When a Band is selected, Press and hold the [? ? |] Forward directional
button
4 or the [|? ? ] Backward directional
5 for 2 seconds to enter the Station Manual-Search mode in the direction desired. When the button is
released the system will stop searching and exi t Manual Search Mode after 5 seconds.
5.7.4
Preset Stations
8, (2/DISC+) -9, (3/P.MODE)-bl, (4/2-6CH)-bm , (5/RPT)-bn & (6/STOP)-bo button(s) to
Press the (1/DISC-)-
switch between preset stations.
11
8 9 bl bm bn bo
Figure 16. Preset Stations Select Buttons
5.7.5
Storing Preset Stations
When a desired station is reached, Press and hold one of the Numbered preset buttons for 2 Seconds to store
the desired station into memory.
8, (2/DISC+) -9, (3/P.MODE)-bl , (4/2-6CH)-bm , (5/RPT)-bn
[(1/DISC-)-
bo ] (see Figure 16
& (6/STOP)-
above).
5.7.6
Scan Preset Stations
Press the [AS/PS ENTER] button
scanning Press
bu?to scan the preset sta tions in current band for 5secs at a time. To stop
bu again.
bu
Figure 17. Preset Station Scan Button (AS/PS ENTER)
5.7.7
Select Local-Distant Control
Press and Hold the [SEL/LOC] button
button
6
for 2 sec onds to enter Local mode; Press and Hold the [SEL/LOC]
6 again for 2 seconds to enter the Distant mode.
6
Figure 18. Select Local-Distant Control Button (SEL/LOC)
5.8. DVD Player Operation
Before DVD operation, make sure a monitor has been prop erly connected to the video output of the unit.
Audio output mode depends on the type of DVD played. Discs have different output modes depending on the
manufacturer, read the instructions supplied with the disc you want to play before operation.
12
5.8.1. Lowerin g the Front Panel (Disc Insertion)
Press the [ ] button
1
to lower the Front Panel and insert a disc
1
Figure 19. Front Panel Release
Button
5.8.2. Disc loading in
Before inserting disc, make sure that there is not a disc in the unit. A Disc Icon will be displayed on the LCD
screen when a disc is loaded into the unit. When a disc is inserted, the unit will automatically close the front
panel.
Disc
Icon
Figure 20. Disc loading
5.8.3. Disc Eject
Press the [
] button
1
to lower the front panel. If a disc is in the unit, the disc will be ejected.
1
Figure 21. Disc loading
Ejecting the disc when in DVD and CD mode will cause the unit to automatically return to tuning mode.
Once a disc is inserted, It is normal for the playback of the d isc to take a few moments before starting while it is
loading.
5.8.4. Closing the Front Panel
When the front panel is lowered , press [ ] button
seconds the front panel will close automatically.
1
to close front panel. If the button is not pressed for 20
13
1
Figure 22. Closing Front Panel
5.8.5. 2.1 Channel — 5.1 Channel Switch
To switch from the full 6 channel mode to down-mix mode, press the [4/2-6CH] button for 2 seconds
down-mix will be displayed on the LCD. To switch back to full 6 channel mode press the [4/2-6CH] button
again for 2 seconds and “FULL 6CH” will be displayed on the LCD.
NOTE: Full 6 channel o peration requires an optional 6 channel amplifier.
bm
bm
Figure 23. Stereo Channel Switch Button (4/2-6CH)
5.8.6. Disc Pause & Playback
Press the [ | | ] button
Press the [ | | ]
bp
bp
to Pause the playback of a disc.
again to return to normal playback of a disc.
bp
Figure 24. Pause & Playback Button ( I I )
5.8.7. Stop Disc Playback
Press the [6/STOP] button
the playback of a disc.
bo
to Stop the playback of a disc. Press the [AS/PS ENTER] button
bu
bo
Figure 25. Stop playback Button (6/STOP)
14
bu?to re-start
5.8.8. Skip Playback
Press the [? ? |] button
4
to skip to the beginning of the next chapter or track. Press the [|? ? ] button
5
to return
to the beginning of current chapter or track.. Press the [|? ? ] button twice to go to the previous chapter or track..
4
5
Figure 26. Skip Playback Buttons ([? ? | ] / [ |?| ? ])
5.8.9. Repeat Playback
While the disc is in playback mode, press the [5/REPT] button
bn
to repeat playback of the current chapter/track
bn
press the [5/REPT] button
a second time to repeat the playback of the Title, press the [5/REPT] button
third time to cancel repeat playback.
bn a
bn
Figure 27. Repeat Playback Button (5/REPT)
5.8.10. Random/Scan Playback
Press the [3/P.MODE] button
bl
to switch between RANDOMà SCAN and NORMAL Playback.
bl once to enter RANDOM which
•
RANDOM playback mode: Press the [3/P.MODE] button
randomly play the tracks of the disc.
•
SCAN mode: Press the [3/P.MODE] button
twice to enter SCAN mode, which will begin to scan
each of the tracks on the disc for 10 seconds at a time. When a desired track is reached press the
button once more to continue playback of that track and end the scan function.
will
bl
TRACK SCANà TRACK RNDà
NORMAL PLAY
bl
Figure 28. Random/Scan Playback
5.8.11. Selecting Play Time
Press the “GOTO ” button on the Remote Control to select a specific chapter (see Figure 2). Press the
“GOTO” button again to select a specific time which will be displayed on the Screen then use the number
buttons to enter chapter number or time data.
15
5.8.12. Selecting Subtitle Language
If a disc in playback mode contains subtitle language options . Press the “SUB-TITLE” button on the R emote
Control to choose from the disc-supported languages. If the disc only supports one subtitle, the function will
not work. Once the language option in chosen, the language description will disappear within 5 seconds.
5.8.12.1 Selecting Audio Language
When a disc is in playback mode press the “AUDIO” button on the R emote Control to choose from the
disc-supported languages. Once the language option in chosen, the language description will disappear
within 5 seconds.
NOTE: Some discs only allow control of subtitle and language options through the DVD Root Menu
5.8.13. Selecting Camera Angle
If the DVD to be veiwed supports multi -angle playback, press the “ANGLE” button on the R emote Control to
playback images in different camera angles. If the DVD does not support multi-angle playback, this function will
not work. Once the angle option in chosen, the angle description will disappear within 5 seconds.
5.8.14. Muting Operation
7
Momentarily press the [MUTE] button
to mute the audio playback. Press the [MUTE] button again or turn the
volume control to cancel the mute function.
7
Figure 29. Audio Mute Button
5.8.15. Fast Forward & Fast Reverse
Press the [? ? ] or the [? ? ] buttons on the Remote Control to search a disc in the Forward or Reverse playback
direction. Each time the [? ? ] or the [? ? ] buttons on the Remote Control are pressed the Fast Forward or Fast
Reverse speed will change, 2X / 4X / 6X and 8X the normal speed.
2Xà 4Xà 6Xà
8X
NORMAL PLAY
Figure 30. Fast Forward & Fast Reverse Speeds
5.8.16. Slow Play
Press “SLOW” button on the Remote Control to slow the playback speed of a disc. Each time the “SLOW”
button on the Remote Control is p ressed the speed will change, 1/2Xà1/4Xà1/8X the normal speed.
1/2Xà 1/4Xà
1/8X
NORMAL PLAY
Figure 31. Slow Speed Disc Playback
16
5.9. OSD Setup
5.9.1. Speaker Setup
1.If the PAV-8000D output is set to 6CH mode.
2. Press “SETUP“ to enter menu setting;
3.Select “SPEAKER SETUP“ and press Left to enter “SPEAKER SETUP”
4.Set Center and Surround speakers (ON).
5.Set delay time of Center and Surround Speakers
6.Exit “SPEAKER SETUP“ Menu.
Figure 32. System Speaker Setup Screens
Figure 33. System Speaker Setup Screens
5.9.2. Setup TV Display
Select “GENERAL“ setup and then press “ENTER“. Highlight “TV DISPLAY” and press left to enter the TV
Display settings, which contains options that can be chosen and/or configured.
To choose from the listed options, press the [p] or [q] direction buttons to highlight a selected option, then
press “ENTER" to confirm.
Figure 34. System General Setup Screens
5.9.3. Setting the Menu Language
Following the above -mentioned operation, press the “OSD LANG” to select menu language (this system
includes English and Chinese), then press “ENTER“ to confirm.
Figure 35. Select On Screen Display Language Screen
17
5.9.4. Selecting the Audio Language
Discs can support different audio languages. You can select the audio language by entering the “AUDIO ”
setting on the “PREFERENCE PAGE” on the Main Menu. Pressing the stop button 2X during the normal
playback of a disc will allow access to the “PREFERENCE PAGE”. During playback of a disc, press the
“AUDIO ” button on the Remote Control to choose from the available audio languages.
Figure 36. Menu Language Screen
5.9.5. Selecting a Subtitle Language
Setting the subtitle language is done through “SUBTITLE ” on the “PREFERENCE PAGE” if the chosen disc
supports this operation. During playback, press the “SUBTITLE” to choose from the subtitle languages listed,
press the [p ] or [q ] direction buttons to highlight a selected subtitle language, then press “ENTER " to
confirm.
Figure 37. Preferred Subtitle Language Screen
5.9.6. Selecting a TV Type
Setting the Video system type is done through “TV TYPE” on the “PREFERENCE PAGE”. There are 3
options in “TV TYPE” (MULTI, NTSC and PAL). Select the Video system type according to the actual TV in
use and then press the “ENTER” button to confirm. The setting will be changed after exiting the setting mode.
Figure 38. Select TV Type Screen
5.9.7. Setting the PARENTAL Preference
Setting the Parental Preference is done through “PARENTAL” on the “PREFERENCE PAGE”.
Select the parental level you desire using UP/DOWN for discs with lock-out function or multiple rating
levels. It is listed from the lowest level (1 Child) to the highest level (8 Adult). Press ‘ENTER’ to enter
the Password Verify Page.
Figure 39. PARENTAL Preference Screen Display
18
5.9.8. Setting the Password
Setting the Password is done through “PASSWORD” on the “PREFERENCE PAGE”. Press “ENTER” to enter
the Password Change Page. Input the Old Password or the Default Password, the New Password, and the
Confirmed New Password. Press “ENTER” to confirm the change. NOTE: The Factory Default Password is:
3308.
Figure 40. Change Password Screen
5.10. Audio CD / MP3 and CD Changer (CDC) Operation
The PAV-8000D is compatible with AUDIOVOX SP-11CD and SP-6CD CD Changers.
MP3 Operation
MP3 discs usually contain a mix of files with multiple sub-directories of MP3 files. When a MP3 disc is
inserted, the PAV-8000D will automatically search all directories that contain MP3 files and use the format of
TRACK to mark them. All directories that contain MP3 files will be displayed as TRACKS in the order/level
that they are structured on the CD. Each TRACK will use one or more pages (screens) to display the names
of the MP3 files contained in that TRACK. Up to 8 MP3 files can be displayed on one page, additional MP3
files within the same TRACK will be displayed on the following page(s). Only the first 8 letters of TRACK/MP3
title will be displayed.
5.10.1.Switching Mode s
bq
Press the “MODE”
button to switch between available modes (mode switching sequence:
RADIOàD VDàCDCàRADIO). If there is no disc inside the PAV-800D the “DVD” mode is bypassed. The
same is true if there is no CDC connected to PAV-8000D system the “CDC” mode is bypassed.
bq
Figure 41. Mode Button (MODE)
5.10.2.Pause and Playback
When a disc is in playback mode, Press the [||] button
button
bp to pause the playback of the disc. To P ress the [||]
bp again to restart playback of the disc.
bp
Figure 42. Pause Button (11)
5.10.3.Selecting Discs (CDC Only)
To select the PREVIOUS disc from the available discs in the CDC, Press the [1/DISC-] button
no other discs in the CDC, this function will return to the current disc.
19
8.
If there are
8
Figure 43. Previous Disc Select (1/DISC-)
To select the NEXT disc from the available discs in the CDC, Press the [1/DISC+] button
other discs in the CDC, this function will return to the current disc.
9.
If there are no
9
Figure 44. Next Disc Select (1/DISC+)
5.10.4.Random / Scan
Press the [3/P.MODE] button
bl
to switch between RANDOMà SCAN and NORMAL Playback.
bl
•
RANDOM playback mode: Press the [3/P.MODE] button
once to enter “RANDOM”, which will play
the tracks on the disc in random order.
CDC only: While in “RANDOM” mode, If the button is pressed a second time the system will begin to
playback the tracks from all loaded discs randomly.
•
SCAN mode: While in normal playback mode, press the [3/P.MODE] button
twice to enter “SCAN”
mode, which will begin to scan each of the tracks on the disc for 10 seconds at a time.
CDC only: While in “SCAN” mode, If the button is pressed a second time the system will begin to scan
all tracks from all loaded discs for 10 seconds at a time. When a desired Disc/Track is reached press
the button once more to continue playback that track and end the scan function.
bl
TRACK RNDà
DISC RNDà
TRACK SCAN à
NORMAL PLAY ßDISC SCAN
bl
Figure 45. Random\Scan Button (3/P.MODE)
5.10.5.Repeat Play
bq
Press the [5/REPT] button
to repeat the playback of the current track of the disc in play. If the button is
pressed a second time, the system will repeat playback of the disc. Press the button a third time to cancel the
repeat playback function.
bq
Figure 46. Repeat Play Button
(5/REPT)
20
6. INSTALLING THE PAV-8000D SYSTEM
Before installing the PAV-8000D verify that the Radio antenna and speakers are operational and are perform ing
well. Disconnect power supply cable from the connecting terminal of the vehicles Battery.
CAUTION: When disconnecting the Battery Negative (-) Connecting Terminal, vehicles equipped with cruise
equipment or a satellite navigator will lose all preset memory.
6.1. Front Panel Installation
6.1.1.
Cautions During Installation
If possible, have qualified personnel install the PAV-8000D system.
The PAV-8000D system is intended for installation in vehicles with DC 12V Negative Ground battery systems.
Make all electrical/electronic connect ions as directed in this manual. Incorrect connection may damage the
equipment and will void the warranty. Carefully read the Instruction Manual and Installation Specification before
installation.
6.2. Accessories and Hardware
Table 2. Installation Hardware
No.
Item
1
Diagram
Quantity
No.
Mounting
sleeve
1
7
Front Panel
Case
1
2
Hex bolt
1
8
Remote
control
1
3
Rear Strap
1
9
Decorating
Panel
1
4
Mounting
screw
1
10
Battery
1
5
Bolt
1
Power
connector
6
Item
Diagram
Quantity
1
6.3. System Installation
6.3.1 Installation Procedure
1.
Install the Mounting Bracket (1) by inserting the Bracket into dashboard and bend the mounting tabs
outwards with a screwdriver so that the bracket is tight.
Figure 47. Mounting Bracket Installation
21
2. Install the PAV-8000D unit
a. Check that all connections are correct.
b. Install the mounting bolt (5).
c. Insert main connector (6) into the rear of the unit.
d. Insert the PAV-8000D unit into mounting Bracket (1) and gently push it in until it locks in -place (a
“click” sound will be heard).
e. Use the following recommended method to anchor the rear of the PAV-8000D unit.
1. Fasten one end of the Rear support Strap (3) to the rear of the PAV-8000D unit.
2. Fasten the other end of the Rear support Strap (3) to the firewall or other sturdy non-moving metal
parts of the vehicle .
6.3.2 Electric Connections
l
l
l
l
Power supply for the unit is DC 12V negative (-) ground.
Connect the unit according to the following wiring diagram to avoid damage.
Do not insert in power supply connector before finishing connections.
Do insulate any exposed cables.
Cables Connection
YELLOW
ACC
RED
BLACK
BLACK
FILTER
12V
FRONT(L)
REAR (L)
AUTO-ANT
BLUE
BLACK
GND
REMOTE
WHITE
TEL-MUTE
BROWN
WHITE
GRAY
WHITE/BLACK
GRAY/BLACK
GREEN
PURPLE
GREEN/BLACK
LIGHT
FRONT (R)
REAR (R)
PURPLE/BLACK
VIDEO-2
YELLOW
YELLOW
VIDEO-1
FRONT L
WHITE
FRONT R
RED
WHITE
REAR L
REAR R
RED
GREY
BROWN
SUB-W
CENTER
Figure 48. Cables Connection Diagram A
ANT
LINE OUT
VIDEO OUT
CDC
Figure 49. Cables Connection Diagram B
22
6.3.3 Speaker Connections
Table 3. Speaker Connections
Left +
Left -
Right +
Right -
Front
Speaker
B6
(white)
B89
(White with black stripe ))
B5
(grey)
B7
(Grey with black stripe)
Rear
Speaker
B12
(green)
B10
(Green with black stripe)
B11
(purple)
B9
(Purple with black stripe
1.
Battery Cable (Yellow)
• Connect to CONSTANT DC 12V power supply.
2. ACC Cable ACC/Red
• Connect to ACC (switched) power supply: Switched DC 12V.
3. Ground Cable Black
• Connect to a clean and exposed part of car chassis.
4. TEL Muting Control Cable (Blue)
• Connect to TEL muting control circuit.
Note: The audio output will be muted when ground is applied to the Tel Mute Wire.
General Notes:
1. Use only ungrounded speakers.
2. Power Handling of used speakers must be 40W or greater.
3. Speaker Impedance: 4O; Speakers with an incorrect impedance may affect output Power and damage
speakers or this unit.
4. Do not use 3-cable speaker system and do not connect speakers to car body.
5. Speaker cables and power amplifiers must be about 30CM from antenna and antenna ext ended parts.
6. Connect speakers according to the following diagram. Incorrect connection will damage this unit or
speakers.
Incorrect connection of Front and Rear speakers will damage equipment.
Correct
Wrong
Figure 50. Speaker Connection Diagram A
Wrong
Figure 51. Incorrect Connection
23
Wrong
Correct
Figure 52. Speaker Connection Diagram B
6.3.4 Optional Power Amplifier Connection
Connect the Power Amplifier according to the following Connection Wiring Diagram. Incorrect
connection will cause damage the Speakers.
Wiring Diagram for Power Amplifier
Figure 53. Wiring Diagram for Power Amplifier
6.3.5 Fuse
NOTE: Replace blown fuses with original values only.
WARNING! Replacing the 10A Fuse with any other value fuse or directly connecting the system to power
without the use of a Fuse may result in Fire and/or Dam age.
7. NOTES ON DISCS
1.
2.
3.
4.
5.
6.
How to hold disc
• Do not touch the data side
• Do not scratch the disc.
• Do not bend the disc.
When not in use, put the disc away.
Do not use irregular shaped or deformed discs.
Do not leave the disc in/on:
• Direct Sunlight
• Near Car Heaters
• Dirty, Dusty or Damp Areas.
Figure 53. Rough Edges Removal
• Seats and Dashboards
Disc Cleaning
• Use a dry and soft cloth to wipe from center to outward.
Cautions on New Discs
• Remove the inner and outer rough edges on new discs which may cause malfunctions by gently
rubbing the edge of the disc with a pencil,
24
8. TROUBLESHOOTING
This troubleshooting guide is intended to help res olve some or all of the problems that typically occur. If you are
unable to correct the problem using this Troubleshooting Guide then please contact a professional service
center for service.
•
No Sound
No Picture
•
•
•
•
•
•
Disc Does Not Play
•
•
Table 4. Troubleshooting Table
If the FF, FR, Search or Single-Frame functions are in use, the
system is muted
Check if the power line is connected properly to a 12VDC source
Check if there is a mobile phone muting option that has somehow
been engaged.
Check that the Audio Mute Button has not been pressed
Check that all cables are connected properly
Check if the Video Monitor is connected, Powered ON, and the
correct Input is selected.
Check if the disc is inserted, and if the disc is inserted correctly
(Label must face up).
Check if the disc is damaged
Check if the disc is wet
25
9. SPECIFICATION
Audio
Audio Output Digital):
S/N Ratio
Dynamic Range:
Output power
Distortion
0.5V,75
80dB
80dB
40W
0.05%
Video Output
Horizontal Definition
1Vpp,75
500
Supply power voltage
10.8~16VDC
Frequency range
Residual Noise Sensitivity (S/N 3dB)
Frequency Response:
S/N Ratio
Antenna Impedance
87.5~108MHz
12dBu
55Hz~10KHz
50dB
50
Frequency Range
Residual Noise Sensitivity (S/N 20dB)
S.N Ratio
Antenna Impedance
530KHz~1720KHz
35dBu
40dB
50O
Video
Power
FM Tuner
AM Tuner
NOTE: Manufactured under license from Dolby Laboratories. “Dolby”, “Pro Logic” and the double-D symbol
are Trademarks of Dolby Laboratories.
26
WARRANTY
12 MONTH LIMITED WARRANTY
Applies to Audiovox Video Products
AUDIOVOX ELECTRONICS CORPORATION (the Company) warrants to the original retail
purchaser of this product that should this product or any part thereof, under normal use and
conditions, be proven defective in material or workmanship within 12 months from the date of original
purchase, such defect(s) will be repaired or replaced with reconditioned product (at the Company's
option) without charg e for parts and repair labor.
To obtain repair or replacement within the terms of this Warranty, the product is to be delivered with
proof of warranty coverage (e.g. dated bill of sale), specification of defect(s), transportation prepaid,
to the Company at the address shown below.
This Warranty does not extend to the elimination of externally generated static or noise, to correction
of antenna problems, to costs incurred for installation, removal or reinstallation of the product, or to
damage to tapes, discs, speakers, accessories, or electrical systems.
This Warranty does not apply to any product or part thereof which, in the opinion of the Company,
has suffered or been damaged through alteration, improper installation, mishandling, misuse,
neglect, accident, or by removal or defacement of the factory serial number/bar code label(s). THE
EXTENT OF THE COMPANY'S LIABILITY UNDER THIS WARRANTY IS LIMITED TO THE
REPAIR OR REPLACEMENT PROVIDED ABOVE AND, IN NO EVENT, SHALL THE COMPANY'S
LIABILITY EXCEED THE PURCHASE PRICE PAID BY PURCHASER FOR THE PRODUCT.
This Warranty is in lieu of all other express warranties or liabilities. ANY IMPLIED WARRANTIES,
INCLUDING ANY IMPLIED WARRANTY OF MERCHANTABILITY, SHALL BE LIMITED TO THE
DURATION OF THIS WRITTEN WARRANTY.
ANY ACTION FOR BREACH OF ANY
WARRANTY HEREUNDER INCLUDING ANY IMPLIED WARRANTY OF MERCHANTABILITY
MUST BE BROUGHT WITHIN A PERIOD OF 30 MONTHS FROM DATE OF ORIGINAL
PURCHASE. IN NO CASE SHALL THE COMPANY BE LIABLE FOR ANY CONSEQUENTIAL OR
INCIDENTAL DAMAGES FOR BREACH OF THIS OR ANY OTHER WARRANTY, EXPRESS OR
IMPLIED, WHATSOEVER. No person or representative is authorized to assume for the Company
any liability other than expressed herein in connection with the sale of this product.
Some states do not allow limitations on how long an implied warranty lasts or the exclusion or
limitation of incidental or consequential damage so the above limitations or exclusions may not apply
to you. This Warranty gives you specific legal rights and you may also have other rights, which vary
from state to state.
U.S.A.: AUDIOVOX ELECTRONICS CORP, 150 MARCUS BLVD., HAUPPAUGE, NEW YORK 11788 l 1- 800- 645- 4994
CANADA : CALL 1-800-645-4994 FOR LOCATION OF WARRANTY STATION SERVING YOUR AREA
128-5918B
27
NOTES
28
For Customer Service
Visit Our Website At
WWW.audiovox.com
Product Information, Photos,
FAQ’s Owner’s Manuals
U.S.A.:AUDIOVOX ELECTRONICS CORP. 150 MARCUS BLVD., HAUPPAUGE, NEW YORK.11788 l 1-800-645-4994
© Copyright 2003 Audiovox Electronics Corp. 150 Marcus Blvd. Hauppauge, NY 11788
29
128-6822