1
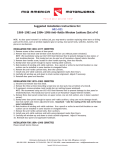
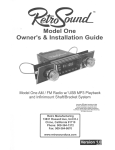
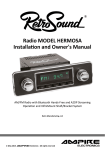
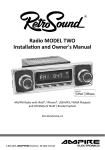
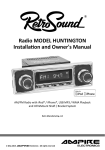
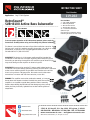
INSTRUCTION SHEET
Part Number
119-202
Application: Any 12 Volt System
RetroSound®
SUB-8100 Active Bass Subwoofer
Tools Needed
part Includes
1 - SUB-8100 subwoofer
4 - Mounting Brackets
1 - Wire & Wire Harness
1 - Remote Bass Control
18 - Installation Hardware
Adhesive tape
(for alternate installations where
mounting brackets can’t be used)
To ensure proper operation of this Retrosound produce, please read these
instructions carefully before using and installing this powered subwoofer.
This Owner’s manual does not cover all possible installation scenarios. If you
feel you can’t install this product yourself, please take it to a local car audio
professional, or contact us via at [email protected] or
call 909-364-1372 | 888-325-1555.
IMpORTANT! This device is a high-power audio amplifier intended for
installation in vehicles with a 12-Volt negative ground electrical system.
Connecting or operating the amplifier with another type of electrical system
may cause damage to the amplifier or electrical system.
IMpORTANT! Disconnect the negative (-) battery cable before beginning
installation. Verify the battery ground by checking that one wire is connected
to the starter mounting bolt or engine block and another to the vehicle
chassis using at least a #8 gauge wire. Also make sure the alternator
connections are secure and free from corrosion, rust or dirt.
WARNING! The amplifier must not be enclosed or covered, as it may overheat.
Do not cover with carpets or enclose it behind trim panels. Do not mount the
amplifier in an inverted or upside down position. Select a mounting
location where drilling of pilot holes will not damage any wires, control
cables, fuel lines, fuel tanks, hydraulic lines or other vehicle systems or
components.
MAMotorworks
Midamotorworks
17082 N. US Hw y 45, p.O. Box 1368, Effingham, IL 62401
800.500.1500 • Worldwide: 217.540.4200 • FAX: 217.540.4800
w w w.mamotor works.com • mail@mamotor works.com
blog.autotainment.com
©Mid America Motorworks, Inc. All rights reserved.
INSTRUCTION SHEET
Part Number
Page 2
119-202
RetroSound®
SUB-8100 Active Bass Subwoofer (cont.)
Step 1. Affix the Mounting Brackets to the bottom of the amp using
the enclosed Mounting Bracket Bolts. (1A, 1B & 1C)
Step 2. Use the enclosed Sheet Metal Screws to mount the powered sub to
the desired location.
Step 3. Refer to “End Panel Controls/Connections” for connection instructions.
End Panel Controls/Connections
1a
1. PHASE: Adjust subwoofer polarity between 0 (normal) and 180 degrees
(reverse). At 0, the subwoofer is “in-phase” with the other speakers,
meaning the subwoofer moves in/out along with the speakers. When
reversed, the subwoofer moves in when the speakers move out. Reversing
polarity may be useful depending on subwoofer placement and acoustics.
1b
2. FREQ: The Low Pass Filter controls adjust the crossover point. The typical
crossover setting is between 60Hz and 80Hz. Since musical tastes vary, you
should play music that you would normally listen to in your vehicle, using
the above settings as a starting point. If necessary, we suggest setting the
crossover point by ear.
3. REMOTE LEVEL CONTROL INPUT: Plug included remote bass level control
into this port
4. GAIN: The input level control (GAIN) matches the output of your radio to
the input of the amplifier. To adjust the input gain after install, begin by
turning the control all the way to the left. Play your input source (CD player,
etc.), with the bass and treble settings flat, then slowly increase the volume
until you begin to hear distortion. Adjust the volume back down until the
distortion is no longer heard. Next, increase the amplifier GAIN slowly until
you begin to hear distortion. Adjust the GAIN back down until the distortion
is no longer heard. Your radio and amplifier levels are now matched.
Toll Free: 800.500.1500
•
Worldwide: 217.540.4200
•
www.mamotorworks.com
1c
•
[email protected]
INSTRUCTION SHEET
Part Number
Page 3
119-202
RetroSound®
SUB-8100 Active Bass Subwoofer (cont.)
5. LOW INPUT L: White RCA connector for low level input.
LOW INPUT R: Red RCA connector for right low level input.
Specifications
6. POWER: The power LED provides a blue indication that the amplifier is
turned on.
7. MAIN HARNESS: This harness contains power, ground, remote turn on
and High level input speaker leads if your radio doesn’t have RCA connections you can use these leads to connect to your speaker wires so the amp
receives your source signal.
NOTE: Connect only the low level (RCA) or high level input. Do not
connect both at the same time.
Power Supply
Voltage: 10.5 - 16.0 VDC
Idling Current (On): 0.4 A
Idling Current (Off ): <0.002 mA
Amplifier Stage
Output Power @14.4 V:
100 Watts RMS / 200 Watt Max
S/N Ratio: > 100 dB
Input Sensitivity: 100 mV - 6.0 V
Frequency Response: 50 Hz - 160 Hz
Total Harmonic Distortion: 0.1%
Filters
Low Pass Filter/Slope:
50 Hz - 160 Hz / 12dB
Phase Control (variable): 0-180
Other Specifications
Fuse: 10A x 1
Size: (W x H x L): 9.2 x 2.75 x 13.74
inches / 350 x 70 x 235 mm
Weight: 9 lbs / 4.08 Kg
Toll Free: 800.500.1500
•
Worldwide: 217.540.4200
•
www.mamotorworks.com
•
[email protected]
INSTRUCTION SHEET
Part Number
Page 4
119-202
RetroSound®
SUB-8100 Active Bass Subwoofer (cont.)
Troubleshooting guide
Problem
Possible Cause
Action to Solve Problem
Powered subwoofer will
not turn on
(no Power on LED indicator)
12 Volt Batt + wire not connected
or incorrect voltage/remote wire not
connected or incorrect voltage
Check all connections for proper voltage
with a volt meter. Voltage range:
12-15 volts.
Ground wire not connected
Check ground connection.
Fuse on Batt + is blown
Replace blown fuse.
Volume turned all the way down
Increase head unit volume/check
volume level on head unit.
Gain control on sub amp is
turned down
Increase gain control on end panel of
sub amp.
Input signal not connected
Check low level inputs for proper
connection.
Incorrect fuse rating
Use fuses with correct 10 amp rating.
Batt + wire is touching chassis ground
Check for pinched or shorted wire.
On-board subwoofer defective
Check/replace subwoofer.
Not +12 Volts/car battery not connected
Make sure the vehicle is + 12 volts and
that the car battery is correctly
connected to the vehicle.
Remote lead shorting
Check the Remote lead to make sure it
is not shorting out the amp.
Bad ground connection
Make sure the Sub-8100 unit is
grounded to clean bare metal of the
vehicle.
Signal ground loop or RFI interference
Re-route RCA cables from existing high
current wiring.
Incorrect input signal type
or input level is too high
Check connections and reduce/adjust
input level.
Poor bass response
Adjust phase control.
No sound heard from unit but
LED power indicator is on
Unit blows fuses
Engine noise
Distorted audio output
Check polarity of speaker wires if using
high level input.
Low audio Output
Incorrect input signal type or input level Check connections and increase/adjust
too low
input level.
Weak bass response
Low frequency output is out of phase
Adjust phase control.
Check crossover adjustment.
Toll Free: 800.500.1500
•
Worldwide: 217.540.4200
•
www.mamotorworks.com
•
[email protected]