1
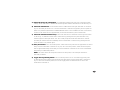
®
Home Theatre
Reference PowerCenter
™
HTS 5000
Owner’s Manual
TABLE OF CONTENTS
Page
Important Safety Precautions . . . . . . . . . . . . . . . . . . . . . . . . . . . . . . . . . . . . . . . . . . . . . . . . . . . . . . . . . . . .ii
Proper Grounding and Installation Tips . . . . . . . . . . . . . . . . . . . . . . . . . . . . . . . . . . . . . . . . . . . . . . . . . . . . .v
Introduction . . . . . . . . . . . . . . . . . . . . . . . . . . . . . . . . . . . . . . . . . . . . . . . . . . . . . . . . . . . . . . . . . . . . . . . .1
Monster’s Patented Clean Power Stages . . . . . . . . . . . . . . . . . . . . . . . . . . . . . . . . . . . . . . . . . . . . . . . . . . . .2
The Design Minds Behind the Monster PowerCenter . . . . . . . . . . . . . . . . . . . . . . . . . . . . . . . . . . . . . . . . . . . .3
Content Checklist . . . . . . . . . . . . . . . . . . . . . . . . . . . . . . . . . . . . . . . . . . . . . . . . . . . . . . . . . . . . . . . . . . . .5
Hookup Guide . . . . . . . . . . . . . . . . . . . . . . . . . . . . . . . . . . . . . . . . . . . . . . . . . . . . . . . . . . . . . . . . . . . . . . .6
Grounding Your Cable TV, Satellite Dish, and Antenna Connections . . . . . . . . . . . . . . . . . . . . . . . . . . . . . . . . .18
HTS 5000 Features . . . . . . . . . . . . . . . . . . . . . . . . . . . . . . . . . . . . . . . . . . . . . . . . . . . . . . . . . . . . . . . . . . .19
Troubleshooting . . . . . . . . . . . . . . . . . . . . . . . . . . . . . . . . . . . . . . . . . . . . . . . . . . . . . . . . . . . . . . . . . . . . .24
Frequently Asked Questions . . . . . . . . . . . . . . . . . . . . . . . . . . . . . . . . . . . . . . . . . . . . . . . . . . . . . . . . . . . . .30
Appendices
A. Glossary of Terms . . . . . . . . . . . . . . . . . . . . . . . . . . . . . . . . . . . . . . . . . . . . . . . . . . . . . . . . . . . . . . . . . .32
B. Warranty Information . . . . . . . . . . . . . . . . . . . . . . . . . . . . . . . . . . . . . . . . . . . . . . . . . . . . . . . . . . . . . . .35
C. How to Contact Us . . . . . . . . . . . . . . . . . . . . . . . . . . . . . . . . . . . . . . . . . . . . . . . . . . . . . . . . . . . . . . . . .39
D. Warranty Registration . . . . . . . . . . . . . . . . . . . . . . . . . . . . . . . . . . . . . . . . . . . . . . . . . . . . . . . . . . . . . . .40
i
IMPORTANT SAFETY PRECAUTIONS
Please read and observe the following safety points at all times.
WARNING – Power Sources
Do not plug your Monster PowerCenter into a power outlet that differs from the source indicated
for safe use on the Monster PowerCenter. If you don’t know the type of electrical power that is supplied
to your home, please consult your local power company.
WARNING – Grounding and Polarization
A. Your Monster PowerCenter has a three-wire grounding-type AC plug (a three-prong plug).
This plug is designed to be inserted into a grounding-type outlet only. If this plug doesn’t fit directly inside
your outlet, do not attempt to force it into the outlet. [Never attempt to dismantle the plug in any way
(or to alter an extension cord) to make it fit into a two-prong outlet. Do not attempt to defeat the grounding feature
by using a 3-to-2 prong adapter. Instead, call a local electrician to install a properly grounded outlet.]
B. If you use rooftop devices such as satellite dishes, antennas, or any other component with wire
that connects to your PowerCenter, be sure the wire(s) is properly grounded. Use grounding techniques
specified in Section 810 of the National Electrical Code (NEC), ANSI/NFPA 70 (in Canada, Part 1 of the Canadian
Electrical Code). This protects against harmful voltage surges and static discharges. Do not place any part
of an antenna near overhead power lines, or any other power circuit. Do not touch any power line or power circuit.
Doing so may cause you severe physical injury and possibly result in death.
ii
WARNING – Liquid: To Avoid Electrical Shocks
Do not operate your Monster PowerCenter if liquid of any kind is spilled onto or inside the unit.
Do not operate your Monster PowerCenter near rain or water that’s spilled or openly exposed (e.g., bathtub, kitchen
or bathroom sink).
WARNING – Power Cord Safety
A. When routing your Monster PowerCenter AC power cord, do not place it near heat sources
or heavy foot traffic areas (e.g., hallways, doorways, and kitchen floors). Do not create a trip hazard
with the power cord.
B. If your power cord’s protective jacket begins to rip or fray, exposing the internal wiring, shielding,
etc., disconnect it from the power source and discontinue use of the Monster PowerCenter
immediately. See the warranty section of this owner’s manual (page 35).
WARNING – Proper Cleaning
In general, the only cleaning necessary for your Monster PowerCenter is a light dusting.
Unplug your component from the wall outlet before cleaning it. Do not use any type of liquid or aerosol cleaners.
iii
WARNING – Storm Precautions
In the event of a lightning storm, immediately disconnect your Monster PowerCenter
from its power source. After you’ve done this, it’s not necessary to disconnect any components
that are connected to your Monster PowerCenter.
WARNING – No User Serviceable Parts Inside
If, for any reason, your Monster PowerCenter is not operating properly, do not remove any part
of the unit (cover, etc.,) for repair. Unplug the unit and consult this owner’s manual for warranty and service
information.
CAUTION – Exposure To Heat
Do not expose your Monster PowerCenter to direct sunlight or place it near wall heaters, space heaters,
or any enclosed space prone to temperature increase (e.g., car trunk).
iv
PROPER GROUNDING AND INSTALLATION TIPS
CAUTION – Proper Grounding
Monster PowerCenters require a properly grounded 3-wire outlet for safety and to protect connected equipment.
If your AC outlet is improperly wired (no ground or reverse polarity), the green ”SYSTEM GROUNDED” LED light on
the front panel of the Home Theatre Reference PowerCenter™ HTS 5000 will not light up. In this event, call a qualified
electrician to fix the problem in your home’s wiring.
Many older buildings are inadequately wired. It’s very common for a building to be improperly grounded. Building
wiring and grounding must conform to applicable NEC (USA) or CEC (Canada) codes for the $100,000 Limited
Connected Equipment Warranty to be valid. If you’re not sure about your home’s wiring, have it checked by
a qualified electrician.
Note to CATV Installer
This reminder is provided to call the CATV System Installer’s attention to Article 820-40 of the NEC that provides
specific guidelines for proper grounding and in particular, specifies that the cable ground shall be connected to the
point of cable entry as practical.
IMPORTANT NOTE – Proper Power and Protection
To completely deliver clean power and protect your equipment against electrical surges, every phone, coaxial cable,
or AC power cable in your system must be connected to an appropriate Monster PowerCenter.
IMPORTANT NOTE – Proper Protection and the Limited Connected Equipment Warranty
The $100,000 Limited Connected Equipment Warranty becomes invalid if any wire (phone, coax, or AC), or audio
or video interconnect leading into the equipment comes from a component that is not properly protected by
the Monster PowerCenter.
v
INTRODUCTION
Thank You
Thank you for purchasing Monster Power’s Home Theatre Reference PowerCenter™ HTS 5000. The PowerCenter
reflects Monster’s commitment to creating performance-enhancing solutions for home theater systems, so you
will enjoy superior picture and sound quality.
Ordinary AC power accessories compromise the quality of the components they power. The PowerCenter’s advanced
technologies and innovative design solve this problem and offer several unique convenience and performance features.
While your PowerCenter does an excellent job of protecting your components from harmful power surges, its main benefit
is much more than just surge protection. Exclusive Clean Power filter circuitry virtually stops the noise that goes right
through typical surge protectors. It isn’t enough to only have filtering from a noisy incoming power line. That’s why your
PowerCenter also features revolutionary separate noise isolation between filtered digital, audio, and video outlets.
If any noise from an electronic product plugged into an outlet gets through our Clean Power noise filters and to the power
line, it will have to go through another filter to get to an adjacent set of outlets. The result is high quality picture and sound
that’s free from performance-damaging interference.
™
Another Monster Power breakthrough is the PowerCenter’s ultra-low loss RF circuitry. While other “line conditioners”
feature coaxial outlets for convenience, their insertion loss can be up to 30dB. The PowerCenter’s incredibly small insertion
loss makes it ideal for all digital coaxial connections such as DBS. Your PowerCenter also features an exclusive color-coding
system which identifies which component should be plugged in where and outlet filter type (digital, high current audio,
analog audio, and video). This way, you won’t jeopardize performance by plugging a high current audio component into
an analog audio outlet.
®
As fellow audiophiles and videophiles, we designed your PowerCenter for the best possible sound and picture. Enjoy!
1
MONSTER’S PATENTED CLEAN POWER STAGES
Each PowerCenter has its own Clean Power stage. Clean Power performs two tasks vital to high performance
audio, video and digital reproduction: filtration and isolation. The higher the Clean Power stage, the more
sophisticated and advanced the filters are, to reject noise generated on the AC powerline. Also, the higher
the Clean Power stage, the more isolation between connected equipment for maximum component-generated
noise rejection. HTS 5000 features Clean Power Stage 4 for the best possible possible performance.
Clean Power Stage 4: Five ultra-advanced isolated filters including two separate digital filters for separate
digital sources, analog audio, video, and ultra-high current audio filters provide the best possible AC powerline
noise rejection and isolation of audio equipment from video equipment for improved component-generated
noise rejection. Ideal for audiophile and videophile a/v systems and reference home theatres.
2
THE DESIGN MINDS BEHIND THE MONSTER POWERCENTER
Richard Marsh – There are few experts able to solve the complex problems of AC power.
Richard Marsh is one of the illustrious few. He has designed best selling power conditioning
components costing more than $3,000 and now brings his expertise to Monster Power.
Richard developed Monster’s exclusive Clean Power circuitry. He is also responsible for several
other groundbreaking designs. Richard’s background and research into amplifier and capacitor
design led to his development of the Servo-DC feedback concept in power amplifiers – a concept
that is used by virtually every amplifier manufacturer today. His status as both the inventor of
the MultiCap internal bypass capacitor and as the driving force behind the high-end audio
balanced circuit design concept has influenced the audiophile community for years. Richard
is responsible for some of the high-end audio world’s most respected product designs, essays and articles, and has
contributed to Fi, The Absolute Sound and Audio magazines. He is included in Who’s Who in the West.
™
™
Demian Martin – Demian Martin has been solving complex AC power problems for several
years. As a technical consultant for successful paper and steel mills, Demian helped create
several innovative AC power solutions. He developed techniques to dramatically improve the
efficiency of these factories’ high power motor control systems – up to 50,000 watts each.
As a result, they avoided the costly premiums many factories must pay for AC power inefficiency.
He now brings his expertise to Monster Power’s elite research and development team.
3
Noel Lee – Noel Lee is best known for popularizing the concept of high performance audio
cable over 20 years ago with his creation of Monster Cable. Originally a laser-fusion design
engineer at Lawrence Livermore National Laboratory and later a touring musician, Noel has
invented or co-invented over 125 U.S. and international patents and drives the explosive growth
of The Monster Group into more than 80 countries worldwide. Monster Power is his realization
of a long-nurtured vision of making affordable power solutions that deliver the best possible
sound and picture.
4
CONTENT CHECKLIST
Before You Begin
Before you do anything, make sure you have everything you need to enjoy the high performance
of your Monster PowerCenter. You’ll need the following items to get started:
1) This owner’s manual.
2) Your favorite pen or a computer with an Internet browser (for registering your warranty information).
3) One Monster Power Home Theatre Reference PowerCenter ™ HTS 5000.
4) One sheet of Monster Power audio/video ID labels (included).
5) Phone cable, coax cable, and rack ears.
5
HOOKUP GUIDE
STEP 1 DBS/DVD/Phone Line Hookup
NOTE:
The PowerCenter is intended for hookup of a single phone line only. A second line will NOT be connected through
the phone line surge protector. You can use this feature as a phone splitter, however. If the “PHONE IN USE –
OUT 1” LED is on, the phone or Pay-Per-View device plugged into the OUT 1 outlet is in use and Monster’s Access
Control Unit disengages the OUT 2 outlet. If the “PHONE IN USE – OUT 2” LED is on, the phone or Pay-Per-View
device plugged into the OUT 2 outlet is in use and Monster’s Access Control Unit disengages the OUT 1 outlet.
FOR PAY-PER-VIEW DEVICES (SUCH AS DBS)
A) Connect one end of a phone cable into a telephone wall jack. Plug the other end into the HTS 5000
“IN” jack (figure 1a).
B) Connect a second phone cable from one of the HTS 5000 “OUT” jacks to the Pay-Per-View input
on your DBS receiver or DVD player (figures 1b and 1c).
FOR STANDARD TELEPHONE LINE PROTECTION (NOT A PAY-PER-VIEW DEVICE)
A) Connect a phone cable from a telephone wall jack to the HTS 5000 “IN” jack. Connect a second
phone cable from one of the HTS 5000 “OUT” jacks to the telephone (figures 1b and 1c).
Figure 1a
From telephone
wall jack
IN
OUT 1
PHONE
OUT 2
Figure 1
Figure 1b
To DBS receiver, DVD player,
or telephone
Figure 1c
To DBS receiver, DVD player,
or telephone
6
STEP 2 Outlet Programming
NOTE:
All PowerCenter outlets located on the rear panel are “programmable”. In order to program each outlet pair, you
must use the recessed slide switches (fig.2). There are two recessed slide switches for each outlet pair that enable
you to program between ”unswitched“, ”switched on“, and ”switched on after delay“ settings. You can change the
settings, when necessary. Using the outlet pair labeled 1 as an example, the following diagrams illustrate how to
program the outlets:
Figure 2
OUTLETS ALWAYS ON
(UNSWITCHED):
UNSWITCHED SWITCHED DELAY NO DELAY
UNSWITCHED SWITCHED DELAY NO DELAY
UNSWITCHED SWITCHED DELAY NO DELAY
1
1
Figure 2a
2
OUTLETS SWITCHED ON:
3
1
Figure 2c
4
UNSWITCHED SWITCHED DELAY NO DELAY
1
Figure 2b
SHORT
(6 seconds)
5
SHORT
(6 seconds)
DELAY
LONG
(20 seconds)
NO DELAY
DELAY TIME
SWITCH
TRIGGER OUT
SWITCH
DC OUT 9~12V 300MA
7
OUTLETS SWITCHED ON
AFTER DELAY:
OUTLET PROGRAMMING SWITCHES
LONG
(20 seconds)
DELAY TIME
SWITCH
Figure 2d
DELAY
NO DELAY
Figure 2e
TRIGGER OUT
SWITCH
A) Outlet Pair Always On (Unswitched): For components (including your VCR, TV, etc.) that need to retain
memory, set left slide switch to UNSWITCHED and the right slide switch to either DELAY or NO DELAY (fig. 2a).
B) Outlet Pair Switched On: Set the left slide switch to SWITCHED and the right slide switch to NO DELAY.
(fig. 2b). The outlet pair will be “live” once the PowerCenter is switched on by pressing the front panel ON
button or by external signal when the NORMAL/REMOTE switch is set to REMOTE (see STEP 3 and STEP 4).
However, it will remain active for approximately 10 seconds after switching off the PowerCenter.
C) Outlet Pair Switched On After Delay: Set the left slide switch to SWITCHED and the right slide switch
to DELAY (fig. 2c). When the PowerCenter is switched on by pressing the front panel ON button or by
external signal, the outlet pair will be “live” after a delay set by the DELAY TIME slide switch. However,
the outlet pair will be turned off immediately once the PowerCenter is switched off by pressing the front
panel OFF button or by external signal.
D) Delay Time Switch: Set to the SHORT position, outlets will receive power after an approximate six second
delay, once the PowerCenter is switched on (fig. 2d). Set to the LONG position, outlets will receive power
after an approximate twenty second delay, once the PowerCenter is switched on. This is the recommended
delay setting for tube-based products.
NOTE: This switch affects all outlet pairs located on the back panel, if the outlet pair switched on
after delay is selected.
E) Trigger Out Programming Switch: Set to the DELAY position, the 12 volt remote trigger will power
an external device after a delay set by the DELAY TIME slide switch once the PowerCenter is switched on
(fig. 2e). Set to the NO DELAY position, the 12 volt trigger powers an external device as soon as the
PowerCenter is switched on.
8
STEP 3 Remote AC Control Hookups
NOTE:
This feature allows you to turn on/off your PowerCenter via your A/V receiver or preamplifier. You can’t turn off
the PowerCenter using the front panel OFF button when the unit is operating in the REMOTE mode.
A) Plug the Remote AC Control Cord’s (included) female end into back of your PowerCenter (see diagram below).
B) Switch the NORMAL/REMOTE switch (located on the back of the PowerCenter) to REMOTE.
C) Plug the Remote AC Control Cord’s 2-prong male end into a switched AC power outlet on a receiver
or preamplifier. When you turn on your receiver or preamplifier the PowerCenter’s outlets programmed
as “switched on” will be turned on immediately. However, the PowerCenter’s outlets programmed
as ”switched on after delay” will be turned on after a delay set by the DELAY TIME switch.
IN
CABLE TV
NORMAL
OUT
OUTLET PROGRAMMING SWITCHES
REMOTE
UNSWITCHED SWITCHED DELAY NO DELAY
1
IN
OUT 1
2
SATELLITE
1
2
3
4
REMOTE
AC IN
110V
3
5
4
IN
GROUND
PHONE
OUT 2
5
OUT
SHORT
(6 seconds)
DELAY
LONG
(20 seconds)
NO DELAY
DELAY TIME
SWITCH
TRIGGER OUT
SWITCH
DC IN
9~12V 300MA
DC OUT 9~12V 300MA
IN
9
ANTENNA
OUT
BREAKER 15A
PRESS TO RESET
1800W MAX TOTAL
STEP 4 Remote DC Control Hookups
NOTE:
This feature allows you to turn on/off your PowerCenter via your Home Automated Control System.
A component you don’t want powered constantly (such as your projector or surround amplifier) can be plugged into
one of the PowerCenter’s outlets programmed as “switched on” or “switched on after delay” and be remotely
activated when needed. This feature also allows you to use a low voltage cable (not supplied) to remotely control
multiple PowerCenters.
You can’t turn off the PowerCenter using the front panel OFF button when the unit is operating in the REMOTE mode.
A) Plug a 1/8" mini-plug cable (not supplied) into the corresponding outlet on the PowerCenter
(see diagram below).
B) Switch the NORMAL/REMOTE switch (located on the back of the PowerCenter) to REMOTE.
C) Plug the other end of the cable into the corresponding outlet on your component that has a 12 volt
output. When you turn on the component that has a 12 volt output, the PowerCenter’s outlets programmed
as ”switched on” will be turned on immediately. However, the PowerCenter’s outlets programmed as
”switched on after delay” will be turned on after a delay set by the DELAY TIME switch.
IN
CABLE TV
NORMAL
OUT
OUTLET PROGRAMMING SWITCHES
REMOTE
UNSWITCHED SWITCHED DELAY NO DELAY
1
IN
OUT 1
2
SATELLITE
1
2
3
4
REMOTE
AC IN
110V
3
5
4
IN
OUT 2
5
OUT
GROUND
PHONE
SHORT
(6 seconds)
DELAY
LONG
(20 seconds)
NO DELAY
DELAY TIME
SWITCH
TRIGGER OUT
SWITCH
DC IN
9~12V 300MA
DC OUT 9~12V 300MA
IN
ANTENNA
OUT
BREAKER 15A
PRESS TO RESET
1800W MAX TOTAL
10
STEP 5 Coaxial Outlet Hookup
NOTE:
You will need additional coaxial cables to connect the PowerCenter to your components with coaxial/RF connections.
Protect Cable TV, Satellite, and Antenna Connections as Follows:
From grounding block
(connected to incoming
cable TV line)*
IN
From grounding block
(connected to
satellite dish)*
IN
CABLE TV
OUT
To TV, VCR, or cable box
SATELLITE
OUT
To satellite receiver
“DISH IN” jack
From grounding block
(connected to antenna)*
To TV, VCR, or signal splitter
IN
OUT
ANTENNA
*See page 18 regarding proper grounding.
11
STEP 6 High Current Audio AC Outlet Hookup
Isolated Clean Power Stage 4 Ultra-High Audio Current Filter: Optimized for maximum noise rejection,
while providing maximum current to high current audio components.
™
NOTE:
These outlets are designed to deliver maximum current to power hungry components such as power amplifiers
and receivers.
You may want to program these outlets to be “switched on after delay” (see page 7, fig. 2c) to enable sequential
power activation. This way, power amplifiers are turned on last and turned off first, preventing the “thump”
from getting to your speakers. See “STEP 2: Outlet Programming” (page 7) for details.
A) Attach a Monster Power® ID label to each component’s power cord before you plug it into
the appropriate color-coded PowerCenter outlet.
B) MAIN AMP: Plug the power cord of any separate amplifiers (not preamplifiers) into the PowerCenter’s
corresponding MAIN AMP outlet.
C) SURROUND AMP: Plug your dedicated surround amplifier’s power cord into the corresponding
SURROUND AMP outlet.
IN
CABLE TV
OUT
NORMAL
OUTLET PROGRAMMING SWITCHES
REMOTE
UNSWITCHED SWITCHED DELAY NO DELAY
1
IN
OUT 1
2
SATELLITE
1
2
3
4
REMOTE
AC IN
110V
3
5
4
IN
OUT 2
5
OUT
GROUND
PHONE
SHORT
(6 seconds)
DELAY
LONG
(20 seconds)
NO DELAY
DELAY TIME
SWITCH
TRIGGER OUT
SWITCH
DC IN
9~12V 300MA
DC OUT 9~12V 300MA
IN
ANTENNA
OUT
BREAKER 15A
PRESS TO RESET
1800W MAX TOTAL
12
STEP 7 Analog Audio AC Outlet Hookup
Isolated Clean Power Stage 4 Analog Audio Filter: Optimized to provide maximum noise rejection
for sensitive analog audio components.
NOTE:
Because certain components don’t need to, or shouldn’t be turned on continuously, you should program these outlets
to be “switched on”(see page 7, fig. 2b). This means the components plugged into these outlets won’t receive power
or shut down unless your PowerCenter is turned on or off.
You can plug any type of low current analog audio component (e.g., preamplifier, tape deck) into the corresponding
PREAMP or TAPE outlet.
A) Attach a Monster Power® ID label to each component’s power cord before you plug it into
the appropriate color-coded PowerCenter outlet.
B) PREAMP: Plug your preamplifier’s power cord into the PowerCenter’s corresponding PREAMP outlet.
C) TAPE: Plug your tape deck’s power cord into the corresponding TAPE outlet.
IN
CABLE TV
OUT
NORMAL
OUTLET PROGRAMMING SWITCHES
REMOTE
UNSWITCHED SWITCHED DELAY NO DELAY
1
IN
OUT 1
2
SATELLITE
1
2
3
4
REMOTE
AC IN
110V
3
5
4
IN
OUT 2
5
OUT
GROUND
PHONE
SHORT
(6 seconds)
DELAY
LONG
(20 seconds)
NO DELAY
DELAY TIME
SWITCH
TRIGGER OUT
SWITCH
DC IN
9~12V 300MA
DC OUT 9~12V 300MA
IN
13
ANTENNA
OUT
BREAKER 15A
PRESS TO RESET
1800W MAX TOTAL
STEP 8 Video AC Outlet Hookup
Isolated Clean Power Stage 4 Video Filter: Optimized to reduce noise generated by video equipment.
Isolates video components from connected digital, analog audio and video components for maximum rejection
of interference.
NOTE:
You may want to program these outlets to be “unswitched” (see page 7, fig. 2a) because some components perform best
when powered continuously. A VCR, for example, should be plugged into one of these outlets to avoid the hassle
of resetting its clock when power is interrupted. Whether you turn your PowerCenter on or off, any component
plugged into these outlets can receive power continuously as long as your PowerCenter is plugged into a properly
grounded 120-volt wall socket and the OUTLET PROGRAMMING SWITCHES for the outlet pair are set to “unswitched”.
You can plug any type of analog video component (e.g., VCR, camcorder) into these two Video AC outlets.
A) Attach a Monster Power® ID label to each component’s power cord before you plug it into the appropriate
color-coded PowerCenter outlet.
B) VCR: Plug your VCR’s power cord into the PowerCenter’s corresponding
AV RECEIVER outlet.
C) TV: Plug your TV’s power cord into the corresponding TV outlet.
IN
CABLE TV
OUT
NORMAL
OUTLET PROGRAMMING SWITCHES
REMOTE
UNSWITCHED SWITCHED DELAY NO DELAY
1
IN
OUT 1
2
SATELLITE
1
2
3
4
REMOTE
AC IN
110V
3
5
4
IN
OUT 2
5
OUT
GROUND
PHONE
SHORT
(6 seconds)
DELAY
LONG
(20 seconds)
NO DELAY
DELAY TIME
SWITCH
TRIGGER OUT
SWITCH
DC IN
9~12V 300MA
DC OUT 9~12V 300MA
IN
ANTENNA
OUT
BREAKER 15A
PRESS TO RESET
1800W MAX TOTAL
14
STEP 9 Digital AC Outlet Hookup
Isolated Clean Power Stage 4 Digital Filter: Optimized to reduce noise generated by digital equipment.
Isolates digital components from connected digital, analog audio and video components for maximum rejection
of interference. HTS 5000 features two isolated filters to accommodate different digital sources.
NOTE:
You can plug any type of digital component (e.g., CD player, DVD player, MiniDisc player, digital camcorder) into
the corresponding CABLE/SAT, CD, SPARE, or DVD outlet.
A) Attach a Monster Power® ID label to each component’s power cord before you plug it into the appropriate
color-coded PowerCenter outlet.
B) CABLE/SAT: If you have a cable TV box, plug its power cord into the PowerCenter’s corresponding
CABLE/SAT outlet. If you are using a satellite receiver, plug its power cord into the same outlet.
15
C) CD: Plug your CD player’s power cord into the corresponding CD outlet.
D) SPARE: Plug the power cord of your additional digital component (e.g., digital camcorder)
into the corresponding SPARE outlet.
E) DVD: If you have a DVD player, plug its power cord into the corresponding DVD outlet. If you are using
a LaserDisc player, you can also plug it into this outlet. If you have a LaserDisc player and a DVD player,
you can plug either component into any of these four AC outlets designed for digital components.
IN
CABLE TV
NORMAL
OUT
OUTLET PROGRAMMING SWITCHES
REMOTE
UNSWITCHED SWITCHED DELAY NO DELAY
1
IN
OUT 1
2
SATELLITE
1
2
3
4
REMOTE
AC IN
110V
3
5
4
IN
OUT 2
5
OUT
GROUND
PHONE
SHORT
(6 seconds)
DELAY
LONG
(20 seconds)
NO DELAY
DELAY TIME
SWITCH
TRIGGER OUT
SWITCH
DC IN
9~12V 300MA
DC OUT 9~12V 300MA
IN
ANTENNA
OUT
BREAKER 15A
PRESS TO RESET
1800W MAX TOTAL
16
STEP 10
Rack Mounting Your PowerCenter
A) Remove your PowerCenter trim covers using a 3/32 Allen key (not included). Turn each Allen screw
counter-clockwise until the screw is completely removed.
B) Align one rack ear over the three 3/32 holes on the left side of the PowerCenter. Using a 3/32 Allen key,
turn the three Allen screws (provided) clockwise until tight.
C) Align the remaining two holes on the left side of the rack ear with the two holes on the left side
of your rack. Using a Phillips screwdriver, turn the two Phillips screws (not included) clockwise until tight.
D) Repeat steps B and C for installation of the rack ear on the right side of the PowerCenter.
HTS 5000 Rack Ears
17
GROUNDING YOUR CABLE TV, SATELLITE DISH, AND ANTENNA CONNECTIONS
IMPORTANT NOTE:
Proper grounding can be accomplished by using a special grounding block attached to a cold water pipe
or copper ground rod driven into the ground. Consult with a qualified electrician to verify your outdoor
connections are grounded properly.
Coaxial Input/Output Hookup
CABLE TV
LINE
SATELLITE
DISH
ANTENNA
IN
CABLE TV
NORMAL
OUT
OUTLET PROGRAMMING SWITCHES
REMOTE
UNSWITCHED SWITCHED DELAY NO DELAY
1
IN
OUT 1
2
SATELLITE
1
2
3
4
REMOTE
AC IN
110V
3
5
4
IN
PHONE
OUT 2
5
OUT
GROUND
SHORT
(6 seconds)
DELAY
LONG
(20 seconds)
NO DELAY
DELAY TIME
SWITCH
TRIGGER OUT
SWITCH
DC IN
9~12V 300MA
DC OUT 9~12V 300MA
IN
OUT
BREAKER 15A
PRESS TO RESET
1800W MAX TOTAL
HTS 5000
GROUNDING BLOCK
ON COLD WATER PIPE
OR GROUNDING ROD
COAXIAL SECTION
OF HTS 5000
ANTENNA
CATV
SATELLITE
ANTENNA
OUT
OUT
OUT
IN
IN
IN
18
HTS 5000 FEATURES
PLEASE TURN TO PAGE 20 FOR DESCRIPTION OF PRODUCT FEATURES
30
9
10
11
12
METER ILLUMINATION
OFF
D
ON
ON
ON
ED
TE
D
D
RS
ED
ER
EC
HE
HE
VE
W
OK
OT
TIM
ITC
ITC
RE
PO
PR
ND
G
SW
E
N
SW
IN
OU
EA
RG
UN
IR
T1
T2
GR
CL
W
SU
OU
OU
PROTECTION ON
1
2
OUTLETS
5
3
4
ON
PHONE IN USE
7
6
13
8
Home Theatre
Reference PowerCenter™ HTS 5000
with Clean Power™ Stage Four Filtering
15
14
20
17
16
IN
CABLE TV
OUT
24
32
NORMAL
OUTLET PROGRAMMING SWITCHES
IN
OUT 1
REMOTE
UNSWITCHED SWITCHED DELAY NO DELAY
1
OUT 2
2
SATELLITE
1
2
3
4
REMOTE
AC IN
110V
3
5
4
IN
5
OUT
GROUND
SHORT
(6 seconds)
IN
OUT
PHONE
DELAY
LONG
(20 seconds)
NO DELAY
DELAY TIME
SWITCH
TRIGGER OUT
SWITCH
DC IN
9~12V 300MA
DC OUT 9~12V 300MA
ANTENNA
31
18
SATELLITE RECEIVER
19
29
22
1800W MAX TOTAL
27
28
25
23
19
BREAKER 15A
PRESS TO RESET
21
26
HTS 5000 FEATURES
NUMBERS REFER TO DRAWINGS ON PAGES 19
INDEX DRAWINGS
1. Wiring Reversed LED: Indicates that polarity is reversed on AC lines. If the LED is on, unplug the HTS 5000
and consult an electrician.
2. Ground OK LED: Indicates PowerCenter is plugged into a properly grounded 120V AC power outlet.
3. Surge Protected LED: Indicates Monster Power Surge Protection Circuitry is functioning properly.
4. Clean Power LED: Indicates Monster Clean Power circuitry is functioning.
5. Unswitched On LED: Indicates components plugged into the outlets programmed as “unswitched”
are receiving AC power.
6. Switched On LED: Indicates components plugged into the outlets programmed as “switched on” will receive
power when the ON button is pressed.
7. Timed On LED: Indicates components plugged into the outlets programmed as “switched on after delay”
will receive power after a delay.
8. Phone In Use LED: Shows activity on the phone line.
9. Expanded Scale Volt Meter with Adjustable Illumination: Measures incoming voltage and shows
fluctuations in the AC power.
10. On Button: Press to provide AC power to outlets programmed as “switched on” or “switched on after delay”.
20
NUMBERS REFER TO DRAWINGS ON PAGES 19
11. Meter Illumination Button: Adjusts amount of light to the volt meter.
12. Off Button: Press to shut down outlets programmed as “switched on” or “switched on after delay”.
13. Digital Isolation Filters: For digital components such as CD players, DVD players, and satellite receivers,
special filter circuit designed to reduce interference such as digital noise from your components getting into
the rest of your system.
NOTE: It does not harm analog video components or analog audio components to be connected to the digital
outlet section. However, for the best possible performance, we recommend plugging in only digital
components here.
14. Video Interference Reduction Filter: Special filter circuit designed to reduce interference (such as wide band
noise that would disturb video performance) to your video components.
NOTE: It does not harm audio components or digital components to be connected to the video outlet section.
However, for the best possible performance, we recommend plugging in only video components here.
15. Analog Audio Filter: For low current analog audio components such as preamplifiers and tape decks,
special filter circuit that reduces noise from the AC power line that would degrade the audio performance.
NOTE: It does not harm video components or digital components to be connected to the analog audio
outlet section. However, for the best possible performance, we recommend plugging in only
low current analog audio components here.
NOTE: After a powerline or lightning surge, the HTS 5000 MKII may provide an audio tone from the internal
buzzer. If the surge protect light is off, the unit will no longer provide surge protection.
21
NUMBERS REFER TO DRAWINGS ON PAGES 19
16. High Current Audio Filter: For high current audio components such as power amplifiers and receivers, special
filter circuit to reduce noise from the AC power line that would degrade the audio performance and to optimize
high current demand.
NOTE: It does not harm low current audio components, video components or digital components to be
connected to the high current audio outlet section. However, for the best possible performance, we
recommend plugging in only high current audio components here.
17.Cable TV Coaxial Input/Output: The input connects the coaxial cable from a wall cable outlet.
The output connects the coaxial cable to the input of your TV, VCR, or cable box.
18. Satellite Coaxial Input/Output: The input connects the coaxial cable from your satellite dish.
The output connects the coaxial cable to the input of your satellite receiver.
19. Antenna Coaxial Input/Output: The input connects the coaxial cable from your TV antenna.
The output connects the coaxial cable to the input of your TV, VCR, or splitter.
20. Outlet Programming Switches: Enables you to program each outlet pair to be either ”unswitched“,
” switched on“ or ”switched on after delay“.
21. Delay Time Switch: Selects delay time.
22. Trigger Out Programming Switch: Determines whether the 12V remote trigger powers an external device
immediately or after a delay.
22
NUMBERS REFER TO DRAWINGS ON PAGES 19
23. 1/8 inch Mini-Plug Jack Output for Remote DC hookup: Enables remote control of an external device.
24. Normal/Remote Switch: Allows the PowerCenter to operate in Normal or Remote mode. In Remote mode,
outlets programmed as “switched on” or “switched on after delay” are turned on/off by external signal.
25. Remote AC Hookup: Connects to a switched outlet on an external device. Used in conjunction
with the Normal/Remote switch, it enables remote control of the PowerCenter’s outlets.
26. 1/8 inch Mini-Plug Jack Input for Remote DC Hookup: Used in conjunction with the Normal/Remote
switch, enables remote control of the PowerCenter’s outlets.
27. Thermal Circuit Breaker: Protects the PowerCenter from power overload.
28. Extra-long 8 ft. Ultra-High Current Powerline™ Power Cord: For maximum power delivery
| and easy reach to outlets.
29. Monster Power Color-Coded Audio/Video ID Labels: For easy identification of your components
and where they’re connected.
30. Included Rack “Ears”: Two “ears” are included with the PowerCenter for rack mounting.
31. Ground Post: Provides a ground reference point for ungrounded components.
32. Phone Line: Allows you to hook up two telephones simultaneously.
23
TROUBLESHOOTING
PROBLEM – The PowerCenter is not receiving power.
Possible Cause #1
The PowerCenter is not turned on.
Possible Solutions
• Press the ON button on the PowerCenter.
• Make sure the PowerCenter’s AC power plug is plugged into a properly grounded
120V wall outlet.
• In some households, a wall switch may need to be thrown to make the wall outlet come alive.
Try turning on the light switches located near the wall outlet powering the PowerCenter.
• If the PowerCenter NORMAL/REMOTE switch is switched to REMOTE, switch it to NORMAL.
Possible Cause #2
Too many devices are connected, causing an overload, throwing the thermal circuit breaker. Please note: The total
power consumption on all the components powered by the PowerCenter should not exceed 1800 watts.
Possible Solutions
• Press the PowerCenter’s thermal circuit breaker (labeled BREAKER 15A on the back panel)
button in to reset. Please allow 10 minutes from the time the circuit breaker is initially thrown
before attempting to reset. If you reset too soon, the breaker will prematurely sense power
overload and not allow unit to operate.
• Disconnect any component that may be overloading the PowerCenter.
24
TROUBLESHOOTING (continued)
Possible Cause #3
The PowerCenter’s power cord is plugged into an outlet on the back of one of your components and the component
is not turned On.
Possible Solution
• Turn on the component.
NOTE: For the best possible performance, plug the PowerCenter into a wall outlet,
not an outlet on another component.
Possible Cause #4
The PowerCenter is defective.
Possible Solution
• Please see page 35 for warranty information.
PROBLEM – PowerCenter is not providing power to the components.
Possible Cause #1
The component is plugged into an outlet programmed as “switched on” or “switched on after delay”
and the PowerCenter has not been turned on.
Possible Solutions
• Press the ON button on the PowerCenter. The components plugged into the PowerCenter”s
outlets programmed as ”switched on“ should be turned on immediately.
• Press the ON button on the PowerCenter and wait for a few seconds for the components plugged
into the PowerCenter”s outlets programmed as ”switched on after delay“ to be turned on.
• Or, plug the component into an outlet programmed as “unswitched”.
25
TROUBLESHOOTING (continued)
Possible Cause #2
PowerCenter is plugged into a switched outlet on a component which is not turned on. The PowerCenter will not
receive power and therefore will not provide power to the components plugged into the PowerCenter’s outlets.
Possible Solution
• Turn on the component.
NOTE: For the best possible performance, plug the PowerCenter into a wall outlet,
not an outlet on another component.
Possible Cause #3
The PowerCenter is defective.
Possible Solution
• Please see page 35 for warranty information.
PROBLEM – Speakers emit a humming or buzzing noise.
Possible Cause
The PowerCenter is sharing AC power with equipment that is not properly grounded.
Possible Solution
• Connect your PowerCenter to a dedicated outlet.
26
TROUBLESHOOTING (continued)
PROBLEM – The ”UNSWITCHED ON“ LED is off.
Possible Cause
The PowerCenter is not plugged into a properly grounded AC outlet.
Possible Solution
• Plug the PowerCenter into a properly grounded 120V outlet.
PROBLEM – The ”SWITCHED ON“ LED is off.
Possible Cause #1
You are using the Remote AC Control feature (see page 9) and haven’t plugged the Remote AC Control Cord into either
the PowerCenter’s corresponding outlet or the component you wish to activate the Remote AC Control feature.
Possible Solution
• Plug one end of the Remote AC Control into the PowerCenter’s corresponding outlet and the
other end into the component you wish to activate the Remote AC Control feature. Once you
turn on the component, the “SWITCHED ON” LED should light up.
27
TROUBLESHOOTING (continued)
Possible Cause #2
You are using the Remote DC Control feature (see page 10) and haven’t plugged a 1/8” mini-plug cable into either
the PowerCenter’s corresponding outlet or the component you wish to activate the Remote DC Control feature.
Possible Solution
• Plug one end of the mini-plug cable into the PowerCenter’s corresponding outlet and the other
end into the component you wish to activate the Remote DC Control feature. Once you
turn on the component, the “SWITCHED ON” LED should light up.
Possible Cause #3
The component you wish to use to activate the Remote AC (or DC) Control feature isn’t plugged into a properly
grounded 120V outlet.
Possible Solution
• Plug the component into a properly grounded 120V outlet.
PROBLEM – ”TIMED ON“ LED is Off.
Possible Cause #1
You are using the Remote AC Control feature (see page 9) and haven’t plugged the Remote AC Control Cord into either
the PowerCenter’s corresponding outlet or the component you wish to activate the Remote AC Control feature.
Possible Solution
• Plug one end of the Remote AC Control into the PowerCenter’s corresponding outlet and
the other end into the component you wish to activate the Remote AC Control feature.
Once you turn on the component, the “SWITCHED ON” LED should light up.
28
Possible Cause #2
You are using the Remote DC Control feature (see page 10) and haven’t plugged a 1/8” mini-plug cable into either
the PowerCenter’s corresponding outlet or the component you wish to activate the Remote DC Control feature.
Possible Solution
• Plug one end of the mini-plug cable into the PowerCenter’s corresponding outlet and the other
end into the component you wish to activate the Remote DC Control feature. Once you
turn on the component, the “SWITCHED ON” LED should light up.
Possible Cause #3
The component you wish to use to activate the Remote AC (or DC) Control feature isn’t plugged into a properly
grounded 120V outlet.
Possible Solution
• Plug the component into a properly grounded 120V outlet.
29
FREQUENTLY ASKED QUESTIONS
Q. What is the importance of component-to-component filtering?
A. With the Monster PowerCenter, AC power must first go through a segment of noise filters, which isolates your
equipment from noise on the AC power line. Most manufacturers’ battle against line noise stops there. The next
crucial step of noise filtering must occur between components. Our patent-pending component-to-component noise
filtering is one of the PowerCenter’s incredibly innovative features because it protects components from degrading
each other’s performance via their own special brand of interference. The PowerCenter outlets are all directly
connected, so the noise that’s generated by a particularly noisy component (digital components like CD players are
infamous for this) will attempt to get onto other components. It will not, however, because it must to go through
a specialized filter to get to an adjacent outlet, and noise is eliminated for the best possible sound and picture.
Q. Does it matter which outlets I plug my components into?
A. Yes. Each group of outlets is specifically designed to protect and maximize performance of ONLY the components
they are intended to power. For example, a power amplifier is high current device and has a special high current
audio filter that allows for the greater power requirement and still reduces noise from the AC power line. A VCR
is not a high current device, like an amplifier, and the filter used with video products like this one reduces a wider
band of noise that is specific to video products. In summary, each type of component receives separate noise filtering
to accommodate the inherent needs and differences.
30
FREQUENTLY ASKED QUESTIONS
Q. Will it harm a component to plug it into an outlet that it’s not designated to power,
like a high power amplifier into an outlet marked for TV?
A. No. However, you may not realize the full performance potential of the component.
Q. If my PowerCenter stops operating, what do I do?
A. First you need to check the reset button (labeled as BREAKER 15A on the PowerCenter’s rear panel). It is possible
the overload came from your high-powered audio equipment. If your system were to draw too much power, a special
circuit breaker may kick in. To restore the operation of your PowerCenter, wait for 10 minutes and press the reset
button. If power is still not restored to your PowerCenter, please refer to page 24 and read through the related
troubleshooting questions.
31
APPENDIX A
Glossary of Power-Related Terms
Audio Noise: In the audio-frequency range, any electrical disturbance introduced from a source extraneous to the signal.
Alternating Current (AC): A flow of electricity which reaches maximum positive polarity in one direction, decreases
to zero, then reverses itself and reaches maximum negative polarity in the opposite direction. This cycle is
repeated continuously.
Amp: A common abbreviation for Ampere, a unit of electrical current or rate of flow of electrons.
CSA: A common abbreviation for Canadian Standards Association. CSA has developed over 200 standards,
including several for electrical and electronic products.
Clean Power™: Noise filtering designed exclusively for Monster Power products by renowned engineer/inventor
Richard Marsh. Filters out unwanted interference caused by RFI, EMI, and component-generated noise, so
components plugged into a PowerCenter can deliver maximum performance without noise entering their signal path.
Conducted Noise: Any unwanted electrical signal conducted on the power lines supplying the equipment.
Current: The movement of electrons through a conductor.
Digital Noise: In the digital-frequency range, any electrical disturbance introduced from a source extraneous
to the signal.
Direct Current (DC): A flow of continuous electric current in positive or negative polarity.
Electromagnetic Interference (EMI): Electromagnetic phenomena in which various appliances and components
generate interference that can contribute to a degradation in performance of an electronic receiver or system.
32
Filter: A selective network of resistors, inductors, or capacitors which offers comparatively little opposition to certain
frequencies, while blocking or attenuating other frequencies.
Ground: A point in an electrical system that has zero voltage. Usually, the chassis of an electrical component
is at ground potential and thus serves as the return path for signals as well as for power circuits.
Hertz (Hz): A unit of frequency equal to one cycle per second.
Joule Rating: A measurement of how much surge can be absorbed by a surge suppressor device. The higher
the joule rating, the more surge it can absorb.
Peak Current: The maximum current which flows during a complete cycle without permanent change in breakdown
ratings or published life specifications.
Power: The energy dissipated into an electrical or electronic circuit or component that is conducting either AC or DC.
Electrical energy developed to do “work” such as the voltage from an amplifier used to drive a speaker.
Power Line: Two or more wires conducting electric power from one location to another.
Radio Frequency Interference: Any electrical signal capable of being propagated into and interfering with the
proper operation of electrical or electronic equipment. The frequency range of such interference may be taken to
include the entire electromagnetic spectrum.
33
Spike: An abrupt transient which comprises part of a pulse, but exceeds its average amplitude considerably.
Surge: A large, sudden change of voltage or current, usually caused by the collapse of a magnetic field or by
a shortened or opened circuit element.
Surge Protector: A device which protects component circuitry from high alternating voltage peaks or transients.
Transient: A momentary surge on a signal or power line which may cause component breakdown and failure.
UL: A common abbreviation for Underwriters’ Laboratories, Inc., a corporation supported by some underwriters
for the purpose of establishing safety standards on types of equipment or components.
Video Noise: In the video-frequency range, any electrical disturbance introduced from a source extraneous to the signal.
Volt (V): The unit of measurement of electromotive force.
Voltage Rating: The maximum voltage which an electrical device or component can sustain without breaking down.
34
APPENDIX B
Warranty Information
Monster Cable Products, Inc. warrants that this product shall be free of defects in materials and workmanship
under normal use for 5 years from the date of purchase from an Authorized Monster Power Dealer.
This warranty extends only to the original purchaser and is nontransferable. During the warranty period,
Monster Cable Products, Inc. will, at no additional charge, repair or replace defective parts or, at the option
of Monster Cable Products, Inc., replace the entire unit.
This warranty does not extend to any Monster Cable Products, Inc. product that has been damaged or rendered
defective (a) as a result of accident, misuse or abuse; (b) by the use of parts not manufactured or sold
by Monster Cable Products, Inc.; or (c) by modification of product.
Connected Equipment Warranty
Monster Cable Products, Inc. will replace, or, at its option, pay to repair or pay the fair market value of equipment
that is damaged by an AC power, cable, telephone, or lightning surge while connected to a properly installed
Monster Cable Products surge protector, 5 years from the date of purchase from an Authorized
Monster Power Dealer.
$100,000 is the maximum amount Monster Cable Product, Inc. will pay. The foregoing Connected Equipment
Warranty is conditioned on the damage having arisen from surge damage or the Monster Cable Products
surge protector having operated outside the designed specifications.
35
GENERAL PROVISIONS
As To Each Warranty:
Any technical or other advice offered before or after delivery with respect to the use and application of the product
is furnished without charge and subject to the understanding that such advice is issued at the purchaser’s sole risk
without any limitation or modifications of any disclaimer or other provision contained herein.
THE ABOVE ARE IN LIEU OF ALL OTHER WARRANTIES, EXPRESS OR IMPLIED, INCLUDING IMPLIED
WARRANTY OF MERCHANTABILITY AND FITNESS FOR A PARTICULAR PURPOSE.
IN NO EVENT SHALL MONSTER CABLE PRODUCTS, INC. BE LIABLE FOR SPECIAL, INCIDENTAL,
CONSEQUENTIAL OR INDIRECT DAMAGES.
36
CONNECTED EQUIPMENT CLAIM
How To Make A Claim
In the event damage has occurred to equipment which is properly connected to a Monster Power product as a result
of an abnormally high voltage spike, you must follow these instructions.
1. Call 877/800-8989.
2. Give a detailed explanation of how the damage occurred.
3. Obtain a Return Authorization number for the Monster Power product.
4. A “Connected Equipment Claim Form” will be sent to you. This claim form must be filled out entirely
and sent back with the Monster Power product.
5. Return the Monster Power product, shipping prepaid, to Monster for verification of damage, along with
a copy of your sales receipt for your Monster Power product, completed Connected Equipment Claim Form,
and Return Authorization number printed on the outside of the package. The Connected Equipment Claim
Form will include complete instructions for return, along with an address label.
6. Monster will respond as to whether the damage to the connected equipment was caused
by the Monster Power product.
37
7. If it is determined that the damage was caused by the Monster Power product, Monster Cable Products, Inc.,
at its discretion, will direct you to:
A. Obtain a repair estimate at a service center authorized by the manufacturer of the connected equipment;
or,
B. Send the connected equipment to Monster for repair; or,
C. Reimburse you for the prorated fair market value of the damaged connected equipment (see Limited
Connected Equipment Warranty for details).
8. If a repair estimate is required, as stated in 7A above, you will be instructed on how to properly submit
Monster Cable Products, Inc. for payment.
Note: Compensation for or restoration of data loss is not covered.
If you have any questions regarding this claim procedure, call 877/800-8989.
38
APPENDIX C
How to Contact Us
39
Write to us at:
Monster Power
455 Valley Drive
Brisbane, CA 94005
Visit us on the web at:
monstercable.com
Call us toll-free at:
877/800-8989
Register Your Product For Warranty Coverage
▲ Please Tear the Return Registration Card Out of the Manual Here ▲
Please either complete and return this questionnaire by mail, or go to monstercable.com/warranty to register online
Name (please print) ________________________________________________________________ Age ______________________
Address ____________________________________________________________________________________________________
City/State/Country ____________________________________________________________________________________________
Zip/Postal Code ______________________________________________________________________________________________
Daytime Phone Number (with area and/or country code) ________________________________________________________________
Evening Phone Number (with area and/or country code)__________________________________________________________________
Name and Location of Dealer ____________________________________________________________________________________
Monster Power Model Purchased ______________________________________________________ Serial Number ______________
Other Monster Power and/or Monster Cable Products Used ______________________________________________________________
1. How did you hear about Monster Power?
o Salesperson o Friend o Newspaper/Magazine Advertisement o Newspaper/Magazine Story or Review
o In-Store Display o Other_____________________________
2. Estimated value of your entire system?
o Under $1,000 o $1,000–3,000 o $3,000–5,000 o $5,000–10,000 o Over $10,000
3. What is your favorite music?
o Classic Rock o Alternative o Classical o R&B o Rap o Country o New Age Instrumental o Jazz o Blues o Pop o Oldies
o Other_____________________________
4. Did you buy this Monster PowerCenter with a new system or component?
o Yes o No
Please see other side a
5. Was this Monster PowerCenter a gift?
o Yes o No
6. What was the purchase price of this unit? __________________
7. How would you describe your experience when purchasing this product?
o The salesperson was knowledgeable and helpful o The salesperson was not knowledgeable about Monster Power products
o I knew exactly what I wanted and didn’t need any help with my decision o Not applicable o Other_________________________
8. Approximately how many times have you purchased Monster Power products?
o This is the first time o Two o Three o Four o Five o More than five
9. How would you describe Monster PowerCenter’s contribution to your system?
o I never tried it any other way o It made no difference at all o I noticed a slight improvement o I am impressed. It made a big improvement
o I can’t believe it! Is this the same system?
10. What audio, video or music magazines do you read?
o Fi Magazine o Stereophile o Audio o Stereo Review o Home Theater o Audio Video Interiors o Video o Absolute Sound
o Stereophile’s Guide to Home Theatre o Widescreen Review o Other__________________________________
11. Annual household income?
o Under $25,000 o $25,000–50,000 o $51,000–100,000 o Over $100,000
12. Age? o Under 18 o 18–34 o 34–49 o 49–59 o 59–69 o 69–79 o Over 79
13. Have you made any purchases through the mail in the last twelve months?
14. o Male
o Yes o No
o Female
15. Do you rent…o DVDs o Video Tapes o Laser Discs
16. Do you buy…o DVDs o Video Tapes o Laser Discs
17. If you could suggest a new Monster Power product or an improvement to one or more of our existing products,
what would it be?________________________________________________________________________________________
Please return warranty registration to:
Monster Power
455 Valley Drive
Brisbane, CA 94005
®
NOTES
42
NOTES
43
®
A division of The Monster Group™
455 Valley Drive • Brisbane • CA 94005
Visit us on the web at: monstercable.com
The Monster Power Home Theatre Reference PowerCenter™ HTS 5000 is protected
under U.S. Pat. No. 5,589,718. Other Patents Pending.
”Monster“ ”Monster Cable“ ”Monster Power“ ”Clean Power“ and ”PowerCenter“
are registered and unregistered trademarks of Monster Cable Products, Inc.
© Monster Cable 1999 All Rights Reserved.
inv. no. 154191