1
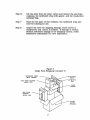
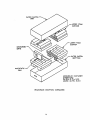
MINISCRIBE CORPORATION 5 1/4" HALF HEIGHT PRODUCTS GROUP MSS PRODUCTS DIVISION . . TECHNICAL SUPPORT MANUAL SEPTEMBER. 198·8 Rev.A 60131 INDEX PAGE -CO~n .....•.........................•.............••.••..•..•....•....••.••.•.•..••••.•••.•.•..•..••.•.••••••.....••.•..•..•..• 1 Tech Support Questionnaire ............................................................................................ 3 Error Messages - Not Hard Drive Failures .................................................................. 4 3650/3675 Installation Guide ......................................................................................... 6 3053 Inst:a.1l.ation Guide ........................•..............•..................•.•..............•...•.•.............•...... 8 Parldng Heads .. Moclel3650/3675 ............................................................................ 10 Error Codes .. Model 3650/3675 ................................................................................ 11 Error Codes - Model 3053 ............................................................................................. 12 Standard Report ................................................................................................................. 14 Handling and Packing ......... ...... ........ ...... .................... .......................... ........................... 15 Fonnat and Partition - Western Digital ..................................................................... 21 Fonnat and Partition - Adaptec .................................................................................... 23 Fonnat. aI'l.d Partl.tlon - U'fC •••••••••.•••••••••••••••••••••••••••••••••••••••••••••••••••••••••••••••••••••••••••••••••• 25 Form..at and Parti.tion - Omti .......................................................................................... 27 Compatlbilitr - In.teIfaces, Onboard............................................................................. 29 Controller. Installation Software, Non-DOS Operating Systems, MFM or RLL, Interleaving. Write Precompensation Disk ~er 'by" 0rl.tJ:'ack. ................................................................................................ 34 MS DOS 3.3 Hard Disk Partitioning Guide ............................................................... 37 MS DOS 3.3 - Creating Multiple Partitions.............................................................. 45 Error Codes - Reference ................................................................................................. 49 i FORMATl'ED DRIVE WRITE PRECOMP ACCESS TIME 336 128 179 MS ------- 4 336 128 179 MS 1 306 2 336 128 93 MS ------- 10 MB FH 306 4 336 128 85 MS 1 4010 8MBFH 480 2 336 128 133 MS ------- 4020 16 MB FH 480 4 522 128 133 MS 1 3012 10l\m HH 612 2 656 128 155 MS ------- 3212 10:MB HH 612 2 656 128 85 MS ------- 3412 10MB HH 306 4 100 128 60 MS 1 3425 20:MB HH 615 4 656 128 85 MS 2,6 3425P 20MB HE 615 4 656 128 53 MS 2, 6 3438* 32l\m HH 615 4 656 128 85 MS 2,6 3438*P 33l\m HH 615 4 656 128 53 MS 2,6 3650 42lV1B HH 809 6 852 128 61 MS 3 3675* 63:MB HH 809 6 852 128 61 MS 3 3053 44MB HE 1024 5 AUTO 512 25 MS 11,17,36 3085 71 MB HH 1170 7 AUTO 512 22 MS 12, 19 6032 26MBFH 1024 3 AUTO 512 28 MS 10 6053 44MBFH 1024 5 AUTO 512 28 MS ll.17.36 6085 71 MB FH 1024 8 AUTO 512 28 MS 4,45 6079* 68MBFH 1024 5 AUTO 512 28 MS 11.17,36 6128* 110MBFH 1024 8 AUTO 512 28 MS 4,45 MODEL CAPAClTI ens 1006 5MBFH 306 2 1012 10 MB FH 306 2006 5MBFH 2012 BEADS PARK 1 TYPE (AT) FORMATTED WRITE PRECOMP ACCESS TIME DRIVE CAPACITY ens 8412 10l\1B 3 1/2" 306 4 336 128 50 MS 1 8425 - 32l\m -3 1/2" - 615 4- -664 t28 68--MS 2-,6 8438* 32MB 3 1/2" 615 4 664 128 63 MS 2,.6 8425F 20l\1B 3 1/2" 615 4 664 128 40 MS 2,6 8438F* 32 MB 3 1/2" 615 4 664 128 40 MS 2,6 8225 21l'11B 3 1/2" 771 ·2 810 128 45 MS ------- 8450 40l\1B 3 1/2" 771 4 810 128 46 MS 2,6 84255 20MB 3 1/2" 615 4 656 128 68 MS 2,6 8425XT 20l\1B 3 1/2" 615 4 AUTO 128 28 MS ..------ 8051A 42l'AB 3 1/2" 745 4 AUTO 128 28 MS 8051S 42MB 3 1/2" 745 4 AUTO 128 28 MS MODEL HEADS PARK TYPE (AT) 9230E 203l\1B FH 1224 9 AUTO 512 16 MS ------------------- 9380E 338l\ffi FH 1224 15 AUTO 512 16 MS ------- 92305 207 l\Iffi FH 1224 9 AUTO 512 16 MS ------- 93805 347 MB FH 1224 15 AUTO 512 16 MS ------- * RLL Certified Reduced -write current = total cyls. + 1 Max correctable error burst = 11 (Western Digital) CCB option byte = 3 or 7 (Western Digital) 2 TECH SUPPORT QUESTIONNAIRE 1. Hard· drive model number? 2. Are you getting a flashing error message from LED? a b. If yes. identify error message (see product manual) If no. continue . . . . 3. What system? (AT. XT, clone. etc.) 4. Is this the only hard drive in the system? 5. What controller? (Mfg. and model number) Is the controller compatible with the drive and/or system? 6. What version of DOS? 7. How is the hard drive being formatted? (Low level format. partition, high level format) 8. At what point did the problem occur? 9. Verify the following: a. b. c. d. e. f. 34 pin ribbon cable (straight or twisted?) (The twist inverts the drive select) Drive Select Is the 20 pin ribbon cable attached to the correct port on the controller? Is pin one (1) properly identified at the controller? At the hard drive Has a low level format been performed? (XT - debug) (AT - debug, Advanced Diag., Disk Manager) Is a power plug connected to the hard drive? 10. Have you tried to format the drive with another controller? 11. Have you tried to format the hard drive in another system. or format another hard drive in this system? 12. Have you tried another formatting procedure and/or software? 3 HARD DISK DRIVE ERROR MESSAGES (Not Necessarily Hard Drive Fallures) PROBLEM: ----SOLUTION: PROBLEM: SOLUTION: PROBLEM: SOLUTION: PROBLEM: SOLUTION: PROBLEM: SOLUTION: PROBLEM: SOLUTION: 1701 error (Drive Not R e a d y ) . A. -- Drive not formatted. press F1 to continue. 1780 error Check for proper drive select. B. Check ribbon cables at controller for proper pin one (1) alignment C. Verify that the 20 pin ribbon cable is connected to the correct port on the controller card. D. Replace 20 pin ribbon cable. E. Replace controller card. A. Error Code 20 Check for proper drive select~ B. Check ribbon cables at controller for proper pin one (1) alignment. C. Verify that the 20 pin ribbon cable is connected to the correct port on the controller card. D. Check for proper installation of the controller card in the expansion slot. E. Replace controller card. A. Error Code 80 A. Check for proper drive select. B. Check 34 pin and 20 pin ribbon cables for proper installation. C. Replace controller card. "Error Reading Fixed Disk" when booting the system. Primary DOS partition not active. A. ''Track Zero Bad-Disk Unusable" A. Reformat hard disk with DOS 3.0 or higher. B. Access the config.sys file. make buffers = 99, and reformat hard disk. After the fonnat is complete. lower buffers to their original configuration. PROBLEM: SOLUTION: A. "Error Reading Track 0" Hard disk not formatted. PROBLEM: SOLUTION: A. Low level Fonnat Takes Too Long. 20 pin ribbon cable connected to the wrong port on the controller card. B. Check ribbon cables at controller for proper pin one (1) alignment. 4 PROBLEM: SOLUTION: 'Won't Format" - "System Won't Recognize" "Can't Access" A Has drive been initialized? now level format, partitioned. high level format) B. --Check --for--properdrive--setect.-C. Check ribbon cables at controller for proper pin one (1) alignment. D. Verify that the 20 pin ribbon cable is connected to the correct port on the controller card. E. If two hard drives in system, verify proper termination. (The terminating reSistor must be removed from all but the last physical hard drive in the chain) F. Check for proper installation of the controller card in the expansion slot. G. Replace controller card. TECHNICAL SUPPORT AVAILABLE AT 1 (800) 356-5333 5 Installation Guide for MiniScribe Models 3650 & 3675 This guide will allow you to install a MiniScribe hard disk drive into your IBM penI AT orcrone~system: Please read the entire installation guide before attempting to install your hard disk drive. Installation 1. Set the drive on a padded surface (anti-static if available) with the printed circuit board facing up. (If available. a properly grounded write strap should be worn during this installation.) Do not touch any part of the printed circuit board at any time during installation. 2. If your system requires the drive to use mounting rails. secure the rails to the drive in the orientation that best fits your system. 3. Setting the Drive Select jumpers: The drive select jumper (see fig. 2) is set according to the drives asSignment. (C.D. etc.) and the configuration of the 34 pin ribbon cable. If the 34 pin ribbon cable has no twisted connections (see fig. 1) configure the fIrst drive (e) (inner connector) as drive select 0 (DSO). and the second drive (D) (end connector) as drive select 1 (DSl). For a single drive installation. attach the drive to either connector and configure as drive select 0 (DSO). I ~~~==:=~==::a~.u o o o o o o o o ~ 18181818 c:o - ~ N ~ V" ~ V4 g 8181 ~ ~ N - ~ 0 J2 19 n1,"lnnlUI! nnnI UULJU lJU ! i 3-4- PIN RIBOON CABLE (T'MSTt:O) flCUR( 1. 6 !: i,: I l ,I'. i If the 34 pin ribbon cable has a twist (see fig. 1) at the end connector. attach the first drive (C) to the end (twisted) connector. and the second drive (D) to the inner connector. Configure both drives (C & 0) for drive select 1 (DS 1). For a single drive installation. attach the drive to the end (twisted) connector and configure as drive select 1 (OS 1). -~4. When installing a single drive. the resistor termination pack (RPI) must remain installed. When installing two drives. the resistor tennination pack (RP 1) must be removed from all but the last physical drive in the chain. 5. Slide the drive into your system's open slot with the activity LED towards the outside of the system. 6. Plug the 34 pin control cable and 20 pin data cable onto the hard drive's printed circuit board edge connectors J 1 and J2 respectively. The striped edge of the ribbon cable indicates pin 1. The location of pin 1 on the connector must coincide with pin 1 on the printed circuit board edge connector. Tip: On models 3650 and 3675 the striped edge of the ribbon cable should always face the power connector (J3). 7. Connect a 4 pin power connector to J3 on the hard disk. 8. Check all connections for proper installation before powering up the system. Do not apply power to the drive until the drive is secure and the system cover is in place. 9. You are now ready to proceed with the required hard disk formatting operations. To properly prepare the hard disk for use in your system. three steps must be taken: low level format. partition. and high level or physical format. Consult the formatting documentation supplied with the controller card or partitioning software instructions for the model 3650 and 3675. Drive Specifications Drive ·CYL HDS RWC Precomp 3650 3675 809 809 6 6 810 810 128 128 Technical Support is available at 1-800-356-5333. 7 MINISCRIBE CORPORATION INSTALLATION GUIDE FOR MINISCRIBE MODEL 3053 This gUide will allow you to install a MiniScribe hard disk drive into your IBM PC XI' / AT or clone system. 1. Set the drive on a padded surface (anti-static if available). with the printed circuit board facing up. 2. If your system requires the use of mounting rails to secure the drives. attach them in the orientation that best fits your system. 3. Setting the drives select switCh: DRIVE SELECT JUMPERS RP14 v 34 Pin Ribbon Cable (TwIsted) F1GUREl POWER CONNE DRIVE SPECIFICATIONS Formatted Capacity -44.6 MBytes Data Cylinder -1024 Read/Write Heads -5 Average Access Time -25msec (Based on a 6 microsec step rate) Power Dissipation -12.4 Watts Average Write Precompensation Cyl -512 Starting Reduce Write -1024 Current Cylinder 8 Attach 20 pin ribbon cable to J2. Attach 34 pin ribbon cable to J 1. Attach power connector to J3. F1GURE 2. When attaching the first drive (C) to the twisted connection of the 34 pin ribbon cable (see figure 1). and the second drive (0) to the nontwisted connection of the 34 pin ribbon cable. configure both drives as drive select 2. when--attachTrig the firsldfive (C) to the non-twisted-connectlon of the34 pin ribbon cable and the second drive (0) to the twisted connection of the 34 pin ribbon (See Figure 1). configure both drives as drive select 1. Check your controller installation manual to ensure correct attachment of the 20 pin ribbon cable and the 34 pin ribbon cable at the controller. 4. Configuring the terminator resistor: When installing a single drive. the terminator resistor (RP14) must remain installed. When installing two or more drives, the terminator reSistor must be removed from all but the least drive (the drive attached to the end connector). (See Figure 2.) 5. Slide the hard drive into your system. The drive may be mounted in any attitude including the normal flat position, on either side or on either end. 6. Verify that the location of pin 1 on the controller coincides with pin 1 of the ribbon cables (See Figure 1.). The color coded, striped edge of the ribbon cable indicates pin 1. 7. Connect a 4 pin power connector to J3 on the disk drive. Do not apply power until the drive is secured. 8. You are now ready to complete drive formatting procedures. 9 PARKING HEADS ON MODELS 3650 AND 3675 In the month of July, 1988 MiniScribe's Recon facility reported that 76°A> of the Model 3650 and 3675 drives arrived with the heads NOT ---PARKED- at the "land1ng-zon~' ,which-on these models is Cylinder- 852. As you know, drives "not landed" could seriously damage the heads and disks of the drives when they are in transit. resulting in high scrap cost. and possibly voiding the warranty of the drive. We really need your help in stressing to your customers and fellow employees the importance of "PARKING THE HEADS" and "proper packaging" of the drives for shipping. Here are the steps to take to "park the heads" and "properly package" the Model 3650 and 3675 for shipping. 1. Disconnect both ribbon cables from the hard drive. 2. Remove the drive select jumper from either DSO or DS!. 3. Place that juniperon the pins marked JP3. 4. Apply power to the drive. 5. In approximately 30 seconds the heads will park at the "landing zone". You will hear the stepper motor turn as it moves the . heads to the "landing zone", and the drives' LED will turn amber, indicating the heads are parked. 6. Disconnect power. 7. Place the drive in its "Original" anti-static bag, and package the drive for shipment in its "original" container. If the drive will not spin or the stepper motor and/or its circuitry is defective, then of course the heads cannot be parked. In this case it is imperative that the drive is packaged for shipment in its "original" container, thus minimizing the possibility of serious damage to the heads and disks. Your cooperation is vital and will certainly be greatly appreCiated. Thank you. 10 MINISCRIBE MODELS 3650 AND 3675 ERROR CODES Zero = 0.5 second flashing red mode One = 0.5 second continuous red ON mode Between Bits = 0.5 seconds off Between Repeat Cycles = 1.0 second off Listed below are the binary to hexadeCimal conversion values: 0=0000 1=0001 2=0010 3=0011 4=0100 5=0101 6=0110 7=0111 8=1000 9=1001 A=1010 B=1011 C=1100 D=1101 E=1110 F=1111 Example: Code "E" 0.5 Sec ON 0.5 Sec OFF 0.5 Sec ON 0.5 Sec OFF 0.5 Sec ON 0.5 Sec OFF 0.5 Sec FLASHING 1.0 Sec OFF MESSAGE DEFINITIONS Code 0 - Microprocessor RAM error Code 1 - Microprocessor ROM checksum error Code 2 - Interface chip diagnostic failure Code 3 - Write Fault latch will not reset Code 4 - Index pulse not detected during spinup Code 5 - Unable to reach 3600 rpm in 30 seconds Code 6 - Unable to stabilize spin speed in 10 seconds Code 7 - Unable to maintain spin speed to 0.5% Code 8 - Unable to uncover Track Zero sensor Code 9 - Unable to cover Track Zero sensor Code A - Track Zero interrupter misadjusted Code B - Shipping zone error, crash stop misadjusted Code C - Carriage stuck during recal error Code D - Seek error during bum-in or recal Code E - Unused Code F - Unexpected .interrupt from processor 11 MINISCRIBE MODEL 3053 ERROR CODES Zero = 0.5 second flashing mode One-= -----0-.5 secoIiaCoIltihlious--ONIfidde-Between Bits = 0.5 second off Between Repeat Cycles (Words) = 1.0 second off Usted below are the binary to hexadecimal conversion values: 0=00000 1=00001 2=00010 3=00011 4=00100 5=00101 6=00110 7=00111 Example: 8=01000 9=01001 A=01010 B=01011 C=01100 D=01101 E=01110 F=Ollll 10=10000 11=10001 12=10010 13=10011 14=10100 15=10101 16=10110 17=10111 Code "lA" 11010 1 1 o 1 o 0.0 sec ON 0.5 sec OFF 0.5 sec ON 0.5 sec OFF 0.5 sec FLASHING 0.5 sec OFF 0.5 sec ON 0.5 sec OFF 0.5 sec FLASHING 1.0 sec OFF 12 18=11000 19=11001 1A=11010 1B=11011 1C=11100 ID=11101 1E=11110 IF=11111 ERROR CODE DEFINITIONS Code 00 Code 01 Code 02 .. Code 03 Code 04 Code 05 Code 06 Code 07 Code 08 Code 09 Code OA Code OB Code OC Code 00 Code OE Code OF Code 10 Code 11 Code 12 Code 13 Code 14 Code 15 Code 16 Code 17 Code 18 Code 19 Code lA Code IB Code IC Code ID Code IE Code IF NOTE: = Microprocessor RAM error Microprocessor ROM Checksum error Interface chip diagnostic error ~--. == -- -WRITE FAULT will not reset = Index pulse not detected or lost = Unable to maintain spin speed within 0.5% = Loss of +FINE TK. during idle mode = More than one seek retry = Time out on +END DECEL signal = Time out on track crossing (-CYL PULSE) = Overshoot = Time out on +FlNE TK = +TKO signal not detected on a seek to TKO = Comparator mismatch during settling = Comparator mismatch after track crossing . = Unexpected interrupt from microprocessor = Time out on TKO pattern Time out on GB1 pattern = Time out on GB2 pattern = Seek range error = Voltage unsafe with -WRTGATE inactive = Voltage unsafe with -WRI'GATE active = Chip unsafe (-WRI'TE FAULT) = Step pulses received with -WRTGATE active = Time out on +END DECEL signal = Time out on track crossing (-CYL PULSE) = Overshoot = Time out on +FINE TK = +TKO signal not detected = Comparator mismatch after rezero = Servo adjust failure - no closure = 6301 Trap = = = Codes: 08, 09 = During a seek Codes: OA. OB, OC, OD Codes: 10, 11, 12, 18, 19, IA = During a rezero Codes: IB, 1C, ID = After a rezero 13 =After a seek STANDARD REPORT COMPLAINT ConE COMPLAINT BAD DIREcroRYTRACK - TRACK 0 ERROR BAD . TRACKS/SECTORS/BLOCKS BROKEN/LOOSE HARDWARE BROKEN WIRE/CONNECTOR D~GED FACEPLATE DAMAGEDSHOCKMOUNTS DAMAGED PCBA DEFECTIVE LED DEFECTIVE MEDIA SURFACE DEFECTIVE PCBA COMPONENTS-BURNED DEFECTIVE REZERO EXCESSIVE FLAWS FLASH CODE 0 FLASH CODE 1 FLASH CODE 2 FLASH CODE 3 FLASH CODE 4 FIASHCODE5 FIASHCODE6 FLASH CODE 7 FLASH CODE 8 FLASH CODE 9 FLASH CODE A FLASH CODEB FIASHCODEC FLASH CODED FLASHCODEE FLASHCODEF FLASH CODE 10 FLASH CODE 11 FLASH CODE 12 FLASH CODE 13 FLASH CODE 14 FLASH CODE 15 FLASH CODE 16 FLASH CODE 17 FLASH CODE 18 FLASH CODE 19 FLASH CODE 1A FLASH CODE IB FLASH CODE Ie FLASH CODE ID FLASH CODE IE FLASH CODE IF HARD ERRORS-TOO MANY BAD TRACKS NOISY DRIVE Naf READY - WON'T COME READY POWER UP/SPIN READ /WRITE ERRORS/PROBLEMS SEEK STEP ERROR TIME OUT VERIFY /SELECT PROBLEM WON'T BOOT LOAD WON'T PARK - CAN'T PARK HEADS 14 63A 68 12 9 5 6 7 4 69 7B 11 66 13 14 15 16 17 18 19 20 21 22 23 24 25 26 27 28 29 30 31 32 33 34 35 36 37 38 39 40 41 42 43 44 52C 2 59A 62 55 56 61 58 60 71B HANDLING AND PACKING CAUTION /WARNING The MiniScribe drive is a precision product. During handling, the product must not be dropped. jarred or bumped. Otherwise. damage to the heads and disks may occur. When the drive is removed from the MiniScribe shipping container and not immediately secured within a chassis through its shock mounts. it must be stored on a soft padded conductive (antistatic) surface. UNPACKING AND INSPECTION SINGLE PACK A Retain the packing materials for reuse. Refer to Figure 1 for the following steps: Step 1: Inspect the shipping container for evidence of damage in transit. If damage is evident. notify the carrier immediately. Step 2: Ground out work ~ and operator to eliminate electrostatic dischar~e. . Step 3: Open the outer carton by carefully cutting the tape on the top of the carton. Step 4: Uft the inner carton out of the outer carton and remove the end foam cushions. Step 5: Open the inner carton by carefully cutting the tape on the top of the carton. Step 6: Uft the drive from the inner carton and remove the end foam cushions, the cardboard wrap with spacer. and the conductive/ antistatic bag. Step 7: Place the two pairs of end cushions. the cardboard wrap with spacer. and the inner carton within the outer carton and store for subsequent use. Step 8: Inspect the drive for shipping damage. loose screws or components and correct if possible. If damage is evident without noticeable damage to the shipping cartons, notify MiniScribe immediately for drive disposition. 15 MINISCRIBE DRIVE SLING 17 OUTER BOX 3/8 x 16 1/16 x 9 1/2 Figure 1 Single Pack Shipping Container A SINGLE PACK B Retain the packing materials for reuse. Refer to Figure 2 for the following steps: Step 1: Inspect the shipping container for evidence of damage in transit. If damage is evident. notify the carrier immediately. Step 2: Ground out work area and operator to eliminate electrostatic dischar~e. Step 3: Open the outer carton by carefully cutting the tape on the top of the carton. Step 4: Lift the inner carton out of the outer carton and remove the end foam cushions. Step 5: Open the inner carton by carefully cutting the tape on the top of the carton. 16 Step 6: Lift the drive from the inner carton and remove the end foam cushions. the cardboard wrap with spacer. and the conductive/ antistatic bag. Step 7: Place the two pairs of end cushions, the cardboard wrap and store for subsequent use. Step 8: Inspect the drive for shipping damage. loose screws or components and correct if possible. If damage is evident without noticeable damage to the shipping cartons. notify MiniScribe immediately for drive disposition. Figure 2 Single Pack Shipping Container B CARDBOARD WRAP (WITH SPACER) MINISCRIBE DRIVE 1I.t:.~::;:\--- ANTI STATIC END FOAM CUSHION INNER (2X) BAG INNER CARTON END FOAM CUSHION OUTER (2X) OUTER CARTON 17 X II X 15 17 MULTIPACK Retain the packing materials for reuse. Refer to Figure 3 for the following -steps: ---.. ---._.. . Step 1: Inspect the shipping container for evidence of damage in transit. If damage is evident. notify the carrier immediately. Step 2: Ground out work ~ and operator to eliminate electrostatic dischar~e. Step 3: Lift off outer carton top. Step 4: Lift off upper foam cushion. This will expose the drives in their conductive / antistatic bag. Step 5: Uft each drive out of the lower foam cushion individually and remove the conductive/antistatic bag. Step 6: Return conductive/antistatic bag to lower foam cushion for reuse. Step 7: Place drive on a protective foam pad and inspect the drive for shipping damage. loose screws or components and correct if possible. If damage is evident without noticeable damage to the shipping carton. notify MiniScribe immediately for drive disposition. Step 8: Once all the drives have been removed from the shipping carton and the conductive/antistatic bad has been returned to the lower foam cushion. reassemble the carton and store for reuse. REPACKING Should the MiniScribe drive require shipment. repack the drive using the antistatic bag supplied and the other MiniScribe packing materials and following the steps above in reverse order. The MiniScribe series contain shipping zones for protectlon of the data areas from periods of mishandling. Prior to power down for shipment. the host controller should access this zone: if it is NOT the product warranty is void. 18 OUTER CARTON (TOP) UPPER FOAM CUSHION l.OWER FOAM CUSHION MINISCRISE ORIVE OUTER CARTON (80TTOM) ANTISTATIC . BAG ASSEM8LED CONTAINER DIMENSIONS; 34.2~ x 12.7S 1 ~. 00 (23. ~o l 12. 7~ l ~.OO) MOLTIPACK SHIPPING CONTAINER 19 NOTICE ___Th_~_~§_~~b~_c!!1Y~:Q_~QQU~!_~~!Y_ is y~i~_ i(!J1e ~V'~ _i§_ ~~!urned to _ MiniScrtbe in other than the standard MiniScribe shipping carton packed in accordance with the enclosed procedure. It should also be noted that the MiniScribe drive product warranty is void if the multi-pack shipping container is not shipped on a pallet. 20 FORMATTING AND PARTITIONING THE MINISCRIBE 3650, 3675, OR 3053 WITH THE WESTERN DIGITAL WDIOO2A-WXl CONTROLLER 1. Boot the machine from drive A: 2. Load DOS debug. com utility by typing: A>debug<Return> 3. At the debug prompt (-) type: -g=c800:5<Return.> 4. The screen should display the following: Super Bios Formatter Rev. 2.4 (C) Copyright Western Digital Corp. 1987 Current Drive is C:, Select new Drive or RETURN for current. 5. Press return for drive C: <Return> 6. The screen should display the following: Current interleave is 3. Select new interleave or RETURN for current. 7. Press Return or type new interleave value. <Return.> 8. The screen should display the following: Are you dynamically configuring the drive - answer YIN 9. Type Y for Yes <Return> 10. Key in disk characteristics as follows: ccc h rrr ppp ee 0 where ccc = total number of cylinders (1-4 digits) h = number of heads (1-2 digits) rrr = starting reduced write cylinder (1-4 digits) ppp = write precomp cylinder ee = max correctable error burst length (1-2 digits) range = 5 to 11 bits, default = 11 bits o = CCB option byte, step rate select (1 hex digit) range = 0 to 7, default = 5 refer to controller and drive specification for step rates 11. Enter: 809, 6, 810, 128, 11, 7 for models 3650/3675. Enter: 1024, 5, 1025, 512, 11, 7 for model 3053. 12. Are you virtually configuring the drive - answer Y/N 13. Enter Y for yes. 21 14. Key in cylinder number for virtual drive split as vvv ... where vvv = number of cylinders for drive C: (1-4 digits) 15. Enter: 602 for 30/10 Meg. split or 405 for 20/20 split (models 3650/3675). Enter: 698 for 30/14 meg. split or 512 fcir~22122-rileg-split -rmoaer 3053). 16. Screen will display: press Y to begin formatting Drive C with interleave 3. 17. Press Y <Return> to begin the Low Level Format. Any other key will exit with nothing done. 18. The screen should display the following: Formatting... Then or after several minutes it will prompt you. Do you want to format bad tracks - answer YIN 19. Type N, for no (typing Y for yes is not recommended.) 20. The screen should display the following: Format Successful System will not restart Insert DOS diskette in drive A: Press any key when ready. 21. Load and execute DOS FDISK utility for drive C and D. 22. Load and execute DOS FORMAT utility for driveC and D. Reference DOS Manual for questions regarding FDISK and FORMAT utilities. If further assistance is required, contact MiniScribe Tech Support at 800-356-5333. - 22 FORMATTING AND PARTITIONING THE MlNISCRlBE 3650, 3675, OR 3063 WITH THE ADAPI'EC ABC2010A CONTROLLER -Boot-system with DOS-in drive- I'A". Run DEBUG as follows: A>debug -g=c800:ccc ADAPTEC ACB2010A FORMAT PROGRAM Enter interleave (1-9) = 3 Enter drive id (0/1) = 0 Should we use Adaptec defect handling (Y/N)? N Should we use the default parameters (YIN)? N Reply to the following questions in hex only: Number of logical units for this drive (1-8) = 2 Step pulse rate (0-7) = 6 Landing zone = 852 (3650/3675), 1024 (3053) ECC correction span = 11 Write pre-camp cylinder = 128 (3650/3675), 512 (3053) Reduce write current cylinder = 810 (3650/3675), 1025 (3053) Head count = 6 (3650/3675), 5 (3053) Cylinder count = 809 (3650/3675), 1024 (3053) Sendihg mode select = 15 Sending write buffer = OF Forrnat in progress = 04 Track verification = logical unit 00 Track verification = logical unit 01 23 Press <RETI1RN> to proceed or <ESCAPE> to cancel. . . Interleave (1-15): 3 Are you SURE you want to format (YIN) Y Formatting. . . Format complete. Verifying... 100%. Verify complete. Load and execute DOS FDISK utility for drive C and D. Load and execute DOS FORMAT utility for drive C and D. Reference DOS Manual for questions regarding FDISK and FORMAT utilities. If further technical assistance is required. contact MiniScribe Technical Support at 800-356-5333. 24 FORMATTING AND PARTITIONING THE MINISCRIBE 3650. 3675. OR 3053 WITH DTC MODEL 5150 CR. CIt AND CS CONTROLLERS Turn system power on. The following prompts will appear on the screen: please respond as indicated. *Controller board configuration* Hards Disk 1: Configuration parameters not found. To install configuration parameters. run DEBUG from floppy disk "A" as follows: A>debug g=CBOO: 5 Insert DOS diskette in drive "A" System will boot! Please wait. . . . *Format Utility* Drive no. (1-2): 1 Interleave (2-9): 3 Drive Table: O. ST-225/Tandon-262 1. ST-403B. 2. 3. 4. 5. 6. 7. MiniScribe-3425 /Microscience-725. ST-212/ST-412. Priam-V150 .. Priam-V170. ST-425. Tandon-362/ST-13B. ST-4051/Tandon-755. ST-251. ST-213/MiniScrtbe-3012/3212/Syquest-312. Tandon-703. Maxtor-10B5. ST-4096. Oki-540. Free Format B. 9. 10. 11. 12. 13. 14. 15. Table no: 15 25 Fonnat complete, press CTRL-BRK. Type Q to exit DEBUG. __~ad and_execute DOS FDISK utility for drive C and D. Load and execute DOS FORMAT utility for drive C and D. Reference DOS Manual for questions regarding FDISK and FORMAT utilities. If further technical assistance is required. contact MiniScribe Technical Support at 800-356-5333. 26 FORMATTING AND PARTITIONING THE MINISCRIBE 38150, 36715, OR 30153 WITH OMTI MODEL 5220A CONTROLLER (-10 BIOS) ... Turn system power on. The following prompts will appear on the screen; please respond as indicated. To install configuration parameters. run DEBUG from floppy disk "A" as follows: A>debug g=C800: 6 This FO~T routine will DESTROY ALL data on your disk! Press <RETURN> to proceed or <ESCAPE> to cancel. . . Enter drive # (0 or 1): 0 Use default parameters (YIN) N Total CYLS; 809 (3650/3675). 1024 (3053) Total HEADS; 6 (3650/3675). 5 (3053) Write Precomp CYL «RETURN> for none): 128 (3650/3675, 512 (3053) CONTROL BYTE: 2 Press >RETURN> to proceed or <ESCAPE> to cancel. .. Logical. partitioning deSired (Y IN) Y Total CYLS in 1st logical unit: 616 (3650/3675). 744 (3053) Any defects (Y IN)? N Any defects (YIN)? y (Press <RETURN> to end defect list) CYLINDER: HEAD: CYLINDER: More entries (YIN)? N 27 ·Format Utility· Cylinders (1-2048): 809 (3650/3675), 1024 (3053). lj:eads (1-16): 6 (3650/3675),.5 (3Q53t Step Rate (Micro sec): (59 10 9 20 9 30 9 40 9 50 9 60, 70) Step Rate (Micro sec): 10 Set reduced write current at cylinder: Press <RETURN> for None Set write precompensatlon at cylinder: 128 (3650/3675), 512 (3053) Split into 2 logical units (YIN): Type Y Drive will split into 2. Enter drive defect table (YIN) N Enter drive defect table? (YIN) Y (Type <ESCAPE> to end input) Line Cylinder Head 1 Is above information correct? (YIN) Ready to ERASE entire disk? (YIN): Type Y Formatting hard disk no. 1 Cyl Head Cyl 808 Head 5 Format complete. Insert DOS diskette in drive A: Proceed to FDISK and. FORMAT. Enter any key. System will restart! Load and execute DOS FDISK utility for drive C and D. Load and execute DOS FORMAT utility for drive C and D. Reference DOS Manual for questions regarding FDISK and FORMA utilities. If further technical assistance is required. contact MiniScribe Technical Support at 800-356-5333. 28 COlWPATIBILITY Interfaces ST506/ST412 The ST506/ST412 interface has been an industry standard since 1981. It is primarily intended for low-cost. low-capacity applications. This interface standard places most of the drive subsystem's logic on the controller. The drive in this installation is primarily a recording device. The compatibility from drive to controller is primarily centered around one question. Can the controller properly handle a drive with the drive's characteristics? These characteristics are number of cylinders, number of heads and encoding method (MFM or RLL). If the controller can handle the drives characteristics it should be compatible. RLL is an encoding method that allows about 500/0 more infonnatlon to be recorded on a disk drive compared to MFM recording. This does not imply' that drives that have been designed for MFM use will work properly when connected to a RLL controller. RLL encoding by nature requires drive circuitry that can handle a wider frequency range than MFM drives have been designed for. If using an RLL controller it is always best to stay With an RLL certified drive. This will minimize the chances of data loss. The compatibility of the controller to the computer largely depend on whether both the controller and the computer adhere to industry standards. If either the controller or the computer deviate from the standards there is a potential for incompatibility. Controller to computer compatibility questions should be directed to the controller manufacturer and/or computer manufacturer. ESDI The ESDI (Enhanced Small Device Interface) is as its name implies an enhanced interface. This interface has been around for a shorter period than the ST506/ST412 and there are still new features being designed in. It is a substantial upgrade of the ST506/ST412 interface. This interface is oriented toward high-capacity, high-speed small Winchesters. It is also capable of handling magnetic tapes and optical disk" drives. The ESDI is designed around a serial transfer rate of 10 and 15 megabit per second. This interface puts more logic on the drive and allows the controller to be simplified. The compatibility issues are almost the same as the ST506/ST412 interface. One new issue is interface speed. ESDI drives and controllers are aVailable in 10 and 15 megabit per second versions. The controller speed has to match the drive speed. 29 SCSI The SCSI (Small Computer Systems Interface) differs from the previous interfaces in that it is not dedicated only to hard disk interfacing. It will allow printers. floppy drives and other devices to share a common interface. The SCSI interface allows the computer to communicate with up to eight separate devices. With SCSI most of the drive control is designed into the drive. The SCSI bus transfers bytes of infonnation in parallel rather than in serial form like the ST506/ST412 and ESDI interfaces. The maximum data transfer rate is from 1.5 Megabytes/second to 4 Megabytes/second. This is equivalent to a 12 Megabit/ second to 32 Megabit/ second serial transfer rate. SCSI is still in an evolutionary stage. Some computer manufacturers have customized their SCSI interfaces for their systems. These two factors coupled with the inherent complexity of the interface are the primary causes of incompatibility with SCSI devices. ONBOARD CONTROLLER Drives with integrated controllers are allowing MiniScribe to maximize disk drive performance while at the same time reduce the had drive subsystems overall cost. size and power consumption. These drives also minimize compatibility issues since the controller circuitry is imbedded on the drive. Computer manufacturers are designing new computers with hard disk support circuitry on their motherboards. With these newer systems it is possible to plug the new drives with integrated controllers directly into the motherboard. Check with MiniScribe for compatibility with these new computers. Older XT and AT systems can utilize these new drives with a simple interface board that plugs into the system bus (like a regular controller) and the appropriate cable. The xr interface will handle two integrated XT style drives. The AT interface is available in two versions. One version will control two integrated AT style drives while the other version will handle two floppy drives as well as the two AT drives. rnSTALLATIONSOFrWARE Installation/partitioning software is sometimes necessary in AT systems when the AT BIOS does not support the drive satisfactorily and/or their version of DOS does not allow multiple DOS partitions without external drivers. Installation/partitioning software s function is quite Simple. It handles all I/O to all partitions beyond the DOS boot partition. It does this with an external device driver that is loaded in at boot time. This device driver reads the drive parameters from the boot area of the disk allowing partitions beyond the DOS partition to escape the limitations of the BIOS drive type. 1 Installation software is generally compatible with current versions of MS-DOS and PCODOS. As new versions of DOS become available it is usually necessary to obtain the most current version of installation software. 30 When used with controllers with BIOS low-level formatters it is generally necessary to initialize the drive with the BIOS formatter. Then the installation software is used to partition and prepare the drive. The three steps necessary to prepare a drive for use are as follows: I. lhitia.IiZe(lbw-level-formatl the drive (with utility disk; controllerBIOS routine. or install/partitioning software). 2. Partition the drive (with DOS Fdisk command or partitioning software). 3. Format the dnve (with DOS Format command or partitioning software) .. Caution! Do not use any disk diagnostics on drives installed with installation software (other than those included with the installation software) without checking with the installation software company. Outside diagnostic utilities can inadvertently write to a data area on the disk. damaging infonnation. NON-DOS OPERATING SYSTEMS UNIX &XENIX Unix and Xenix for 286 and 386 machines for the most part require a drive table entry for the drive to work properly. Controllers that have their own BIOS routines for hard disk control may present unique installation problems. contact your controller manufacturer and/or operating system company for compatibility issues. NOVELL Novell's hard disk installation program "CompSurf' limits drive selection to those found in the AT drive table. If the drive is found in the drive table there is no need for installation software. If there is no suitable match in the AT drive table. installation software like Ontrack's disk Manager type N will be necessary for a drive installation under Novell. Contact Ontrack for compatibility issues surrounding Novell versions and controller compatibility. MFMORRLL? MFM has been the industry standard for a number of years. It is part of a family of codes used for magnetic recording which allows the controller to track the data as it is being read to help insure reliable data transfers. 'This code is based on a 5 megabit per second transfer rate which, when used with the industIy standard format. yields 512 bytes in 17 sectors or 8704 bytes per recording track. (A byte of information can be thought of as any key stroke on a typewriter). 31 RLL has recently become popular and is based on a 7.5 megabit per second transfer rate. Because of the higher transfer rate. more data can be put onto a track: 26 sectors of 512 bytes or 13312 bytes per track. 7.5 mega bits per second is 50% faster than 5.0 megabits per second. A drive running MFM might yield 20 megabytes and 30 if it can run RLL. -RLL is similar enough to MFM so that no major redesign of the drive was required. Differences however do exist. MFM code uses a Simpler arrangement of three frequencies while RLL uses 6. The drive configuration table identifies which drives are MFM or RLL. This does not mean an MFM drive will not run RLL.· MiniScribe's warranty for data reliability of the drive is based on the deSignated encoding method. There are companies that buy our :MFM products and retest it to RLL specifications. These companies then offer their own warranty for RLL performance. If you come across one of these drives verify that they do test to RLL specifications and that they warranty their product. If in doubt give us a call at 1800-356-5333. . INTERLEAVING During the initialization of the drive you may be asked for interleave. Interleave refers to the numbering sequences of the sectors of information. Typically there are 17 sectors per disk. If these were visible. the disk would resemble being sliced into sections like pie. During a read or write operation. the controller must collect the data then transfer it to the deSired location. This handling of data takes time causing consecutive sectors may be missed. To avoid this. the data can be recorded or read in leap frog fashion. Example: Read 1. skip 2. read 1. skip 2., etc.· In this case. every 3rd sector is read which represents an interleave of 3 to 1 (3: 1 or simply 3). It also means that it will take 3 revolutions of the disk to read the entire track. If the interleave is too tight: say 1: 1. the neXt sector may have already passed under the recording head when the controller is ready to continue. The result is that the controller will have to wait 1 revolution for that sector to arrive again. This pattern continues for all of the 17 sectors forcing the controller to wait for 17 revolutions to read 1 track. It is better to be too loose than be too tight on interleave. Following is an interleave table to better illustrate different interleaves. Typically the following table will work: 6:1 4: 1 3: 1 2: 1 IBM XT Rl1 XT Clones l\1FM AT and XT Clones Turbo MFM Systems To determine the optimum performance will require _some experimentation. 32 ~PRECOMPENSAnON If you were to look at the drive's data Signals they would appear as electronic pulses. The frequencies used to generate .these pulses are stepped up and down at very specif1c intervals. This is necessary for the controller to be able to track the data as it is being read. . As the drive records toward the inner portions of the disk these precisely timed .- -pulses-begin to shift~· This· degrades its reliability:---Fortunateiy;-the-shiftoccurs-irr a predictable manner which can be corrected by the controller. If the shift will cause a shorter pulse the controller will write the pulse longer. This causes the pulse to shift closer to the correct time interval. The predictable shifting of the data signal is precompensated to cancel the effect of writing at the inner portion of the disk. 33 DISK MANAGER BY ONTRACK COl\fPUTER SYSTEMS PC-XT 1YPE CONSIDERATIONS Approach 1: If your controller card has a switch or jumper setting which correctly matches all parameters necessary for correct operation of your particular disk drive. you should set those switches/jumpers accordingly. The drive should then be treated as a "STANDARD" drive when using DISK MANAGER. Approach 2: Use "AUTO-CONFIGURE" on controller cards so equipped (usually invoked by using "DEBUG") to make DISK MANAGER perceive that the hard disk . controller correctly matches all parameters necessary for correct operation of your particular disk drive. This process is usually invoked by using the DOS "DEBUG" program. and involves using programs which are stored in the controller'S BIOS ROM to "AUTO-CONFIGURE" and low level format the hard disk. The drive should then be treated as a "STANDARD" drive when using DISK MANAGER The DISK MANAGER low level format SHOULD NOT be performed after low level fonnatting with an "AUTO CONFIGURE" BIOS, since the "AUTO CONFIGURATION" data may be destroyed. NOTE: Many "AUTO CONFIGURE" controllers prOvide an option for allowing the user to "SPLIT" the drive into 2 parts. Use of this option will cause DISK MANAGER to see the drive as though it were 2 separate disks. This is not recommended, and precludes the attachment of a second physical hard disk in most cases. Approach 3: Use of DISK MANAGER to call it a NONSTANDARD drive can be done as follows: A B. C. Choose a drive-type which is supported by your controller'S ROM-BIOS using the 1YPE-SELECTION criteria below. Use DISK MANAGER in either the "AUTOMATIC" or "MANUAL" mode to install the drive as a NONSTANDARD drive, and inform DISK MANAGER of what type of drive you actually have at the appropriate prompt. Please see the note below on CAPACITY REDUCTION. 34 PC-XT TYPE SELECTION CRITERIA The chosen TYPE must be smaller or equal to the actual disk drive you are installing in BOTH the head-count and cylinder-count dimensions. Further. it is deSirable to match AS CLOSELY AS POSSIBLE the head-count between the drive-type and the drive you are installing. For further information on the consequences of this parameter. read the section below on CAPACITI REDUCTION. PC-AT TYPE CONSIDERATIONS Drive-type selection is performed on PC-AT type computers by an internal "CMOS CONFIGURATION MEMORY" rather than Switches and jumpers as in the PC-X'I' type computers. DISK MANAGER is capable of analyzing your computer's internal drive-type tables and correctly selecting the optimum CMOS setting for you. if deSired. DISK MANAGER also allows you to choose CMOS settings based on your own criteria. if desired. Further. if your disk drive is a NONSTANDARD drive (one that does NOT have a corresponding entry in your machine's internal tables), DISK MANAGER's device driver will compensate for that. allowing partitions handled by the device driver to use the drive's full capacity. See notes below regarding CAPACI1Y REDUCTION, and, if you desire to select CMOS yourself. see the section immediately below on TYPE SELECTION criteria. PC-AT TYPE SELECTION CRITERIA The chosen TYPE must be smaller or equal to the actual disk drive you are installing in BOTH the head-count and cylinder-count dimensions. Further. if you are installing a drive with more than 8 heads (or has logic which decodes all 4 head-select bits) you MUST choose a type which either does NOT use WRITE-PRE C OMPENSATION, or has a "08" value for the control byte. Failure to satisfy the above requirements will result in a system which has an extremely long delay on boot (2-3 minutes) and finally produces a DISK ERROR message after the delay. Usually, the boot process can then be completed from diskette. Finally, it is deSirable to match AS CLOSELY AS PODSSIBLE the head count between the drive-type and the drive you are installing. For further information on the consequences of this parameter. read the section below on CAPACI1Y REDUCTION. 35 CAPACOY REDUCTION The DOS partition (necessary ONLY to boot) on a NONSTANDARD disk can use ONLY the part of the disk depicted by the BIOS ROM for the particular drive-type you have chosen (With--switche-s-~-Jumpers;--CMOS,--etc.).---Therefore, if you have a drive which DOES NOT have a drive-type entry with the same number of heads, the DOS partition will effectively WASTE DISK SPACE. If the head-count mismatch is severe. only a VERY SMALL DOS partition would be possible without wasting a Significant portion of the capacity. This limitation DOES NOT apply to partitions handled by the DISK MANAGER device driver. Specific operating instructions are available by accessing the "READ ME" file on your DISK MANAGER diskette. 36 MSDOS3.3 HARD DISK PARTITIONING GUIDE Prepared by: Roger Groeneveld Technical Support Representative MlDiScribe Corporation 37 The information contained in this Guide is for partitioning hard disk drives in a PC/XI' type system using MS DOS 3.3. The debug address used for the low level fonnt is for a Western Digital controller card. This address may vary depending on the brand of controller card used. Data that must be entered via keyboard will be indicated by underining. INDEX Page 1 Low Level Format (Western Digital) Pages 1 - 3 PartitiOning Using MS DOS 3.3 (FDISK and DOS format answering "N" to virtually configuring) Pages 4 - 6 Partitioning using Western Digital controller (FDISK and DOS format answemg 'Y" to virtually configuring) 38 Low Level Fonnat (Western Digital) I. A Insert MS DOS 3.3 diskette into A: drive. B. Cold or warm boot system. C. Remove MS DOS 3.3 diskette from A: drive. D__ ~~_~ Insert MS DOS 3.3 "Utility" diskette into A: drive. 1. Enter DEBUG CR 2. At DEBUG prompt (-), enter: G=C800:5 CR E. Screen will display: 1. SUPER BIOS FORMATIER 2. CURRENT DRIVE IS C:, SELECT NEW DRIVE OR CR FOR CURRENT. 3. CURRENT INTERLEAVE IS 3, SELECT NEW INTERLEAVE OR CR FOR CURRENT. 4. ARE YOU DYNAMICALLY CONFIGURING THE DRIVE -ANSWERYjN A. ENTER YCR B. KEY IN DISK CHARACTERISTICS _ _ _ CYLINDERS, HEADS, ETC. CR 5. ARE YOU VIRrUALLY CONFIGURING THE DRIVE ANSWERYjN A NOTE: ENTER Y CR IF YOU WANT A C: PARTITION SMALLER THAN THE MAXIMUM SIZE ALLOWED FOR A DOS PARTII10N. ENTER N CR IF YOU WANT A C: PARTITION THE MAXIMUM SIZE ALLOWED FOR A DOS PARTITION. 6. PRESS Y TO BEGIN FORMATIING DRIVE C WITH INTERLEAVE 03. A ENTER YCR NOTE: Low level format should take apprOximately 10-20 minutes to complete. II. FDISK and DOS format (if you answered "N" for virtually configuring) . A B. C. D. E. F. G. Remove MS DOS 3.3 utility diskette from A drive. Insert MS DOS 3.3 diskette into A drive. Press any key to reboot system. A: Enter FDISK CR Screen will display: 1. FDISK OPTIONS 2. CURRENT FIXED DISK DRIVE: 1 3. CHOOSE ONE OF THE FOLLOWING: 4. ENTER CHOICE: (1) CR (CREATE DOS PARTITION) Screen will now display: 1. CREATE DOS PARTITION 2. CURRENT FIXED DISK DRIVE: 1 3. ENTER CHOICE: (1) CR (CREATE PRlMARY DOS PARTITION) Screen will now display: 39 1. 2. 3. H. NOTE: 1. J. K. L. M. N. O. CREATE PRIMARY DOS PARTITION CURRENT FIXED DISK DRIVE: 1 DO YOU WISH TO USE THE MAXIMUM SIZE FOR A DOS PARTITION AND MAKE THE DOS PARrmON ACTIVE (YIN) . . . . ? --A ENTER- al-iQEl Screen will now display: 1. SYSTEM WILL NOW RESTARr 2. INSERr DOS DISKEIIE IN DRIVE A: PRESS ANY KEY WHEN READY ... System will now reboot. Enter FDISK CR Screen will now display: 1. FDISK OPTIONS 2. CURRENT FIXED DISK DRIVE: 1 3. ·CHOOSE ONE OF THE FOLLOWING: 4. ENTER CHOICE: (1) CR (CREATE DOS PARTITION) Screen will now display: 1. CREATE DOS PARTITION 2. CURRENT FIXED DISK DRIVE: 1 3. ENTER CHOICE: (2) CR (CREATE EXTENDED DOS PARTITION) Screen will now display: 1. CREATE EXTENDED DOS PARrIll0N 2. CURRENT FIXED DISK DRIVE: 1 3. PARTITION STATUS _ _ _ 4, TOTAL DISK SPACE IS # CYLINDERS. MAXIMUM SPACE AVAILABLE FOR PARTmON IS # CYLINDERS. 5. ENTER PARTITION SIZE ... (#CYLS) CR Screen will now display: 1. CREATE EXTENDED DOS PARrITION 2. CURRENT FIXED DISK DRIVE: 1 3. PARrITION STATUS _ _ _ 4. EXTENDED DOS PARTITION CREATED 5. PRESS ESC TO RETURN TO FDISK OPTIONS Screen will now display: 1. CREATE LOGICAL DOS DRIVE(S) 2. NO LOGICAL DRIVES DEFINED 3. TOTAL PARrITION SIZE IS # CYLINDERS 4. MAXIMUM SPACE AVAILABLE FOR LOGICAL DRIVE IS # CYLINDERS. 5. ENTER LOGICAL DRIVE SIZE ... (# CYLS) CR Screen will now display: 1. CREATE LOGICAL DOS DRIVE(S) 2. DRV START END SIZE A:. D: _ _ _ 3. 4. ALL AVAILABLE SPACE IN THE. EXTENDED DOS PARrITION IS ASSIGNED TO LOGICAL DRIVES LOGICAL DOS DRIVE CREATED, DRIVE LEI IERS 40 P. _Q~ NOTE: R CHANGED OR ADDED 5. PRESS ~ TO RETURN TO FDISK OPTIONS Screen will now display: 1. FDISK OPTIONS 2. PRESS ESC TO RETURN TO DOS S~reen will now display: _ I. SYSTEM WILL NOW RESTARr 2. INSERT DOS DISKETIE IN DRIVE A: PRESS ANY KEY WHEN READY .... System will now reboot. A: Enter FORMAT C: IS QR 1. WARNING. ALL DATA ON NON-REMOVABLE DISK DRIVE C: WILL BE LOST! PROCEED WITH FORMAT (YIN)? A EnterYCR NOTE: S. D: Partition is now being prepared. This should take approximately 4 - 5 minutes. Screen will now display: 1. FORMAT COMPLETE 2. SYSTEM TRANSFERRED 3. CAPACl1Y OF C: PARrITION 4. A:. ENTER FORMAT D: CR 5. WARNING. ALL DATA ON NON-REMOVABLE DISK DRIVE D: WILL BE LOST! PROCEED WITH FORMAT (Y IN)? A EnterYCR NOTE: T. D: Partition is now being prepared. This should take approximately 2 - 3 minutes. Screen will now display: 1. FORMAT COMPLETE 2. CAPACl1Y OF D: PARTITION Your hard disk drive is now ready to be used. III. FDISK and DOS Format (if you answered "Y" to virtually configuring) A B. C. D. E. Remove MS DOS 3.3 utility diskette from A: drive Insert MS DOS 3.3 diskette into A: drive Press any key to reboot system A: Enter FDISK CR Screen will now display: 1. FDISK OPTIONS 2. CURRENT FIXED DISK DRIVE:' 1 3. CHOOSE ONE OF THE FOLLOWING: 41 F. G. H. NOTE: I. J. 4. ENTER CHOICE: (1) ~ (CREATE DOS PARTITION) Screen will now display: 1. CREATE DOS PARTIIION 2. CURRENT FIXED DISK DRIVE: 1 3. ENTER CHOICE (1) CR (CREATE PRIMARY DOS PARTITION) Screen will now display: 1. CREATE PRIMAR DOS PARTITION 2. CURRENT FIXED DISK DRIVE: 1 3. DO YOU WISH TO USE THE MAXIMUM SIZE FOR A DOS PARTITION AND MAKE THE DOS PARTITION ACTIVE (YIN) . . .? ( ) A. Enter NCR Screen will now display: 1. CREATE PRIMARY DOS PARTITION 2. CURRENT FIXED DISK DRIVE: 1 3. TOTAL DISK SPACE IS # CYLINDERS. MAXIMUM SPACE AVAILABLE FOR PARTmON IS # CYLINDERS. The # cylinders will be the number of cylinders minus one that you selected for the Virtual split in the low level format. 4. ENTER PARTITION SIZE ... : (# CYLS) CR Screen will now display: 1. CREATE PRIMARY DOS PARTITION 2. CURRENT FIXED DISK DRIVE: 1 3. PARTITION STATIJS TYPE START END SIZE 4. PRIMARY DOS PARTITION CREATED 5. PRESS ESC TO RETURN TO FDISK OPTIONS Screen will now display: 1. FDISK OPTIONS 2. CURRENT FIXED DISK DRIVE: 1 3. CHOOSE ONE OF THE FOLLOWING: NOTE: WARNING! No partitions marked active. ENTER CHOICE: !2l CR (CHANGE ACTIVE PARTITION) Screen will now display: 1. CHANGE ACTIVE PARTITION 2. CURRENT FIXED DISK DRIVE: 1 3. PARTITION STATUS TYPE START END SIZE 4. TOTAL DISK SPACE IS # CYLINDERS 5. ENTER THE NUMBER OF THE PARTITION YOU WANT TO MAKE ACTIVE . . .: ill CR 6. PARTITION 1 MADE ACTIVE 7. PRESS ESC TO RETURN TO FDISK OPTIONS Screen will now display: 1. FDISK OPTIONS 2. CURRENT FIXED DISK DRIVE:' 1 3. CHOOSE ONE OF THE FOLLOWING: 4. K. L. 42 ENTER CHOICE: i5.l CR (SELECT NEXT FIXED DISK DRIVE) Screen will now display: 1. FDISK OPTIONS 2. CURRENT FIXED DISK DRNE: 2 3. CHOOSE ONE OF THE fOLLOWING: 4. ENTER CHOICE: ill CR (CREATE DOS PARTmON) Screen will now display: 1. CREATE DOS PARTITION 2. CURRENT FIXED DISK DRNE: 2 3. ENTER CHOICE: CR (CREATE EXTENDED DOS PARTITION) Screen will now display: 1. CREATE EXTENDED DOS PARTITION 2. CURRENT FIXED DISK DRNE: 2 3. TOTAL DISK SPACE IS # CYLINDERS. MAXIMUM SPACE. AVAILABLE FOR PARTmON IS # CYLINDERS 4~ ENTER PARTmON SIZE ... : (# CYLS) .QB Screen will now display: 1. CREATE EXTENDED DOS PARTITION 2. CURRENT FIXED DISK DRNE: 2 3. PARTITION STATUS TYPE START END SIZE 4. EXTENDED DOS PARTITION CREATED 5. PRESS ESC TO RETURN TO FDISK OPTIONS Screen will now display: 1. CREATE LOGICAL DOS DRIVE(S) 2. NO LOGICAL DRIVES DEFINED 3. TOTAL PARTITION SIZE IS # CYLINDERS 4. MAXIMUM SPACE AVAILABLE FOR LOGICAL DRIVE IS # CYLINDERS 5. ENTER LOGICAL DRIVE SIZE ... : (# CYLS) CR Screen will now display: 1. CREATE LOGICAL DOS DRIVE(S) 2. DRV START END SIZE 3. ALL AVAILABLE SPACE IN THE EXTENDED DOS PARTITION IS ASSIGNED TO LOGICAL DRNES 4. LOGICAL DOS DRIVE CREATED, ORNE LEI IERS CHANGED OR ADDED 5. PRESS ESC TO RETURN TO FDISK OPTIONS Screen will now display: 1. FDISK OPTIONS 2. PRESS ESC TO RETURN TO DOS Screen will now display: 1. SYSTEM WILL NOW RESTART 2. INSERT DOS DISKETIE IN DRIVE A: PRESS ANY KEY WHEN READY ... 4. M. N. m O. P. Q. R. S. T. NOTE: U. System will now reboot. A: Enter FORMAT C:/S CR 1. WARNING: ALL DATA ON NON=-REMOVABLE DISK DRIVE C: WILL BE LOST! PROCEED WITH FORMAT 43 (YIN)? A. EnterY~ NOTE: V. C: Partition is now being prepared. This will take approximately 4 - 5 minutes. Screen will now display: 1. FORMAT COMPLETE 2. SYSTEM TRANSFERRED 3. CAPACI1Y OF C: PARlIliON 4. A: ENTER FORMAT D: CR 5. WARNING, ALL DATA ON NON-REMOVABLE DISK DRIVE D: WILL BE LOST! PROCEED WITH FORMAT (yIN)? A. NOTE: W. Enter Y .QB D: Partition is now being prepared. This should take approximately 4 - 5 minutes. Screen will now display: 1. FORMAT COMPLETE 2. CAPACITY OF D: PARTITION Your hard disk drive is now ready to be used. 44 CREATING MULTIPLE PARTITIONS WITH DOS 3.3 DRIVE: CONTROLLER: SYSTEM: MiniScribe 3650 WD1002 - WXl XT The drive was virtually split at Cylinder 404 in the low level format to create two logical drives. In FDisk a 10MB DOS partition and a 10l\t1B extended DOS partition was created within each logical drive. These partitions were designated C. D, E and F. Drive 1 DOS EXT. Drive 2 Iii DOS 3.3 will not allow two DOS or two extended DOS partitions to be created within a logical drive partition. What is of interest. when the extended DOS partition was created on the first logical drive, DOS 3.3 labeled it as the D partition. When the DOS partition was created on the second logical drive, DOS 3.3 then labeled it as the D partition and changed the extended DOS partition on the first logical drive to E. If the drive is not virtually split into logical units, DOS 3.3 is capable of creating multiple partitions through the FDISK command. This is accomplished by first creating a DOS partition (32:MB limit), then selecting extended DOS for the remaining cylinders on the drive. When logical partitions are assigned. DOS 3.3 will create 32MB partitions labeled D, E, F, etc. until the maximum number of cylinders indicated as extended DOS are reached. 45 Section F This ection will cover system errors and possible solutions. Hard File Adaptor Errors: 1700 Hard ftle/adaptortesf-passed-(no-errofr 1701 Drive not ready (also a post error) Non fatal drive/adaptor test failed (also a post error) Check that drive has power and that spindle motor is spinning. If motor is not spinning, check that 12 vdc comes up within one second. Some large Switching power supplies require more time to charge the large capacitors which may cause system to time out. 1702 Hard file/adaptor error out - is drive powered up and spinning? Are cables correct? Tim~ 1703 Hard flle/drive error Seek failed - is drive low level formatted? ECC error - probably controller related 1704 Check drive select Hard file or adaptor error Controller failed 1705 No recm:d found 1706 Write fault 'Are two heads selected? Are voltages ok? See product manual for what causes write fault 1707 Track 0 error Is drive formatted? 1708 Bad select error Is drive formatted? 1709 BadECC Check controller 1710 Read buffer override Check controller and interleave 46 Section F continued 1711 Hard file bad address mark Check controller and drive low level format 1712 Bad address mark Check controller 1714 Drive select Check jumpers 7 cables 1726 Data Compare Error Check for added hard error Check format 1770 Surface errors Check for added hard error 1780 Check Data Cable Set-up error drive 0 failure drive 0 failure '.' 1781 Drive 1 failure. (fatal-drive· may still be ok) 1782 Controller failure 1790 Drive # 0 Error 1799 ·Undefined ''1'rack zero bad-disk unuasable" Check format. spare hard errors if the drive is more than 16 mega bytes formated. Check for bug in DOS 2.0 & 2.1. Neither the drive nor controller is defective. Indicated by drive failure due to hard error beyond 16 mega bytes. 47 Section F continued xx: Expansion Unit Error 8 IPL Initial Program Load: -1400--- Graphic Printer 0154 Detects absence of 10MB drive C Error Reading Track 0: Not formatted. Read Error: Check ground. controller or disc. Format taking too long to format: 'Indicated data cable may be connected wrong. (drive C goes to controller J 4 connector) Also check interleave for a value of 3 or 4 (AT). Only change to an interleave IR 4 if 3 causes format to be too slow. It is not possible to use faster (2 or 1). mega! Drive Specified: Indicates that the primary format or "FDISK" was not performed correctly. Recheck your parameter values and redo the format. 48 · Section G !fhis ···section we will cover controller error ~odes.--This--is-an-error. code table used by both Adaptec and Western Digital. Code Error 01 02 Bad Command passed to Disk I/O Address mark not found Requested Sector not found Reset Failed Drive Parameter Activity Failed Attempt. to DMA across 64k Boundary Access to Bad Sector Bad Track Flag Detected Bad ECC on Disk Read ECC Corrected Data Error Controller Timeout Seek Operation Failed Attachment Failed to Respond Undefined Error Occurred Sense Operation Failed 04 05 07 09 OA OB 01 11 20 40 80 138 FF 49