1
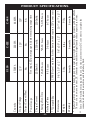
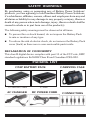
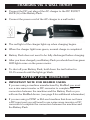
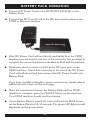
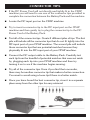
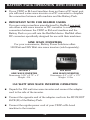
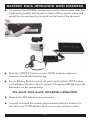
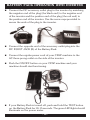
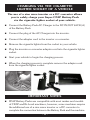
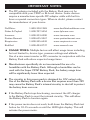
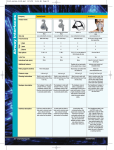
Power your CPAP machine no matter where your world takes you! Giving CPAP users the freedom to experience new adventures on the road! Your CPAP machine doesn’t have to keep you from enjoying the great outdoors... START YOUR NEW ADVENTURE TODAY! TABLE OF CONTENTS CPAP BATTERY PACK FEATURES 1 PRODUCT SPECIFICATIONS 2 SAFETY WARNINGS 3 PACKING LIST 3 CONTROL BOARD PART IDENTIFICATION 4 THE POWER METER 4 CHARGING VIA A WALL OUTLET 5 BATTERY PACK OPERATION 5-6 CONNECTOR TIPS 7 BATTERY PACK OPERATION WITH AN INVERTER 8-10 CHARGING VIA THE CIGARETTE LIGHTER SOCKET OF A VEHICLE 11 IMPORTANT NOTES 11-12 CPAP BATTERY PACK FEATURES Works with most makes & models of CPAP and Bi-Level machines. (use of an inverter or DC converter may be required) Available in three different sizes and capacities. Includes stylish & functional soft side carrying case, connector tips, AC Charger and DC Power Cord. Five stage power gauge indicates remaining usage time. Battery Pack does not have to be fully discharged before recharging. Battery Packs are designed and manufactured with a PCB (Protective Circuit Board) which provides the following internal protective safety features: (1) (2) (3) (4) (5) Internal protection against thermal runaway (overheating) Internal protection against over charging Internal protection against over discharge Internal protection against over voltage and over current Internal protection against short circuit Built within an aluminum alloy scratch resistant shell for durability. Standard smart chargers keeping the Battery Pack topped off and ready to go as an emergency power backup during power outages. Battery Packs can also be used to power other devices that operate from a 12V DC Current such as portable DVD players, iPods, iPads, cell phones, laptops and more. Perfect for camping! With the addition of a sine wave inverter or a DC converter (sold separately) you can safely recharge your Battery Pack via the cigarette lighter socket of a vehicle. START YOUR NEW ADVENTURE TODAY! -1- -2- 6-7 hours *50-55 hours 6 months 4 lbs. 9.8” x 5.9” x 1.3” 6 months 9 lbs. 10 1/8” x 6 7/8” x 2 5/8” ** Some CPAP machines may require the use of a sine wave inverter or DC converter to complete the connection between the machine and the Battery Pack. Battery Pack run times vary depending upon several factors including device type, pressure setting & altitude. The use of a sine wave inverter, DC converter or humidifier will significantly reduce expected run times. 6 months Warranty 9.8” x 5.9” x 1.3” 3 lbs. * 5-6 hours *25-30 hours 2500mAh CPAP/Bi-Level machines & other devices which require a 12V power source 4-5 hours *15-20 hours Weight Dimensions **Compatibility Recharge Time *Average Run Time 2500mAh 2500mAh 8A Charge Current 8A 12V 444Wh C-444 Five stage LED power gauge indicates remaining usage time 8A Output Current (Max) 12V 222Wh C-222 Power Gauge 12V 150Wh Output Voltage Capacity C-150 PRODUCT SPECIFICATIONS SAFETY WARNINGS By purchasing, using or possessing any of Battery Power Solutions’ products, you are agreeing to hold harmless Battery Power Solutions, it’s subsidiaries, affiliates, owners, officers and employees from any and all claims or liability for any damage to any property or injury, illness or death of any person when such damage, injury, illness or death shall be caused in whole or in part from use of the product(s). The following safety warnings must be observed at all times: To prevent fire or shock hazard, do not expose the Battery Pack to rain or moisture of any type. To reduce the risk of electric shock, do not remove the Battery Pack cover (back) as there are no user-serviceable parts inside. DECLARATION OF CONFORMITY This class B digital device complies with part 15 of the FCC rule, EMC standard regulations En55022 Class B and Canadian ICES-003. PACKING LIST CPAP BATTERY PACK C-150 or C-222 AC CHARGER CARRYING CASE C-444 DC POWER CORD -3- CONNECTORS CONTROL BOARD PART IDENTIFICATION E A C A. DC IN/OUT JACK (A) C. TEST BUTTON E. POWER METER D B B. DC IN/OUT JACK (B) D. LOW POWER ALARM POWER METER THE POWER METER MAY BE ACTIVATED AFTER THE FIRST CPAP BATTERY PACK CHARGING. Press the TEST button, the number of LED lights will show you the power level of the Battery Pack. When the red low battery alarm LED is flashing, the Battery Pack needs to be charged. 4 green LED lights 3 green LED lights 2 green LED lights 1 green LED light 75%-100% 50%-75% 25%-50% < 25% power power power power level level level level To turn your CPAP Battery Pack on and off, hold the TEST button down for 10-15 seconds. -4- CHARGING VIA A WALL OUTLET Connect the DC-out plug of the AC charger to the DC IN/OUT JACK (A) of the Battery Pack. Connect the power cord of the AC charger to a wall outlet. The red light of the charger lights up when charging begins. When the charger light turns green, normal charge is completed. Battery Pack does not need to be fully discharged before charging. After you have charged your Battery Pack you should see four green LED lights come on the power meter. To shut off your Battery Pack, hold down the test button for 10-15 seconds until the lights go black. BATTERY PACK OPERATION IMPORTANT NOTE FOR RESMED USERS If you are using a machine manufactured by ResMed you must use a sine wave inverter or DC converter to complete the connection between the machine and the Battery Pack or you will ruin the ResMed device. (see page 8 for additional information) If you are using a CPAP or Bi-Level machine that does not have a DC input port you will need to use a sine wave inverter or DC converter to complete the connection between the machine and the Battery Pack -5- BATTERY PACK OPERATION Connect DC Power Cord to the DC IN/OUT JACK (B) on the Battery Pack. Connect the DC Power Cord to the DC input port located on the CPAP or Bi-Level machine. If the DC Power Cord will not directly and tightly fit in the CPAP machine you will need to use one of the connector tips provided to complete the connection between the Battery Pack and the machine. Determine which connector tip fits in the DC input port on the CPAP machine. Attach that connector to the end of the DC Power Cord of the Battery Pack then connect the DC Power Cord to the Battery Pack. If you have trouble locating the correct connector tip, please refer to additional instructions on the next page. Once the connection between the Battery Pack and the CPAP machine is complete, press the ON/OFF button on the machine. Your CPAP machine should start functioning. If your Battery Pack is turned off, push and hold the TEST button on the Battery Pack for 10-15 seconds. The green LED lights should illuminate on the power meter. -6- CONNECTOR TIPS If the DC Power Cord will not directly and tightly fit in the CPAP machine you will need to use one of the connector tips provided to complete the connection between the Battery Pack and the machine. Locate the DC input port on the CPAP machine. Try to insert a connector tip to the DC input port on the CPAP machine and then gently try to plug the connector tip to the DC Power Cord of the Battery Pack. Test all of the connector tips. Create 2 different piles of tips. The first pile will include all the connecter tips that do not fit tightly into the DC input port of your CPAP machine. The second pile will include those connector tips that are potential matches because they physically fit into the DC input port of your CPAP machine. Connect the DC output cable to the Battery Pack. Carefully test each tip from the handful of potential matches that were set aside by plugging each tip into your CPAP machine and then try turning it on to see if the machine begins running. Try all of the connector tips. Even if you find that one works, there may be another connector tip that makes a better connection. You want to avoid using a loose tip if there is a better match. Once you have found the best connector tip, store it in a separate place away from the other tips for easy retrieval. -7- BATTERY PACK OPERATION WITH INVERTER If your CPAP or Bi-Level machine does not have a DC input port, you will need a sine wave inverter or a DC converter to complete the connection between with machine and the Battery Pack. IMPORTANT NOTE FOR RESMED USERS If you are using a machine manufactured by ResMed you must use either a sine wave inverter or DC converter to complete the connection between the CPAP or Bi-Level machine and the Battery Pack or you will ruin the ResMed device. ResMed offers DC converters specifically designed for use with their machines. SINE WAVE INVERTERS For your convenience, Battery Power Solutions offers 150 Watt and 225 Watt sine wave inverters (sold separately). 150 WATT SINE WAVE INVERTER Dimensions: 5.25” x 2.75” x .5” Weight: .5 lb 225 WATT SINE WAVE INVERTER Dimensions: 4.5” x 4.5” x 1.75” Weight: 1.3 lbs 150 WATT SINE WAVE INVERTER OPERATION Unpack the 150 watt sine wave inverter and connect the adapter cord to the side of the inverter. Connect the opposite end of the adapter cord into the DC IN/OUT JACK (B) of the Battery Pack. Connect the regular power cord of your CPAP or Bi-Level machine to the inverter. -8- BATTERY PACK OPERATION WITH INVERTER To connect the CPAP/Bi-Level power cord to the inverter, slide the small spring loaded tab (found on back of the inverter) which will reveal the two-prong plug (located on the back of the inverter). Push the ON/OFF button on your CPAP machine and your machine should start functioning. If your Battery Pack is turned off, push and hold the TEST button on the Battery Pack for 10-15 seconds. The green LED lights should illuminate on the power meter. 225 WATT SINE WAVE INVERTER OPERATION Unpack the 225 watt sine wave inverter. You will not need the battery clips included with the inverter for use with your CPAP Battery Pack so you may set those aside. -9- BATTERY PACK OPERATION WITH INVERTER Connect the DC accessory outlet plug to the inverter by matching the negative end of the plug (the black end) to the negative end of the inverter and the positive end of the plug (the red end) to the positive end of the inverter. Use the screw caps provided to secure the ends of the plug to the inverter. Connect the opposite end of the accessory outlet plug into the DC IN/OUT JACK (B) of the Battery Pack. Connect the regular power cord of your CPAP machine to the AC three-prong outlet on the side of the inverter. Push the ON/OFF button on your CPAP machine and your machine should start functioning. If your Battery Pack is turned off, push and hold the TEST button on the Battery Pack for 10-15 seconds. The green LED lights should illuminate on the power meter. - 10 - CHARGING VIA THE CIGARETTE LIGHTER SOCKET OF A VEHICLE The use of a sine wave inverter or a DC converter allows you to safely charge your Super CPAP Battery Pack via the cigarette lighter socket of your vehicle. Connect the Battery Pack AC Charger to the DC IN/OUT JACK (A) of the Battery Pack. Connect the plug of the AC Charger into the inverter. Connect the adapter cord to the inverter or converter. Remove the cigarette lighter from the socket in your vehicle. Plug the inverter or converter adapter cord into the cigarette lighter socket. Start your vehicle to begin the charging process. When the charging process is complete remove the adapter cord from the cigarette lighter socket. IMPORTANT NOTES CPAP Battery Packs are compatible with most makes and models of CPAP and Bi-Level machines; however, some machines require the additional use of a sine wave inverter or a DC converter to complete the connection between the Battery Pack and the machine. - 11 - IMPORTANT NOTES The DC adaptor included with the Battery Pack may not be compatible with your CPAP or Bi-Level device. Some devices require a manufacturer-specific DC adaptor cable with built-in fuses or special connection types. When in doubt, please contact the manufacturer of your device. DeVilbiss: 1-800-338-1988 www.devilbisshealthcare.com Fisher & Paykel: 1-800-707-5454 www.fphcare.com Invacare: 1-800-333-6900 www.invacare.com Puritan Bennett: 1-800-635-5267 www.puritanbennet.com Respironics: 1-800-345-6443 www.respironics.com ResMed: 1-800-424-0737 www.resmed.com USAGE TIMES: Multiple factors will affect usage times including, but not limited to, device type, pressure settings and altitude. Use of a sine wave inverter or DC converter in conjunction with the Battery Pack will reduce expected usage times. Manufacturers specifically do not recommend the use of a humidifier with the Battery Pack. Although a humidifier can be used with the Super CPAP Battery Pack, the battery usage time will be significantly lower than expected. The circuitry in this power pack is designed for 12V output only. Use of the Battery Pack with a device that requires more than 12V may cause the Battery Pack’s internal circuitry to shut off to protect the battery from over run. If the Battery Pack stops functioning, reconnect the AC charger to the Battery Pack to reset the internal circuitry. This will allow the Battery Pack to function again. If the power meter does not work, hold down the Battery Pack test button for 10-15 seconds or until the LED lights display. This will activate the power meter. - 12 - 1-877-445-5228 www.batterypowersolutions.net DISPOSAL OF LITHIUM ION BATTERIES Lithium Ion batteries are recyclable in most states. For information on where you can recycle your batteries at no cost, visit www.call2recycle.org or call 1-877-723-1297. Though some municipalities may allow disposal through the normal waste system you should contact your Local Governmental Household Hazardous Waste Agencies or go to www.call2recycle.org for information on where to recycle batteries to comply with state battery disposal regulations. SUPER CPAP BATTERY PACK USER’S GUIDE - April 2012 -