1
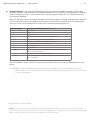
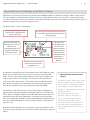
HyperControl
for Logic Pro
User Guide
HyperControl for Logic Pro
|
User Guide
What is HyperControl? . .
. . . . . . . . . . . . . . . . . . . . . . . . . . . . . . . . . . . . . . . . . . . . . . . . 1
HyperControl Requirements . .
. . . . . . . . . . . . . . . . . . . . . . . . . . . . . . . . . . . . . . . . . . . 2
Logic Pro 8 Software . . . . . . . . . . . . . . . . . . . . . . . . . . . . . . . . . . . . . . . . . . . . . . . . . . . . . . . . . . . 2
Axiom Pro Hardware. . . . . . . . . . . . . . . . . . . . . . . . . . . . . . . . . . . . . . . . . . . . . . . . . . . . . . . . . . . . 2
HyperControl Installation. .
. . . . . . . . . . . . . . . . . . . . . . . . . . . . . . . . . . . . . . . . . . . . . . 3
HyperControl with Axiom Pro Hardware. .
Using Logic Pro with HyperControl. .
. . . . . . . . . . . . . . . . . . . . . . . . . . . . . . . 5
. . . . . . . . . . . . . . . . . . . . . . . . . . . . . . . . . . . . 13
General Overview . . . . . . . . . . . . . . . . . . . . . . . . . . . . . . . . . . . . . . . . . . . . . . . . . . . . . . . . . . . . . 13
HyperControl Display and Soft-Keys. .
Mixer Mode . .
. . . . . . . . . . . . . . . . . . . . . . . . . . . . . . . . . . . 14
. . . . . . . . . . . . . . . . . . . . . . . . . . . . . . . . . . . . . . . . . . . . . . . . . . . . . . . . . . 15
Instrument Mode . .
. . . . . . . . . . . . . . . . . . . . . . . . . . . . . . . . . . . . . . . . . . . . . . . . . . . . . 19
Using Instrument Mode . . . . . . . . . . . . . . . . . . . . . . . . . . . . . . . . . . . . . . . . . . . . . . . . . . . . . . . . . . 20
HyperControl for Logic Pro
|
User Guide
|
1
What is HyperControl?
HyperControl is a powerful new technology that automatically maps your Axiom Pro controls (i.e., knobs, buttons, sliders 1, etc.) to the
on-screen controls of Logic Pro and all of its plug-ins and virtual instruments. This helps you make music more quickly since you no
longer have to perform the tedious and time-consuming task of assigning MIDI controls.
Furthermore, since HyperControl is a two-way communication protocol, your Axiom Pro hardware and Logic Pro always remain
synchronized with each other. For example, if a knob is turned on Axiom Pro, its corresponding knob in Logic Pro will update.
Alternatively, if an on-screen knob is turned within Logic Pro (using your computer’s mouse), the corresponding knob position of
Axiom Pro (as shown on the LCD display) updates as well. If a new instrument (or a different preset within the same instrument) is
loaded, the parameter names and various button, knob, and slider 1 positions automatically update on the Axiom Pro display. This
makes Axiom Pro feel like a “dedicated” hardware controller since the knobs and LCD screen are tightly integrated with Logic Pro and
always reflect what is currently happening within your software.
Finally, HyperControl allows for more than just MIDI data to be sent from Axiom Pro—ASCII keystrokes can also be sent, emulating
Logic Pro keyboard shortcuts. This allows the controller to have “deep” integration into Logic Pro, and allows things like zooming,
markers, copy, undo and many other features to be controlled right from Axiom Pro. This minimizes the amount of time you must
spend using your computer’s mouse and keyboard to control your software.
In short, these features let you use Logic Pro more intuitively and give you more “hands on” control of your software to inspire your
creativity.
1
Only available on Axiom Pro 49/61.
HyperControl for Logic Pro
|
User Guide
|
2
HyperControl Requirements
Logic Pro 8 Software:
Please note that HyperControl requires Logic Pro version 8.02 or later. Earlier versions of Logic Pro are not supported for use
with HyperControl.
Axiom Pro Hardware:
HyperControl requires the presence of an Axiom Pro controller on your computer and this document assumes your Axiom Pro
keyboard has already been installed and connected to your system. To learn more about this installation procedure, please see
the Axiom Pro Quick Start Guide.
HyperControl for Logic Pro
|
User Guide
|
HyperControl Installation
✓NOTE: If Logic Pro is running, close the application before beginning the HyperControl installation procedure. The
instructions below will indicate when Logic Pro should be launched.
1.HyperControl technology requires an Axiom Pro “personality” file to be added to your system. Run the Axiom Pro Logic
HyperControl installer and follow the on-screen instructions.
2. Once the installation is complete, launch Logic Pro.
3. Select “Setup…” from the Logic Pro > Preferences > Control Surfaces menu.
4. Click “New” and select “Install…”
5. Select “M-Audio Axiom Pro 25” (or “M-Audio Axiom Pro” for 49 or 61-key users).
6. Click “Scan.” An Axiom Pro icon will appear on the right side of the screen. Verify that the HyperControl MIDI ports 2 are
selected for both the “MIDI input” and “MIDI output” drop-down menus on the left side of the screen.
Installation is complete and Logic Pro can now be controlled with Axiom Pro using HyperControl technology. Close the Setup
window and continue to the next section of this User Guide.
Note that HyperControl port names may vary depending on factors your operating system and/or drivers. The table on the next
page describes how Axiom Pro will appear on your system.
2
3
HyperControl for Logic Pro
|
|
User Guide
Mac OS X 10.4 (Tiger) users:
hen using Axiom Pro in Mac OS X 10.4 (Tiger), the Axiom Pro MIDI ports will be displayed as shown in the right
W
column of the table below. Please use this table to identify how the Axiom Pro MIDI ports map in your operating system.
Axiom Pro Class-Compliant Port Names
Axiom Pro MIDI Input Ports
Mac OS X 10.4 MIDI Input Ports
Axiom Pro 613 USB A In
Axiom Pro 61 Port 1
Axiom Pro 61 HyperControl In
Axiom Pro 61 Port 2
Axiom Pro 61 MIDI In
Axiom Pro 61 Port 3
Axiom Pro 61 USB B In
Axiom Pro 61 Port 4
Axiom Pro MIDI Output Ports
Mac OS X 10.4 MIDI Output Ports
Axiom Pro 61 MIDI Out
Axiom Pro 61 Port 1
Axiom Pro 61 HyperControl Out
Axiom Pro 61 Port 2
3
3
3
3
3
3
These MIDI port names will display the corresponding number of keys, based on the Axiom Pro model you use: 25, 49 or 61.
4
HyperControl for Logic Pro
|
|
User Guide
5
HyperControl with Axiom Pro Hardware
9
6
8
10
11
2
1
3
4
5
7
1.Slider Buttons 4 – These buttons let you select, mute, solo, or record-enable tracks within Logic Pro. By default, these
buttons select channels, however, pressing the Flip button 4 lets you step through the three other functions: mute, solo, or
record-enable.
2.Sliders 4 – These sliders control their corresponding bank of eight faders in the Logic Pro mixer. Note that in the Logic Pro
Arrange window, the left edges of all tracks that are currently under the control of the Axiom Pro sliders are highlighted in
white, as shown below:
Selected Bank of Tracks
(Controlled by Axiom Pro)
Unselected Bank of Tracks
4
Only available on Axiom Pro 49/61.
HyperControl for Logic Pro
3.
|
User Guide
|
6
Master Slider 5 – This slider automatically maps to the Master Fader track of your Logic Pro project.
4.Flip Button 5 – Axiom Pro can operate in two different modes when using HyperControl: Mixer Mode and Instrument
Mode. The functionality of the Flip button varies depending on the mode that you are in (the “F1” F-Key selects the mode;
see the “F-Keys” section below for more information).
• Mixer Mode:
When Axiom Pro is in Mixer Mode, the flip button determines the function of the Slider buttons. By default, the Slider
buttons choose channels within your Logic Pro project. However, pressing the Flip button lets you step through the
other functions that the Slider buttons can perform (i.e., record-enable, mute, solo). When you press the Flip button,
the functionality of the Slider Buttons is listed near the lower-right side of the display.
• Instrument Modes:
When Axiom Pro is in Instrument Mode, the Axiom Pro Sliders control Logic Pro track volume settings whereas the
Encoder knobs control the parameters of your selected virtual instrument. The Flip Button can be used to exchange
(or “flip”) the function of the Encoder knobs and the Sliders. This lets you use the Axiom Pro sliders to adjust virtual
instrument settings, while using the Encoder knobs to set track levels.
✓NOTE: Switching back to Mixer Mode will cancel Flip Faders mode.
5.Encoder Knobs – These knobs map to the parameters of the Logic Pro tracks (i.e., pan, send level, etc.), insert plug-ins, or
virtual instrument controls that are currently selected through Axiom Pro. The “Using Logic Pro with HyperControl” section
of this guide describes how you can select different kinds of track, insert, and virtual instrument parameters for these knobs
to control.
6.Soft-Keys – These four buttons correspond to the “Pages” displayed along the bottom of the LCD screen and let you
access various parameters of your Logic Pro tracks (i.e., insert, send, and EQ settings) and virtual instrument settings. The
“HyperControl Display and Soft-Keys” section covers these buttons in detail.
5
Only available on Axiom Pro 49/61.
HyperControl for Logic Pro
7.
|
User Guide
|
Transport Controls – These buttons map to the Logic Pro Transport and perform the following functions:
Axiom Pro Control Functionality within Logic Pro
Engage Loop. This button engages and disengages looping between the Left Locator and
Right Locator positions as specified in the Logic Pro transport. The button is illuminated when
looping is engaged.
Rewind. Tapping this button will skip to the beginning of the previous bar. Holding this button
causes the transport to rewind until the button is released.
Fast Forward. Tapping this button will skip to the beginning of the next bar. Holding the
button causes the transport to fast forward until the button is released.
Stop. This buttons stops recording or playback. Pressing this button a second time returns
the transport to the beginning of the song.
✓NOTE: If cycle mode is active, pressing this button a second time will return the
transport to the left locator; pressing this button a third time will return the transport to the
beginning of the song.
Play. This button starts playback.
Record. This button begins recording on all record-enabled tracks.
7
HyperControl for Logic Pro
|
User Guide
|
8
8.F-Keys – These buttons let you navigate through Logic Pro and accomplish several tasks without using the mouse or
computer keyboard.
✓Axiom Pro 25 Users:
Due to space limitations, Axiom Pro 25 does not feature dedicated F-Keys. Instead, the Soft-Keys on the bottom
row can be converted to F-Keys by pressing the “F1-4” Function button on the top row. Note that Axiom Pro 25
only supports F-Keys 1 through 4 (Mode, < Track, Track >, and Mute); it does not have F-keys 5-7 (Solo, < Bank,
and Bank >).
• F1 (Mode)
Axiom Pro can operate in two different modes when using HyperControl: Mixer Mode and Instrument Mode. This
button toggles between the two modes.
• F2 (< Track)
This button selects the previous track within Logic Pro. If a MIDI or virtual instrument track is selected, that track is
also record-enabled. For example, if track 8 is currently selected, pressing this button will select track 7. The currently
selected track is highlighted in white.
• F3 (Track >) This button selects the next track within Logic Pro. If a MIDI or virtual instrument track is selected, that track is also
record-enabled. For example, if track 1 is currently selected, pressing this button will select track 2. The currently
selected track is highlighted in white.
• F4 (Mute)
This button mutes the track that is currently selected within Logic Pro.
• F5 (Solo)
This button solos the track that is currently selected within Logic Pro.
• F6 (< Bank) In the Arrange window, the left edges of all tracks that are currently under the control of Axiom Pro are highlighted in
white. Pressing this button shifts control to the previous bank of eight tracks in Logic Pro. For example, if tracks 9-16
are currently controlled by Axiom Pro, pressing this button shifts control to tracks 1-8 and highlights those tracks in
the Arrange window.
• F7 (Bank >)
In the Arrange window, the left edges of all tracks that are currently under the control of Axiom Pro are highlighted in
white. Pressing this button shifts control to the next bank of eight tracks in Logic Pro. For example, if tracks 1-8 are
currently controlled by Axiom Pro, pressing this button shifts control to tracks 9-16 and highlights those tracks in the
Arrange window.
✓Note to Axiom Pro 25 users:
While Axiom Pro 25 does not feature Bank buttons, bank selection can still be performed using the “< Track”
and “Track >” (F2, F3) buttons and selecting the track beyond the bounds of the currently selected bank. For
example, if the right-most track of the current bank is selected and the “Track >” button is pressed, the next bank
of tracks will become active. Alternatively, if the left-most track of a current bank is selected and the “< Track”
button is pressed, the previous bank will become active.
HyperControl for Logic Pro
|
User Guide
|
9
9.Load Button – This button brings up a prompt allowing you to load stored Axiom Pro patches. Loading of patches is
covered in the “Function Buttons and Soft Keys” section of the Axiom Pro User Guide.
Save Button – This button brings up a prompt allowing you to save the current settings of your Axiom Pro. Saving of
patches is covered in the “Function Buttons and Soft Keys” section of the Axiom Pro User Guide.
Hold (Load + Save Buttons) – By default, the LCD screen displays the position and status of the last control that was
used. For example, if the screen is displaying the status of the drum pad group and you turn an Encoder knob, the LCD
will immediately switch to the encoder group, highlight the encoder that was turned, and display that encoder’s associated
parameter and value on the lower-left side of the screen.
In certain cases, you may want to ”hold” the information on the LCD, preventing the screen from updating when a control of
a different group is moved. To do this, simultaneously press and hold the Save and Load buttons.
When the display is locked, if you move a control outside the “locked” group, you will still see the control’s parameter name
and value near the bottom of the display, but the remainder of the display will not update.
Pressing the Save and Load Buttons again will disable the Hold feature.
HyperControl for Logic Pro
|
User Guide
|
10
Why do I need patches? Doesn’t HyperControl assign controls automatically?
HyperControl technology automatically handles the assignment of most Axiom Pro controls and—in many cases—you will not
need to load or save any Axiom Pro patches. However, there are some cases in which you may need to use customized
patches:
1.Using external MIDI hardware. If you are using Logic Pro to control hardware MIDI devices (synthesizers, samplers,
etc.), you will need to load a customized patch that assigns MIDI CC values of Axiom Pro controls (encoder knobs,
sliders*, etc.) to the parameters of your hardware device.
✓NOTE: When controlling external MIDI devices, the “HyperControl” parameter
must be set to “Transport.” Please refer to the “Edit Mode (Main Menu)” section of
the Axiom Pro User Guide to learn how to do this.
2.Assigning the performance controls (drum pads, keyboard zones, sustain/expression pedals, etc.) and the numerical
keypad 6.
The numerical keypad is not automatically assigned so that you can still customize some of the Axiom Pro controls
to your preference even if HyperControl is in use. For example, you can assign Logic Pro keyboard shortcuts to the
buttons of the Axiom Pro keypad. Before you begin customizing the keypad, note that Axiom Pro ships from the
factory with a number of useful patches that may already assign the numerical keypad to functions you wish to use.
Please see Appendix A at the end of the Axiom Pro User Guide to learn how each factory patch is configured.
The performance controls are not automatically assigned by HyperControl so that you can set note, zone, and other
assignments to your preference. For example, your virtual instrument may require you to assign the pads to send
specific MIDI note or velocity values. Alternatively, you may wish to configure keyboard zones in a specific way to
help you accomplish a specific task. This can be done through Edit mode. Please see the Axiom Pro User Guide to
learn how to do this.
3.Running Logic Pro and other audio applications concurrently. It is possible to simultaneously use Logic Pro and
other audio applications at the same time. When working in this configuration, Logic Pro makes use of HyperControl
technology while your other audio applications are controlled using standard MIDI messages (i.e., Axiom Pro acts as a
“traditional” MIDI controller keyboard).
✓NOTE: When controlling audio applications that are running alongside Logic Pro,
the “HyperControl” parameter within Axiom Pro must be set to “Transport.” Please
refer to the “Edit Mode (Main Menu)” section of the Axiom Pro User Guide to learn
how to do this.
6
Only available on Axiom Pro 49/61.
HyperControl for Logic Pro
|
User Guide
|
11
10. Edit Button – This button lets you enter and exit Edit Mode.
When using HyperControl, many of the Axiom Pro controls (i.e., buttons, knobs, transport controls, etc.) are automatically
assigned to the on-screen controls of your software. These automatic assignments cannot be edited. However, you can
customize the numerical keypad and performance controls (the drum pads, keyboard zones, sustain/expression pedals,
etc.) to your personal preference by using Edit Mode.
This mode is covered in greater detail in the “Edit Mode” section of the Axiom Pro User Guide.
✓NOTE: : It is possible to set HyperControl to only map the Axiom Pro transport controls to Logic Pro while
allowing all other control groups (encoder knobs, sliders 7, buttons, etc.) to function like a traditional MIDI controller.
This is useful for users who have created their own fully-customized patches for their audio applications or external
MIDI hardware but would still like the Axiom Pro transport controls to automatically map to the software they are
using.
To do this, enter Edit Mode and change the “HyperControl” parameter (of the main menu) from “Normal” to
“Transport.” For more information, see the “Edit Mode” section of the Axiom Pro User Guide.
Note that HyperControl “Transport” and “Normal” modes can be toggled “on the fly” while HyperControl is active.
This lets you switch between “normal” HyperControl assignments and an additional set of your own custom
controller assignments that you can specifically tailor to your needs, giving you even more hands-on control over
your MIDI hardware or Logic Pro features you frequently use.
11.Zone/GRP Button – This button switches the functionality of the buttons beneath the Sliders (on Axiom Pro 49/61) or
Transport Control (on Axiom Pro 25) and allows you to select the Performance Groups and Zones. When the button is not
illuminated (i.e., not pressed), the associated buttons send out HyperControl commands. When the button is pressed, it
becomes illuminated, and the associated buttons can then be used to activate/deactivate Zones and Groups.
The “Edit Mode > Zones” section of the Axiom Pro User Guide covers this subject in greater detail.
7
Only available on Axiom Pro 49/61.
HyperControl for Logic Pro
|
User Guide
|
12
12.Numerical Keypad 8 – The numerical keypad buttons can be programmed to send MIDI commands as well as ASCII
keystrokes (just like a computer keyboard). These ASCII keystrokes can correspond to your audio application’s “keyboard
shortcuts” allowing you to access various features of your software straight from Axiom Pro (i.e., without having to touch
your computer’s keyboard).
Axiom Pro ships with a variety of pre-programmed patches that map these buttons to popular audio applications (a detailed
list of these patches can be found in Appendix A of the Axiom Pro User Guide). For example, when using HyperControl
with Logic Pro, the numerical keypad can be used to perform the following by loading patch 14:
Axiom Pro Keypad
Default shortcut within Logic Pro 9 (Patch 14)
1
Save project
2
Undo
3
Toggle Mixer View
4
Shows/hides any plug-in and virtual instruments that are open
5
Engages and disengages the metronome (click track)
6
Quantizes selected MIDI events or arrange window regions
7
Inserts a new marker at the current song position
8
Go to previous marker
9
Go to next marker
— (Minus)
When controlling plug-ins or virtual instruments, pressing this button loads the
previous preset for that device.
0
Sets locators by the selected region’s boundaries.
+ (Plus)
When controlling plug-ins or virtual instruments, pressing this button loads the next
preset for that device.
See the “Edit Mode > Control” section of the Axiom Pro User Guide to learn how to make customized patches for these
buttons.
✓TIP: When working in Edit Mode, these buttons allow Axiom Pro 49/61 users to enter numerical values quickly.
Axiom Pro 25 users can enter values by using the black piano keys (the keys range from 0-9 as you move from left
to right on the keyboard).
8
Only available on Axiom Pro 49/61.
9
OTE: The Axiom Pro presets are designed to work with the default shortcuts of Logic Pro. If you have customized
N
your shortcuts, you will need to reprogram your Axiom Pro keypad buttons to match your custom shortcuts. See the “Edit
Mode > Control” section of the Axiom Pro User Guide to learn how to do this.
HyperControl for Logic Pro
|
User Guide
|
13
Using Logic Pro with HyperControl
General Overview
HyperControl is designed to let you intuitively control Logic Pro, its plug-ins, and its virtual instruments with little or no use of your
computer’s mouse or keyboard.
The Transport Controls give you instant access to the Logic Pro transport and let you start, stop, record, loop, as well as perform
various other tasks straight from the Axiom Pro keyboard.
The F1-F7 F-Keys (F1-F4 on Axiom Pro 25) let you select individual channels or fader banks, as well as record-enable, solo, and
mute tracks within your Logic Pro project without having to use the mouse. When a MIDI or virtual instrument track is selected
using the F2-F3 (Track) keys, the track is highlighted in white within Logic Pro. These keys are covered in further detail on page 7.
The Slider buttons 10 can be used in conjunction with the Flip button 10 button to select, record-enable, mute, or solo channels
within the Logic Pro Mixer. See the “Flip Button” section on page 6 to learn how to do this.
The eight Sliders 10 of Axiom Pro usually control the levels of the selected tracks within the Logic Pro mixer. You can use the
F2-F3 (Track) or F6-F7 (Bank) F-Keys to select which Logic Pro channels are currently being controlled by the sliders of
Axiom Pro (the left edges of the active channels are highlighted in white within the arrange window of Logic Pro).
The right-most slider 10 of Axiom Pro will control the level of the Master Fader in the Logic Pro mixer.
Finally, any time you switch to a new page using the soft-keys (i.e., to the “Home”, “Ins”, “Sends”, and “EQ” pages), the LCD
screen will show a list of Logic Pro track names or insert/virtual instrument parameters that will be controlled by the Encoder
knobs . If any of the Axiom Pro controls (i.e., pads, sliders 10, or numerical keypad 10 ) are moved, the LCD screen will update to
show the position of the currently used control and its group. However, approximately 3 seconds after you release the control
(encoder, slider, etc.), the screen will return to the list of track names or insert/virtual instrument parameters that are being
controlled by Encoder knobs.
10
Only available on Axiom Pro 49/61.
HyperControl for Logic Pro
|
|
User Guide
14
HyperControl Display and Sof t-Keys
HyperControl can control Logic Pro from any window within the DAW regardless of whether the “Arrange,” “Mixer,” or plug-in/virtual
instrument window is currently selected. However, Axiom Pro is ideally suited to control Logic Pro when in a sequencing situation
(i.e., while working within the “Arrange” window) since the Axiom Pro display and controls can handle the mixing functions of Logic Pro
while your computer monitor lets you arrange your music.
The default “Home” screen is shown below:
The name of the currently selected
Logic Pro track is displayed at the
top-left of the screen.
The upper-right corner of the display lists the parameter,
insert, or virtual instrument that the Encoder Knobs are
currently controlling.
Any time a slider, knob, or
other control is moved on
Axiom Pro, the
corresponding Logic Pro
parameter and its value
are listed on this line.
The bottom row lists menus and
options that can be accessed
using Soft-Keys 1-4.
The center of the
screen displays either
the names of the
Logic Pro tracks that
are under the control
of Axiom Pro or the
current position of the
knobs, sliders, or
other con-trols of
Axiom Pro.
As indicated in the top-right corner of the example screen shown above, this page
allows you to set Pan positions of your Logic Pro tracks by using the Encoder
knobs. The two columns display the track names of your Logic Pro project (“Vox
Lead” through “VirtInst” in this example). These tracks are currently under the
control of the Axiom Pro encoders: the left column (Vox Lead, Harmony, Guitar,
Bass) always corresponds to Encoder knobs E1-E4 whereas the right column
(Kick, Snare, Overheds, VirtInst) corresponds to Encoder knobs E5-E8.
The Soft-Keys of Axiom Pro allow you to select the four different HyperControl
pages that are listed along the bottom of the display (“Home,” “Ins,” “Sends,” and
“EQ”). When a new page is loaded, the Encoder knobs automatically map to the
parameters listed on the newly loaded page. For example, in the picture shown
above, pressing Soft-Key 3 (Sends) accesses the Send page of HyperControl and
lets you use the Encoder knobs to control send levels that you’ve assigned in the
Logic Pro mixer.
Note that if the Encoder knobs are not assigned to control any parameters within
Logic Pro, turning a knob will have no effect on your Axiom Pro display or Logic Pro
project.
✓ W
hat about the Axiom Pro 49/61
sliders?
The Axiom Pro 49/61 sliders always control
the volume faders of your selected tracks
within Logic Pro. This happens regardless
of what page is currently loaded using
Soft-Keys 1-4 (the loaded page only affects
the Encoder knobs).
The only exception to this rule is if
Axiom Pro is either in “Instrument” or
“Insert” mode and flip faders mode is
activated. When flip faders mode is
activated, the sliders are used to control
insert and virtual instrument parameters,
while the Encoder knobs are used to set
track levels.
HyperControl for Logic Pro
|
User Guide
|
15
Mixer Mode
The HyperControl menus are as follows:
1. “Home” Page
This is the default “Home” page of HyperControl. On the Home page, the Encoder knobs of Axiom Pro are assigned to
control the pan position of your selected Logic Pro mixer channels.
Since Axiom Pro 25 does not feature any sliders, pressing the “Home” Soft-Key lets you use the Encoder knobs to control
both track level and pan position by toggling between the “Home” (track volume control) and “Pan” (pan control) pages.
Soft-Keys 2-4 (Ins, Sends, EQ) will take you to the Inserts, Sends, and EQ HyperControl pages. These are explained below.
2. “Ins” Page
The “Ins” page lets you call up and control insert plug-ins using your Axiom Pro.
When Soft-Key 2 (Ins) is pressed, a “menu” screen (shown above) appears on the Axiom Pro LCD. This screen lets you
choose the insert slot, select any of the available plug-ins, and switch that plug-in on or off:
Selecting an insert slot:
The Logic Pro mixer has 15 insert slots per channel. Use Encoder Knob E1 to select the slot in which you would like to
insert the plug-in effect. The slot number is displayed at the lower-left of the screen (i.e., “Insert 1”, “Insert 2”, etc.)
• If you select a slot that does not contain a plug-in, two dashes (“--”) will appear at the lower-right of the display.
• If you select an insert slot that already contains a plug-in, the name of that plug-in will appear at the lower-right of
the screen.
Selecting a plug-In:
Use Encoder Knob E3 to scroll through all of the plug-ins that are available to Logic Pro. Once you have located the
plug-in that you would like to use, press Soft-Key 3 (Load) to load the plug-in.
✓TIP: T
o remove a plug-in, turn Encoder Knob E3 until “--” appears on the display. Next, press Soft-Key 3 (Load).
This will remove the plug-in from the insert slot.
HyperControl for Logic Pro
|
User Guide
|
16
Switching plug-ins on or off.
If you have selected an insert slot that contains a plug-in, you can use Encoder Knob E2 to switch the plug-in on and off
(bypass). Turn the encoder clockwise to switch off the plug-in; turn the encoder counter-clockwise to switch the plug-in
back on.
✓NOTE: If the selected insert slot does not contain a plug-in, turning Encoder Knob E2 will
have no effect.
Controlling a plug-in with the Axiom Pro Encoder knobs
• Select the insert slot containing your desired plug-in by using Encoder Knob E1. In the example shown below, the
Logic Pro “Tape Delay” plug-in was loaded:
• Press Soft-Key 4 (Edit) to view the parameters of the plug-in, as shown below:
The parameters of the plug-in are listed in two columns and are automatically mapped to the Axiom Pro Encoder knobs.
The left column is mapped to knobs E1-E4 whereas the right column is mapped to knobs E5-E8. For example, if you
would like to change the feedback amount of the plug-in, turn Encoder Knob E4; if you’d like to change the low cut filter
point, turn Encoder Knob E6.
If a plug-in features multiple pages of parameters, use Soft-Keys 3-4 (“< Page” and “Page >”) to step through all of the
pages of parameters. The page number is listed near the lower-left of the screen.
• To return to the insert “menu” screen, press Soft-Key 2 (Ins).
• Pressing Soft-Key 1 (Home) will return you to the HyperControl Home page.
HyperControl for Logic Pro
|
User Guide
|
17
3. “Sends” Page
The Sends page lets you use the Encoder knobs to set effect send levels for your Logic Pro mixer tracks. You can step
through the eight effect send slots by repeatedly pressing Soft-Key 3 (Sends). The current effect send slot is listed on
the top-right of the screen (i.e., Send1, Send2, etc.).
Note that the Encoder knobs control the same Send slot across the selected bank of Logic Pro channels. For example, if
“Send1” is selected for tracks 1 – 8, turning Encoder Knob E1 will affect the first channel’s first send slot, Encoder Knob
E2 will affect the first send slot of the second channel, and so on.
✓NOTE: You must first assign a send on your Logic Pro mixer channel before you can use
this page. If no send has been assigned, turning an Encoder Knob will not have any effect
within Logic Pro (or the Axiom Pro display).
Pressing Soft-Key 1 (Home) or Soft-Key 2 (Ins) will take you to the Home and Insert HyperControl pages, respectively.
4. “EQ” Page
The EQ page allows you to access the Logic Pro mixer’s eight-band Channel EQ. Note that you must activate the
Channel EQ on your Logic Pro mixer channel before you can use this page. If the Channel EQ has not been activated,
the Axiom Pro LCD will appear mostly blank and turning an Encoder Knob will not have any effect within Logic Pro (or the
Axiom Pro display).
HyperControl has four Channel EQ pages and each page contains parameters for two EQ bands. Pressing Soft-Key 4
(EQ) lets you step through the four pages. Note that these EQ bands are listed in the following order: 3/4, 5/6, 7/8, and
1/2. This is because bands 3/4 and 5/6 are the most commonly used “parametric” style EQs (the remaining bands are
“shelf” and high/low pass EQs).
The following table describes how the Axiom Pro knobs are mapped to the Logic Pro Channel EQ.
Channel EQ Band
User Guide
Axiom Pro Encoder
Knob
|
HyperControl
Parameter
HyperControl Page 4
HyperControl Page 3
HyperControl Page 2
HyperControl Page 1
Channel EQ
HyperControl for Logic Pro
Description:
Freq 1
E1
3
Sets the center-frequency of the third Channel EQ band
Gain 1
E2
3
Sets the gain level of the third EQ band
Q1
E3
3
Sets the width or “Q” of the third EQ band
PK1On/Of
E4
3
Enables and disables the third EQ band
Freq 2
E5
4
Sets the center-frequency of the fourth Channel EQ band
Gain 2
E6
4
Sets the gain level of the fourth EQ band
Q2
E7
4
Sets the width or “Q” of the fourth EQ band
PK2On/Of
E8
4
Enables and disables the fourth EQ band
Freq 3
E1
5
Sets the center-frequency of the fifth Channel EQ band
Gain 3
E2
5
Sets the gain level of the fifth EQ band
Q3
E3
5
Sets the width or “Q” of the fifth EQ band
PK3On/Of
E4
5
Enables and disables the fifth EQ band
Freq 4
E5
6
Sets the center-frequency of the sixth Channel EQ band.
Gain 4
E6
6
Sets the gain level of the sixth EQ band
Q4
E7
6
Sets the width or “Q” of the sixth EQ band
PK4On/Of
E8
6
Enables and disables the sixth EQ band
HiShFreq
E1
7
Sets the corner-frequency of the high shelf (the seventh Channel EQ band)
HiShGain
E2
7
Sets the gain level of the high shelf
HiShelfQ
E3
7
Sets the width or “Q” of the high shelf filter
HShOn/Of
E4
7
Enables and disables the high shelf
HCutFreq
E5
8
Sets the corner-frequency of the high cut filter (the eighth Channel EQ band)
HCtSlope
E6
8
Sets the slope or “steepness” of the high cut filter
HiCutQ
E7
8
Sets the width or “Q” of the high cut filter
HCtOn/Of
E8
8
Enables and disables the high cut filter
LCutFreq
E1
1
Sets the corner-frequency of the low cut filter (the first Channel EQ band)
LCtSlope
E2
1
Sets the slope or “steepness” of the low cut filter
LoCutQ
E3
1
Sets the width or “Q” of the low cut filter
LCtOn/Of
E4
1
Enables and disables the low cut filter
LoShFreq
E5
2
Sets the corner-frequency of the low shelf (the second Channel EQ band)
LoShGain
E6
2
Sets the gain level of the low shelf
LoShelfQ
E7
2
Sets the width or “Q” of the low shelf
LShOn/Of
E8
2
Enables and disables the low shelf
|
18
Pressing Soft-Key 1 (Home), Soft-Key 2 (Ins), or Soft-Key 3 (Sends) will take you to the Home, Insert, and Sends HyperControl
pages, respectively.
HyperControl for Logic Pro
|
|
User Guide
19
Instrument Mode
Axiom Pro can operate in two different modes when using HyperControl: Mixer Mode and Instrument Mode. The previous
sections of this User Guide have covered Mixer Mode. This section covers Instrument mode and describes how HyperControl
and Axiom Pro can be used to give you “hands-on” control over your virtual instrument plug-ins.
To use Instrument Mode, you must first:
1. Create an Instrument Track within Logic Pro.
2. Load a virtual instrument into the track’s I/O slot.
3.Make sure that the track containing your virtual instrument is selected within Logic Pro (for example by using the F2 and
F3 “Track” keys on Axiom Pro or by clicking the name of the track that contains your virtual instrument).
4. Finally, press the F1 “Mode” button to enter Instrument mode. (Pressing Mode again will return you to Mixer Mode).
✓NOTE: If you are in Instrument Mode and select a track that is not assigned to a virtual
instrument, the Axiom Pro display will appear mostly blank. For example if you select
an audio or auxiliary track (or an instrument track that does not have a virtual instrument
loaded), you will see a screen similar to the following:
Instrument Mode cannot be used to control these tracks; to use Instrument Mode, you
must select an instrument track that has a virtual instrument loaded into its I/O slot.
The name of the currently selected
Logic Pro track is displayed at the
top-left of the screen.
The bottom row lists menus and
options that can be accessed using
Soft-Keys 1-4. These options are
described in detail below.
The name of the virtual instrument is
displayed at the top-right of the screen.
The center of the
screen displays the
various parameters
contained by the
virtual instrument. The
listed parame-ters can
be modified by the
Encoder Knobs of
Axiom Pro.
HyperControl for Logic Pro
|
User Guide
|
20
Using Instrument Mode:
The parameters of your virtual instrument are listed on screen and are automatically mapped to the eight Encoder knobs of
Axiom Pro. The parameters in the left column are mapped to Encoder knobs of the top row whereas the right column parameters
are mapped to Encoder knobs on the bottom row.
If the virtual instrument’s window has been minimized within Logic Pro, pressing Soft-Key 2 (Open) will open the virtual
instrument’s window on your computer monitor.
If a virtual instrument contains more than eight parameters, the controls are listed on multiple pages that can be accessed by
using Soft-Keys 3-4 (labeled “< Page” and “Page >” on the LCD screen).
Finally, pressing Soft-Key 1 (1-8) will provide quick access to the first eight pages of the virtual instrument’s parameters, as shown
below:
Once the “1-8” Soft-Key is pressed, the first Soft-Key (now labeled “1&2”) lets you access the first two pages (press once for
page one; press twice for page two). Similarly, the second, third, and fourth Soft-Keys let you access pages 3-4, 5-6, and 7-8
respectively.
To exit the “1-8” page and return to the standard Instrument view (i.e., “pg1-8,” “Open,” “< Page,” and “Page >” listed along the
bottom of the screen), press the F1 (Mode) button twice.
© 2008 Avid Technology, Inc. All rights reserved. Product features, specifications, system requirements and availability are
subject to change without notice. Avid, M-Audio, HyperControl, and Axiom Pro are either trademarks or registered trademarks of
Avid Technology, Inc. All other trademarks contained herein are the property of their respective owners.
M-Audio USA
M-Audio Germany
Technical Support
Technical Support
Sales
Sales
Web. .
Web. .
. . . . . . . . . . . . . . . . .
. . . . . . . . . . . . . . . .
M-Audio U.K.
M-Audio Canada
Technical Support
Technical Support
Sales
Web. .
Sales
. . . . . . . . . . . . . . .
Benelux
Web. .
. . . . . . . . . . . . . . . . .
Technical Support
Belgium tel. . . . . . . . . . . . . . +32 22 54 88 93
Holland tel . . . . . . . . . . . . . +31 35 625 0097
M-Audio France
M-Audio Japan
エムオーディオ/アビッドテクノロジー株式会社
〒107-0052 東京都港区赤坂 2-11-7 ATT新館ビル4F
Avid Technology K K | M-Audio
4F ATT Bldg 2-11-7 Akasaka, Minato-ku Tokyo 107-0052 Japan
カスタマーサポート(Technical
Support)
Renseignements Commerciaux
セールスに関するお問い合わせ(Sales)
Assistance Technique
Web . .
Web. .
. . . . . . . . . . . . . . . .
. . . . . . . . . . . . . . . . .