1
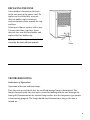
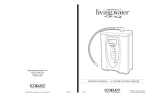
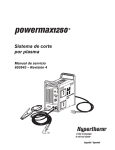
OWNER’S MANUAL
• Application
• Notable Features
• Specifications
• Installation
• Operation
• Maintenance
• Warranty
Eagle 2500 TM
Electronic Air Purification 110 and 220 volt Systems
EcoQuest International®
310 T. Elmer Cox Drive • Greeneville, TN 37743 • 423.638.7246
www.ecoquest.com
CAUTION: read manual carefully for proper procedures and operation.
CONTENTS
Applications . . . . . . . . . . . . . . . . . . . . . . . . . . . . . . . . . . . . . . . . . . . . . . . . . . . . . .
3
Notable Features . . . . . . . . . . . . . . . . . . . . . . . . . . . . . . . . . . . . . . . . . . . . . . . . . .
3
Model Specifications . . . . . . . . . . . . . . . . . . . . . . . . . . . . . . . . . . . . . . . . . . . . . .
3
Principles of Operation . . . . . . . . . . . . . . . . . . . . . . . . . . . . . . . . . . . . . . . . . . . .
4
Pre-Installation / Inspection . . . . . . . . . . . . . . . . . . . . . . . . . . . . . . . . . . . . . . .
4
Ozone Plate/Lint Screen Install . . . . . . . . . . . . . . . . . . . . . . . . . . . . . . . . . . . . .
5
Placing the Unit . . . . . . . . . . . . . . . . . . . . . . . . . . . . . . . . . . . . . . . . . . . . . . . . . . .
6
Setting / Adjusting Controls . . . . . . . . . . . . . . . . . . . . . . . . . . . . . . . . . . . . . . . .
7
Maintenance . . . . . . . . . . . . . . . . . . . . . . . . . . . . . . . . . . . . . . . . . . . . . . . . . . . . .
8
Troubleshooting. . . . . . . . . . . . . . . . . . . . . . . . . . . . . . . . . . . . . . . . . . . . . . . . . . .
9-11
Warranty . . . . . . . . . . . . . . . . . . . . . . . . . . . . . . . . . . . . . . . . . . . . . . . . . . . . . . . . .
12
Please record the serial number of your Eagle 2500:
Serial # __________________________________________________________
Please record the name and phone of your EcoQuest Dealer:
Name ___________________________________________________________
Phone ___________________________________________________________
CAUTION! - Disconnect power cord before servicing.
Use 1.0 AMP slow blow fuse.
CAUTION: Do not operate unit without one or all ozone plate(s) properly
installed. Doing so may void your warranty.
2
Applications
Eliminate
• Smoke
• Odors
• Tobacco Smoke
Plus it works as an appliance to Sanitize an area to Reduce
• Mold • Mildew • Bacteria
For use in your Salon, Home, Apartment, Office, Automobile, Boat... anywhere you
need clean air!
Notable Features
• Compact
• Portable
• No Duct Work Required
• No Chemicals
• Low Maintenance
• Low Electrical Use
• Complete User Control
• No Residual Contamination
• Plugs into 110 (or 220) volt outlet
Specifications
• Positive/Negative Ion Generation Technology
• Ozone Generation
Features:
• Adjustable fan speed control
• Washable permanent lint screen
• Adjustable ozone control
Electrical:
• 120 volt 60 Hz or 220v 50 Hz
• 60 watts power consumption
• 24 to 30 KV, 20-30 khz ion generation pulsator
• 20 KV negative ion generator
Mechanical:
• 350 CFM fan
Size:
• Height: 13 3/4"; Width: 8"; Depth: 9 3/4"
• Weight: 20 pounds
Ozone Output:
• 0-390 mg per hour (dependent on the number of plates installed.)
Warranty:
• 3 years parts and labor (excludes plates) on 110 volt models
• 1 year parts on 220 volt models
3
PRINCIPLES OF OPERATION
Nature cleanses the air with the lightning and rain. Lightning bolts produce ozone,
as well as positive and negative ions which cleanse the air naturally. Rain helps
bring the ozone and ions closer to the earth's surface. They are then attracted to
atmospheric contaminants that are either removed from the air and attached to
grounded objects or are oxidized.
The Eagle 2500 reproduces the natural conditions found in the outdoors. It is not
designed to create an artificial environment. The re-establishment of a natural
environment takes place out in the air, rather than inside the unit. It cleanses the
air, rather than filtering it, masking the symptoms, or attempting to dilute it.
PRE-INSTALLATION AND INSPECTION
1. Remove unit from shipping carton
2. Remove all protective materials
3. Check for shipping damage and loose or broken parts
4. Read Owners Manual thoroughly prior to installation
5. Remove glass plates from the box and install
6. OPTIONAL: Plug the unit into a 110 volt (or 220 volt) outlet, place in shipping box
with unit on and purifier knob set to maximum for at least one hour to remove
traces of manufacturing odor.
7. Determine placement location for the unit, plug the unit into 110 volt (or 220 volt)
outlet and adjust controls according to the application.
Front Grill
Lint Filter
Power
Switch
Ion Control
Ozone Control
4
Fan Control
Power Cord
Fuse
1
OZONE PLATE INSTALLATION
2
The Eagle 2500 utilizes three glass ozone plates.
1. Rotate the lint screen retainers out of the way.
2. Remove the rear lint screen.
3
3. After detemining the square footage, use
the purifier chart to determine the correct
number of plates to install.
4. Fully insert the needed ozone plates (a,b,c)
between the guide-grooves in the top and
bottom of the plate cage (between the posts
and clips) making sure the metal clip on each
side of the plate is in contact with the metal
screen on the plate.
5. Re-install lint screen as shown below.
1
LINT SCREEN INSTALLATION
1. Always install bottom of lint screen first.
2. The white lint screen tab should depress the
safety switch arm towards the front of unit.
3. Fit top of lint screen into
cabinet.
Unit will not operate
if safety switch is not
depressed.
4. Secure with lint
screen retainers.
Lint
Screen
Tab
4
2,3
5
PLACING THE UNIT
Place the unit as high as possible to insure
complete purification.
If raised placement is not available, place
unit as high as possible and elevate front
of unit so fan blows towards ceiling.
Some pollutants, such as smoke, rise and
the unit, when elevated, can oxidize the
pollutants more effectively. A ceiling fan
can also aid in distribution of cleansing
properties.
The Eagle 2500 is most effective when
placed in a position that allows the
ions and ozone to be mixed evenly and
thoroughly with the polluted air.
Suggested locations, listed in the order
of preference:
1. Nearest the source of the worst pollution.
2. Near a cold-air return to thoroughly circulate clean air throughout the area.
3. In the area most heavily used to achieve maximum benefit.
Note:
• For maximum control the unit should be placed where easy access to the controls
is possible.
• The rear of the unit should always have at least one inch of open area to allow
unrestricted airflow.
• Be sure power cord is not accessible to small children to prevent injury.
Caution: This unit should never be placed where it can blow directly into the face
of any person or pet.
6
SETTING AND ADJUSTING CONTROLS
1. FAN CONTROL
The disbursement of cleansing properties is best accomplished with good air
circulation. The fan control should be set as high as reasonably possible without
creating an undesirable noise level. This will be determined by personal preference
and the distance you wish the cleansing properties to be dispersed.
Note: A ceiling fan can also aid in distribution of cleansing properties.
2. OZONE CONTROL
Ozone Control: Set the control at the nine o'clock position for one hour.
Adjust the ozone control up or down after one hour based on the
following criteria:
1. In normal conditions it is not necessary to turn the ozone control indicator
above the square-footage of the environment. (refer to purifier chart, pg.5)
2. Keeping in mind the previous statement (#1), adjust the purifier so that the
odor of ozone fades into the background 15-30 seconds after entering the
environment.
3. SANITIZING AN AREA
To sanitize an approximately 12x12 area
for mold, mildew, or bacteria, turn the
unit on high for 3-4 hours.
Caution: Always be sure a room or area
is UNOCCUPIED before performing the
above described sanitizing procedure.
Air out room by opening door and/or
window.
4. ION CONTROL
The normal setting of a DC ionizer is
full negative. This setting seems to work
best in removing particulate (cigarette
Ozone Control
Fan Control
smoke) as well as reducing static. When
trying to reduce static, if the full negative
setting results in more static, turn the
ion control in small increments towards
the positive until the static is relieved.
Ion Control
7
MAINTENANCE
Periodic maintenance is required to insure that the Eagle 2500 operates properly.
A severely polluted environment can foul an ozone plate in as little as two weeks
or as long as a year. Shown here are basic maintenance procedures that should be
carried out to keep your unit running at top performance.
Rear lint-screen filter cleaning:
You have two options to clean the lint screen:
• When visibly dirty, simply remove the lint screen and with a hand-held vacuum
remove the heavy particulate from the screen. This method will extend the life of
the filter.
- OR • When visibly dirty, remove the lint screen from the back of the unit and wash in
hot water, brushing gently with a toothbrush to remove particulate. Allow to dry
prior to re-installing the lint screen.
Ozone Plate
Carefully remove the glass
ozone plates (a,b & c) from
the card cage by grasping
the middle of the edge
nearest to you, and slowly
pulling straight out.
Clean the ozone plate with
hot water and ammonia.
Dry completely using a hair
dryer if necessary. Reinstall ozone plates. Be sure to check
that the electrical tabs are in contact with the plate.
Plate Card Cage
Also be sure to clean the stand-offs at the corners of
the ozone plate card cage. (A cotton swab with alcohol
works well.)
Fan Blade and Front Grill
Wipe off fan blade and front grill if dirty with damp
washcloth. The fan requires no maintenance (with
the exception of the first time it is used, when it may
be necessary to give it a gentle push to get it started).
If the fan squeaks, a drop of lightweight oil may be
needed on the fan shaft.
8
REPLACING THE FUSE
A fuse holder is located on the back
of the unit next to the power cord. To
replace or check the fuse, unscrew
the fuse holder cap by turning it
counterclockwise then remove the cap
and fuse.
If the fuse is blown, replace with a new
1.0 amp slow blow type fuse. Insert
the new fuse into the fuse holder and
replace the fuse holder cap.
If the fuse holder cap is not installed
correctly, the unit will not operate.
Fuse
TROUBLESHOOTING
Indicators of Operation
Operation of the ion indicator lamp:
Turn the unit on and check that the small red/orange lamp is illuminated. The
lamp is located inside the unit and is viewed by looking into the unit through the
front grill. Illumination of the internal lamp verifies that the frequency type ionizer
is functioning properly. The lamp should stay illuminated as long as the unit is
turned on.
9
Troubleshooting - What to look for first.
1. I have plugged in the unit, turned "ON" the power switch and nothing
happens…what's wrong?
• Make sure the electrical outlet is capable of providing power to the unit.
• Check the lint screen located at the back of the machine to ensure that the
safety switch activator clip depresses the safety switch.
• Check to see if the proper fuse is installed and that it is serviceable.
• Ensure that the fuse cap is completely seated and secured in its receptacle.
2. The fan is operating although the unit won't produce any ozone…what's
wrong?
• Check the ozone plate(s) for serviceability. If they are cracked or broken, the
ozone plate(s) will require replacement. Ensure maintenance procedures
required for the ozone plate(s) have been performed according to the
"Maintenance" section (page 8) of this Owner's Manual. Order new plates
from your Dealer.
• Electrical stainless steel contacts are not contacting the screen portion of the
Ozone plate(s). Inspect the unit for any loose connections.
• Do not attempt to disassemble the unit, due to the Limited Warranty of the
product.
3. How am I able to know if the Frequency-Type Ionizer is working?
• Current models with the FT Ionizer system have a neon light bulb mounted
on the base of the FT antenna. When the power switch to the unit is turned
ON, the neon light bulb will illuminate, indicating that the FT Ionizer is
functioning normally (see page 9, “Indicators of Operation”).
4. The Ozone Plate(s) are making a noise, have a burning smell, and/or appear
to arc or spark. What is the problem?
• Ozone plate is most likely cracked. Refer to the answers for question # 2, as it
would apply to this question also.
5. What are the most typical application problems?
10
• Symptom: A belief that the proper equipment is placed in the environment and
the equipment appears unsuccessful.
Problem: Lack of air movement, improper placement of the unit.
• Symptom: Strong odors still remain with the environment after
placement.
Problem: Lack of ozone, improper placement of the unit.
• Symptom: A strong odor of ozone is present within the environment.
Problem: Too much ozone accumulation within the environment, as a result of
improper purifier control setting, and / or lack of air movement.
• Symptom: Visual haze of smoke and / or particulate remain within the
environment.
Problem: Lack of ionization and / or air movement.
6. Unit does not operate • Is the unit plugged in?
• Are you sure the outlet is active?
• Is the unit turned on?
• Is the rear lint screen installed properly to depress the safety switch forward?
7. Air flow is restricted or reduced • Is the unit properly placed away from objects that may obstruct air flow?
• Are the filter and fan housing clean?
If your unit fails to operate properly after performing trouble-shooting, contact
your EcoQuest Dealer for further assistance, contact us at the address located on
the front of the manual, or visit www.EcoQuestintl.com for additional technical
support.
11
Eagle 2500TM
Electronic Air Purification 110 and 220 volt Systems
WARRANTY INFORMATION
This product is of solid state construction and is warrantied by
EcoQuest International, 310 T. Elmer Cox Drive, Greeneville, TN 37743,
to the original purchaser, to be free from defect in materials and workmanship for
three-years from date of purchase. (220 volt units are warrantied for one year, parts
only.) This warranty excludes ozone plates, which are covered for 90 days from the
same date of purchase.
See warranty card for specific details.
If you have any questions concerning your Eagle 2500 system,
please see your local EcoQuest Dealer.
If your unit is defective, please contact
EcoQuest International, 310 T. Elmer Cox Drive, Greeneville, TN 37743
or visit www.ecoquest.com for technical help.
Did you forget to register your Eagle 2500?
By registering, you’ll activate your warranty, and your privacy is guaranteed.
Just fill out your warranty card and drop it in the mail.
EcoQuest International®
310 T. Elmer Cox Drive
Greeneville, TN 37743
423.638.7246
www.ecoquest.com
65-00064-001
Rev. 10/02