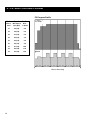
1
The 400T
Owner’s Operating Manual
The 400T measures, monitors, and
motivates your fitness and health.
LT-12396 Rev F
CYBEX International, Inc.
10 Trotter Drive, Medway, Massachusetts 02053 USA
READ ALL INSTRUCTIONS BEFORE USING
GROUNDING INSTRUCTIONS
This treadmill is intended for household use. This treadmill must be grounded. If it should malfunction or
break down, grounding provides a path of least resistance for electric current to reduce the risk of electric
shock. This product is equipped with a cord having an equipment-grounding conductor and a grounding
plug. The plug must be plugged into an appropriate outlet that is properly installed and grounded in
accordance with all local codes and ordinances.
DANGER: Improper connection of the equipment-grounding conductor can result in a risk of
electric shock. Check with a qualified electrician or serviceman if you are in doubt as to
whether the treadmill is properly grounded. Do not modify the plug provided with the
treadmill; if it will not fit the outlet, have a proper outlet installed by a qualified electrician.
This treadmill is for use on a nominal 115 VAC, 60 Hz ±5%, 20 amp (220/240 VAC, 50 Hz ±5%,15 amp)
grounded, dedicated circuit. Make sure that the treadmill is connected to an outlet having the same
configuration as the plug. No adaptor should be used with this treadmill.
IMPORTANT SAFETY INSTRUCTIONS
When using a treadmill, follow these precautions:
Know your treadmill. Read and understand the Owner’s Operating Manual and labels affixed to the
treadmill. Read all instructions before using.
DANGER:
WARNING:
To reduce the risk of electric shock, always unplug this treadmill from the electrical
outlet immediately after using it and before cleaning it.
To reduce the risk of burns, fires, electric shock, or injury:
1. Never leave the treadmill unattended when plugged in and running. After turning off the treadmill,
don’t leave it until it comes to a complete stop. To disconnect, turn all controls to the STOP or OFF
position, and then remove the plug from the outlet. Unplug from outlet when not in use and before
removing or installing parts.
2. Keep close supervision of the treadmill when it is used by or near children, invalids, or disabled
persons.
3. Use the treadmill only for its intended use, as described in this manual. Do not use attachments
not recommended by the manufacturer.
4. Never operate the treadmill if it has a damaged cord or plug, if it is not working properly, or if it has
been dropped or damaged. Return for service or have treadmill serviced by a qualified technician.
5. Keep the cord away from heated surfaces and sharp edges.
6. Never drop or insert any objects into any opening or any moving part of the treadmill. Keep hands,
hair, and loose clothing and towels away from the running belt area.
7. Do not use outdoors.
8. Do not operate where aerosol (spray) products are being used or where oxygen is being used.
9. All repairs, electrical or mechanical, should be attempted only by trained repair personnel. Contact
the nearest authorized CYBEX dealer or other competent repair service. Use only CYBEX
replacement parts; any other may create a hazard.
10. To disconnect, turn all controls to the STOP or OFF position, and then remove the plug from the
outlet. Connect this treadmill to a properly-grounded outlet only. See Grounding Instructions.
Save These Instructions
PREFACE
This manual is written for use in North America, the United Kingdom,
and other English-speaking areas. For your convenience, all
measurements and voltage requirements are listed in both English and
metric units. English values are listed first, followed by metric units in
parentheses. For example: 1 in. (2.54 cm).
Before you assemble your 400T, you should check to make sure it is
the right model and has the correct voltage requirements for your area.
To check for the correct model and voltage requirements, locate the
end of the power cord where it connects to the base of the machine.
As you face the machine, the power cord attaches at the rear left side,
near the On/Off (I/O) switch. The voltage requirements are printed on a
label placed to the left of the power cord.
If you are a resident of North America (U.S.A. or Canada), the voltage
requirements for this unit are 115 VAC, 60 Hz, and 20 amps.
If you are a resident of the U.K. or Europe, the voltage requirements on
the label should read 220/240 VAC, 50 Hz, 15 amps.
Do not attempt to use this unit with a voltage adaptor.
Warning: Changes or modifications to this unit not expressly
approved by the party responsible for compliance could void the
user’s authority to operate the equipment.
Note: This equipment has been tested and found to comply with the
limits for a Class B digital device, pursuant to Part 15 of the FCC Rules.
These limits are designed to provide reasonable protection against
harmful interference in a residential installation. This equipment
generates, uses, and can radiate radio frequency energy and, if not
installed and used in accordance with the instructions, may cause
harmful interference to radio communications. However, there is no
guarantee that interference will not occur in a particular installation. If
this equipment does cause harmful interference to radio or television
reception, which can be determined by turning the equipment off and
on, the user is encouraged to try to correct the interference by one or
more of the following measures:
• Reorient or relocate the receiving antenna.
• Increase the separation between the equipment and receiver.
• Connect the equipment into an outlet on a circuit different from
that to which the receiver is connected.
• Consult the dealer or an experienced radio TV technician for help.
© 1999 CYBEX INTERNATIONAL, INC.
All rights reserved. Printed in USA
NOTE: For European customers only.
TABLE OF CONTENTS
1 INTRODUCING THE 400T
Treadmill Exercise and Fitness
Treadmill vs. Other Forms of Exercise
The 400T Design
Historical Background
Special Features of the 400T
3
4
5
5
6
2 SETUP & ASSEMBLY
Choosing and Preparing a Site
Electrical Power Requirements
Unpacking
Assembling the 400T
8
8
8
9
3 GETTING STARTED
Starting the 400T
Setup Mode
Programmed Workouts
P1 Manual Mode:
Creating A Personal Workout
Saving Your Personal Workout As P6
Switching from Manual to Program Mode
% Grade vs. Degrees of Incline
12
14
15
16
18
18
18
4 PROGRAMMED WORKOUTS
Selecting a Programmed Workout
Stopping a Programmed Workout
Pausing a Programmed Workout
Changing a Programmed Workout
Changing Level in a Programmed Workout
Saving a Modified Program
Scanning Workout Data
P1 Manual and P6 Saved Program Modes
P2 Speed Challenge Program
P3 Cardiovascular Program
P4 Weight Loss Program
P5 Fitness Test Program
20
21
22
22
23
23
23
24
25
27
29
31
5 MAINTENANCE
Preventive Maintenance
Running Belt/Deck Maintenance
Running Belt Adjustments
Service Schedule
33
34
34
36
6 TROUBLESHOOTING
Service Reminders
Error Codes
Diagnostic Tests
Customer Hotline
Returned Goods Authorization (RGA)
Damaged Treadmill or Parts
37
39
42
48
48
49
1
1 / INTRODUCING THE 400T
8
1 / INTRODUCING THE 400T
Congratulations and thank you for purchasing the CYBEX 400T
programmed treadmill. The 400T combines the latest treadmill
technology with superior operation to help you achieve your
personal fitness goals, whether they are to train for specific sports,
condition your cardiovascular system, or just feel better in your
daily activities.
The 400T is simple to operate and program. It combines high
performance with convenience and safety. The digital readouts on
the 400T provide real-time feedback on the status of your program
and your level of exertion. You always know how you are doing at
each stage of your workout.
If you improve your health,
you reduce the risk of certain
chronic degenerative diseases.
If you improve your
fitness, you can
perform moderate to
vigorous activity
without undue fatigue.
Treadmill Exercise and Fitness
Exercise on a CYBEX treadmill is one of the best ways to improve
your health, your physical fitness, and your well-being. It is
recommended by many of today’s leading physicians, fitness
spokespersons, and authorities. A combined program of regular
physical exercise, sufficient rest, and sound nutrition is the best
way to improve your health, increase your resistance to disease,
and expand your physical capacity and mental alertness.
The CYBEX treadmill not only helps you improve your health, but it
is also your key to physical fitness. As the American College of
Sports Medicine (ACSM) has pointed out in a recent position
statement, there is a distinction between an individual’s overall
health and physical fitness. If you exercise only to improve health,
you can “reduce the risk of certain chronic degenerative diseases”
but you won’t improve your endurance or your ability to perform
activities throughout your life. Whereas, fitness is “the ability to
perform moderate to vigorous levels of physical activity without
undue fatigue and the capability of maintaining such ability
throughout life.”
Total physical fitness means something different for each person’s
body. Each time you exercise, you have to be receptive to the
level of exercise your body can handle. The ACSM recommends
that an individual perform some aerobic activity 3 to 5 days per
week to sustain the heart rate at 60% to 90% of its maximum
capacity. This recommendation covers a wide range of activities
and you may find it difficult to determine just how much and how
hard you should exercise. Your CYBEX 400T treadmill contains a
unique self-evaluation program that helps you determine your level
of cardiovascular fitness. You use the self-evaluation program not
only to determine where to begin your exercise program but also
to help you evaluate your progress.
3
1 / INTRODUCING THE 400T
One goal of physical fitness is a healthier heart that gets
progressively stronger. It doesn’t matter how young or old you are,
if you exercise regularly without overdoing it, your heart rate will
improve. Your resting pulse may also go down, which means that
your heart isn’t working as hard for even your most mild daily
activities. A stronger heart also means that you must exercise more
vigorously to attain the recommended 60%-90% of its capacity.
The 400T programs include several levels of difficulty for each
programmed workout. You will never outgrow your CYBEX
treadmill’s ability to challenge your fitness goals.
Treadmill vs. Other Forms of Exercise
The American Heart Association states
that regular aerobic physical activity
plays a significant role in preventing
heart and blood vessel disease.
With a CYBEX 400T in your home or office, you can exercise daily,
at whatever time is most convenient for you. You don’t have to
worry about traffic or weather conditions. In the clean air of an
inside environment, you won’t be bothered by car fumes, city
smog, or unstable walking/running surfaces. With a CYBEX
treadmill in the home or office, you can also exercise in privacy. You
can watch television, listen to music, dictate business letters, or
simply enjoy the satisfaction of a solitude that’s dedicated to
fitness.
The advantages and benefits of a treadmill:
• Real-time Results — See the total calories burned and distance
achieved immediately and accurately
• Control — Choose your own program of exercise to set the pace
• Safety and Comfort — Walk or run on a smooth, stable, and flat
running surface
• Cardiovascular Exercise — Help your heart function more
efficiently, increase bone density to help fight osteoporosis, and
minimize strain on your back and spine
• Convenience — Exercise any time you want, 24 hours a day
The programs included with your CYBEX treadmill are designed to
improve one or more of the following aspects of your workout:
• Speed
• Duration
• Intensity
If your workout includes running and you enjoy training for road
races, you may be interested in the programs CYBEX offers to
increase your speed. Speed gains in running are difficult to achieve
since it is often difficult to maintain a consistently fast pace
throughout a workout and at the same time push yourself just a
little to realize speed gains. The CYBEX treadmill helps you set a
challenging pace and gives you a chance to stretch your limits,
without overdoing the workout.
4
1/ INTRODUCING THE 400T
If your workout includes walking or jogging, you may be interested
in improving the duration of your workout, or your ability to
exercise for longer periods of time without stress. For example, you
may now be able to walk for 2 miles and would like to be able to
walk 4 or more miles for exercise. This kind of exercise is ideal if
you are interested in weight reduction or in maintaining your current
physical condition.
Interval training combines aerobic
exercise to strengthen your heart with
anaerobic exercise to improve muscular
performance.
CYBEX 400T features include:
• Four programmed workouts
designed to meet the guidelines set
forth by the American College of
Sports Medicine
• Ability to create and store your own
personal workouts
• User-friendly digital display to
measure and monitor your workout
• Smooth, cushioned running surface
• Open front to accommodate the
longest stride
• Over twenty-five years of treadmill
manufacturing experience
• Large worldwide dealer, sales, and
service network
• Customer Service Hotline number:
Call 888-462-9239 in North America.
Dial 508-533-4300 or
Fax 508-533-5183 in all other areas.
If the goal of your workout is to improve your cardiovascular
system and your ability in sports, you may be interested in the
programs that vary the intensity of exercise. Some of the
CYBEX programs vary exercise intensity through a process called
interval training. Interval training improves fitness by incorporating
anaerobic with aerobic exercise. Aerobic activity strengthens your
heart and lungs, and anaerobic activity improves muscular
performance.
The 400T Design
All CYBEX treadmills are strong, solid, and well-engineered. The
body of each CYBEX is a welded, one-piece chassis of 12-gauge
(.254 cm thick) steel. The body has no frame nuts and bolts to
shake loose; you won’t hear any rattles or other unnecessary noise
during your workout. Powered by a strong, quiet, and durable 2horsepower, continuous duty rated DC motor, the 400T will give
you years of carefree operation with low maintenance.
The CYBEX 400T is safe, comfortable, and easy to use. Its
cushioned handgrips and wide, impact-absorbing running deck
ensure your comfort during a workout. The wide-open front surface
design lets you run or walk forward freely, at any speed or incline.
The handgrips of the 400T are out of the way, yet remain easily
accessible, when and if you need them. Running belt guards
prevent towels or loose clothing from catching at points where the
rollers and belt meet.
Historical Background
The use of treadmills is not new; they actually date back to preRoman times. More recently, William Cubitt, an Englishman, is
credited with the invention of the first modern treadmill, in 1817, as
a device to grind grain.
As a means of personal exercise, however, the use of the treadmill
is relatively new. On-going discoveries of the benefits of this form
*If a Polar® compatible heart rate transmitter is worn.
5
1 / INTRODUCING THE 400T
Programmed workouts are designed
in accordance with the American
College of Sports Medicine
recommendations.
of exercise and recent dramatic changes in the availability of
special features and advances in electronic design have greatly
increased its popularity and use in commercial fitness centers and
in the home.
With each succeeding generation of treadmills, CYBEX has
improved the performance and increased the level of automation.
As the 400T demonstrates, CYBEX’s new goals are to combine the
latest in state-of-the-art electronics and microprocessor design
with ease of use and comfort. CYBEX’s experience of over twentyfive years in the fitness industry means that not only is your CYBEX
the finest treadmill available today, but that we will be there
tomorrow to answer any of your questions and to provide support
throughout the life of your machine.
With all new electronics, this
generation of CYBEX treadmills
measures, monitors, and
motivates you like never before.
The two digital displays report
your incline in % grade, speed,
elapsed time (or the time
remaining, if in a program),
distance, calories burned, pace in
minutes, seconds, calories
burned per hour and heart rate.*
It’s like having a personal trainer
to encourage you toward better
health and fitness.
Special Features of the 400T
The 400T improves upon the design and performance of its
predecessors. CYBEX has improved and streamlined the features
and functions of earlier units to address the needs of today’s
fitness enthusiast in the 400T.
Whatever your regimen, you can set your own pace with a CYBEX
400T. Walk or run at the speed and incline you choose. Hit the hills
when you’re ready and cool-down on the flats. Eliminate kneejamming downhill runs. Vary the speed, time, distance, and incline
from day to day; increase workout length and difficulty; or repeat
the same routine each day. You decide because your treadmill is
programmable.
The 400T gives you true training capabilities, including a warm-up
period before the main workout and a cool-down period after, in
accordance with the American College of Sports Medicine
recommendations.
*If a Polar® compatible heart rate
transmitter is worn.
The 400T includes a choice of programs to meet specific, individual
fitness and conditioning goals, whether they be weight loss,
cardiovascular conditioning, speed training, or basic body
maintenance.
Fig. 1-1: Display Panel
6
2 / SETUP & ASSEMBLY
Display Panel
Console
Handgrip
Front Roller Cover
Console
Support
Bars
Foot Pad
Running Belt
Running Belt Tension Bolts
Base
(Chassis)
Assembly
7
2 / SETUP & ASSEMBLY
Specifications
Overall Length:
Overall Width:
Running Area Length:
Running Area Width:
Weight:
Programs:
Levels of Difficulty:
Manual Mode:
Speed Range:
Incline Range:
Chassis Construction:
Deck Material:
Electrical Voltage:
Operating Frequency:
Power Requirement:
Outlet Requirement:
Circuit Requirement:
Plug Configuration:
69 in. (175 cm)
30 in. (76 cm)
52 in. (132 cm)
18 in. (46 cm)
250 lb. (113 kg)
4 preset, 1 custom
9 per program
Yes
1.0 to 10.0 mph
(1.6 to 16.1 kph)
0 to 12% grade
12-gauge uni-welded steel
Wax-coated wood
115 VAC (220/240 VAC)
60 Hz (50 Hz)
20 amp (15 amp)
Grounded
Dedicated
NEMA #5-15 (CEE 7/7)
Setting up your 400T is simple and easy. Before you unpack the
machine, however, be sure to select a suitable site and have the
proper electrical outlet power available for optimum 400T
operation and safety.
Choosing and Preparing a Site
The area you select for the 400T should be well-lit and wellventilated. Locate the 400T on a structurally sound and level
surface a few feet from walls or furniture. If the 400T is to be
located above the first floor, place it near or above major support
beams. If the area has a heavy, plush carpet, the air flow around
the base of the machine may be restricted or the carpeting may
interfere with the moving parts. To protect the carpeting and the
machinery, you can place a 3¼4 inch (1.9 cm) thick wood base
under the 400T.
Do not install the 400T in an area of high humidity, such as in the
vicinity of a steam room, sauna, or indoor pool. Exposure to
extensive water vapor and/or chlorine could adversely affect the
electronics as well as other parts of the machine.
A comfortable environment will help you enjoy your exercise
routine and give you additional motivation to continue.
Electrical Power Requirements
The CYBEX 400T requires a standard 115 VAC, 60 Hz, 20 amp
(220/240 VAC, 50 Hz, 15 amp) grounded outlet on a dedicated
circuit. Contact your electrician if you have any doubts about your
electrical service.
Do not use a ground plug adaptor to adapt the 3-prong power
cord plug to a nongrounded electrical outlet. We do not
recommend the use of an extension cord.
Unpacking
Unpack and remove the treadmill from its shipping container.
Check for the following parts and tools (see Figure 2-1):
Base (chassis) assembly
Control panel console
Console support bars (2)
Owner’s Operating Manual
Warranty & Registration Card
Button-head screws (1/2” long) for the front roller cover (4)
Button-head screws (3/4” long) for the top of the support bars (4)
Nuts (1/2” Hex) for the bottom of the support bars (8)
Allen wrenches (Hex key), 3/16”, 5/32”
Fig. 2-1: Carton contents
8
Front roller cover
If any of these parts are missing from your package, contact your
CYBEX dealer at once.
2 / SETUP & ASSEMBLY
Additional Tools
In addition to the Allen wrenches shipped with the treadmill, a few
common household tools will be required to assemble the treadmill:
1. Phillips head screwdriver
2. 1/2” open end or socket wrench or adjustable wrench
3. 3/4” open end or socket wrench or adjustable wrench
Assembling the 400T
To ensure correct assembly of the 400T, carefully read and follow
these steps:
1. Identify the left and right side console support bars (they are not
interchangeable) and locate their screw holes on the top and
bottom. The holes mark the inner surface of the bars and will face
inward (toward the center of the treadmill) when they are set into
place. The outer surface of each bar has a long, plastic insert.
2. The plastic inserts are fastened to each support bar by two
Phillips head screws. Remove the screws and slide the inserts up
the bars about 10”.
3. On the right side of the treadmill base, locate four threaded bolts.
Pick up the right support bar and insert the bolts through the
corresponding holes in the bar. The top front edge of the support
bar should be higher than the rear edge. (If the rear edge is
higher, the left support bar is on the right side.) Thread the four
Fig. 2-2a: Threading the console control cable
1/2” hex nuts over the bolts and finger tighten them. Use a 1/2”
wrench to secure the nuts and the right support bar to the
treadmill base.
4. Repeat the above step for the left support bar.
5. Slide the long, plastic insert on the right bar back over the
support bars and into position. Secure with two Phillips head
screws. The left insert should remain up for the following
assembly steps.
6. Pick up the control panel console and gently lower it into position
on top of the support bars. Place the two steel tabs (with the two
threaded screw inserts) on the top of the support bars. Thread the
wire cable and its connector through the left support bar (Figure
2-2a) and down to the base of the treadmill (Figure 2-2b), being
careful not to pinch the cable between the console and the bar.
Fig. 2-2b: The console control cable
7. Plug the pin connector (male) into its receptacle (female) from the
relay box end. Note that the connector is made so that it will fit
into the receptacle in only one direction. To insure good electrical
contact, push the pin connector in until it clicks.
8. Slide the long, plastic support bar insert down into place and
secure it to the base with two Phillips head screws.
9. Slide the control panel console into place on the support bars.
Insert four 3/4” button-head screws through the holes in the
9
2 / SETUP & ASSEMBLY
console and bars and tighten the console securely to the bars
using the 3/16” Allen wrench (included).
10. Place the front cover into position on the front of the treadmill.
Insert the four 1/2” button-head screws through the holes in the
cover and screw them into the base using the 5/32” Allen
wrench (included). Tighten them securely.
Checking the 400T
Use the following instructions to test the full speed and incline
range of the treadmill and check the belt for proper operation.
1. Without anyone on the treadmill, plug the power cord into a
power outlet from a 115 VAC, 60 Hz, 20 amp (220/240 VAC, 50
Hz, 15 amp) grounded, dedicated electrical circuit.
2. Locate the On/Off (I/O) power switch on the lower left side of
the treadmill chassis (Figure 2-5). Turn it to the On (I) position to
bring power to the internal treadmill components.
Fig. 2-3: Location of relay box
3. The control panel continuously displays the prompt message
PRESS START when the treadmill is dormant with the On/Off
(I/O) power switch turned On (I) and the treadmill power cord
plugged in. (CYBEX recommends that the treadmill be
unplugged or the On/Off (I/O) power switch turned Off (O) when
it is not in use.)
4. Press START/ENTER to enter the Program Select Mode.
5. Upon entering the Program Select Mode, the center window
lights to prompt the user to press the appropriate keys to
change the program and/or level. The display shows “- +
PROGRAM and ▼▲ LEVEL.” After 5 seconds, the PRESS
START message will begin to flash.
Fig. 2-4: Relay box
6. Press START/ENTER to accept the default program, 1. Manual
mode. The treadmill begins a countdown in both display
windows, “3...2...1,” and sounds a tone for each count. After it
reaches one (1), the treadmill gives a steady tone, and then
starts accelerating the belt to reach 1 mph (1.6 kph).
7. The left display will flash the incline set point of 0% grade and
the right display will flash the speed set point of 1.0 until the
treadmill reaches these settings, at which time the values will
stop flashing and remain steadily illuminated.
8. Press and hold down the SPEED + key until the treadmill
reaches a speed of approximately 4 mph (6.4 kph), as indicated
on the display.
Fig. 2-5: On/Off (I/O) power switch
9. Observe the belt to see that it is running properly: it should stay
centered in the middle of the deck. If you have problems with
the running belt operation, see Chapter 5, Running Belt
Adjustments.
10. Run the treadmill through its full speed range. First press the
SPEED + key until the treadmill reaches its highest speed, 10
10
2 / SETUP & ASSEMBLY
mph (16.1 kph). Then press the SPEED – key until the treadmill
is back to 1.0 mph (1.6 kph).
As you press the INCLINE or SPEED increase or decrease keys,
the left display will flash the selected incline and the right display
will flash the selected speed. The control panel will continue to
flash these settings as the treadmill “seeks” to reach the
selected incline and/or speed values.
When the treadmill reaches the set incline and speed, the
displays will stop flashing and remain steadily illuminated to
indicate that the desired settings have been reached.
11. Run the treadmill through its full % grade range. Press the
INCLINE ▲ key until the treadmill reaches its highest grade
(12%). Then press the INCLINE ▼ key until the treadmill is
back to 0% grade.
12. Press STOP three times to stop the running belt, end the
checkout session, and return the display to dormant
mode (with continuous display of the PRESS START
prompt message).
Your treadmill is now ready for use. Follow the instructions in the
next chapter to learn how to operate the treadmill. You should
begin with walking speeds first, to be sure everything is
functioning properly.
11
3 / GETTING STARTED
CAUTION: DO NOT STAND
DIRECTLY ON THE RUNNING
BELT WHEN STARTING THE
TREADMILL. PLACE YOUR FEET
ON THE TWO SIDE FOOTPADS.
Using your treadmill is meant to be a pleasant experience. Before
starting, however, make sure that you always keep the following
safety concerns in mind:
• As with any fitness program, have your physician or other health
care professional determine your capacity for exercise and
proceed accordingly. If you have been physically inactive for some
time, a complete physical examination is advisable.
• Begin your exercise program gradually and only increase the
duration and intensity of the exercise as your capacity improves.
• Observe the precautions associated with aerobic exercise,
specifically with regard to warm-up and cool-down periods,
overexertion, target pulse rate, recovery pulse and breathing rates.
• Never continue to exercise if you feel any abnormal symptoms or pain.
• Do not wear loose clothing that can get caught in the running belt.
• Never use the treadmill with the front roller cover removed.
• Keep hands, feet, fingers, clothing, and towels away from the
moving belt and rollers while making adjustments or performing
alignment procedures.
• Always disconnect the power cord while cleaning the treadmill or
making repairs.
Starting the 400T
Follow the steps below to start up and turn off the 400T, particularly
if this is the first time you have used a treadmill:
Fig. 3-1: Place feet on footpads when
starting running belt.
1. Plug the treadmill power cord into a power outlet from a 115 VAC,
60 Hz, 20 amp (220/240 VAC, 50 Hz, 15 amp) grounded,
dedicated circuit.
2. Locate the On/Off (I/O) power switch on the lower left side of the
treadmill chassis (next to the power cord and the treadmill
identification plate). Turn it to the On (I) position to bring power to
the internal treadmill components and illuminate the display
panel.
3. Mount the treadmill from the rear and place your feet on the two
footpad areas located on the top of the chassis to each side of
the running belt (Figure 3-1).
CAUTION: DO NOT STAND DIRECTLY ON THE RUNNING BELT
WHEN STARTING. HOLD ONTO THE HANDGRIPS.
4. Press START/ENTER to enter the Program Select Mode.
12
5. Upon entering the Program Select Mode, the center window
lights to prompt the user to use the appropriate keys to change
the program and/or level. The display shows “- + PROGRAMS”
and ▼▲ LEVEL. After 5 seconds, if no key has been pressed,
the PRESS START message will begin to flash. After 20
seconds, if no key has been pressed, the treadmill will return to
the dormant mode.
3 / GETTING STARTED
6. Press the + key pad four times to advance through the
program choices until P5 (the Fitness Test) is displayed in the
right window. In Chapter 4 you will learn how to select the
other programs available with the 400T.
Press the ▼▲ key pad until L1 (Level 1) appears in the display
window. Chapter 4 also explains how to determine which level
you should use for a workout.
Press START/ENTER to accept Program 5, Level 1.
The treadmill begins a countdown in both display windows,
“3...2...1,” and sounds a tone for each count. After it reaches
one (1), the treadmill gives a steady tone, and then starts
accelerating the belt, to reach 1.5 mph (2.4 kph).
7. The left display will flash the incline set point of 0% grade, and
the right display will flash the speed set point of 1.5 (2.4), until
the treadmill reaches these settings, at which time the values
will stop flashing and remain steadily illuminated.
8. After the treadmill has run for a few seconds, the center
window lights to prompt the user to press the appropriate keys
to change the user weight.
The center display shows “USE - + TO SET WEIGHT.”
The right display flashes the default weight of 160 lb. (73 kg).
Use the - and + keys to adjust the weight number displayed in
the right window to reach your current weight. The 400T
accepts weights from 50 to 400 lb. (23 to 182 kg).
(If after five seconds no key has been pressed to adjust the
weight display, the treadmill will accept 160 lb. (73 kg) as the
default weight and revert to the run mode.)
After adjusting the weight display, the center display windows
will flash the instruction “PRESS START.”
Press the START/ENTER key to accept your new weight
reading and revert to the run mode. The treadmill uses your
weight, speed, and % grade to determine how many calories
you burn during a workout.
(If you do not press the START/ENTER key within three
seconds of changing the weight value, the treadmill will
automatically accept your new weight value and revert to the
run mode.)
9. You could step onto the running belt and start with this
program. For now, though, press STOP three times to turn off
the display.
13
3 / GETTING STARTED
Setup Mode
The 400T’s Setup mode allows you to configure the four following
features:
1. Memory Retention Mode
2. Metric/English Measurement Units
3. Programs On/Off Mode
4. Time Limits (in Manual mode, only)
5. Pause On/Off Mode
The description of each feature, as well as the procedure to access
the Setup mode, is listed below:
Note: The Setup mode can be accessed only while the treadmill is in
the dormant mode, i.e., the On/Off switch must be turned On (I) and
the treadmill belt must not be moving.
To enter the Setup mode, press and hold the SHIFT key for three
seconds. The left and right display windows will illuminate. The left
display window will show the status of the memory retention mode
as either “on” or “oFF.” The right display window will show the
status of the measurement units, “E” for English or “nn” for metric.
To advance to the Program On/Off mode, press the SHIFT key once
after entering the Setup mode. The left display window will indicate
the status of the Program On/Off mode as either “P on” or “Poff.” If
“Poff” is selected, the right display window will indicate the time
limit setting in minutes.
To advance to the Pause On/Off mode, press the SHIFT key once again.
The left display window will indicate the status of the Pause On/Off
mode as either “on” or “oFF.” The right window will display, “PAUS.”
1. Memory Retention Mode
The memory retention mode feature remembers the last program
number, program level and weight setting used.
Memory Retention On: When this feature is enabled (“on”), the 400T
uses your last program values as the new default program, level, and
weight, replacing P1 and 160 lb. (73 kg) as the standard defaults. The
memory retention feature is convenient, if you consistently use the
same program routine, because it allows you to quickly start the
treadmill by simply pressing START twice. The stored default values
are automatically entered from the last workout.
Additionally, the memory retention mode allows you to review your
last program, program level, maximum grade, maximum speed,
calories burned (CAL) and DISTANCE run, by pressing the SHIFT
key when in the dormant mode.
14
Memory Retention Off: Setting the memory retention mode feature
to “oFF” resets the 400T defaults to the standard values. The
standard program default is P1 (Manual Mode) and the standard
default weight setting is 160 lb. (73 kg). You can toggle the Memory
Retention mode “on” and “oFF” by using the ▲ and ▼ keys.
3 / GETTING STARTED
2. Metric/English Measurement Units
This feature allows you to display speed, distance, and weight in
either English or metric units of measurement. You can toggle between
the “E” for English or “nn” for metric by using the - and + keys.
3. Programs On/Off Mode
The programs on/off mode can be used to prevent or “lock out” the
use of the 400T’s programs. When “P on” is selected, the programs
are enabled and there is no time limit set. The right display window
will not be illuminated. When “Poff” is selected the programs are
turned off and they are not available for use. The 400T can only be
run manually. To toggle between “P on” for programs on and “Poff”
for programs off, use the ▲ and ▼ keys.
4. Time Limits (in Manual mode, only)
Time limits can be set on the use of the treadmill in the manual
mode if the programs on/off mode is set to “Poff.” The right display
window will indicate the time limit setting, in 5 minute increments,
from 5 to 995. The number of minutes for the time limit setting can
be changed by using the + and - keys.
Note: Time limits can only be set when programs are deactivated,
“Poff” in the Programs On/Off Mode. Time limits can not be set
when programs are activated, “P on” in the Programs On/Off Mode.
5. Pause On/Off Mode
The pause on/off mode can be used to turn the pause function on
or off. When “on” is selected, the pause function is enabled for a
pause time of 5 minutes. When “oFF” is selected, the pause
function is turned off and not available for use. To toggle between
“on” and “oFF” use the ▲ and ▼ keys.
Programmed Workouts
As mentioned earlier, the 400T contains a manual mode of
operation, four programs that automatically change the speed
and/or incline at preset intervals, and a memory location (P6) that
allows you to store your own custom workout program. All of these
programs are listed to the left of the control panel and are fully
explained in Chapter 4, Programmed Workouts. Chapter 4 also
outlines how to select each of these programs, how to modify
them, and how to save program modifications. The program
choices are summarized as follows:
P1
Manual
You control speed, elevation, and time.
P2
Speed Challenge
9 Levels
30 Minutes
P3
Cardiovascular
9 Levels
30 Minutes
P4
Weight Loss
9 Levels
45 Minutes
P5
Fitness Test
9 Levels
20 Minutes
P6
Saved Program
You control speed, elevation, and time.
15
3 / GETTING STARTED
P1 Manual Mode: Creating A Personal Workout
If you design your own program, be
sure to include a 3 to 5 minute warm-up
and cool-down.
In addition to the four programmed workouts included with the
400T, you can also create your own workout by manually changing
the speed and/or incline as you exercise. You increase or decrease
the speed and incline settings, using SPEED + and – and INCLINE
▲ and ▼. You can even create a workout to mimic a route you
normally run or walk outside.
When you design your own program, be sure to include a 3 to 5
minute warm-up and cool-down period. You can warm up by
setting a slow speed for walking/jogging on the treadmill at zero
incline and then gradually increase the speed to the target for your
workout. Reverse this process for your cool-down period, slowing
down the speed gradually and returning the incline to zero.
Follow the steps below to create your personal workout:
CAUTION: ALWAYS PLACE YOUR FEET
ON THE TWO SIDE FOOTPADS WHEN
STARTING THE TREADMILL.
1. Make sure the treadmill is plugged in and turned on (the On/Off
(I/O) switch is in the On (I) position).
2. Mount the treadmill from the rear and place your feet on the
footpad areas (Figure 3-1). Hold onto the support grips, if needed.
3. The control panel continuously displays the prompt message
PRESS START when the treadmill is dormant, with the On/Off
(I/O) power switch turned On (I) and the power cord plugged in.
(CYBEX recommends that the treadmill be unplugged or the
On/Off (I/O) power switch turned Off (O) when the treadmill is not
in use.)
4. Press START/ENTER to enter the Program Select mode.
5. Upon entering the Program Select mode, the center window
lights to prompt the operator to use the appropriate keys to
change the program and/or level.
The display shows “- + PROGRAMS” and “▼▲ LEVEL.”
After 5 seconds, the PRESS START message will begin to flash.
6. Press START/ENTER to accept the initial default program, P1
Manual mode. The treadmill begins a countdown in both display
windows (“3...2...1”) and sounds a tone for each count. When it
reaches one (1), the treadmill gives a steady tone, and then starts
accelerating the belt to reach 1 mph (1.6 kph).
Note: The default program can be changed by the user to the
program of his/her choice. See memory retention mode earlier in
this chapter.
7. The left display will flash the incline set point of 0% grade, and
the right display will flash the speed set point of 1.0 until the
treadmill reaches these settings, at which time the values will
stop flashing and remain steadily illuminated.
16
8. After the treadmill has run for a few seconds, the center window
lights to prompt the operator to use the appropriate keys to
change the user weight.
3 / GETTING STARTED
The center display shows “USE - + TO SET WEIGHT.”
The right display flashes the default weight of 160 lb. (73 kg).
Use the - and + keys to adjust the weight number displayed in the
right windows to your current weight. The 400T accepts weight
from 50 to 400 lb. (23 to 182 kg).
(If after five seconds no key has been pressed to adjust the weight
display, the treadmill will accept 160 lb. (73 kg) as the default
weight and revert to the run mode.)
After adjusting the weight display, the center display window will
flash the instruction “PRESS START.”
Press START/ENTER to accept your new weight reading and revert
to the run mode. The treadmill uses your weight, speed, and %
grade to determine how many calories you burn during a workout.
(If you do not press the START/ENTER key within 3 seconds of
changing the weight display, the treadmill will automatically accept
your new weight value and revert to the run mode.)
9. Press + to increase the speed and ▲ to increase the % grade.
The left display will flash the incline % grade selected, and the
right display will flash the speed selected, until the treadmill
reaches these settings. Once the settings have been reached, the
values will stop flashing.
Use SPEED + - and ▲▼ INCLINE any time during your workout
to increase and decrease your speed and % grade. The display
will reflect your changes.
10. When you want to interrupt the program, press STOP to pause.
The running belt will stop and % grade will decline to 0%. The
treadmill will pause for up to five minutes. Press the START key to
return to your workout at any time within the 5-minute pause period.
11. Don’t forget to allow yourself a 3 to 5 minute cool-down period.
Press STOP twice to end the session. The speed and % grade
return to 0.0.
As you exercise, the 400T keeps track of your speed, % grade,
calories burned per hour, the accumulated number of miles you
cover, the amount of time you have spent (or have left) in a program,
the total calories burned, your pace, and your hear rate.* You can
review this data any time during the workout.
To review accumulated data, during a program: Press SHIFT once to
review each set of data. Each time you press SHIFT, the display
cycles to the next set of data that you wish to monitor, as follows:
Display 1
% GRADE
and SPEED
Display 2
TIME
and DISTANCE
Display 3
CAL
and PACE (in minutes and seconds)
Display 4
CAL/HR
Heart rate* (in beats per minute)
*If a Polar® compatible heart rate transmitter is worn.
17
3 / GETTING STARTED
To review accumulated data, after a program: Press SHIFT to
activate a display sequence showing the total calories burned,
distance traveled and total time.
To cycle continuously through available data during a program:
Press and hold down SHIFT for 2-3 seconds. The treadmill
shows each set of data, cycling to the next set every 3 seconds.
To stop the display on the current data, press SHIFT once.
Saving Your Personal Workout As P6
To save your personal workout for later use (or any program you
create either in P1 Manual Mode or by modifying a programmed
workout, P2–P6), press the START key after pressing STOP
twice, or at any time during the 20-second workout review at
the end of a program.
If the custom program is saved, the display will beep to confirm
the save. The new custom workout will be saved as Program 6
(P6). If an earlier custom program was already saved in the P6
location, it will be replaced by the new program.
Switching from Manual to Program Mode
Switching to a programmed workout (P2–P6) while in the P1
Manual Mode is easy. Press START/ENTER to enter the
Program Select Mode and follow the instructions from this point
for selecting a programmed workout in Chapter 4.
Relationship between % grade
and degrees of incline.
% grade
Degrees of incline
1
0.57
2
1.15
3
1.73
4
2.30
5
2.87
6
3.45
7
4.01
8
4.59
9
5.16
10
5.74
11
6.31
12
6.88
18
% Grade vs. Degrees Of Incline
A 1% grade is not the same as a 1 degree incline.
The % grade is the relationship of the measurement of rise over
the measurement of run (also called slope). For example, a 1
foot (meter) rise in height over a length of 100 feet (meters) is a
1% grade. Expressed as a mathematical formula, the grade is
calculated as follows:
1 ft. (m) / 100 ft. (m) = 0.01 = 1%
With respect to treadmills, the percent grade is roughly equal to
the increase in height (rise) of the treadmill divided by the length
(run) of the treadmill.
The degree of incline, or the angle of the treadmill, is calculated
by a different mathematical formula: the arctangent of the grade
(or slope).
4 / PROGRAMMED WORKOUTS
4 / PROGRAMMED WORKOUTS
The 400T is one of the most advanced personal fitness treadmills
available. With the 400T, you choose from four different programs, all of
which have 9 levels of difficulty, for a total choice of 36 different
preprogrammed options. With this unique combination of programs, you
can tailor your workout to achieve exactly the fitness goals you desire:
weight loss, conditioning, endurance, or maintenance of overall health.
Selecting a Programmed Workout
1. Turn the On/Off (I/O) switch to the On (I) position.
CAUTION: DO NOT STAND
DIRECTLY ON THE RUNNING
BELT WHEN STARTING THE
TREADMILL. PLACE YOUR FEET
ON THE TWO SIDE FOOTPADS.
2. Mount the treadmill and place your feet on the footpads (Figure
3-1). Do not stand directly on the running belt.
3. Press START/ENTER to enter the Program Select Mode.
4. Upon entering the Program Select Mode, the center window
lights, prompting you to press the appropriate keys to change
the program and/or level.
The center display shows “- + PROGRAMS” and “▼▲ LEVEL.”
If no key has been pressed after 5 seconds, the “PRESS
START” message will begin to flash.
If no key has been pressed after 20 seconds, the treadmill will
return to the dormant mode.
5. Use the – or + key pad to select a programmed workout.
6. Use the ▼▲ key pad to select the level for the program.
Adjustable, programmed
workouts let you tailor your
exercise program to fit your
personal fitness goals.
Note: The program entry screen will display the program level number
(L#), followed by a flashing number representing maximum grade for
this program/level and the program number (P#), followed by a
flashing number representing maximum speed for this program/level.
7. Press START/ENTER to accept your program and program level.
8. The treadmill begins a countdown in both display windows,
“3...2...1,” and sounds a tone for each count. After it reaches one (1),
the treadmill gives a steady tone and begins accelerating the belt.
9. The left display flashes the program’s initial incline % grade set
point, and the right display flashes the program’s initial speed set
point. Once the treadmill reaches these set points, the values
stop flashing and remain steadily illuminated. After the initial
warm-up period, the belt speed and incline will automatically
change as prescribed by the program. The 400T sounds a tone
before each change.
10. While holding onto the handgrips, carefully step onto the
running platform to begin the program. After you have walked
on the treadmill for a while and are used to the feel of the
moving belt, you can gradually let go of the handgrips and walk
or run normally.
11. After the treadmill has run for a few seconds, the center window
lights to indicate which keys should be used to change the user
weight and display reading.
20
The center display shows “USE - + TO SET WEIGHT.”
4 / PROGRAMMED WORKOUTS
The right display flashes the default weight, 160 lb. (73 kg).
Use the - and + keys to adjust the weight displayed in the right
window. The 400T accepts weights from 50 to 400 lb. (23 to
182 kg).
If no key has been pressed after 5 seconds, the treadmill will accept
160 lb. (73 kg) as the default weight and revert to the run mode.
12. After adjusting the weight display, the center display window
will flash “PRESS START.”
Press START/ENTER to accept your new weight and revert to the
run mode. The treadmill uses your weight, speed, and % grade to
determine how many calories you burn during a workout.
If you do not press the START/ENTER key within 3 seconds of
adjusting the weight value, the treadmill automatically accepts
your new weight and reverts to the run mode.
At the end of the program, the speed and incline gradually
decrease to 0.0 and the 400T displays a review of your
accumulated performance data.
The left control panel window display cycles between total calories
burned and total workout time in five second intervals.
The right control panel window displays total workout distance.
The review data is displayed for 20 seconds, and then the 400T
returns to the dormant mode.
Note: If the memory retention mode is enabled “on” (see Chapter
3), pressing SHIFT from the dormant mode will also allow you to
review the data from your last workout. The program level and
maximum grade will be displayed in the left control panel window.
The program number and maximum speed will be displayed in the
right control panel window (for 3 seconds). Then calories burned
and distance run will be displayed (for 3 seconds) before the
treadmill returns back to the dormant mode.
Stopping a Programmed Workout
If you don’t feel able to complete an entire workout, you can stop
the treadmill at any time. Don't forget to allow yourself a 3 to 5
minute cool-down period if you leave the program before it is
complete. After you stop, you can review your progress so far, or
you can reset the treadmill values.
To stop a programmed workout: Press STOP twice. The treadmill
slows the belt speed and incline to 0.0. The display shows a review
of your accumulated performance data.
The left control panel window display cycles between total calories
burned and total workout time in five second intervals.
The right control panel window displays total workout distance.
The review data is displayed for 20 seconds, and then the 400T
returns to the dormant mode.
21
4 / PROGRAMMED WORKOUTS
Note: If the memory retention mode is enabled “on” (See Chapter
3.), pressing SHIFT from the dormant mode will also allow you to
review the data from your last workout.The program level and
maximum grade will be displayed in the left control panel window.
The program number and maximum speed will be displayed in the
right control panel window (for 3 seconds). Then calories burned
and distance run will be displayed (for 3 seconds) before the
treadmill returns back to the dormant mode.
Pausing a Programmed Workout
As you go through your workout, you may have a brief interruption
or you may want to take a break. The 400T has a pause feature,
“PAUS,” that freezes the current program for up to 5 minutes. With
this feature, you can return to your stopping point at any time
during that 5-minute period and resume your workout.
Note: The pause mode can be turned
off, if desired, by entering the setup
mode. See Chapter 3, Getting Started.
To pause the treadmill: Press STOP once. The speed and elevation
return to 0.0 and the program is frozen. A countdown of the time
remaining in the pause mode is displayed in the left window. During
the last 30 seconds of the countdown, the display flashes the
message “PRESS START.”
To return to the same place in your program: At any time during the
pause mode (up to 5 minutes), press START/ENTER to resume the
workout.
Changing a Programmed Workout
During a programmed workout, you may find you want to change
the speed or incline to make the program easier or more difficult.
You do not have to start the program over again to make these
modifications.
To increase or decrease speed: Press SPEED + or – during a
program.
To increase or decrease incline: Press INCLINE ▲▼ during
a program.
Any manual changes you make to the speed and/or incline during a
programmed workout affect only the current segment of that
program (2 to 5 minutes). At the beginning of the next segment, the
program returns to its preset values.
Multiple changes in speed and/or incline made within a one-minute
segment will not be retained in memory. Only the changes in effect
at the end of the one-minute segment will be saved.
Note: The numeric displays for speed and incline reflect any
changes you make. If you save the program changes as P6: Saved
Program, the new speed and incline values will be incorporated the
next time P6 is selected.
22
4 / PROGRAMMED WORKOUTS
Changing Level in a Programmed Workout
During a programmed workout, you may want to change to an
easier or more difficult level. You do not have to begin the program
again to change levels.
To change a program level: Press START/ENTER to display the
current program and level status information.
Press the ▼ or ▲ key to select a new program level.
The level change will occur immediately. The program will continue
from the point when the ▼ or ▲ key was pushed, and it also
continues to accumulate performance data without interruption.
Saving a Modified Program
If you make speed or incline modifications during a program, you
may want to save your changes so that you can repeat that same
workout again. You can save that custom program in location P6:
SAVED PROGRAM. You can create a custom program by modifying
a programmed workout or by creating your own workout from
scratch. See Chapter 3 for more information about creating a
personal workout from scratch.
To save a programmed workout you have modified: After you
complete the workout, press START/ENTER during the program
review (within 20 seconds of completing the program), a tone will
sound, and the 400T will save your custom program in location P6:
SAVED PROGRAM.
Note: If a program already exists at P6, the new program will replace it.
After you save a program, select it using the same procedure described at the beginning of this chapter for selecting other programs.
That is, use + and – until the display shows the program number
(P1 to P6) you wish to select.
Scanning Workout Data
*If a Polar® compatible heart rate transmitter
is worn.
As you exercise, the 400T keeps track of your % grade, speed, the
amount of time you have spent (or have left) in a program, the
accumulated distance you have covered in miles (km), the total
calories burned, your pace, the number of calories burned per hour,
and heart rate.*. You can review this data any time during the workout
or during the 20-second review sequence following your workout.
To review accumulated data, during a program: Press SHIFT once
to review each individual set of data. Each time you press SHIFT
the display cycles to the next set of data that you wish to monitor.
To review accumulated data, after a program: Press SHIFT to
activate a display showing total calories burned, distance travelled
and total time.
To cycle continuously through available data during a program:
Press and hold down SHIFT for 2–3 seconds. The display shows
each set of data for 3 seconds before switching to the next set.
To stop the display on the current data, press SHIFT once.
23
4 / P1: MANUAL MODE AND P6: SAVED PROGRAM MODE
For an explanation of P1 Manual Mode and P6 Saved Program
Mode see Chapter 3, Getting Started.
24
4 / P2: SPEED CHALLENGE PROGRAM
The P2 Speed Challenge Program is a 30-minute, high-intensity
walking workout designed to improve your cardiorespiratory
system and increase your muscle workload capability. P2 uses
changes in intensity to exercise your body at near maximum
capacity for short time intervals. If you are training for road races or
other high-energy sports, the P2 program will help you shave
minutes off your race times.
P2 is designed to push you to the
limit to improve your walking speed.
Program Profile
The P2 Program consists of an initial 8-minute warm-up of
relatively mild increases and decreases in both speed and incline.
This is followed by a series of four 5-minute super-intervals,
consisting of one steady incline and a substantial increase in
speed.
Each of these four intervals lasts for 5 minutes: 2 minutes at the
high speed followed by 3 minutes at a 30% speed slow down to
allow you to “catch your breath” before increasing the speed once
again.
At the time of the speed increase, your walking speed increases to
approximately 12% faster than your P5 peak speed at your
maximum P5 grade. At the end of the four super-intervals, a 2minute cool-down period slows the treadmill and returns to 0%
grade.
Choose a level that reflects your fitness level as determined in the
P5 Fitness Test program.
Program Results
The P2 Speed Challenge program is one of the most challenging
work-outs offered by your 400T. It is designed to push you to the
limit to improve your walking speed.
If you are just starting your fitness walking program, this workout
may be too much for you. In that case, you can cut your P2
workouts short at any point until you feel comfortable completing
the full 30-minute workout. Don’t forget to allow yourself a 3 to 5
minute cool-down period if you leave the program before it is
complete.
Even one P2 workout a week strengthens the cardiorespiratory
system, enabling your muscles to accept higher workloads and
thus increase your normal walking speed.
25
4 / P2: SPEED CHALLENGE PROGRAM
P2 Program Profile
Maximum Speed and Incline
Fitness
Level
Max. Speed
mph (kph)
Max.
% Grade
L1
2.8 (4.5)
4.0
L2
3.4 (5.5)
5.0
L3
3.7 (5.8)
6.0
L4
3.9 (6.3)
7.0
L5
4.2 (6.8)
8.0
L6
4.5 (7.2)
9.0
L7
5.1 (8.2)
10.0
L8
5.6 (9.0)
11.0
L9
6.2 (9.9)
12.0
% Grade
Speed
30
25
20
15
Minutes Remaining
26
10
5
0
4 / P3: CARDIOVASCULAR PROGRAM
The P3 Cardiovascular Program is a 30-minute workout that
uses high-intensity, aerobic exercise to strengthen the heart
muscle, stressing the heart at about 70% to 85% of its
maximum pumping rate.
Program Profile
P3 gives you a complete
cardiovascular workout geared to
your workout level.
The P3 Program consists of an initial 4-minute warm-up
segment of relatively mild increases in speed and incline. This is
followed by a 12-minute segment of automatic increases in
speed and % grade. During this time the program reaches its
maximum intensity.
The next 10-minute segment is “all downhill” as the speed
begins to slow and the % grade gradually decreases.
A final 4-minute segment serves as the cool-down period. The
treadmill slows down and the incline returns to 0% grade.
Choose a level that reflects your fitness level as determined in
the P5 Fitness Test program.
Program Results
The P3 Cardiovascular Program is designed to keep your
metabolism high for most of the 30-minute workout. For 71% of
the time (22 out of the 30 minutes) you are working at an
intensity level averaging approximately 93% of your maximum
P5 performance workload. If you are just starting your fitness
walking program, this workout may be too much for you. In that
case, you can cut your P3 workouts short at any point until you
feel comfortable completing the full 30-minute workout. Don’t
forget to allow yourself a 3 to 5 minute cool-down period if you
leave the program before it is complete.
Three P3 workouts per week, with 48 hours of recovery time in
between each session (e.g., Tuesday, Thursday, and Saturday),
are sufficient to maintain good cardiovascular conditioning.
The P4 Weight Loss Program is a 45-minute walking workout
designed to help you lose weight. In this program, weight loss is
based on the length of time you exercise. Exercising at a lower
27
4 / P3: CARDIOVASCULAR PROGRAM
P3 Program Profile
Maximum Speed and Incline
Fitness
Level
% Grade
Max. Speed
Max.
mph (kph) % Grade
L1
2.5 (4.0)
4.0
L2
3.0 (4.8)
5.0
L3
3.2 (5.1)
6.0
L4
3.5 (5.6)
7.0
L5
3.8 (6.1)
8.0
L6
4.0 (6.4)
9.0
L7
4.5 (7.2)
10.0
L8
5.0 (8.0)
11.0
L9
5.5 (8.8)
12.0
Speed
30
25
20
15
Minutes Remaining
28
10
5
0
4 / P4: WEIGHT LOSS PROGRAM
P4 is designed for weight
reduction.
intensity allows you to handle a longer duration and distance
workout and thus burn more calories. With other lifestyle factors
remaining the same (such as diet), simply adding the P4 workout
to your schedule should result in weight loss because of the
increase in calories burned.
You could alternate this program with any of the other 400T
programs to combine weight reduction and fitness training.
Program Profile
The P4 Program consists of an initial 6-minute warm-up of
relatively mild increases in speed and incline. This is followed by
five 7-minute segments (35 minutes total), during which speed
remains constant and the % grade changes to simulate hill
profiles.
Near the end of each 5-minute segment, the % grade
automatically increases to the maximum % grade for that “L”
level. For example, if the current grade is 6% and the maximum
is 8%, the 400T will increase to 8% grade for 2 minutes and
then return to 6% grade for another 5-minute segment. The
speed remains constant during the entire period. This is
equivalent to walking at a constant speed on a series of 5 rolling
hills. It is these hills that help you burn extra calories and more
fat by providing a “metabolic spike” as your workload increases
during the periods of maximum incline.
A 4-minute segment at the end of the program serves as a cooldown period. The treadmill slows down and the incline returns
to 0% grade.
Choose a level that reflects your fitness level as determined in
the P5 Fitness Test program.
Program Results
The P4 Weight Loss Program is designed to keep your
metabolism high for most of the 45-minute workout. For 77% of
the time (35 out of the 45 minutes) you are working out at a level
averaging approximately 85% of your maximum P5
performance workload.
If you are just starting your fitness walking program, this
workout may be too much for you. In that case, you can cut
your P4 workouts short at any point until you feel comfortable
completing the full 45-minute workout. Don’t forget to allow
yourself a 3 to 5 minute cool-down period if you leave the
program before it is complete.
Three to four P4 workouts per week, in conjunction with other
400T programs performed on alternate days, will ensure that
29
4 / P4: WEIGHT LOSS PROGRAM
P4 Program Profile
Maximum Speed and Incline
Fitness
Level
% Grade
Max. Speed
Max.
mph (kph) % Grade
L1
2.2 (3.5)
4.0
L2
2.6 (4.2)
5.0
L3
2.8 (4.5)
6.0
L4
3.1 (5.0)
7.0
L5
3.3 (5.3)
8.0
L6
3.5 (5.6)
9.0
L7
3.9 (6.2)
10.0
L8
4.4 (7.0)
11.0
L9
4.0 (7.7)
12.0
Spee
45
40
35
30
25
20
Minutes Remaining
30
15
10
5
0
4 / P5: FITNESS TEST PROGRAM
you remain active on a daily basis. This is the ideal way to
schedule your weight loss program for maximum results.
The P5 Fitness Test Program is a 20-minute walking workout
designed to test your aerobic walking capacity. It is the guide by
which you determine which fitness “L” level is best suited to
your current performance capability and physical condition.
If you successfully complete the 20-minute test at a certain
fitness level (L1...L9), you are capable of training in the other
programs (P2, P3, and P4) at that same “L” level number.
In addition to providing the key to your current “L” level status,
the P5 program can be used at any time as an excellent
cardiovascular conditioning workout. P5 provides a relatively
long and gradual warm-up period of increasing speed and
incline and a 5 minute cool-down period at the end. The middle
portion of the program brings you to a fairly high percentage of
maximum heart rate at the peak workload point in the program
(minute 12 to minute 15).
To take your heart rate:
• Keep moving on the treadmill.
• Place the first two fingers of your right hand on
your neck, just under your jaw and to the right
of your Adam’s apple.
• Press in slightly until you feel a pulse.
• Count the number of beats you feel for 15
seconds.
• Multiply the number of beats by 4 to get your
heart rate per minute.
Use the chart below to determine your target
heart rate:
Approx.
Maximum
85% Heart Rate
Age
Heart Rate (Should be less than)
20
200
170 beats per minute
30
190
162 beats per minute
40
180
153 beats per minute
50
170
145 beats per minute
60
160
136 beats per minute
70
150
128 beats per minute
Program Profile
The P5 Program consists of five 3-minute segments (15 minutes
total) and one 5-minute cool-down segment. At the end of each
3-minute segment, both the SPEED and the GRADE of the
treadmill increase.
When the fifth segment begins (12 minutes into the workout), you
are at the maximum workload point in the program. The final 5minute segment (beginning at minute 16) serves as a cool-down
period when the treadmill slows down and returns to 0% grade.
Choose a level that realistically reflects your fitness level and
begin your fitness test. Do NOT begin at L9 and work your way
down. If you have been relatively inactive for some time, start at
level L1 to L3.
Program Results
To pass your P5 Fitness Test successfully:
• You must complete the entire program without any major
pains or discomfort.
*Your heart rate will be displayed on the 400T
control panel in beats per minute if you wear
a Polar® compatible transmitter chest strap.
• You must feel that you could carry on a conversation with
someone standing nearby during the entire 20-minute program.
• You must feel that you could have continued the fifth interval
(the most difficult interval) even if it was increased from its 3minute time period to a 10-minute time period.
• Your heart rate* did not exceed 85% of its maximum
capability, immediately after the maximum workload interval
(fifth segment) or exactly 15 minutes into the program.
If you are unable to complete the P5 workout at your current “L”
level, drop back one “L” level and try again in a day or so. If you
31
4 / P5: FITNESS TEST PROGRAM
are able to complete the P5 workout with no strain at all, increase
your “L” level one number and repeat the fitness test in 24 hours.
If you are just able to complete the P5 workout and realize that
the next highest “L” level is out of your reach, you have found
your true “L” fitness level.
The 400T is designed to help you set goals and measure your
progress. The key is to evaluate your fitness level “L” and to reevaluate it periodically at different stages of your training. Most
importantly, the fitness test tells you precisely which “L” level is
P5 Program Profile
Maximum Speed and Incline
Fitness
Level
Max. Speed
mph (kph)
Max.
% grade
L1
2.5 (4.0)
4.0
L2
3.0 (4.8)
5.0
L3
3.2 (5.1)
6.0
L4
3.5 (5.6)
7.0
L5
3.8 (6.1)
8.0
L6
4.0 (6.4)
9.0
L7
4.5 (7.2)
10.0
L8
5.0 (8.0)
11.0
L9
5.5 (8.8)
12.0
% Grade
Speed
20
15
10
Minutes Remaining
32
5
0
5 / MAINTENANCE
CAUTION: TO PREVENT ELECTRICAL
SHOCK, BE SURE THAT POWER IS
SHUT OFF AND THE TREADMILL IS
UNPLUGGED FROM THE ELECTRICAL
OUTLET BEFORE PERFORMING ANY
CLEANING OR MAINTENANCE
PROCEDURES.
Your CYBEX 400T is a high-quality machine that is built to last.
Many CYBEX products are still in daily use twenty years after the
original date of their manufacture. Although no one can guarantee
that your 400T will last that long, one thing is certain — simple
routine cleaning and a preventive maintenance program go a long
way toward extending the life of your fitness equipment.
Preventive Maintenance
WARNING: Do not spray cleaning
solution directly on the treadmill. Direct
spraying could cause damage to the
electronics and may void the warranty.
CAUTION: To prevent electrical shock, be sure that power is
shut off and the treadmill is unplugged from the electrical
outlet before performing any cleaning or maintenance
procedures.
Use the Service Schedule on page 36 and the following routine to
help insure your treadmill’s long life:
Preventive maintenance — routine
cleaning of the 400T reduces the
chance of wear.
Cleaning — wipe up any perspiration or
dirt that accumulates during use.
After each use
Wipe up any liquid spills immediately. After each workout, use a
damp cloth to wipe up any remaining perspiration from the
handrails and painted surfaces.
Be careful not to spill or get excessive moisture between the edge
of the display panel and the console, as this might create an
electrical hazard or cause premature failure of the electronics.
When cleaning your treadmill spray a mild cleaning solution on a
clean cloth first, and then wipe the treadmill with the cloth.
Cleaning the Treadmill
Vacuum any dust or dirt that might accumulate under or around the
400T. Motors are especially susceptible to dust and dirt, and a restricted
airflow can prevent adequate cooling that could shorten motor life.
To clean the motor components, you must remove the plastic front
roller cover. Remove the four 1/2-inch button-head screws (one on
each side and two in the front) that hold the cover in place, using
the 5/32-inch Allen wrench included with your treadmill. Lift the
cover and put it and the screws aside. Use a vacuum attachment or
hand vacuum to clean the exposed elevation assembly and the
surrounding areas.
Also use a cloth for the areas that you can’t reach with the vacuum
cleaner. If the machine has not been used for some time or is
excessively dirty, use a cloth to wipe all exposed areas. Replace the
cover and screws when finished.
With the help of another person, pick up the treadmill from the rear and
stand it on its front end, bringing the front console to rest on the floor.
Vacuum and clean the underside of the 400T to prevent dust and
dirt build-up. Again, a cloth may be required if it appears
excessively dirty or dusty. When finished, return the treadmill to its
normal position.
33
5 / MAINTENANCE
Running Belt/Deck Maintenance
The running belt and deck will need to be cleaned and the belt may
need minor adjustments. Use the following two sections to keep
your 400T operating properly.
Cleaning the Belt and Deck Surfaces
To minimize the effect of friction between the wood deck and the
running belt, we recommend cleaning the underside of the running
belt and the top of the running deck surface by wiping them with a
clean dry towel. This simple procedure should be done to prevent
premature wear of the deck, running belt, and the drive motor system.
Running Belt Adjustments
You may need to adjust the running belt after the first few weeks of
use. All running belts are properly set at the factory, but they may
stretch or become off-center after use. Stretching is normal during
the break-in period, and before long, your belt will reach its optimal
length.
When you set up the 400T, you checked for the proper tension and
centering of the belt. The following section describes how to adjust
the belt tension. If you adjust the tension during the first few weeks,
you should do so on an “as needed” basis (i.e., if you experience
belt slippage or hesitation).
The second section below describes how to center the belt.
Because each person runs or walks differently, the natural weight
shifts may cause some deflection of the running belt to either the
left or right of center during use. The directions in the second
section tell you how to return the belt to center.
Adjusting the Belt Tension
If the belt feels as though it is “slipping” or hesitating when you
plant your foot during a run, the tension on the running belt may
have to be increased.
To increase the running belt tension:
1. Locate the two large, steel, 3/4-inch hex head bolts at the rear of
the treadmill (see Figure 5-1). These are called belt tension bolts.
2. Place a 3/4-inch open end or socket wrench (or adjustable
wrench) on the left belt tension bolt. Turn the wrench clockwise
1/4 turn to draw the rear roller toward you and increase the belt
tension.
Fig. 5-1: Running belt tension bolts
3. Repeat step 2 for the right belt tension bolt. You must be sure to
turn both bolts the same number of turns so that the rear roller
will stay square relative to the frame.
4. Start the running belt and check to see if the “slipping” has been
corrected.
34
5. Repeat steps 2 and 3 until the slipping is eliminated.
5 / MAINTENANCE
CAUTION: BE CAREFUL NOT TO
OVERTIGHTEN THE RUNNING BELT
TENSION. OVERTIGHTENING CAN
CREATE EXCESSIVE PRESSURE ON THE
FRONT AND REAR ROLLER BEARINGS,
CAUSING PREMATURE ROLLER
BEARING WEAR AND/OR FAILURE.
To decrease the tension on the running belt, turn both bolts
counter-clockwise the same number of turns. Set the bolt
tension so that your last 1¼4 turn removes the apparent belt
slippage and/or hesitation.
Centering the Running Belt
When you run, you may push off harder with one foot than the
other. This deflection can cause the belt to move off-center. The
severity of the deflection depends on the amount of force that
one foot exerts in relation to the other. This deflection is normal
and the running belt will often return to the center of the deck if
the weight distribution becomes more balanced or if the running
belt has a chance to reseat itself with no one on it. If the belt
remains consistently off-center, however, you will need to center
the belt manually.
Note: Before centering the belt, make sure it has the proper
tension. Refer to the previous section, “Adjusting the Belt
Tension,” for more information. Also, the machine should be run
at the speeds indicated without anyone on the belt.
To move the belt back to center:
1. Start the treadmill and press SPEED + until the speed is
approximately 4 mph (6.4 kph), as indicated on the display.
2. Locate the two large, steel 1/4-inch hex head bolts at the rear
of the treadmill (see Figure 5-1).
3. Observe whether the belt is running more towards the right or
left side of the deck.
If the belt appears to be moving to the left:
Using a 3/4-inch wrench (or an adjustable wrench), turn the
left bolt clockwise 1/4 turn (to your right). Wait for one minute
for the results of this adjustment to take effect. This action
moves the belt to the right and back to center.
If the belt appears to be moving to the right:
Using a 3/4-inch wrench (or an adjustable wrench), turn the
left bolt counterclockwise 1/4 turn (to your left). Wait for one
minute for this action to take effect. This action moves the
belt to the left and back
to center.
4. If the belt is still not centered, repeat step 3 until it is.
5. After the belt is centered, increase the speed of the belt to 10
mph (16.1 kph) by pressing SPEED + and verify that the belt
is running smoothly. Repeat step 3 as necessary.
If the above procedure is unsuccessful in resolving belt wander,
you may need to increase the belt tension. See the previous
section, “Adjusting the Belt Tension,” for more information.
35
Odometer Reading in
Miles (Km)
100 (162)
250 (402)
500 (805)
750 (1207)
1000 (1609)
1250 (2012)
1500 (2414)
1750 (2816)
2000 (3219)
2250 (3621)
2500 (4023)
2750 (4426)
3000 (4828)
3250 (5230)
3500 (5633)
3750 (6035)
4000 (6437)
4250 (6840)
4500 (7242)
4750 (7644)
5000 (8047)
5250 (8449)
5500 (8851)
5750 (9254)
6000 (9656)
6250 (10058)
6500 (10461)
6750 (10863)
7000 (11265)
C
Service Schedule
he
ck
Va R
cu unn
u
in
C md gB
he
eb
e
ck
ris lt &
t
M
h
ea e c insi Ten
de
su
u
s
re rre
ho ion
C
n
M
he
od /Tr
ot t dr
ck
aw co ack
or
ve
Lu de
a
ck Bru
ra sn
br
sh
ic
n
w
d eed
at
ea
Le
R
cl
e
r
ep
ng
ea ed
El
ev
la
th
n
ce
tre
a
ad
th tion
e
m
R
ill
un
ni
ng
Be
lt
5 / MAINTENANCE
X
X
X
X
X
X
X
X
X
X
X
X
X
X
X
X
X
X
X
X
X
X
X
X
X
X
X
X
X
X
X
X
X
X
X
X
X
X
X
X
X
X
X
X
X
X
X
X
115V Unit Max Current Draw, Displayed at 3.0 MPH, walking on it => 18 Amps at 0% Grade
220V Unit Max Current Draw, Displayed at 3.0 MPH, walking on it => 10 Amps at 0% Grade
Minimum brush length, as measured from top of 'box' shape to the bottom: 0.438 (7/16") (1.1 cm)
Running belt should not noticeably slip when loaded at 3.0 MPH.
If so, tighten each rear bolt 1/4 turn clockwise and retest.
Replace deck at 14000 miles (22,530 Km)
36
6 / TROUBLESHOOTING
The CYBEX 400T is equipped with the
most sophisticated service diagnostics
available in any treadmill today.
The cause of most operating problems is usually easily seen,
detected, and repaired. If the cause of a problem is not obvious, it is
important to follow a logical process of checking each component in
the system. The authorized CYBEX dealer network and our
Customer Service Department can provide this kind of assistance.
We are there to help resolve any problem you may have with your
treadmill, for as long as you own it. We can provide you with
troubleshooting guidance or provide a service technician to repair
your treadmill, should that be necessary.
The CYBEX 400T is equipped with the most sophisticated service
diagnostics available in any treadmill today. The 400T has three
distinct and complementary areas of service information.
Service Reminders
These prompts occur at preset mileage intervals and advise you to
check a specific area of the treadmill. If you take the preventive
maintenance action associated with the prompt, you can help
lengthen the useful life of the treadmill and minimize maintenance
problems. See Service Schedule on page 36.
Error Codes
These codes notify you of a problem condition and provide a measure
of safety by stopping the treadmill. The codes also help to indicate
the part of the treadmill most likely to be causing the problem.
Diagnostic Tests
These tests display status information about the treadmill to help
you isolate the cause of a problem or to monitor accumulated
usage data. Some of the tests also give quantitative information
(e.g., voltage and current readings) to help you further evaluate the
machine’s condition.
The next three sections describe these messages and tests in more
detail and give you some suggestions for action.
Service Reminders
nn 1: Clean Treadmill
nn 2: Check Current Draw
nn 3: Check Motor Brushes
nn 4: Check Deck Wear
nn 5: Lubricate Elevation
The treadmill displays one of the above service reminders after you
have accumulated a specific number of miles on the treadmill.
These prompts never interrupt your current workout. If you reach a
target mileage service reminder (for example, 500 miles/800 km)
during a workout, you will be able to complete the workout
normally. On the next start-up, the treadmill displays the
appropriate maintenance prompt.
37
6 / TROUBLESHOOTING
A stylized letter “m” (nn) will be displayed in the left window, and the
maintenance prompt number will be displayed in the right window.
The maintenance prompt will be displayed for two seconds before
each start of the treadmill, until the prompt is cleared. The prompt can
be cleared by entering the diagnostic mode, test 12. See page 47.
nn 1: Clean Treadmill
This message appears every 500 miles (805 km).
See Chapter 5 for information on cleaning the treadmill. Proper
cleaning will help improve air circulation, eliminate excessive heat
buildup in and around the drive and elevation motor assembly, and
reduce wear on the motors.
nn 2: Check Current Draw
This message appears every 1,000 miles (1609 km).
This can be done in the diagnostic mode, test d3. Check the current
draw at 3 mph (4.8 kph) and with a load of approximately 180 lb. (82
kg) on the treadmill. At this speed and load, the treadmill has a
maximum allowable current limit of 14 amps @ 115 VAC or 8 amps
@ 220 VAC. If you check the current draw at regularly scheduled
intervals, you can spot trends in the motor’s performance. If the
current draw is above or nearing the allowable limits, there may be
a drive component that is not performing properly, which could
compromise the integrity of the rest of the treadmill’s drive system.
If the current draw is above or nearing the above limits, call your
local CYBEX dealer or call CYBEX for the name of a service
representative near you.
nn 3, nn 4, and nn 5
The maintenance suggested by the next three messages (nn 3, nn
4,
and nn 5) should be performed by a qualified CYBEX treadmill
repair technician. If you see any of these messages, contact your
local authorized CYBEX dealer or CYBEX Customer Service for
help.
nn 3: Check Motor Brushes
This message appears every 2,000 miles (3219 km).
Under normal circumstances, the drive motor brushes will last in
excess of 5,000 hours. This message reminds you to check the
brushes at routine intervals for any signs of abnormal wear.
Any arcing, pitting, or burning of the brushes, or a brush that is less
than half its original length (7/8”), indicates the need for brush
replacement. The tightness of the brush cap and brush holder mount
in the drive motor housing should also be checked at this time.
38
6 / TROUBLESHOOTING
nn 4: Check Deck Wear
This message appears every 2,500 miles (4023 km).
The treadmill running deck should be checked routinely for signs of
wear. Any signs of abnormal deck wear, such as excessive
furrowing, scraping, cracking, fissures, or burnt or insufficient wax,
may indicate the need for deck replacement.
The front and rear rollers should also be checked for any signs of
build-up of wax or other foreign materials and cleaned if necessary.
Note: Maintenance instructions relative to nn1 also apply at this mileage.
nn 5: Lubricate Elevation
This message appears every 5,000 miles (8047 km).
The elevation jack screw should be lubricated to assure proper
performance. First remove any old grease and accumulated dirt
from the jack screw using a clean, dry cloth. Next, use lithium
grease to lubricate the screw; lithium grease can be purchased
from a hardware store or appliance repair shop. Apply the new
lubricant liberally, using a small bristle brush to help spread the
lubricant in and around the screw threads.
Proper lubrication will help the jack screw turn smoothly, reducing
wear on the elevation drive motor system.
Other Service Recommended
In addition to the above five service reminders, Cybex
recommends that a qualified Cybex treadmill repair technician
should rotate the deck and replace the running belt at 7,000 miles
(11265 km). There are no service prompts for these.
Error Codes
ERR 1:
ERR 2:
ERR 3:
ERR 4:
ERR 5:
ERR 6:
ERR 7:
NO SPEED SIGNAL AT STARTUP
EXCESSIVE CURRENT DRAW
LOSS OF SPEED SIGNAL
NO FREQUENCY LOCK
ELEVATION ERROR
OVERSPEED
LOSS OF NOVRAM
If you have a problem that interrupts an important operational area
of the treadmill, you may see one of the above error codes
displayed in the control panel. If an Error Code is generated during
operation, the treadmill’s drive motor will stop. In order to restart
the treadmill, the Error Code must be cleared by cycling the power
to the machine by switching the ON/OFF switch to “OFF” for 5
seconds and then switching it back “ON” again. Should a message
reappear soon after cycling off, then on again, report the problem
to your dealer or to CYBEX Customer Service.
39
6 / TROUBLESHOOTING
ERR 1: NO SPEED SIGNAL AT STARTUP
This error code usually occurs only during start-up and indicates
that the computer in the control panel is not receiving any indication
of motor speed.
To isolate the source of this problem, you need to determine
whether the drive motor tried to start up and did rotate or whether it
never came on at all.
If the drive motor (and running belt) rotates, even if only for a
second or so, the error code usually indicates that the speed sensor
on the drive motor is too far away from the sensor gear on the drive
motor shaft. To reduce the gap between the two, move the speed
sensor closer to the sensor gear teeth, approximately a business
card’s width away.
If the speed sensor positioning is adequate, the speed sensor could
have a poor, loose, or intermittent connection to the control panel.
Check these connectors and also look for loose, short, or pushed in
pins in the DDM cable connectors. If these connections are all in
good condition, the error code could indicate a defective main
program chip in the control panel.
If the drive motor (and running belt) does not rotate at all, the zero
miles per hour motor speed always triggers an ERR 1 code. The
problem is either in the drive motor assembly itself or in the voltage
supply to the motor from the relay box.
Check the SCR module in the relay box for adequate input and
output voltages. The input voltage at pins AC1 and AC2 should read
approximately 115 VAC. The output voltage at the screw terminals
(+) and (–) should spike to approximately 130 VDC (@ 120
VAC/60Hz) or 260 VDC (@ 220/240 VAC/50Hz) at the end of the
countdown sequence.
If any of these voltage conditions are not present, the drive motor
will not activate. Check for any signs of obvious loose connections
and call CYBEX Customer Service for further troubleshooting
advice, if needed.
If the voltages are correct, the drive motor assembly itself is suspect.
Check for any signs of obvious loose connections at the drive motor,
capacitor, and choke. Check the drive motor brushes for any signs of
abnormal wear. Any arcing, pitting, or burning of the brushes, or a
brush that is less than half its original length of 7/8,” indicates the need
for brush replacement. The tightness of the brush cap and brush
holder mount in the drive motor housing should also be checked.
40
ERR 2: EXCESSIVE CURRENT DRAW
This error code usually occurs after the treadmill has started and
indicates that the treadmill is using much more power than normal.
This code is usually caused by problems in the drive motor brush
area, such as worn, pitted, or arcing motor brushes; a loose drive
motor brush cap; or a loose drive motor brush holder.
6 / TROUBLESHOOTING
Another source of this problem could be excessive friction between
the deck and belt, usually caused by a lack of routine belt/deck
cleaning (see Chapter 5), or by a worn deck.
A third cause for this code could be a defective choke or a poor
connection at the choke assembly.
Last, the failure of an electronic component in the relay box or loss
of magnetism in the drive motor permanent magnet could also
generate this error message.
ERR 3: LOSS OF SPEED SIGNAL
This error message usually occurs after the treadmill has started
and indicates that the computer in the digital display control panel
is not receiving a motor speed signal from the speed sensor. The
causes for this error are similar to those listed for Error 1.
ERR 4: NO FREQUENCY LOCK
This error code can occur when the treadmill is powered on by
turning the main ON/OFF switch to the ON position and the
treadmill is unable to identify the frequency of the supply voltage.
The cause of this error can usually be attributed to noise or
“interference” from the power line. An electrical device with a high
speed motor, such as a vacuum, blender, or power saw, on a local
power line can sometimes cause this error. If this error occurs,
check to make sure the treadmill is installed on a dedicated line
and re-cycle the power to the machine by switching the main
ON/OFF power switch to “OFF” for 5 seconds and then switching it
back “ON.” If the problem persists, contact CYBEX or your local
CYBEX dealer.
ERR 5: ELEVATION ERROR
This error code indicates a problem with the elevation control
circuitry. It can occur if the treadmill recognizes a discrepancy in
the actual elevation grade vs. the grade set at the control panel. If
the actual elevation grade does not reach the set grade within 60
seconds, this error code will be saved in the error log.
A defect may be present in the elevation potentiometer, the
elevation wiring or other areas of the circuit.
If either of these conditions exist, call your local CYBEX dealer or
CYBEX customer service. An authorized CYBEX trained technician
can usually detect the source of the problem with a service visit.
ERR 6: OVERSPEED
This error code indicates a problem with the speed control circuitry.
It can occur if the treadmill recognizes a discrepancy in the actual
belt speed vs. the speed set at the control panel. If the actual
speed of the belt is 1 mph (1.6 kph) over the set speed for 0.2
seconds or 2 mph (3.2 kph) below the set speed for 2 seconds, this
error code will be displayed.
41
6 / TROUBLESHOOTING
If the speed attempts to increase, it may be because of a defect
in the power supply circuitry to the drive motor, the speed
sensor, or the filter capacitor.
If the speed attempts to decrease, it may be because of a defect
in the drive motor, the speed sensor, or a worn running deck.
If either of these conditions exist, call your local CYBEX dealer
or CYBEX Customer Service. An authorized CYBEX technician
can usually detect the source of the problem with a service visit.
ERR 7: LOSS OF NOVRAM
This error code indicates a problem with the nonvolatile random
access memory (NOVRAM) contents. The NOVRAM chip is
located in the DDM (Digital Display Module). Its contents may
have become lost or destroyed. Among other data, this chip
holds the accumulated miles and time information. You can
reset the NOVRAM error by turning the treadmill off and then on
again, but you may lose all of the accumulated data. Should the
problem recur, you will need to replace the microprocessor chip
or the DDM.
Diagnostic Tests
d1: SOFTWARE REVISION
d2: ACTUAL SPEED
d3: CURRENT DRAW
d4: INCLINE, INCLINE VOLTAGE, and CALIBRATION
d5: LED TEST
d6: KEYPAD TEST
d7: TOTAL TIME
d8: TOTAL DISTANCE
d9: NUMBER OF STARTS
d10: SPEED SENSOR
d11: ERROR LOG
d12: LOG CLEAR
STOP: Used to exit Diagnostic Test mode.
Note: The diagnostic tests can be accessed while the treadmill is
in the dormant mode or while it is running.
To access the diagnostic tests, press and hold the SHIFT key,
then the - key. Once the diagnostic mode is entered, “d1,”
representing diagnostic test 1, will be displayed in the left
control panel window and the test results will be displayed in
the right display window.
To advance to a specific diagnostic test, press the START key to
scroll forward or the SHIFT key to scroll backward through the
menu of tests.
42
To exit the diagnostic test mode, press the STOP key at any
time. This will return you to the mode you were in before
entering the diagnostic tests.
6 / TROUBLESHOOTING
d1: SOFTWARE REVISION
This test displays the configuration information for the main
program chip in the control panel. “d1” is displayed in the left
control panel window, and the right control panel window
displays the revision level of the main program.
For example:
Note: The heart icon will also illuminate in d1. It
d1
1.09
will blink with the signal from a Polar® transmitter.
If it blinks erratically, this may indicate interference Active keys during this test:
near the treadmill, which can cause the heart rate
display to be inaccurate or inoperative.
START/ENTER will advance you to the next diagnostic test.
STOP will exit the test mode and return you to the mode you
were in before entering the diagnostic tests.
SHIFT backs you up one step in the diagnostic test menu.
d2: ACTUAL SPEED
This test displays the diagnostic test number d2 and flashes the
set speed, in 0.1 mph (kph) increments, in the left control panel
window. Note: The decimal point is not displayed. The right
control panel window displays the actual measured speed of the
drive motor in mph (kph) by using the signal from the speed
sensor.
For 9.5 mph, for example:
d2 95
9.50
Active keys during this test:
START/ENTER will advance you to the next diagnostic test.
STOP will exit and return you to the mode you were in before
entering the diagnostic tests.
SHIFT backs you up one step in the diagnostics test menu.
The - and + keys change the set speed in 0.1 mph (kph)
increments.
d3: CURRENT DRAW
The diagnostic test number d3 is displayed in the left control
panel window. The right control panel window displays the
current draw of the treadmill in amperes. See nn 2 page 38 for
details.
For example:
d3
2.5
Active keys during this test:
START/ENTER will advance you to the next diagnostic test.
STOP will exit and return you to the mode you were in before
entering the diagnostic tests.
SHIFT backs you up one step in the diagnostics test menu.
The - and + keys change the speed set point.
The ▼ and ▲ keys change the elevation set point.
43
6 / TROUBLESHOOTING
d4: INCLINE, INCLINE VOLTAGE, and CALIBRATION
This test allows you to:
Note: To calibrate the 400T, run the elevation
to its lowest limit (0% grade) using the ▼ key.
Next back off one pulse of the elevation
motor by pressing the ▲ key. Set the lower
limit by pressing the - key. The “CAL” light
will illuminate on the display to indicate
acceptance. To set the upper limit, run the
elevation to its maximum limit (15% grade),
using the ▲ key. Next, back off one pulse of
the elevation motor by pressing the ▼ key.
Set the upper limit by pressing the + key. The
“CAL” light will illuminate to indicate
acceptance.
1. Elevate the treadmill up and down using the ▲ and ▼ keys.
The elevation reading flashes in the left control panel window.
2. Re-calibrate the elevation sensor.*
This test displays the diagnostic test number d4 and flashes the
elevation % grade in the left control panel window. The right
control panel window displays the elevation potentiometer
signal voltage.
For example:
d4 12
4.9
Active keys during this test:
START/ENTER will advance you to the next diagnostic test.
STOP will exit and return you to the mode you were in before
entering the diagnostic tests.
SHIFT backs you up one step in the diagnostics test menu.
The - key is used to store the elevation lower limit.
The + key is used to store the elevation upper limit.
The ▲ and ▼ keys change the elevation up or down.
d5: LED TEST
This test lights up all the LEDs and back-lit messages on the
display individually, in sequence. It allows you to locate any bad
LED segments.
For example:
----
----
Active keys during this test:
The - or + keys will light up all the display segments at once.
START/ENTER will advance you to the next diagnostic test.
STOP will exit and return you to the mode you were in before
entering the diagnostic tests.
SHIFT backs you up one step in the diagnostics test menu.
d6: KEY PAD TEST
The diagnostic test number, d6, is displayed in the left control
panel window. This test displays a code number for any key
depressed during the test in the right display window. Each key
on the display is represented by a code number 1, 2, 4, 8, 16,
32, 64, counting from left to right.
For example, for the + key:
d6
44
64
6 / TROUBLESHOOTING
Active keys during this test:
Note: The keys listed below must be held for two seconds to
activate the described response.
START/ENTER will advance you to the next diagnostic test.
STOP will exit and return you to the mode you were in before
entering the diagnostic tests.
SHIFT backs you up one step in the diagnostics test menu.
d7: TOTAL TIME
This test displays the total accumulated time to date, in hours,
that the treadmill has been used.
The diagnostic test number, d7, is displayed in the left control
panel window. The right control panel window displays the
hours. The time starts in the right window but as the number of
hours increases it expands into the left window.
For example:
d711
TIME
8941
This display indicates 118,941 hours.
Active keys during this test:
START/ENTER will advance you to the next diagnostic test.
STOP will exit and return you to the mode you were in before
entering the diagnostic tests.
SHIFT backs you up one step in the diagnostics test menu.
d8: TOTAL DISTANCE
This test displays the total accumulated distance to date, in
miles (or km), that the treadmill has been used. The diagnostic
test number, d8, is displayed in the left control panel window.
The right control panel window displays the distance in miles
(km) if 9,999 or less. As the number increases to 10,000 and
above, the most significant digits expand into the left window,
as additional space is needed.
For example:
d8 5
1938
DISTANCE
This display indicates 51,938 miles.
Active keys during this test:
START/ENTER will advance you to the next diagnostic test.
STOP will exit and return you to the mode you were in before
entering the diagnostic tests.
SHIFT backs you up one step in the diagnostics test menu.
d9: NUMBER OF STARTS
This test displays the total accumulated distance to date, in
miles (km), that the treadmill has been used.
45
6 / TROUBLESHOOTING
The diagnostic test number, d9, is displayed in the left control panel
window. The right control panel window displays the number of
times that the treadmill has been started if 9,999 or less. As the
number increases to 10,000 and above, the most significant digits
expand into the left window, as additional space is needed.
For example:
d9 1
START 9480
This display indicates 19,480 starts.
Active keys during this test:
START/ENTER will advance you to the next diagnostic test.
STOP will exit and return you to the mode you were in before
entering the diagnostic tests.
SHIFT backs you up one step in the diagnostics test menu.
d10: SPEED SENSOR
This test confirms that the speed sensor is being detected and
processed by the speed sensor. During this test, if the motor is
running, you should see the numbers on the display constantly
increasing, counting the number of pulses generated by the speed
sensor. As the speed of the motor is increased the numbers will
increment faster.
This test displays the diagnostic test number d10 in the left control
panel windows. The right control panel window displays the speed
sensor count.
For example:
d10
8888
Active keys during this test:
START/ENTER will advance you to the next diagnostic test.
STOP will exit and return you to the mode you were in before
entering the diagnostic tests.
SHIFT backs you up one step in the diagnostics test menu.
d11: ERROR LOG
This test will allow you to view the last nine error codes the treadmill has
generated. In this test, the left window displays the diagnostic test
number d11 followed by a flashing digit representing the error log
sequence number (1 through 9). Number 1 represents the most recent
error code, 2 the next most recent, up to 9, the oldest error code. The
right window displays the error code number (1 through 7, see list below)
associated with the error code sequence displayed in the left window.
Example 1:
d11 4
46
6
Example 1 shows that error code number 6 was generated four
error messages ago.
6 / TROUBLESHOOTING
ERROR CODE NUMBERS
1: NO SPEED SIGNAL AT STARTUP
2: EXCESSIVE CURRENT DRAW
3: LOSS OF SPEED SIGNAL
4: NO FREQUENCY LOCK
5: ELEVATION ERROR
6: OVERSPEED
7: LOSS OF NOVRAM
Only one error code from the log can be displayed at any time. To
scroll through the Error Log, use either the speed or the elevation keys.
All errors will cause the treadmill to be inoperative. Power must be
cycled on and off to resume usage. If errors recur, the treadmill will
again be inoperative.
Active keys during this test:
START/ENTER will save settings and advance you to the next
diagnostic test.
STOP will exit and return you to the mode you were in before
entering the diagnostic tests.
SHIFT backs you up one step in the diagnostics test menu.
The - and + keys cycle you through the Error codes.
The ▼ and ▲ keys cycle you through the Error codes.
d12: LOG CLEAR
(ERROR LOG & MAINTENANCE PROMPT CLEAR SWITCH)
This test allows you to clear (erase) all the error codes in the Error
Log and/or to clear (turn off) a Maintenance Prompt. In this test, the
left window displays the error set message (ErrS), and the right
window shows the Maintenance Prompt set message (nnS).
Example 1:
ErrS
nnS
To clear the Error Log, press the ▲ key, and the left window will
display the error clear command (Err C).
To turn off a Maintenance Prompt, press the + key, and the right
window will display the Maintenance Prompt clear command (nnC).
Example 2:
ErrC
nnC
Press START to accept the clear command(s) and advance to d1.
Active keys during this test:
START/ENTER will accept the displayed state of the Error Log and
Maintenance and advance you to the first diagnostic test.
STOP will accept the displayed state of the Error Log and
Maintenance Prompt and will exit and return you to the mode you
were in prior to entering the diagnostic tests.
SHIFT accepts the displayed state of the Error Log and
47
6 / TROUBLESHOOTING
Maintenance Prompt and backs you up one step in diagnostic
test menu.
The ▼ and ▲ keys toggle the Error Log from Set (S) to Clear (C).
The - and + keys toggle the Maintenance Prompt from Set (S) to
Clear (C).
EXIT...PRESS STOP
To exit the diagnostic test mode, press STOP to return the
treadmill to its previous state.
Note: If you were in the middle of a program before entering the
test mode, you will be returned to the exact spot in the program
where you left off. The speed, elevation, and time will all return
to where they were prior to entering the diagnostic test mode.
You will not lose any information and the elapsed time will not
have changed.
Customer Hotline:
Call 888-462-9239 in North America.
In all other areas dial 508-533-4300 or
fax 508-533-5183.
Customer Hotline
CYBEX has installed a convenient toll-free telephone hotline to
serve our customers. A technical support engineer is available
to answer any questions you may have, discuss maintenance
procedures, or provide troubleshooting assistance.
Our Hotline number is: 888-462-9239 in North America, and
508-533-4300 or fax 508-533-5183 for all other areas.
Returned Goods Authorization (RGA)
The Returned Goods Authorization (RGA) system outlines the
procedures to follow when returning goods for replacement, repair,
or credit. The system assures that returned goods are properly
handled and analyzed. Follow these procedures carefully.
Contact your local authorized CYBEX dealer on all warrantyrelated matters. Your local CYBEX dealer will request an RGA
from CYBEX, if applicable. Under no circumstances will
defective parts or equipment be accepted by CYBEX without
proper Return Goods Authorization and prepayment of all
postage or freight charges.
RGA Procedure
1. Call the Customer Service Hotline listed above for the return
of any item that is defective.
2. Provide the technician with a detailed description of the problem
you are having or the defect in the item you wish to return.
3. Notify the technician of the serial number of your treadmill.
The number is located on a metal foil sticker attached to the
left-hand side of the treadmill base, near the power cord. The
serial number always begins with a letter, for example: N1003320199.
48
4. If the technician cannot resolve your problem over the phone,
he or she will request that you return the problem part(s) to
6 / TROUBLESHOOTING
CYBEX for evaluation and repair or replacement. The technician
will assign you an RGA number. This number should be put on
the outside of the package that contains the item(s) to be
returned. Include a description of the problem, the serial number
of the treadmill and the name and address of the owner in the
package along with the part(s).
5. Forward the package to CYBEX, prepaid.
Note: Merchandise returned without an RGA number on the
outside of the package or shipments sent C.O.D. will not be
accepted by the CYBEX Receiving Department.
Damaged Treadmill or Parts
Goods damaged in shipment should not be returned for credit
before notifying the carrier. Shipping damages are the
responsibility of the carrier (UPS, Federal Express, trucking
companies, etc.).
Concealed damage is the carrier’s
responsibility.
Apparent Damage
Upon receipt of your shipment, check the boxes carefully. Any
damage seen with a visual check must be noted on the freight
bill and signed by the carrier’s agent. Failure to do so will result
in the carrier’s refusal to honor your damage claim. The carrier
will provide you with the required forms for filing such claims.
Concealed Damage
Damage not seen with a visual check upon receipt but noticed
later must be reported to the carrier as soon as possible. Upon
discovery of the damage, a written or phone request to the
carrier asking them to perform an inspection of the goods must
be made within ten days of the date of delivery. Keep all
shipping containers and packing materials; they will be needed
as part of the inspection process. The carrier will provide you
with an inspection report and the necessary forms for filing a
concealed damage claim.
Concealed damage is the carrier’s responsibility.
Thank You for Buying the CYBEX 400T
The 400T is built for years of reliable performance and will
continue to challenge your fitness goals. If you have any
questions about your treadmill or comments about our products
or this owner’s manual, please call our toll-free Customer Hotline
(in North America call 888-462-9239. In all other areas dial
508-533-4300 or fax 508-533-5183). We welcome comments
and suggestions from all CYBEX owners.
49