1
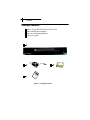
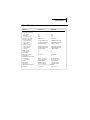
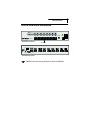
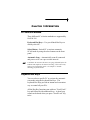
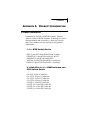
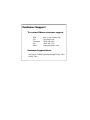
RAS106 & RAS108
User's
Guide
COPYRIGHT & TRADEMARKS
Copyright 2000 by Edimax Computer Company. All rights reserved. Lan
Professional, LanPro, and Edimax are trademarks of Edimax Computer
Company. No part of this manual may be reproduced, transcribed, stored in
any form or by any means of mechanical, electronic, photocopying, recording
or otherwise, including translation to another language or format, without the
express written consent of Edimax Computer Company.
FCC INFORMATION
This device complies with part 15 of the FCC Rules. Operation is subject to
the following two conditions: (1) this device may not cause harmful
interference and (2) this device must accept any interference received,
including interference that may be caused undesired operation.
LIMITED ONE-YEAR WARRANTY
Edimax warrants RAS106/108 KVM Switch (cable is not included) is free from
physical defects in material and workmanship under the normal use. If the
product is found to be defective during the warranty period, then, as your sole
remedy and as the manufacturer's only obligation, Edimax will repair or replace
the product.
Edimax makes no other warranty or representation, expressed, implied or
otherwise, regarding the RAS106/108 KVM Switch, and specifically disclaims
any warranty for merchantability, quality, performance or fitness for any
particular purpose. In no event shall Edimax's liability exceed the price paid
for the product from direct, indirect, special, incidental, or consequential
damage resulting from the use of the product, its accompanying accessories, or
its documentation.
PRODUCT UPDATE
Edimax reserves the rights to revise or update its products, accessories and
documentation without obligation to notify any individual or entity. For any
update information, please contact Edimax Customer Support.
CONTENTS
1 INTRODUCTION
General Information
Features
Package Contents
Specifications
Connectors and Cables
Front & Rear Panel Description
1-1
1-2
1-3
1-4
1-5
1-6
2 INSTALLATION
Operating Environment
Connecting The Peripherals
Connecting The PCs
Connecting Power Adapter
2-1
2-1
2-2
2-3
3 OPERATION
PC Selection Method
Keyboard Hot Keys
Select Push Button
Reset Button
3-1
3-1
3-2
3-3
4 LEDS AND BUZZER
4-1
5 TROUBLE SHOOTING
5-1
APPENDIX Product Information
Product Information
A-1
1-1 INTRODUCTION -GENERAL INFORMATION
CHAPTER 1 INTRODUCTION
General Information
Congratulations on your purchase of Edimax's 6-/8-port
Rackmount KVM Switch - RAS106 & RAS1088.
RAS106/108 are electronic keyboard/video/mouse (KVM)
Switches that controls up to 6 or 8 PCs using a single
keyboard, monitor, and mouse.
RAS106/108 KVM Switches can save you money by
eliminating redundant peripherals (e.g. keyboard, monitor,
and mouse) and provide a centralized control of multiple
PCs. With a small investment in Edimax's RAS106/108
KVM Switches you can preserve precious office space, cut
energy cost and redundant peripheral cost, and increase
productivity.
RAS106/108 KVM Switches feature standard 19" rackmount
size that fits into any industrial rack, PC99 compliant colorcoded connectors for easy correct cable connection,
individual intelligent mouse and keyboard emulation to
ensure successful PC boot up and flawless operation. Cap
Lock, Num Lock, and Scroll Lock status are recorded and
restored while switching among PCs. User can select PC by
using keyboard Hot Keys, front-panel select buttons or let
the RAS106/108 KVM Switches do the automatic scan.
1-2
INTRODUCTION -FEATURES
Features
+ Easy Installation -- A truly plug and play device.
Complete installation within minutes with Edimax's
standard cable kits.
+ Smooth Control -- User can select any PC by keyboard
Hot Keys or push button.
+ Flawless Booting -- Individual keyboard and mouse
emulation to every PC.
+ Intelligent Keyboard Emulation -- Cap Lock, Num
Lock, and Scroll Lock status are recorded and restored
while switching among PCs.
+ 19" Rack Mount size -- Fit in any standard industrial
rack (mounting bracket included).
+ MS Intellimouse Support -- Provide Microsoft PS/2
Intellimouse and other name brand PS/2 mice emulation
to ensure proper wheel mouse function.
+ Wide Video Bandwidth -- Support monitor resolution up
to 1600 x 1280 (recommend maximum 70Hz when set
at 1600 x 1280).
+ Reset Button: Reset mouse and keyboard simulation
without power down the PCs.
+ Standard and color-coded connectors -- Use standard
PS/2 and VGA cables; PC99-compliant color-coded
connectors to ensure correct cable connection.
1-3 INTRODUCTION -- PACKAGE
CONTENTS
Package Contents
1
2
3
4
One 6-/8-port KVM Switch (RAS106/108)
One external power adapter
One set of mounting brackets
One user's guide
1
2
3
4
Figure 1-1 Package Content
1-4 INTRODUCTION -SPECIFICATIONS
Specifications
Model
RAS106
RAS108
Number of PC Ports
PC Selection Method
Push Button
Hot Keys
Automatic Scan
Maximum Resolution
Console Connectors
Keyboard (PS/2)
Mouse (PS/2)
Monitor
PC Port Connectors
Keyboard (PS/2)
Mouse (PS/2)
Monitor
READY LED
ACTIVE LED
SCAN LED
Scan Interval Time
Reset button
Maximum Cable Length
to Console
to Computers
Power
Net Weight
Dimension
Operating Environment
Emission
6
8
Yes
Yes
Yes
1600x1280
Yes
Yes
Yes
1600x1280
1 Mini-DIN6/Female
1 Mini-DIN6/Female
1 HDB15/Female
1 Mini-DIN6/Female
1 Mini-DIN6/Female
1 HDB15/Female
6 Mini-DIN6/Female
6 Mini-DIN6/Female
6 HDB15/Male
6
6
1
10 Seconds
1
8 Mini-DIN6/Female
8 Mini-DIN6/Female
8 HDB15/Male
8
8
1
10 Seconds
1
30 feet (5 meters)
30 feet (5 meters)
60 feet (20 meters)
60 feet (20 meters)
9VDC 500mA
9VDC 500mA
5.5 lbs.(2.5 Kg)
4.0 lbs.(1.8 Kg)
370x248x42 mm
262x181x42 mm
0
0
32-131 F (0-55 C) , 0%-90% RH
FCC Class B
FCC Class A
1-5 INTRODUCTION -CONNECTORS AND CABLES
Connectors and Cables
Console Connectors
Three different types of console connectors are built on the rear
panel for connection to the keyboard, monitor, and mouse. Each
connector is represented by a picture and color-coded.
: PS/2 Keyboard (6-pin mini DIN, female; in purple)
: VGA Monitor (HDB15, female; in blue)
: PS/2 Mouse (6-pin mini DIN, female; in green)
PC Port Connectors
Sixe (RAS106) or Eight (RAS108) groups of connectors are built on
the real panel for connection to PCs using standard keyboard,
monitor and mouse cables. Each connector is represented by a
letter and color-coded.
K: PS/2 Keyboard (6-pin mini DIN, female; in purple)
V: VGA Monitor (HDB15, male; in blue)
M: PS/2 Mouse (6-pin mini DIN, female; in green)
Please refer to the "Specifications" in page 1-4 for details on
RAS106/RAS108's PC port connectors.
Cable Kits
Optional PS/2 cable kits of different lengths are available for
connection between RAS106/108 and PCs. Each cable kit consists
of one keyboard cable, one mouse cable and one monitor cable.
Refer to Appendix A page A-2 for detailed cable kit ordering
information.
1-6 INTRODUCTION -- FRONT& REAR
PANEL DESCRIPTION
Front & Real Panel Description
READY
ACTIVE
1
2
3
4
6
5
SCAN
RESET
8
7
POWER
RAS108 8-Port KVM Switch
RAS108 Front Panel
Select Buttons
M1
K1
M2
K2
M3
K3
M4
K4
M5
K5
M6
K6
M7
K7
RAS108 Rear Panel
RAS106's front and rear panel layout is similar as RAS108's.
M8 K8
2-1
INSTALLATION -- OPERATING ENVIRONMENT
& CONNECTING THE PERIPHERALS
CHAPTER 2 INSTALLATION
Operating Environment
RAS106/108 must be installed and operated within the
limits of specified operating temperature and humidity (see
previous section under Specifications). Do not place object
on top of the unit. Do not position the unit near any heating
source such as heater, radiator, or direct exposure to sun.
Prevent entering of water and moisture into the unit. If
necessary, use dehumidifier to reduce humidity.
Connecting The Peripherals
Keyboard -- Connect one PS/2 keyboard to console
keyboard connector (purple one) located on the rear panel
of the unit.
Mouse -- Connect one PS/2 mouse to the PS/2 console
mouse connector (green one) located on the real panel of
the unit.
Do not use any serial to PS/2 adapter to connect the mouse to the
console mouse port.
RAS106/108 support 2-button and 3-button mice, 4-button or other
custom mice may not function properly or lose certain special
funcion.
Monitor -- Connect monitor to console monitor
connector (blue one) located on the rear panel of the unit.
Use only high resolution shielded monitor cable to ensure
quality video output.
2-2 INSTALLATION -- CONNECTING
THE PCS
Connecting The PCs
You may use any standard cables or use the cable kits
from Edimax to connect RAS106/108 and the PCs.
Make sure the cable connectors match the following:
PS/2 mouse cable: male to male, mini-DIN6
PS/2 keyboard cable: male to male, mini-DIN6
Monitor: male to female, HDB15
For monitor cables, Use only UL2919 compliant cable to
ensure the video signal quality.
It is strongly recommended to use high quality cable
kits from Edimax to simplify the installation and
ensure good quality connections. Please refer to
"Connectors and Cables" in page 1-5 and "Product
Information" in Appendix A page A-2 for detailed
cable kit information.
Connect one end of each of the three cables
(keyboard, mouse and monitor cable) to the
RAS106/108's PC ports and the other end to the PC.
Make sure all the cables are firmly plugged-in and
secured. Follow the same procedures to connect all
PCs.
2-3
INSTALLATION -- CONNECTING POWER
ADAPTER
Connecting Power Adapter
First remove the AC power adapter from the package.
Read the input voltage specification from the power
adapter and make sure it matches with your local power
voltage.
Connect the AC power adapter to the unit. Plug the AC
power adapter to your power outlet. Turn power on
using the toggle switch on the front panel and the
power LED shall be lit.
CAUTION: Plugging the AC power adapter to a power outlet
with different voltage may cause personal injuries and damages
to the power adapter.
3-1
OPERATION -- KEYBOARD HOT KEYS
CHAPTER 3 OPERATION
PC Selection Method
Three different PC selection methods are supported by
RAS106/108.
Keyboard Hot Keys -- Use pre-defined Hot Keys to
directly select PC.
Select Button - Switch PC or activate automatic
SCAN mode by using the select buttons on the front
panel.
Automatic Scan - Automatically scan all connected
and power-on PCs at a pre-set time interval.
CAUTION: Do not move the mouse or typing keyboard before the
RAS106/108 completes the channel switching. Fail to do so may
lock up your keyboard or mouse. See Chapter 5 "Trouble
Shooting" for further detail.
Keyboard Hot Keys
You can select a specific PC or activate the automatic
scan mode using the keyboard Hot Keys. The
keyboard Hot Keys provide an instant and convenient
way to control all your PCs.
All the Hot Key functions start with two "Scroll Lock"
key and followed with additional keys. A short beep
sound can be heard when you press "Scroll Lock" key
twice.
3-2 OPERATION -- PUSH BUTTON
1. To select a PC directly:
Scroll Lock
Scroll Lock
PC#
<ENTER>
The "PC#" represents the PC number from 1 to 6 or 8.
The built-in buzzer will beep once to confirm the
switching. The ACTIVE LED will switch and identify
which PC is currently under control.
2. To activate Automatic SCAN mode:
Scroll Lock
Scroll Lock
<Space Bar>
A long beep sound to confirm the activation. The SCAN
will be lit to indicate the operation of SCAN mode.
3. To deactivate Automatic SCAN mode:
Press any key on the keyboard
A short beep sound to confirm the deactivation. The
SCAN LED will be turned off to indicate the end of
SCAN mode.
Select Push Button
1. To select a PC:
Push the SELECT button right below each PC number to
select that PC. The built-in buzzer will beep once to
confirm each PC switching. The ACTIVE LED will
switch and identify which PC is currently under
control.
3-3 OPERATION -- AUTO SCAN &
RESET BUTTON
2. To activate Automatic SCAN mode:
Push and immediately release the SCAN button right
below the SCAN LED to activate SCAN mode.
The built-in buzzer will beep to confirm the activation.
The SCAN LED will be lit to indicate the operation of
SCAN mode.
3. To deactivate Automatic SCAN mode:
Press any PC SELECT button or SCAN button.
The built-in buzzer will beep once to confirm the
deactivation. The SCAN LED will be turned off to
indicate the end of SCAN mode.
Reset Button
Press the Reset button will automatically reset the
RAS106/108 KVM Switches' keyboard and mouse
emulation processors. In normal operation, users do
not need to use the reset function. In case of losing
keyboard or mouse connection during operation, you
may press the Reset button to force the RAS106/108 to
re-initiate the emulation and re-establish the
connection.
Do not move the mouse or typing the keyboard during
the reset process. The built-in buzzer will sound a long
beep to confirm the activation of reset. The reset
process will be complete within three (3) seconds.
4-1 LEDS & BUZZER
CHAPTER 4 LEDS & BUZZER
LEDs
RAS106/108 LEDs are located in the front panel.
Please refer to the section of "Front & Real Panel
Description" under Chapter 1 "Introduction" for the
detail location of each LED.
READY LED: When a PC is properly connected and
the PC is powered on, the READY LED
corresponding to that PC will be lit.
ACTIVE LED: Indicate the currently selected PC.
Only one ACTIVE LED will be lit although more
than one computers are connected.
SCAN LED: LED is lit when RAS106/108 is
operating at automatic SCAN mode.
BUZZER
RAS106/108 has a built-in buzzer provide audio
confirmation of PC switch and activation/deactivation
of SCAN mode.
5-1 TROUBLE SHOOTING
CHAPTER 5 TROUBLE SHOOTING
1. No screen display after the PC is powered on
or after PC switching
+ Press the PC SELECT button to switch to a port with PC
connected.
+ Make sure the external power adapter is plugged into the
power outlet and power switch is turned on.
+ Make sure the mouse and keyboard cables are not misconnected.
+ Make sure the monitor is firmly plugged into the console
connector.
+ Make sure the cables are firmly plugged into the PC port
connectors.
+ Try different video resolution by adjusting the setting of
the display controller card from the Windows control
panel.
2. Lose mouse control
+ Do not move the mouse during the switching. RAS106/108
can not switch the mouse control when it is still receiving
the mouse signals.
+ Make sure the unit is not in SCAN mode.
+ Make sure the mouse is firmly plugged into the console
connector.
+ Make sure the cable is firmly plugged into the PC port
connector and the PC.
+ Try disabling touchpad if you are using a notebook
computer.
+ Restart your Windows 95, 98, NT, or 2000.
+ Press Reset button.
5-2 TROUBLE SHOOTING
3. Lose keyboard control
+ Do not type any key on the keyboard before the
channel is completely switched to new PC as indicated
by the change of display screen.
+ Make sure the keyboard is firmly plugged into the
console connector.
+ Make sure all the cables are firmly plugged into the PC
port connectors.
+ Try to switch to another channel and switch back.
+ Press Reset button.
4. Wheel mouse does not function properly
+ Make sure wheel mouse driver is installed on every
PC.
+ RAS106/108 supports only 2-button and 3-button
mouse such as Microsoft Intellimouse, Logitech
FirstMouse+ and MouseMan. Try different brand
wheel mouse.
+ Press Reset button.
5. Mouse and keyboard do not respond
instantly after PC switching
+ Do not move the mouse or typing keyboard before
RAS106/108 completes the PC switching. If
RAS106/108 detects mouse or keyboard signals input
from current PC before the switching is complete, it
will delay the PC switching until there's no more
signal input.
In such case, you will feel slight delay in the response
of mouse pointer or keyboard. Stop moving the mouse
or typing the keyboard, and RAS106/108 will complete
the switching immediately.
5-3 TROUBLE SHOOTING
6. Unable to switch PC
+ If you are using Hot Keys, make sure "Scroll Lock" key
is pressed twice, and you hear the confirmation beep and
followed by a valid digit number and "Enter" key.
+ If you are using push button, make sure push the center
of the button to accurately initiate the switching.
+ Do not move the mouse or typing keyboard before
RAS106/108 completes the switching. RAS106/108 will
not switch to selected PC until no more mouse or
keyboard signals are detected.
APPENDIX A-1 -- PRODUCT
INFORMATION
APPENDIX A PRODUCT INFORMATION
Product Information
In addition to RAS106/108 KVM Switches, Edimax
offers a varities of KVM Switches. Following is a list of
different models and accessories. Check our web site
http://www.edimax.com for most up-to-date product
information.
I. Genie KVM Switch Series
MG2: 2-port PS/2 Mini KVM Switch w/cables
GENIE2-AP: 2-port KVM Switch AT & PS/2
GENIE4-P: 4-port KVM Switch PS/2
RAS106: 6-port KVM Switch PS/2, rackmount
RAS108: 8-port KVM Switch PS/2, rackmount
II. Cable Kits for Genie KVM Switches and
CPU Switch Series
CS-AT-6: 6-feet AT cable kit
CS-AT-10: 10-feet AT cable kit
CS-AT-25: 25-feet AT cable kit
CS-AT-50: 50-feet AT cable kit
CS-PS2-6: 6-feet PS/2 cable kit
CS-PS2-10: 10-feet PS/2 cable kit
CS-PS2-25: 25-feet PS/2 cable kit
CS-PS2-50: 50-feet PS/2 cable kit
APPENDIX A-2 -- PRODUCT
INFORMATION
PS/2 type cable kit:
! Keyboard - 6-pin Mini-DIN, male-to-male
! Mouse - 6-pin Mini-DIN, male-to-male
! Monitor - HDB15, male-to-female
AT type cable kit:
! Keyboard - 5-pin DIN, male-to-male
! Mouse - DB9, female-to-male
! Monitor - HDB15, male-to-female
Customer Support
To contact Edimax customer support
Web
FTP
Telephone
Fax
eMail
http://www.edimax.com
ftp.edimax.com
(408) 988-6092
(408) 980-1530
[email protected]
Customer Support Hours
9:00AM to 5:00PM, Monday through Friday, USA
Pacific Time.