1
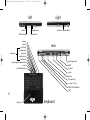
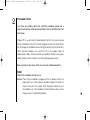
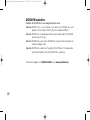
BBIA_5550_vprM_PalominoGetStart
8/9/02
4:43 PM
Page 2
vprn-gs200
Series
1800
rev.01 2000
2200
© 2002 vpr Matrix, Inc. All rights reserved.
BBIA_5550_vprM_PalominoGetStart
8/9/02
4:43 PM
Page 3
Series 1800
2000
2200
BBIA_5550_vprM_PalominoGetStart
8/9/02
4:43 PM
Page 5
vpr Matrix
Getting Started Guide
WELCOME
Congratulations on your purchase of a vpr Matrix notebook computer. We are
confident you will enjoy the leading-edge power and outstanding reliability of your
new notebook, as well as the opportunities it provides for education, work,
entertainment and more.
This guide is a short course in setting up your computer and defines some basic
concepts regarding your notebook and the Internet. It also provides some quick
solutions for common questions regarding the set-up and operation of your
notebook. Taking a few minutes to read this guide will help ensure that you
have the information necessary to operate your notebook safely and easily. At
vpr Matrix, we are committed to constantly delivering the best quality product and
experience.
Thank you again for your purchase.
1
BBIA_5550_vprM_PalominoGetStart
2
8/9/02
4:43 PM
Page 6
BBIA_5550_vprM_PalominoGetStart
8/9/02
4:43 PM
Page 7
CONTENTS
1 USING YOUR NOTEBOOK COMPUTER
5
2 TROUBLESHOOTING
19
3 LIMITED WARRANTY
24
4 IMPORTANT SAFETY INSTRUCTIONS
28
3
BBIA_5550_vprM_PalominoGetStart
8/9/02
4:43 PM
Page 8
left
modem
10/100 network
volume
power
scroll lock
number lock
caps lock
indicators
optical drive
hard drive
user programmable button
e-mail
vpr Matrix button
right
headphones
dvd/cd-rw combo drive
microphone
rear
Kensington lock
USB
monitor
serial
printer
AC power [A]
s-video / TV out
IEEE-1394 (FireWire®)
PS/2
4
track pad
keyboard
BBIA_5550_vprM_PalominoGetStart
8/9/02
4:43 PM
Page 9
USING YOUR NOTEBOOK COMPUTER
1
Placement of your notebook PC
It is important that you choose a good location to set up your notebook so that
both you and your new computer are safe. Make sure your working position is
comfortable and that it encourages good posture while you are at your notebook.
Proper placement of your notebook is essential to avoid repetitive stress-related
injuries. Use the computer on a flat surface so that you can comfortably view the
display and use the keyboard and trackpad without slouching. While typing try to
hold your hands slightly above the keyboard and keep your wrists parallel with the
floor. Take regular breaks from using your notebook to rest your eyes and stretch
your muscles.
There are ventilation holes on the rear and left side of your notebook that should
be kept clear at all times. Your notebook contains a fan that will operate if the
computer reaches a preset temperature, and the vents are an important part of
this cooling system. The fan may turn on under normal usage conditions and does
not indicate a problem with your notebook.
Whenever possible, use a surge protector to prevent power surges from
damaging your notebook and accessories, and a grounded 3-hole outlet to
prevent electrical shorts or fires.
5
BBIA_5550_vprM_PalominoGetStart
8/9/02
4:43 PM
Page 10
Installing your battery
WARNING: Do not attempt to open your battery’s plastic casing—there are
no user-serviceable parts inside and hazardous chemicals may be released if
the case is damaged. Do not dispose of batteries in fire, they may explode or
release hazardous chemicals. Dispose of or recycle your used batteries
properly according to your local regulations.
Before using your notebook, you will first need to install the battery (packed
separately in your notebook box).
Installing battery
With the LCD display closed, turn your notebook
over to access the bottom. Holding the battery at
a 30 O angle, slide the front end of the battery into
the battery compartment, then press the back of
the battery down into the compartment until a
click signals that it has seated properly.
Removing battery
Slide the battery release latch and lift the battery from its compartment.
6
BBIA_5550_vprM_PalominoGetStart
8/9/02
4:43 PM
Page 11
Using and maintaining your battery
Your notebook comes equipped with an intelligent Lithium Ion battery that can be
recharged many times. Your battery is used only when your notebook is not
connected to an AC outlet. When your computer is connected to your plugged-in
AC adapter, the notebook uses AC power directly and recharges the battery at
the same time. The battery will recharge faster if the notebook is turned off while
the AC is plugged in. A full recharge requires approximately 3 hours with the
computer turned off and 6 hours with the computer turned on.
Your battery has an LED gauge that indicates how
much power remains. To determine how much of
the battery's charge remains, press the indicator
button on the battery. The LEDs will light to signify
the percentage of charge remaining.
When the battery is running low, the Windows operating system will display a
prompt screen. This power alert feature can be set or updated by clicking
Start > Control Panel > Power Options > Alarm.
Any time your battery charge falls below 25%, you should reconnect the AC
adapter to recharge the battery or shut down your notebook and insert a
fully-charged battery.
7
BBIA_5550_vprM_PalominoGetStart
8/9/02
4:43 PM
Page 12
Connecting the AC adapter
Your battery will need to be charged when you first unpack your notebook.
To charge the battery, plug in the AC adapter and plug the AC adapter jack into the
power connection on the back of your notebook. Fully charge the battery before
using the notebook without the AC adapter. When charging, the charge indicator
light will glow orange; when fully charged it will glow blue.
Turning the notebook on and off
Starting your computer
REMINDER: Make certain your notebook is connected to a working phone
line or a network with Internet access before starting up for the first time. This
will allow the automatic registration process to begin. Connect one end of
the included modem cable to the modem jack on the side of your notebook
and the other end to a working phone line before you turn on the notebook.
· Open your notebook by moving the latch in the front center of the notebook to
the right and lifting the display to a comfortable viewing position
· Press the red power button near the top of the keyboard
· The display will light up and Windows® will begin to load
8
NOTE: If a bootable CD (such as the Restore CD) is left in the notebook when it is started, Windows
may start up from the disc rather than the hard drive. If you mistakenly boot up from a disc and wish to
BBIA_5550_vprM_PalominoGetStart
8/9/02
4:43 PM
Page 13
restart from the hard drive, remove the CD and restart the notebook.
Your notebook has Microsoft® Windows® XP Home preinstalled on its hard disk
drive. The first time you turn on your notebook, the Windows setup program runs
automatically. You will be asked a series of questions to configure your notebook.
Follow the instructions as they appear on the display.
NOTE: If your notebook is left powered on but unused for an extended period of
time, it may go into standby mode or hibernation mode. In both modes the screen
goes dark in order to save power. You can determine if your notebook is in standby
or hibernation mode by checking the power indicator at the top of the keyboard—
the LED will flash instead of glowing constantly. To wake your system from either
mode, press the red power button at the top of the keyboard briefly and your
display will light up.
Turning off your computer
· Save all information and close all application programs
· Click Start, then click Turn Off Computer
· In the Turn Off Computer dialog box, click Turn Off and wait for your notebook to
power off automatically. The notebook is off when the power indicator light stops
glowing.
· Turn off any other devices connected to your notebook
· Alternately, you can depress Ctrl+Alt+Del to access the Windows Task Manager
window and Click Shut Down > Shut Down
9
BBIA_5550_vprM_PalominoGetStart
8/9/02
4:43 PM
Page 14
· If the notebook cannot be shut down using the Windows menu and Ctrl+Alt+Del
does not produce the Windows Task Manager window, you can shut down your
notebook by depressing the power button for more than 4 seconds. Use this
method only if absolutely necessary. Your notebook may perform additional
diagnostic tests upon restart if it is turned off this way.
Using your notebook
Using your DVD/CD-RW drive
To play a CD or DVD, press the load/eject button on the side of your notebook. Place
the CD label-side up in the center of the tray and press the button again to load the
disc.
Windows Media Player will automatically start playing audio CDs, and software
CDs will usually produce a prompt screen after they are loaded. DVDs will
automatically play with your preinstalled DVD player software. If the CD or DVD
you have inserted doesn’t seem to work, click the Start menu and then click
My Computer. The CD or DVD should be visible in the Devices with Removable
Storage section of the My Computer window. Double click on the CD or DVD to
open it, and then double click the program or audio track you wish to access.
10
To record music or data to a CD-R or CD-RW disc, refer to the Windows XP
instructions for recording to CD. Click Start > Help > Support. Type “Record CD”
BBIA_5550_vprM_PalominoGetStart
8/9/02
4:43 PM
Page 15
and click the arrow key. Detailed instructions for copying files and folders to
CD will appear.
Using your touchpad and buttons
Your notebook’s touchpad (1) is used to control the position of the cursor much like a
mouse does. Simply touch the pad lightly with your finger and drag your finger in the
direction you want the cursor to move. If you run out of room on the touchpad, move
your finger back to the center of the pad and continue.
Three buttons that perform the functions of the right and left mouse buttons and
scroll wheel are located at the bottom of your touchpad. Click the right (2) or left (3)
button once or twice with light pressure to perform standard mouse single- or
double-clicks. The rocker button (4) in the center is a multidirectional scrolling
control—press the top, bottom, right or left side to scroll in the desired direction
within an open window.
1
3
4
2
The vpr Matrix button at the top of the keyboard provides quick access to
vprmatrix.com (if you have a working Internet connection) for updates, drivers and
other useful information.
Using your built-in wireless networking (some models)
If your notebook includes built-in 802.11b wireless capabilities, you can easily
connect to an existing wireless network*. If you are using a wireless access
point (WAP), please refer to your WAP manufacturer’s instructions to configure and
*Wireless networking requires a wireless access point or other compatible wireless product in order to create a network.
11
BBIA_5550_vprM_PalominoGetStart
8/9/02
4:43 PM
Page 16
connect your notebook to the wireless LAN. If you are connecting to a business
or campus wireless network, please contact your network administrator for
configuration assistance. Check your packing slip to see if your model has this feature.
Caring for your LCD display
The display on your notebook will maintain its original crisp and bright appearance if
cared for properly. Avoid touching the display with fingers or other objects that couldscratch the screen. Use only a soft cloth and an approved cleaning solution to clean
the display—coarse cloth, strong cleansers or alcohol-based solvents will damage
the screen. When cleaning the display use very gentle pressure to avoid scratching
or other damage. Avoid exposing your notebook to extreme heat or cold. Protect the
outside of the notebook when carrying it to prevent impacts to the notebook casing
that could damage the display or other components.
Battery safety and maintenance
12
If your notebook will not operate on battery power, press the power indicator
button on the battery to see if the battery has enough charge remaining to power
the notebook. If it does, remove your battery and check and clean the metal
connections with a soft cloth to ensure they are able to conduct electricity.
Replace the battery and reconnect your AC adapter and ensure that the AC
adapter light is on and the charge indicator (located on the front edge of the
notebook) glows orange to indicate a charging battery. If after several hours of
charging the battery still fails to hold a charge, the battery may have exceeded its
useful life and a new battery may need to be purchased.
BBIA_5550_vprM_PalominoGetStart
8/9/02
4:43 PM
Page 17
· Use only the notebook or an approved battery charger for recharging the battery.
· If you have more than one battery, rotating their use will extend the lives of all the
batteries.
· If you are not going to use your notebook for more than a month, remove the
battery and store in a cool, dry place and out of direct sunlight.
· Never leave batteries in temperatures above 140 O. Avoid exposure to direct
sunlight or leaving the notebook or battery in a car parked in the sun.
· Ensure that the battery is fully seated in your notebook before using it. You will
hear a click when the battery fully seats in the battery compartment.
· Keep the battery dry and don’t touch the metal terminals of the battery with any
liquid or metal object—this may short out the battery and damage it.
· Never attempt to take apart the battery.
· Avoid dropping the battery. If you find any damage to the battery case or if there
is any leakage from the battery, dispose of the battery immediately. Use gloves to
handle damaged batteries and dispose of or recycle used batteries properly
according to your local regulations.
13
BBIA_5550_vprM_PalominoGetStart
8/9/02
4:43 PM
Page 18
Connecting to the Internet
When you first click on a program that requires Internet access (like a Web
browser or an e-mail program), Windows XP will ask you a series of questions that
will guide you through the process of signing up with an ISP (Internet Service
Provider) and connecting to the Internet. An ISP is a service that allows your
computer to connect to the Internet. The type of service and cost may vary from
provider to provider. Most charge a monthly fee for a specified number of hours of
access plus one or more e-mail accounts.
Your computer is equipped with a standard v.92 dial-up modem as well as a
network (Ethernet) port. If you have a working phone connection, you should be
able to sign up for and use a standard dial-up connection to access the Internet.
You can also use the network port or wireless networking connection (if included
in your notebook and supported by your local network) to connect to the Internet
if you have access to a network with Internet access.
14
High-speed Internet access (DSL, cable or satellite) is available in some areas for
an additional charge. High-speed Internet services require additional equipment
that must be purchased or obtained from your ISP before you can enable
high-speed Internet access.
BBIA_5550_vprM_PalominoGetStart
8/9/02
4:43 PM
Page 19
Web tools
Windows XP includes the Internet Explorer Web browser, which allows you
to access the Internet’s information, pictures, video and more. Windows also
includes Outlook Express, which allows you to send and receive electronic
messages called “e-mail.” Other browsers and e-mail programs are available for
purchase or download if you wish to choose other software.
Internet basics
The Internet is a worldwide network of computers that exchange information over
a system of wires, optical cables and satellite connections. When you connect
your computer to the Internet it becomes a temporary part of this network.
You can choose which of your files and what information you wish to share over
the Internet, and you can only share or receive information while you are
connected through your ISP.
The best-known part of the Internet is the World Wide Web. This part is used by
companies, individuals and organizations for a wide variety of purposes, including
sharing information, and buying and selling goods and services.
15
BBIA_5550_vprM_PalominoGetStart
8/9/02
4:43 PM
Page 20
An individual Web location is known as a “Web site,” and is located through its
unique Web address — also known as a URL (Uniform Resource Locator).
A typical Web address (URL) looks something like this:
www.anycompany.com
or
www.anyuniversity.edu
Use a period (called a “dot”) to separate the sections of the Web address. The last
section of the URL indicates whether the site is operated by a business (.com), a
school (.edu), an organization (.org or .net) or a governmental body (.gov). Other
endings (.tv, .uk) can indicate other types of organizations or sites that are based in
other countries. You may notice that the URL listed on your browser’s address bar
also has the characters “http://” preceding the address — these characters are
automatically added by modern Web browsers and do not need to be entered
by the user.
Searching the Internet
16
To find what you’re looking for on the Internet you use an Internet search feature,
much like you would use a telephone directory to find people or businesses
in your area. Click on the “Search” button on your browser and type in the
description of what you are looking for (“plumber”). If you return too many results,
try searching again with a more specific description (“plumber Peoria Illinois”). If
you return too few results, try a more general description. Other search engines
BBIA_5550_vprM_PalominoGetStart
8/9/02
4:43 PM
Page 21
with different features are available at different locations on the Web — try some
different ones and see which feels right for you.
E-mail
E-mail allows you to send messages to friends, family, co-workers and businesses.
These messages can include other electronic documents, including photos, video
clips, sound files, text files and more.
E-mail addresses typically look something like this: [email protected]. To get
an e-mail account you will need to sign up for an ISP. Your ISP will provide
information you need to enter in order to use the Internet and e-mail, such as your
e-mail address, your incoming mail server name and your outgoing mail (SMTP)
server name. Windows will take you through a series of questions to enter this
information when you first use Outlook Express.
Sending a new e-mail with Outlook Express in Windows XP
After signing up for your ISP and getting your e-mail address (JohnSmith@
yourisp.com), click the Start menu and then click Outlook Express. Click Create Mail
and enter the e-mail address of your recipient ([email protected]) in the To
field. Press Tab to move to the Subject line and add a subject. Tab to the
message box and type your message. When you are done, click Send. If you have
not yet entered your incoming and outgoing server names, you will be asked to
enter these now. Your ISP will provide you with this information when you sign up.
17
BBIA_5550_vprM_PalominoGetStart
18
8/9/02
4:43 PM
Page 22
BBIA_5550_vprM_PalominoGetStart
2
8/9/02
4:43 PM
Page 23
TROUBLESHOOTING
If you have any problems with your vpr Matrix notebook, please take a
moment to find some of the common problems that can be fixed with a few
simple steps.
Windows XP has a useful built-in troubleshooting function that can be accessed
from the Control Panel. Click Start, click My Computer and then click Control Panel.
Click the category of the problem you are having (Network or Internet Connections,
Printers and Other Hardware, etc.), and then click on the category under the
Troubleshooters header that best describes your problem. Windows will lead you
through a helpful series of steps that can help you get going again quickly.
Below are steps to solve some of the most common notebook problems:
Power
Problem: Your notebook will not turn on.
Solution: Check that your notebook is plugged into the AC adapter and that the
adapter light is on. Check all power cord and AC adapter connections to
make sure they are firmly seated. Check the power indicator to see if
the notebook is on. If the notebook is on but the display is dark, see the
Display section of troubleshooting below.
19
BBIA_5550_vprM_PalominoGetStart
8/9/02
4:43 PM
Page 24
Solution: The notebook may be in hibernation mode. If the power indicator light
is blinking, wake up your notebook by pressing the red power
button briefly.
Solution: Check that the battery is properly installed and that the battery gauge
is full.
Solution: If you are using an external display, ensure that it is connected to your
notebook properly and that it is plugged in and turned on.
Hard disk drive
Problem: Display and power indicator light function, but Windows does not
load or an "Operating system not found" message appears.
Solution: Ensure there are no CDs or DVDs in the notebook drive. Turn off
notebook and restart.
Solution: Restart your notebook and hold down the F2 button as the computer
starts up. The BIOS menu screen will appear. Use the arrow keys to
select the Exit menu and then the Get Default Values option. Press Enter.
The message “Load default configuration now?” appears. Select Yes and
press Enter. Use arrow keys to Save and Exit, select Yes and press Enter
to confirm message “Save configuration changes and exit now?”
The notebook will restart and Windows should load.
20
If the notebook still is unresponsive after restarting, your operating
system may have been damaged. Refer to your Windows XP manual for
details, call the vpr Matrix technical support line or try restarting from
your Restore CD.
BBIA_5550_vprM_PalominoGetStart
8/9/02
4:43 PM
Page 25
Audio
Problem: Sound is too loud or too soft.
Solution: Volume is turned up or down. Use the two volume control buttons at the
top of the keyboard to adjust the output. Alternately, Click Start, then
click My Computer. Click Control Panel. Click Sounds, Speech and
Audio, then click Adjust the System Volume. Move the Volume control
up or down to control volume. Click to uncheck the Mute box if it is
checked. Click Apply when finished.
Display
Problem: Display doesn’t work.
Solution: Adjust the brightness for the screen by pressing the up arrow
or
down arrow keys.
Solution: Are you using an external monitor? Press FN > F4 to return to the main
display.
Problem: Display looks out of focus, images are too big or too small.
Solution: Reset the resolution of your display using the Display control panel in
Windows. Click Start, then My Computer, then Control Panel. Click
Change the Screen Resolution. Slide the screen resolution control to
your desired resolution (higher resolution numbers will produce smaller
images on the screen, and not all resolutions will work with your
display). The recommended resolution is 1024 x 768. Click Color Quality
and select color depth if desired. Click Apply when done.
21
BBIA_5550_vprM_PalominoGetStart
8/9/02
4:43 PM
Page 26
DVD/CD-RW combo drive
Problem: CD or DVD disc is not recognized by the drive.
Solution: CD/DVD disc is not centered in the drive. Eject CD/DVD disc and
position it in the center of the CD tray, then reload the CD/DVD.
Solution: CD/DVD disc is upside down. Make sure the label side of the CD/DVD
disc faces up in the tray.
Solution: CD/DVD disc is dirty. Clean CD/DVD disc using a CD disc cleaning kit to
remove smudges or dirt.
Solution: CD/DVD disc is defective. Try another CD or DVD disc. If the drive works
with other CDs/DVDs, then the CD/DVD disc is defective.
For technical support, call 1 (800) 332-4800 or visit www.vprmatrix.com.
22
BBIA_5550_vprM_PalominoGetStart
8/9/02
4:43 PM
Page 27
23
BBIA_5550_vprM_PalominoGetStart
3
8/9/02
4:43 PM
Page 28
LIMITED WARRANTY
THIS AGREEMENT CONTAINS THE LIMITED WARRANTY AND CERTAIN ADDITIONAL TERMS AND CONDITIONS THAT APPLY TO YOUR
PURCHASE OF NOTEBOOK COMPUTERS AND RELATED PRODUCTS FROM vpr Matrix, LP (“vpr Matrix”). THE TERM “PRODUCT” MEANS HARDWARE PURCHASES FROM AN AUTHORIZED RETAILER AND DESCRIBED IN YOUR PURCHASE RECEIPT OR INCLUDED IN THE ORIGINAL PACKAGING. THE TERM “PRODUCT” DOES NOT INCLUDE SOFTWARE, EXTERNAL HARDWARE, PERIPHERALS SUCH AS JOYSTICKS, PRINTERS,
SCANNERS, ETC., AND THEIR RELATED DOCUMENTATION (COLLECTIVELY “ACCESSORIES”). PLEASE BE CERTAIN TO READ THE INDIVIDUAL
WARRANTIES FOR ACCESSORIES CONTAINED IN THE SHIPPING CARTONS. YOU ACKNOWLEDGE AND AGREE THAT THIS AGREEMENT APPLIES TO THE PURCHASE OF YOUR PRODUCT AND ACCESSORIES.
Notebook Products Limited Warranty Information
One Year Limited Warranty
How to reach vpr Matrix, Inc.
If service is required in the United States, please call vpr Matrix Customer Support at 1-800-332-4800 (7 days a week). vpr Matrix’s mailing
address for limited Warranty matters in the United States is vpr Matrix, P.O. Box 9312, Minneapolis, Minnesota 55440-9312, Attention: Limited
Warranty Department.
What does my limited Warranty cover?
Vpr Matrix warrants that the hardware product and all the internal components of the vpr Matrix notebook, that is, the Product will be free from
defects in material and workmanship under normal use for a period of one (1) year commencing on the date of original purchase and ending on
the first anniversary of the date of purchase (“the Warranty Period”).
The limited Warranty is available only to the original owner.
In the event of a hardware defect covered under the terms of this limited Warranty, vpr Matrix or a vpr Matrix authorized third-party service
provider will have the option of replacing any defective hardware part or Product with a functionally equivalent new, used, or reconditioned part
or product that is in good working order. All replacement or exchanged parts or Products are warranted for the remainder of the original limited
Warranty Period. SUCH SERVICES SHALL BE THE CONSUMER’S SOLE AND EXCLUSIVE REMEDY. All exchanged parts or Products replaced
under this limited Warranty will become the property of vpr Matrix or a vpr Matrix authorized service provider.
During the Warranty Period, in the event that the Product covered by this Limited Warranty is serviced by vpr Matrix an authorized vpr Matrix
third-party service provider, or if serviced directly by the customer for installation of vpr Matrix branded and authorized hardware, the duration
of this Limited Warranty is not extended, rather the Product will remain covered by this Limited Warranty for the remainder of the original
Warranty Period.
24
vpr Matrix provides toll-free technical support service during the limited Warranty Period. This non-fee-based support does not include training
on how to use your software. Training on software products may be available on a fee basis only.
The sole remedy under this limited Warranty shall be repair or replacement of defective part(s) as provided above. vpr Matrix’s liability for
BBIA_5550_vprM_PalominoGetStart
8/9/02
4:43 PM
Page 29
failure to conform to the requirements of this limited Warranty after a reasonable number of attempts will be limited to a replacement of the
hardware system or, if vpr Matrix is unable to provide replacement and repair is not commercially practicable or cannot be made in a timely
manner, providing a refund not to exceed the purchase price of the hardware system. These remedies are your exclusive remedies for breach of
limited Warranty.
vpr Matrix MAKES NO OTHER EXPRESS WARRANTIES WITH RESPECT TO THE PRODUCT. ALL EXPRESS AND IMPLIED WARRANTIES FOR THE
PRODUCT, INCLUDING BUT NOT LIMITED TO ANY IMPLIED WARRANTIES OF AND CONDITIONS OF MERCHANTABILITY AND FITNESS FOR A
PARTICULAR PURPOSE, ARE LIMITED IN DURATION TO THE LIMITED WARRANTY PERIODS SET FORTH ABOVE AND NO WARRANTIES,
WHETHER EXPRESS OR IMPLIED, WILL APPLY AFTER SUCH PERIOD. SOME STATES AND JURISDICTIONS DO NOT ALLOW LIMITATIONS ON
HOW LONG AN IMPLIED LIMITED WARRANTY LASTS, SO THE ABOVE LIMITATIONS MAY NOT APPLY TO YOU.
What is not covered by this limited Warranty?
This limited Warranty does not cover software products, expandable parts, or consumable items such as batteries and the like, or hardware
parts or products purchased from anyone other than vpr Matrix. Rather, the limited Warranty covers only hardware defects with vpr Matrix
hardware parts or Products during the period of the limited Warranty. Limited Warranty and support for all third-party software applications and
third-party hardware shall be provided, if at all, by their respective companies. For more information, please refer to the software license
agreements or hardware limited Warranty documentation, if any, which are included with the respective software and hardware products.
This limited Warranty does not cover the repair or replacement of any hardware part or Product that is malfunctioning due to accidents such as
dropping and the like, negligence, misuse, abuse, theft, vandalism, fire, earthquakes, water, spilled liquids, immersion in liquids, lightning, or
other peril or other damages caused by any natural disaster. This limited Warranty also does not cover any Product on which the serial number
has been defaced, modified or removed, or damage caused by failure to provide a suitable installation environment for the hardware Product,
such as inappropriate electrical power, temperature or humidity; damage caused by unauthorized repairs (repairs performed by anyone other
than a vpr Matrix authorized service provider) or improper maintenance; damage caused by modifications or alterations of the hardware Product
or damage caused by third-party peripherals. Consumers are cautioned that product performance is affected by system configuration, software,
the application, customer data, and operator control of the system. You, and not vpr Matrix, are responsible for the selection, use and results
obtained from the Product. vpr Matrix does not warrant uninterrupted or error-free operation of this hardware Product nor does it warrant that
any Product that you purchase will meet your individual requirements. Please refer to the vpr Matrix license agreement included with your
computer for software warranties and software technical support information. Limited Warranty coverage and technical support options vary for
software products.
**IMPORTANT** Critical components: vpr Matrix’s Products are not authorized for use as critical components in life support devices or systems
without the express prior written approval of the Chief Executive Officer of vpr Matrix. Life support devices or systems are those that are
intended to support or sustain life and whose failure to perform can be reasonably expected to result in a significant injury to the user. Critical
components are those where failure to perform can be reasonably expected to cause failure of a life support device or system or affect its safety
or effectiveness.
25
BBIA_5550_vprM_PalominoGetStart
8/9/02
4:43 PM
Page 30
How do I obtain service in the United States?
If service is required in the United States, please call vpr Matrix Customer Support at 1-800-332-4800 (7 days a week). Please have the
following required information ready when making your call: hardware Product model number, serial number and date of purchase. The
computer product model number and serial number may be found on a label located on the hardware Product.
vpr Matrix’s mailing address for limited Warranty matters in the United States is: vpr Matrix, P.O. Box 9312, Minneapolis, Minnesota 554409312, Attention: Limited Warranty Department.
If the vpr Matrix technician determines that you have a hardware defect which cannot be resolved over the telephone, then vpr Matrix will,
at its option, either arrange for the exchange of defective end-user replaceable parts with functioning parts or replace the Product with a
functionally equivalent new, used or reconditioned Product that is in good working order and/or provide you with information on the process to
carry in the defective hardware Product to a vpr Matrix authorized service center. You will not be charged for replacement parts or Products or
for labor costs during your one-year limited Warranty Period, except as otherwise provided herein.
If, after discussing your problem, vpr Matrix determines that the problem is not the result of a hardware defect, then fee-based technical
support may be available to assist you. All components not originally installed on the Product or any unauthorized upgrade products (upgrade
products other than factory authorized parts) must be removed from the system before authorized vpr Matrix service providers will perform
service. Neither vpr Matrix nor its authorized service providers are responsible for non-original installed components or unauthorized products
that have been left in the unit. Such components include, but are not limited to, upgrade processors, additional memory and various component
upgrades.
Throughout the limited Warranty Period, service for end-user replaceable items may be provided on an exchange basis, by mail during
the limited Warranty period. End-user replaceable items may include, but are not limited to, keyboards, pointing devices, removable drives,
removable LCD panels, in-limited Warranty batteries, other expendable items, AC adapters, speakers and monitors. You are authorized to
replace said items if authorized by vpr Matrix.
Replacement components or systems will only be shipped to you after the non-functioning components or systems have been returned to
vpr Matrix. Alternately, you may secure the return of the non-functioning components or systems with a credit card at the time of the call. It is
your financial responsibility to return non-functioning components or systems. If they are not returned within 30 days your credit card will be
charged. This limited Warranty is valid only for hardware Products that have been purchased in the United States of America.
Service options may vary between countries and therefore limited Warranty service can only be provided in the U.S. Hardware Products taken
outside of the United States of America must be returned to the U.S. to receive the services described herein.
What could happen to my data during service?
26
Repairs on systems may result in the need to reformat the hard disk drive. Reformatting the hard disk permanently removes any files or software
programs installed there. Therefore, any original data is not retrievable. If your computer is functioning before shipping it to an authorized
service provider, you are strongly advised to copy or back up all data on your hard disk drive. NEITHER vpr Matrix NOR ITS SERVICE PROVIDERS
ARE RESPONSIBLE FOR ANY LOSS OR DESTRUCTION OF DATA OR MEDIA RESULTING FROM SERVICES PERFORMED HEREUNDER.
BBIA_5550_vprM_PalominoGetStart
8/9/02
4:43 PM
Page 31
Keep this computer identification information handy for easy reference:
Model Number:_____________________
vpr Matrix Serial Number:_____________________
Date of Purchase:___________________
vpr Matrix™ Customer Support
Call 1-800-332-4800
7 days a week
UNDER NO CIRCUMSTANCES SHALL vpr Matrix BE LIABLE IN ANY WAY TO THE END-USER OR ANY THIRD PARTY FOR ANY DAMAGES
IN CONNECTION WITH THE SALE, PURCHASE OR USE OF THE PRODUCT, INCLUDING, BUT NOT LIMITED TO, ANY LOSS OF DATA, LOSS OF
BUSINESS, LOSS OF PROFITS, LOSS OF USE OF THE HARDWARE PRODUCT OR ANY ASSOCIATED PERIPHERALS, COST OF REPLACEMENT
PRODUCT, DOWN-TIME, CHARGES FOR YOUR TIME AND EFFORT, OR ANY OTHER DIRECT, INDIRECT, SPECIAL, INCIDENTAL OR
CONSEQUENTIAL DAMAGES WHETHER OR NOT FORESEEABLE AND WHETHER OR NOT BASED ON BREACH OF LIMITED WARRANTY,
CONTRACT OR NEGLIGENCE, EVEN IF vpr Matrix HAS BEEN ADVISED OF THE POSSIBILITY OF SUCH DAMAGES. Some states or jurisdictions do
not allow the exclusion or limitation of incidental or consequential damages, so the above limitation or exclusion may not apply to you.
You agree to comply with all applicable laws and regulations of the various states and of the United States. This Agreement will be interpreted,
construed and enforced in all respects in accordance with the laws of the State of Minnesota without reference to its choice of law principles.
This limited Warranty shall not be applicable to the extent that any provision of this limited Warranty is prohibited by any Federal, State,
Provincial or Municipal law that cannot be preempted. This limited Warranty gives you specific legal rights, and you may also have other rights
that vary from state to state.
The terms and conditions for obtaining service during the period of this limited Warranty are subject to change by vpr Matrix without notice. In
addition, the terms and conditions covering services offered by or through vpr Matrix outside the limited Warranty period or during the limited
Warranty period for matters not covered by the limited Warranty (such as technical assistance for hardware usage, software issues and
“how-to” questions) and the fees charged for such services, are subject to change by vpr Matrix without notice. The availability of toll-free
telephone lines during or after the limited Warranty period, the types of services vpr Matrix may offer from time to time to its customers, and the
days and hours of operation during which vpr Matrix’s technical support and customer service operations will be available, are all subject to
change, without notice, at vpr Matrix’s discretion.
27
BBIA_5550_vprM_PalominoGetStart
4
8/9/02
4:43 PM
Page 32
IMPORTANT SAFETY INSTRUCTIONS
WARNING!
Please read all warnings and instructions
BEFORE operating the system.
This product contains no user-serviceable parts. Refer servicing only to qualified personnel.
Do not attempt to modify or use the supplied AC power cord if it is not the exact type required.
The DC push-button on/off switch on the system does not turn off system AC power. To remove AC power from the system,
you must unplug each AC power cord from the wall outlet or power supply.
28
SAFETY STEPS: Whenever you remove the chassis covers to access the inside of the system, follow these steps:
1. Turn off all peripheral devices connected to the system.
2. Turn off the system by using the push-button on/off power switch on the system.
3. Unplug all AC power cords from the system or from wall outlets.
4. Label and disconnect all cables connected to the I/O connectors or ports on the rear of the system.
5. Provide some electrostatic discharge (ESD) protection by wearing an antistatic wrist strap attached to chassis ground of the
system — any unpainted metal surface — when handling components.
6. Do not operate the system with the chassis covers removed.
BBIA_5550_vprM_PalominoGetStart
8/9/02
4:44 PM
Page 33
Danger of explosion if the battery is incorrectly replaced. Replace only with the same or equivalent type recommended by the
equipment manufacturer. Discard used batteries according to manufacturer’s instructions.
The system is designed to operate in a typical office environment. Choose a site that is:
· Clean and free of airborne particles (other than normal room dust)
· Well ventilated and away from sources of heat including direct sunlight
· Away from sources of vibration or physical shock
· Isolated from strong electromagnetic fields produced by electrical devices
· In regions that are susceptible to electrical storms, we recommend you plug your system into a surge suppressor and
disconnect telecommunication lines to your system during an electrical storm
· Provided with a properly grounded wall outlet
· Provided with sufficient space to access the power supply cords, because they serve as the product’s main power disconnect
CAUTION:
• To reduce the risk of fire, use only No. 26 AWG or larger telecommunication line cord.
• Do not use this product near water, for example, near a bath tub, wash bowl, kitchen sink or laundry tub, in a wet basement or near a swimming pool.
• Avoid using a telephone (other than a cordless type) during an electrical storm. There may be a remote risk of electric shock from lightning.
• Do not use the telephone to report a gas leak in the vicinity of the leak.
• Use of controls or adjustments or performance of procedure other than those specified herein may result in hazardous radiation.
29
BBIA_5550_vprM_PalominoGetStart
8/9/02
4:44 PM
Page 34
ADVERTIR!
Lea por favor Todas Advertencias y las instrucciones
ANTES DE operar el sistema.
Este producto contiene no partes utilizables de usuario. Refiérase atender a sólo al personal calificado.
No procure modificar ni usar la cuerda suministrada del poder de AC si no es el tipo exacto requerido.
El pulsador de DC en/prende lejos el sistema no apaga el poder de sistema AC. Para quitar AC el poder del sistema, usted debe
quitar cada cuerda del poder de AC de la salida de pared o alimentación.
30
La SEGURIDAD DA UN PASO: Cuando usted quita las cubiertas del chasis para accesar el interior del sistema, sigue estos pasos:
1. Apague todos artefactos periféricos conectaron al sistema.
2. Apague el sistema usando el pulsador en/del poder prende el sistema.
3. Quite todas cuerdas del poder de AC del sistema o de salidas de pared.
4. La etiqueta y desconecta todo cablegrafía conectado a los conectores de E/S o puertos en el trasero del sistema.
5. Proporcione alguna protección electrostática de la descarga (ESD) por llevar una anti correa constante de muñeca conectada
al suelo del chasis del sistema, superficie no pintada de metal, cuándo manejar los componentes.
6. No opere el sistema con el chasis cubre quitado.
BBIA_5550_vprM_PalominoGetStart
8/9/02
4:44 PM
Page 35
El peligro de la explosión si la batería se reemplaza inexactamente. Reemplace sólo con el tipo mismo o equivalente
recomendado por el fabricante del equipo. Tire baterías usadas según instrucciones del fabricante.
El sistema se diseña para operar en un ambiente típico de la oficina. Escoja un sitio que es:
· Limpio y libre de partículas en el aire (de otra manera que polvo normal de habitación)
· Bien ventilado y lejos de fuentes del calor inclusive luz directa del sol
· Lejos de fuentes de la vibración o el golpe físico
· Aislado de campos electromagnéticos fuertes producidos por artefactos eléctricos
· En las regiones que están susceptibles a tempestades eléctricas, nosotros recomendamos que usted tape su sistema en un
suppresser de oleada y desconecte las líneas de telecommunication a su sistema durante una tempestad eléctrica
· Proporcionado con un molió apropiadamente salida de pared
· Proporcionado con el espacio suficiente para accesar las cuerdas de la alimentación, porque ellos sirven como el producto’s el
poder principal desconecta
31
BBIA_5550_vprM_PalominoGetStart
8/9/02
4:44 PM
Page 36
Safety and Regulatory Requirements
Read all instructions before using the system. Save all the safety and regulatory
instructions for future reference.
FCC Declaration of Conformity
This device complies with Part 15 of the FCC Rules. Operation is subject to the following
two conditions: (1) this device may not cause harmful interference, and (2) this device
must accept any interference received,including interference that may cause undesired
operation.
CAUTION, ESD Precautions
Electrostatic discharge (ESD) can damage disk drives, add-in boards, and other parts.
The system can withstand normal levels of environmental ESD. However, we recommend
doing all procedures in this guide only at an ESD-protected workstation. If one is not
available, you can provide some ESD protection by wearing an antistatic wrist strap
attached to chassis ground of the system — any unpainted metal surface — when
handling components.
CAUTION: Use Grounded Outlet
Use only a grounded power service connection to protect yourself and your system in the
event of a power surge.
This equipment has been tested and found to comply with the limits for a Class B digital
device, pursuant to Part 15 of the FCC Rules. These limits are designed to provide
reasonable protection against harmful interference in a residential installation. This
equipment generates, uses, and can radiate radio frequency energy and, if not installed
and used in accordance with the instructions, may cause harmful interference to radio
communications. However, there is no guarantee that interference will not occur in a
particular installation. If this equipment does cause harmful interference to radio or
television reception, which can be determined by turning the equipment off and on,
the user is encouraged to try to correct the interference by one or more of the
following measures:
· Reorient or relocate the receiving antenna
· Increase the separation between the equipment and the receiver
· Connect the equipment to an outlet on a circuit other than the one to which the receiver
is connected
· Consult the dealer or an experienced radio/TV technician for help
Canadian Department of Communications Compliance Statement:
This digital apparatus does not exceed the Class B limits for radio noise emissions from
digital apparatus set out in the Radio Interference Regulations of the Canadian
Department of Communications. Le présent appareil numerique német pas de bruits radioélectriques dépassant les limites applicables aux appareils numériques de la classe B
prescrites dans le Réglement sur le broullage radioélectrique édicté par le ministère des
Communications du Canada.
WARNING
32
The push-button on/off power switch on the front panel of the system does not
turn off the AC power. To remove AC power from the system, you must unplug the
AC power cord from each power supply or wall outlet.
Check Power Cord
WARNING
Do not modify or use a supplied AC power cord if it is not the exact type required
in the region where the system will be installed and used. Only replace the cord
with the correct type. Refer to the cord requirements described below.
Power Cord Requirements
Rating: Cords must be rated for available AC voltage and have a current rating at least
125% of the current rating of the system.
Connector, wall outlet end: Cords must be terminated in grounding-type male plugs
designed for use in your region. It must have certification marks showing certification by
an agency acceptable in your region.
Connector, power supply end: The connector that plugs into the AC receptacle on the
system’s power supply must be an IEC 320, sheet C13, type female connector.
Cord length and flexibility: Cords must not be less than 4.5 feet (1.37 meters) long, and
must be flexible.
Note
Surge suppressor recommended: In geographic regions that are susceptible to
electrical storms, we highly recommend that you plug the system into a surge suppressor.
BBIA_5550_vprM_PalominoGetStart
8/9/02
4:44 PM
Page 37
La seguridad y los Requisitos Regulativos
EL CUIDADO, las Precauciones de ESD
Lea todas instrucciones antes de usar el sistema. Salve toda la seguridad y las
instrucciones regulativas para la referencia futura.
La descarga (ESD) electrostática puede dañar impulsores de discos, agregan en tablas, y
en otras partes. El sistema puede resistir a los niveles normales de ESD de entorno. Sin
embargo, nosotros recomendamos hacer todos procedimientos en esta guía sólo en un
ESD- estación de trabajo protegida. Si uno no está disponible, usted puede proporcionar
alguna protección de ESD por llevar una anti-y correa constante de muñeca conectada al
suelo del chasis del sistema — superficie no pintada del metal — cuándo manejar los
componentes.
FCC Declaration of Conformity
Este artefacto se conforma con la Parte 15 de las Ordenes de FCC. La operación es con sujeción a las siguientes dos condiciones: (1) este artefacto no puede causar interferencia
perjudicial, y (2) este artefacto debe aceptar cualquier interferencia recibida, Inclusive interferencia que puede causar la operación de undesired.
Este equipo se ha probado y ha sido encontrado para conformarse con los límites para una
Clase B artefacto digital, Según Parte 15 del FCC Gobiernan. Estos límites se diseñan para
proporcionar la protección razonable contra interferencia perjudicial en una instalación
residencial. Este equipo engendra, los usos, y puede irradiar la energía de la frecuencia
de radio y, si no instaló y usó de acuerdo con las instrucciones, pueden causar interferencia perjudicial a comunicaciones de radio. Sin embargo, no hay la garantía que esa interferencia no ocurrirá en cierta instalación. Si este equipo causa interferencia perjudicial a
la recepción del radio o la televisión, que puede ser determinada apagando el equipo y en,
el usuario es alentado a tratar de corregir la interferencia por uno o por más de las medidas siguientes:
· Reorient o relocate la antena recipiente
· Aumente la separación entre el equipo y el receptor
· Conecte el equipo a una salida en un circuito de otra manera que el uno a que el
receptor se conecta
· Consulte el comerciante o un radio experimentado/técnico de TELEVISION para la
ayuda
El Departamento canadiense de la Declaración de la Conformidad de Comunicaciones:
Este aparato digital no excede los límites de la Clase B para emisiones de ruido de radio
del aparato digital embarcar en las Regulaciones de Interferencia de Radio del
Departamento canadiense de Comunicaciones. Le présent appareil numerique német pas
de bruits radioélectriques dépassant les limites applicables aux appareils numériques de
la classe B prescrites dans le Réglement sur le broullage radioélectrique édicté par le
ministére des Communications du Canada.
ADVERTIR
El pulsador en/lejos poder prende el entrepaño anterior del sistema no apaga el
poder de AC. Para quitar AC el poder del sistema, usted debe quitar la cuerda del
poder de AC de cada salida de la alimentación o la pared.
EL CUIDADO: EL USO MOLIÓ SALIDA
Use sólo un molió la conexión del servicio del poder de protegerse y su sistema en caso de
una oleada del poder.
Verifique Cuerda de Poder
ADVERTIR
No modifique ni use una cuerda suministrada del poder de AC si no es el tipo exacto requerido en la región donde el sistema se instalará y será usado. Sólo
reemplace la cuerda con el tipo correcto. Refiérase a los requisitos de cuerda
descritos abajo.
Accione los Requisitos de Cuerda
La calificación: Las cuerdas se deben valorar para el voltaje disponible de AC y tener
una corriente que valora por lo menos 125% de la corriente que valoran del sistema.
El conector, el fin de salida de pared: Las cuerdas deben ser terminadas a moler el tipo
tapón masculino diseñado para el uso en su región. Debe tener la certificación de mostrar
de marcas de certificación por una agencia aceptable en su región.
El conector, la alimentación finaliza: El conector que tapa en el receptacle de AC en el
sistema & la alimentación’s debe ser un IEC 320, la hoja C13, escribe el conector femenino.
La longitud de la cuerda y la flexibilidad: Las cuerdas no deben ser pies de menos de
4.5 (1.37 contadores) largo, y deben ser flexible.
Nota
Encréspese suppressor recomendado: En las regiones geográficas que están susceptibles a tempestades eléctricas, nosotros recomendamos altamente que usted tapa el
sistema en un suppressor de oleada.
33