1
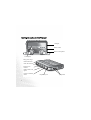
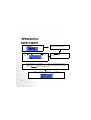
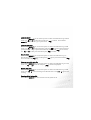
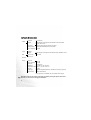
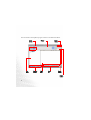
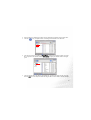
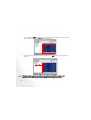
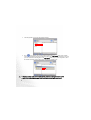
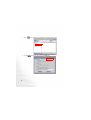
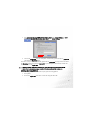
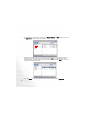
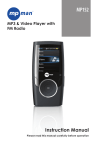
Joybee 210 (DA210)
MP3 Player
User Manual
Welcome
Copyright
All rights reserved. No part of this publication may be reproduced, transmitted,
recorded, stored in a retrieval system, or translated into any language or computer language, in any form or by any means, electronic, mechanical, recording,
photocopying, or otherwise, without the prior permission of the BenQ Corporation.
Disclaimer
The BenQ Corporation shall make no warranty or representation, either
expressed or implied, with respect to the quality, accuracy or fitness for any particular purpose of this document. The information in this document is subject
to change without notice. The content of this manual has been checked and
proofread prior to publication.
*Windows is the registered trademark of Microsoft Corporation. All trademarks or product names appearing in this manual are registered property of their respective owners.
Important Information
FCC Compliance
This equipment has been tested and found to comply with the limits for a Class
B digital device, pursuant to Part 15 of the FCC Rules. These limits are designed
to provide reasonable protection against harmful interference in a residential
installation. This equipment generates, uses, and can radiate radio frequency
energy and, if not installed and used in accordance with the instructions, may
cause harmful interference to radio communications. However, there is no
guarantee that interference will not occur in a particular installation. If this
equipment does cause harmful interference to radio or television reception,
which can be determined by turning the equipment off and on, the user is
encouraged to try to correct the interference by one or more of the following
measures:
1. Reorient or relocate the receiving antenna.
2. Increase the separation between the equipment and receiver.
3. Connect the equipment into an outlet on a circuit different from that to
which the receiver is connected.
4. Consult the dealer or an experienced radio/TV technician for help.
Any unauthorized changes or modifications to this equipment would void the
user’s authority to operate this device.
This device complies with Part 15 of the FCC Rules. Operation is subject to the
following two conditions: (1) This device may not cause harmful interference,
and (2) this device must accept any interference received, including interference
that may cause undesired operation.
Accessories precautions
Batteries:
Li-polymer batteries are recyclable. You can help to preserve our environment by
returning your used rechargeable batteries to the authorized collection and recycling outlet. For detailed locations of the recycle outlets in each country, please
call your environment protection agency for detail.
Use this unit to recharge the battery pack.
The battery pack is not waterproof. Do not use the battery outside if it is snowing or raining.
Do not get dirt, sand, liquids, or other foreign matter on the terminals.
Do not touch the plug terminals with metal objects.
Do not disassemble, remodel, heat or throw into fire.
Warnings
To reduce the risk of fire, electric shock or product damage, do not expose
this apparatus to rain, moisture, dripping or splashing and that no
objects filled with liquids shall be placed on the apparatus.
Use of controls or adjustments or performance of procedures other
than those specified herein may result in hazardous radiation
exposure. Do not open covers and do not repair yourself. Refer
servicing to qualified personnel.
Table of Contents
Copyright .....................................................................................................................i
Disclaimer ....................................................................................................................i
Important Information ...............................................................................................ii
FCC Compliance .......................................................................................................... ii
Accessories precautions .............................................................................................. iii
Warnings ....................................................................................................................iii
Introduction ................................................................................................................ 1
Before Use ................................................................................................................... 2
Check your package contents ...................................................................................... 2
Check your computer specification ............................................................................ 3
Charging battery by USB cable .................................................................................... 3
Touring the Joybee 210 MP3 player ............................................................................ 4
Installing relevant software .......................................................................................... 5
Remove the Joybee 210 from your PC ........................................................................ 6
Basic operations .......................................................................................................... 8
Basic idea on operation 8
Listen to music ............................................................................................................... 9
Listen to FM radio.......................................................................................................... 9
Record voice ................................................................................................................... 9
Listen to recorded voice file........................................................................................... 9
Record FM radio ............................................................................................................ 9
Turning off the Joybee 210 ............................................................................................ 9
Joybee 210 menu tree ................................................................................................. 10
Advanced Operations ............................................................................................... 11
Using QMusic .............................................................................................................11
Overview of QMusic .................................................................................................... 11
Adding music to the Joybee 210 using QMusic.......................................................... 14
Adding music from an audio CD to Joybee 210 .................................................14
Adding files from a PC to Joybee 210 ..................................................................17
Updating Joybee 210 automatically with QMusic...................................................... 19
Deleting files using QMusic......................................................................................... 21
Music Mode ................................................................................................................23
Segment Repeat ............................................................................................................ 23
Delete Files.................................................................................................................... 23
Voice Mode .................................................................................................................23
Delete Files.................................................................................................................... 23
Record Mode ...............................................................................................................24
Record Voice ................................................................................................................ 24
FM Radio Mode ..........................................................................................................24
Program preset channel ............................................................................................... 24
Select preset channel to listen ...................................................................................... 24
Record FM Radio ......................................................................................................... 24
Adjust volume in FM Mode......................................................................................... 25
Setup Mode .................................................................................................................25
Format Memory ........................................................................................................... 25
Idle time to power off automatically ........................................................................... 25
Idle time to turn off the Backlight ............................................................................... 25
Adjust Screen Contrast ................................................................................................ 25
Select Language ............................................................................................................ 26
Lyrics Display ............................................................................................................... 27
Notes ......................................................................................................................... 31
Frequently Asked Questions .................................................................................... 32
Introduction
Thank you for purchasing the BenQ 210 MP3 player!
Joybee 210 not only serves as a MP3 player of high quality audio playback with
exclusive design but also functions as a mobile USB flash drive, a digital voice
recorder, FM radio and language learning device.
Joybee 210-More than a MP3 player
A.MP3/ WMA/ WAV digital audio file formats supportable
-Embedded BenQ sound effect technology and 6 equalizers to
enhance sound performance.
-Supports lyrics synchronization.
- Multi-languages supportable
B.Mobile flash drive with USB interface
- Hot plug and play. Driverless except Windows 98SE
- Files copy-and-paste even with Windows Explorer
C.Digital Voice recorder
-Built-in microphone, records up to 500 minutes(WAV/128MB)
D.FM receiver
-20 preset channels
E.Languages learning device
- Supports segment repeat
Powerful 5 in 1 multi-function MP3 player
Built-in rechargeable li-polymer battery and up to
8 hours continuous playback
Bundled with QMusic and other free software
Charged by USB connected to active PC
1
Before Use
Check your package contents
Joybee 210 MP3
player
USB cable
Earphones
Software/User manual
Joybee 210 QSG
Warranty card
Please contact your retailer if anything is
missing when you open the package.
2
Check your computer specification
To perform Joybee 210 best with your computer, please meet the system requirements below.
•OS: Microsoft Windows 98SE/2000/ME/XP (QMusic supports Windows 2000/XP)
•CPU: Pentium 200 MHz or faster
•I/O port: USB (1.1 or higher)
•Device: CD-ROM
•Hard disk space: 60 MB (minimum)
•System memory: 32 MB (minimum)
Charging battery by USB cable
Connect your Joybee 210 with USB provided to active PC. It takes about 5 hours for first
charging and 2.5 hours hereafter.
3
Touring the Joybee 210 MP3 player
USB port
Power switch
Built-in microphone
LCD display
Play/ pause/ stop/
confirm selection
Next/ fast forward
Previous/ fastrewind
Buttons lock/ A-B
repeat
Power on and off/
menu
4
Earphones jack
Strap holes
Installing relevant software
Insert the CD-ROM and you'll see an autorun screen. Click the item to start installing the
program you want.
Item
Description
Install QMusic
QMusic is an easy-to-use file manager that allows you to play an audio CD and
MP3 files, convert music on an audio CD into MP3 files, create playlists, and
save your MP3 files on CDs if your computer is equipped with a CD burner.
With QMusic, you can save your music files on the Joybee 210, and organize
and update the data stored on the Joybee 210. Note that QMusic works only
on Windows 2000/XP. Windows 2000 does not support the CD burning
function.
Install BenQ
The player software includes driver for Windows 98SE, you must install the
driver before connecting the Joybee 210 to your PC.
Joybee 210
Driver
Install Windows QMusic requires Windows Media Player 9 to be installed on your system. Click
Media Player
this item to install Windows Media Player 9 if you do not have it installed.
Install Direct X
QMusic requires Direct X 8.1 to be installed on your system. Click this item to
install Direct X if you do not have it installed.
Install Acrobat
Reader
Install the Acrobat Reader to read the electronic documentation for your MP3
player.
Read User
Manual
Click to read the User Manual in the language of your choice. Choose from
English, Simplified Chinese, Traditional Chinese, Japanese, French, Spanish,
and Portuguese.
5
Remove the Joybee 210 from your PC
Double click the USB device icon
6
on the task bar.
1.
A dialog box as shown below appears on the screen. Select USB Mass Storage Device in the
dialog box and press Stop.
2.
Another dialog box as shown below appears on the screen. Select BenQ Joybee 210 USB
Device and press OK.
3. When the following dialogue box appears on the screen, press OK and disconnect the Joybee
210 from the PC.
Do not disconnect the Joybee 210 from your PC without using the procedure described here or there may be loss of
data.
The procedure described here may differ for the different operating systems.
Remove the disk following the steps above and you can still play the Joybee 210 during charging.
7
Basic operations
Basic idea on operation
Press MENU/
to power on.
Press
select.
to move, and
and
The mode of latest use when you
shut down the Joybee 210.
to
Press MENU/
menu.
to enter main
(Music/ Voice/ FM/ Record/ Setup)
Ex.
During playback, press and hold MENU/
for two seconds to enter options
menu under each main function. For example, when MP3 file is played, press
and hold MENU/ for two seconds to have...
(Press
8
and
to move, and
to select.)
Listen to music
Press and hold MENU/ for one second to power on. Refer to the table above to go to Music
mode. Use
and
to make selection and press
to confirm. Press and hold
MENU/ for two seconds to go to options menu.
Listen to FM radio
Press and hold MENU/ for one second to power on. Refer to the table above to go to FM
mode. Use
and
to adjust frequencies, and press
to save the current channel to
preset channel list. To go to preset channels directly, press and hold
for two seconds,
use
and
to select preset channel and press
to confirm.
Record voice
Press and hold MENU/ for one second to power on. Refer to the table above to go to
Record mode. Press
to start recording. Press
again to pause. Press and hold
for two seconds to stop recording.
Listen to recorded voice file
Press and hold MENU/ for one second to power on. Refer to the table above to go to Voice
mode. Use
and
to select file and press
to confirm and playback.
Record FM radio
Press and hold MENU/ for one second to power on. Refer to the table above to go to FM
mode. Press A-B/
to start recording current FM radio show. Press A-B/
again to end
recording.
Turning off the Joybee 210
Press and hold MENU/
for three seconds to turn the Joybee 210 off.
9
Joybee 210 menu tree
Music
Volumes
Repeat
Voice
Volume
Repeat
FM
Save to CH
Select CH
(control bar)
OFF/ Repeat This/ Repeat All/ Random Once/ Random
Repeat/ Intro Scan
Equalizer
Normal/ Classical/ Pop/ Rock/ Jazz/ Bass
BenQ Sound ArtSound/ BestBASS/ InConcert/ OFF
Lyrics Display On/ Off
OFF/ Repeat This/ Repeat All/ Random Rep/ Random Once/
Intro Scan
Record
Setup
Play-List
Lyrics Display
Contrast
Backlight
Auto Power off
Format
Language
System Info
On/ Off
On/ Off
(control bar)
On/ Off/ 5s/ 10s/ 30s/ 60s
Never/ 1 m/ 2 m/ 3m/ 5 m
Yes/ No
English/ Simplified Chinese/ Traditional Chinese/ Japanese
System information
Note: Japanese is available only in models sold in Japan.
Note that in order to save power and protect your battery, turning the power switch to off
whenever it’s not at use is strongly recommended.
10
Advanced Operations
Using QMusic
QMusic is a software provided to help you to organize your music collection. You can use it to play
audio CDs or MP3s on your PC, convert audio CD tracks into MP3 format, create playlists, transfer
music to your Joybee 210, burn music CDs and create your own music album.
The QMusic icon appears on your Desktop after it is successfully installed. Double
click the icon to launch QMusic. Alternatively, you can start QMusic by clicking Start
on the Windows task bar and clicking Programs | QMusic2 | QMusic2.
Overview of QMusic
11
The user interface of the QMusic program is shown in the illustration below.
Action
buttons
Left
panel
Display
Playback
buttons
Right
pane
System
buttons
Status
bar
Feature
buttons
Search
window
12
Features
Description
Action buttons Provide specific functions of QMusic.
Left panel
Displays all files supported by QMusic.
Playback
buttons
Provide functions such as playing a selected file,
skipping to the next or previous files, pausing
playback, stopping playback, ejecting a CD, and
volume control.
Status bar
Displays details of files, such as total number of files
and playing time.
Feature
buttons
Set repeat or random playing of files in playback mode
and provide additional options.
Right panel
Displays the files in the folder or media selected in the
left panel.
Search
window
Provides searching function. Type in a file name and
press the magnifier icon to search for a particular file.
System
buttons
Control QMusic window.
Display
Displays progress of an action. For example, when an
audio file is being played, the name, elapsed playing
time and other information of the file is displayed
here.
13
Adding music to the Joybee 210 using QMusic
Connect the Joybee 210 to the PC. The icon Joybee 210 appears in the left panel of the QMusic
interface, and the directories on the Joybee 210 are displayed under the icon.
You can now add files to your Joybee 210 from an audio CD using the file conversion facility provided by QMusic or you can directly copy your audio music files from the PC to the Joybee 210.
Adding music from an audio CD to Joybee 210
1. Put an audio CD in the CD-ROM on your PC. The
icon appears in the left panel
of QMusic, and the files on the CD appear in the right panel.
14
2.
Select the files to be added to the Joybee 210 by clicking the checkboxes in front of the files.
3.
Click the
4.
After the conversion is completed, a New Album is added to the left panel. All the converted
files are placed in this album. Click the New Album to display the details of files in the right
panel.
5.
Click to select the file to be added to the Joybee 210. To select more than one file, press and
hold the Ctrl key on the keyboard while selecting the files. To select all files, click the first file,
icon, and QMusic starts converting the selected files into MP3 files.
15
press and hold the Shift key on the keyboard, and then click the last file. If you want to delete
files, select files and press the Delete key on the keyboard.
6.
Drag to copy the selected files from the right panel to the MP3 directory under the Joybee
210 icon.
•
When files are being transferred to the Joybee 210, do not disconnect the JOYBEE 210 from the PC.
•
Check if there is enough memory space on Joybee 210 before transferring files to Joybee 210.
16
Adding files from a PC to Joybee 210
1. Click the My Joybee folder in the left panel.
2.
Press
and a dialog box opens to help you to select the desired files. Browse and select
MP3, WAV or WMA files to be added to the Joybee 210 from the PC. Press Open to add the
selected files to My Joybee.
17
3.
Click the Joybee 210 icon on the QMusic interface.
4.
Press
and QMusic starts transferring the files in the My Joybee folder to the Joybee
210. Before transferring the selected files to Joybee 210, QMusic shows a dialog box to ask if
you want to delete the existing files in the My Joybee folder. If you want to keep them, abort
the transfer and back up these files, before starting file transfer again.
•
When files are being transferred to the Joybee 210, do not disconnect the Joybee 210 from the PC.
•
Check if there is enough memory space on Joybee 210 before transferring files to Joybee 210.
18
Updating Joybee 210 automatically with QMusic
You can set up the Joybee 210 to be updated with the music from the My Joybee folder automatically
when it is connected to the PC.
1.
Click the My Joybee folder in the left panel.
2.
Press
and a dialog box opens to help you to select the desired files. Browse and select
MP3, WAV or WMA files to be added to the Joybee 210 from the PC. Press Open to add the
selected files to My Joybee.
19
3.
Press
4.
In the Option dialog box shown, click the Joybee tab.
20
on the right panel of QMusic in the function button area.
5.
Select Automatically launch QMusic when Joybee added under Launch Settings and Automatically transfer MP3 files to Joybee when added under Update Settings. Click the
button to save your settings.
6.
Connect the Joybee 210 to the PC and QMusic automatically updates the files on Joybee 210
with the files in My Joybee folder.
From now on, if you want to automatically update files on Joybee 210, you only need to save files in
the My Joybee folder and connect the Joybee 210 to your PC. QMusic automatically transfers the
files in the folder to the Joybee 210.
•
When files are being transferred to the Joybee 210, do not disconnect the Joybee 210 from the PC.
•
Check if there is enough memory space on Joybee 210 before transferring files to Joybee 210.
Deleting files using QMusic
Use the following procedure to delete files on your Joybee 210 using QMusic.
1.
Start QMusic.
2.
Turn on the Joybee 210 and connect it to the PC using the USB cable.
21
3.
Locate the files to be deleted by clicking on the MicIn, FMRadio or MP3 subdirectory under
the Joybee 210 icon in the left panel of QMusic.
4.
The files in the selected directory are displayed in the right panel. Click to select the file to be
deleted. To select more than one file, press and hold the Ctrl key on the keyboard while
selecting the files. To select all files, click the first file, press and hold the Shift key on the keyboard, and then click the last file.
5.
Press the Delete key on the keyboard to delete all selected files from the Joybee 210.
22
Music Mode
Segment Repeat
Press MENU/ for one second to start up the Joybee 210, and press MENU/ again to go to
main menu selection. Use
and
to move and press
to go to Music mode. Press
A-B/
to to set segment repeat start point A; press again to set segment repeat end point B.
This segment will start to repeat right after point B is set. Press A-B/
to stop this repeat and
to continue playback.
Delete Files
You can delete files on the Joybee 210 directly. Press MENU/ for one second to start up the
Joybee 210, and press MENU/ again to go to main menu selection. Use
and
to
move and press
to go to Music mode. Press
for two seconds to stop playback and
to list all current music files. Use
and
to select the music file you want to delete and
press A-B/
to go to Erase/ Yes or Erase/ No. Select Yes to confirm deletion or No to exit.
Voice Mode
Delete Files
Press MENU/ for one second to start up the Joybee 210, and press MENU/
again to go
to main menu selection. Use
and
to move and press
to go to Voice mode. Press
for two seconds to stop voice file playback. Use
and
to select the music file you
want to delete and press A-B/
to go to Erase/ Yes or Erase/ No. Select Yes to confirm deletion or No to exit.
23
Record Mode
Record Voice
Press MENU/ for one second to start up the Joybee 210, and press MENU/
to go to
main menu selection. Use
and
to move and press
to go to Record mode. Press
to start recording. Press
to pause, or press
for two seconds to stop
recording and go to Voice mode directly. The recorded voice files would be saved in
MICXXXX.wav format in the Joybee 210 MICIN folder.
FM Radio Mode
Program preset channel
Press MENU/ for one second to start up the Joybee 210, and press MENU/ to go to
main menu selection. Use
and
to move and press
to go to FM mode. Use
and
to adjust FM frequency and press
to save the current channel to preset channel
list. Use
and
to select preset channel number and
to confirm selection.
Select preset channel to listen
Press MENU/ for one second to start up the Joybee 210, and press MENU/ to go to
main menu selection. Use
and
to move and press
to go to FM mode. Press
for two seconds to list preset channels, use
and
to make selection and press
again to confirm.
Record FM Radio
Press MENU/ for one second to start up the Joybee 210, and press MENU/
to go to
main menu selection. Use
and
to move and press
to go to FM mode. Press A-B/
to start recoding. Press again to stop recording. The files would be saved in FMXXXX.wav
format in the Joybee 210 FMRADIO folder. You can go to Voice mode to play the files as well.
24
Adjust volume in FM Mode
Press MENU/ for two seconds to have control graphic, and use
increase volume.
or
to decrease or
Setup Mode
Format Memory
Press MENU/ for one second to start up the Joybee 210, and press MENU/ to go to main
menu selection. Use
and
to move and press
to go to SETUP mode. Use
and
to move to FORMAT. Use
and
to select Yes or No. Press
to execute format or No/ MENU/ to exit.
Idle time to power off automatically
Press MENU/ for one second to start up the Joybee 210, and press MENU/ to go to main
menu selection. Use
and
to move and press
to go to SETUP mode. Use
and
to move to Auto off and press
to enter. Use
and
to select the interval
you want the Joybee 210 to turn off automatically and press
to confirm.
Idle time to turn off the Backlight
Press MENU/ for one second to start up the Joybee 210, and press MENU/ to go to main
menu selection. Use
and
to move and press
to go to SETUP mode. Use
and
to move to Backlight and press
to enter. Use
and
to select the backlight duration and press
to confirm.
Adjust Screen Contrast
Press MENU/ for one second to start up the Joybee 210, and press MENU/ to go to main
menu selection. Use
and
to move and press
to go to SETUP mode. Use
25
and
to move to Contrast and press
to enter. Use
and
bar. Press MENU/
to confirm and go back to SETUP mode.
to adjust the control
Select Language
Press MENU/ for one second to start up the Joybee 210, and press MENU/ to go to
main menu selection. Use
and
to move and press
to go to SETUP mode. Use
and
to move to Language and press
to enter. Use
and
to select the language and press
to confirm.
26
Lyrics Display
Joybee 210 supports lyrics synchronization function, with which Joybee 210 serves as your
personal mobile karaoke and lets you enjoy singing whenever and wherever you go. Joybee 210
also supports standard lyrics synchronization file format Lyrics 3.2 Before activating this
function, please edit lyric files and save them. These files would be embeddedin MP3 files.
To edit a lyric file, you have to use Winamp Lyric Plug-in programs. You can go to http://
www.winamp.com/ to download the program and its plug-ins.Follow the steps below to see
how to create an lyrics file.
Step one: Follow the
instructions to complete
the Installation of
Winamp. Initiate the
Winamp and click Ctrl+Y
or select Lyrics to activate
Lyric function.
27
Step two: Click
on the lower right of the program window.
Step three: When the cursor appears, you can paste the lyrics files (*.TXT) or select the tool
on the lower right to select Import From>.TXT to text the files by yourself. Please note
that each line of lyrics can not be over 24 byte. If so, you have to separate it into different lines
to make screenplay readable.
28
Step four: After finishing editting the lyrcis, click the tool icon
add time stamp or Ctrl+D.
on lower right and click
Step five:
When Add time Stamp is opened,
please playback the MP3 file and
click left to insert time stamp at
the same time.(Usually you can
insert the time stamp one or two
seconds before every separate line
of lyrics starts.) Repeat this until
every line of the lyrics is stamped.
29
Step six:After finishing the time stamp, click the tool icon on lower right and select Save as >
Lyrics 3.2 or Save .
The lyrics files you edit and save as Lyrics 3.2 would be embedded in their respective MP3 files.
Step seven:Copy and paste the MP3 files which are edited lyric files to the MP3 folder under
the Joybee 210, and select ON in MODE/ Lyrics Display on Joybee 210 MP3 Player.
Step eight:Switch to MP3 mode and starts to playback MP3 file. You will see the lyrcis shown
on the screen while the MP3 file is played.
Winamp main program: www.winamp.com
Winamp plug-in program:
http://www.winamp.com/plugins/browse.php?search=yes&filter=C&query=lyric
30
Notes
•Do not put too many files (256 at most) under each directory or in the root directory to
prevent the system from slowing down. If a large number of files must be put in the player,
organize the files into different directories.
•Do not store data in the player to its full memory capacity. Allow at least 0.5 MB for the
system to manage memory to prevent the system from slowing down or improper data
storage status.
•When transferring files to the Joybee 210 Digital Audio Player, do not remove the USB cable
when the transfer is in progress.
•The Joybee 210 Digital Audio Player only plays the files under default folder MP3, FMRADIO
and MicIn in the memory.
•Do not remove the USB cable when updating the firmware of the player. Otherwise, the player
may not be able to startup. Remove the USB cable only when you are informed by the
message on the display.
•This player can play wma files with same bit rate or higher than 48 kbps.
When formatting the player using the Windows Format command, do not format it using the
NTFS file system.
31
Frequently Asked Questions
Why can’t I play certain songs in WMA format using my Joybee 210 Digital Audio Player?
Some WMA songs currently available from the Internet are copyright protected. This kind of
protection method prevents unauthorized person from playing protected song files. These
songs can only be played using a Window Media Player program that has been authorized,
and Joybee 210 doesn’t support this kind of music files. For more information on this, please
refer to http://www.microsoft.com/windows/windowsmedia/drm/default.aspx
How many minutes of MP3 music can be stored in the Joybee 210 Digital Audio Player?
It depends on the memory capacity of the player and the compression ratio used in encoding
the MP3 files. For MP3 files encoded by MPEG1 Layer3 with a bit rate of 128kbps and
sampling frequency of 44kHz (most commonly used), 1MB of memory can store about 1
minute of music. i.e. 128MB/256MB of memory stores about 128/256 minutes of music.
When should I recharge the battery?
When the battery indicator on the display shows that the battery is empty, or battery appears
to be weak (there is only one bar in the battery icon).
Why do different songs have different sound volumes?
Because the parameter of the volume level when recording each song may not be the same, the
volume level of different songs are different.
The file size is smaller than the free memory available in my player, but I still cannot transfer it
to my player
32
The Joybee 210 Digital Audio Player allocates memory in cluster of 16KB or 32KB. A file of 1
Byte also occupies one cluster, so a file of a size smaller than the free memory available might
not be transferred to the player.
Why is the memory capacity shown in the player smaller than that in the specifications chart?
The player needs some memory space to store other system data, therefore the usable memory
is smaller than its full capacity.
How can I get the updated firmware and fonts data?
You can go to BenQ website at http://www.BenQ.com to download these data when they are
available.
The Joybee 210 Digital Audio Player does not start up!
Check the following:
•Make sure if you have accidentally disconnected the player from the computer when updating
firmware.
•Physical damages in the flash memory may result in this problem.
•The battery power is too low.
Solutions:
•Recharge the battery.
•Perform the firmware upgrade procedure again.
•Please try to format the flash memory completely. If the problem still exists, please contact
your local service providers.
Can Joybee 210 be formatted using my computer?
33
When formatting the player using the Windows Format command, do not format it using the
NTFS file system.
Why can’t my QMusic read my Joybee 210?
Maybe the QMusic you are using is not the latest version, please uninstall the old version and
run installation again. Or, you can go to www.benq.com.tw/support
to download the program. Please select MP3 player/ applications to get the
latest QMusic.
34


![VadaTech VT85x User Manual[1]](http://vs1.manualzilla.com/store/data/005803212_1-bb50408d9ec4263de47f5dcd2a97e7b3-150x150.png)