1
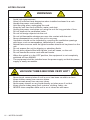
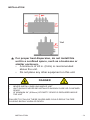
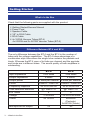
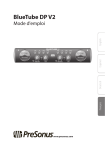
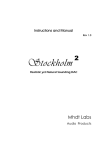
BlueTube Audio
Vacuum Tube Amplifier
Owner’s & Operator’s Manual
BT-4
BT-6
SAFETY PRECAUTIONS
CAUTION
RISK OF ELECTRIC
SHOCK DO NOT OPEN
CAUTION:
TO REDUCE THE RISK OF ELECTRIC SHOCK, DO NOT REMOVE
COVER (OR BACK). NO USER-SERVICEABLE PARTS INSIDE.
REFER SERVICING TO A QUALIFIED SERVICE PERSONNEL.
The lightning flash with arrowhead symbol, within an
equilateral triangle, is intended to alert the user to the
presence of uninsulated “dangerous voltage” within the
product’s enclosure that may be of sufficient magnitude to
constitute a risk of electric shock to persons.
The exclamation point within an equilateral triangle is
intended to alert the user to the presence of important
operating and maintenance (servicing) instructions in the
literature accompanying the appliance.
CAUTION:
HOT SURFACE. DO NOT TOUCH.
Hot
Surface
Mark
The glass vacuum tubes on top of the appliance
will become very hot when operating the product
continuously.
Do not touch hot areas, especially around the “Hot
Surface Mark” and the glass vacuum tubes.
I - SAFETY PRECAUTIONS
IMPORTANT SAFETY
INSTRUCTIONS
1.
2.
3.
4.
5.
6.
7.
8.
9.
Read these instructions.
Keep these instructions.
Heed all warnings.
Follow all instructions.
Do not use this apparatus near water.
Clean only with dry cloth.
Do not block any ventilation openings.
Install in accordance with the manufacturer’s instructions.
Do not install near any heat sources such as radiators, heat
registers, stoves, or other apparatus (including amplifiers) that
produce heat.
10. Do not defeat the safety purpose of the polarized or grounding-type
plug. A polarized plug has two blades with one wider than the other.
A grounding type plug has two blades and a third grounding prong.
The wide blade or the third prong are provided for your safety. If the
provided plug does not fit into your outlet, consult an electrician for
replacement of the obsolete outlet.
11. Protect the power cord from being walked on or pinched particularly
at plugs, convenience receptacles, and the point where they exit
from the apparatus.
12. Only use attachments/accessories specified by the manufacturer.
13. Unplug this apparatus during lightning storms.
14. Refer all servicing to qualified service personnel.
CAUTION:
To completely disconnect this product from the mains, disconnect the plug
from the wall socket outlet.
The mains plug is used to completely interrupt the power supply to the unit
and must be within easy access by the user.
SAFETY PRECAUTIONS - II
NOTES ON USE
WARNINGS
•
•
•
•
•
•
•
•
•
•
•
•
•
•
•
•
•
Avoid high temperatures.
Allow for sufficient heat dispersion when installed enclosed in a rack.
Handle the power cord carefully.
Hold the plug when unplugging the cord.
Keep the unit free from moisture, water, and dust.
Unplug the power cord when not using the unit for long periods of time.
Do not obstruct the ventilation holes.
Do not let foreign objects into the unit.
Do not let flammable substances come into contact with the unit.
Never disassemble or modify the unit in any way.
Ventilation should not be impeded by covering the ventilation openings
with items, such as newspapers, tablecloths or curtains.
Naked flame sources such as lighted candles should not be placed on the
unit.
Do not expose the unit to dripping or splashing fluids.
Do not place objects filled with liquids, such as vases, on the unit.
Do not handle the mains cord with wet hands.
When the switch is in the OFF position, the equipment is not completely
switched off from MAINS.
The equipment shall be installed near the power supply so that the power
supply is easily accessible.
VACUUM TUBES BECOME VERY HOT!
•
•
•
•
•
•
Never touch vacuum tubes if unit is on or has been on within an hour.
Keep children away from vacuum tubes.
Keep animals away from vacuum tubes.
Never spray cleaner or any liquid directly on tubes even if not hot.
Keep vacuum tubes away from curtains, clothing, fabric, etc.
NEVER clean amplifier while unit is on or tubes are still warm.
III - NOTES ON USE
INSTALLATION
Wall
*
For proper heat dispersion, do not install this
unit in a confined space, such as a bookcase or
similar enclosure.
• A minimum of 24 in. (0.6m) is recommended
above the unit.
• Do not place any other equipment on this unit.
DANGER
•
•
•
NEVER INSTALL SHELVING ABOVE UNIT
UNIT SHOULD NEVER BE INSTALLED IN BOOK CASE OR CONFINED
SPACE
AT MINIMUM 24” (600mm) OF EMPTY SPACE IS REQUIRED ABOVE
THE UNIT
FAILURE TO FOLLOW THESE GUIDELINES COULD RESULT IN FIRE
CAUSING BODILY HARM OR DEATH
INSTALLATION
- IV
Table of Contents
SAFETY PRECAUTIONS
I
NOTES ON USE
III
INSTALLATION
IV
Table of Contents
1
Getting Started
3
What’s In the Box
3
Difference Between BT-4 and BT-6
3
Features
4
First Setup
5
Installing Tubes
5
Cautions on Handling
6
Controls7
Front Panel
7
Turning Unit On
8
Changing the Volume
8
Switching Inputs
8
Connections9
Rear Panel
Connecting an Audio Device (RCA Cables)
10
Connecting an Audio Device (1/8” Headphone Jack)
11
Connecting a Phono Player Using an External Preamp
12
Connecting to Bluetooth®
13
Connecting to the USB Charging Port
14
Connecting the Speakers
15
For Optimum Speaker Performance
16
Sub-woofer Inputs and Controls (optional)
17
Connecting Sub-woofer to BlueTube Amplifier
19
1 - Table of Contents
9
Switching Voltage
19
Connecting Headphones
20
Audio21
Vacuum Tube Break-in
21
Bluetooth® Noise
21
Volume Level
21
Care of BlueTube Products
22
Service
22
Cleaning
22
Additional information
23
Troubleshooting
23
Limited Warranty
25
© 2013 BlueTube Audio, Inc. All rights reserved. Reproduction in whole or in part without
written permission is prohibited. iPod, iPhone, iPod touch, iPod classic, iPod nano, and
iPad are trademarks of Apple Inc. Android and Google Play are trademarks of Google, Inc.
Bluetooth is a trademark of Bluetooth SIG, Inc. All other trademarks are trademarks of their
respective owners. Features and specifications are subject to change without notice.
Table of Contents - 2
Getting Started
What’s In the Box
Check that the following parts are supplied with the product.
① Getting Started/Owners Manual
② Power Cord
③ Speaker Cable
④ 1/8” to RCA Cable
⑤ RCA Cable
⑥ 4x 10GV8 Vacuum Tubes (BT-4)
4x 6005W and 2x 5670W Vacuum Tubes (BT-6)
Difference Between BT-4 and BT-6
The only difference between the BT-4 and the BT-6 is the number of
tubes and the voltage capabilities. The BT-4 takes advantage of a
combination style tube where the single tube contains the pentode and
triode. Whereas the BT-6 uses a 3rd tube per channel and the pentode
and triode are in different tubes. The sound quality of both amplifiers is
outstanding.
BT-4
BT-6
100k ohms
100k ohms
8 ohms
8 ohms
Output power
8 watts per channel
8 watts per channel
Circuit
Class A - Push Pull
Class A - Push Pull
20 to 20,000 Hz
20 to 20,000 Hz
@1 Watt <1%
@1 Watt <1%
4
6
Voltage
115V/60hz
115-230V/50-60Hz
Tubes
4x 10GV8
4x6005W
(Pentode),
2x5670W(Triode)
.5V
.5V
Input impedance
Output impedance
Frequency response
Total harmonic distortion
# of Tubes
Min input for full output
3 - What’s In the Box
Features
Solid 3/4” walnut and cherry hand-rubbed, waxed enclosures
The 3/4” thick walnut and cherry enclosures are hand rubbed with
linseed oil, then waxed and are reminiscent of audio equipment built
50 years ago by craftsman.
True stereo output (8 watts per channel)
Class A push-pull amp for outstanding sound reproduction.
Internal Bluetooth® receiver with voice command setup, 2
hard-wired inputs
Gold Plated Auxiliary RCA jacks allow you to connect up to two (2)
additional audio sources to the BlueTube Audio Amplifier.
High quality Gold Plated “easy-connect” spring loaded speaker
connections
Gold Plated spring loaded binding posts allow for a quick and easy
connection to a set of BlueTube Audio speakers using the included
stranded speaker cable or using banana clips.
USB charging port to power and charge portable audio players
(iPhones®, Android® Phones, MP3 players, etc)
The charging port offers optimal power to today’s mobile devices.
Whether connecting to an iPhone®, iPad®, Android®, or any other
mobile device, the BlueTube Audio Amplifiers Smart Circuitry
provides the appropriate power.
Sub-Woofer output
Audio Level Sub-woofer output.
Features - 4
First Setup
1. Unbox and verify contents.
2. Switch the voltage on the back to your appropriate voltage (BT-6
only) if unsure about your voltage consult a licensed electrician.
3. Plug in power cable.
4. Connect input devices.
5. Connect speakers. (Do not operate without speakers connected)
6. Connect sub-woofer (optional).
7. Install tubes (See below for instructions).
8. Turn unit on.
9. Enjoy!
Installing Tubes
Installing the tubes is a quick and simple procedure.
First, the old wives tale that you should never touch a vacuum tube is
false. While you should never touch a hot tube as you may suffer burns,
touching a cool tube with your bare hands is just fine.
1. Take note of the position of the pins on the bottom
of the vacuum tube. You will notice a section with no
pins. The pins that are there will correspond with the
pin holes on the socket on the amp.
2. Using your bare hands line up the pins with the
holes on the socket and apply a slow rocking even pressure until the
tube is seated.
3. Continue this process until all tubes are installed.
4. On the BT-6, the short fat tubes should be installed in the two front
holes.
5 - First Setup
Cautions on Handling
Before turning the power on
Check once again that all connections are correct and that there are no
problems with the connection cables.
Power is supplied to some of the circuitry even when the unit is set to the
OFF mode. When going on vacation or leaving home for long periods of
time, be sure to unplug the power cord from the power outlet.
About condensation
If there is a major difference in temperature between the inside of
the unit and the surroundings, condensation (dew) may form on the
operating parts inside the unit, causing the unit not to operate properly.
If this happens, let the unit sit for 4-6 hours with the power turned off and
wait until the temperature of the amp matches the ambient temperature
before using the unit.
Cautions on using mobile phones
Using a mobile phone near this unit may result in noise. If that occurs,
move the mobile phone away from this unit when it is in use.
Moving the unit
Turn off the power and unplug the power cord from the power outlet.
Next, disconnect the connection cables to other system units before
moving the unit. CAUTION: Tubes remain hot for 20 minutes or more.
About care
•
•
•
Wipe the cabinet and control panel clean with a soft cloth.
Do not spray cleaners on the glass tubes. Follow the care
instructions in this manual.
Benzene, paint thinner or other organic solvents as well as
insecticide may cause material changes and discoloration if brought
into contact with the unit, and should therefore not be used.
Cautions on Handling - 6
Controls
Front Panel
1. Power Switch - ON/OFF Positions. Blue LED ring indicates power
is on.
2. Volume Knob - Controls volume level, turn clockwise to turn the
volume up, reverse direction to reduce the volume.
3. Input Selector Knob - Selects which input you want the amp to
output. Aux 1 and 2 are on the back of the amp. The third symbol is
for Bluetooth®. (see page 13 for Bluetooth® operations)
4. Auto-switching Headphone Output Jack - 1/4” headphone jack.
When headphones are plugged in, amp automatically turns speaker
outputs off and redirects output to headphones.
DO NOT rotate knobs past the built in stops, DAMAGE will occur.
Turn Volume Knob to half position when turning on.
7 - Front Panel
Turning Unit On
Press power button until you hear a click,
release. Power button will now be flush
and is in the ON position. To turn unit off
press power button until you hear a click and
release. The power button will be slightly
protruding in the OFF position.
Changing the Volume
Turn the large volume knob in the center
clockwise to turn the volume up. Turn the
knob counter clockwise to turn the volume
down. NOTE: You should always have the
volume knob in the halfway position when
turning the unit on.
Switching Inputs
The input selector knob has 3 stops. Turn it
to have the arrow pointing at the input you
want to use. When pointing at the Bluetooth®
logo the unit will search for connected
devices, if none are found, it will go into the
Bluetooth® programming mode (For Bluetooth®
programming see page 13).
Turning Unit On - 8
Connections
Note:
• Do not plug in the power cord until all connections have been
completed.
• When making connections, also refer to the operating instructions of
the other devices being connected.
• Be sure to connect the left and right channels properly (left with left,
right with right).
• Do not bundle power cords together with other cables. Doing so can
result in noise.
Rear Panel
1. Sub-woofer Output
6. Left Speaker Output
2. Aux 1 input
7. 115V/230V voltage selector
(BT-6 only)
3. Aux 2 input
4. USB Charger
5. Right Speaker Output
9 - Rear Panel
8. IEC Power connector/fuse
9. Cooling vents - DO NOT
BLOCK
Connecting an Audio Device (RCA Cables)
Using one of the supplied RCA cables, connect the red connector to
the right output of your device and the white connector to the left output
on the your device. On the other end of the cable, connect the red
connector to the right input of Aux 1 or Aux 2 on the BlueTube Audio
Amplifier and connect the white connector to the left input of Aux 1 or
Aux 2 of the BlueTube Audio Amplifier.
Connecting an Audio Device (RCA Cables) - 10
Connecting an Audio Device (1/8” Phone Jack)
Using a cable with RCA plugs on one end and an 1/8” headphone plug
on the other, connect the headphone plug to your device. On the other
end of the cable, connect the red connector to the right input of Aux 1 or
Aux 2 on the BlueTube Audio Amplifier and connect the white connector
to the left input of Aux 1 or Aux 2 of the BlueTube Audio Amplifier.
11 - Connecting an Audio Device (1/8” Phone Jack)
Connecting a Phono Player Using an External Preamp
NOTE: if your phono player does not have a built in preamp,
you will need to use an external pre-amp. (Not included)
If your turntable has a built in pre-amp and you don’t need to use an
external pre-amp, this page does not apply. Instead follow the directions
on connecting an Audio Input Device.
Using one of the supplied RCA cables, connect the red connector to the
right output of your pre-amp and the white connector to the left output
on the your preamp. On the other end of the cable, connect the red
connector to the right input of Aux 1 or Aux 2 on the BlueTube Audio
Amplifier and connect the white connector to the left input of Aux 1 or
Aux 2 of the BlueTube Audio Amplifier. Then
consult the users manual for the pre-amp
and phono player for instructions.
Connecting a Phono Player Using an External Preamp - 12
Connecting to Bluetooth®
Syncing Bluetooth®
1. Turn on amp and allow to warm up before selecting Bluetooth®
input.
2. Enable Bluetooth® on your device. This is usually located in the
“Settings” or “Options” area of your phone.
You may also need to find the setting that
allows Bluetooth® devices to find your
phone. Enable this setting.
3. Turn the input selector switch to Bluetooth®.
4. Follow the voice commands.
5. The BlueTube Audio Amplifier will show up
as “BT-1A” on your devices menu.
6. You are now ready to listen to audio from
your device via Bluetooth®.
Notes on Using Bluetooth®.
•
The BlueTube amp and your device should remember each other.
As long as your device’s Bluetooth® is still on, it should auto connect
to the BlueTube Audio Amplifier.
•
After a period of no connection, the Bluetooth® module will power
down. Move the selector knob from Bluetooth® to Aux 2 then back
to Bluetooth® to reconnect.
•
Bluetooth® on any amp especially a vacuum tube amp is a
convenience. It does not and never will deliver the best audio
quality. For convenience you can use the Bluetooth® module,
however, for the best quality use the Aux 1 and Aux 2 inputs.
Bluetooth® must compress your audio, send it over the airwaves,
then uncompress it again. This will result in deterioration of audio
quality.
•
Bluetooth® audio uses RF to transmit the audio. Being encased in
a vacuum tube amplifier could result in some noise being picked up
from the high voltage transformers. This will usually only be noticed
at very low volumes.
13 - Connecting to Bluetooth®
Connecting to the USB Charging Port
The USB port on the back of the amplifier is for charging devices only
and has no ability to transmit data.
To use, simply connect your USB cable to the USB port. The smart
charging circuitry will take care of feeding the proper current to your
device.
•
Unit will charge devices up to 1 Amp of current.
•
Output will be automatically shut down to protect itself if more than
1 Amp of load is applied.
•
When charging a device that is connected to the Amplifier through
the device’s 1/8” headphone jack some noise could occur at low
volumes.
•
On most USB cables, you will want to install it with the USB logo
facing up.
Connecting to the USB Charging Port - 14
Connecting the Speakers
1. Strip back about 1/2” of the insulation on each of the speaker wires
on both ends.
2. Connect the wire with the white stripe to the red binding post on right
speaker output.
3. Connect the wire with no stripe to the black binding post on the right
speaker output on the back of the amplifier.
4. On the other end of the cable, connect the wire with the white stripe
to the red binding post on the back of the right speaker.
5. Connect the speaker wire with no stripe to the black binding post on
the back of the right speaker.
6. Repeat on the left side.
NOTE: If speaker connections are reversed (black to red and red
to black) the speakers will still produce sound, however, they
will be out of phase and the sound quality will not be optimal.
15 - Connecting the Speakers
For Optimum Speaker Performance
•
Use only quality speaker cable.
•
Speakers should have input impedance of 4-16Ω, DO NOT connect
speakers of less than 4Ω.
•
The higher the db rating of your speakers, the louder the volume
will be. NOTE: Higher wattage does not automatically translate to
louder volume.
•
Do not touch the speaker cone. BlueTube speakers utilize a thin
sheet of titanium as the speaker cone and can easily be dented.
•
There are no serviceable parts inside the BlueTube Speakers.
•
Do not spray polish or cleaner on speakers. See care of product
section for more information (Page 22).
•
Before use remove protective covers from speakers.
For Optimum Speaker Performance - 16
Sub-woofer Inputs and Controls (optional)
INPUT/OUTPUT CONNECTIONS
1. Low-Level Inputs (Left/Right) - RCA style jacks that will accept standard
line level inputs from a pre-amp level source. They will accept a stereo
signal and internally combine it into mono. (Note: Both left and right input
jacks must be connected to the source in order to drive the amplifier to
full output).
2. High-Level Inputs - Speaker level inputs using spring clip type jacks to
permit connection with bare wire. Allows the user to connect the speaker
level output of a full range amplifier to the input of the sub-woofer amp
using standard speaker wire. A mono signal is derived from the stereo
input, which then feeds the sub-woofer amplifier crossover input.
3. High-Level Outputs - Speaker level pass-through outputs using spring
clip type jacks to permit connection with bare wire. Used to connect
from the sub-woofer amp to pass signal from the full range amp on to
the main L/R speakers. Signal is only present on this output if the high
level input is also used. The signal to the L/R speakers is not filtered.
17 - Sub-woofer Inputs and Controls (optional)
The impedance “seen” by the full-range source amplifier will be that of the
connected speakers only.
4. Power input - This unit features a hardwired AC power cable and
externally-accessible fuse. It is supplied with an 0.75 A, 250V fuse
and USA type polarized 2-pin plug. This unit is not suitable for 230V
applications.
CONTROLS/INDICATORS
5. Power/Gain Knob (“Gain”) - This control will
match the amplifier’s input sensitivity to the
output of the pre-amp source. If the source
output has a variable control, we recommend
that the user spend a moment or two
determining the best balance between the two
controls. When a balance is found between
low noise, linear level control, and sufficient
level to drive the amp to the required output,
the gain knob can be considered to be the
“volume control” for the sub-woofer system.
To shut the sub-woofer amplifier off, turn the
control all the way to the left until it ‘clicks’.
6. Frequency Knob (“Freq”) - This control is
used to establish the highest frequency that
Optimal Gain Range
the sub-woofer will reproduce and has a
range between 60 to 180 Hz with a slope of
24 dB per octave. If you are using the system for music and your main
speakers have good bass capability, you could set the control to a fairly
low value, often between 60 and 100 Hz. If the main speakers are smaller
or do not have much bass output, set the control higher. Experiment with
the amount of “overlap” that you will experience when all speakers are
playing in the same range. This can be helpful when integrating the subwoofer with the rest of the system and with the room.
7. Power LED - When the power switch is moved to the “on” position, the
LED will illuminate green, and the amp will be in “On” mode. If the LED
is not illuminated, check that the amplifier is plugged into a power source
and that the “Gain” knob is not set to the “Off” position.
WARNING: It is possible to over-drive bass speaker with too
high of a GAIN setting. Damage to speaker may occur.
Sub-woofer Inputs and Controls (optional) - 18
Connecting Sub-woofer to BlueTube Amplifier
1. Using the supplied RCA cables, connect the cable to the sub-woofer
output on the back of the amp.
2. Connect the RCA cable to the Low Level Input on the back of the
sub-woofer.
3. Recommended setting for frequency when connected to BlueTube
Amp is 100-120 Hz.
4. Recommended setting for gain is between 10:00 and 1:00 positions.
Switching Voltage
The unit is set at the factory for 115V U.S. operation; simply connect the
included IEC power cord to your wall outlet. For 230V operation, move
the voltage selector switch to the 230V position. When operating at 230V
the internal fuse located in the IEC socket should also be changed. In
most 230V applications a separate power cord will be required and may
not be included.
Note: Be sure to change the fuse to a 1.5A rating before switching to
230V operation.
Using a finger or small coin drag
the switch down to change to
230V.
19 - Connecting Sub-woofer to BlueTube Amplifier
Replace the fuse with the
appropriate fuse for your power.
Connecting Headphones
To connect your headphones to the BlueTube Audio Amplifier, use
headphones with a 1/4” headphone jack or use a 1/8” to 1/4” headphone
jack adapter. Connect in the port on the front of the amplifier labeled
“PHONES”. The unit will automatically switch outputs to the headphones
and you will no longer hear sound from the speakers.
Connecting Headphones - 20
Audio
Vacuum Tube Break-in
Vacuum tubes require a break-in period of approximately 100 hours to
reach their optimal performance. After 20 hours you will begin to notice
a large difference in the quality of sound over the brand new tubes. Also
every single time you turn your BlueTube amplifier on you will notice
the sound will gradually improve over the first 20 minutes until the tubes
have reached their normal operating temperature.
Bluetooth® Noise
Bluetooth® technology on a vacuum tube amp is a convenience it does
not and never will deliver the best audio quality. For convenience use
the Bluetooth® module, for quality use the Aux 1 and Aux 2 inputs.
Bluetooth® compresses the audio for transmission then uncompresses
it on the receiving end. Depending on the individual you may or may not
pick up on this small compression noise.
Volume Level
Different devices connected to the BlueTube Amplifier will have different
output power levels. If the audio distorts, lower the output volume on the
device connected to the amplifier.
21 - Vacuum Tube Break-in
Care of BlueTube Products
Service
BlueTube Audio products are designed and manufactured in Franklin,
Indiana. For service or warranty support contact us at:
BlueTube Audio
2001 N Morton St.
Franklin, IN 46131
You can also call us at:
1-800-445-5058 (International call +1 317-738-4474)
For warranty see Page 25.
Cleaning
To keep your BlueTube Audio Products looking like new some periodical
cleaning is necessary. For a majority of the time just use a soft clean
cotton towel or even better a microfiber dust cloth and simply wipe the
wood down to remove any dust.
Occasionally you’ll find that you want to use a chemical or cleaner to
make the wood shine like new. You should consider a furniture polish
with a wax base formula, such as Original Beeswax Polish. This is the
only spray polish we recommend. Be aware that a spray polish could
potentially harm the waxed surface or remove it entirely. The reason is
that most furniture polishes are a solvent base, i.e. mineral spirits and
turpentine, which both remove wax.
To apply the Original Beeswax Polish spray on to your cloth, NEVER
spray directly on Amp or speakers, and lightly rub over all wood surfaces.
Use a Stainless Steel cleaner sprayed onto a clean dry cotton cloth to
clean the face plate.
Service - 22
Additional information
Troubleshooting
If a problem should arise, first check the following:
1. Are the connections correct?
2. Is the set being operated as described in the owner’s manual?
3. Are the other devices operating properly?
If this unit does not operate properly, check the items listed in the table
below. Should the problem persist, there may be a malfunction.
In this case, disconnect the power immediately and contact your store of
purchase.
Symptom
Solution
Only 1 Channel
Works
1. Swap speaker connections at amplifier. If
problem stays with same speaker there is a
problem with the speaker or speaker wire continue
to step 2a. If the problem moves to the other
speaker than continue to step 2b.
2a. Swap speaker connections at the speakers.
If problem moves to the other speaker then the
speaker wire is wired wrong or needs replaced. If
problem stays with the same speaker then there
is a problem with the speaker. Contact speaker
manufacturer or replace speaker.
2b. While the amplifier is cold swap the left two
tubes (three tubes on the BT-6) with the right two
tubes (three tubes on the BT-6). If the problem
switches speakers then the tubes need replaced.
Sub-woofer
sounds distorted
1. Sub-woofer is being overdriven, reduce the
gain. On the BlueTube Audio Sub-woofer the
recommended position for the gain is between
11:00 and 1:00.
Bluetooth® has
“noise” at low
volume and in
headphones at
low volume
1. Due to the nature of Bluetooth® this is an
unfortunate side effect of using the Bluetooth®
module. For optimum listening quality it is advised
to use the Aux 1 and 2 inputs.
23 - Troubleshooting
Symptom
Solution
Unit will not
power up
1. Check power cable plug is firmly plugged into
the back of the amplifier.
2. Check that power cable is firmly plugged into
wall outlet.
3. Check the unit on another wall outlet in another
room.
4. If using the BT-6 be sure the voltage selector
switch is displaying the voltage for your country.
(North America should be 115V Most of Europe
should be 230V). If unsure switch voltage
is correct for your country consult a licensed
electrician.
Audio is
Distorted
Reduce the device supplying the signal or reduce
the volume on the BlueTube amplifier.
Turntable is
really quiet
1. Check that you are using a preamp if your turn
table requires one.
2. Consult the manual supplied with your turn
table and preamp.
Troubleshooting - 24
Limited Warranty
Limited Warranty
BlueTube Audio provides a 30-Day Return Window (see Return of Non-Defective Products below) and the
following limited warranty. This limited warranty extends only to the original purchaser.
Please note that any warranty services or questions must be accompanied by the order number from the
transaction through which the warranted product was purchased. The order number serves as your warranty
number and must be retained. BlueTube Audio will offer no warranty service without this number.
BlueTube Audio warrants this product and its parts against defects in materials or workmanship for three years
labor and one year parts from the original ship date. During this period, BlueTube Audio will repair or replace
defective parts with new or reconditioned parts at BlueTube Audio’s option, without charge to you.
Shipping fees incurred from returns for under-warranty service in the first 30-days will be paid by BlueTube
Audio. All shipping fees both to and from BlueTube Audio following this 30-day period must be paid by the
customer. All returns, both during and following the 30-day period, must be affected via the Procedures for
Obtaining Warranty Service described below.
All original parts (parts installed by BlueTube Audio at the original system build) replaced by BlueTube Audio
or its authorized service center, become the property of BlueTube Audio. Any after-market additions or
modifications will not be warranted. The audio system owner is responsible for the payment, at current rates, for
any service or repair outside the scope of this limited warranty.
BlueTube Audio makes no other warranty, either express or implied, including but not limited to implied
warranties of merchantability, fitness for a particular purpose, or conformity to any representation or
description, with respect to this computer other than as set forth below. BlueTube Audio makes no warranty or
representation, either express or implied, with respect to any other manufacturer’s product or documentation,
its quality, performance, merchantability, fitness for a particular purpose, or conformity to any representation or
description.
Except as provided below, BlueTube Audio is not liable for any loss, cost, expense, inconvenience or damage
that may result from use or inability to use the audio equipment. Under no circumstances shall BlueTube Audio
be liable for any loss, cost, expense, inconvenience or damage exceeding the purchase price of the audio
equipment.
The warranty and remedies set forth below are exclusive and in lieu of all others, oral or written, expressed or
implied. No reseller, agent or employee is authorized to make any modification, extension or addition to this
warranty.
Warranty Conditions
The above Limited Warranty is subject to the following conditions:
This warranty extends only to products distributed and/or sold by BlueTube Audio. It is effective only if the
products are purchased and operated in the USA. (Within the USA including US 48 States, Alaska and Hawaii.)
This warranty covers only normal use of the equipment. BlueTube Audio shall not be liable under this warranty
if any damage or defect results from (i) misuse, abuse, neglect, improper shipping or installation; (ii) disasters
such as fire, flood, lightning or improper electric current; or (iii) service or alteration by anyone other than an
authorized BlueTube Audio representative; (iv) damages incurred through irresponsible use.
You must retain your bill of sale or other proof of purchase to receive warranty service.
No warranty extension will be granted for any replacement part(s) furnished to the purchaser in fulfillment of this
warranty.
A non-defective product may be returned to BlueTube Audio within thirty (30) days of the invoice date for a
refund of the original purchase price with the following amendments/fees:
BlueTube Audio will refund neither the original shipping cost nor the shipping and handling fees incurred from the
products return. If the original purchase was made under a “Free Shipping” promotion then a standard $40 fee
will be deducted from any return in counter to that offer.
Any non-defective returns are subject to a 15% restocking fee, which percentage is taken from the final purchase
price less any shipping or handling charges.
Quantity purchases of five systems or more are not eligible for return.
To return a defective product, please contact our Customer Service Department for a Return Merchandise
Authorization (RMA) number and follow the Return of Products Instructions below. The RMA is valid for 10 days
25 - Limited Warranty
from date of issuance. Returns will not be accepted without an RMA. Manufacturer restrictions do apply.
Procedures for Obtaining Warranty Service
RMA (Returning Merchandise Authorization) Policy:
If repairs are required, the customer must obtain a RMA number and provide proof of purchase. RMA and
services are rendered by BlueTube Audio only. Any shipping costs after 30 days (starting from the original date
of purchase) on any item returned for repair is the customers’ responsibility. All returned parts must have a RMA
number written clearly on the outside of the package along with a letter detailing the problems and a copy of
the original proof of purchase. No COD packages will be accepted. No package will be accepted without a RMA
number written on the outside of the package. RMA numbers are only valid for 30 days from the date of issue.
Should you have any problems with your audio equipment, please follow these procedures to obtain the service:
1. If the equipment must be repaired, a RMA number (Return Merchandise Authorization Number) will be issued
for shipment to our repair department. Please follow the instructions given by BlueTube Audio technical support
staff to ship your equipment. BlueTube Audio will not accept any shipments without a RMA number.
2. Pack the equipment in its original box or a well-protected box, as outlined in the Return Shipping Instructions.
BlueTube Audio will not be responsible for shipping damage/loss of any product outside the original 30-day
BlueTube Audio-paid service period. It is very important that you write the RMA number clearly on the outside of
the package. Ship the equipment with a copy of your bill of sale or other proof of purchase, your name, address,
phone number, description of the problem(s), and the RMA number you have obtained to:
BlueTube Audio Repair Service Center
RMA#____________
2001 N Morton St
Franklin, IN 46131
3. Upon receiving the equipment, BlueTube Audio will repair or replace your equipment (at BlueTube Audio’s
discretion) and will ship it back to you within 2 weeks (dependent on parts availability) via UPS or other carrier at
BlueTube Audio’s discretion.
4. Cross-exchange (Parts only): You will need to provide a valid credit card number as a deposit guarantee when
the RMA number is issued. Once approval has been obtained on your credit card, the part(s) will be shipped
UPS. You will need to ship defective part(s) back to BlueTube Audio within 15 days to avoid charges to your
credit card. If such charges are incurred, the shipped part(s) will be billed at the then current price.
5. BlueTube Audio will pay for shipping to and from the customer only within the first thirty days following the
original product ship date. Following this 30-day period all shipping fees both for under warranty and post
warranty repairs are the sole responsibility of the customer. The customer also assumes full liability for losses or
damages resulting from shipping as well as all responsibility to pursue remuneration for such issues with their
selected carrier.
After One-Year Warranty – Post Warranty Repair
For post warranty repair, the procedure is the same as outlined above for RMA and shipping. However, you are
responsible for shipping charges both ways, current labor ($75 per hour if not under warranty), and the current
price of part(s) used in repair.
Technical Support:
· 317-738-4474
Customer Service:
· 800-445-5058
WARRANTY EXCLUSIONS
BlueTube Audio accepts no liability for problems caused by after-market modifications or additions. This warranty
is null and void if the defect or malfunction was due to damage resulting from operation not within manufacturer
specifications. It will also be null and void if there are indications of misuse and/or abuse. BlueTube Audio has
the option of voiding the warranty if any one other than a BlueTube Audio technician attempts to service the
product. BlueTube Audio will not warrant any problems arising from an act of God (lightning, flooding, tornado,
etc.), Electrical spikes or surges, or problems arising out of additional devices added to complement any
system/component bought at BlueTube Audio. Under no circumstances will BlueTube Audio be responsible
for any refund or remuneration exceeding the original purchase price of the product less any shipping fees.
BlueTube Audio will not be held responsible for typographical errors on sales receipts, repair tickets, product
documentation, this manual, or on our website. BlueTube Audio makes every effort to make sure all information
on our website is correct.
REV 8/2013
Limited Warranty - 26
BlueTube Audio
2001 N Morton Street
Franklin IN 46131