1
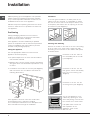
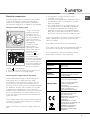
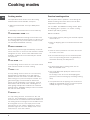
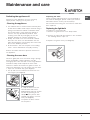
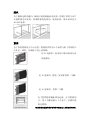
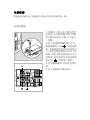
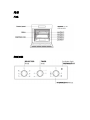
Operating Instructions OVEN Contents GB English,1 CN Installation, 2-3 Positioning Electrical connections Data plate Description of the appliance, 4 Overall view Control panel Start-up and use, 5 Starting the oven How to use the timer Clock with Country Style timer Cooking modes, 6-7 FH 51 CN FH 51 IX CN Cooking modes Practical cooking advice Cooking advice table Precautions and tips, 8 General safety Disposal Respecting and conserving the environment Assistance Maintenance and care, 9 Switching the appliance off Cleaning the appliance Cleaning the oven door Replacing the light bulb GB Installation ! Before placing your new appliance into operation please read these operating instructions carefully. They contain important information for safe use, for installation and for care of the appliance. ! Please keep these operating instructions for future reference. Pass them on to possible new owners of the appliance. Ventilation To ensure good ventilation, the back panel of the cabinet must be removed. It is advisable to install the oven so that it rests on two strips of wood, or on a completely flat surface with an opening of at least 45 x 560 mm (see diagrams). . mm 560 Positioning 45 m m. ! Keep packaging material out of the reach of children. It can become a choking or suffocation hazard. (see Precautions and tips). ! The appliance must be installed by a qualified person in compliance with the instructions provided. Incorrect installation may cause harm to persons, animals or may damage property. Fitting the appliance Use the appropriate cabinet to ensure that the appliance functions properly. • The panels adjacent to the oven must be made of heat-resistant material. Centring and fastening Position the 4 tabs on the side of the oven according to the 4 holes of the outer frame. Adjust the tabs according to the thickness of the cabinet side panel, as shown below: thickness of 20 mm: take off the removable part of the tab (see diagram) • Cabinets with a veneer exterior must be assembled with glues which can withstand temperatures of up to 100°C. • to install the oven under the counter (see diagram) and in a kitchen unit, the cabinet must have the following dimensions: thickness of 18 mm: use the first groove, which has already been set in the factory (see diagram) . min mm 45 m m. mm . thickness of 16 mm: use the second groove (see diagram) 5 mm. 567 mm. 560 575-585 mm. 23 mm. . 547 595 mm. GB 595 mm 24 545 . mm mm . . ! The appliance must not come into contact with electrical parts once it has been installed. The consumption indications on the data plate have been calculated for this type of installation. 2 Secure the appliance to the cabinet by opening the oven door and putting 4 screws into the 4 holes of the outer frame. ! All parts which ensure the safe operation of the appliance must not be removable without the aid of a tool. Electrical connections ! Ovens equipped with a three-pole power supply cable are designed to operate with alternating current at the voltage and frequency indicated on the data plate located on the appliance (see below). Fitting the power supply cable L N 1. Open the terminal board by inserting a screwdriver into the side tabs of the cover. Use the screwdriver as a lever by pushing it down to open the cover (see diagram). 2. Install the power supply cable by loosening the cable clamp screw and the three wire contact . screws L-NConnect the wires to the corresponding terminals: the Blue wire to the terminal marked (N), the Brown wire to the terminal marked (L) and the Yellow/Green wire to the terminal (see diagram). marked 3. Secure the cable by fastening the clamp screw. 4. Close the cover of the terminal board. Connecting the supply cable to the mains Install a standardised plug corresponding to the load indicated on the data plate (see side). The appliance must be directly connected to the mains using an omnipolar circuit-breaker with a minimum contact opening of 3 mm installed between the appliance and the mains, suitable for the load indicated and complying with current electrical regulations (the earthing wire must not be interrupted by the circuit-breaker). The supply cable must not come into contact with surfaces with temperatures higher than 50°C. ! The installer must ensure that the correct electrical connection has been made and that it is compliant with safety regulations. Before connecting to the power supply, make sure that: • The appliance is earthed and the plug is compliant with the law. • The socket can withstand the maximum power of the appliance, which is indicated on the data plate (see below). • The voltage must be in the range between the values indicated on the data plate (see below). • The socket is compatible with the plug of the appliance. If the socket is incompatible with the plug, ask an authorised technician to replace it. Do not use extension cords or multiple sockets. GB ! Once the appliance has been installed, the power supply cable and the electrical socket must be easily accessible. ! The cable must not be bent or compressed. ! The cable must be checked regularly and replaced by authorised technicians only (see Assistance). ! The manufacturer declines any liability should these safety measures not be observed. DATA PLATE Dimensions width cm 43.5 height cm 32 depth cm 41,5 Volume lt. 58 Electrical connections ENERGY LABEL voltage: 220-240V ~ 50/60Hz o 50Hz (see data plate) maximum power absorbed 2250W Directive 2002/40/EC on the label of electric ovens Norm EN 50304 Energy consumption for Natural convection heating mode: a Convection Declared energy consumption for Forced convection Class heating mode: b Fan assisted This appliance conforms to the following European Economic Community directives: - 2006/95/EEC of 12/12/06 (Low Voltage) and subsequent amendments; - 2004/108/EEC of 15/12/04 (Electromagnetic Compatibility) and subsequent amendments; - 93/68/EEC of 22/07/93 and subsequent amendments. - 2002/96/EC and subsequent amendments. 3 Description of the appliance GB Overall view GUIDES for the sliding racks Control panel position 5 position 4 position 3 position 2 position 1 GRILL DRIPPING PAN Control panel THERMOSTAT indicator light SELECTOR knob * Only on certain models 4 TIMER knob * THERMOSTAT knob Start-up and use ! The first time you use your appliance, heat the empty oven with its door closed at its maximum temperature for at least half an hour. Ensure that the room is well ventilated before switching the oven off and opening the oven door. The appliance may produce a slightly unpleasant odour caused by the burning away of protective substances used during the manufacturing process. Starting the oven 1. Select the desired cooking mode by turning the SELECTOR knob. 2. Select the desired temperature with the THERMOSTAT knob. See the Cooking advice table for cooking modes and the suggested cooking temperatures (see Cooking Modes). 3. When preheating is finished, the THERMOSTAT indicator light will stay on: place the food in the oven. 4. You may do the following during cooking: - change the cooking mode by turning the SELECTOR knob. - change the temperature by turning the THERMOSTAT knob. - stop cooking by turning the SELECTOR knob to the “0” position. Oven light GB It goes on when selecting with the SELECTOR knob. It stays on when a cooking mode is selected. How to use the timer * 1. To set the buzzer, turn the TIMER knob clockwise almost one complete revolution. 2. Turn the knob anticlockwise to set the desired time: align the minutes shown on the knob with the indicator on the control panel. 3. The timer operates in minutes: when the selected time has elapsed, a buzzer will sound. ! The timer does not turn the oven on or off. ! Never put objects directly on the oven bottom to avoid damaging the enamel coating. ! Always place cookware on the rack(s) provided. Cooling ventilation In order to cool down the external temperature of the oven, some models are fitted with a cooling fan that blows out air between the control panel and the oven door. ! Once the cooking has been completed, the cooling fan remains on until the oven has cooled down sufficiently. * Only on certain models 5 Cooking modes GB Cooking modes Practical cooking advice ! A temperature value can be set for all cooking modes between 60°C and Max, except for ! Do not place racks in position 1 and 5 during fanassisted cooking. Excessive direct heat can burn temperature sensitive foods. • GRILL (recommended: set only to MAX power level); • GRATIN (recommended: do not exceed 200°C). ! In the GRILL and GRATIN cooking modes, place the dripping pan in position 1 to collect cooking residues (fat and/or grease). TRADITIONAL OVEN mode MULTI-COOKING Both the top and bottom heating elements will come on. With this traditional cooking mode, it is best to use one cooking rack only; if more than one rack is used, the heat will be distributed unevenly. • Use position 2 and 4, placing the food that requires more heat on 2. MULTI-COOKING mode All the heating elements (top and bottom), as well as the fan, will come on. Since the heat remains constant throughout the oven, the air cooks and browns food uniformly. A maximum of two racks may be used at the same time. TOP OVEN mode • Place the dripping pan on the bottom and the rack on top. GRILL • Insert the rack in position 3 or 4. Place the food in the centre of the rack. • We recommend that you set the maximum power level. The top heating element is regulated by a thermostat and may not always be on. PIZZA The top heating element comes on. This mode can be used to brown food at the end of cooking. GRILL mode The top heating element comes on. The extremely high and direct temperature of the grill makes it possible to brown the surface of meats and roasts while locking in the juices to keep them tender. The grill is also highly recommended for dishes that require a high temperature on the surface: such as beef steaks, veal, rib steak, filets, hamburgers etc... Some grilling examples are included in the “Practical Cooking Advice” paragraph. Always cook in this mode with the oven door closed. GRATIN mode The top heating element, as well as the fan, will come on. This combination of features increases the effectiveness of the unidirectional thermal radiation of the heating elements through forced circulation of the air throughout the oven. This helps prevent food from burning on the surface, allowing the heat to penetrate right into the food. Always cook in this mode with the oven door closed. 6 • For best results when cooking pizza, use the MULTI-COOKING mode. • Use a light aluminium pizza pan. Place it on the rack provided. For a crispy crust, do not use the dripping pan (prevents crust from forming by extending cooking time). • If the pizza has a lot of toppings, we recommend adding the mozzarella cheese on top of the pizza halfway through the cooking process. Cooking advice table Cooking modes Convection Oven Multi-cooking Top oven Grill Gratin GB Foods Weight (in kg) Rack position Pre-heating time (min) Recommended temperature Duck Roast veal or beef Pork roast Biscuits (short pastry) Tarts Pizza (on 2 racks) Lasagne Lamb Roast chicken + potatoes Mackerel Plum cake Cream puffs (on 2 racks) Biscuits (on 2 racks) Sponge cake (on 1 rack) Sponge cake (on 2 racks) Savoury pies 1 1 1 1 1 1 1 1+1 1 1 0.5 0.5 0.5 1 1.5 3 3 3 3 3 2 and 4 3 2 2 and 4 2 2 2 and 4 2 and 4 2 2 and 4 3 15 15 15 15 15 15 10 10 15 10 10 10 10 10 10 15 200 200 200 180 180 230 180 180 200 180 170 190 180 170 170 200 Cooking time (minutes) 65-75 70-75 70-80 15-20 30-35 15-20 30-35 40-45 60-70 30-35 40-50 20-25 10-15 15-20 20-25 25-30 Browning food to perfect cooking - 3/4 15 220 - Soles and cuttlefish Squid and prawn kebabs Cod filet Grilled vegetables Veal steak Cutlets Hamburgers Mackerels Toasts Grilled chicken Cuttlefish 1 1 1 1 1 1 1 1 4 1.5 1.5 4 4 4 3 or 4 4 4 4 4 4 2 2 5 5 5 5 5 5 5 5 5 5 5 Max Max Max Max Max Max Max Max Max 200 200 8-10 6-8 10 10-15 15-20 15-20 7-10 15-20 2-3 55-60 30-35 7 Precautions and tips GB ! The appliance was designed and manufactured in compliance with international safety standards. The following warnings are provided for safety reasons and must be read carefully. General safety • The appliance was designed for domestic use inside the home and is not intended for commercial or industrial use. • The appliance must not be installed outdoors, even in covered areas. It is extremely dangerous to leave the appliance exposed to rain and storms. • When handling the appliance, always use the handles provided on the sides of the oven. • Do not touch the appliance with bare feet or with wet or moist hands and feet. • The appliance must be used by adults only for the preparation of food, in accordance with the instructions outlined in this booklet. Any other use of the appliance (e.g. for heating the room) constitutes improper use and is dangerous. The manufacturer may not be held liable for any damage resulting from improper, incorrect and unreasonable use of the appliance. • When the appliance is in use, the heating elements and some parts of the oven door become extremely hot. Make sure you don't touch them and keep children well away. • Ensure that the power supply cable of other electrical appliances does not come into contact with the hot parts of the oven. • The openings used for ventilation and dispersion of heat must never be covered. • Always grip the oven door handle in the centre: the ends may be hot. • Always use oven gloves to place cookware in the oven or when removing it. • Do not use aluminium foil to line the bottom of the oven. • Do not place flammable materials in the oven: if the appliance is switched on by mistake, it could catch fire. • Always make sure the knobs are in the “”/“” position when the appliance is not in use. • When unplugging the appliance always pull the plug from the mains socket, do not pull on the cable. • Never carry out any cleaning or maintenance work without having unplugged the plug from the mains. • In the case of a malfunction, under no circumstances should you attempt to repair the appliance yourself. Repairs carried out by inexperienced persons may cause injury or further malfunctioning of the appliance. Contact a Service Centre (see Assistance). • Do not rest heavy objects on the open oven door. 8 • The appliance should not be operated by people (including children) with reduced physical, sensory or mental capacities, by inexperienced individuals or by anyone who is not familiar with the product. These individuals should, at the very least, be supervised by someone who assumes responsibility for their safety or receive preliminary instructions relating to the operation of the appliance. • Do not let children play with the appliance. Disposal • Observe local environmental standards when disposing packaging material for recycling purposes. Observe existing legislation when disposing of the old appliance. • The European Directive 2002/96/EC on Waste Electrical and Electronic Equipment (WEEE), requires that old household electrical appliances must not be disposed of in the normal unsorted municipal waste stream. Old appliances must be collected separately in order to optimise the recovery and recycling of the materials they contain and reduce the impact on human health and the environment. The crossed out “wheeled bin” symbol on the product reminds you of your obligation, that when you dispose of the appliance it must be separately collected. Consumers should contact their local authority or retailer for information concerning the correct disposal of their old appliance. Respecting and conserving the environment • By using the appliance in the hours between late afternoon and early morning, you can help reduce the work load placed on electrical companies. • Always keep the oven door closed when using the GRILL and GRATIN mode to attain best results and to save energy (approximately 10%). • Regularly check the door seals and wipe clean to ensure they are free of debris so that they stick properly to the door and do not allow heat to disperse. Assistance Communicating: • appliance model (Mod.) • serial number (S/N) This information is found on the data plate located on the appliance and/or on the packaging. Maintenance and care Switching the appliance off Disconnect your appliance from the electricity supply before carrying out any work on it. Cleaning the appliance • The stainless-steel or enamel-coated external parts as well as the rubber seals may be cleaned using a sponge that has been soaked in lukewarm water and neutral soap. If these stains are difficult to remove, use only specialised products. After cleaning, rinse and dry thoroughly. Do not use abrasive powders or corrosive substances. • Ideally, the inside of the oven should be cleaned after each use, when it is still lukewarm. Use hot water and detergent, rinse and dry with a soft cloth. Do not use abrasive products. • All accessories - with the exception of the sliding racks - can be washed like everyday crockery. Inspecting the seals Check the door seals around the oven periodically. If the seals are damaged, please contact your nearest After-sales Service Centre (see Assistance). We recommend not using the oven until the seals have been replaced. Replacing the light bulb To replace the oven light bulb: 1. Remove the glass cover of the lamp-holder. 2. Remove the light bulb and replace it with a similar one: Wattage 25 W, cap E 14. 3. Replace the glass cover (see diagram). ! Never use steam cleaners or pressure cleaners on the appliance. Cleaning the oven door Clean the glass part of the oven door using a sponge and a non-abrasive cleaning product, then dry thoroughly with a soft cloth. Do not use rough abrasive material or sharp metal scrapers as these could scratch the surface and cause the glass to crack. To clean more thoroughly, you can remove the oven door. 1. Open the oven door fully (see diagram). 2. Lift up and turn the small levers located on the two hinges (see diagram). F F 3. Grip the door on the two external sides and close it approximately half way. Unlock the door by pressing on the clamps F, then pull the door towards you lifting it out of its seat (see diagram). To replace the door, reverse this sequence. 9 GB GB 10 安装使用说明书 FH 51 IX CN 内容 安装 安装 电器连接 技术参数 烤箱 外观 控制面板 开始和使用 烤箱使用 如何使用计时器 烹饪模式 烹饪模式 烹饪建议 烹饪建议表 建议 安全 处置 环保 帮助 维护 关闭电器 清洁电器 清洗烤箱门 置换灯泡 安装 !将此使用说明书放在安全的地方以备使用。如果烤箱搬动或出 售,可将此说明书和机器一起给使用者。 !仔细阅读此说明书,它包含了安装,使用和安全的重要事项。 安装 !包装材料请远离儿童,以免造成严重和危险的后果。 !烤箱的安装必须由合格人员根据说明书来安装,错误的安装将会造 成对人,动物以及财产的损坏。 固定机器 为了让嵌入式烤箱的作用完全发挥,橱柜必须是定制的。 z 邻近的橱柜嵌板必须是用耐热的材料制作。 z 尤其橱柜外部的面板必须承受 100 C 以上的温度。 z 如将烤箱安装在橱柜中,必须按照如下尺寸: 0 !目前的安全标准是指一旦烤箱被安装好以后烤箱的任何电子零部件 就不能被接触到了。 数据标牌上已注明安装时的消耗指示。 通风 为了确保足够的通风,橱柜后面的嵌板必须去掉。用剩下的两个木片 安装烤箱是可取的。如果烤箱用连续的,扁的表面,那么必须至少 45x560 毫米。 紧固 为了你的烤箱处于中心位置,烤箱的四周有 4 个标签与柜子周围的 4 个孔是一致的。如果柜子边上的面板: 是 20 毫米厚:标签的可移动的部分必 须被移动 是 18 毫米厚:使用厂家设置的第一个槽。 是 16 毫米厚:用第二个槽 为了把烤箱和橱柜固定起来,打开烤箱的 门,用 4 个螺丝插入 4 个孔中,拧紧以便 固定烤箱。 !确保烤箱安全操作的所有部件必须通过工具的帮助来移动。 电器连接 烤箱配备的插头是与数据牌上所显示的电压和频率所一致。 ...... 安装电源线 1......... 1. 将螺丝刀伸入盖子侧边的突 ................. 出部分,打开接线端子板。将螺 丝刀做为杠杆向下推,打开盖子 (见图)。 2. 松开电缆紧固螺钉和三个电 线接触螺钉 L-N- ,安装电源 2............... 线。将电线接连接到对应的端子 上:蓝色电线连接标记为 N 的 终端,棕色电线连接到标记为 L 的终端,黄色或绿色电线连接到 标记为 的终端(见图)。 3. 拧紧紧固螺钉,将固定电缆牢 靠。 4. 盖上接线端子板的盖子。 ........ L N 连接电线到主机 安装标准插头,与资料相一致。当连接电线到插座时,在烤箱和 电源之间安装一个万能的 3 毫米的开着的闸盒。万能闸盒应该根据资 料上的大小来选择(地线不应该被闸盒干扰)。电线必须安置好,不 能超过 50 度。 在作连线前,应先检查以下几点: z 如果烹饪方法得当,有安全的地线,烤箱的安全就会得到保证。 不断确认地线的功效,如果仍有任何疑问,可以让专业的技术人 员检查系统。对于因为没有地线而造成的烤箱损坏的后果,生产 商不负任何责任。 z 在把烤箱通电源之前,在资料中检查特殊的指示要与你家的电源 相匹配。 z 检查系统的负荷量,插座支持的最大强度,如果你不清楚,请技 术人员来检查 !如果插座和烤箱插头不匹配,通过技术人员换一个合适的插座。 !尤其要确认通过插座的部分的电流是否适合烤箱的接收。 !不建议用接的插座或者是额外的,如果不得不使用,记住仅用单一 的或者复合的以保证安全。在这些基础上,决不要超出最大的容量。 插头和插座一定要离的很近。 !制造商不对错误的使用而造成的后果承担任何责任。 技术参数 外型尺寸 宽 43.5 cm; 高 32 cm; 厚 41.5 cm 容量 电源 数据牌 58 升 220/240V;50/60 或 50Hz ; 最大功率 2250w 根据电烤箱 2002/40/EC 标准 EN50304 带排风冷却系统的型号: 自然对流状态下的能量消耗 加热模式: 一般烹饪 强制对流状态下申明的能量消耗 加热模式: 风扇助力 不带排风冷却系统的型号: 强制对流状态下的能量消耗 加热模式: 风扇助力 自然对流状态下申明的能量消耗 加热模式: 一般烹饪 该烤箱符合 E.E.C.规程: -2006/95/EEC 的 12/12/06(低压)及后来的修正规 则; -89/336/EEC 的 03/05/89(电磁兼容性)及后来 的修正规则 -93/68/EEC 的 22/07/93 及后来的修正规则 -2002/96/EC 烤箱 外观 控制面板 烤箱使用 !在初次使用烤箱的时候,我们建议您将自动调温器设置在高温状态, 在烤箱内无任何东西的情况下关闭烤箱门工作半个小时。然后,打开 烤箱门使其通风良好。在初次使用期间你会发现某种气味,这是用来 保护烤箱和烤架的物质挥发的气味。 烤箱开始工作 1.通过调节选择钮来选择理想的烹饪模式。 2.调节温控钮来选择理想的温度,可参考烹饪建议表来进行温 度和烹饪模式的选择。 3.当预热完成后,温控指示灯持续发亮:可在烤箱内放入食物。 4.烹饪时可做以下工作: -通过调节选择钮来选择理想的烹饪模式 -调节温控钮来选择理想的温度 -调节选择钮至“0”位置可停止烤箱工作。 !不要直接在烤箱底部放入任何物品以免损坏烤箱外观涂层。 !谨记餐具必须放置在烤箱的格架上。 排风冷却 为了让温度降下来,一些型号装有排风冷却系统,它会在烤箱热的时 候自动工作。当风扇运作时,在烤箱门和控制面板之间会产生气流声。 !烹饪完毕,风扇运作将一直持续到烤箱完全冷却为止。 烤箱灯 旋转旋钮 着。 就打开烤箱灯。当热量在烤箱中持续中,烤箱灯一直亮 如何使用计时器 1. 将计时器按钮顺时针旋转到底来设置蜂鸣器。 2. 逆时针拨动旋钮来设置理想的时间:控制面板上能看到所需要 的时间。 3. 时间以分钟来计时:当到达选择的时间时,蜂鸣器会有响声。 !计时器不能开或关闭烤箱。 烹饪模式 烹饪模式 温度可设置在 600C 和最大值之间除了 炙烤:建议设置在最高温度 排风扇助力炙烤:建议不超过 2000C 一般烹饪模式 选中该模式,上部和下部的加热元器件同时工作,食物可以上下受热, 当用一般烹饪模式烹饪时,仅仅用一个滴油盘或者是烹饪架,否则就 会受热不均匀。 多功能烹饪模式 选中该模式,上部和下部的加热元器件包括风扇将同时工作 因为持续不断的热量均匀的通过烤箱,烤箱可以覆盖食物的整个表 面。此中烹饪模式两个格架能够同时被使用。 顶部加热 顶部的热量持续。 这个模式可以在烹饪最后用于将食物烤脆。 炙烤 顶部中央的热量持续。具有极端高的和直接温度的电烤架能保证使食 物整个表面均匀烘烤,而又能锁住水分从而保持食物的鲜嫩。强力推 荐电烤架用于需要表面高温加热的食物:如牛排,小牛肉,排骨,汉堡 包等......一些烧烤的例子请详见"烹饪技巧"一节。烹饪时切记关紧 烤箱门。 排风扇助力炙烤 顶部中央热量和风扇持续工作。这些功能加起来既增加了热量,又增 加了烤箱的烤制效果,使风不能从烤箱中通过,这就帮助防止了食物 表面燃烧起来,是热量恰好渗入食物内部。当做烤肉串混有蔬菜、香 肠、排骨、小羊骨带有香料的鸡肉、鹌鹑、猪骨头等时可以达到最好 的效果。烹饪时切记关紧烤箱门。 烹饪技巧 当使用排风扇助力模式时不要放置在第 1 个和第 5 个格架,过 高的热量会烧焦食物。 使用炙烤和排风扇助力炙烤模式时,在格架 1 放置滴油盘来防止 油脂滴落。 多功能烹饪 z 使用第 2 个和第 4 个格架,将需要更多热量的食物放在第 2 格 z 将滴油盘放置在底部,格架在顶部。 炙烤 z 在位置 3 或 4 放入格架,将食物放置在格架中间。 z 建议设置在最高的温度,顶部的加热元器件由温控器所控制。 匹萨 z 当烹饪匹萨时,使用多功能烹饪程序。 z 将匹萨盘放置在格架上。 为使达到松脆的表皮,不要使用滴油盘。 z 建议在烹饪过程中在匹萨上加入奶酪如果馅料很多。 烹饪建议表 旋钮位置 一般烹饪 多功能烹 饪 顶部加热 炙烤 风扇助力 炙烤 食 物 鸭肉 烤牛排 烤猪肉 饼干(小糕点) 果馅饼 比萨(在第二个架子上) 意大利式卤汁面条 小羊 烤鸡+马铃薯 鲭鱼 葡萄干蛋糕 冰激凌松饼(在第二个架子上) 甜面包(在第二个架子上) 海绵蛋糕(在第一个架子上) 海绵蛋糕(在第二个架子上) 馅饼 烤架位 自动调温 重量(千克) 置(从底 预热时间 旋钮位置 部数) 1 3 15 200 1 3 15 200 1 3 15 200 3 15 180 1 3 15 180 1 2-4 15 230 1 3 10 180 1 2 10 180 1+1 2-4 15 200 1 2 10 180 1 2 10 170 0.5 2-4 10 190 0.5 2-4 10 180 0.5 2 10 170 1.0 2-4 10 170 1.5 3 15 200 烹饪时间 65-75 70-75 70-80 15-20 30-35 15-20 30-35 40-45 60-70 30-35 40-50 20-25 10-15 15-20 20-25 25-30 烤制美味的食物 - 3/4 15 220 - 乌贼 鱼和对虾 鲟鱼肉片 烤蔬菜 牛肉片 炸肉饼 汉堡包 鲭鱼 吐司三明治 1 1 1 1 1 1 1 1 4 4 4 4 3/4 4 4 4 4 4 5 5 5 5 5 5 5 5 5 Max Max Max Max Max Max Max Max Max 8-10 6-8 10 10-15 15-20 15-20 7-10 15-20 2-3 烤鸡 乌贼 1.5 1.5 3 3 5 5 200 200 55-60 30-35 建议 电器完全符合国际安全标准,以下为关于安全的警告请仔细阅 读。 安全须知 z 本设备专为家庭设计使用,是非专业性工具。不能改变其功 能。 z 勿将设备暴露在露天,暴露在日晒雨淋中是极其危险的。 z 用烤箱所配备的把手来操作烤箱。 z 勿用身体湿的部分和光脚时使用设备 z 仅供成人在说明书的指示下使用,禁止儿童使用。 z 使用设备时,加热元件和炉门的一些部件会变得很热,请不 要触摸它们,使孩童远离它。 z 勿将其它小设备的电源线与烤箱热的部分接触。 z 勿阻碍烤箱通风或阻挡分散热流的缝隙 z 开门时握住位于烤箱中心的把手,边缘部会很热。 z 戴手套放置或移动炊具 z 勿使用金属薄片垫于烤箱底部 z 勿将正在使用的易燃液体靠近设备 z 在设备不使用时,应确认按钮是在 z 勿用拉设备或电源线的方法将插头从插座中拔出 z 清洁工作必须断电并将插头拔出。 位置 z 勿在没有具有资格的人员的帮助下,自行安装或修理设备, 必须与具有资格的人员联系。 z 勿在开启的烤箱门上放置重物。 处置 根据当地的环境保护标准来处理包装材料作为再生材料使用。 欧洲条款 2002/96/EC 废弃电器和电器设备(WEEE),规定废弃电 器不可扔于普通的垃圾堆中。必须单独的收集起来作为再生材料 使用而减少污染和保护环境。顾客可咨询当地的机构或零售商以 正确的处置废弃电器和电器设备。 重视和保护环境 在下午晚些时候到清晨使用电器,你可以减少电力公司的工作负 荷。 当使用表面形成焦皮的烹饪模式时,保持烤箱门关闭,可达到最 佳效果并节省能源(大约 10%)。 经常检查烤箱门并保持干净,以保证烤箱门的紧密关闭,防止热 量散发。 维护和保养 在清理烤箱之前,或者在维修的时候,请切断电源。 清洁电器 z 有漆的部分和不锈钢的部分必须用温水清洗,不能用任何磨损性 的粉末和腐蚀性的物质清洗,否则会损坏部件,不锈钢可能会染有 污点。如果这些污点很难被清除,可以用在市场上能够买到的专门 的东西来清洁它。在清洗后,烤箱要彻底的清洗干净并晾干。 z 烤箱内部的清洁最好在使用完之后马上进行,当内部仍有余热时 用热水和肥皂清洗;皂液应彻底漂洗干净,烤箱内部必须保持干 燥。应避免用磨损性的粉末(例如粉状清洗物等)和腐蚀性的物质 (例如石灰石等),这些都会损坏涂漆.如果油点和污物特别顽固, 请使用随说明书附赠的专门清洗产品。 z 附件可以日常洗涤(并可放入洗碗机) 。 清洁烤箱门 为了更彻底的清洗,您可以拆下烤箱门,步骤如下: 1 完全打开烤箱门 2 举起并旋转小杠杆使两个铰链处于并排的位置 3 紧握着在两个外边的门,慢慢的关闭,但不要完全关闭,朝你的方向 拉门,拉着它离开它的底座,安上门的步骤和上述步骤相反 检查密封条 定期检查烤箱门密封条。如有损坏,请致电售后服务中心。建议换上 新的密封条后再使用烤箱。 换烤箱灯 更换烤箱灯: 1 拧下灯支座的玻璃罩。 2 拧下电灯,更换以下特性灯泡: 电压 230/240V, 功率 25W, 型号 E14。 3 重新装上玻璃罩,并连接电源。 帮助 交流: z 型号(Mod.) z 序列号(S/N) 此信息可在数据牌上找到。 09/2011 10/2009- -195078177.01 195078177.00 XEROX FABRIANO "#$"! " !$& %%%"#$! ! Cod. 1.007.34.0