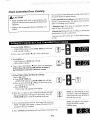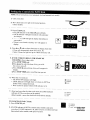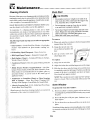
1
Welcome .................................................................
1
Safety Instructions ............................................... 1-3
Range at a Glance ................................................... 4
Controlsat a Glance .............................................. 5-7
,
:
....
*,
Surfac_
Co0king
............. .............:i....21.i.......
8_10
Surface Controls
8
Coil Element Surface ....................................... 9
Glass-Ceramic Surface ................................... 10
| O•
•
•
•
•
Oven Operation ................................................ 1t-14
Baking and Roasting ...................................... 11
Oven Vent and Light
12
Oven Racks .................................................. 12
Broiling .......................................................... 13
Clock Controlled
Oven Cooking .......................................... 14
•
•
•
•
•
•
Care and Cleaning ........................................... 15-18
Self-Clean Oven ....................................... 15-16
Cleaning Chart .......................................... 17-18
Maintenance .................................................... 19-20
Before You Call for Service ............................ 21-22
•
•
•
•
•
Warranty ..............................................................
•
®
23
I
I
Models: U.S. • MER5710 • MER5530 • MER5550 • MER5730 • MER5755
I
Welcome..........,.,......,.
Important Safety
Congratulations
on your
choice
ofa Maytag
electric
range.Instructions,,,,.,.,.,.,.,,.,
Your complete satisfaction is very important to us.
Read and follow all instructions before using this appliance to prevent the potential risk of fire, electric shock,
personal injury or damage to the appliance as a result of
improper usage of the appliance. Use appliance only for
its intended purpose as described in this guide.
Read this user's guide carefully. It is intended to help you
operate and maintain your new range,
In addition, you will find a booklet entitled "Cooking Made
Simple." It contains information on selecting cookware and
provides baking, roasting and broiling tips.
Save time and money. Check the "Before You Call" section
of this guide. It lists causes of minor operating problems that
you can correct yourself.
To ensure proper and safe operation: Appliance must
be properly installed and grounded by a qualified techniclan.
_
IIkWARNING
These numbers are also on the Product Registration card that
came with your appliance. Before sending in this card, record
_
• ALL RANGES CAN TIP AND
CAUSE INJURIESTO
PERSONS
• INSTALLANTI-TIPDEVICE
Model
these numbers along with
theNumber
purchase date below.
_
• FOLLOW ALL INSTALLATION
INSTRUCTIONS
PACKED WITHRANGE
However, should you need service, it is helpful to have the
model and serial numbers available. This information can be
found on the data plate located on the storage drawer frame.
:
WARNING: To reduce risk of tipping of the appliance
from abnormal usage or by excessive loading of the oven
door, the appliance must be secure by a properly installed
anti-tip device.
Serial Nuinber
Date of Purchase
To check if device is properly installed, remove storage
drawer and look underneath range to make sure one of th_
rear leveling legs is properly engaged in the bracket slot
IMPORTANT: Keep this guide and the sales receipt in a
safeplaceforfuture
reference. Proof of originalpurchase
date is needed for warranty service,
The anti-tip device secures the rear leveling leg to the floo
when properly engaged. You should check this anytim_
the range has been moved.
If you have questions, write us (include your model number
and phone uumber) or call:
In Case of Fire
Maytag Appliances Sales Company
Attn: CAIR sMCenter
P.O. Box 2370
Cleveland. TN 37320-2370
1-800-688-9900 fUSA)
....
Turn off appliance and ventilating hood to avoid spread
ing the flame. Extinguish flame then turn on hood to re
move smoke and odor.
• Cooktop: Smother fire or flame
in a pan with a lid or cookie sheet.
1-800-688-2002 CANADA)
1-800-688-2080 U.S. TTY for deaf, hearing
impaired or speech impaired)
(Men. - Fri . 8 am-8 pm Eastern Time)
_nternet: http://www.maytag.com
.._a-
NEVER pick up or move a flareing pan.
For service information, see page 22,
• Oven: Smother fire or flame by closing the oven door
NOTE: In our continuing effort to improve the quality
and performance of our cooking products, it may be
necessary to make changes to the appliance without
revising this guide.
Do not use water on grease fires. Use baking soda, a dr
chemical or foam-type extinguisher to smother fire c
flame.
1
General Instructions
Cooktop
WARNING: NEVER use appliance door,
or drawer, if equipped, as a step stool or seat
as this may result in possible tipping of the
appliance, damage to the appliance, and serious injuries,
NEVER leave surface units unattended
especially when using high heat settings.
An unattended boilover could cause
smoking and a greasy spillover can cause
a fire.
If appliance is installed near a window,
proper precautions should be taken to prevent curtains from blowing over surface
elements,
This appliance is equipped with different
size surface elements. Select pans having
flat bottoms large enough to cover element. Proper relationship of pan to element will improve cooking efficiency.
_
NEVER use appliance to warm or heat the
room, Failure to follow this instruction can
lead to possible burns, injury, fire, or damage to the appliance,
If pan is smaller than element, a portion
' _ .
of the element will be exposed to direct
contact and could ignite clothing or potholder.
., _
.
NEVER wear loose-fitting or hanging garments while using the appliance. Clothing .
could catch utensil handles or ignite and =
cause bums if garment comes in contact with _
hot heating elements,
Only certain types of glass, glass/ceramic, ceramic, earthenware or other glazed utensils are suitable for cooktop
or oven service without breaking due to the sudden change
in temperature. Follow utensil manufacturer's instructions
when using glass.
To ensure proper operation and to avoid damage to the appliance or possible injury, do not adjust, service, repair or replace any part of the appliance unless specifically recommended in this guide. Refer all other servicing to a qualified
technician,
This appliance has been tested for safe performance using
conventional cookware. Do not use any devices or accesseries that are not specifically recommended in this manual.
Do not use eyelid covers, stovetop grills or add-on oven
convection systems. The use of devices or accessories that
are not expressly recomlnended in this manual can create
serious saftey hazards, result in performance problems, and
NEVER store or use gasoline or other combustible or flammable materials in the oven, near surface units or in the vicinity of this appliance as fumes could create a fire hazard or an
explosion.
reduce the life of the components of this appliance.
Turn pan handle toward center of cooktop,
face element. This reduces the risk of burns,
not
out into
the room materials,
or over another
surignition
of flammable
or spillage
if pan is accidently bumped or reached by
small children.
Toprevent
greaseaccumulate
fires, do notinletorcooking
or other flammane materials
near thegrease
appliance,
Use only dry potholders. Moist or damp
_
potholders on hot surfaces may result in
'
a steam burn. Do not let potholder touch
hot beating elements, Do not use a towel
or other bulky cloth which could easily
touch hot heating elements andignite.
<,_v
To prevent damage to removable heating elements, do not
immerse, soak or clean in a dishwasher or self-clean oven.
A damaged element could short resulting in a fire or shock
hazard.
' _ _'_
Always turn off all controls when cooking is completed.
NEVER heat unopened containers on the surface unit or in
oven. Pressure build-up in the container may cause container
to burst resulting in burns, injury or damage to the appliance.
Make sure drip bowls are in place as absence of these bowls
during cooking could damage wiring.
Glass-Ceramic Cooktop
NEVER use aluminum foil to line drip bowls, or to cover an
oven rack or oven bottom. Misuse could result in risk of
electric shock, fire, or damage to the appliance. Use foil
only as directed in this guide,
(select models)
NEVER cook on broken cooktop. Ifcooktop should break,
cleaning solutions and spillovers may penetrate the broken cooktop and create a risk of electric shock. Contact a
qualified technician immediately.
Deep Fat Fryers
Clean cooktop with caution. Some cleaners can produce
noxious fumes if applied to a hot surface. If a wet sponge,
cloth, or paper towel is used to wipe spills on a hot cooking area, be careful to avoid steam burn.
Use extreme caution when moving the grease pan or disposing of hot grease. Allow grease to cool belbre attempting to
move pan.
2
Safety
Instructions
(continued)................................
Oven
Child Safety
Use care when opening door. Let hot air
or steam escape before removing or replacing food.
NEVER leave children alone or unsupervised in area where appliance is in
use or is still hot.
For proper oven operation and performaned, do not block or obstruct oven vent
NEVER allow children to sit or stand
on any part of the appliance as they
could be injured or burned.
duct.
Always place oven racks in desired locations while oven is
cool. If rack must be moved while oven is hot, do not let
potholder contact hot heating element in oven.
Self-Cleaning
:_.......
CAUTION: NEVER store items of interest to children in cabinets above an
appliance or on backguard of a range.
Children climbing on appliance, door or
drawer to reach items could damage the
appliance or be burned or seriously injured.
Oven
Clean only parts listed in this guide. Do not clean door gasket. The gasket is essential for a good seal. Care should be
taken not to rub, damage, or move the gas_ _ _-..
Children must be taught that the appliance and utensils in
or on it can be hot. Let hot utensils cool in a safe place, out
of reach of small children. Children should be taught that
to play with controls or other parts of the unit.
Do not use oven cleaners. No commercial oven cleaner or oven liner protective
ket.
__
coating of any kind should be used in or libel
_:!ib
,.
=F
around any part of the oven.
............
Before self-cleaning the oven, remove broiler pan, oven racks
and other utensils to prevent excessive smoking, discoloration of the oven racks or possible damage to utensils,
Clean range hood and filters frequently to prevent grease
or other flammable materials from accumulating on hood
or filter and to avoid grease fires.
Wipe up excessive spillovers, especially greasy spills, before the clean cycle to prevent smoking or flare-ups.
Turn the fan on when flambding foods (such as Cherry
Jubilee) under the hood.
an
appliance is not
atoy. Children should not be allowed
Ventilating
Hoods
It is normal for the cooktop to become hot during a clean
cycle. Therefore, avoid touching or lifting the cooktop during a clean cycle.
/
iii! i
Important
Safety
Notice
and
Warning
Heating Elements
The California Safe Drinking Water and Toxic Enforcement Act of 1986 (Proposition 65) requires the Governor
of California to publish a list of substances known to the
NEVER touch surface or oven heating elements, areas
near elements, or interior surfaces of oven.
State
of California
to cause
or reproductive
harm,
and requires
businesses
to cancer
warn customers
of potential
exposures to such substances.
Heating elements may be hot even though they are dark in
color, Areas near surface elements and interior surfaces of
an oven may become hot enough to cause bums. During and
after use, do not touch or let clothing or other flammable
materials contact heating elements, areas near elements, or
interior surfaces of oven until they have had sufficient time
to cool.
Other potentially hot surfaces include: Cooktop, areas facing the cooktop, oven vent, and surfaces near the vent opening, oven door, areas around the door and oven window.
Users of this appliance are hereby warned that when the
oven is engaged in the self-clean cycle, there may be some
low level exposure to some of the listed substances, ineluding carbon monoxide. Exposure to these substances
can be minimized by properly venting the oven to the outdoors during the self-clean cycle by opening a window
and/or door in the room where the appliance is located.
Save These
Instructions
for Future
3
Reference
Range at a Glance
eooooooooooeooooeooeooeoooooeeooeoeoee
:!i) 21)
ELECTRONIC CONTROL (pages 5-7)
OVEN LIGHT SWITCH (page 12)
BACKGUARD •
. SURFACE CONTROLS
." AND INDICATOR LIGHT (pages 8 & 9)
I•
SURFACE CONTROLS
AND INDICATOR LIGHT
• ...
(pages 8 & 9)
••"
OVEN VENT (page 12)
• ° on glass-ceramic range
• • on coil element range
HOT SURFACE INDICATORS
• (glass-ceramic cooktop
only, page 9)
DOOR LOCK LEVER
Select models (page 16)
SURFACE ........
ELEMENTS
(pages 9 & 10)
•BROIL ELEMENT
(not shown, page 13)
COOKTOP • • "
(page 9 & 10)
" • RACK SUPPORTS
• "- OVEN RACKS
(page 12)
ANTI-TIP BRACKET
(page 20) ........
LEVELING LEG • • •
(page 20)
BAKE ELEMENT
(page 11)
DATA PLATE . • "
•"
OVEN WINDOW
STORAGE DRAWER
(page 20)
DOOR GASKET
4
Controls
at a Glance.............................
The control panel is designed for ease in programming. The display window on the electronic control shows time of day,
timer and oven temperatures.
BAKE
I
CLEAN
TIMER
CLOCK
I
COOK
TIME
STOP
TIME
[
"
NOTE: Styling and features may differ slightly depending on the model.
Function Pads
......
• Press, or press and hold, these pads to enter time,
oven temperature or to select HI or LO broil. No
beep will sound when these pads are
pressed.
For example: If you set the oven to bake
at 350°F and then set a timing operation,
the indicator light on the BAKE pad will
"dim" and the indicator light on the
TIMER pad will be "full on."
The display will show the operation for
• Press
to cancel
all operations
exceptthis
the pad
TIMER
and CLOCK.
• Function pads are the BAKE, BROIL, CLEAN, TIMER,
CLOCK. COOK TIME, STOP TIME, and CANCEL
pads. A beep will sound when these pads are pressed.
• All function pads except the CANCEL pad feature an
indicator light,
When BAKE or BROIL pad is pressed, the indicator light
will turn on to let you know that the oven is set for
this operation.
Indicator lights on CLEAN, TIMER, CLOCK, [_J
COOK TIME and STOP TIME pads will flash _
when
the pad
is pressed.
indicator
will stop
flashing
but willThese
remain
lit oncelights
the L_J
function starts,
• If an indicator light on a function pad is lit and you set a
second operation:
the
padthe
with
the "fullpad
on"with
indicatorlight.
I T_MER
_
j On"
Press
function
the "dim" I_
indicator light to recall that operation.
NOTE: lfmore than 30 seconds elapse between pressing
afunction pad and a • or • pad, the program will be
canceled and the display will return to the previous
display.
BAKE
Pad
Use for baking or roasting.
1. Press BAKE pad.
2. Press • or • pad until the correct oven temperature
appears in the display.
See page 11 for additional information.
Either the control will not accept the operation or
BROIL Pad
The indicator light on the first pad will "dim" slightly
Use for top browning and broiling.
and the indicator light on the pad you just pressed will
be "full on." This lets you know that you have set the
control for two operations.
1. Press BROIL pad.
2. Press • or • pad for HI or LO broil.
See page 13 for additional information.
.........
_F_
CLEAN Pad
Setting the Timer
Use to set self-clean cycle.
The timer can be set from one minute (0:01 ) up to 9 hours
and 50 minutes (9:50).
For models with a manual door lock:
1. Close and lock oven door,
2. Press CLEAN pad. "3:00" will appear in the display,
3. Oven will automatically clean for 3 hours or press
• or • pad to select 2 to 4 hours of cleaning.
For models with an automatic door lock:
1. Press CLEAN pad. '....
will appear in the display.
2. Press • or • pad. "3:00" hours of cleaning time will
automatically be entered,
3. If more or less cleaning time is desired, press
• or • pad to select times between 2 to 4 hours.
See pages 15-16 for additional information.
COOK TIME
,,
The timer can be used independently of any other oven
activity and it can be set while another oven function is
operating. THE TIMER DOES NOT CONTROL THE
OVEN.
1. Press the TIMER pad.
2. Press or press and hold the • or • pad until the correct
time appears in the display.
• The timer will start automatically. The TIMER
indicator on the TIMER pad will light whenever the
timer is in use.
° One long beep and "End" will be briefly displayed
to signal the end of the timer operation.
To cancel timer: Press and hold TIMER pad for three
seconds. Time of day will reappear in the display.
TIME Pads
Use to program the oven to start and stop automatically.
Control Options
1. Press COOK TIME pad and enter the desired cooking
time.
Clock Controlled
2. Press the BAKE pad and enter oven temperature.
3. To delay the startof cooking, press the STOP TIME pad
and enter the time you wish the oven to turn off.
Option 1. (default option) Four beeps at the end of
cooking, then, one beep every 30 seconds for the next
five minutes or until the CANCEL pad is pressed.
See page 14 for additional information.
Option 2. Four beeps at the end of cooking, then, no
other beeps.
Setting the Clock
1. Press CLOCK pad.
Option
Fourminute
beeps for
at the
beep 3.
every
the end
next of12cooking,
hours or then,
until one
the
CANCEL pad is pressed.
2. Press or press and hold • or • pad until the correct time
of day appears in the display.
Setting Clock Controlled
Oven Cooking Beeps
The display will flash when electrical power is first supplied
to the range or if there has been a power failure,
To recall the time of day when another function is displayed,
press the CLOCK pad.
1, Press COOK TIME and CLOCK pads at the same
time and hold for three seconds.
• A single beep will sound.
• Display will show current option.
Clock time cannot be changed when the oven has been
programmed for clock controlled cooking, self-clean or
delayed self-clean,
2. Press the • or • pad to select the option number you
wish. The current time of day will reappear in the
display after four seconds.
Oven Cooking Beep Option
Controls
at a Glance
(continued).......................
Cancel Clock Display Option
Oven Temperature Adjustment
If you prefer that the time of day not be displayed:
To set: Press CLOCK and CANCEL pads at the same time
and hold for three seconds,
You may adjust the oven temperature if you think the oven
is not baking correctly. To decide how much to change the
temperature, set the temperature 25 degrees higher or lower
than your recipe recommends, then bake. The results of the
When clock display is not shown, press CLOCK pad to
briefly recall the time of day, if desired,
"test" should give you an idea of how much to adjust the
temperature.
To restore: Press the CLOCK and CANCEL pads at the
same time and hold for three seconds. The time of day will
reappear in the display.
TO
Automatic
Oven Turn Off Option
The oven will automatically turn off after 12 hours, if you
accidentally leave it on. You can deactivate this feature, if
desired,
To Eliminate
12 Hour Turn Off
1. Press the CLOCK pad and hold for three seconds,
;
Option
Adjust the Oven Temperature
1. Press the BAKE pad.
2. Enter 550° by pressing • pad.
3. Press and hold the BAKE pad for three seconds until00 °
appears in the display.
• If the oven temperature was previously adjusted, the
change will be displayed. For example, if the oven
temperature was reduced by 15°, the display will
show -15°.
4. Press and hold the • or • pad to change the _emperature. Each time a pad is pressed, the temperature changes
2. Press and hold the • or • pad until 8:88 appears in the
display. Current time of day will reappear in the display
after four seconds,
by 5°.
• The oVenotemperatureocan be increased or decreased
by 5 to 35
To restore: Repeat steps 1 and 2.12:00 will appear briefly
in the display followed by the current time of day.
5. The time of day will automatically reappear in the
display.
It is not necessary to readjust the oven temperature if there
is a power failure or interruption. Broiling and cleaning
temperatures cannot be adjusted.
Control Lock-Out Option
The Control Lock-Out feature prevents the oven from being
turned on.
To Set Control
Oven
Light
Lock-Out
1. Press
andCANCEL
and hold pads
both STOP
forthreeTIME
secends.
and __
2. "OFF" will appear m the display when this feature is
activated. Only the clock and timer functions will operate
when Control Lock-Out feature is activated.
Repeat step 1 to deactivate.
comes
off.
select
whenever
models
theoven
ovenpanel
door
lightis
opened.
PushOn
theon
switch
on thethe
control
toautomatically
turn
it on and
Surface
Cooking ....................................
Surface Controls
Suace
Cooking CAUTIONS:
Use to turn on the surface elements. An infinite choice of
heat settings is available from LOW to HIGH. The knobs
can be set on or between any of the numbered settings.
Before Cooking
• Always place a pan on the surface unit before you turn
it on. To prevent damage to range, never operate
surface unit without a pan in place.
Setting the Controls
• Do not use the cooktop as a storage area for food or
cookware.
1. Place pan on surface element.
2. Push in and turn the knob in either direction to the
desired heat setting.
During Cooking
• Be sure you know which knob controts which surface
unit. Make sure you turned on the correct surface unit.
,
• Begin cooking on a higher heat setting then reduce to a
lower setting to complete the operation. Never use a
high heat setting for extended cooking.
The backguard is marked to identify which element
the knob controls. For example, @_, indicates right
front element.
_' •
Off
• Never allow a pan to boil dry. This could damage the
pan and the appliance.
,
Never touch cooktop until it has cooled. Expect some
parts of the cooktop, especially around the surface
units, to become warm or hot during cooking. Use
potholders to protect hands.
_"!
Suggested Heat Settings
After Cooking
• Be sure surface element and surface indicator light are
off after cooking.
The size and type of cookware will affect the heat setting.
• Clean up messy spills as soon as possible.
For information on cookware and other factors affecting
heat settings, refer to "Cooking Made Simple" booklet.
Other Tips
• To eliminate the hazard of reaching over hot surface
elements do not install cabinet storage directly above a
unit.
Setting
HIGH
If storage is provided, limit it to items that are infrequently used and can be safely stored in an area sub-
8
Med. Hi
jeered to heat.
Temperatures may be unsafe for items such as volatile
liquids, cleaners or aerosol sprays.
4--6
• Aerosol-type spray cans are EXPLOSIVE or highly
flammable when exposed to heat. Avoid their use or
storage near an appliance.
8
Use to brown meat, heat oil for deep fat
frying, saute or fry. Maintainfast boil for
large amounts of liquids.
Use to maintain moderateto slow boil for
large
amounts of liquidsand for mostfrying
operations.
2
Med. Lo
Useto continuecookingcoveredfoodsand to
maintain pressurein most pressure cookers
and stew or steam operations.
LOW
• Do not allow aluminum foil, meat probes or any other
metal object, other than a pan on a surface element, to
contact heating elements.
Use to bringliquidto a boil,blanch,or reach
pressurein apressurecooker. Alwaysreduce
setting to a lower heat when liquidsbegin to
boil or foods begin to cook.
Med.
• Do not leave any items, especially plastic items, on the
cooktop. The hot air from the vent may ignite flarerouble items, melt or soften plastics, or increase pressure in closed containers causing them to burst.
Uses
Use to keep foods warm and melt chocolate
and butter.
Surface
Cooking
(continued)........................-...-.
Surface Indicator Lights
Coil Elements
There is an indicator light under each pair of control knobs.
When one or both of the surface control knobs is turned on,
.
the light will turn on. The light will turn off when the surface
element(s) is turned off.
• Coil elements are self-cleaning.
When an element is turned on, it will cycle on and off
to maintain the heat setting.
• Do not immerse in water.
(glass-ceramic cooking surface
To remove: When cool, raise element. Carefully pull out
and away from receptacle.
_.._
/
models only)
Each element has a HOT _/"
_-'_
SURFACE indica- f
_go_%P
-"__I
torlight, mlightwill _
/
J//7
be illuminated when
_"'_
J/
the matching surface element
_----------_,_/_J
is hot. It will remain on, even after
W
the control is turned off. until the area has
cooled. They are located at the front center of the cooktop,
To replace: Insert terminals on the element into receptacle.
Guidethe element into place. Gently press down onthe outer
edge of the element until it sits level on the drip bowl.
Hot Surface Lights
Coil Element Surface
(select
models)
TERMINALS
Lift-up Porcelain Cooktop
Drip Bowls
To prevent the cooktop from discoloring or staining:
•
Clean cooktop after each use.
•
Wipe acid or sugar spills as soon as the cooktop has
cooled as these spills may discolor or etch the
porcelain,
The drip bowls, located under each surface element, are
designed to catch believers and must always be used. Absence of these bowls during cooking may damage wiring or
other parts underneath the cooktop.
Your range features an upswept porcelain cooktop that can be
lifted up for convenient access to the area under the cooktop,
To prevent the risk of electric shock or fire, never line drip
bowls with aluminum foil.
To lift cooktop: When cool. grasp the front edge of the
cooktop. Gently lift up until the two support rods at the front
Drip bowls will discolor or craze over time, if overheated.
This discoloration or crazing is permanent. However, it will
of the cooktop snap into place.
not affect cooking performance.
_
• Av°id using high heat settings f°r l°ng peri°ds °f time"
4_---_
SUPPORT
ROD
i
L: _
not usedrip
oversized
cookware. Pans should not
ToDo
protect
bowl finish:
e
• When
the Canning
Element
(Model
extendhome
more canning,
than 1-2use
inches
beyond the
element.
\
To lower cooktop: Hold the front edge of the cooktop and
carefully push back on each support rod to release. Then
gently lower the top into place. The support rods will slide
into the range frame.
eEl). Contact your Maytag dealer for details.
• Clean frequently. (See cleaning section, page 17.)
9
Glass-Ceramic
Surface
Tips to Protect the Surface
(select models)
• Before first use, clean the cooktop as directed in the
cleaning chart on page 18.
CAUTION: Do not use the cooktop if the glass is
cracked or broken, or if metal melts on to it. Call an
authorized servicer. Do not attempt to repair it yourself.
• Do not use glass pans. They may scratch the surface.
• Do not allow plastic, aluminum foil, sugar or foods with
high sugar content to melt onto the hot cooktop. If these
accidentally melt onto the cooktop, clean immediately.
(See cleaning chart, page 18.)
• On Canadian models, the right front element may not operate
during a self-clean cycle. This is normal.
• Never use cooktop as a work surface or cutting board.
• Cooktop may emit a light smoke and odor the first few times
the cooktop is used. This is normal.
• Never cook food directly on the surface.
• When a control is turned on, a red glow from the element can
be seen through the glass-ceramic surface. The element will
• Never let a pan boil dry as this will permanently damage
the surface and pan.
cycle on and off to maintain the preset heat setting.
• Glass--ceramic cooktops retain heat for a period of time after
the unit is turned off. When the HOT SURFACE light turns
• Never use foil-type disposable containers or place a
trivet or wok ring between the surface and pan. These
items can mark or etch the top.
off (see page 9), the surface will be cool enough to touch.
• NOTE: Do not attempt to lift the cooktop,
• Do not slide aluminum pans across a hot surface. The
pans may leave marks which need to be removed
promptly. (See cleaning chart, page 18.)
• Make sure the surface and the pan bottom are clean
before turning on to prevent scratches.
Cooking Areas
The cooking areas on your range are identified by permanent
patterns on the glass-ceramic surface. For most efficient
cooking, fit the pan size to the element size.
• To prevent scratching or damage to the glass-ceramic
top, do not leave sugar, salt or fats on the cooking area.
Wipe the cooktop surface with a clean cloth or paper
towel before using.
Pans should not extend more than 1/2 to I-inch beyond the
cooking area. (For more information on cookware, refer to
"Cooking Made Simple" booklet.)
• Never use a soiled dish cloth or sponge to clean the
cooktop surface. A film will remain which may cause
stains on the cooking surface after the area is heated.
10
Oven
A
Operation
......................................
Food
food
Prepared
Warning: Follow
manufacturer's
instructions. If a plastic frozen food container and/or its
cover distorts, warps, or is otherwise damaged during
cooking, immediately discard the food and its container.
The food could be contaminated.
$
Oven Operation CAUTIONS:
• Be sure all packing material is removed from oven before
turning on.
• Do not use oven for storing food or cookware.
• Follow the manufacturer's directions when using oven
• Many aerosol-type spray cans are EXPLOSIVE when
cooking bags.
exposed to heat and may be highly flammable. Avoid their
use or storage near the oven.
• When oven is in use, the area near the oven vent may feel
hot to the touch.
, Allow steam and hot air to escape before reaching into the
oven to check, add or remove food.
For additional baking and roasting tips, see "Cooking Made Simple" booklet.
Setting the Controls
for Baking and Roasting
1. Press BAKE pad.
• BAKE indicator on the BAKE pad will light.
• 000 will light in display.
Bake _
Indicator I _
Light [ m
2. Press or press and hold the • or • pad to select oven
temperature,
• 350° will light when either pad is pressed.
• Oven temperature can be set from 170° to 550°.
)
"
•
•
•
•
•
.
•
•
•
•
•
•
•
•
•
•
•
.
•
•
•
•
•
•
•
•
•
*
•
•
•
•
.
•
•
•
•
•
•
•
•
•
.
•
•
]
J
it
•
•
•
•
•
•
.
•
*
3. There will be a four second delay before oven turns on.
When the oven turns on:
• OVEN ON indicator will light.
• PREHEAT indicator will light,
• The preselected teinperature will remain in
the display.
_ PREHEAT
c:3 LOCK
4. Allow 8-15 minutes for the oven to preheat.
• A single beep will indicate that the oven has preheated.
• The OVEN ON indicator will remain lit.
• The PREHEAT indicator will turn off.
_(Z_ OVENON
PREHEAT
c:_LOCK
•
•
•
•
•
•
•
•
•
•
•
•
•
•
•
,
I
•
•
•
•
•
•
•
•
•
•
•
•
•
•
•
•
•
•
•
•
•
•
•
•
•
•
•
•
•
•
•
•
•
•
•
•
•
•
•
OVEN ON
•
5. Place food in the oven.
•
•
•
*
•
•
0
•
*
•
•
•
•
•
•
•
•
•
•
•
NOTE: The oven temperature can be changed at any time
by pressing the • or • pad for the desired temperature. If
another function is displayed, press the BAKE pad, then
press the • or • pad to select new temperature.
6. Check cooking progress at the minimum cooking time.
Cook longer if needed.
7. Press CANCEL pad and remove food from the oven.
• The BAKE indicator on the BAKE pad will turn off.
• The OVEN ON indicator will turn off.
• Time of day will reappear m the display.
NOTE: If you forget to turn off the oven, it will automatically turn off at the end of 12 hours. If you wish to
deactivate this feature, see page 7.
11
Oven Vent
RACK
2:
When the oven is in use, the area near the vent may feel warm
or hot to the touch. Never block the vent opening,
Used for roasting small cuts of meat. casseroles.
baking loaves of bread, bundt cakes or custard pies.
onglass-ceramicrange
Used for roasting large cuts of meat and poultry,
Two rack:
Use rack positions 2 and 4, or 1 and 4.
RACK
1:pieS,Rackdessertcooking:SOUffles
Multiplefr°zen
or angel food cake.
VEN
VENTLOCATION
oncoil
_elementrange
• Ona coilelement surface,be sure thedripbowl (_"
in the vent locationhas a hole in thecenter. Do
not cover the drip bowl with aluminum foil.
_..
"_')
Half Rack
OVEN
VENT
OPENING
Tabs
models)
To install in oven:
Supports
1. Always install half rack
_._,
when oven is cool.
_._._
Oven Racks
_----_x_
2. Toinstall, grasp top center _.._,_
of the half rack. Align the
_._
side arm support between Front
the top fourth and fifth oven rack guides. Insert the
two tabs on the back frame of the half rack into the
slots on the upper left rear of the oven wall.
A
CAUTION: Do not attempt to change the rack pealtion when the oven is hot.
Your oven has two racks. They are
(select
___
designed with a lock-stop edge.
Select models have one regular
rack and one RollerGlide TM rack.
The RollerGlide TM rack rolls out
on metal rollers and allows the
rack to fully extend making it easy
to place food in and take toed out of the oven.
3. Push firmly on the top surface of the half rack until
the tabs slide into the slots and the half rack side arm
support rests on the fourth oven rack guide.
4. Check for proper installation by placing your hand
on the top surface of the half
rackandpressingdown firmly.
To remove flat rack: Pull rack straight out until it stops at the
lock-stop position; lift up on the front of the rack and pull out.
To remove from the oven:
When the oven is cool, grasp the
To remove RollerGlidC Mrack: Pull both the rack glide and
the rack base out together. (See graphic above),
top center of the half rack and
pull upward untilthe back tabson
the rack slide out of the oven back
slots.
To replace: Place rack on the rack support in the oven; tilt the
front end up slightly; slide rack back until it clears the lock-stop
position; lower front and slide back into the oven.
Rack Positions
J
/</
Notes:
@1
• Do not use cookware that extends beyond edge of rack.
RACK 5 (The RollerGlidC _
rack on select models is not
4
_
• Forbest results, allow two inches between thepan placed
on the rack and the oven side wall.
recommended on rack
position 5): Used for
toasting bread or broiling
thin non-fatty foods.
2
*
• When opening the oven door, allow steam and hot air to
escape before reaching into the oven to remove food.
• Use caution when removing items from the half rack to
avoid burns.
RACK 4:
Used for most broiling.
° Carefully remove items from the lower rack to avoid
disturbing the half rack.
RACK 3:
Used for most baked goods on a cookie sheet or jelly roll
pan, layer cakes, fruit pies, or frozen convenience foods.
• "HALFRACK" Accessory Kit is available from your
dealer when not included with range.
12
Oven Operation
(continued)..............................
Broiling
• For best results, use a pan designed for broiling.
• For additional broiling tips, refer to the "Cooking Made Simple"
booklet.
Setting the Controls for Broiling
Broil _
Indicator
Light
1. Press the BROIL pad.
• BROIL indicator on the BROIL pad will light.
• 000 will light in the display.
• The OVEN ON indicator will light. There will be an
eight second delay before the oven turns on.
_
I
OVEN ON
c_ PREHEAT
LOCK
•
•
•
•
•
•
•
•
•
•
•
•
•
•
•
*
•
•
•
•
•
•
•
*
•
•
o
•
•
•
•
•
=
•
•
*
•
•
2. Press the • pad to select HI (high) broil or the • pad
to set LO (low) broil.
• Select HI broil for normal broiling.
0 Select LO broil for low temperature broiling of
longer cooking foods such as poultry.
3. For optimum browning, preheat broil element for
three to four minutes before adding food.
•
•
=
•
•
•
•
•
o
i
•
•
•
•
•
.
•
•
•
.
•
.
*
•
.
*
•
HI *kO
Expect broil times to increase and browning to be slightly
lighter if appliance is installed on a 208 volt circuit.
4. Place food in the oven.
5. Turn meat once about half way through cooking.
6. Press CANCEL pad. Remove food and broiler pan from the oven.
• The OVEN ON indicator will turn off.
• The BROIL indicator on the BROIL pad will turn off.
• Time of day will reappear in display.
Broiling Chart
Rack Position*
(use flat rack only)
Doneness
Total Cook Time
(Minutes)**
;acon
4
Well Done
6-10 rain.
;eel Steaks-- 1" thick
4
4
Medium
Well
15-18 rain.
19-23 rain.
3 or 4
Well Done
(LO Broil) 30-45 min.
'ish -- Fillets
Steaks, 1" thick
4
4
Flaky
Flaky
8-12 rain.
10-15 min.
;round Beef-- Patties, 3/4" thick
4
Well Done
15-18 rain.
lain -- Precooked Slice, 1/2" thick
4
Warm
8-12 rain.
'ork Chops -- 1" thick
4
Well Done
22-26 min.
Type of Meat
_hieken -- Pieces
"_Thetop rack position is #5.
**Broiling rimesare approximate and may vary depending on the meat.
13
.
Clock Controlled
,_
Oven Cooking
The clock must be functioning and set at the correct time of
day for this feature to operate correctly.
CAUTION
• Highly perishable foods such as dairy products, pork,
poultry or seafood arenot recommended for delayed cook
operations,
Clock Controlled Oven Cooking is used to turn the oven on
and off at a preset time of day. This feature can be used with
either oven cooking or self-cleaning.
• Baking is not recommended because preheating is require&
• Immediate Start: Oven turns on immediately and automatically turns off at a preset time.
• Delayed Start: Delays the start of cooking or cleaning and
automatically turns off at a preset time.
Cook time can only be set for up to 11hours and 59 minutes
(11:59).
Setting the Controls for Clock Controlled Oven Cooking
1. Press the COOK TIME pad.
• COOK TIME indicator on the COOK TIME pad will flash.
_
• 0:00 will light in display.
2. Press or press and hold • or • pad to enter cooking time.
then
[_J
3. Press BAKE pad.
• BAKE indicator on BAKE pad will light.
• 000 will light in display.
4. Press or press and hold • or • pad to enter oven temperature.
NOTE: Beeps will sound and 000 will flash in display if
the BAKE pad is not pressed within four seconds.
] _K:_ I then
5. If You Wish to Delay the Start of Cooking:
(if not, skip to #6)
• STOP TIME indicator on STOP TIME pad will flash,
a. Press
Press or
STOP
pad.• or • pad to enter time of day
b.
press TIME
and hold
you wish the oven to turn off.
c. Press CLOCK pad.
• Time of day will reappear in the display.
•
•
•
•
•
•
•
•
•
•
•
•
•
•
•
•
•
•
•
*
•
•
•
•
•
•
•
•
•
•
•
•
•
•
•
then
then
_
•
•
•
•
6. When the oven turns on, the OVEN ON indicator will light.
COOK
pad to recall
the remaining
cook time.
The ovenTIME
temperature
will appear
in the display.
Press the
•
•
•
•
•
•
•
•
* •
•
.
•
•
.
•
•
.
•
•
°
•
•
•
•
•
•
•
•
•
•
*
•
•
•
•
*
•
•
•
•
•
•
•
•
i
D •
•
•
•
•
•
•
•
*
•
•
•
•
NOTE: It is not necessary to set a
[c_J
when
to turn
the oven
based on
start time.
Control
willon
determine
the cook time you set.
•
NOTE: See page 6 if you wish to
change the end of cooking
reminder beeps.
•
.
•
8. Press CANCEL pad and beeps will stop. Remove food from oven.
14
*
_
7. Oven will automatically turn off. Four beeps will sound and
"END" will light in the display. A beep will sound every 30
seconds for the next 5 minutes,
•
•
•
,
•
.
,
•
•
•
•
.
•
m
•
.
•
•
•
•
•
.
•
* •
•
•
.
•
•
.
Care
and Cleaning
Self-Clean
A
...................................
Oven
Self-Clean CAUTIONS:
• It is normalfor parts of the range to become hot during a
clean cycle.
• Avoid touching cooktop, door, window, or oven vent
area during a clean cycle,
, To prevent damage to oven door, do not attempt to open
the door when the LOCK indicator word is displayed.
, Do not use commercial oven cleaners on the self-clean
oven finish or around any part of the oven as they will
damage the finish or parts.
Toprevent damage, do not clean or rub the gasket around
oven
designed
the
door. The gasket is
to seal in heat during
the clean cycle.
Wipe up excess grease or spillovers from the oven bottom te
prevent excessive smoking, flare-ups or flaming during the
clean cycle. For ease of cleaning, the heating element can
be lifted slightly (1 to 1]h inches).
Wipe up sugary and acid spillovers such as sweet potatoes,
tomato or milk-based sauces. Porcelain enamel is acid resistant, not acid proof. The porcelainfinish may discolor ij
acid spills are not wiped up prior to a self-clean cycle.
During Clean Cycle
The self-clean cycle uses above normal cooking temperatures
to automatically clean the entire oven interior.
It is normal for excessive flare-ups, smoking and flaming to
occur during cleaning if the oven is heavily soiled. It is better
to clean the oven regularly rather than to wait until there is a
heavy build-up of soil in the oven.
When the LOCK indicator word lights in the display, the door
cannot be opened. To prevent damage to door, do not force
door open when the LOCK indicator word is displayed.
Some smoke and odor may be detected the first few times the
oven is cleaned. This is normal and will lessen in time. Smoke
may also occur if oven is heavily soiled or if broiler pan was
During the cleaning process, the kitchen should be well
ventilated to help eliminate normal odors associated with
cleaning,
left in oven.
As oven heats, you may hear sounds of metal parts expandin_
and contracting. This is normal and will not damage oven.
Before Self-Cleaning
After Self-Cleaning
Turn off the oven light before cleaning as the light may burn
out during the clean cycle,
About one hour after the end of the clean cycle, the LOCI_
indicator word will turn off At this point, the door can b_
opened.
Remove broiler pan. atl pans and the oven racks from the
oven. The oven racks will discolor and may not slide easily
after a self-clean cycle,
Clean oven frame, door
frame tarea outside the door
gasket) and around the openlng in the door gasket with a
nonabrasive cleaning agent
such as Bon Ami or detergent and water. These areas
are not exposed to cleaning
temperatures and should be
cleaned to prevent soil from
baking on during the clean cycle.
Some soil may leave a light gray, powdery ash which can be
removed with a damp cloth. If soil remains, it indicates tha
the clean cycle was not long enough. The soil will be re
moved during the next clean cycle.
If the oven racks were left in the oven and do not slid_
smoothly after a clean cycle, wipe racks and embossed rac_
supports with a small amount of vegetable oil to restore eas<
of movement.
A white discoloration may appear after cleaning if acid o
sugary foods were not wiped up before the clean cycle. Thi_
discoloration is normal and will NOT affect performance.
15
Setting the Controls for Self Clean
NOTE: These instructions cover automatic lock and manual lock models.
1. Close oven door.
2. Move door lock lever right to the locked position
(select models).
_bh._
_.,_
3. Press CLEAN pad.
• CLEAN indicator on the CLEAN pad will flash.
• LOCK indicator will light on models with automatic
lock feature.
• " :
" or 3:00 will light in display depending on
model.
• your
If door
is not closed or locked, "dr" will appear in
display.
[ _i5_i!J
or
thon
4. Press • or • pad to select clean time or change clean time.
• Oven will automatically clean for 3 hours. Or,
• Select 2 hours for light soil up to 4 hours for heavy soil.
5. IF YOU WISH TO DELAY THE START OF
CLEANING (if not, skip to #6):
a.Press STOP TIME pad.
b.Press • pad to select the time of day you wish
_
oven
to turn pad
off. and time of day will reappear in
e. the
Press
CLOCK
display.
d.Press STOP TIME pad to recall the time you set.
•
,
•
•
•
•
.
•
.
•
•
•
•
,
•
.
•
•
.
•
,
•
•
•
•
.
*
•
•
•
•
.
[ _
•
*
•
•
•
•
.
•
J then
.
•
.
•
•
.
•
.
•
*
•
•
•
6. When the oven turns on:
• The OVEN ON indicator will light,
• LOCK indicator will light when oven heats to 400°F on
models with a manual door lock.
• Door cannot be opened when LOCK indicator is lit.
m
OrE,OR
CD PREHEAT
m LOCK
7. About one hour after the clean cycle ends, the LOCK indicator
will turn off. The oven door can be opened,
(Select models - move door lock lever to the left to unlock.)
c:z OVEN
ON
czz PRENOT
c_ LOCK
TO CANCEL CLEAN CYCLE:
1. Press CANCEL pad.
_
2. If LOCK indicator is NOT lit, unlock (select models) and open
oven door. If LOCK indicator is lit, allow oven to cool about one hour
then unlock (select models) and open oven door,
16
II
°
* •
*
•
•
•
•
•
•
*
_ OVEN
O.
(Z_
PREHEAT
C_
LOCK
_
WHEN
LIGHT
TURNSOFF,
OPENDOOR.
•
.
•
Care & Cleaning
,_
(continued)...........................
Cleaning CAUTIONS:
• Be sure appliance is off and all parts are cool before
handling or cleaning. This is to avoid damage and
possible burns.
• To prevent staining or discoloration, clean appliai
after each use.
• If a part is removed, be sure it is correctly replace
Cleaning Chart
•
Parts
Cleaning Procedure
Backguard
&
Cooktop,
porcelain enamel
Cooktop on
coil elements
Trim on glassceramic surfaces
Porcelain enamel is glass fused on metal and may crack or chip with misuse. It is acid resista
not acid proof. All spillovers, especially acid or sugar spillovers, should be wiped up immedi
with a dry cloth.
• When cool, wash with soapy water, rinse and dry.
• Never wipe off a warm or hot surface with a damp cloth. This may cause cracking or chipp
• Never use oven cleaners, abrasive or caustic cleaning agents on exterior finish of range.
.
•
•
•
•
•
•
•
•
.
•
Broiler Pan
and Insert
,
,
*
•
.
•
•
•
•
•
•
•
.
•
•
•
•
•
•
•
•
.
•
•
•
•
•
•
•
.
•
•
•
•
•
*
•
,
•
•
•
•
•
•
* •
•
Clock & Control
Pad Area
• To activate "Control Lock" for cleaning, see page 5.
• Wipe with a damp cloth and dry.
• Glass cleaners may be used if sprayed on a cloth first. DO NOT spray directly on
control pad and display area.
Control Knobs
• Remove knobs in the OFF position by pulling forward.
• Wash. rinse and dry. Do not use abrasive cleaning agents as they may scratch the finish.
• Turn on each element to be sure the knobs have been correctly replaced.
*
•
"
"
•
•
•
•
•
•
Never cover insert with aluminum foil as this prevents the fat from draining to the pan bel_
• Place soapy cloth over insert and pan; let soak to loosen soil.
• Wash in warm soapy water. Use soap filled scouring pad to remove stubborn soil.
• Broiler pan and insert can be cleaned in dishwasher.
Drip Bowls,
porcelain
_select models)
•
•
•
Enamel• painted
Side panels
Storage drawer
Oven door
(select models _
Porcelain may craze if overheated. This is normal and will not affect cooking performance.
• When cool, wash after each use, rinse and dry to prevent staining or discoloration. May be
washed in the dishwasher.
• To clean heavy soil, soak in hot sudsy water, then use mild abrasive cleaner such as Soft Sc
and a plastic scouring pad.
' For burned on soil, remove from range, place on newspapers and carefully spray with
commercial oven cleaner. (Do not spray surrounding surfaces.) Place in plastic bag and alk
soak several hours. Wearing rubber gloves, remove from bag, wash, rinse and dry.
•
*l"
•
•
•
•
•
•
•
•
•
•
•
•
•
•
•
•
•
•
•
•
•
•
•
•
•
•
•
•
•
•
•
•
•
•
•
•
•
•
•
•
•
•
*
•
•
•
•
•
•
•
•
• When cool, wash with warm soapy water, rinse and dry. Never wipe a warm or hot surface
a damp cloth as this may damage the surface and may cause a steam burn.
• For stubborn soil, use mildly abrasive cleaning agents such as baking soda paste or Bon An:
Do not use abrasive, caustic or harsh cleaning agents such as steel wool pads or oven cleane
These products will scratch or permanently damage the surface.
NOTE: Use dry towel or cloth to wipe up spills, especially acid or sugary spills. Surface may disl
or dull if soil is not immediately removed• This is especially important for white surfaces.
17
Cleaning Chart -- continued
Parts
Cleaning
Glass
Oven window
Oven door
(select models)
• Avoid using excessive amounts of water which may seep under or behind glass.
• Wash with soap and water or g]ass cleaner. Rinse with clear water and dry.
• Do not use abrasive materials such as scouring pads. steel wool or powdered cleaning agents.
They will damage glass.
............
Glass-Ceramic
Procedure
; hl;,2bl
r
each, ammonia or glas
Never use oven clean rs, c
Cooktop
(select models)
;it,,ammonia.
cleaners
NOTE: Call an authorized servicer if the glass-ceramic surface should crack, break or if metal
or aluminum foil should melt on the cooktop.
• General Cleaning and Light Soil - Use soap and water and a clean cloth or paper towel,
or nonabrasive cleaner such as Ban Ami. Rinse and dry. Commercial cooktop cleaners may
also be used such as Cooktop Cleaning Creme (Part No. 20000001). Follow package directions.
• Heavy Soils or Metal Marks - Gently scrub with Cooktop Cleaning Creme and a plastic
scrubber. Reapply cleaner. Cover with damp paper towels to keep cleaner moist. Let stand for
30 to 45 minutes. Scrub again to remove remaining stain. Rinse and dry.
• Burned-on or Crusty Soils - Hold razor blade scraper at 30°
/
angle and very carefully scrape off soil. Clean remaining soil
with method described above.
o Melted Sugar or Plastic - Immediately turn element to LOW and
scrape from hot surface to a cool area. Then turn element OFF and
cool. Clean residue wilh razor blade scraper and Cooktop Cleaning
Creme as described above.
.............
Metal Finishes
Trim parts
•
•
•
•
•
.
=
.
•
.
Oven Interior
Oven Racks
............
• "''h
Was with
..... soa ;a]ld""water
" ; a"g'l""
ass c;e'a ner,
...........
or mildliquid spra y: . .................
• To prevent scratching or dulling of the finish, do not use mildly abrasive, abrasive, harsh or
caustic cleaners such as oven cleaners.
•
•
= •
•
•
•
•
•
•
•
•
•
•
•
•
•
Q •
•
•
•
•
•
•
•
.
*
•
*
•
•
.
= •
=
•
•
•
= •
•
,
•
.
•
•
•
.
•
•
•
•
•
• Follow instructions on pages 15-16 for Self-Cleaning Oven.
• Clean w ith soa;y water .
• Remove stubborn soil with cleansing powder or soap-filled scouring pad. Rinse and dry.
Racks will permanently discolor and may not slide smoothly if left in the oven during a
self-clean operation. If this occurs, wipe the rack and embossed rack supports with a small
amount of vegetable oil to restore ease of movement, then wipe off excess oil.
..........................
Plastic Finishes
Door handles
Backguard trim
End caps
... ....... ..............................
• When cool, clean with s poa and water, rinse and dry,
• Use a glass cleaner and a soft cloth.
NOTE: Never use oven cleaners, abrasive or caustic liquid or powdered cleansers" on plastic
.finishes. These cleaning agents will scratch or mar finish.
NOTE: To prevent staining or discoloration, wipe up fat, grease or acid (tomato, lemon,
vinegar, milk, fruit juice, marinade) immediately with a dry paper towel or cloth.
18
•
•
•
Maintenance.........................................
Cleaning Products
Oven Door
ACAUTION
Because of the many new cleaning products introduced in the
marketplace each year, it is not possible to list all products that
can be safely used to clean this appliance. Listed below arejust
•
Do not place excessive weight on or stand on an
open oven door. This could cause the range to tip
over, break the door, or injure the user.
READ THE MANUFACTURER'S INSTRUCTIONS to be
sure the cleaner can be safely used on this appliance,
•
Do not attempt to open or close door or operate
oven until door is properly replaced.
To determine if a cleaning product is safe, test a small
inconspicuous area using a very light pressure to see if the
surface may scratch or discolor. This is particularly important
for porcelain enamel, highly polished, shiny, painted, or
plastic surfaces.
•
Never place fingers between hinge and front oven
frame. Hinge arms are spring mounted. If accidentally hit, the hinge will slam shut against oven
frame and could injure your fingers.
a few examples of recommended products,
To remove:
The following brands may help you to make an appropriate
selection:
1. When cool, open the oven door to the broil stop position
• Glass Cleaners - Cinch, Glass Plus, Windex. (Avoid glass
cleaners with ammonia on glass-ceramic cooking surfaces.)
(opened about four inches).
2. Grasp door at each side. Do
not use the door handle to lift
door.
• Dishwashing Liquid Detergents - Dawn, Ivory, Joy.
Windex
GlassSu ace.
":
;
'::
.....
NonabrasiveCleaners-BonAmi,
water.
To
repl.ee:
1. Grasp door at each side.
paste ofbaking soda and
2. Align slots in the door with the hinge arms on the range.
. Mildly Abrasive Powder or Liquid Cleaners - Ajax Barkeepers Friend, Cameo, Soft Scrub, Smart Cleanser. (Note:
If the cleaner is recommended for use on plastic, glass or
porcelain finishes, it can be used on the same type of
appliance finish.)
3. Slide the door down onto the hinge arms until the door
is completely seated on the hinges. Push down on the top
corners of the door to completely seat door on hinges.
Door should not appear crooked.
NOTE: The oven door on a new range may feel "spongy"
when it is closed. This is normal and will decrease with
• Nonabrasive or Scratchless Plastic or Nylon Scouring
Pads or Sponges - Chore Boy Plastic Cleaning Puff.
Scrunge Scrub Sponges, Scotch-Brite No Scratch Pads.
use.
Oven Window
• Abrasive Scouring Pads - S.O.S., Brillo Steel Wool Soap,
Scotch-Brite Wool Soap Pads.
iiiiI
_/
3. Lift up evenly until door
clears hinge arms.
, Mild Liquid Spray Cleaners - Fantastik, Formula 409.
• Multi-Surface Cleaners - Formula 409 Glass & Surface,
:
S:
To protect the oven door window:
(Brand names for the above cleaning products are registered
trademarksofthe respective manufacturers.)
1. Do not use abrasive cleaning agents such as steel wool
scouring pads or powdered cleansers as they may scratch
the glass.
2. Do not hit the glass with pots, pans, furniture, toys, or
other objects.
3. Do not close the oven door until the oven racks are in
place.
Scratching, hitting, jarring or stressing the glass may weaken
its structure causing an increased risk of breakage at a later
.....
date.
!;: il _
19
!i,
Oven Light
Storage Drawer
[ACAUTIONS:
ACAUTION:
• Disconnect power to range before replacing light bulb.
• Do not store plastic, paper products, food or
flammable materials in this drawer. The drawer
. Use
dry potholder
whena replacing
bulb.to prevent possible harm to hands
• Be sure bulb is cool before touching bulb.
may
oven become
is in use.too warm for these items when the
The storage drawer can be removed to allow you to
clean under the range.
To remove:
• Donottouchhotbulbwithadampclothasthismaycause
the bulb to break.
1. Empty drawer and pull out to the first stop position.
To replace oven light bulb:
2. Lift up the front of the drawer.
1. When oven is cool, hold bulb cover in place, then slide wire
retainer offcover. NOTE: Bulb cover will fall if not held in
place
while removing wire
retainer.
3. Pull out to the second stop position.
BOLgCOVER
4. Grasp sides and lift drawer up and out.
To replace:
2. Remove bulb cover and _-__,
light bulb.
/_/
3, Replacewitham0watt S'
appliance bulb.
_
4. Replace bulb cover and
secure with wire retainer.
(/l!_l@y_.._)
_A((-2/_
_/_RE
RzrA_,VZR
)
_
1. Fittheendsofthedrawerglidesintotherailsinthe
range.
2. Lift up front of drawer and gently push in to the first
stop position.
3. Liftdrawerupagainandpushuntildrawerisclosed.
5. Reconnect power to range. Reset clock.
Leveling Legs
ACAUTION:
•
Be sure the anti-tip bracket secures one of the rear
leveling legs to the floor to prevent the range from
accidentally tipping.
The range should be leveled when installed. If the I_
range is not level, turn the plastic leveling legs, h
located at each corner of the range, until range v_/_%,
,_¢
is Ievel.
. - "'*;..
:]
iI
_
RACKET
__
"LEVELING
LEG
2O
Before You Call for Service......................
Check these )oints if...
Part or all of the
appliance does
not work.
Surface or oven
elements fail to
operate or heat
food.
Glass-ceramic
surface shows wear.
•
•
•
•
•
•
Check
Check
Check
Check
Check
Check
to be sure plug is securely inserted into receptacle.
or re-set circuit breaker. Check or replace fuse.
power supply.
if surface and/or oven controls have been properly set. See pages 8 and l 1.
if oven door is unlocked after a self-clean cycle. See pages 15-16.
if oven is set for a delayed cook or clean program. See page 14.
NOTE." On Canadian models, the right front element on glass-ceramic cooking surfiwes
may not operate during a self-clean cycle.
• Check to be sure plug is securely inserted into receptacle.
• Check or re-set circuit breaker. Check or replace fuse.
• Check power supply.
• Check if surface and/or oven controls have been properly set. See pages 8 and 11.
• Check if coil element is properly installed. See page 9.
• Check if oven is set in a delayed oven operation.
• Check to see if coil elements need to be replaced.
1. Tiny scratches or abrasions.
• Check to make sure cooktop and pan bottom are clean. Do not slide glass or metal pans
across top. Make sure pan bottom is not rough. Use the recommended cleaning
agents. See page 18.
2. Metal marks.
• Do not slide metal pans across top. If it happens, clean when cool with Cooktop
Cleaning Creme. See page 18.
3. Brown streaks and specks.
• Spills not removed promptly. Wiping with soiled cloth or sponge. Pan bottom not clean.
4. Areas with a metallic sheen.
• Mineral deposits from water and food.
5. Pitting or flaking.
• Sugary boilovers that were not removed promptly. See page 18.
• Check the oven temperature selected. Make sure oven is preheated when recipe or
directions recommend preheat.
• Check rack positions. See page 12.
• Use correct pan. Dark pans produce dark browning. Shiny pans produce light browning.
Baking results are
not what you
expected•
Baking results
differ from
previous oven.
Food is not
broiling
properly•
"Cooking
Made
Simple"
booklet
more
on bakeware.
• See
Check
the use of
foil in
the oven.
Neverforuse
foil information
to cover an entire
oven rack. Place a
small piece of foil on the rack below the pan to catch spillovers.
• Check pan placement. Stagger pans when using two racks. Allow 1-2 inches between
pans and oven walls.
• Make sure the oven vent has not been blocked. See page 12 for location.
• Check to make sure range is level.
• Temperatures often vary between a new oven and an old one. As ovens age, the oven
temperature often "drifts" and may become hotter or cooler. See page 7 for instructions
on adjusting the oven temperature.
NOTE: It is not recommended to adjust the temperature if only one or two recipes are
in question.
•
•
•
•
•
Check oven setting. See page 13.
Check oven rack positions. See page 13.
Broil element was not preheated.
Aluminum foil was incorrectly used. Never line the broiler insert with foil.
Oven door was closed during broiling. Leave the door open to the first stop position
(about 4-inches).
21
Oven smokes
excessively during
broiling•
•
•
•
•
Food too close to element. See page 13 for more information.
Broiler insert covered with aluminum foil.
Trim excess fat from meat prior to broiling.
A soiled broiler pan was used.
..... wilol.....r."
,
'h;c
2k;io tro,
=e
• Check to make sure the cycle is not set for a delayed start.
• Check if door is closed.
self-clean.
•
•
•
•
•
•
•
•
•
•
•
•
*
•
•
•
•
•
•,•
•
Oven did not clean
properly•
•
•
•
•
*
*
•
*
*
•
•
•
•
•
•
*
•
•
•
i•
Oven door will not
unlock after
self-clean cycle,
•
•
•
•
•
•
•
•
*
*
•
*
*
•
•
•
•
•
•
•
•
•
•
•
•
•
•
•
•
*
•
•
•
*
•
•
• 66°
95• *
•
•
•
•
•
•
•
•
F plus a number
appears in display•
•
•
•
•
•
*
•
•
•
•
•
•
•
*
•
•
•
•
*
*
•
•
•
•
*
*
*
*
•
•
:
*
*
*
*
*
*
*
•
•
•
o
• Longer cleaning time may be needed.
• Excessive spillovers, especially sugary and or acid foods, were not removed prior
to the self-clean cycle.
•
*
*,•
•,•
There is a strong odor
or light smoke when oven
is turned on.
•
•
•
•
•
•
*
•
*
•
•
•
*
•
•
•
•
•
*
*
•
°
.
•
•
*
*
•
*
•
•
•
•
o
*
•
*
•
•
•
•
•
•
•
•
•
•
• Oven interior is still hot. Allow about one hour for the a oven to cool after the
completion of a self-clean cycle. The door can be opened when the LOCK
indicator word is not displayed.
Moisture condensation
collects on oven window•
•
•
............
•
•
•
•
•
*
•
•
•
•
•
•
•
•
•
•
• This is normal when cooking food high in moisture.
• Excessive moisture was used when cleaning the window.
*
*
*
*
*
•
*
•
*
•
•
•
•
.
•
*
•
*
•
*
•
*
•
*
•
*
•
*
•
•
•
*
•
*
*
*
•
*
•
*
•
•
•
•
•
o
•
•
•
*
•
•
•
*
*
•
•
.
•
°
*
•
•
•
*
•
*
•
•
•
*
•
*
•
*
*
• This is normal for a new range and will disappear after a few uses. Initiating a
clean cycle will "burn off" the smells more quickly.
• Turning on a ventilation fan will help remove the smoke and/or odor.
• Excessive food soils on the oven bottom. Use a self-clean cycle.
•
• i•
••
•
•
•
•
•
•
•
•
•
•
•
•
•
•
•
•
•
•
•
•
•
•
•
•
•
•
•
•
•
•
•
•
•
•
•
•
•
•
•
•
•
•
•
This is called a fault code. If a fault code appears in the display and beeps sound,
press the CANCEL pad. If the fault code and beeps continue, disconnect power
to the appliance. Wait a few minutes, then reconnect power. If fault code and
beeps still continue, disconnect power to the appliance and call an authorized
servicer.
• If the oven is heavily soiled, excessive flare-ups may result in a fault code during
a clean cycle. Press CANCEL pad and allow the oven to cool for one hour, then
reset the clean cycle. If the fault code and beeps still continue, disconnect power
to the appliance and call an authorized servicer.
If You Need Service
• Call the dealer from whom your appliance was purchased or call Maytag Appliances Sales Company, Maytag
Customer Assistance at 1-800-688-9900, USA or 1-800-688-2002, CANADA to locate an authorized servicer.
• Be sure to retain proof of purchase to verify warranty status. Refer to WARRANTY (next page) for further
information of owner's responsibilities for warranty service.
• If the dealer or service company cannot resolve the problem, write to Maytag Appliances Sales Company, Attn:
CAIR TM Center, RO. Box 2370, Cleveland, TN 37320-2370, or call 1-800-688-9900, USA or 1-800-688-2002,
CANADA.
U.S. customers using TTY for deaf, hearing impaired or speech impaired, call 1-800-688-2080.
NOTE: When writing or calling about a service problem, please include the following information:
a. Yourname, address and telephone number;
b. Model number and serial number;
c. Name and address of your dealer or servicer;
d. A clear description of the problem you are having;
e. Proof of purchase (sales receipt).
• User's guides, service manuals and parts catalogs are available from Maytag Appliances Sales Company,
Maytag Customer Assistance.
22
•
Range Warranty ..................................
Full One Year Warranty
- Parts and Labor
For one (1) year from the original retail purchase date, any part which fails in normal home use will be repaired or replaced
free of charge.
Limited
Warranties
- Parts Only
Second Year - After the first year from the original purchase date, parts which fail in normal home use will be repaired or
replaced I?ee of charge for the part itself, with the owner paying all other costs, including labor, mileage and transportation.
Third Through Fifth Year - From the original purchase date, parts listed below which fail in normal home use will be
repaired or replaced free of charge for the part itselL with the owner paying all other costs, including labor, mileage and
transportation.
• Electronic Controls
• Glass-ceramic Cooktop: due to thermal breakage.
• Electric Heating Elements: surface, broil and bake elements on electric cooking appliances.
Third Through Tenth Year - From the original purchase date. parts listed below which fail in normal home use will be
repaired or replaced free of charge for the part itself, with the owner paying all other costs, including labor, mileage and
transportation.
• Sealed Gas Burners
Canadian
Residents
The above warranties only cover an appliance installed in Canada that has been certified or listed by appropriate test agencies for compliance to a National Standard of Canada unless the appliance was brought into Canada due to transfer of
residence from the United States to Canada.
Limited Warranty Outside the United States and Canada - Parts Only
For two (2_ years from the date of original retail purchase, any part which fails in normal home use will be repaired or
replaced free of charge for the part itself, with the owner paying all other costs, including labor, mileage and transportation.
The spec(fic warranties expressed above are the ONLY warranties provided by the manufacturer. These warranties give you
specific legal rights, and you may also have other rights which vary from state to state.
What is Not Covered By
These Warranties:
1. Conditions and damages resulting from any of the
following:
a. Improper installation, delivery, or maintenance.
b, Any repair, modification, alteration, or adjustment
not authorized by the manufacturer or an
authorized servicer,
c. Misuse. abuse, accidents, or unreasonable use.
d, Incorrect electric current, voltage, or supply.
e. lmproper setting of any control,
2. Warranties are void if the original serial numbers have
been removed, altered, or cannot be readily
determined,
MAYTAG
Form No. A/12/99
• 403 West Fourth Street North
Part No. 8113P261-60
_,R_,_
3. Light bulbs
4. Products purchased for commercial or industrial use.
5. The cost of service or service call to:
a. Correct installation errors.
b. Instruct the user on the proper use of the product.
c. Transport the appliance to the servicer.
6. Consequential or incidental damages sustained by any
person as a result of any breach of these warranties.
Some states do not allow the exclusion or limitation of
consequential or incidental damages, so the above
exclusion may not apply.
• EO. Box 39 • Newton,
h t t p : / [ w w w.
m a y t a g . c o rn
Iowa 50208
740052_4
Litho U.SA