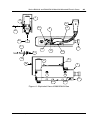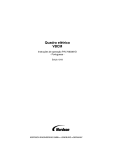
1
Series B900-N and B900SW-N
Manifold Mounted Electric Guns
For use with DuraBlue Series Melters
Customer Product Manual
Part 1041221B
Issued 3/06
NORDSON CORPORATION • DULUTH, GEORGIA • USA
www.nordson.com
For CE Declaration, refer to melter manual.
Nordson Corporation welcomes requests for information, comments, and inquiries about its
products. General information about Nordson can be found on the Internet using the following
address: http://www.nordson.com.
Address all correspondence to:
Nordson Corporation
Attn: Customer Service
11475 Lakefield Drive
Duluth, GA 30097
Notice
This is a Nordson Corporation publication which is protected by copyright. Original copyright date 2003.
No part of this document may be photocopied, reproduced, or translated to another language without the
prior written consent of Nordson Corporation. The information contained in this publication is subject to
change without notice.
Trademarks
AccuJet, AeroCharge, Apogee, AquaGuard, Asymtek, Automove, Baitgun, Blue Box, CanWorks, Century, CF,
Clean Coat, CleanSleeve, CleanSpray, ColorMax, Control Coat, Coolwave, Cross-Cut, Cyclo-Kinetic, Dispensejet,
DispenseMate, DuraBlue, Durafiber, Dura-Screen, Durasystem, Easy Coat, Easymove Plus, Ecodry, Econo-Coat,
e.dot, EFD, e stylized, ETI, Excel 2000, Fillmaster, FlexiCoat, Flexi-Spray, Flex-O-Coat, Flow Sentry, Fluidmove,
FoamMelt, FoamMix, Heli-flow, Helix, Horizon, Hot Shot, iControl, iFlow, Isocoil, Isocore, Iso-Flo, iTRAX, Kinetix,
Little Squirt, Magnastatic, March, MEG, Meltex, Microcoat, Micromark, MicroSet, Millennium, Mini Squirt,
Mountaingate, MultiScan, Nordson, OptiMix, Package of Values, Pattern View, PermaFlo, Plasmod, Porous Coat,
PowderGrid, Powderware, Printplus, Prism, ProBlue, Pro-Flo, ProLink, Pro-Meter, Pro-Stream, RBX, Rhino,
Saturn, Scoreguard, Seal Sentry, Select Charge, Select Coat, Select Cure, Slautterback, Smart-Coat, Solder Plus,
Spectrum, Speed-Coat, SureBead, Sure Clean, Sure Coat, Sure-Max, Tracking Plus, Trends, Tribomatic,
Ultrasaver, UpTime, Vantage, Veritec, VersaBlue, Versa-Coat, Versa-Screen, Versa-Spray, Walcom, Watermark,
and When you expect more. are registered trademarks of Nordson Corporation.
Accubar, Advanced Plasma Systems, AeroDeck, AeroWash, AltaBlueAquaCure, ATS, Auto-Flo, AutoScan,
Best Choice, Blue Series, Check Mate, Classicblue, Controlled Fiberization, Control Weave, CPX, DispensLink,
Dry Cure, DuraBraid, DuraCoat, DuraDrum, DuraPail, Easy Clean, EasyOn, Eclipse, E-Nordson, Equi=Bead, ESP,
Fill Sentry, G−Net, G−Site, HDLV, iON, Iso-Flex, iTrend, Lacquer Cure, Lean Cell, LogiComm, Maverick, Maxima,
MicroFin, MicroMax, MiniBlue, Minimeter, Multifil, Myritex, OptiStroke, PatternPro, PCI, Powder Pilot, Powercure,
Primarc, Process Sentry, Prodigy, Pulse Spray, Quad Cure, Ready Coat, Royal Blue, Select Series, Sensomatic,
Shaftshield, SheetAire, Smart, SolidBlue, Spectral, Spectronic, SpeedKing, Spray Works, Summit, Sure Brand,
SureMix, SureSeal, Sure Wrap, Swirl Coat, Tempus, ThruWave, Trade Plus, Trak, TrueBlue, Ultra, Ultrasmart,
Universal, VersaDrum, VersaPail, Vista, Web Cure, and 2 Rings (Design) are trademarks of Nordson Corporation.
Designations and trademarks stated in this document may be brands that, when used by third parties for their own
purposes, could lead to violation of the owners’ rights.
Part 1041221B
E 2006 Nordson Corporation
Table of Contents
Safety . . . . . . . . . . . . . . . . . . . . . . . . . . . . . . . . . . . . . . . . . . . . . . . . . . . . . . . . . . . . . . . . 1
Safety Alert Symbols . . . . . . . . . . . . . . . . . . . . . . . . . . . . . . . . . . . . . . . . . . . . . . . . . 1
Responsibilities of the Equipment Owner . . . . . . . . . . . . . . . . . . . . . . . . . . . . . . . . 1
Safety Information . . . . . . . . . . . . . . . . . . . . . . . . . . . . . . . . . . . . . . . . . . . . . . . . . 2
Instructions, Requirements, and Standards . . . . . . . . . . . . . . . . . . . . . . . . . . . . 2
User Qualifications . . . . . . . . . . . . . . . . . . . . . . . . . . . . . . . . . . . . . . . . . . . . . . . . . 2
Applicable Industry Safety Practices . . . . . . . . . . . . . . . . . . . . . . . . . . . . . . . . . . . . 2
Intended Use of the Equipment . . . . . . . . . . . . . . . . . . . . . . . . . . . . . . . . . . . . . . 3
Instructions and Safety Messages . . . . . . . . . . . . . . . . . . . . . . . . . . . . . . . . . . . . 3
Installation Practices . . . . . . . . . . . . . . . . . . . . . . . . . . . . . . . . . . . . . . . . . . . . . . . 3
Operating Practices . . . . . . . . . . . . . . . . . . . . . . . . . . . . . . . . . . . . . . . . . . . . . . . . 4
Maintenance and Repair Practices . . . . . . . . . . . . . . . . . . . . . . . . . . . . . . . . . . . 4
Equipment Safety Information . . . . . . . . . . . . . . . . . . . . . . . . . . . . . . . . . . . . . . . . . . 4
Equipment Shutdown . . . . . . . . . . . . . . . . . . . . . . . . . . . . . . . . . . . . . . . . . . . . . . . 5
Relieving System Hydraulic Pressure . . . . . . . . . . . . . . . . . . . . . . . . . . . . 5
De-energizing the System . . . . . . . . . . . . . . . . . . . . . . . . . . . . . . . . . . . . . . 5
Disabling the Guns . . . . . . . . . . . . . . . . . . . . . . . . . . . . . . . . . . . . . . . . . . . . 5
General Safety Warnings and Cautions . . . . . . . . . . . . . . . . . . . . . . . . . . . . . . . 6
Other Safety Precautions . . . . . . . . . . . . . . . . . . . . . . . . . . . . . . . . . . . . . . . . . . . 9
First Aid . . . . . . . . . . . . . . . . . . . . . . . . . . . . . . . . . . . . . . . . . . . . . . . . . . . . . . . . . . . 10
Safety Labels and Tags . . . . . . . . . . . . . . . . . . . . . . . . . . . . . . . . . . . . . . . . . . . . . . . 10
Description . . . . . . . . . . . . . . . . . . . . . . . . . . . . . . . . . . . . . . . . . . . . . . . . . . . . . . . . . . . 12
Installation . . . . . . . . . . . . . . . . . . . . . . . . . . . . . . . . . . . . . . . . . . . . . . . . . . . . . . . . . . . . 13
Connect Footswitch and Gun Cordset . . . . . . . . . . . . . . . . . . . . . . . . . . . . . . . . . . . 13
Make the Electrical Connections . . . . . . . . . . . . . . . . . . . . . . . . . . . . . . . . . . . . . . . 15
Operation . . . . . . . . . . . . . . . . . . . . . . . . . . . . . . . . . . . . . . . . . . . . . . . . . . . . . . . . . . . . . 16
Prepare for Operation . . . . . . . . . . . . . . . . . . . . . . . . . . . . . . . . . . . . . . . . . . . . . . . . . 16
Set the Gun Temperature . . . . . . . . . . . . . . . . . . . . . . . . . . . . . . . . . . . . . . . . . . . . . . 16
Adjust the Module Stroke . . . . . . . . . . . . . . . . . . . . . . . . . . . . . . . . . . . . . . . . . . . . . . 16
Maintenance . . . . . . . . . . . . . . . . . . . . . . . . . . . . . . . . . . . . . . . . . . . . . . . . . . . . . . . . . . 17
Recommended Maintenance Schedule . . . . . . . . . . . . . . . . . . . . . . . . . . . . . . . . . . 18
Cleaning Nozzles . . . . . . . . . . . . . . . . . . . . . . . . . . . . . . . . . . . . . . . . . . . . . . . . . . . . 18
E 2005 Nordson Corporation
Part 123456X
ii
Table of Contents
Troubleshooting . . . . . . . . . . . . . . . . . . . . . . . . . . . . . . . . . . . . . . . . . . . . . . . . . . . . . . 20
Repair . . . . . . . . . . . . . . . . . . . . . . . . . . . . . . . . . . . . . . . . . . . . . . . . . . . . . . . . . . . . . . . . 28
Replace a Module . . . . . . . . . . . . . . . . . . . . . . . . . . . . . . . . . . . . . . . . . . . . . . . . . . . . 28
Remove a Module . . . . . . . . . . . . . . . . . . . . . . . . . . . . . . . . . . . . . . . . . . . . . . . . . 28
Install a Module . . . . . . . . . . . . . . . . . . . . . . . . . . . . . . . . . . . . . . . . . . . . . . . . . . . . 30
Replace a Coil and Housing Assembly . . . . . . . . . . . . . . . . . . . . . . . . . . . . . . . . . . 30
Replace a Module Component . . . . . . . . . . . . . . . . . . . . . . . . . . . . . . . . . . . . . . . . . 31
Disassemble the Module . . . . . . . . . . . . . . . . . . . . . . . . . . . . . . . . . . . . . . . . . . . . 32
Reassemble the Module . . . . . . . . . . . . . . . . . . . . . . . . . . . . . . . . . . . . . . . . . . . . 34
Replace the Coil Connector . . . . . . . . . . . . . . . . . . . . . . . . . . . . . . . . . . . . . . . . . . . . 34
Replace a Heater . . . . . . . . . . . . . . . . . . . . . . . . . . . . . . . . . . . . . . . . . . . . . . . . . . . . 36
Replace an RTD . . . . . . . . . . . . . . . . . . . . . . . . . . . . . . . . . . . . . . . . . . . . . . . . . . . . . 37
Replace a Nozzle . . . . . . . . . . . . . . . . . . . . . . . . . . . . . . . . . . . . . . . . . . . . . . . . . . . . 40
Using the Illustrated Parts Lists . . . . . . . . . . . . . . . . . . . . . . . . . . . . . . . . . . . . . . . . 41
B900-N Gun Parts . . . . . . . . . . . . . . . . . . . . . . . . . . . . . . . . . . . . . . . . . . . . . . . . . . . . 42
B900SW-N Gun Parts . . . . . . . . . . . . . . . . . . . . . . . . . . . . . . . . . . . . . . . . . . . . . . . . 44
Replacement Modules for B900 Guns . . . . . . . . . . . . . . . . . . . . . . . . . . . . . . . . . . . 46
Module Rebuild Kits . . . . . . . . . . . . . . . . . . . . . . . . . . . . . . . . . . . . . . . . . . . . . . . . . . 48
Lubricants and Sealants . . . . . . . . . . . . . . . . . . . . . . . . . . . . . . . . . . . . . . . . . . . . . . . 50
Technical Data . . . . . . . . . . . . . . . . . . . . . . . . . . . . . . . . . . . . . . . . . . . . . . . . . . . . . . . . 50
Specifications . . . . . . . . . . . . . . . . . . . . . . . . . . . . . . . . . . . . . . . . . . . . . . . . . . . . . . . . 50
Gun Heater Resistance . . . . . . . . . . . . . . . . . . . . . . . . . . . . . . . . . . . . . . . . . . . . . . . 51
Module Coil Resistance . . . . . . . . . . . . . . . . . . . . . . . . . . . . . . . . . . . . . . . . . . . . . . . 51
Resistance Values . . . . . . . . . . . . . . . . . . . . . . . . . . . . . . . . . . . . . . . . . . . . . . . . . . . 52
Part 123456X
E 2005 Nordson Corporation
Series B900-N and B900SW-N Manifold Mounted Electric Guns
1
Series B900-N and B900SW-N
Manifold Mounted Electric Guns
Safety
Read this section before using the equipment. This section contains recommendations and
practices applicable to the safe installation, operation, and maintenance (hereafter referred
to as “use”) of the product described in this document (hereafter referred to as
“equipment”). Additional safety information, in the form of task-specific safety alert
messages, appears as appropriate throughout this document.
WARNING: Failure to follow the safety messages, recommendations, and
hazard avoidance procedures provided in this document can result in personal
injury, including death, or damage to equipment or property.
Safety Alert Symbols
The following safety alert symbol and signal words are used throughout this document to
alert the reader to personal safety hazards or to identify conditions that may result in
damage to equipment or property. Comply with all safety information that follows the signal
word.
WARNING: Indicates a potentially hazardous situation that, if not avoided, can
result in serious personal injury, including death.
CAUTION: Indicates a potentially hazardous situation that, if not avoided, can
result in minor or moderate personal injury.
CAUTION: (Used without the safety alert symbol) Indicates a potentially
hazardous situation that, if not avoided, can result in damage to equipment or
property.
Responsibilities of the Equipment Owner
Equipment owners are responsible for managing safety information, ensuring that all
instructions and regulatory requirements for use of the equipment are met, and for
qualifying all potential users.
E 2006 Nordson Corporation
Part 1041221B
2
Series B900-N and B900SW-N Manifold Mounted Electric Guns
Safety Information
S Research and evaluate safety information from all applicable sources, including the
owner-specific safety policy, best industry practices, governing regulations, material
manufacturer’s product information, and this document.
S Make safety information available to equipment users in accordance with governing
regulations. Contact the authority having jurisdiction for information.
S Maintain safety information, including the safety labels affixed to the equipment, in
readable condition.
Instructions, Requirements, and Standards
S Ensure that the equipment is used in accordance with the information provided in this
document, governing codes and regulations, and best industry practices.
S If applicable, receive approval from your facility’s engineering or safety department, or
other similar function within your organization, before installing or operating the
equipment for the first time.
S Provide appropriate emergency and first aid equipment.
S Conduct safety inspections to ensure required practices are being followed.
S Re-evaluate safety practices and procedures whenever changes are made to the
process or equipment.
User Qualifications
Equipment owners are responsible for ensuring that users:
S receive safety training appropriate to their job function as directed by governing
regulations and best industry practices
S are familiar with the equipment owner’s safety and accident prevention policies and
procedures
S receive, equipment- and task-specific training from another qualified individual
NOTE: Nordson can provide equipment-specific installation, operation, and
maintenance training. Contact your Nordson representative for information
S possess industry- and trade-specific skills and a level of experience appropriate to
their job function
S are physically capable of performing their job function and are not under the influence
of any substance that degrades their mental capacity or physical capabilities
Applicable Industry Safety Practices
The following safety practices apply to the use of the equipment in the manner described in
this document. The information provided here is not meant to include all possible safety
practices, but represents the best safety practices for equipment of similar hazard potential
used in similar industries.
Part 1041221B
E 2006 Nordson Corporation
Series B900-N and B900SW-N Manifold Mounted Electric Guns
3
Intended Use of the Equipment
S Use the equipment only for the purposes described and within the limits specified in this
document.
S Do not modify the equipment.
S Do not use incompatible materials or unapproved auxiliary devices. Contact your
Nordson representative if you have any questions on material compatibility or the use of
non-standard auxiliary devices.
Instructions and Safety Messages
S Read and follow the instructions provided in this document and other referenced
documents.
S Familiarize yourself with the location and meaning of the safety warning labels and tags
affixed to the equipment. Refer to Safety Labels and Tags at the end of this section.
S If you are unsure of how to use the equipment, contact your Nordson representative for
assistance.
Installation Practices
S Install the equipment in accordance with the instructions provided in this document and in
the documentation provided with auxiliary devices.
S Ensure that the equipment is rated for the environment in which it will be used and that
the processing characteristics of the material will not create a hazardous environment.
Refer to the Material Safety Data Sheet (MSDS) for the material.
S If the required installation configuration does not match the installation instructions,
contact your Nordson representative for assistance.
S Position the equipment for safe operation. Observe the requirements for clearance
between the equipment and other objects.
S Install lockable power disconnects to isolate the equipment and all independently
powered auxiliary devices from their power sources.
E 2006 Nordson Corporation
Part 1041221B
4
Series B900-N and B900SW-N Manifold Mounted Electric Guns
Installation Practices (contd)
S Properly ground all equipment. Contact your local building code enforcement agency for
specific requirements.
S Ensure that fuses of the correct type and rating are installed in fused equipment.
S Contact the authority having jurisdiction to determine the requirement for installation
permits or inspections.
Operating Practices
S Familiarize yourself with the location and operation of all safety devices and indicators.
S Confirm that the equipment, including all safety devices (guards, interlocks, etc.), is in
good working order and that the required environmental conditions exist.
S Use the personal protective equipment (PPE) specified for each task. Refer to Equipment
Safety Information or the material manufacturer’s instructions and MSDS for PPE
requirements.
S Do not use equipment that is malfunctioning or shows signs of a potential malfunction.
Maintenance and Repair Practices
S Perform scheduled maintenance activities at the intervals described in this document.
S Relieve system hydraulic and pneumatic pressure before servicing the equipment.
S De-energize the equipment and all auxiliary devices before servicing the equipment.
S Use only new factory-authorized refurbished or replacement parts.
S Read and comply with the manufacturer’s instructions and the MSDS supplied with
equipment cleaning compounds.
NOTE: MSDSs for cleaning compounds that are sold by Nordson are available at
www.nordson.com or by calling your Nordson representative.
S Confirm the correct operation of all safety devices before placing the equipment back into
operation.
S Dispose of waste cleaning compounds and residual process materials according to
governing regulations. Refer to the applicable MSDS or contact the authority having
jurisdiction for information.
S Keep equipment safety warning labels clean. Replace worn or damaged labels.
Equipment Safety Information
This equipment safety information is applicable to the following types of Nordson
equipment:
S hot melt and cold adhesive application equipment and all related accessories
S pattern controllers, timers, detection and verification systems, and all other optional
process control devices
Part 1041221B
E 2006 Nordson Corporation
Series B900-N and B900SW-N Manifold Mounted Electric Guns
5
Equipment Shutdown
To safely complete many of the procedures described in this document, the equipment must
first be shut down. The level of shut down required varies by the type of equipment in use
and the procedure being completed.
If required, shut down instructions are specified at the start of the procedure. The levels of
shut down are:
Relieving System Hydraulic Pressure
Completely relieve system hydraulic pressure before breaking any hydraulic connection or
seal. Refer to the melter-specific product manual for instructions on relieving system
hydraulic pressure.
De-energizing the System
Isolate the system (melter, hoses, guns, and optional devices) from all power sources
before accessing any unprotected high-voltage wiring or connection point.
1. Turn off the equipment and all auxiliary devices connected to the equipment (system).
2. To prevent the equipment from being accidentally energized, lock and tag the
disconnect switch(es) or circuit breaker(s) that provide input electrical power to the
equipment and optional devices.
NOTE: Government regulations and industry standards dictate specific requirements
for the isolation of hazardous energy sources. Refer to the appropriate regulation or
standard.
Disabling the Guns
All electrical or mechanical devices that provide an activation signal to the guns, gun
solenoid valve(s), or the melter pump must be disabled before work can be performed on or
around a gun that is connected to a pressurized system.
1. Turn off or disconnect the gun triggering device (pattern controller, timer, PLC, etc.).
2. Disconnect the input signal wiring to the gun solenoid valve(s).
3. Reduce the air pressure to the gun solenoid valve(s) to zero; then relieve the residual air
pressure between the regulator and the gun.
E 2006 Nordson Corporation
Part 1041221B
6
Series B900-N and B900SW-N Manifold Mounted Electric Guns
General Safety Warnings and Cautions
Table 1 contains the general safety warnings and cautions that apply to Nordson hot melt
and cold adhesive equipment. Review the table and carefully read all of the warnings or
cautions that apply to the type of equipment described in this manual.
Equipment types are designated in Table 1 as follows:
HM = Hot melt (melters, hoses, guns, etc.)
PC = Process control
CA = Cold adhesive (dispensing pumps, pressurized container, and guns)
Part 1041221B
E 2006 Nordson Corporation
Series B900-N and B900SW-N Manifold Mounted Electric Guns
7
Table 1 General Safety Warnings and Cautions
Equipment
Type
Warnings and Cautions
HM
WARNING: Hazardous vapors! Before processing any
polyurethane reactive (PUR) hot melt or solvent-based
material through a compatible Nordson melter, read and
comply with the material’s MSDS. Ensure that the material’s
processing temperature and flashpoints will not be exceeded
and that all requirements for safe handling, ventilation, first aid,
and personal protective equipment are met. Failure to comply
with MSDS requirements can cause personal injury, including
death.
HM
WARNING: Reactive material! Never clean any aluminum
component or flush Nordson equipment with halogenated
hydrocarbon fluids. Nordson melters and guns contain
aluminum components that may react violently with
halogenated hydrocarbons. The use of halogenated
hydrocarbon compounds in Nordson equipment can cause
personal injury, including death.
HM, CA
WARNING: System pressurized! Relieve system hydraulic
pressure before breaking any hydraulic connection or seal.
Failure to relieve the system hydraulic pressure can result in
the uncontrolled release of hot melt or cold adhesive, causing
personal injury.
HM
WARNING: Molten material! Wear eye or face protection,
clothing that protects exposed skin, and heat-protective gloves
when servicing equipment that contains molten hot melt. Even
when solidified, hot melt can still cause burns. Failure to wear
appropriate personal protective equipment can result in
personal injury.
HM, PC
WARNING: Equipment starts automatically! Remote triggering
devices are used to control automatic hot melt guns. Before
working on or near an operating gun, disable the gun’s
triggering device and remove the air supply to the gun’s
solenoid valve(s). Failure to disable the gun’s triggering device
and remove the supply of air to the solenoid valve(s) can
result in personal injury.
Continued...
E 2006 Nordson Corporation
Part 1041221B
8
Series B900-N and B900SW-N Manifold Mounted Electric Guns
General Safety Warnings and Cautions (contd)
Table 1 General Safety Warnings and Cautions (contd)
Equipment
Type
Warnings and Cautions
HM, CA, PC
WARNING: Risk of electrocution! Even when switched off and
electrically isolated at the disconnect switch or circuit breaker,
the equipment may still be connected to energized auxiliary
devices. De-energize and electrically isolate all auxiliary
devices before servicing the equipment. Failure to properly
isolate electrical power to auxiliary equipment before servicing
the equipment can result in personal injury, including death.
HM, CA, PC
WARNING: Risk of fire or explosion! Nordson adhesive
equipment is not rated for use in explosive environments and
should not be used with solvent-based adhesives that can
create an explosive atmosphere when processed. Refer to the
MSDS for the adhesive to determine its processing
characteristics and limitations. The use of incompatible
solvent-based adhesives or the improper processing of
solvent-based adhesives can result in personal injury,
including death.
HM, CA, PC
WARNING: Allow only personnel with appropriate training and
experience to operate or service the equipment. The use of
untrained or inexperienced personnel to operate or service the
equipment can result in injury, including death, to themselves
and others and can damage to the equipment.
Continued...
Part 1041221B
E 2006 Nordson Corporation
Series B900-N and B900SW-N Manifold Mounted Electric Guns
Equipment
Type
9
Warnings and Cautions
HM
CAUTION: Hot surfaces! Avoid contact with the hot metal
surfaces of guns, hoses, and certain components of the
melter. If contact can not be avoided, wear heat-protective
gloves and clothing when working around heated equipment.
Failure to avoid contact with hot metal surfaces can result in
personal injury.
HM
CAUTION: Some Nordson melters are specifically designed to
process polyurethane reactive (PUR) hot melt. Attempting to
process PUR in equipment not specifically designed for this
purpose can damage the equipment and cause premature
reaction of the hot melt. If you are unsure of the equipment’s
ability to process PUR, contact your Nordson representative
for assistance.
HM, CA
HM
CAUTION: Before using any cleaning or flushing compound
on or in the equipment, read and comply with the
manufacturer’s instructions and the MSDS supplied with the
compound. Some cleaning compounds can react
unpredictably with hot melt or cold adhesive, resulting in
damage to the equipment.
CAUTION: Nordson hot melt equipment is factory tested with
Nordson Type R fluid that contains polyester adipate
plasticizer. Certain hot melt materials can react with Type R
fluid and form a solid gum that can clog the equipment. Before
using the equipment, confirm that the hot melt is compatible
with Type R fluid.
Other Safety Precautions
S Do not use an open flame to heat hot melt system components.
S Check high pressure hoses daily for signs of excessive wear, damage, or leaks.
S Never point a dispensing handgun at yourself or others.
S Suspend dispensing handguns by their proper suspension point.
E 2006 Nordson Corporation
Part 1041221B
10
Series B900-N and B900SW-N Manifold Mounted Electric Guns
First Aid
If molten hot melt comes in contact with your skin:
1. Do NOT attempt to remove the molten hot melt from your skin.
2. Immediately soak the affected area in clean, cold water until the hot melt has cooled.
3. Do NOT attempt to remove the solidified hot melt from your skin.
4. In case of severe burns, treat for shock.
5. Seek expert medical attention immediately. Give the MSDS for the hot melt to the
medical personnel providing treatment.
Safety Labels and Tags
Figure 1 illustrates the location of the product safety labels and tags affixed to the
equipment. Table 2 provides an illustration of the hazard identification symbols that appear
on each safety label and tag, the meaning of the symbol, or the exact wording of any safety
message.
2
1
Figure 1: Safety labels and tags
Part 1041221B
E 2006 Nordson Corporation
Series B900-N and B900SW-N Manifold Mounted Electric Guns
11
Table 2 Safety Labels and Tags
Item
Part
1.
N/A
WARNING: Hot Surface! Before touching the gun
body, allow the gun to cool, or wear heat−protective
gloves. Failure to allow the gun body to cool or to wear
heat−protective gloves may cause personal injury.
Description
2.
600137
WARNING: Disconnect power and remove system
pressure before disassembly or maintenance. Failure to
follow these instructions may result in serious personal
injury.
3.
243352
WARNING: Fire, injury, or equipment damage can
result if cleanout materials do not meet the following
requirements:
a. Minimum flashpoint to be 550_F (288_C).
b. Liquid and vapor to be non-toxic at use temperature in
equipment.
c. Chemical reactions with adhesive and equipment
materials must not be violently heat producing.
d. Cleanout material must not corrode or otherwise
weaken equipment materials.
4.
600103
CAUTION: This gun is RTD (resistance temperature
detector) controlled. Prior to operation and before
changing adhesive, consult instruction manual for
changing operating temperature. Failure to follow
instructions may result in personal injury or property
damage.
5.
243352
CAUTION: This equipment is factory tested with
Nordson type R fluid containing Polyester Adipate
plasticizer. Certain adhesives may react
with the type R fluid residue to form solid gum, which
can be difficult to remove.To avoid equipment damage,
check with adhesive supplier regarding compatibility
and cleanout procedure before putting adhesive into the
system.
E 2006 Nordson Corporation
Part 1041221B
12
Series B900-N and B900SW-N Manifold Mounted Electric Guns
Description
CAUTION: This gun is intended for use only with the following DuraBlue units:
D4L, D10L, D16L, D10 and D16. Do not use this gun with any other type of
melter.
B900-N and B900SW-N (B900) electric guns are high-speed, all-electric guns designed for
the precision placement of hot melt adhesive. The module is an electric solenoid valve
with a spring-loaded armature inside the adhesive chamber. The module stroke can be
adjusted to change and to balance the adhesive flow between modules. The module coil is
AC-powered.
The gun temperature is controlled by a resistance temperature detector (RTD). RTD
overtemperature protection is provided by a 246 _C (475 _F) overtemperature
thermoswitch.
B
A
1
2
Figure 2: B900-N Extrusion (A) and B900SW-N Swirl Pattern (B) Electric Gun
1. Nozzle air swirl inlet
2. Air manifold for swirl pattern
Note: Items 1 and 2 are on the B900SW−N only.
Part 1041221B
E 2006 Nordson Corporation
Series B900-N and B900SW-N Manifold Mounted Electric Guns
13
Installation
Connect Footswitch and Gun Cordset
1. See Figure 3. Connect the handgun footswitch to the appropriate switch receptacle on
the back of the melter.
P/N 1030542
2
1
4
3
Figure 3: Connect the Gun and Accessories
2. See Figure 3. Connect the fluid inlet gun directly to the manifold. Connect the cordset
to the melter. Up to two guns may be used with the melter. Operating parameter 12 or
13 on the DuraBlue melter must be enabled to use this gun. Refer to Table 3 for the
procedure.
NOTE: Connect the gun to Port 1 or Port 2 only. Operating parameters 12 and 13 do
not affect Port 3 or Port 4.
E 2006 Nordson Corporation
Part 1041221B
14
Series B900-N and B900SW-N Manifold Mounted Electric Guns
Table 3 DuraBlue Operating Parameters for B900 Gun Set-up
12
Change Hose 1 Output to Electric Gun
Activation
Description:
Value:
Changes the proportioned 240 VAC
current that is provided to the hose 1
heater to a switched 240 VAC current
that is used to activate a
manifold-mounted electric gun.
0 (disabled)
1 (enabled)
Resolution:
Default Value:
Format:
Use:
13
—
0 (disabled)
—
Use only when a Nordson
manifold-mounted electric gun is
installed and a switching device is
connected to the melter’s switch
receptacle.
Change Hose 2 Output to Electric Gun
Activation
Description:
Value:
Changes the proportioned 240 VAC
current that is provided to the hose 1
heater to a switched 240 VAC current
that is used to activate a
manifold-mounted electric gun.
0 (disabled)
1 (enabled)
Resolution:
Default Value:
Format:
Use:
Part 1041221B
—
0 (disabled)
—
Use only when a Nordson
manifold-mounted electric gun is
installed and a switching device is
connected to the melter’s switch
receptacle.
E 2006 Nordson Corporation
Series B900-N and B900SW-N Manifold Mounted Electric Guns
15
Make the Electrical Connections
Make wiring connections at the melter. Refer to the melter or gun driver manual for
instructions. The following gun cordset wiring diagram is provided for reference. A 12-pin
cordset connector is present on both gun models.
1
HEATER
2
3
SENSOR
4
5
SOLENOID
6
7
GROUND
8
9
10
11
12
Figure 4: Wiring Diagram of B900 Gun
E 2006 Nordson Corporation
Part 1041221B
16
Series B900-N and B900SW-N Manifold Mounted Electric Guns
Operation
Prepare for Operation
1. Start the melter and allow it to reach operating temperature. Refer to the melter manual
as needed.
2. Tighten all hydraulic fittings.
3. Remove the gun nozzles and flush adhesive through the guns. Refer to the melter
manual for the flushing procedure.
4. Reinstall the gun nozzles.
Set the Gun Temperature
Use a pyrometer to periodically measure the operating temperature of the gun. Adjust the
temperature of the gun at the melter. Refer to melter manual as needed.
Adjust the Module Stroke
Module stroke is the distance the armature must travel to open. The stroke is factory-set
at 0.38 mm (0.015 in.), which is recommended for most applications. However, module
stroke adjustment may be required if:
S A high-viscosity adhesive is used.
S The flow rate among several modules is not balanced.
Before adjusting the module stroke, keep the following in mind:
S Increasing the stroke distance over 0.61 mm (0.024 in.) results in poor operational
reliability.
S Decreasing the stroke distance below 0.18 mm (0.007 in.) can result in poor adhesive
flow or cutoff.
Part 1041221B
E 2006 Nordson Corporation
Series B900-N and B900SW-N Manifold Mounted Electric Guns
17
See Figure 5.
1
2
Figure 5: Module stroke adjustment
1. Guide tube
2. Retaining nut
1. Loosen the retaining nut (2) on top of the module.
2. Use a screwdriver to turn the guide tube (1) clockwise until the armature needle stops
against the seat.
3. Turn the guide tube one-half turn counterclockwise to adjust the stroke to 0.38 mm
(0.015 in.).
4. While holding the guide tube stationary, tighten the retaining nut. Do not overtighten.
Maintenance
WARNING: Allow only personnel with appropriate training and
experience to operate or service the equipment. The use of
untrained or inexperienced personnel to operate or service the
equipment can result in injury, including death, to themselves and
others, and damage to the equipment.
Use these procedures to properly maintain the gun. Attempting any other maintenance
procedures can result in improper system operation, equipment damage, or personal
injury.
E 2006 Nordson Corporation
Part 1041221B
18
Series B900-N and B900SW-N Manifold Mounted Electric Guns
Recommended Maintenance Schedule
Table 4 provides a recommended maintenance schedule. The operating environment will
determine how often these steps should be performed.
Table 4 Recommended Maintenance Activities and Schedule
Maintenance Activity
Monthly
As Needed*
Check for leaks
X
X
Check the modules for foreign material
X
X
Clean the outside surfaces of the gun
Daily
X
Clean nozzles (refer to Cleaning
Nozzles)
Replace the filter (refer to Replacing a
Filter)
X
X
X
*Extra maintenance may be required for continuous-duty operations.
Cleaning Nozzles
Gun nozzles may become clogged when char, a by-product of overheating the hot melt,
becomes lodged in the nozzle.
1. Heat the gun to application temperature.
2. Relieve system pressure and disable the gun. Refer to Safety.
3. See Figure 6. Remove the nozzles.
Figure 6: Removing a nozzle
WARNING: Risk of fire. Do not heat Nordson Type R fluid above 245 _C (475
_F). Use only an industrial grade, regulated, electrical heating device that is
designed to heat industrial fluids. Personal injury or property damage can result if
Type R cleaning fluid is heated with an open flame or in an unregulated heating
device.
Part 1041221B
E 2006 Nordson Corporation
Series B900-N and B900SW-N Manifold Mounted Electric Guns
19
CAUTION: Do not use a torch, high heat, or agressive solvents to clean
reduced-cavity nozzles. Doing so will damage the nozzle O-ring.
4. Soak the nozzles in Nordson Type R cleaning fluid that has been heated above the
melting point of the hot melt.
5. Remove the nozzles from the cleaning fluid.
CAUTION: Use the correct size precision pin probe to clean Nordson nozzles.
The use of non-precision or incorrectly sized probes may damage the nozzle.
The Nordson nozzle cleaning kit contains a variety of probe sizes.
See Figure 7.
6. See Figure At the outlet of each nozzle, insert a correctly sized cleaning probe.
Figure 7: Clean a nozzle
7. With a clean cloth, firmly grip the cleaning probe, then pull the probe out of the nozzle,
wiping the probe clean.
8. Reinstall the nozzles. Tighten the nozzles to 4.5 NSm (40 in.-lb).
E 2006 Nordson Corporation
Part 1041221B
20
Series B900-N and B900SW-N Manifold Mounted Electric Guns
Troubleshooting
WARNING: Allow only personnel with appropriate training and
experience to operate or service the equipment. The use of
untrained or inexperienced personnel to operate or service the
equipment can result in injury, including death, to themselves and
others, and damage to the equipment.
The following table lists the gun problems that are most likely to occur, the possible causes
of each problem, and steps for corrective action.
Part 1041221B
E 2006 Nordson Corporation
Series B900-N and B900SW-N Manifold Mounted Electric Guns
Problem
1. No
adhesive
output
Possible Cause
21
Corrective Action
Melter pump off
Start the melter pump.
Melter flow control valve set too
low
Increase the system hydraulic
pressure (without stalling the
motor) by adjusting the flow
control valve. If there is no
change, inspect the flow control
valve for proper operation.
Replace the valve as necessary.
Defective RTD
Unplug the gun cordset and verify
that the RTD connections are
secure. If the connections are
secure, check the continuity of the
RTD across the RTD pins on the
cordset. If there is no continuity,
replace the RTD. Refer to the
wiring diagram and resistance
data.
Defective coil
Unplug the gun cord set and
check the coil resistance across
the coil pins on the cordset. Refer
to the wiring diagram and
resistance data.
Adjust the module stroke. Refer
to Adjust the Module Stroke under
Installation.
Module stroke not properly
adjusted
Blockage in module
Disassemble and reassemble the
module, removing blockages and
cleaning parts as needed. Refer
to Replace a Module Component
under Repair.
Clogged nozzle
Clean the nozzle. Refer to
Cleaning Nozzles under
Maintenance.
Clogged melter filter (where used)
Clean or replace. Refer to the
melter manual.
Continued...
E 2006 Nordson Corporation
Part 1041221B
22
Series B900-N and B900SW-N Manifold Mounted Electric Guns
Troubleshooting
Problem
2. Adhesive
output too
low
(contd)
Possible Cause
Corrective Action
Defective RTD
Unplug the gun cordset and verify
that the RTD connections are
secure. If the connections are
secure, check the continuity of the
RTD across the RTD pins on the
cordset. If there is no continuity,
replace the RTD. Refer to the
wiring diagram and resistance
data.
Module stroke not properly
adjusted
Adjust the module stroke, Refer to
Adjust the Module Stroke under
Installation.
Blockage in module
Disassemble and reassemble the
module, removing blockages and
cleaning parts as needed. Refer
to Replace a Module Component
under Repair.
Increase the system hydraulic
pressure (without stalling the
motor) by adjusting the flow
control valve. If there is no
change, inspect the flow control
valve for proper operation.
Replace the valve as necessary.
Melter flow control valve set too
low
Adhesive viscosity too high
Increase the overall system
temperature (melter and guns). If
there is no change, consult the
adhesive vendor.
NOTE: Do not exceed material
specifications.
Melter temperature too low
Adjust. Refer to the melter
manual.
Incorrect nozzle size
Replace the nozzle with a nozzle
that has a larger orifice.
Clogged nozzle
Clean the nozzle. Refer to
Cleaning Nozzles under
Maintenance.
Clogged melter filter (where used)
Clean or replace. Refer to the
melter manual.
Clog of unknown origin
Purge the system to remove any
obstructions.
Continued...
Part 1041221B
E 2006 Nordson Corporation
Series B900-N and B900SW-N Manifold Mounted Electric Guns
Problem
3. Adhesive
output too
high
4. Erratic
temperature
readings
Possible Cause
23
Corrective Action
Defective RTD
Unplug the gun cordset and
verify that the RTD connections
are secure. If the connections
are secure, check the continuity
of the RTD across the RTD pins
on the cordset. If there is no
continuity, replace the RTD.
Refer to the wiring diagram.
Module stroke not properly
adjusted
Adjust the module stroke, Refer
to Adjust the Module Stroke
under Installation.
Melter flow control valve set too
high
Decrease the system hydraulic
pressure using the flow control
valve. If there is no change,
inspect the flow control valve for
proper operation. Replace the
valve as necessary.
Adhesive viscosity too low
Decrease the overall system
temperature (melter and guns).
If there is no change, consult the
adhesive vendor.
Melter temperature too high
Adjust. Refer to the melter
manual.
Incorrect nozzle size
Replace the nozzle with a nozzle
that has a smaller orifice.
Incorrect system voltage
Ensure that system voltages
match.
Incorrect component wiring
Check all wires and wire
terminations in the hose heater,
output connector, and RTD
circuit and repair as needed.
Refer to the wiring diagram.
Defective RTD
Unplug the gun cordset and
verify that the RTD connections
are secure. If the connections
are secure, check the continuity
of the RTD across the RTD pins
on the cordset. If there is no
continuity, replace the RTD.
Refer to the wiring diagram.
Continued...
E 2006 Nordson Corporation
Part 1041221B
24
Series B900-N and B900SW-N Manifold Mounted Electric Guns
Cleaning Nozzles
Problem
5. Gun fails
to heat
6. Gun
overheats
(contd)
Possible Cause
Corrective Action
Poor electrical connections
Check all wires and wire
terminations in the output
connector and RTD circuit and
repair as needed. Refer to the
wiring diagram. With the system
power off, disconnect the gun
cordsets from the melter. Check
for heater and RTD continuity
through the wires to gun. Also
check the heater from wire to
ground to ensure that a wire is not
grounded. Replace if there is no
continuity or if a heater wire is
grounded.
Incorrect system settings
Verify system settings. Refer to
the melter manual.
Defective heater or RTD
Check the resistance of the RTD
and heater across the appropriate
pins on the gun cordset. If the
resistance is not correct, replace
the RTD or heater. Refer to the
wiring diagram and resistance
data.
Incorrect system voltage
Ensure that system voltages
match.
Temperature settings too high
Check the component
temperature settings.
Defective RTD
Unplug the gun cordset and verify
that the RTD connections are
secure. If the connections are
secure, check the continuity and
resistance of the RTD across the
RTD pins on the cordset. If there
is no continuity, replace the RTD.
Refer to the wiring diagram.
Continued...
Part 1041221B
E 2006 Nordson Corporation
Series B900-N and B900SW-N Manifold Mounted Electric Guns
Problem
7. Gun heats
slowly
8. Module
seat leaks
Possible Cause
25
Corrective Action
Incorrect system voltage
Ensure that system voltages
match.
Incorrect component wiring
Check all wires and wire
terminations in the hose heater,
output connector, and RTD circuit
and repair as needed. Refer to
the wiring diagram.
Failed heater
Check the resistance of the
heater across the appropriate
pins on the gun cordset. If the
resistance is not correct, replace
the heater. Refer to the wiring
diagrams and resistance data
under Technical Data as needed.
Module stroke not properly
adjusted
Adjust the module stroke. Refer
to Adjusting the Module Stroke
under Installation.
Blockage in module
Disassemble and reassemble the
module, removing blockages and
cleaning parts as needed. Refer
to Replacing a Module
Component under Repair.
Continued...
E 2006 Nordson Corporation
Part 1041221B
26
Series B900-N and B900SW-N Manifold Mounted Electric Guns
Cleaning Nozzles
Problem
9. Gun will
not trigger
− adhesive
will not
dispense
(contd)
Possible Cause
Corrective Action
Gun not heating correctly
See above.
Poor electrical connections
Check all wires and wire
terminations in the hose heater,
output connector, and RTD circuit.
With system power off,
disconnect the gun cordsets from
the melter. Check the heater and
RTD continuity. Also check each
heater through wire to ensure the
wire is not grounded. Replace
the hose if there is no continuity
or if a heater wire is grounded.
Incorrect component wiring
Check all wires and wire
terminations in the hose heater,
output connector, and RTD circuit
and repair as needed. Refer to
the wiring diagrams under
Technical Data as needed.
Defective coil
Unplug the gun cordset and
check the coil resistance across
the coil pins on the cordset.
Refer to the wiring diagrams and
resistance data under Technical
Data as needed.
Module stroke not properly
adjusted
Adjust the module stroke. Refer
to Adjusting the Module Stroke
under Installation.
Blockage in module or nozzle
Disassemble and reassemble the
module, removing blockages and
cleaning parts as needed. Refer
to Replacing a Module
Component under Repair.
Adhesive viscosity too high
Increase the overall system
temperature (melter, hoses, and
guns). If there is no change,
consult the adhesive vendor.
NOTE: Do not exceed material
specifications.
System not up to operating
temperature
Allow system to heat. Refer to
the melter manual for other
related problems.
Continued...
Part 1041221B
E 2006 Nordson Corporation
Series B900-N and B900SW-N Manifold Mounted Electric Guns
Problem
10. Poor
adhesive
cutoff
Possible Cause
27
Corrective Action
Module stroke not properly
adjusted
Adjust the module stroke. Refer
to Adjusting the Module Stroke
under Installation.
Blockage in module
Disassemble and reassemble the
module, removing blockages and
cleaning parts as needed. Refer
to Replacing a Module
Component under Repair.
Verify mounting of the gun for
adequate bead placement.
Incorrect distance from substrate
Incorrect nozzle type or size
Some nozzles require extra
warm-up time or have poor cutoff
when the gun is mounted
horizontally. Contact a Nordson
representative for assistance with
the application.
System pressure incorrect
Adjust pressure up or down until
desired performance is achieved.
Adhesive viscosity too high
Increase the overall system
temperature (melter and guns). If
there is no change, consult the
adhesive vendor.
NOTE: Do not exceed material
specifications.
11. Excess
residue
Nozzle loose
Verify that the nozzle is secure.
Adjust or replace as needed.
Nozzle leaking
Clean or replace if necessary.
Incorrect nozzle type or size
Some nozzles require extra
warm-up time or have poor cutoff
when the gun is mounted
horizontally. Contact a Nordson
representative for assistance with
the application.
Nozzle loose
Verify that the nozzle is secure.
Adjust or replace as needed.
Incorrect distance from substrate
Verify mounting of the gun for
adequate bead placement.
E 2006 Nordson Corporation
Part 1041221B
28
Series B900-N and B900SW-N Manifold Mounted Electric Guns
Repair
Troubleshooting activities may identify needed repairs. Use these repair procedures as
appropriate. Refer to Parts for component part numbers.
WARNING: Allow only personnel with appropriate training and
experience to operate or service the equipment. The use of
untrained or inexperienced personnel to operate or service the
equipment can result in injury, including death, to themselves and
others, and damage to the equipment.
WARNING: Read and follow all procedures as detailed in the Safety section
before engaging in any repairs. Falure to do so can result in injury, including
death, to themselves and others, and damage the equipment.
CAUTION: Always disconnect the gun electrical connector when performing
maintenance to prevent accidental triggering.
Before proceeding with any maintenance procedure:
1. Completely relieve the system hydraulic pressure.
2. Verify that the B900 gun is positioned over a waste receptacle.
3. Disable the gun by turning off or disconnecting the gun from the melter.
Replace a Module
Follow this procedure to replace a complete module. To replace a module component that
requires complete disassembly and reassembly of the module, refer to Replace a Module
Component. To replace only the coil and housing assembly, refer to Replace the Coil and
Housing Assembly. Refer to Parts for replacement module part numbers.
Remove a Module
See Figure 8.
1. De-energize the system and disable the guns. Refer to Safety.
2. Remove the nozzle (5).
3. Remove the screws (4) that secure the module to the manifold. If the module is tightly
clamped between other modules, loosen the adjacent modules.
Part 1041221B
E 2006 Nordson Corporation
Series B900-N and B900SW-N Manifold Mounted Electric Guns
29
1
2
3 4
5
6
Figure 8: Module replacement
1. Coil pin seal
4. Module screw
2. Coil pins
5. O-ring
3. Ground pin
6. Nozzle
4. Grasp the module at the top and bottom and carefully pull the module away from the
gun to disconnect the coil pins (2) and ground pin (3). If the module resists, lightly tap
the coil until the module breaks free.
CAUTION: Do not rotate module. Damage to pins may result.
5. Wipe off dripping adhesive from the manifold face. Do not allow the adhesive to drip
into the electrical connector.
E 2006 Nordson Corporation
Part 1041221B
30
Series B900-N and B900SW-N Manifold Mounted Electric Guns
Install a Module
See Figure 8.
1. Ensure that the coil pin seal (1) is in place.
2. Lubricate the O-ring (5) with Parker Hi-Temp lubricant (P/N 900493) and ensure that it is
in good condition and in place.
3. Engage the coil pins (2) in the connector block on the gun manifold and secure the
module with the screws (4) removed previously.
4. Energize the system and allow the module to warm up for 10 minutes.
5. After the module is at operating temperature, adjust the module stroke as needed.
Refer to Adjust the Module Stroke under Installation.
Replace a Coil and Housing Assembly
Follow this procedure to replace only the coil and housing assembly on a module. To
replace a complete module, refer to Replace a Module. To replace a module component
that requires complete disassembly and reassembly of the module, refer to Replace a
Module Component. Refer to Parts for coil and housing kit part numbers.
See Figure 9.
1. De-energize the system and disable the guns. Refer to Safety.
2. Remove the module. Refer to Remove a Module under Replace a Module.
3. Remove the retaining nut (1).
4. Pull coil and housing assembly (2) away from the module body (3), sliding it up the
guide tube (4).
5. Install the new coil and housing assembly in the module body, slipping it over the guide
tube.
6. Install the retaining nut.
7. Install the module on the gun. Refer to Install a Module under Replace a Module.
Part 1041221B
E 2006 Nordson Corporation
Series B900-N and B900SW-N Manifold Mounted Electric Guns
31
1
2
3
0970442a
4
Figure 9: Coil replacement
1. Retaining nut
3. Module body
2. Coil and housing assembly
4. Guide tube
Replace a Module Component
Follow these procedures to replace (or clean) a module component that requires complete
disassembly and reassembly of the module. To replace a complete module, refer to
Replace a Module . To replace only the coil and housing assembly, refer to Replace the
Coil and Housing Assembly. Refer to Parts for module rebuild kit part numbers.
E 2006 Nordson Corporation
Part 1041221B
32
Series B900-N and B900SW-N Manifold Mounted Electric Guns
Disassemble the Module
See Figure 10.
1. Heat the system to application temperature. The adhesive in the module must be
molten for this procedure.
2. De-energize the system and disable the gun. Refer to Safety.
3. Remove the module on which a component is to be replaced. Refer to Remove a
Module under Replace a Module.
4. Loosen the retaining nut (1).
CAUTION: Failure to back the armature off of the seat may damage both the
seat and armature when the seat is reinstalled.
5. To back the armature off of the seat, turn the coil end of the guide tube counterclockwise
until it stops turning.
6. Pull the coil and housing (2) from module body (6).
7. Remove the seat (12), armature (10), and spring (9).
8. Clamp the module body in a vice.
CAUTION: Do not use pliers to turn the guide tube. Pliers will damage the fine
threads and deform the tube wall.
9. With a screwdriver, turn the guide tube (8) clockwise until it comes loose (about 12
turns).
10. Push down on the top of the guide tube until it can be pulled free from the bottom of the
module body.
11. As needed, clean the module components by placing them in a container of Nordson
Type R fluid heated to 245 _C (475 _F). Allow the components to soak for 10 minutes,
then remove them and blow off excess residue with an air gun or wipe them with a shop
rag.
Part 1041221B
E 2006 Nordson Corporation
Series B900-N and B900SW-N Manifold Mounted Electric Guns
33
1
2
3
4
5
6
7
8
9
0970478c
10
11
12
Figure 10: Module disassembly
1. Retaining nut
7. O-ring
2. Coil and housing assembly
8. Guide tube
3. Coil pin seal
4. Coil pin
9. Spring
10. Armature
5. O-ring
11. O-ring
6. Module body
12. Seat
E 2006 Nordson Corporation
Part 1041221B
34
Series B900-N and B900SW-N Manifold Mounted Electric Guns
Reassemble the Module
See Figure 10.
1. Lubricate a new O-ring (5) with Parker Hi-Temp lubricant (P/N 900493) and install it in
the groove in the top of the module body.
CAUTION: Failure to screw the guide tube fully into the module body will result
in damage to the armature and seat due to lack of stroke clearance.
2. Lubricate the top threads of the guide tube (8) with high temp silicone. Carefully pass
the top threads through the O-ring by rotating it clockwise. Push the guide tube through
until the threads engage, and screw the guide tube fully into the module body.
3. Install the spring (9), armature (10), O-ring (11), and seat (12). Lubricate the O-ring
Parker Hi-Temp lubricant (P/N 900493).
4. Install the coil and housing assembly (2) on the module body, slipping it over the guide
tube. Note the location of the coil pins (4).
5. Install the retaining nut (1).
6. Lubricate and install the module body O-ring (7) with Parker Hi-Temp lubricant (P/N
900493). Replace the O-ring if the existing one is worn or damaged.
7. Ensure that the coil pin seal (3) is in place.
8. Install the module on the gun. Refer to Install a Module under Replacing a Module.
Replace the Coil Connector
Follow this procedure to replace the electrical connector (terminal block) for the module coil.
Refer to Parts for the coil connector kit part number.
1. De-energize the system and disable the gun. Refer to Safety.
2. Remove the module from the gun. Refer to Remove a Module under Replace a Module.
See Figure 11.
3. Place a shop cloth over the coil connector to prevent adhesive from getting into the
connector. Replace the coil seal if it becomes damaged; otherwise, contamination of
the connector will result.
4. Remove the manifold cover and gasket. If the gasket is broken, replace it.
5. Loosen the connector socket screws and remove the wires.
Part 1041221B
E 2006 Nordson Corporation
Series B900-N and B900SW-N Manifold Mounted Electric Guns
35
6. Remove the connector mounting screws and then remove the connector.
7. If necessary, cut the connector wires back to the insulation and re-strip them to 4 mm
(0.19 in.).
8. Insert the connector wires into the screw-clamp sockets and tighten the screws.
9. Press the connector into the slot in the manifold and reinstall the mounting screws.
1
2
3
4
Figure 11: Coil connector replacement
1. Socket screw
3. Mounting screw
2. Coil connector
4. Wires
Note:
10. Check the screw-clamp terminations and tighten as necessary.
11. Reinstall the gasket and manifold cover plate.
E 2006 Nordson Corporation
Part 1041221B
36
Series B900-N and B900SW-N Manifold Mounted Electric Guns
Replace a Heater
Follow this procedure to replace a heater. Refer to Parts for heater replacement kit part
numbers.
1. De-energize the system and disable the gun. Refer to Safety.
See Figure 12.
2. Remove the manifold cover and gasket, and disconnect the heater wires (1).
3. Gently push the old heater (2) out of the manifold by inserting a rod in the heater bore
on the back of the manifold (3).
4. Cut the new heater wires to match the length of the old heater wires.
5. Strip the new heater wires to 6 mm (0.250 in.).
6. Apply heater lubricant (P/N 165415) to the new heater and slide it into the heater bore.
7. Connect the heater wires to the terminal block.
NOTE: Refer to Technical Data at the end of this manual for wiring diagrams.
8. Install the gasket and manifold cover.
1
2
3
Figure 12: Heater replacement
1. Heater wires
3. Manifold
2. Heater
Part 1041221B
E 2006 Nordson Corporation
Series B900-N and B900SW-N Manifold Mounted Electric Guns
37
Replace an RTD
To ensure proper temperature control, replace an RTD as a complete unit, with soldered
gold contact pins and shielded wires. Refer to Parts for the RTD replacement kit part
number.
1. Disconnect and lock out electrical power to the melter system.
2. Disconnect the gun electrical connector.
3. Access the gun electrical cavity.
See Figure 13.
4. Cut the leads of the defective RTD (1) 25 mm (1 in.) from the RTD element (2).
5. Remove and discard the defective RTD element.
1
2
Figure 13: RTD Replacement
1. RTD lead
E 2006 Nordson Corporation
2. RTD
Part 1041221B
38
Series B900-N and B900SW-N Manifold Mounted Electric Guns
Replace an RTD (contd)
See Figure 14.
1
2
3
4
RTD
Figure 14: Splicing RTD leads
1. Old RTD lead
3. Parallel wire splice
2. Heat shrink tubing
4. New RTD lead
6. Strip about 6 mm (0.25 in.) of insulation from the old RTD leads.
7. Cut the heat shrink tubing from the kit in half (into two 25 mm [1 in.] pieces) and slide a
piece of heat shrink tubing onto each of the old RTD leads.
8. Cut the new RTD leads about 50−76 mm (2−3 in.) from the RTD element and strip about
6 mm (0.25 in.) of the insulation from the new RTD leads.
9. Use a parallel wire splice to crimp the exposed wire of one old and one new RTD lead
together. Repeat for the other old and new RTD leads.
10. Slide the heat shrink tubing over the splices and heat it to shrink the tubing around the
splices.
11. Install the new RTD in the manifold and apply heat sink compound (P/N 900298).
Part 1041221B
E 2006 Nordson Corporation
Series B900-N and B900SW-N Manifold Mounted Electric Guns
39
12. If the knockout hole was used to remove the old RTD, seal it with a silicone sealant (P/N
900411).
13. Route the RTD wires through the armored conduit and back shell. Push the gold pins
into positions 4 and 5 on the back shell. Pull the pins into their final positions such that
they click into place.
14. Reassemble the conduit and tighten the set screws. On water-resistant guns, seal the
set screws with a silicone sealant (P/N 1019259).
15. Inspect the gasket and replace if damaged.
16. Install the gasket and manifold cover.
E 2006 Nordson Corporation
Part 1041221B
40
Series B900-N and B900SW-N Manifold Mounted Electric Guns
Replace a Nozzle
Follow this procedure to replace a nozzle. The adhesive in the system must be heated to
application temperature before a nozzle is removed.
1. Heat the system to application temperature.
2. Relieve system pressure and disable the gun. Refer to Safety.
See Figure 15.
1
2
Figure 15: Nozzle replacement
1. Module seat
2. Nozzle
3. Use a 17 mm (11/16 in.) wrench to hold the module seat (1) stationary, and use a 14 mm
(9/16 in.) wrench to remove the nozzle (2).
4. Clean adhesive char from the face of the module seat.
5. Install the new nozzle.
Part 1041221B
E 2006 Nordson Corporation
Series B900-N and B900SW-N Manifold Mounted Electric Guns
41
Using the Illustrated Parts Lists
To order parts, call the Nordson Customer Service Center or your local Nordson
representative. Use these four-column parts lists, and the accompanying illustrations, to
describe and locate parts correctly. The following chart provides guidance for reading the
parts lists.
The number in the Item column corresponds to the circled item number in the
parts list illustration. A dash in this column indicates that the item is an
assembly.
The number in the Part column is the Nordson part
number you can use to order the part. A series of
dashes indicates that the part is not saleable. In this
case, you must order either the assembly in which the
part is used or a service kit that includes the part.
The Description column describes
the part and sometimes includes
dimensions or specifications.
The Quantity column tells you how
many of the part is used to
manufacture the assembly shown in
the parts list illustration. A dash in
this column indicates that the amount
of the item required in the assembly
is not quantifiable.
Item
Part
Description
Quantity
S
S S
NOTE
NS:
A:
B:
Not Shown
E 2006 Nordson Corporation
Part 1041221B
42
Series B900-N and B900SW-N Manifold Mounted Electric Guns
B900-N Gun Parts
See Figure 16.
Item
Part
—
1031733
1
2
Description
Quantity
—
Gun, B900-N, 230V, DuraBlue
1031890
S
Benchmount manifold
1
1029816
S
Heater service kit
1
3
1032416
S
Module assembly
1
4
342272
S
Tube fitting, 3/8 X 9/16-18, str.thd.
1
5
1027970
S
Single plate cover
1
6
1031769
S
Manifold plate cover
6/
32
1
5/
16
7
1028204
S
Screw, self tap,
8
1032909
S
RTD service kit
1
X
7
UNC
9
981101
S
Screw, socket set, 10-32 X .187, cmp, zn
1
10
1029732
S
Connecting block, 3-pin
1
11
1019009
S
Insulator, .75 OD x .328 ID x .25
2
12
1030521
S
Heat shield
1
5/ ,
8
13
1031582
S
Screw, flt. head, 10-32 X
14
1026684
S
Nozzle, straight, .020/.300
1
15
1035722
S
Cordset
1
16
939586
S
Connector, plastic
1
17
981975
S
Scr, skt cap, 10−32 X 1.125
2
Part 1041221B
blk
2
E 2006 Nordson Corporation
Series B900-N and B900SW-N Manifold Mounted Electric Guns
43
2
9
7
15
8
10
3
11
16
6
5
12
13
7
14
14
1
4
Figure 16: Exploded View of B900-N Gun
E 2006 Nordson Corporation
Part 1041221B
44
Series B900-N and B900SW-N Manifold Mounted Electric Guns
B900SW-N Gun Parts
See Figure 17.
Item
Part
—
1031734
1
2
Description
Quantity
Gun, B900SW-N, 230V, DuraBlue
—
1031890
S
Benchmount manifold
1
1029816
S
Heater service kit
1
3
1032618
S
Module assembly
1
4
342272
S
Tube fitting, 3/8 X 9/16-18, str.thd.
1
5
1027970
S
Single plate cover
1
6
1031769
S
Manifold plate cover
6/
32
1
5/
16
7
1028204
S
Screw, self tap,
8
1032909
S
RTD service kit
1
X
7
UNC
9
981101
S
Screw, socket set, 10-32 X .187, cmp, zn
1
10
1029732
S
Connecting block, 3-pin
1
11
1019009
S
Insulator, .75 OD X .328 ID X .25
2
12
1028208
S
Hose clamp, 1/4 in.
1
1/
4
13
971607
S
Connector, 10-32 X
14
1020490
S
Screw, self tap, panhd, 6-32 X 1/2 in., zn
1
8
15
1032114
S
Air manifold
1
16
1035722
S
Cordset
1
17
1028910
S
Tubing, 1/4 in. OD X 1/8 in. ID
in.
18
1037526
S
Screw, soc, button, 10-32 X
19
1030521
S
Heat shield
3/
16
1
1
1
5/ ,
16
20
1031582
S
Screw, Flthd, 10-32 X
21
100728
S
CFDisk-B-025-6-ST-CW
1
22
939586
S
Connector, plastic
1
Part 1041221B
bld
2
E 2006 Nordson Corporation
Series B900-N and B900SW-N Manifold Mounted Electric Guns
45
3
11
16
10
9
2
20
21
17
4
7
8
13
12
22
5
6
19
1
14
15
18
Figure 17: Exploded View of B900SW-N Gun
E 2006 Nordson Corporation
Part 1041221B
46
Series B900-N and B900SW-N Manifold Mounted Electric Guns
Replacement Modules for B900 Guns
See Figure 18.
Table 5 Module and Module Parts
Item
Part
Quantity
Note
1
1032618
Module, B900SW-N, 240 VAC
Part
—
A
1032416
Module, B900-N, 240 VAC
—
A
Nut, lock, 3/8-32 x 0.093
1
2
984444
3
1029801
Kit, coil and housing assembly, 240 V
1
4
1027905
Seal, coil pin
1
5
940073
O-ring, Viton, 0.145 ID x 0.070 W in.
1
B
6
1041206
Plate, locking, seat
1
C
7
982760
Screw, socket, cap, 6-32 x 0.375 in.
2
C
NOTE
B
A: Order this part for a complete replacement module.
B: This part is included in the coil and housing assembly kit (item 3).
C: Used with the B900SW-N only.
Part 1041221B
E 2006 Nordson Corporation
Series B900-N and B900SW-N Manifold Mounted Electric Guns
47
1
6
7
2
3
4
5
Figure 18: Module parts
E 2006 Nordson Corporation
Part 1041221B
48
Series B900-N and B900SW-N Manifold Mounted Electric Guns
Module Rebuild Kits
See Figure 19.
Table 6 Rebuild Kit and Component Part Numbers
Item
Part
—
1029811
Description
Kit, module body
3/ -32
8
Quantity
—
1
984444
Nut, lock,
2
1027905
Seal, coil
1
3
940121
O-ring, Viton, 0.364 ID x 0.070 W in.
1
4
------
Body, module
1
5
981975
Screw, socket, cap, 10-32 x 1.125 in.
2
O-ring, Viton, 0.145 ID x 0.070 W in.
1
Kit, guide tube
—
Nut, lock, 3/8-32 x 0.093
1
Seal, coil
1
1
x 0.093
1
6
940073
—
1033136
1
984444
2
1027905
3
940121
O-ring, Viton, 0.364 ID x 0.070 W in.
6
940073
O-ring, Viton, 0.145 ID x 0.070 W in.
1
1
7
------
Tube, guide
10
940133
O-ring, Viton, 0.426 ID x 0.070 W in.
1
—
1029809
Kit, armature and seat, AC
—
1
984444
Nut, lock, 3/8-32 x 0.093
1
2
1027905
Seal, coil
1
3
940121
O-ring, Viton, 0.364 ID x 0.070 W in.
1
5
981975
Screw, socket, cap, 10-32 x 1.125 in.
2
6
940073
O-ring, Viton, 0.145 ID x 0.070 W in.
1
8
987073
Spring, compression, 0.75 x 0.13 x 0.02 in.
1
9
------
Armature
1
10
940133
O-ring, Viton, 0.426 ID x 0.070 W in.
1
11
------
Seat, with insert
1
—
1029812
Kit, O-rings and spring, AC
—
3
940121
O-ring, Viton, 0.364 ID x 0.070 W in.
4
6
940073
O-ring, Viton, 0.145 ID x 0.070 W in.
4
8
987073
Spring, compression, 0.75 x 0.13 x 0.02 in.
4
10
940133
O-ring, Viton, 0.426 ID x 0.070 W in.
4
Part 1041221B
E 2006 Nordson Corporation
Series B900-N and B900SW-N Manifold Mounted Electric Guns
49
1
0970441
2
3
4
5
6
7
8
9
10
11
Figure 19: Module rebuild kit parts (B900-N shown)
E 2006 Nordson Corporation
Part 1041221B
50
Series B900-N and B900SW-N Manifold Mounted Electric Guns
Lubricants and Sealants
Part Number
Description
900493
Parker Hi-Temp lubricant
900411
Sealant, RTV
165415
Heater lubricant
900298
Heat sink compound
1019259
Silicone sealant (waterwash units only)
Technical Data
Specifications
Parameter
Specification
Source voltage
240 VAC
Module coil voltage
240 VAC
Module coil wattage
90 W
Heater wattage
150 W
Hose connections
Male, 37° JIC, in no. 6, 8 and 10
Adhesive viscosity
Maximum 25,000 centipoise
NOTE: For higher adhesive viscosities, consult your
Nordson representative.
Operating pressure
3.4–40 bar (50–600 psi)
Operating Temperature
Range
40–230 °C (100–450 °F)
Part 1041221B
E 2006 Nordson Corporation
Series B900-N and B900SW-N Manifold Mounted Electric Guns
51
Gun Heater Resistance
Voltage
240
Heater
Quantity
1
Heater Wattage
Ohms
150
369−399
Module Coil Resistance
Coil Voltage
240
E 2006 Nordson Corporation
Ohms
285−335
Part 1041221B
52
Series B900-N and B900SW-N Manifold Mounted Electric Guns
Resistance Values
Unless otherwise specified, resistance values are measured at 20 _C + 5 _C
(68 _F + 10 _F).
Nickel RTD
Temperature in _C
Resistance
in Ohms
Temperature in _F
Figure 20: RTD resistance vs. temperature
Part 1041221B
E 2006 Nordson Corporation