1
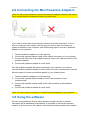
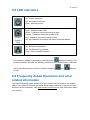
EM8030 – EM8031
Mini Powerline Adapter 500Mbps
2 | ENGLISH
EM8030 – EM8031
Mini Powerline Adapter 500Mbps
Table of contents
1.0 Introduction ........................................................................................................... 2
1.1 Packing contents ............................................................................................... 2
2.0 Connecting the Mini Powerline Adapters ............................................................... 3
3.0 Using the software ................................................................................................. 3
3.1 Installing the software ........................................................................................ 4
3.2 Securing your network using the software.......................................................... 4
3.3 Add a new unsecured Powerline Mini to your already secured network ............. 5
4.0 Reset the powerline adapter .................................................................................. 5
5.0 LED indicators ....................................................................................................... 6
6.0 Frequently Asked Questions and other related information .................................... 6
7.0 Service and support............................................................................................... 7
8.0 Warning and points of attention ............................................................................. 7
9.0 Warranty conditions ............................................................................................... 8
1.0 Introduction
Congratulations with the purchase of this high-quality Eminent product! This product
has undergone extensive testing by Eminent’s technical experts. Should you
experience any problems with this product, you are covered by a five-year Eminent
warranty. Please keep this manual and the receipt in a safe place.
Register your product now on www.eminent-online.com and receive product updates!
1.1 Packing contents
The following parts need to be present in the packing of the EM8030:
•
1 EM8030 Powerline Mini 500Mbps
•
1 UTP network cable
•
1 CD-ROM
The following parts need to be present in the packing of the EM8031:
•
2 x EM8030 Powerline Mini 500Mbps
•
2 x UTP network cable
•
1 CD-ROM
3 | ENGLISH
2.0 Connecting the Mini Powerline Adapters
Note: For the best performance, connect the powerline adapters directly to the mains.
Don’t connect them to an extension cable or a power strip.
If you want to share the current internet connection with other computers, or if you
want to create your own network, the first step you need to take is connecting a
powerline adapter to your computer. Use the following steps to connect a powerline
adapter to your computer:
1. Take the powerline adapter out of the packing.
2. Connect the supplied network cable to the network connection of your computer.
3. Connect the other end of the supplied network cable to the LAN connection of the
powerline adapter.
4. Connect the powerline adapter to a wall outlet.
Now the powerline adapter has been connected to your computer, you need to
connect another powerline adapter to a free LAN port of your (modem)router. Use the
following steps to connect a powerline adapter to your (modem)router:
1. Take the powerline adapter out of the packing.
2. Connect the supplied network cable to a free LAN connection of your
(modem)router.
3. Connect the supplied network cable to the LAN connection of the powerline
adapter.
4. Connect the powerline adapter to a wall outlet.
Note: You can connect a maximum of 16 Mini Powerline adapters in your network.
3.0 Using the software
As soon as the powerline devices haven been connected correctly, a network
connection will be established automatically. It is possible to secure the powerline
network. In order to secure the network, the powerline software needs to be installed.
4 | ENGLISH
3.1 Installing the software
1.
2.
3.
4.
Take the supplied CD-ROM out of the packing.
Insert the CD-ROM in your computer’s CD-ROM or DVD-player.
The CD-ROM will start automatically.
Follow the steps on your screen to install the software.
3.2 Securing your network using the software
After installing the software, an icon on your desktop has been added. This icon is
named ‘PLC Utility’.
Double-click this icon to open the powerline software. When the software has been
opened, the screen is divided in two parts: The upper part shows information about
the powerline adapter which is connected directly to this computer (local MAC). The
lower part shows information about other powerline adapters which are present in the
same network and have the (default) name ‘Remote’.
Note: If you want to secure powerline adapters which are not directly connected to
your computer, you need to use the so called ‘Password’ or ‘Device ID key’ which is
present on the sticker at the bottom of the powerline adapter. You do not have to use
this key to secure the adapter which is directly connected to your computer.
Use the following steps the secure the powerline adapters:
1.
2.
3.
4.
5.
6.
7.
8.
In the bottom field of the ‘PLC Utility’ you can choose a Powerline Mini adapter
from the list, where no value is set in the ‘Password’ column.
Click ‘Enter Password’.
Fill out the ‘Password’ or ‘Device ID’, and click ‘OK’. The ‘Password’ or ‘Device
ID’ can be found on the sticker of the Powerline Mini. An example of this key is
‘XK8Y-GH36-BR1K-LSZA’.
Repeat steps 1 to 3 for all Powerline Mini adapters, until all adapters are shown
in the bottom list with a password in the ‘Password’ column.
Enter a made-up and secret network name in the ‘Network Name’ field.
Click ‘Set all remote devices whose Password has been entered. And “Set local
device’.
Click ‘OK’.
Your Powerline Mini home network has now been secured. There is no need to
repeat any of these steps on your other computers.
Hint: The ‘Network Name’ enables you to access your Powerline Mini home network.
Do not share this name with other people! If you wish, you can write down the
‘Network Name’ in the manual and keep the manual in a secure place.
5 | ENGLISH
3.3 Add a new unsecured Powerline Mini to your already
secured network
If you have a secured Powerline Mini home network, and you wish to connect a new
Powerline Mini adapter which is not secured yet, you will need to set the so-called
‘Network Name’ on this new adapter to add this new powerline adapter to your already
secured network.
The new Powerline Mini is directly connected to a computer.
1. If you are using a new computer, you need to install the software first. Double click
the ‘PLC Utility’ icon on your desktop to open the software.
2. Click the ‘Main’ tab.
3. Enter the secret network name in the ‘Network Name’ field.
4. Click ‘Set Local Device’.
5. The ‘PLC Utility’ will indicate the network name has been set.
6. Click ‘OK’.
7. You can now check whether a connection with the other adapters in the Powerline
Mini home network has been established:
•
Click the ‘Main’ tab.
•
All Powerline Mini adapters in your home network should now be visible and
will be connected.
8. Your new Powerline Mini has now been added to your Powerline Mini network,
and is secured.
4.0 Reset the powerline adapter
To reset the powerline adapter to factory defaults, please follow these steps :
1.
2.
3.
4.
Press the ‘NID/RST’ button.
Keep the button pressed for 10 to 15 seconds.
Release the button.
All LED indicators with switch Off and the powerline adapter will reboot.
6 | ENGLISH
5.0 LED indicators
On : Power connected
Off : No power connected
Flash : Stand-by mode*
(Green)
(Green /
Orange /
Red)
Flash : Powerline data traffic
Green : Powerline connection quality is good
Orange : Powerline connection quality is fair
Red : Powerline connection quality is bad
Off : No Powerline connection with other Powerline adapter
On : Ethernet link detected
Off : No Ethernet link detected
Flash : Ethernet traffic detected
(Green)
symbol is flashing. The
*) The powerline adapter is in stand-by mode when the
powerline adapter will enter the stand-by mode when ther is 60minutes no ethernet
link or the dataconnection is loss.In stand-by mode the
be Off.
and
will both
6.0 Frequently Asked Questions and other
related information
The latest Frequently asked questions for your product can be found on the support
page of your product. Eminent will update these pages frequently to assure you have
the most recent information. Visit www.eminent-online.com for more information about
your product.
7 | ENGLISH
7.0 Service and support
This users manual has been carefully written by Eminent’s technical experts. If you
have problems installing or using the product, please fill out the support form at the
website www.eminent-online.com/support.
You can also contact us by phone. Please check www.eminent-online.com/support for
the helpdesk phone number and opening hours.
8.0 Warning and points of attention
Due to laws, directives and regulations set out by the European parliament, some
(wireless) devices could be subject to limitations concerning its use in certain
European member states. In certain European member states the use of such devices
could be prohibited. Contact your (local) government for more information about this
limitations.
Always follow up the instructions in the manual*, especially where it concerns devices
which need to be assembled.
Warning: In most cases this concerns an electronic device. Wrong/improper use may
lead to (severe) injuries!
Repairing of the device should be done by qualified Eminent staff. The warranty
immediately voids when products have undergone self repair and/or by misuse. For
extended warranty conditions, please visit our website at www.eminentonline.com/warranty.
*Tip: Eminent manuals are written with great care. However, due to new technological
developments it can happen that a printed manual does not longer contain the most
recent information.
If you are experiencing any problems with the printed manual or you cannot find what
you are looking for, please always check our website www.eminent-online.com first for
the newest updated manual.
Also, you will find frequently asked questions in the FAQ section. It is highly
recommended to consult the FAQ section. Very often the answer to your questions will
be found here.
8 | ENGLISH
9.0 Warranty conditions
The five-year Eminent warranty applies to all Eminent products, unless mentioned
otherwise before or during the moment of purchase. After buying a second-hand
Eminent product the remaining period of warranty is measured from the moment of
purchase by the product’s initial owner. Eminent warranty applies to all Eminent
products and parts, indissolubly connected or mounted to the product it concerns.
Power supply adapters, batteries, antennas and all other products not directly
integrated in or connected to the main product or products of which, without
reasonable doubt, can be assumed that wear and tear during use will show a different
pattern than the main product, are not covered by the Eminent warranty. Products are
not covered by the Eminent warranty when exposed to incorrect/improper use,
external influences or when opening the service parts of the product by parties other
than Eminent. Eminent may use refurbished materials for repair or replacement of
your defective product. Eminent cannot be held responsible for changes in network
settings by internet providers. We cannot guarantee that the Eminent networking
product will keep working when settings are changed by the internet providers.
Eminent cannot guarantee the working of web services, apps and other third party
content that is available through Eminent products. Eminent products with an internal
hard disk have a limited warranty period of two years on the hard disk. Eminent could
not be held responsible for any data lost. Please make sure that if the product stores
data on a hard drive or other memory source, you will make a copy before you return
the product for repair.
When my product gets defective
Should you encounter a product rendered defective for reasons other than described
above: Please contact your point of purchase for taking care of your defective product.
EM8030–EM8031-UK | 08-2014