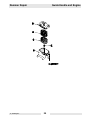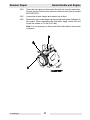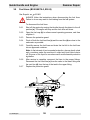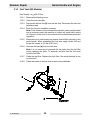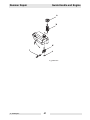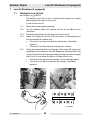
1
www.wackergroup.com 0114549 009 1107 en Vibratory Rammers BS 50 / BS 60 / BS 70 BS 500 / BS 600 / BS 700 BS 65 / BS 650 DS 70 / DS 720 REPAIR MANUAL 0 1 1 4 5 4 9 Rammer Repair Foreword This manual covers machines with Item Number: BS 50-4 0009386, 0009415, 0620108, 0620071, 0620077, 0620078 BS 50-2 0009380, 0009382, 0009384, 0009410, 0009411, 0009413, 0620025, 0620048 BS 50-2i 0009332, 0009338, 0009383, 0009412, 0009414, 0009416, 0009473, 0620026 BS 500 0007550, 0008048, 0008049, 0008204, 0009074, 0009075 BS 500-4 0009329 BS 500-oi 0009165, 0009343 BS 500S 0009211 BS 60-4 0009340, 0009422, 0620000, 0620051, 0620109, 0620110, 0620072, 0620073, 0620074 BS 60-2 0009388, 0009391, 0009417, 0009418, 0009421 BS 60-2i 0009339, 0009393, 0009419, 0009420 BS 600 0007551, 0008205, 0008207, 0009076, 0009077, 0009307 BS 600-4 0009331 BS 600-oi 0009166, 0009262 BS 600S 0009212 BS 70-2 0009397, 0009399, 0009424, 0009425, 0009427 BS 70-2i 0009341, 0009401, 0009426, 0009428 BS 700 0007552, 0008051, 0008052, 0008206, 0009078, 0009079, 0009308 BS 700-oi 0009167, 0009328 BS 65 0009396, 0009423 BS 650 0008209 DS 70 0009342, 0009402, 0009403, 0620049, 0620050, 0620052, 0620053, 0620054 DS 720 0008200, 0008203, 0009309 wc_tx000360gb.fm 3 Foreword Rammer Repair Operating / Parts Information You must be familiar with the operation of this machine before you attempt to troubleshoot or make any repairs to it. Basic operating and maintenance procedures are described in the operator’s / parts manual supplied with the machine. The operator’s / parts manual should be kept with the machine. Use it to order replacement parts when needed. If this manual becomes lost, please contact Wacker Corporation to order a replacement. Damage caused by misuse or neglect of the unit should be brought to the attention of the operator, to prevent similar occurrences from happening in the future. This manual provides information and procedures to safely repair and maintain the above Wacker model(s). For your own safety and protection from injury, carefully read, understand, and observe all instructions described in this manual. THE INFORMATION CONTAINED IN THIS MANUAL IS BASED ON MACHINES MANUFACTURED UP TO THE TIME OF PUBLICATION. WACKER CORPORATION RESERVES THE RIGHT TO CHANGE ANY PORTION OF THIS INFORMATION WITHOUT NOTICE. WARNING CALIFORNIA Proposition 65 Warning: Engine exhaust, some of its constituents, and certain vehicle components, contain or emit chemicals known to the State of California to cause cancer and birth defects or other reproductive harm. All rights, especially copying and distribution rights, are reserved. Copyright 2007 by Wacker Corporation No part of this publication may be reproduced in any form or by any means, electronic or mechanical, including photocopying, without express written permission from Wacker Corporation. Any type of reproduction or distribution not authorized by Wacker Corporation represents an infringement of valid copyrights, and violators will be prosecuted. We expressly reserve the right to make technical modifications, even without due notice, which aim at improving our machines or their safety standards. wc_tx000360gb.fm 4 Rammer Repair 1. Safety Information 1.1 1.2 1.3 1.4 2. 8 Operating Safety .................................................................................. 9 Operator Safety while using Internal Combustion Engines ................ 11 Service Safety .................................................................................... 12 Service and Repair Safety .................................................................. 13 General 2.1 2.2 2.3 2.4 2.5 2.6 2.7 2.8 2.9 2.10 2.11 2.12 2.13 2.14 2.15 2.16 2.17 2.18 2.19 3. Table of Contents 14 Description ......................................................................................... 14 Power Transmission ........................................................................... 14 Spring System .................................................................................... 14 Bellows ............................................................................................... 15 Lubricating System ............................................................................. 15 Threadlocking Compounds ................................................................ 15 Torque Values .................................................................................... 15 Recommended Special Tools ............................................................ 16 Recommended Repair Tools .............................................................. 17 Periodic Maintenance Schedule (BS 50/60/70-2, BS 65) ................... 18 Periodic Maintenance Schedule (BS 500/600/700/650) ..................... 19 Periodic Maintenance Schedule (BS 50/60/70-2i) .............................. 20 Periodic Maintenance Schedule (BS 500/600/700-oi) ........................ 21 Periodic Maintenance Schedule (DS 70) ........................................... 22 Periodic Maintenance Schedule (DS 720) ......................................... 23 Transporting the Rammer (BS Models) .............................................. 24 Transporting the Rammer (DS Models) ............................................. 25 Long-Term Storage (BS Models) ....................................................... 26 Long-Term Storage (DS Models) ....................................................... 26 Guide Handle and Engine 3.1 3.2 3.3 3.4 3.5 3.6 3.7 3.8 28 Air Cleaner (BS 500/600/700/650, DS720) ........................................ 28 Air Cleaner (BS 50/60/70-2, BS 65, DS 70) ....................................... 30 Air Cleaner (BS 50/60-4) .................................................................... 31 Silencing Cover .................................................................................. 32 Guide Handle ..................................................................................... 33 Shock Mounts ..................................................................................... 34 Throttle Control ................................................................................... 35 Tillotson Carburetor (BS 500/600/700/650 only) ................................ 36 wc_br0114549en_008TOC.fm 5 Table of Contents 3.9 3.10 3.11 3.12 3.13 3.14 3.15 3.16 3.17 3.18 3.19 3.20 3.21 3.22 3.23 3.24 4. Fuel Lines (BS 50/60/70-2, BS 65) ......................................................38 Fuel Tank (BS Models) ........................................................................39 Fuel Tank (DS Models) .......................................................................40 Fuel Tank Cap .....................................................................................42 Muffler (BS Models) .............................................................................44 Engine Cooling Fins ............................................................................45 Muffler (DS Models) ............................................................................46 Removing WM 80 Engine From BS Model Rammers .........................48 Removing WM 90 Engine From BS Model Rammers .........................50 Engine (DS Models) ............................................................................52 Clutch (BS Models) .............................................................................54 Clutch (DS 720 only) ...........................................................................56 Clutch (DS 70 only) .............................................................................58 Engine Oil (DS 720 Only) ....................................................................60 Engine Oil (DS 70 only) .......................................................................62 Engine Oil (BS 50/60-4 only) ...............................................................63 Ramming System 4.1 4.2 4.3 4.4 4.5 4.6 4.7 4.8 5. Rammer Repair 64 Bellows ................................................................................................64 Ramming Shoe ....................................................................................67 Spring System Cover Removal and Installation ..................................68 Spring System .....................................................................................74 Inspecting the Spring System ..............................................................76 Protective Pipe ....................................................................................77 Ramming System Lubrication (BS 500/600/700/650, DS 720) ...........78 Ramming System Lubrication (BS 50/60/70, BS 65, DS 70) ..............79 Crankcase 5.1 5.2 5.3 82 Crank Gear and Connecting Rod ........................................................82 Crank Gear, Connecting Rod, and Adjuster Assembly (BS 650/65 only) ..................................................................................85 Clutch Drum ........................................................................................88 wc_br0114549en_008TOC.fm 6 Rammer Repair 6. Oil Injection (if equipped) 6.1 6.2 6.3 7. Float Switch Testing and Replacement .............................................. 90 Oil Line Check Valve .......................................................................... 92 Oil Pump / Cartridge Assembly .......................................................... 94 96 Engine Hard to Start ........................................................................... 96 Engine Does Not Start ........................................................................ 97 Engine Does Not Accelerate or Runs Poorly ..................................... 97 Engine Overheats ............................................................................... 98 Rammer Does Not Tamp ................................................................... 98 Rammer Jumps Erratically ................................................................. 99 Technical Data 9.1 9.2 9.3 9.4 9.5 9.6 9.7 9.8 9.9 9.10 9.11 9.12 9.13 9.14 9.15 9.16 9.17 95 Testing the Low Oil Unit ..................................................................... 95 Troubleshooting 8.1 8.2 8.3 8.4 8.5 8.6 9. 90 Low Oil Shutdown (if equipped) 7.1 8. Table of Contents 100 BS 50-2 ............................................................................................ 100 BS 50-4 ............................................................................................ 101 BS 500 .............................................................................................. 102 BS 500S ........................................................................................... 103 BS 50-2i ............................................................................................ 104 BS 500-oi .......................................................................................... 105 BS 60/70-2 ....................................................................................... 106 BS 60-4 ............................................................................................ 107 BS 600/700 ....................................................................................... 108 BS 600S ........................................................................................... 109 BS 60/70-2i ....................................................................................... 110 BS 600/700-oi ................................................................................... 111 BS 600/700 High Altitude ................................................................. 112 BS 65-V ............................................................................................ 113 BS 650 .............................................................................................. 114 DS 70 ............................................................................................... 116 DS 720 ............................................................................................. 118 wc_br0114549en_008TOC.fm 7 Safety Information 1. Rammer Repair Safety Information This manual contains DANGER, WARNING, CAUTION, NOTICE and NOTE callouts which must be followed to reduce the possibility of personal injury, damage to the equipment, or improper service. This is the safety alert symbol. It is used to alert you to potential personal injury hazards. Obey all safety messages that follow this symbol to avoid possible injury or death. DANGER indicates a hazardous situation which, if not avoided, will result in death or serious injury. DANGER WARNING indicates a hazardous situation which, if not avoided, could result in death or serious injury. WARNING CAUTION indicates a hazardous situation which, if not avoided, could result in minor or moderate injury. CAUTION NOTICE: Used without the safety alert symbol, NOTICE indicates a hazardous situation which, if not avoided, could result in property damage. Note: Contains additional information important to a procedure. wc_si000112gb.fm 8 Rammer Repair 1.1 Operating Safety WARNING wc_si000112gb.fm Safety Information Familiarity and proper training are required for the safe operation of the machine. Machines operated improperly or by untrained personnel can be dangerous. Read the operating instructions contained in both this manual and the Engine Manual and familiarize yourself with the location and proper use of all controls. Inexperienced operators should receive instruction from someone familiar with the machine before being allowed to operate it. 1.1.1 NEVER operate this machine in applications for which it is not intended. 1.1.2 NEVER allow anyone to operate this equipment without proper training. People operating this equipment must be familiar with the risks and hazards associated with it. 1.1.3 NEVER touch the engine or muffler while the engine is on or immediately after it has been turned off. These areas get hot and may cause burns. 1.1.4 NEVER use accessories or attachments that are not recommended by Wacker. Damage to equipment and injury to the user may result. 1.1.5 NEVER leave the machine running unattended. 1.1.6 NEVER tamper with or disable the function of operating controls. 1.1.7 NEVER use choke to stop engine. 1.1.8 NEVER operate the machine in areas where explosions may occur. 1.1.9 NEVER operate the rammer with the stroke adjusting cover open. The locking lever rotates rapidly and could catch on skin or clothing, causing injury. 1.1.10 ALWAYS read, understand, and follow procedures in the Operator’s Manual before attempting to operate the machine. 1.1.11 ALWAYS be sure that all other persons are at a safe distance from the machine. Stop the machine if people step into the working area of the machine. 1.1.12 ALWAYS be sure operator is familiar with proper safety precautions and operation techniques before using machine. 1.1.13 ALWAYS wear protective clothing appropriate to the job site when operating the machine. 1.1.14 ALWAYS wear hearing protection when operating equipment. 1.1.15 ALWAYS keep hands, feet, and loose clothing away from moving parts of the machine. 1.1.16 ALWAYS use common sense and caution when operating the machine. 9 Safety Information Rammer Repair 1.1.17 ALWAYS be sure the rammer will not tip over, roll, slide, or fall when not being operated. 1.1.18 ALWAYS turn the engine OFF when the rammer is not being operated. 1.1.19 ALWAYS guide the rammer in such a way that the operator is not squeezed between the rammer and solid objects. Special care is required when working on uneven ground or when compacting coarse material. Make sure to stand firmly when operating the machine under such conditions. 1.1.20 ALWAYS operate the rammer in such a way that there is no danger of it turning over or falling in, when working near the edges of breaks, pits, slopes, trenches and platforms. 1.1.21 ALWAYS store the machine properly when it is not being used. The machine should be stored in a clean, dry location out of the reach of children. 1.1.22 ALWAYS close fuel valve on engines equipped with one when machine is not being operated. 1.1.23 ALWAYS operate machine with all safety devices and guards in place and in working order. DO NOT modify or defeat safety devices. DO NOT operate machine if any safety devices or guards are missing or inoperative. wc_si000112gb.fm 10 Rammer Repair 1.2 Operator Safety while using Internal Combustion Engines DANGER wc_si000112gb.fm Safety Information Internal combustion engines present special hazards during operation and fueling. Read and follow the warning instructions in the engine Owner’s Manual and the safety guidelines below. Failure to follow the warnings and safety standards could result in severe injury or death. 1.2.1 DO NOT smoke while operating the machine. 1.2.2 DO NOT smoke when refueling the engine. 1.2.3 DO NOT refuel a hot or running engine. 1.2.4 DO NOT refuel the engine near an open flame. 1.2.5 DO NOT spill fuel when refueling the engine. 1.2.6 DO NOT run the engine near open flames. 1.2.7 DO NOT run the machine indoors or in an enclosed area such as a deep trench unless adequate ventilation, through such items as exhaust fans or hoses, is provided. Exhaust gas from the engine contains poisonous carbon monoxide gas; exposure to carbon monoxide can cause loss of consciousness and may lead to death. 1.2.8 ALWAYS refill the fuel tank in a well-ventilated area. 1.2.9 ALWAYS replace the fuel tank cap after refueling. 1.2.10 ALWAYS check the fuel lines and the fuel tank for leaks and cracks before starting the engine. Do not run the machine if fuel leaks are present or the fuel lines are loose. 11 Safety Information 1.3 Rammer Repair Service Safety WARNING A poorly maintained machine can become a safety hazard! In order for the machine to operate safely and properly over a long period of time, periodic maintenance and occasional repairs are necessary. 1.3.1 DO NOT attempt to clean or service the machine while it is running. Rotating parts can cause severe injury. 1.3.2 DO NOT operate the machine without an air cleaner. 1.3.3 DO NOT remove air cleaner cover, paper element, or precleaner while engine is running. 1.3.4 DO NOT alter engine speeds. Run the engine only at speeds specified in the Technical Data Section. 1.3.5 DO NOT crank a flooded engine with the spark plug removed on gasoline-powered engines. Fuel trapped in the cylinder will squirt out the spark plug opening. 1.3.6 DO NOT test for spark on gasoline-powered engines if the engine is flooded or the smell of gasoline is present. A stray spark could ignite the fumes. 1.3.7 DO NOT use gasoline or other types of fuels or flammable solvents to clean parts, especially in enclosed areas. Fumes from fuels and solvents can become explosive. 1.3.8 ALWAYS replace the safety devices and guards after repairs and maintenance. 1.3.9 ALWAYS keep the area around the muffler free of debris such as leaves, paper, cartons, etc. A hot muffler could ignite the debris and start a fire. 1.3.10 ALWAYS do periodic maintenance as recommended in the Operator’s Manual. 1.3.11 ALWAYS clean debris from engine cooling fins. 1.3.12 ALWAYS replace worn or damaged components with spare parts designed and recommended by Wacker Corporation. 1.3.13 ALWAYS disconnect the spark plug on machines equipped with gasoline engines, before servicing, to avoid accidental start-up. 1.3.14 ALWAYS keep the machine clean and labels legible. Replace all missing and hard-to-read labels. Labels provide important operating instructions and warn of dangers and hazards. 1.3.15 ALWAYS follow instructions when disconnecting fuel lines. Failure to do so may result in fuel squirting from fuel system. wc_si000112gb.fm 12 Rammer Repair 1.4 Safety Information Service and Repair Safety The service procedures contained in this manual are intended for use by an individual equipped with the proper tools and equipment and familiar with safe shop practices. Should questions arise during the service or repair of this equipment please contact WACKER for assistance! WACKER Corporation maintains a staff of trained service specialists to answer your questions and to provide assistance and training. DANGER DO NOT remove bottom spring cover without first reading disassembly procedures or receiving instruction from someone familiar with its safe removal! The spring cover is under heavy spring pressure and could cause a serious injury if the proper disassembly procedures are not followed. DO NOT run the engine while it is off the machine without first removing the clutch! Centrifugal force will cause the clutch shoes to separate and fly off the engine crankshaft with considerable force. wc_si000112gb.fm 13 General 2. Rammer Repair General 2.1 Description Rammers are designed to compact loose soils and gravel to prevent settling and to provide a firm, solid base for the placement of footings, concrete slabs, foundations, and other structures. 2.2 Power Transmission BS 50, BS 60, BS70, BS 65, BS 500, BS 600, BS 700, and BS 650 Rammers are powered by the WACKER WM80 engine. The BS 50-4 and BS 60-4 Rammers are powered by the WACKER WM90 engine. These gasoline engines are specifically designed for use on WACKER Rammers. The DS 720 and DS 70 Rammers are powered by a Yanmar diesel engine, making it suitable for use in potentially explosive environments. The engine crankshaft turns a centrifugal clutch that allows the engine to be disengaged from the ramming system during engine start-up and idling. The engine drives the ramming system through a set of reduction gears and a connecting rod. The reduction gears and connecting rod convert the engine’s circular motion (4250-4450 rpm) to the vertical stroking motion (600-750 blows per minute) of the ramming system. The gear reduction increases the available power to drive the ramming system through each stroke. The connecting rod attached to the crank gear converts the circular rotation of the gears to the up and down stroking motion of the rammer. 2.3 Spring System The spring system consists of a piston between two spring sets. The piston is connected to the ram that is driven by the connecting rod attached to the crank gear. Plastic bushings on either side of the piston prevent the springs from bottoming out. The piston and spring sets are housed in the spring cylinder that slides up and down inside the guide cylinder. The spring system has two functions. The spring system’s first function is to store energy created by the engine and release it to the shoe during its downward stroke. The spring system’s second function is to isolate the shock that is created when the ramming shoe hits and prevent it from being transmitted back to the rammer. wc_tx000284gb.fm 14 Rammer Repair 2.4 General Bellows The bellows provides a flexible joint between the ramming system and the upper machinery. It seals out dust and dirt and provides a clean path for recirculating oil. 2.5 Lubricating System The rammers use a sealed-oil-bath lubricating system. Oil is distributed to the gears, the bearings, the springs, and the other moving parts by the up and down action of the ramming system. The ramming system carries the oil into the crankcase through holes drilled in the spring system piston and the spring cylinder. 2.6 Threadlocking Compounds Due to the heavy vibration inherent in this type of equipment, the repair and service procedures described in this manual specify the use of threadlocking compounds. These compounds should be used where indicated to prevent the fasteners from becoming loose. Although Loctite® is referred to throughout this manual, any equivalent type of sealant such as Hernon, Prolock, or Omnifit may be used. Clean the screw threads and wipe off any oil or grease before applying a threadlocking compound. For a complete list of recommended sealing and locking compounds, refer to the Use of Threadlockers and Sealants chart at the end of this Repair Manual. 2.7 Torque Values The torque values for the referenced fasteners are detailed in the repair procedures. For a complete list of the recommended torque values, refer to the Torque Values chart at the end of this Repair Manual or in the Rammer Parts Book. wc_tx000284gb.fm 15 General 2.8 Rammer Repair Recommended Special Tools See Graphic: wc_gr001305rm 0081423 P/N 0081423 Spring box tool P/N 0117972 Clutch puller P/N 0153566 Clutch puller (DS 70 only) P/N 0116816 Impact bushing puller 0153566 0117972 0116816 wc_gr001305rm wc_tx000284gb.fm 16 Rammer Repair 2.9 General Recommended Repair Tools Hex key or socket: 4 mm, 5 mm, 6 mm, 8 mm Ratchet wrench Extension Sockets: 10 mm, 13 mm, 17 mm, 19 mm (3/4”), 24 mm, 27 mm (1-1/16”), 32 mm, 38 mm (1-1/2”) Open-end wrench: 13 mm Screwdriver Needle-nose pliers Large-diameter retaining-ring pliers Rubber mallet Punch Bearing puller Slide hammer Drift pin Impact wrench Torque wrench (up to 210 Nm [155 ft.lbs.]) Loctite 243 Shell Alvania RL 2 (No. 2) grease Hydraulic press Two threaded rods M8 x 120 mm and nuts Split puller Source of compressed air wc_tx000284gb.fm 17 General Rammer Repair 2.10 Periodic Maintenance Schedule (BS 50/60/70-2, BS 65) After first 5 hours Every week or 25 hours Tighten ramming shoe hardware. Check engine cylinder screws. Check external hardware. Daily before starting Check fuel level. Check air filter indicator. Replace as needed. Check ramming system oil level in sightglass. Check fuel line and fittings for cracks or leaks. Replace as needed. Clean engine cooling fins. Clean and check spark plug gap. Replace spark plug. Every month or 100 hours Every 3 months or 300 hours Clean recoil starter. Change ramming system oil.* Clean engine muffler and exhaust port. Inspect crane lifting cable for wear, damage, or abuse. Inspect fuel filter. * Change ramming system oil after first 50 hours of operation. Note: If engine performance is poor, check, clean, and replace air filter elements as needed. wc_tx000284gb.fm Every Year 18 Rammer Repair General 2.11 Periodic Maintenance Schedule (BS 500/600/700/650) After first 5 hours Every week or 25 hours Tighten ramming shoe hardware. Check external hardware. Daily before starting Check fuel level. Check engine oil level. Inspect air filter. Replace as needed. Check oil level in sightglass. Check fuel line and fittings for cracks or leaks. Replace as needed. Clean engine cooling fins. Clean and check spark plug gap. Every month or 100 hours Change engine oil. Replace spark plug. Every 3 months or 300 hours Clean recoil starter. Change ramming system oil.* Inspect crane lifting cable for wear, damage, or abuse. Inspect fuel filter. * Change ramming system oil after first 50 hours of operation. Note: If engine performance is poor, check, clean, and replace air filter elements as needed. wc_tx000284gb.fm Every Year 19 General Rammer Repair 2.12 Periodic Maintenance Schedule (BS 50/60/70-2i) After first 5 hours Every week or 25 hours Tighten ramming shoe hardware. Check engine cylinder screws. Check external hardware. Daily before starting Check fuel level. Check engine oil level. Check air filter indicator. Replace as needed. Check ramming system oil level in sightglass. Check fuel line and fittings for cracks or leaks. Replace as needed. Clean engine cooling fins. Clean and check spark plug gap. Replace spark plug. Every month or 100 hours Every 3 months or 300 hours Clean recoil starter. Change ramming system oil.* Clean engine muffler and exhaust port. Inspect crane lifting cable for wear, damage, or abuse. Inspect fuel filter. * Change ramming system oil after first 50 hours of operation. Note: If engine performance is poor, check, clean, and replace air filter elements as needed. wc_tx000284gb.fm Every Year 20 Rammer Repair General 2.13 Periodic Maintenance Schedule (BS 500/600/700-oi) After first 5 hours Every week or 25 hours Tighten ramming shoe hardware. Check engine cylinder screws. Check external hardware. Daily before starting Check fuel level. Inspect air filter. Replace as needed. Check engine oil level. Check ramming system oil level in sightglass. Check fuel line and fittings for cracks or leaks. Clean engine cooling fins. Clean and check spark plug gap. Replace spark plug. Every month or 100 hours Every 3 months or 300 hours Clean recoil starter. Change ramming system oil.* Clean engine muffler and exhaust port. Inspect crane lifting cable for wear, damage, or abuse. Inspect fuel filter. Inspect oil filter. * Change ramming system oil after first 50 hours of operation. Note: If engine performance is poor, check, clean, and replace air filter elements as needed. wc_tx000284gb.fm Every Year 21 General Rammer Repair 2.14 Periodic Maintenance Schedule (DS 70) After first 5 hours Every week or 25 hours Tighten ramming shoe hardware. Check external hardware. Daily before starting Check fuel level. Check engine oil level. Check air filter indicator. Replace as needed. Check rammer oil level in sightglass. Check fuel line, cap and fittings for cracks or leaks. Replace as needed. Check bellows for damage and fit. Clean engine cooling fins. Every month or 100 hours Every 3 months or 300 hours Every 5 months or 500 hours Change engine oil.* Clean engine oil filter.* Clean recoil starter. Change ramming system oil.* Inspect crane lifting cable for wear, damage, or abuse. Check and adjust valve clearance. ** Replace engine oil filter. Check fuel filter, clean or replace. * Perform initially after first 50 hours of operation. Note: If engine performance is poor, check, clean, and replace air filter elements as needed. ** Perform initially after first 25 hours of operation. wc_tx000284gb.fm 22 Rammer Repair General 2.15 Periodic Maintenance Schedule (DS 720) After first 5 hours Every week or 25 hours Tighten ramming shoe hardware. Check external hardware. Clean engine cooling fins. Daily before starting Check fuel level. Check engine oil level. Check rammer oil level in sightglass. Check fuel line, cap and fittings for cracks or leaks. Check bellows for damage and fit. Change engine oil.* Every month or 100 hours Every 3 months or 300 hours Every 5 months or 500 hours Clean engine oil filter.* Clean recoil starter. Change ramming system oil.* Inspect crane lifting cable for wear, damage, or abuse. Check and adjust valve clearance.** Replace engine oil filter. Check fuel filter, clean or replace. * Perform initially after first 50 hours of operation. ** Perform initially after first 25 hours of operation. Note: If engine performance is poor, check, clean, and replace air filter elements as needed. wc_tx000284gb.fm 23 General Rammer Repair 2.16 Transporting the Rammer (BS Models) See Graphic: wc_gr000050 2.16.1 Always shut off the engine and close the fuel valve when transporting the rammer. 2.16.2 Make sure lifting devices have enough capacity to lift the rammer. See identification plate on rammer for weight. WARNING Always inspect the lifting device for wear, damage, or abuse before lifting the rammer. Do not use damaged or defective lifting devices. Repair or replace damaged lifting devices before lifting the rammer. 2.16.3 Use the central lifting point (a) when lifting the rammer. 2.16.4 Wacker Corporation recommends transporting rammers upright whenever possible. A rammer should never be allowed to fall over. Tie down the rammer to the transport vehicle to prevent it from tipping, falling, or rolling. 2.16.5 If the rammer cannot be secured in the upright position, lay the rammer down only as shown. Check for fuel leakage from the cap (c). Drain the fuel tank as required to prevent fuel leaking from the cap. CAUTION 2.16.6 Tie the rammer to the transport vehicle at points (a) and (b). wc_tx000284gb.fm 24 Rammer Repair General 2.17 Transporting the Rammer (DS Models) See Graphic: wc_gr000063 2.17.1 Always shut off the engine and close the fuel valve when transporting the rammer. 2.17.2 Make sure lifting devices have enough capacity to lift the rammer. See identification plate on rammer for weight. WARNING Always inspect the lifting device for wear, damage, or abuse before lifting the rammer. Do not use damaged or defective lifting devices. Repair or replace damaged lifting devices before lifting the rammer. 2.17.3 Use the central lifting point (a) when lifting the rammer. 2.17.4 Wacker Corporation recommends transporting rammers upright whenever possible. A rammer should never be allowed to fall over. Tie down the rammer to the transport vehicle to prevent it from tipping, falling, or rolling. 2.17.5 If the rammer cannot be secured in the upright position, lay the rammer down only as shown. Check for fuel leakage from the cap (c). Drain the fuel tank as required to prevent fuel leaking from the cap. CAUTION 2.17.6 Tie the rammer to the transport vehicle at points (a) and (b). NOTICE: After transporting the rammer horizontally, upright the rammer and allow the oil to drain back through the engine. It may take up to 45 minutes for the oil level to recover. Failure to do so may result in engine damage. c a b a wc_gr000063 wc_tx000284gb.fm 25 General Rammer Repair 2.18 Long-Term Storage (BS Models) 2.18.1 Drain the fuel from the tank. 2.18.2 Start the engine and run it until remaining fuel is used. 2.18.3 Remove the spark plug. Pour approximately 30 ml (1 oz.) of clean SAE 10W30 engine oil into the cylinder through the spark plug opening. 2.18.4 Pull the starter rope slowly to distribute oil in the engine. 2.18.5 Re-install the spark plug. 2.19 Long-Term Storage (DS Models) 2.19.1 Drain the fuel from the fuel tank. 2.19.2 Start the engine and run it until remaining fuel is used. 2.19.3 Cover the rammer and store in a clean, dry location. wc_tx000284gb.fm 26 Rammer Repair General Notes wc_tx000284gb.fm 27 Guide Handle and Engine 3. Rammer Repair Guide Handle and Engine 3.1 Air Cleaner (BS 500/600/700/650, DS720) See Graphic: wc_gr001307rm The rammer is equipped with a dual element air cleaner. Under normal operating conditions the elements will not require scheduled cleaning and should not be removed from the rammer. If the elements do become plugged with dirt, the engine will begin to lose power. If this occurs, the air cleaner elements can be removed and cleaned using the following procedure. Replace an element if it becomes so plugged with dirt that it can no longer be cleaned. NOTICE: NEVER run the engine without the air cleaner. Severe engine damage will occur. NEVER use gasoline or other types of low flash point solvents for cleaning the air cleaner. A fire or explosion could result. WARNING 3.1.1 Remove the air cleaner cover (a) by turning the handle counterclockwise until the cover becomes loose and can be lifted out of the mount. 3.1.2 Remove the precleaner (c) and the paper element (b) and inspect them for holes or tears. Replace the precleaner and the paper element if they are damaged. 3.1.3 Tap the paper element lightly to remove excess dirt. Replace the paper element if it appears heavily soiled. 3.1.4 Clean the precleaner with low-pressure compressed air. When heavily soiled, wash the precleaner in a solution of mild detergent and warm water. Rinse the precleaner thoroughly in clean water and allow it to dry before reinstalling. Note: Do not oil the precleaner. 3.1.5 Wipe out the filter housing (e) with a clean rag. NOTICE: Do not allow dirt to get into the engine intake port while cleaning. Damage to the engine will result. wc_tx000285gb.fm 28 Rammer Repair wc_tx000285gb.fm Guide Handle and Engine 29 Guide Handle and Engine 3.2 Rammer Repair Air Cleaner (BS 50/60/70-2, BS 65, DS 70) See Graphic: wc_gr001168 NEVER use gasoline or other types of low flash point solvents for cleaning the air filter. A fire or explosion could result. WARNING NOTICE: NEVER run engine without main paper filter element (b). Severe engine damage will occur. Filter Indicator The air intake system is equipped with a filter indicator (h), which indicates when a filter change is required. Replace the main paper filter element (b) when the yellow plunger of the indicator appears in or near the red line. Push and hold in the yellow plunger on top of the indicator to reset it after replacing the main paper filter element. Clean elements using the following procedure: 3.2.1 Remove the air cleaner cover (a). Remove the main paper filter element (b) and the secondary prefilter (c) and inspect them for holes or tears. Replace the elements if they are damaged. 3.2.2 Main paper filter element (b): Replace the main paper filter element if it appears heavily soiled and/or when the yellow plunger of indicator appears in or near the red line. 3.2.3 Prefilter (c): Clean it with low-pressure compressed air. When the prefilter is very soiled, wash it in a solution of mild detergent and warm water. Rinse it thoroughly in clean water. Allow the prefilter to dry thoroughly before reinstalling it. Note: Do not oil the prefilter. 3.2.4 Wipe out the filter housing (d) with a clean cloth. Do not use compressed air. NOTICE: Do not allow dirt to get into the engine intake port (k) while cleaning. Damage to engine will result. 3.2.5 Check that the precleaner debris ejector slot (i) is clear. a b c i d h k wc_tx000285gb.fm wc_gr001168 30 Rammer Repair 3.3 Guide Handle and Engine Air Cleaner (BS 50/60-4) See Graphic: wc_gr001306 NEVER use gasoline or other types of low flash point solvents for cleaning the air filter. A fire or explosion could result. WARNING NOTICE: NEVER run the engine without the main paper air filter (b). Severe engine damage will occur. Clean elements using the following procedure: 3.3.1 Remove the air cleaner cover (a). Remove the main paper filter element (b) and secondary prefilter (c) and inspect them for holes or tears. Replace the elements if they are damaged. 3.3.2 Main paper filter element (b): Replace the main paper filter element if it appears heavily soiled. 3.3.3 Prefilter (c): Clean the prefilter with low-pressure compressed air. When very soiled, wash the prefilter in a solution of mild detergent and warm water. Rinse it thoroughly in clean water. Allow the prefilter to dry thoroughly before reinstalling. Note: Do not oil the prefilter. 3.3.4 Wipe out the filter housing (d) with a clean cloth. Do not use compressed air. NOTICE: Do not allow dirt to get into the engine intake port (k) while cleaning. Damage to engine will result. 3.3.5 Check that the precleaner debris ejector slot (i) is clear. a b c i d k wc_tx000285gb.fm wc_gr001306 31 Guide Handle and Engine 3.4 Rammer Repair Silencing Cover See Graphic: wc_gr001309rm Recommended Tools Ratchet Wrench Torque Wrench Hex Key or Hex Socket: 5 mm Loctite 243 (Blue) Remove the four socket head cap screws (b) that hold the silencing cover (a) to the guide handle (c). When reinstalling the silencing cover, apply Loctite 243 and torque the screws to 9.4 Nm (6.9 ft.lbs.). a b c d e w c wc_tx000285gb.fm 32 g r0 0 1 3 0 9 rm Rammer Repair 3.5 Guide Handle and Engine Guide Handle See Graphic: wc_gr003704 Recommended Tools Ratchet Wrench Socket: 10 mm Screwdriver Pliers Loctite 243 (Blue) 3.5.1 Close the fuel valve. 3.5.2 Disconnect the fuel line. 3.5.3 Loosen the throttle cable holder. 3.5.4 Disconnect the throttle cable from the throttle cam lever. 3.5.5 Remove the silencing cover. 3.5.6 Remove the four hex head cap screws (d) that hold the guide handle to the shock mounts (e). When reinstalling the guide handle, apply Loctite 243 and torque the screws to 23 Nm (17 ft.lbs.). 3.5.7 Move the guide handle down and away from the shock mounts. 3.5.8 Lift the guide handle from the rammer. Note: To inspect or change the shock mounts, it is not necessary to disconnect the fuel line or the throttle cable. a a b wc_gr003704 wc_tx000285gb.fm 33 Guide Handle and Engine 3.6 Rammer Repair Shock Mounts See Graphic: wc_gr003705 Recommended Tools Ratchet Wrench Torque Wrench Loctite 243 (blue) 3.6.1 Remove the silencing cover, the air cleaner, and the guide handle. 3.6.2 Inspect the shock mounts (a) and make sure that they are securely mounted to the crankcase. Replace the shock mounts if they are torn or damaged. 3.6.3 Remove the four socket head cap screws (b) that hold the shock mounts to the crankcase. On Rammers with guards, remove the guards (c) from the crankcase. Then, remove the screws that hold the shock mounts to the guard. When reinstalling the shock mounts, apply Loctite 243 or an equivalent to the screws and torque them to 34 Nm (25 ft.lbs.). Note: Replace the shock mounts as a set. Check the shock mount screws after the first five hours of operation and tighten them if necessary. a b c a b c a b wc_gr003705 wc_tx000285gb.fm 34 Rammer Repair 3.7 Guide Handle and Engine Throttle Control See Graphic: wc_gr003876 3.7.1 Adjust the nut (a) on the throttle control lever (b) so that the lever moves freely but still holds its position while the rammer is operating. The recommended torque value is 2.9 Nm (2.1 ft.lbs.). To adjust the throttle cable: 3.7.2 Place the throttle lever in the STOP position (c). 3.7.3 Loosen the clamp screws (d). 3.7.4 Slide the throttle cable (e) through the clamp until there is slack (f) in the throttle cable and the stop lever activates the stop button (g). 3.7.5 Tighten the clamp screws. 3.7.6 Place the throttle control in the IDLE position (h). 3.7.7 Check that the stop button is not activated. There should be a gap (i) between the stop lever and the stop button. 3.7.8 Adjust the cable at the clamp as necessary so that the engine stops when the throttle control is in the STOP position and idles when the throttle control is in the IDLE position. b a c h e d f g i wc_gr003876 wc_tx000285gb.fm 35 Guide Handle and Engine 3.8 Rammer Repair Tillotson Carburetor (BS 500/600/700/650 only) See Graphic: wc_gr001308rm Recommended Tools Ratchet Wrench Torque Wrench Hex Key or Hex Socket: 4 mm, 6 mm Screwdriver Loctite 243 (blue) The Tillotson carburetor uses a fixed low and high speed fuel jet. The only adjustment is to set the engine idle speed. Refer to section Technical Data for the correct idle and operating rpm. For best accuracy, use a tachometer when making carburetor adjustments. NOTICE: The engine is lubricated by the fuel mixture; running the engine too lean could cause it to overheat. High Altitude Operation The WM 80 engine used in the rammers is designed to operate most efficiently at normal altitudes (1524 meters) (up to 5000 ft.). At high altitudes (1524 meters) (above 5000 ft.) minor modifications to the carburetor can be made to improve its performance. All modifications must be performed by an authorized WACKER dealer. Contact WACKER Corporation for more information. High altitude operations involve modifications to the engine air/fuel mixture. At normal altitudes, these modifications can be damaging to the engine components. When returning the rammer to normal altitude operation, remember to reset the carburetor to its standard specifications. Setting Idle Speed Adjustment 3.8.1 Start the engine and allow it to warm up to operating temperature. 3.8.2 Set the engine idle speed with the engine running at idle and the choke (a) fully open. Adjust the idle speed screw (b) in or out to obtain the correct idle speed. NOTICE: DO NOT turn the adjusting screw in too tightly or you may damage the carburetor. Removing the Carburetor 3.8.3 wc_tx000285gb.fm Remove the three socket head cap screws holding the carburetor guard to the engine. When reinstalling the carburetor guard, apply Loctite 243 and torque the screws to 23 Nm (17 ft. lbs.). 36 Rammer Repair Guide Handle and Engine 3.8.4 Close the fuel valve and disconnect the fuel line from the carburetor. See the section Fuel Lines for removal of fuel and vent lines for models BS 50/60/70/65. 3.8.5 Loosen the air duct clamps and remove the air duct. 3.8.6 Remove the two socket head cap screws (c) holding the carburetor to the engine. When reinstalling the carburetor, apply Loctite 243 and torque the screws to 5.4 Nm (4.0 ft.lbs.). Note: It is not necessary to disconnect the throttle cable to remove the carburetor. wc_tx000285gb.fm 37 Guide Handle and Engine 3.9 Rammer Repair Fuel Lines (BS 50/60/70-2, BS 65) See Graphic: wc_gr001493 ALWAYS follow the instructions when disconnecting the fuel lines. Failure to do so may result in fuel leaking from the fuel system. CAUTION To disconnect the fuel lines: 3.9.1 Shut off the engine by moving the throttle through the detent to the off position (a). The engine will stop and the fuel valve will close. 3.9.2 Open the fuel cap (b) to relieve normal operating pressure, and then retighten it. 3.9.3 Remove the protective guard. 3.9.4 Pinch off both the fuel feed line (c) and the vent line (d) as close to the carburetor as possible. 3.9.5 Carefully remove the fuel lines and drain the fuel left in the fuel lines into an approved container. Note: In the interests of environmental protection, place a plastic sheet and a container under the machine to collect any liquid which drains off. Dispose of this liquid in accordance with environmental protection legislation. wc_tx000285gb.fm 3.9.6 After service is complete, reconnect the lines to the proper fittings. Reconnect the fuel feed line (c) from the valve to the lower fitting and the vent line (d) from the top of the tank to the upper fitting. 3.9.7 Replace the protective guard. 38 Rammer Repair Guide Handle and Engine 3.10 Fuel Tank (BS Models) See Graphic: wc_gr001312rm 3.10.1 Remove the silencing cover. 3.10.2 Close the fuel valve (a). 3.10.3 Disconnect the fuel line (b) from the fuel tank. Disconnect the vent line (c) where used. 3.10.4 Drain the fuel into a suitable container. Note: In the interests of environmental protection, place a plastic sheet and a container under the machine to collect any liquid which drains off. Dispose of this liquid in accordance with environmental protection legislation. 3.10.5 Remove the four socket head cap screws that hold the fuel tank to the guide handle. When reinstalling the fuel tank, apply Loctite 243 and torque the screws to 9.4 Nm (6.9 ft. lbs.). 3.10.6 Unscrew the filter (d) from the fuel tank. Note: It is not necessary to separate the fuel valve from the fuel filter unless replacing the parts. To separate, pull and twist the fuel valve from the fuel filter. wc_tx000285gb.fm 3.10.7 Clean the fuel filter. Replace the fuel filter if the mesh element is torn or punctured. 3.10.8 Clean the inside of the fuel tank to remove any sediment. 39 Guide Handle and Engine Rammer Repair 3.11 Fuel Tank (DS Models) See Graphic: wc_gr001313rm 3.11.1 Remove the silencing cover. 3.11.2 Disconnect the fuel supply line (f) and fuel return line (c) from the fuel tank and drain the fuel into a suitable container. Note: In the interests of environmental protection, place a plastic sheet and a container under the machine to collect any liquid which drains off. Dispose of this liquid in accordance with environmental protection legislation. 3.11.3 Remove the M6 screw that holds the fuel tank to the guide handle. When reinstalling the fuel tank, apply Loctite 243 and torque the screw to 9.4 Nm (6.9 ft.lbs.). 3.11.4 To remove the fuel filter (b), unscrew the two nuts (e) holding the fuel supply valve (d) to the fuel tank. The fuel supply valve will come off. 3.11.5 Unscrew the cap (a) from the tank. 3.11.6 Carefully remove the fuel filter with needle-nose pliers. 3.11.7 Replace the fuel filter if the paper element is torn, punctured, or clogged. 3.11.8 Clean the inside of the fuel tank to remove any sediment. wc_tx000285gb.fm 40 Rammer Repair Guide Handle and Engine a b d c f e wc_gr001313rm wc_tx000285gb.fm 41 Guide Handle and Engine Rammer Repair 3.12 Fuel Tank Cap See Graphic: wc_gr004562 To disassemble and clean the fuel tank cap: 3.12.1 Grasp the fuel tank cap (a) in one hand and the baffle (b) in the other. 3.12.2 Pull and twist the baffle left and right to separate it from the fuel tank cap. 3.12.3 Remove the fuel tank gasket (c) from the baffle. 3.12.4 Remove the green umbrella valve (d). 3.12.5 Remove the two screws (e), the diaphragm retainer (f), and then the diaphragm itself (g). 3.12.6 Clean all parts with soapy water and rinse thoroughly. DO NOT use chemical solvents. To reassemble the fuel tank cap: 3.12.1 Insert the green umbrella valve (d) into the top side of the baffle (b). Press on the valve to seat it properly in the baffle. 3.12.2 Re-install the diaphragm (g) and attach the diaphragm retainer (f) with the two screws (e). Torque the screws to 0.28 Nm (2.5 in.lbs.), being careful not to strip them. 3.12.3 Re-install the fuel tank gasket (c) on the baffle. 3.12.4 Place the baffle assembly in the fuel tank cap (a). Use a screwdriver or similar blunt instrument to work the fuel tank gasket into the threads of the fuel tank cap until the baffle assembly snaps into place. wc_tx000285gb.fm 42 Rammer Repair Guide Handle and Engine a e f g d b c wc_gr004562 wc_tx000285gb.fm 43 Guide Handle and Engine Rammer Repair 3.13 Muffler (BS Models) See Graphic: wc_gr001314rm Recommended Tools Ratchet wrench Torque wrench Hex key: 5 mm Hex key or hex socket: 6 mm Socket: 19 mm (3/4”) Loctite 243 (blue) Carbon deposits can form in the muffler (d) and in the cylinder exhaust port. If allowed to accumulate, they will gradually restrict the exhaust passages, resulting in poor engine performance and hard starting. Factors contributing to this problem include: • Too much oil in the fuel mixture • Dirty air filter causing the engine to run rich • Excessive engine idling • Dirty carburetor 3.13.1 Remove the two hex head cap screws (a) holding the muffler guard (b) to the muffler (d). When reinstalling the muffler guard, apply Loctite 243 and torque the screws to 35 Nm (25 ft.lbs.). 3.13.2 Remove the two socket head cap screws (f) holding the muffler and the muffler guard to the engine cylinder. When reinstalling the muffler and the muffler guard, apply Loctite 243 and torque the screws to 23 Nm (17 ft.lbs.). 3.13.3 Remove the two socket head cap screws (c) located inside the muffler. 3.13.4 Remove the muffler. 3.13.5 Slowly pull the starter rope until the piston is at the top of its stroke and is covering the exhaust port. This prevents dirt from entering the engine cylinder. 3.13.6 Remove any carbon deposits on the engine exhaust port with a blunt scraper. 3.13.7 Replace the silencer gasket (e). 3.13.8 Soak the muffler in carburetor cleaner or a similar cleaning solution for several hours. 3.13.9 Drain the muffler and blow it dry. wc_tx000285gb.fm 44 Rammer Repair a Guide Handle and Engine a d b e c 35 Nm (25 ft.lbs.) 18 Nm (13 ft.lbs.) d e 18 Nm (13 ft.lbs.) f f 23 Nm (17 ft.lbs.) 23 Nm (17 ft.lbs.) wc_gr001314rm 3.14 Engine Cooling Fins Recommended Tools Screwdriver Compressed air The Wacker WM 80 engine is air cooled, so dirt accumulation between the cylinder ribs may cause the engine to overheat. Use a screwdriver to remove any dirt that is impacted between the cylinder ribs. Clean the entire area using compressed air. wc_tx000285gb.fm 45 Guide Handle and Engine Rammer Repair 3.15 Muffler (DS Models) See Graphic: wc_gr001315rm Recommended Tools Ratchet wrench Torque wrench Hex key: 5 mm Hex key or hex socket: 6 mm Socket: 19 mm (3/4”) Loctite 243 (blue) Carbon deposits can form in the muffler (a) and in the cylinder exhaust port. If allowed to accumulate, they will gradually restrict the exhaust passages resulting in poor engine performance and hard starting. Factors contributing to this problem include: • Dirty air filter causing the engine to run rich • Excessive engine idling 3.15.1 Remove the two nuts (b) and two screws (c) holding the muffler to the engine cylinder. When reinstalling the muffler, apply Loctite 243 and torque the screws to 23 Nm (17 ft.lbs.). 3.15.2 Remove the muffler. 3.15.3 Remove any carbon deposits on the engine exhaust port with a blunt scraper. 3.15.4 Replace the muffler gasket (d) P/N 0073660. 3.15.5 Soak the muffler in carburetor cleaner or a similar cleaning solution for several hours. 3.15.6 Drain the muffler and blow it dry. wc_tx000285gb.fm 46 Rammer Repair Guide Handle and Engine a c d b w c _ g r0 0 1 3 1 5 rm wc_tx000285gb.fm 47 Guide Handle and Engine Rammer Repair 3.16 Removing WM 80 Engine From BS Model Rammers See Graphic:wc_gr002935 Removal: 3.16.1 Stop the machine and allow it to cool. 3.16.2 Remove the carburetor. See section Removing Carburetor. 3.16.3 Remove the muffler guard (a) (if equipped) and the muffler (b). 3.16.4 Disconnect the connector (c) from the stop switch. 3.16.5 Remove the three socket head cap screws (d) that hold the engine to the crankcase. 3.16.6 Tilt the engine down and away to remove it from the crankcase. WARNING NOTICE: The rammer tips easily when the engine is removed. DO NOT run the engine while it is off the machine unless the clutch (e) has been removed. Running the engine with the clutch attached to the crankshaft will cause the clutch shoes to separate and fly off. Installation: 3.16.7 Position the engine onto the machine. Using Loctite 234 or equivalent on the three screws (d), secure the engine to the machine. Torque the screws to 27 Nm (20 ft.lbs.). 3.16.8 Reconnect the stop switch. 3.16.9 Install the muffler (b) and muffler guard (a). 3.16.10 Install the carburetor. See section Removing Carburetor. wc_tx000285gb.fm 48 Rammer Repair Guide Handle and Engine d b e a c d wc_gr002935 wc_tx000285gb.fm 49 Guide Handle and Engine Rammer Repair 3.17 Removing WM 90 Engine From BS Model Rammers See Graphic: wc_gr001954, wc_gr003661, wc_gr001956, and wc_gr001957 3.17.1 Disconnect the spark plug cap (a) from the spark plug. 3.17.2 Disconnect the fuel line (b) from the carburetor and plug the line. 3.17.3 Disconnect the stop switch wire (c). 3.17.4 Disconnect the wiring (k) from the low-oil unit (l) (if equipped). 3.17.5 Remove the M8 x 16 bolt and washer (d) securing the guard to the engine. 3.17.6 Remove the M8 bolt and washer (e) securing the guard to the rammer crankcase. 3.17.7 Remove the six M8 bolts (f) securing the lower guard to the engine and remove the guard. 3.17.8 Remove the wire running from the engine to the low-oil unit (if equipped). 3.17.9 Loosen the retainer (g) from the throttle cable. Pry open the clamp (h) and remove the throttle cable. 3.17.10 Loosen the clamp (i) securing the air intake hose to the carburetor and remove the hose. 3.17.11 Remove the four nuts (j) securing the engine to the adapter and remove the heat shield and the engine. wc_tx000285gb.fm 50 Rammer Repair Guide Handle and Engine d c a k b f j e l wc_gr003661 wc_gr001954 wc_tx000285gb.fm 51 Guide Handle and Engine Rammer Repair 3.18 Engine (DS Models) See Graphic: wc_gr001317rm Recommended Tools Ratchet wrench Torque wrench Socket: 19 mm (3/4”) Hex key: 5 mm Hex key or hex socket: 4 mm, 6 mm Screwdriver 3.18.1 Close the fuel valve. 3.18.2 Disconnect the fuel lines. 3.18.3 Loosen the throttle cable holder. 3.18.4 Disconnect the throttle cable. 3.18.5 Remove the four M10 nuts (a) that hold the engine to the crankcase. When reinstalling the engine, torque the nuts to 49 Nm (36 ft.lbs.). 3.18.6 Tilt the engine down and away to remove it from the crankcase. WARNING wc_tx000285gb.fm NOTICE: The rammer tips easily when the engine is removed. DO NOT run the engine while it is detached from the machine unless the clutch has been removed. Running the engine with the clutch attached to the crankshaft will cause the clutch shoes to separate and fly off. 52 Rammer Repair Guide Handle and Engine a w c _ g r0 0 1 3 1 7 rm wc_tx000285gb.fm 53 Guide Handle and Engine Rammer Repair 3.19 Clutch (BS Models) See Graphic: wc_gr01318rm Recommended Tools Impact wrench Torque wrench Socket: 17 mm Needle-nose pliers Clutch puller P/N 0117972 Removal 3.19.1 Remove the engine from the rammer. 3.19.2 Check the condition of the clutch shoes (a) and replace them if necessary. The clutch shoes should be absolutely dry. If oil is present, inspect the engine shaft seal. 3.19.3 Prevent the clutch from turning and use an air impact wrench and 17 mm socket to loosen the clutch nut (b). If an impact wrench is not available, rap the wrench handle sharply to help break the nut loose. Note: Loosen the nut but do not completely remove it from the engine crankshaft. This will protect the crankshaft threads from the clutch puller screw. 3.19.4 Screw the clutch puller (P/N 0117972) (c) (or other suitable puller) into the small holes in the clutch and turn the center screw against the end of the crankshaft until the clutch hub breaks free of the taper. Note: When reinstalling the clutch, make sure the taper in the clutch hub and on the engine crankshaft is absolutely free of any oil or grease. Installation 3.19.5 Place the clutch on the engine crankshaft. 3.19.6 Reinstall the clutch nut and torque to 35 Nm (25 ft.lbs.). 3.19.7 Reinstall the engine on the crankcase. Torque the screws to 27 Nm (20 ft.lbs.). 3.19.8 Perform an operation check. The clutch should be disengaged with the throttle at the idle position. Engine Speed (idle) (rpm): 1500 ± 200 Clutch Engagement (rpm): 2800 ± 200 wc_tx000285gb.fm 54 Rammer Repair Guide Handle and Engine BS Models a b c w c _ g r0 0 1 3 1 8 rm wc_tx000285gb.fm 55 Guide Handle and Engine Rammer Repair 3.20 Clutch (DS 720 only) See Graphic: wc_gr001319rm Recommended Tools Impact wrench Torque wrench Needle-nose pliers Clutch puller P/N 0153566 Removal 3.20.1 Remove the engine from the rammer. 3.20.2 Check the condition of the clutch shoes (a) and replace them if necessary. The clutch shoes should be absolutely dry. If oil is present, inspect the engine shaft seal. 3.20.3 Prevent the clutch from turning and use an air impact wrench to loosen the clutch bolt (b). If an impact wrench is not available, rap the wrench handle sharply to help break the bolt loose. Note: Loosen the bolt but do not completely remove it from the engine crankshaft. This will protect the crankshaft threads from the clutch puller screw. 3.20.4 Screw the clutch puller (P/N 0153566) (c) (or other suitable puller) into the small holes in the clutch and turn the center screw against the end of the crankshaft until the clutch hub breaks free of the taper. Note: When reinstalling the clutch, make sure the taper in the clutch hub and on the engine crankshaft is absolutely free of any oil or grease. Installation 3.20.5 Place the clutch on the engine crankshaft. 3.20.6 Reinstall the clutch bolt and torque to 27 Nm (20 ft.lbs.). 3.20.7 Reinstall the engine on the crankcase. Torque the screws to 49 Nm (36 ft.lbs.). 3.20.8 Perform an operation check. The clutch should be disengaged with the throttle at the idle position. Engine Speed (idle) (rpm): 1200 ± 200 Clutch Engagement (rpm): 2000 ± 200 wc_tx000285gb.fm 56 Rammer Repair Guide Handle and Engine DS 720 Models a c b wc_gr001319rm wc_tx000285gb.fm 57 Guide Handle and Engine Rammer Repair 3.21 Clutch (DS 70 only) See Graphic: wc_gr002372rm Recommended Tools Impact wrench Torque wrench Needle-nose pliers Clutch puller P/N 0153566 Removal 3.21.1 Remove the engine from the rammer. 3.21.2 Check the condition of the clutch shoes (a) and replace them if necessary. The clutch shoes should be absolutely dry. If oil is present, inspect the engine shaft seal. 3.21.3 Prevent the clutch from turning and use an air impact wrench to loosen the clutch bolt (b). If an impact wrench is not available, rap the wrench handle sharply to help break the bolt loose. Note: Loosen the bolt but do not completely remove it from the engine crankshaft. This will protect the crankshaft threads from the clutch puller screw. 3.21.4 Screw the clutch puller (P/N 0153566) (c) (or other suitable puller) into the small holes in the clutch and turn the center screw against the end of the crankshaft until the clutch hub breaks free of the taper. Installation 3.21.5 Place the clutch on the engine crankshaft. 3.21.6 Reinstall the clutch bolt and torque to 27 Nm (20 ft.lbs.). 3.21.7 Reinstall the engine on the crankcase. Torque the screws to 49 Nm (36 ft.lbs.). 3.21.8 Perform an operation check. The clutch should be disengaged with the throttle at the idle position. Engine Speed (idle) (rpm): 1050 ± 50 Clutch Engagement (rpm): 2500 ± 200 wc_tx000285gb.fm 58 Rammer Repair Guide Handle and Engine DS 70 Models a c b wc_gr002372rm wc_tx000285gb.fm 59 Guide Handle and Engine Rammer Repair 3.22 Engine Oil (DS 720 Only) See Graphic: wc_gr001320rm, wc_gr000057 Engine oil Check oil level: Tilt the machine backwards approximately 15° until the engine is level by placing a wedge under the shoe. The oil surface should reach NO HIGHER THAN the bottom of the filler neck “H”, but no lower than “L” (see drawing) or visible on the dipstick (a) when it is inserted (not screwed) into the filler neck. Add CC or better quality oil through the filler neck as required. CAUTION: DO NOT overfill. The oil level should just reach the bottom of the filler neck. Too much oil can cause damage to the engine and the rammer. Note: After transporting the rammer horizontally, upright the rammer and allow the oil to drain back through the engine. It may take up to 45 minutes for the oil level to recover. ENGINE OIL VISCOSITY GRADE - AMBIENT TEMPERATURE Ambient Temperature -25ºC -20ºC (-13ºF) (-4ºF) -15ºC (5ºF) 0ºC (32ºF) 15ºC (59ºF) 30ºC (86ºF) SAE 10W-30 SAE 15W-40, 20W-40 (Multi-grade) SAE 5W-20 wc_gr000057 Oil change: 3.22.1 Let the engine warm up, then shut it off. 3.22.2 Place the rammer so that the engine is level. 3.22.3 Unscrew the engine oil drain plug (b) and let oil flow out. 3.22.4 Screw in the oil drain plug. 3.22.5 Fill with approximately 800 ml (27 oz.) of oil through the oil fill opening. Refer to Check oil level, above. Oil filter: 3.22.6 Drain the oil as above. 3.22.7 Unscrew the bolt (c) on the oil filter cover and pull out the oil filter. To clean the oil filter: Use low pressure compressed air to remove any visible debris on the oil filter. To replace the oil filter: Discard the old oil filter in accordance with environmental regulations. Replace with Wacker-supplied oil filter and O-ring. wc_tx000285gb.fm 60 Rammer Repair Guide Handle and Engine a a b H L c w c _ g r0 0 1 3 2 0 rm wc_tx000285gb.fm 61 Guide Handle and Engine Rammer Repair 3.23 Engine Oil (DS 70 only) See Graphic: wc_gr000066 and wc_gr000067 3.23.1 Drain the oil while the engine is still warm. Note: In the interests of environmental protection, place a plastic sheet and a container under the machine to collect any liquid which drains off. Dispose of this liquid in accordance with environmental protection legislation. 3.23.2 Place the rammer so that the engine is level. 3.23.3 Remove the oil fill plug (a) and drain the plug (b) to drain the oil. 3.23.4 Install the drain plug (b). 3.23.5 Fill the engine crankcase with the recommended oil up to the level of the plug opening (c). Do not thread in the dipstick to check the oil level. See section Technical Data for oil quantity and type. 3.23.6 Install the oil filler plug (a). a H a b L c d wc_gr000066 15° e wc_gr000067 wc_tx000285gb.fm 62 Rammer Repair Guide Handle and Engine 3.24 Engine Oil (BS 50/60-4 only) See Graphic: wc_gr002431 and wc_gr000067 3.24.1 Drain the oil while the engine is still warm. Note: In the interests of environmental protection, place a plastic sheet and a container under the machine to collect any liquid which drains off. Dispose of this liquid in accordance with environmental protection legislation. 3.24.2 Place the rammer so that the engine is level. 3.24.3 Remove the oil fill plug (a) and drain the plug (b) to drain the oil. 3.24.4 Install the drain plug (b). 3.24.5 Fill the engine crankcase with the recommended oil up to the level of the plug opening (c). Do not thread in the dipstick to check the oil level. See section Technical Data for oil quantity and type. 3.24.6 Install the oil filler plug (a). a c a b b c d wc_gr002431 15° e wc_gr000067 wc_tx000285gb.fm 63 Ramming System 4. Rammer Repair Ramming System 4.1 Bellows Se Graphic: wc_gr001321rm Recommended Tools Ratchet wrench Torque wrench Hex key or hex socket: 8 mm Socket: 13 mm Punch Rubber mallet Screwdriver Loctite 243 The bellows provides a flexible joint between the ramming system and the upper machinery. It seals the ramming system and provides a path for recirculating the oil. Periodically, tighten the clamps, clean the bellows, and inspect the bellows for signs of damage or leaks. Removal wc_tx000286gb.fm 4.1.1 Drain the oil into a suitable container as described in section Ramming System Lubrication. 4.1.2 Remove the four socket head cap screws (c) that secure the ramming system to the crankcase. 4.1.3 Stand on the ramming shoe and pull up hard on the crankcase until the end plugs (h) are visible. 4.1.4 Drive out the end plugs and piston pin (g) holding the connecting rod to the ram. Do not reuse the end plugs. 4.1.5 Lift the upper machinery from the ramming system. 4.1.6 Remove the O-ring (b); do not reuse. 4.1.7 To free the guide cylinder (a) from the bellows (e), loosen the top bellows clamp (d), stand on the ramming shoe, and pull up hard on the guide cylinder. 4.1.8 To free the bellows from the protective pipe (j), loosen the bottom bellows clamp (f), stand on the ramming shoe, pull on the bellows, and rap along the bottom of the bellows with a rubber mallet. 64 Rammer Repair Ramming System b a c d e f h g j wc_gr001321rm Installation 4.1.9 Oil the inner edges of the bellows. 4.1.10 Place the lower clamp (f) on the protective pipe (j). 4.1.11 Press the bellows (e) onto the protective pipe (j) with a strong downward push. 4.1.12 Partially tighten the clamp onto the bellows. 4.1.13 Place the upper clamp (d) on the bellows. 4.1.14 Press the guide cylinder (a) onto the bellows with a strong downward push. 4.1.15 Partially tighten the spring clamp onto the bellows. 4.1.16 Install a new O-ring (b). 4.1.17 Position the upper machinery over the guide cylinder. 4.1.18 Align the connecting rod inside the ram. 4.1.19 Install the piston pin (g) and new end plugs (h). Note: Use new end plugs whenever the piston pin has been removed. Note: To aid in installation, it may be necessary to gently heat the clamping area of the bellows with an electric heat gun. wc_tx000286gb.fm 65 Ramming System Rammer Repair 4.1.20 Fasten the guide cylinder to the crankcase. Apply Loctite 243 and torque the screws to 43 Nm (32 ft.lbs.). 4.1.21 Lay the rammer flat on the ground and align the protective pipe with the upper machinery. 4.1.22 Position the clamps so that the clamp screws (k) are in line with the sightglass (m). 4.1.23 Tighten the clamps and torque them to 13.5 Nm (10 ft.lbs.). 4.1.24 Fill the ramming system with clean oil as described in section Ramming System Lubrication. 4.1.25 Run the rammer for several minutes and check it for oil leaks around the guide cylinder and the bellows. wc_tx000286gb.fm 66 Rammer Repair 4.2 Ramming System Ramming Shoe See Graphic: wc_gr001323rm Recommended Tools Ratchet wrench Torque wrench Socket: 19 mm Damage to the ramming shoe usually occurs due to loose hardware and improper operation. Operating the rammer with loose screws causes the ramming shoe to pound itself against the spring cylinder. Hitting the ground with the edge of the ramming shoe can cause the ramming shoe to wear out and crack. 4.2.1 Remove the hex head cap screws (a) holding the ramming shoe to the spring cylinder. 4.2.2 Lift the rammer off the ramming shoe. 4.2.3 Install the ramming shoe using new locknuts and torque the screws to 85.5 Nm (63 ft.lbs.). 4.2.4 Check torque on the screws after five hours of use. For BS 700 Optional 13” Plastic Ramming shoe 4.2.5 Remove the four locknuts (b) holding the ramming shoe to the spring cylinder. When reinstalling the ramming shoe, torque the locknuts to 79 Nm (58 ft.lbs.). 4.2.6 Lift the rammer off the ramming shoe. 4.2.7 To detach the bottom plate (e), remove the remaining locknuts (c) and the plowbolts (d). 4.2.8 If the plowbolts are in good condition, they can be reused. Use a wire brush and clean the threads thoroughly. 4.2.9 Install the bottom plate by rotating the plowbolts in the ramming shoe until they feel properly seated in the notches on the bottom plate. Torque the plowbolts to 24 Nm (18 ft.lbs.). 4.2.10 Re-torque the plowbolts after five hours of use. b c d a e wc_gr001323rm wc_tx000286gb.fm 67 Ramming System 4.3 Rammer Repair Spring System Cover Removal and Installation See Graphic: wc_gr001324rm Recommended Tools Ratchet wrench Torque wrench Hex key or socket: 13 mm Hydraulic press or Two threaded rods and nuts: M8 x 120 mm or Spring box tool P/N 0081423 Loctite 243 DANGER The spring system cover is under heavy pressure. It must be carefully removed and installed using either the hydraulic press, the threaded rod, or the spring box tool method. If the spring system cover is removed incorrectly, the springs can eject with enough force to cause serious injury or death! Hydraulic Press Removal Method 4.3.1 Remove the ramming shoe per section Ramming Shoe. Separate the ramming system from the upper machinery per section Bellows. 4.3.2 Remove all but two of the socket head cap screws that hold the spring system cover to the spring cylinder. 4.3.3 Place the spring cylinder in a hydraulic press and position the head of the press in firm contact with the spring system cover. 4.3.4 Lock the press and remove the remaining two screws. 4.3.5 Slowly release the press and allow the springs to expand. 4.3.6 After all the spring pressure is released, remove the spring system cover, the gasket, and the bottom spring set. Hydraulic Press Installation Method 4.3.7 Install the bottom spring set into the spring cylinder. 4.3.8 Place a new gasket onto the spring cylinder. 4.3.9 Center the spring cylinder, the springs, and the spring system cover under the hydraulic press ram. 4.3.10 Align the holes in the spring system cover as close as possible with the holes in the spring cylinder; dowels or steel rods can be placed in the holes to act as guides. 4.3.11 Compress the springs until the spring system cover rests on the spring cylinder. 4.3.12 Install the socket head cap screws. Apply Loctite 243 and torque the screws to 24 Nm (18 ft.lbs.). 4.3.13 Reinstall the ramming shoe. 4.3.14 Attach the ramming system to the upper machinery. wc_tx000286gb.fm 68 Rammer Repair Ramming System Hydraulic Press Method wc_gr001324rm wc_tx000286gb.fm 69 Ramming System Rammer Repair See Graphic: wc_gr001325rm Threaded Rod Removal Method 4.3.15 Remove the ramming shoe per section Ramming Shoe. Separate the ramming system from the upper machinery per section Bellows. 4.3.16 Remove the two socket head cap screws that are opposite of each other on the spring system cover. 4.3.17 Screw the two M8 x 120 threaded rods into the bottom of the spring cylinder until they bottom out. 4.3.18 Turn the nuts down each rod until they contact the spring system cover. 4.3.19 With the nuts holding the spring system cover, remove the remaining screws. 4.3.20 Evenly back off both nuts until the springs have fully expanded and the pressure is released. DANGER Make sure the threaded rods are not turning out of the cylinder while backing off the nuts. The spring system cover is under heavy pressure. It must be carefully removed and installed using either the hydraulic press, the threaded rod, or the spring box tool method. If the spring system cover is removed incorrectly, the springs can eject with enough force to cause serious injury or death! 4.3.21 Remove the spring system cover, the gasket, and the bottom spring set. Threaded Rod Installation Method 4.3.22 Install the bottom spring set into the spring cylinder. 4.3.23 Place a new gasket onto the spring cylinder. 4.3.24 Insert the two threaded rods through the opposite sides of the spring system cover and screw them into the spring cylinder until they bottom out. 4.3.25 Compress the springs by evenly screwing the two nuts down the threaded rods until the spring system cover makes contact with the spring cylinder. 4.3.26 Install the socket head cap screws. Apply Loctite 243 and torque the screws to 24 Nm (18 ft.lbs.). 4.3.27 Reinstall the ramming shoe. 4.3.28 Attach the ramming system to the upper machinery. wc_tx000286gb.fm 70 Rammer Repair Ramming System Threaded Rod Method wc_gr001325rm wc_tx000286gb.fm 71 Ramming System Rammer Repair See Graphic: wc_gr001326 Spring Box Tool Removal Method 4.3.1 Remove the ramming shoe per section Ramming Shoe. Separate the ramming system from the upper machinery per section Bellows. 4.3.2 Align three holes in the spring box tool (a) with three socket head cap screws in the spring system cover. 4.3.3 Remove the three socket head cap screws that align with the holes in the spring box tool. 4.3.4 Place the spring box tool on the spring system cover. Insert the three spring box screws (c) through the three selected holes in the spring box tool and turn the screws into the spring cylinder until they bottom out. 4.3.5 Turn the hex head cap screw (b) through the center of the spring box tool until the spring box tool reaches the top of the spring box screws. 4.3.6 With the spring box tool holding the spring system cover, remove the remaining spring system cover screws. 4.3.7 Back off the hex head cap screw until the springs have fully expanded and the pressure is released. DANGER 4.3.8 The spring system cover is under heavy pressure. It must be carefully removed and installed using either the hydraulic press, the threaded rod, or the spring box tool method. If the spring system cover is removed incorrectly, the springs can eject with enough force to cause serious injury or death! Remove the spring system cover, the gasket, and the bottom spring set. Spring Box Tool Installation Method 4.3.9 Install the bottom spring set into the spring cylinder. 4.3.10 Place a new gasket onto the spring cylinder. 4.3.11 Align three holes in the spring box tool with three holes in the spring system cover. 4.3.12 Insert the three spring box screws through the selected holes in the spring box tool and spring system cover. 4.3.13 Turn the spring box screws into the spring cylinder until they bottom out. 4.3.14 Turn the hex head cap screw through the center of the spring box tool until the spring system cover makes contact with the spring cylinder. 4.3.15 Install the socket head cap screws. Apply Loctite 243 and torque the screws to 24 Nm (18 ft.lbs.). 4.3.16 Reinstall the ramming shoe. 4.3.17 Attach the ramming system to the upper machinery. wc_tx000286gb.fm 72 Rammer Repair Ramming System Spring Box Tool Method Screw Position Schraube position La posicion del tornillo La position de vis 4 2 3 5 Qty st. 4 1 2 BS45Y, BS52Y, ES45Y, ES52Y 3 2 2 BS60Y, GVR151Y 3 3 BS62Y, BS65y, BS600, BS650, BS700, BS60-2i, BS70-2i, BS65V, BS60-4, DS72Y, DS720, DS70 4 3 BS92Y, BS105Y 5 3 BS500, BS50-2I, BS50-4 1 1 5 2 5 3 4 b Machine c a d wc_gr001326 wc_tx000286gb.fm 73 Ramming System 4.4 Rammer Repair Spring System See Graphic: wc_gr001327rm, wc_gr001328rm Recommended Tools Impact wrench Socket: 32 mm or 24mm (BS 500 only) deep well Drift pin Torque wrench Rubber mallet Impact bushing puller P/N 0116816 Loctite 243 (blue) Disassembly 4.4.1 Remove the ramming shoe and separate the ramming system from the upper machinery. 4.4.2 Remove the spring system cover and the spring set per section Spring System Cover Removal and Installation. 4.4.3 Loosen the nut (d) on the impact bushing puller to allow the yoke (c) to set on the flange surface of the rammer and the jaws to reach the bottom of the impact bushing. 4.4.4 Push the jaws (a) of the impact bushing puller over the impact bushing (b) until it seats at the bottom of the impact bushing. 4.4.5 Tighten the nut on the impact bushing puller to remove the impact bushing as shown in the graphic and discard. 4.4.6 Place a drift pin through the holes on the end of the ram (e) to prevent the ram from turning. 4.4.7 Use an impact wrench to remove the locknut (k). 4.4.8 Remove the piston guide (j). 4.4.9 Remove the spring set (g) and the bushing (f) from the spring cylinder. c a d b c wc_gr001327rm wc_tx000286gb.fm 74 Rammer Repair Ramming System Assembly 4.4.10 Slide the ram (e) into the spring cylinder (h). 4.4.11 Reinstall the bushing (f) and the spring set (g). 4.4.12 Reinstall the piston guide (j). 4.4.13 Replace the locknut (k) and torque it to: BS 500 - 210 Nm (155 ft.lbs.) BS 600/700 - 250 Nm (184 ft.lbs.). 4.4.14 Press a new impact bushing (m) onto the end of the ram and seat it by hitting the end of the impact bushing with a rubber mallet. 4.4.15 Reinstall the spring set (n). 4.4.16 Install a new gasket (o). 4.4.17 Reinstall the spring system cover (p) using one of the three methods described in section Spring System Cover Removal and Installation. Apply Loctite 243 and torque the screws to 24 Nm (18 ft.lbs.). f m e n g h j o k p wc_gr001328rm wc_tx000286gb.fm 75 Ramming System 4.5 Rammer Repair Inspecting the Spring System See Graphic: wc_gr001329rm Over time, the constant compression and release of the spring pressure can cause the springs to wear out. If the rammer feels to be hitting with less force, it is possible that the springs are worn and should be replaced. A broken spring causes the rammer to jump erratically. This condition is more noticeable on hard soils. Do not run the rammer if a broken spring is suspected. Doing so may damage other rammer parts. Replace both the top and the bottom spring sets even if only one set is worn or damaged. 4.5.1 Remove the springs from the cylinder and check them for minimum spring free height and maximum spring height difference per the table below. Replace the springs if they do not meet the given specifications. 4.5.2 If a spring has broken, inspect the inside of the spring cylinder wall for burrs, gouges, and cracks as follows: • Slide the piston guide inside the cylinder. Check that the piston guide moves freely but without excessive side play. • Hone the cylinder to remove the ridges and the burrs that were cut into the cylinder wall by the spring movement. • Replace the cylinder if it is badly worn. Minimum spring free height (a) Maximum spring height difference (b) BS 500 194 mm (7 21/32 in.) 5 mm (3/16 in.) BS 600 BS 700 BS 650 DS 720 217 mm (8 9/16 in.) 5 mm (3/16 in.) b a wc_gr001329rm wc_tx000286gb.fm 76 Rammer Repair 4.6 Ramming System Protective Pipe See Graphic: wc_gr001330rm Recommended Tools Ratchet Wrench Torque Wrench Extension Hex Socket: 6 mm Loctite 243 (Blue) If the protective pipe becomes loose or damaged, it must be replaced on the spring cylinder. 4.6.1 Remove the bellows following the procedures in section Bellows. 4.6.2 Remove the socket head cap screws (c). To reinstall the protective pipe, apply Loctite 243 and torque the screws to 24 Nm (18 ft.lbs.). 4.6.3 Reassemble the rammer following the previous procedures. c wc_gr001330rm wc_tx000286gb.fm 77 Ramming System 4.7 Rammer Repair Ramming System Lubrication (BS 500/600/700/650, DS 720) See Graphic: wc_gr001331rm Recommended Tools Hex Key: 8 mm Ratchet Wrench Torque Wrench Extension Sockets: 19 mm (3/4”), 27 mm (1 1/16”) Teflon Tape Oil for lubrication is carried throughout the ramming system by the action of the rammer. Holes drilled in the piston allow the oil to be distributed from the bottom of the rammer to the crankcase. Oil in the ramming system must be maintained at the correct level to ensure the system operates efficiently. Check oil level: Check the oil level in the sightglass (a) daily before starting the rammer. When checking the oil, make sure the rammer is on a flat, level surface. The oil level should fill 1/2–3/4 of the sightglass. Add the oil though the fill plug (c) located in the filter housing at the top of the rammer. See section Technical Data for oil quantity and type. Change the ramming system oil after the first 50 hours of operation and then after every 300 hours of use. Oil change: 4.7.1 Remove the oil fill plug (c) and the seal ring. 4.7.2 BS 500: Remove the sightglass. BS 600/700/650, DS720: Remove the drain plug (b). 4.7.3 Tilt the rammer back until it is resting on its handle. 4.7.4 Allow the oil to drain. 4.7.5 Wrap the sightglass threads with Teflon tape. 4.7.6 Reinstall the sightglass or the drain plug, and torque to 9.5 Nm (7 ft.lbs.). 4.7.7 Stand the rammer upright on a level surface. 4.7.8 Add oil through the fill plug. Proper ramming system lubrication is indicated when approximately 1/2–3/4 of the sightglass is full. NOTICE: It may take some time for the oil to filter down to the sightglass. Use care not to overfill the ramming system. Excessively high levels of oil can create a hydraulic lock in the ramming system. This can result in erratic operation and cause damage to the engine clutch, the ramming system, and the shoe. wc_tx000286gb.fm 78 Rammer Repair 4.7.9 Ramming System Reinstall the seal-ring and the fill plug. Torque the fill plug to 47 Nm (35 ft.lbs.). Note: An alternate method of changing the oil is to drain and fill the oil from the sightglass. a c b 4.8 wc_gr001331rm Ramming System Lubrication (BS 50/60/70, BS 65, DS 70) See Graphic: wc_gr001331rm Recommended Tools Hex key: 8 mm Ratchet wrench Torque wrench Extension Sockets: 19 mm (3/4”), 27 mm (1 1/16”) Teflon tape Oil for lubrication is carried throughout the ramming system by the action of the rammer. Holes drilled in the piston allow the oil to be distributed from the bottom of the rammer to the crankcase. Oil in the ramming system must be maintained at the correct level to ensure the system operates efficiently. wc_tx000286gb.fm 79 Ramming System Rammer Repair Check oil level: Check the oil level in the sightglass (a) daily before starting the rammer. When checking the oil, make sure the rammer is on a flat, level surface. The oil level should fill 1/2–3/4 of the sightglass. If the oil is not visible, oil must be added through the sightglass port. Tilt rammer forward and remove sightglass (a). See section Technical Data for oil quantity and type. Change the ramming system oil after the first 50 hours of operation and then after every 300 hours of use. Oil change: 4.8.1 BS 50: Remove the sightglass (a). BS 60/70/65, DS 70: Remove the drain plug (b). 4.8.2 Tilt the rammer back until it is resting on its handle. 4.8.3 Allow the oil to drain. 4.8.4 Screw in the oil drain plug. Torque to 54 Nm (40 ft.lbs.). 4.8.5 Wrap the sightglass threads with Teflon tape. 4.8.6 Remove sightglass and fill with oil. See Technical Data for oil quantity and type. Install the sightglass. Torque to 9 Nm (6.6 ft.lbs.). 4.8.7 Stand the rammer upright on a level surface. NOTICE: It may take some time for the oil to filter down to the sightglass. Use care not to overfill the ramming system. Excessively high levels of oil can create a hydraulic lock in the ramming system. This can result in erratic operation and cause damage to the engine clutch, the ramming system, and the shoe. wc_tx000286gb.fm 80 Rammer Repair Ramming System Notes wc_tx000286gb.fm 81 Crankcase 5. Rammer Repair Crankcase 5.1 Crank Gear and Connecting Rod See Graphic: wc_gr001332rm, wc_gr001333rm Recommended Tools Hex key: 8 mm 2-Jaw bearing puller Large diameter retaining-ring pliers Hydraulic press Screwdriver Split puller Slide hammer Torque wrench Loctite 243 (blue) Removal 5.1.1 Remove the four socket head cap screws that secure the ramming system to the crankcase. 5.1.2 Stand on the ramming shoe and pull up hard on the crankcase until the pin holding the connecting rod to the ram is visible. 5.1.3 Drive out the end plugs and the piston pin. 5.1.4 Lift the upper machinery from the ramming system. 5.1.5 Remove the four socket head cap screws (a) from the front cover. 5.1.6 Insert a screwdriver into the slots on each side of the cover and pry off the cover. The cover will come out with the crank gear (g) and the connecting rod (k) attached. Note: The crankcase cover cannot be removed until the connecting rod is detached from the ram. 5.1.7 Reach through the slotted hole (m) in the crank gear and release the large retaining ring (f). 5.1.8 Thread two M8 socket head cap screws, or threaded rods, through the pusher holes (n) in the crank gear. Turn the screws into the crank gear to free the crank gear and the bearing from the cover. 5.1.9 Remove the small retaining ring (d) securing the bearing (e) to the crank gear. 5.1.10 Pull the bearing free of the shaft using the split puller (p) and a 2-jaw bearing puller (o). 5.1.11 Remove the small retaining ring (h) that holds the connecting rod and the bearing (j) to the crank gear. 5.1.12 Pull the connecting rod off the crank gear with a 2-jaw bearing puller. 5.1.13 Press the bearing out of the connecting rod. wc_tx000287gb.fm 82 Rammer Repair 5.1.14 Crankcase The needle bearing (c) remains intact in the crankcase cover. Inspect the needle bearing for wear and, if damaged, remove it by using a slide hammer or similar pulling device. g b c d e f k j h a w c _ g r0 0 1 3 3 2 rm Assembly 5.1.15 If the needle bearing was removed, press a new bearing into the cover until the outer race is flush with the flange surface. 5.1.16 Place the large retaining ring over the crank gear shaft. 5.1.17 Press the ball bearing onto the crank gear shaft and reinstall the small retaining ring. 5.1.18 Press the connecting rod assembly onto the crank gear and secure it in place with the small retaining ring. 5.1.19 Push the complete crank gear assembly into the bearing housing and seat the retaining ring in the groove. 5.1.20 Replace the o-ring (b). 5.1.21 Assemble the cover to the crankcase. Torque the screws to 49 Nm (36 ft.lbs.). 5.1.22 Connect the crankcase to the ramming system as follows: • Position the upper machinery over the guide cylinder. • Align the connecting rod inside the ram. • Install the piston pin and the end plugs. Note: Use new end plugs whenever the piston pin has been removed. • wc_tx000287gb.fm Fasten the guide cylinder to the crankcase. Apply Loctite 243 and torque the screws to 43 Nm (32 ft.lbs.). 83 Crankcase Rammer Repair f m n o p wc_gr001333rm wc_tx000287gb.fm 84 Rammer Repair 5.2 Crankcase Crank Gear, Connecting Rod, and Adjuster Assembly (BS 650/65 only) See Graphic: wc_gr001334rm Recommended tools Hex key: 8 mm 2-Jaw bearing puller Large diameter retaining-ring pliers Hydraulic press Screwdrivers or pry bars Split puller Slide hammer Punch Torque wrench Loctite 243 (blue) Removal 5.2.1 Remove the four socket head cap screws that secure the ramming system to the crankcase. 5.2.2 Stand on the ramming shoe and pull up hard on the crankcase until the pin holding the connecting rod to the ram is visible. 5.2.3 Drive out the end plugs and the piston pin. 5.2.4 Lift the upper machinery from the ramming system. 5.2.5 Open the front cover and remove the four socket head cap screws (31) from the bearing mount (16). 5.2.6 Insert a screwdriver on each side of the bearing mount and pry it off. The bearing mount and cover will come out with the crank gear (20) and the connecting rod (24) attached. Note: The bearing mount and cover cannot be removed until the connecting rod is detached from the ram. wc_tx000287gb.fm 5.2.7 Remove the snap ring (25), then pry off the connecting rod assembly (24) with two pry bars. 5.2.8 Press the ball bearing (27) out of the connecting rod. 5.2.9 Turn the assembly over and open up the crankcase cover. 5.2.10 Remove the two retaining rings (3) and drive the pin (13) out of the yoke (4) with a hammer and punch. 5.2.11 Remove the screws (12) and clamping ring (5), then slide out the adjusting plate (6) and two Belville spring washers (7). The eccentric drive shaft (23), pin (28), and spring (29) will also slide out. Pull out the O-ring (21). 5.2.12 Remove the small retaining ring (9) and press the crank gear (20) from the bearing mount. 85 Crankcase Rammer Repair 5.2.13 The crankgear needle bearing (19), oil seal (11), and ball bearing (10) remain intact in the bearing mount. • Examine the needle bearings for wear. • If damaged, replace the needle bearings by removing the large retaining ring (8) holding the ball bearing to the bearing mount and press out the needle bearings and seal. • Replace the needle bearings and oil seal together. 5.2.14 Remove the O-ring (18) and discard it. 5.2.15 The clutch drum needle bearing (17) will remain intact in the bearing mount. Inspect it for wear and if damaged, remove and replace it. wc_tx000287gb.fm 86 Rammer Repair Crankcase Assembly 5.2.16 If the needle bearing (17) was removed, apply Loctite 609 to a new needle bearing and press it into the bearing mount until the outer race is flush with the flange surface. 5.2.17 Press the ball bearing (27) into the connecting rod. 5.2.18 Press the connecting rod assembly (24) onto the eccentric drive shaft (23) and secure it in place with the small snap ring (25). 5.2.19 Press the crank gear (20) into the bearing mount (16) and secure it with the small retaining ring (9). Note: If the small pin (30) was removed, replace it leaving a ½-inch showing. DO NOT bottom the pin in the hole. 5.2.20 Grease O-ring (21) thoroughly and insert it into the crank gear. 5.2.21 Ensure the arrow label (22) is in place, then slide the eccentric drive shaft (23) and the spring (29) and pin (28) into the crank gear. 5.2.22 Place the two Belville spring washers (7) onto the eccentric drive shaft so that the outer edges are facing each other. 5.2.23 Place the adjusting plate (6) over the Belville spring washers, lining up pin (30) at position 1. 5.2.24 Place the clamping ring (5) over the adjusting plate. Apply Loctite 243 to the screws (12) and torque to 9.5 Nm (7 ft.lbs.). Tighten the screws evenly to compress the Belville spring washers. 5.2.25 Fit the yoke (4) over the eccentric drive shaft (23) and secure in place with pin (13). Secure the pin with the two retaining rings (3). Note: Install with the lever open and spring tension relaxed. When CLOSED, the lever should point in the same direction as the arrow. 5.2.26 Insert a new O-ring (18). 5.2.27 Push the complete crank gear assembly into the bearing housing and seat the retaining ring in the groove. 5.2.28 Assemble the bearing mount to the crankcase. Apply Loctite 243 and torque the screws (31) to 49 Nm (36 ft.lbs.). 5.2.29 Connect the crankcase to the ramming system as follows: a. Position the upper machinery over the guide cylinder. b. Align the connecting rod inside the ram. c. Install the piston pin and the end plugs. Note: Use new end plugs whenever the piston pin has been removed. d. wc_tx000287gb.fm Fasten the guide cylinder to the crankcase. Apply Loctite 243 and torque the screws to 43 Nm (32 ft.lbs.). 87 Crankcase 5.3 Rammer Repair Clutch Drum See Graphic: wc_gr001335rm Recommended Tools Hex Key: 8 mm Large diameter retaining-ring pliers Hydraulic press Screwdriver Slide hammer Torque wrench Loctite 243 (blue) Shell Alvania RL2 Removal 5.3.1 Remove the four socket head cap screws that secure the ramming system to the crankcase. 5.3.2 Stand on the ramming shoe and pull up hard on the crankcase until the pin holding the connecting rod to the ram is visible. 5.3.3 Drive out the end plugs and the piston pin. 5.3.4 Lift the upper machinery from the ramming system. 5.3.5 Remove the engine. 5.3.6 Remove the four socket head cap screws from the front cover. 5.3.7 Insert a screwdriver into the slots on each side of the cover and pry off the cover. The cover will come out with the crank gear and the connecting rod attached. Note: The crankcase cover cannot be removed until the connecting rod is detached from the ram. 5.3.8 Remove the small retaining ring (b) from the clutch drum shaft (f) inside the crankcase. 5.3.9 Press the clutch drum free of the crankcase. 5.3.10 Remove the shaft seal (e). 5.3.11 Remove the large retaining ring (d). 5.3.12 Press the clutch drum bearing (c) from the crankcase. 5.3.13 The needle bearing (a) remains intact in the crankcase cover. Inspect the needle bearing for wear and, if damaged, remove it by using a slide hammer or similar pulling device. wc_tx000287gb.fm 88 Rammer Repair Crankcase a b c d e f wc_gr001335rm Assembly 5.3.14 If the needle bearing was removed, press a new bearing into the cover until the outer race is flush with the flange surface. NOTICE: Keep the inside of the clutch drum absolutely free of any oil and grease. 5.3.15 Press the clutch drum ball bearing into the crankcase. 5.3.16 Secure the bearing with the large retaining ring. 5.3.17 Pack the shaft seal cavity with Shell Alvania RL2 grease. Install the shaft seal with the open side facing toward the bearing. 5.3.18 Press the clutch drum into the crankcase. 5.3.19 Secure the clutch drum with the small retaining ring. 5.3.20 Assemble the cover to the crankcase. Apply Loctite 243 and torque the screws to 49 Nm (36 ft.lbs.). 5.3.21 Connect the crankcase to the ramming system as follows: a. Position the upper machinery over the guide cylinder. b. Align the connecting rod inside the ram. c. Install the piston pin and the end plugs. Note: Use new end plugs whenever the piston pin has been removed. d. Fasten the guide cylinder to the crankcase. Apply Loctite 243 and torque the screws to 43 Nm (32 ft.lbs.). wc_tx000287gb.fm 89 Oil Injection (if equipped) 6. Rammer Repair Oil Injection (if equipped) 6.1 Float Switch Testing and Replacement See Graphic: wc_gr001526 NOTICE: Never bypass the float switch except during testing; engine failure may occur. The function of the float switch is to prevent the engine from running without oil in the oil tank. If the oil tank is low on oil, the float switch opens and kills the ignition. A severed float switch wire will also kill the ignition. In the event that the engine runs but shuts off by itself within approximately 25 seconds, even with oil in the oil tank, the float switch could be faulty. To test the float switch (a): 6.1.1 Remove the carburetor guard (d). 6.1.2 Inspect the float switch wire for damage. • If damage is present, replace the float switch. • If no damage to the float switch wire is obvious and the connector is fully seated at the engine (b), continue. 6.1.3 Unplug the float switch wire from the engine. 6.1.4 Insert a jumper wire into the terminal on the engine to connect the two terminal leads. 6.1.5 Start the engine and run it at idle. • If the engine continues to run for more than 45 seconds, the float switch is faulty and must be replaced. • If the engine still shuts off within 25 seconds, the ignition module has failed and must be replaced. To replace the float switch: 6.1.6 Drain the remaining oil from the oil tank or position the rammer so that the oil in the tank will not run out when the float switch is removed. 6.1.7 Remove the oil line from the float switch. 6.1.8 Disconnect the float switch from the back of the engine. 6.1.9 Unscrew the float switch assembly from the oil tank. 6.1.10 Screw a new float switch assembly into the oil tank. 6.1.11 Install the oil line to the float switch. Ensure that the oil line from the oil tank is routed through the coiled portion (c) of the float switch wire near the switch. wc_tx000288gb.fm 90 Rammer Repair 6.1.12 Oil Injection (if equipped) Ensure that the float switch plug is fully seated in the connector on the back of the engine. d c a b wc_gr001526 wc_tx000288gb.fm 91 Oil Injection (if equipped) 6.2 Rammer Repair Oil Line Check Valve See Graphic: wc_gr001527 The the function of the oil line check valve (a) is to prevent raw fuel from backing up to the oil pump. It is important that the check valve be installed in the correct direction. Looking at the side of the check valve, one should notice recessed areas with pointed ends or an arrow (b). The pointed ends or the arrow must point towards the fuel line. This is the direction of oil flow. To test the check valve: The oil line check valve is spring operated and is designed to release at 1.5 psi. Note: Initial release can be as high as 4.5 psi. 6.2.1 Remove the oil line check valve from the oil line. 6.2.2 Attach a hand-operated vacuum pump to the outlet side (pointed end) of the oil line check valve and operate the vacuum pump until the vacuum overcomes the oil line check valve spring. Measure how much vacuum it takes to operate the oil line check valve. A vacuum reading of more than 2 psi (after initial release) is grounds for replacing the oil line check valve. Note: The oil line check valve is only available by replacing the entire hose assembly. Newly installed oil line check valves (and those that have lost their prime) require priming. There are two methods of priming the oil line check valve line with oil. Vacuum method: 6.2.3 Attach a hand-operated vacuum pump to the fuel line end of the oil hose. 6.2.4 Place the oil pump side of the hose in a container of 2-cycle oil. 6.2.5 Operate the vacuum pump until the oil reaches the vacuum pump. 6.2.6 Install the oil line to the oil pump and to the fuel line. Pressure method: 6.2.7 Attach a syringe filled with 2-cycle oil to the oil pump end of the hose. 6.2.8 Inject the oil into the hose until it passes through the oil line check valve. 6.2.9 Attach the oil line to the oil pump. NOTICE: The oil line check valve is an important part of the oil injection system and should not be bypassed. Engine failure may occur. wc_tx000288gb.fm 92 Rammer Repair Oil Injection (if equipped) b a wc_gr001527 wc_tx000288gb.fm 93 Oil Injection (if equipped) 6.3 Rammer Repair Oil Pump / Cartridge Assembly See Graphic: wc_gr001528 If the rammer was used for a long period of time, it does not appear to have used any oil, and the oil line check valve is operating correctly, remove and check the oil pump. Keep in mind that oil-injection rammers can run up to 65 hours on one tank of oil. Removal: 6.3.1 Remove the engine and the carburetor guard. 6.3.2 Remove the output hose only (a) from the oil pump. 6.3.3 Remove the three screws holding the oil pump/cartridge assembly to the rammer crankcase. 6.3.4 Remove the oil pump and the cartridge assembly from the crankcase. 6.3.5 Separate the oil pump from the cartridge assembly. Inspect the plastic gear on the cartridge assembly for damage. If the plastic gear is damaged, replace it. Testing: Ensure that the oil tank is full of oil and that the oil line from the tank to the pump is not kinked or loose. 6.3.6 Open the bleed screw on the front of the pump until oil flows out. Tighten the bleed screw. 6.3.7 With the gear side of the pump facing you, and the gear on the top, rotate the gear clockwise (when viewed from left side). Oil should flow out of the output fitting in less than 20 revolutions of the gear (keep in mind that the pump puts out a 0.8 mm (0.030 in.) droplet of oil every 7–9 seconds of running at 4350 rpm). If no oil comes out of the output fitting, replace the pump. a wc_gr001528 wc_tx000288gb.fm 94 Rammer Repair 7. Low Oil Shutdown (if equipped) Low Oil Shutdown (if equipped) 7.1 Testing the Low Oil Unit See Graphic: wc_gr003673 The function of the low oil unit is to prevent the engine from running after startup if the engine is low on oil. To test the low oil unit: 7.1.1 Remove the lower engine guard (a). 7.1.2 Lay the machine down and remove the low oil unit (b) from the crankcase. 7.1.3 Disconnect the wiring from the engine to the low oil unit. 7.1.4 Attach a 9V battery to the low oil unit as shown. A functioning low oil unit should flash at a steady rate. 7.1.5 • If the low oil unit does not flash at a steady rate, it has failed; replace it. • If the low oil unit does flash at a steady rate, continue. Grasp the sensors (c) with your fingertips. This action will change the capacitance of the sensors, and will change the flashing action (duty cycle) of the low oil unit from a period where the light remains on longer than it is off, to one where the light is off longer than it is on. • If the low oil unit performs accordingly, it is functioning properly. • If the low oil unit does not perform accordingly, it has failed; replace it. b a – + 1 Hz 1 Hz 1 Hz wc_gr003673 wc_tx000288gb.fm 95 Troubleshooting 8. Rammer Repair Troubleshooting 8.1 Engine Hard to Start Problem / Symptom Reason / Remedy The air filters are dirty. Clean or replace the filters. There is too much oil in the fuel(1). Drain the fuel from the tank and fill it with new mixed fuel. The spark plugs are fouled(1). Clean or replace the spark plug. Measure the electrode gap. Incorrect spark plug(1). Must use resistor-type spark plug to operate correctly. The muffler or exhaust port is dirty. Remove and clean the muffler. Clean the exhaust port. The crankshaft seals are leaking. Check/replace the seals (see the WM 80 Engine Repair Manual). The fuel mixture adjustment is incorrect(1). Set the adjusting screw and clean the fuel jets. The engine compression is low. Replace the piston rings (see the WM 80, WM 90 or Yanmar Engine Repair Manual). (1)Does not apply to the DS 720 or DS 70 Rammer. wc_tx000291gb.fm 96 Rammer Repair 8.2 Troubleshooting Engine Does Not Start Problem / Symptom Reason / Remedy There is no fuel in the tank. Add fuel. The fuel valve is closed. Open the fuel valve. The spark plug is fouled(1). Clean or replace the spark plug. Set the electrode gap. The fuel filter is plugged. Replace the fuel filter. Inspect the fuel lines. The fuel mixture adjustment is incorrect(1). Set the adjusting screw and clean the fuel jets. The ignition module has failed. Replace the ignition module. On machines with oil injection, the float switch has failed. Replace the float switch. (1)Does not apply to the DS 720 or DS 70 Rammer. 8.3 Engine Does Not Accelerate or Runs Poorly Problem / Symptom Reason / Remedy The air filters are dirty. Clean or replace the filters. There is too much oil in the fuel(1). Drain the fuel from the tank. Fill with new mixed fuel. The spark plug is fouled(1). Clean or replace the spark plug. Set the electrode gap. Incorrect spark plug(1). Must use resistor-type spark plug to operate correctly. The muffler or the exhaust port is dirty. Remove and clean the muffler. Clean the exhaust port. The crankshaft seals are leaking. Check/replace the seals (see the WM 80, WM 90, or Yanmar Engine Repair Manual). The fuel mixture adjustment is incorrect(1). Set the adjusting screw and clean the fuel jets. There is an air leak in the carburetor system(1). Check all the connections. (1)Does not apply to the DS 720 or DS 70 Rammer. wc_tx000291gb.fm 97 Troubleshooting 8.4 Rammer Repair Engine Overheats Problem / Symptom Reason / Remedy There is not enough oil in the fuel mix(1). Drain the fuel from the tank and fill it with new mixed fuel. The carburetor fuel mix is set too lean(1). Reset the carburetor adjustments. The cooling fins/fan blades are packed with dirt. Clean the debris from the fins and the blades. (1)Does not apply to the DS 720 or DS 70 Rammer. 8.5 Rammer Does Not Tamp Problem / Symptom Reason / Remedy The muffler or the exhaust port is plugged. Remove and clean the muffler. Clean the exhaust port. The clutch is damaged. Remove and replace the clutch. The connecting rod in the ramming system is broken. Disassemble the crankcase. Inspect and replace any damaged components. The crankgear is broken. Disassemble the crankcase. Inspect and replace any damaged components. The pinion on the clutch drum shaft is broken. Disassemble the crankcase. Inspect and replace any damaged components. The engine compression is low. Replace the piston rings (see the WM 80, WM 90, or Yanmar Engine Repair Manual). wc_tx000291gb.fm 98 Rammer Repair 8.6 Troubleshooting Rammer Jumps Erratically Problem / Symptom Reason / Remedy There is oil or grease on the clutch. Inspect and clean the clutch. The spring(s) in the ramming system are broken or worn. Disassemble the spring cylinder. Inspect and replace any damaged components. There are damaged parts in the spring cylinder assembly. Disassemble the spring cylinder. Inspect and replace any damaged components. There are damaged parts in the crankcase assembly. Disassemble the crankcase. Inspect and replace any damaged components. There is soil buildup on the ramming shoe. Clean and inspect the shoe. The engine speed is too low. Adjust the engine speed. wc_tx000291gb.fm 99 Technical Data 9. Rammer Repair Technical Data 9.1 BS 50-2 Item Number: BS 50-2 0009380, 0009382, 0009384, 0009410 0009411, 0009413, 0620025, 0620048 Rammer Engine Model type WM80 Engine Speed - full rpm 4400 ± 100 Engine Speed - idle rpm 1800 ± 100 Clutch Engagement rpm 2500 ± 100 Spark Plug type Champion RL95YC Electrode Gap mm (in) 0.5 (.020) Cylinder Head Compression (cold) bar/cm3 (psi) 8.0–9.7 (120–140) Air Cleaner Engine Lubrication Fuel Tank Capacity Fuel Consumption Running Time type oil grade Three stage with cyclonic precleaner With standard two-cycle oil use 50:1 ratio. With Wacker two-cycle or other oil meeting the NMMA TC-W3 specification, a ratio from 50:1 to 100:1 can be used. l (qts.) 3.0 (3.2) l(qt.)/hr 1.0 (1.1) 2.9 hour Ramming System Lubrication oil grade SAE 10W30 Ramming System Capacity ml (oz.) 562 (19) wc_td000112gb.fm 100 Rammer Repair 9.2 Technical Data BS 50-4 Item Number: BS 50-4 0009386, 0620077 0620108 BS 50-4s 0620071, 0620078 Rammer Engine Model type WM90 Engine Speed - full rpm 4300 ± 100 Engine Speed - idle rpm 2000 ± 100 Clutch Engagement rpm 2500 ± 100 Spark Plug type NGK BM4A or BMR4A Electrode Gap mm (in) 0.6–0.7 (0.023–0.028) Cylinder Head Compression (cold) bar/cm3 (psi) 8.0–9.7 (120–140) Air Cleaner Engine Lubrication type Three stage with cyclonic precleaner oil grade SAE 10W30 SE, SF or higher Engine Oil Capacity ml (oz.) 300 (10) Fuel Tank Capacity l (qts.) 3.0 (3.2) Fuel Fuel Consumption Running Time 1.2 (1.3) l(qt.)/hr 2.5 hour Ramming System Lubrication oil grade Ramming System Capacity ml (oz.) wc_td000112gb.fm Regular unleaded gasoline type SAE 10W30 562 (19) 101 Technical Data 9.3 Rammer Repair BS 500 Item Number: BS 500 0007550, 0008048 0008049, 0009074, 0009075 Rammer Engine Model type WM80 Engine Speed - full rpm 4400 ± 100 Engine Speed - idle rpm 1800 ± 100 Clutch Engagement rpm 2800 ± 100 Spark Plug type Champion RL95YC Electrode Gap mm 0.5 Cylinder Head Compression (cold) Air Cleaner 8.0–9.7 bar/cm3 type Dual Element Engine Lubrication oil grade With standard two-cycle oil - use 50:1 ratio. With Wacker two-cycle or two-cycle oil per NMMA TC-W3, API TC, JASO FC or ISO EGD specifications - use 100:1 or 50:1 ratio. Ramming System Lubrication oil grade SAE 10W30 Ramming System Capacity ml wc_td000112gb.fm 562 102 Rammer Repair 9.4 Technical Data BS 500S Item Number: BS 500S 0009211 Rammer Engine Model type WM80 Engine Speed - full rpm 4700 ± 100 Engine Speed - idle rpm 1800 ± 100 Clutch Engagement rpm 2800 ± 100 Spark Plug type Champion RL95YC Electrode Gap mm (in.) 0.5 (.020) Cylinder Head Compression (cold) bar/cm3 (psi) 8.0–9.7 (120–140) Engine Lubrication oil grade With standard two-cycle oil - use 50:1 ratio. With Wacker two-cycle or two-cycle oil per NMMA TC-W3, API TC, JASO FC or ISO EGD specifications - 100:1 or 50:1 ratio. Ramming System Lubrication oil grade SAE 10W30 ml (oz.) 562 (19) Ramming System Capacity wc_td000112gb.fm 103 Technical Data 9.5 Rammer Repair BS 50-2i Item Number: BS 50-2i 0009332, 0009338 0009414, 0009416 0009473, 0620026 BS 50-2i 0009383 0009412 Rammer Engine Model type WM80 Engine Speed - full rpm Engine Speed - idle rpm 1800 ± 100 Clutch Engagement rpm 2500 ± 100 Spark Plug type Champion RL95YC 4400 ± 100 4600 ± 100 Electrode Gap mm (in) 0.5 (0.020) Cylinder Head Compression (cold) bar/cm3 (psi) 8.0–9.7 (120–140) Air Cleaner Engine Lubrication Fuel Tank Capacity Fuel Fuel Consumption Running Time type oil grade With standard two-cycle oil use 50:1 ratio. With Wacker two-cycle or other oil meeting the NMMA TC-W3 specification, a ratio from 50:1 to 100:1 can be used. 3.0 (3.2) l (qts.) Regular unleaded gasoline type 1.0 (1.1) l(qt.)/hr 2.9 hour Oil Tank Capacity l (qts.) Ramming System Lubrication oil grade Ramming System Capacity ml (oz.) wc_td000112gb.fm Three stage with cyclonic precleaner 0.70 (0.75) SAE 10W30 562 (19) 104 Rammer Repair 9.6 Technical Data BS 500-oi Item Number: BS 500-oi 0009165, 0009343 Rammer Engine Model type WM80 Engine Speed - full rpm 4400 ± 100 Engine Speed - idle rpm 1800 ± 100 Clutch Engagement rpm 2800 ± 100 Spark Plug type Champion RL95YC Electrode Gap mm (in.) 0.5 (0.020) Cylinder Head Compression (cold) bar/cm3 (psi) 8.0–9.7 (120–140) Engine Lubrication oil grade Wacker two-cycle or two-cycle oil per NMMA TC-W3, API TC, JASO FC or ISO EGD specifications. Ramming System Lubrication oil grade SAE 10W30 Ramming System Capacity ml (oz.) 562 (19) wc_td000112gb.fm 105 Technical Data 9.7 Rammer Repair BS 60/70-2 Item Number: BS 60-2 0009388 0009417 0009421 BS 60-2 0009391 0009418 BS 70-2 0009397 0009399 0009424 0009425 0009427 Rammer Engine Model type WM80 Engine Speed - full rpm Engine Speed - idle rpm 1800 ± 100 Clutch Engagement rpm 2500 ± 100 Spark Plug type Champion RL95YC 4400 ± 100 4600 ± 100 Electrode Gap mm (in) 0.5 (0.020) Cylinder Head Compression (cold) bar/cm3 (psi) 8.0–9.7 (120–140) Air Cleaner Engine Lubrication Fuel Tank Capacity Fuel Consumption Running Time type oil grade Three stage with cyclonic precleaner With standard two-cycle oil use 50:1 ratio. With Wacker two-cycle or other oil meeting the NMMA TC-W3 specification, a ratio from 50:1 to 100:1 can be used. 3.0 (3.2) l (qts.) l(qt.)/hr hour 1.2 (1.3) 1.3 (1.4) 2.5 2.3 Ramming System Lubrication oil grade SAE 10W30 Ramming System Capacity ml (oz.) 890 (30) wc_td000112gb.fm 106 Rammer Repair 9.8 Technical Data BS 60-4 Item Number: BS 60-4 0009340, 0620000 0620051, 0620109 0620110 BS 60-4s 0620072, 0620073 0620074 Rammer Engine Model type WM90 Engine Speed - full rpm 4300 ± 100 Engine Speed - idle rpm 2000 ± 100 Clutch Engagement rpm 2500 ± 100 Spark Plug type NGK BM4A or BMR4A Electrode Gap mm (in) 0.6–0.7 (0.002–0.030) Cylinder Head Compression (cold) bar/cm3 (psi) 8.0–9.7 (120–140) Air Cleaner Engine Lubrication type Three stage with cyclonic precleaner oil grade SAE 10W30 SE, SF or higher Engine Oil Capacity ml (oz.) 300 (10) Fuel Tank Capacity l (qts.) 3.0 (3.2) Fuel Fuel Consumption Running Time Regular unleaded gasoline type 1.2 (1.3) l(qt.)/hr 2.5 hour Ramming System Lubrication oil grade SAE 10W30 Ramming System Capacity ml (oz.) 890 (30) wc_td000112gb.fm 107 Technical Data 9.9 Rammer Repair BS 600/700 Item Number: BS 600 0007551, 0008207 0009076, 0009307 BS 700 0007552, 0008051 0008052, 0009308 Rammer Engine Model type WM80 Engine Speed - full rpm 4350 ± 100 Engine Speed - idle rpm 1800 ± 100 Clutch Engagement rpm 2800 ± 100 Spark Plug type Champion RL95YC Electrode Gap mm (in.) 0.5 (0.020) Cylinder Head Compression (cold) bar/cm3 (psi) 8.0–9.7 (120–140) Air Cleaner type Dual Element Engine Lubrication oil grade With standard two-cycle oil - use 50:1 ratio. With Wacker two-cycle or two-cycle oil per NMMA TC-W3, API TC, JASO FC or ISO EGD specifications - 100:1 or 50:1 ratio. Ramming System Lubrication oil grade SAE 10W30 Ramming System Capacity ml (oz.) 890 (30) wc_td000112gb.fm 108 Rammer Repair Technical Data 9.10 BS 600S Item Number: BS 600S 0009212 Rammer Engine Model type WM80 Engine Speed - full rpm 4600 ± 100 Engine Speed - idle rpm 1800 ± 100 Clutch Engagement rpm 2800 ± 100 Spark Plug type Champion RL95YC Electrode Gap mm (in.) 0.5 (0.020) Cylinder Head Compression (cold) bar/cm3 (psi) 8.0–9.7 (120–140) Engine Lubrication oil grade With standard two-cycle oil - use 50:1 ratio. With Wacker two-cycle or two-cycle oil per NMMA TC-W3, API TC, JASO FC or ISO EGD specifications - 100:1 or 50:1 ratio. Ramming System Lubrication oil grade SAE 10W30 Ramming System Capacity ml (oz.) 890 (30) wc_td000112gb.fm 109 Technical Data Rammer Repair 9.11 BS 60/70-2i Item Number: BS 60-2i 0009339 0009419 BS 60-2i 0009393 0009420 BS 70-2i 0009341 0009401 0009426 0009428 Rammer Engine Model type WM80 Engine Speed - full rpm Engine Speed - idle rpm 1800 ± 100 Clutch Engagement rpm 2500 ± 100 Spark Plug type Champion RL95YC 4400 ± 100 4600 ± 100 Electrode Gap mm (in) 0.5 (0.020) Cylinder Head Compression (cold) bar/cm3 (psi) 8.0–9.7 (120–140) Air Cleaner Engine Lubrication Fuel Tank Capacity Fuel Fuel Consumption Running Time type oil grade With standard two-cycle oil use 50:1 ratio. With Wacker two-cycle or other oil meeting the NMMA TC-W3 specification, a ratio from 50:1 to 100:1 can be used. 3.0 (3.2) l (qts.) Regular unleaded gasoline type l(qt.)/hr hour Oil Tank Capacity l (qts.) Ramming System Lubrication oil grade Ramming System Capacity ml (oz.) wc_td000112gb.fm Three stage with cyclonic precleaner 1.2 (1.3) 1.4 (1.3) 2.5 2.3 0.70 (0.75) SAE 10W30 890 (30) 110 Rammer Repair Technical Data 9.12 BS 600/700-oi Item Number: BS 600-oi 0009166, 0009262 BS 700-oi 0009167, 0009328 Rammer Engine Model type WM80 Engine Speed - full rpm 4350 ± 100 Engine Speed - idle rpm 1800 ± 100 Clutch Engagement rpm 2800 ± 100 Spark Plug type Champion RL95YC Electrode Gap mm (in.) 0.5 (0.020) Cylinder Head Compression (cold) bar/cm3 (psi) 8.0–9.7 (120–140) Engine Lubrication oil grade Wacker two-cycle or two-cycle oil per NMMA TC-W3, API TC, JASO FC or ISO EGD specifications. Ramming System Lubrication oil grade SAE 10W30 Ramming System Capacity ml (oz.) 890 (30) wc_td000112gb.fm 111 Technical Data Rammer Repair 9.13 BS 600/700 High Altitude Item Number: BS 600 0009077 BS 700 0009079 Rammer Engine Model type WM80 Engine Speed - full rpm 4350 ± 100 Engine Speed - idle rpm 1800 ± 100 Clutch Engagement rpm 2800 ± 100 Spark Plug type Champion RL95YC Electrode Gap mm (in.) 0.5 (0.020) Cylinder Head Compression (cold) bar/cm3 (psi) 8.0–9.7 (120–140) Air Cleaner type Dual Element Engine Lubrication oil grade With standard two-cycle oil - use 50:1 ratio. With Wacker two-cycle or two-cycle oil per NMMA TC-W3, API TC, JASO FC or ISO EGD specifications - 100:1 or 50:1 ratio. Ramming System Lubrication oil grade SAE 10W30 Ramming System Capacity ml (oz.) 890 (30) wc_td000112gb.fm 112 Rammer Repair Technical Data 9.14 BS 65-V Item Number: BS 65-V 0009396, 0009423 Rammer Engine Model type WM80 Engine Speed - full rpm 4400 ± 100 Engine Speed - idle rpm 1800 ± 100 Clutch Engagement rpm 2500 ± 100 Spark Plug type Champion RL95YC Electrode Gap mm (in.) 0.5 (0.020) Cylinder Head Compression (cold) bar/cm3 (psi) 8.0–9.7 (120–140) Air Cleaner Engine Lubrication Fuel Tank Capacity Fuel Consumption Running Time type oil grade With standard two-cycle oil use 50:1 ratio. With Wacker two-cycle or other oil meeting the NMMA TC-W3 specification, a ratio from 50:1 to 100:1 can be used. l (qts.) 3.0 (3.2) l(qt.)/hr 1.2 (1.3) 2.5 hour Ramming System Lubrication oil grade Ramming System Capacity ml (oz.) wc_td000112gb.fm Three stage with cyclonic precleaner SAE 10W30 890 (30) 113 Technical Data Rammer Repair 9.15 BS 650 Item Number: BS 650 0008209 Rammer Engine Model type WM80 Engine Speed - full rpm 4350 ± 100 Engine Speed - idle rpm 1800 ± 100 Clutch Engagement rpm 2800 ± 100 Spark Plug type Champion RL95YC Electrode Gap mm 0.5 Cylinder Head Compression (cold) Air Cleaner 8.0–9.7 bar/cm3 type Dual Element Engine Lubrication oil grade With standard two-cycle oil - use 50:1 ratio. With Wacker two-cycle or two-cycle oil per NMMA TC-W3, API TC, JASO FC or ISO EGD specifications - 100:1 or 50:1 ratio. Ramming System Lubrication oil grade SAE 10W30 Ramming System Capacity ml wc_td000112gb.fm 890 114 Rammer Repair Technical Data NOTES wc_td000112gb.fm 115 Technical Data Rammer Repair 9.16 DS 70 Item Number: DS 70 0009342 0009402 0009403 DS 70 0620049 0620050 Rammer Operating weight kg (lbs.) 83 (183) Percussion rate (2) strokes/min. 670 Single stroke work J/mkp 100 Stroke of ramming shoe (up) mm (in.) to 71 (2.78) Ramming system lubrication oil grade SAE 10W30 Ramming system oil capacity ml (oz.) 890 (30) (2) Percussion rate can be adjusted with the throttle lever. wc_td000112gb.fm 116 DS 70 0620052 0620053 0620054 Rammer Repair Technical Data Item Number: DS 70 0009342 0009402 0009403 DS 70 0620049 0620050 DS 70 0620052 0620053 0620054 Engine Engine Type single cylinder, air cooled, 4-stroke diesel engine Engine Make Yanmar Engine Model L48EEDWK3 L48V4LF9T 9EWSA Rated Power kW (Hp) 3.1 (4.1) Displacement cm³ (in³) 211 (12.8) Engine Speed - full load rpm 3450 Engine Speed - idle rpm 1050 ± 150 Engine Speed - clutch engagement rpm Valve Clearance (cold) Air Cleaner Engine Lubrication Engine Oil Capacity Fuel Fuel Tank Capacity Fuel consumption Running Time (1) mm (in.) type 0.15 (0.006) Dual Element CC or better (1) ml (oz.) 800 (27) No. 2 Diesel, cetane > 45 l (gals.) 4.2 (1.1) l/h (gal./hr.) 0.9 (0.25) hour Refer to Lubrication. wc_td000112gb.fm 2500 ± 200 oil grade type 117 L48EEDWK3 4.6 Technical Data Rammer Repair 9.17 DS 720 Item Number: DS 720 0008200 Rev. 115 and lower 0008203 Rev. 114 and lower DS 720 0008200 Rev. 116 and higher 0008203 Rev. 115 and higher Rammer Operating weight kg (lbs.) 75 (165) Percussion rate (2) strokes/ min. 650-700 Single stroke work J/mkp Stroke of ramming shoe (up) mm (in.) to 75 (3) Ramming system lubrication oil grade SAE 10W30 ml (oz.) 890 (30) Ramming system oil capacity (2) 100 Percussion rate can be adjusted with the throttle lever. wc_td000112gb.fm 118 DS 720 0009309 Rammer Repair Technical Data Item Number: DS 720 0008200 Rev. 115 and lower 0008203 Rev. 114 and lower DS 720 0008200 Rev. 116 and higher 0008203 Rev. 115 and higher DS 720 0009309 Engine Engine Type single cylinder, air cooled, 4-stroke diesel engine Engine Make Yanmar Engine Model L40AE-DWK2 L48EE-DWK3 Rated Power kW (Hp) 3.1 (4.2) 3.5 (4.7) Displacement cm³ (in³) 199 (12.1) 211 (12.8) Engine Speed - full load rpm 3600 Engine Speed - idle rpm 1200 ± 200 Engine Speed - clutch engagement rpm 2000 ± 200 mm (in.) 0.15 (0.006) type Dual Element Valve Clearance (cold) Air Cleaner Engine Lubrication Engine Oil Capacity Fuel Fuel Tank Capacity Fuel consumption (1) oil grade CC or better (1) ml (oz.) 800 (27) type No. 2 Diesel, cetane > 45 l (gals.) 5.7 (1.5) l/h (gal./hr.) 0.9 (0.25) Refer to Lubrication. wc_td000112gb.fm 119 Technical Data wc_td000112gb.fm Rammer Repair 120 Threadlockers and Sealants Threadlockers and Sealants Threadlocking adhesives and sealants are specified throughout this manual by a notation of “S” plus a number (S#) and should be used where indicated. Threadlocking compounds normally break down at temperatures above 175°C (350°F). If a screw or bolt is hard to remove, heat it using a small propane torch to break down the sealant. When applying sealants, follow instructions on container. The sealants listed are recommended for use on Wacker equipment. TYPE ( ) = Europe Loctite 222 Hernon 420 Omnifit 1150 (50M) COLOR USAGE Purple Low strength, for locking threads smaller than 6 mm (1/4”). Hand tool removable. Temp. range: -54 to 149°C (-65 to 300°F) Blue Medium strength, for locking threads Loctite 243 Hernon 423 larger than 6 mm (1/4”). Omnifit 1350 (100M) Hand tool removable. Temp. range: -54 to 149°C (-65 to 300°F) Loctite 271/277 Red High strength, for all threads up to 25 mm Hernon 427 (1”). Omnifit 1550 (220M) Heat parts before disassembly. Temp. range: -54 to 149°C (-65 to 300°F) Loctite 290 Green Medium to high strength, for locking Hernon 431 preassembled threads and for sealing Omnifit 1710 (230LL) weld porosity (wicking). Gaps up to 0.13 mm (0.005”) Temp. range: -54 to 149°C (-65 to 300°F) Loctite 609 Green Medium strength retaining compound for Hernon 822 slip or press fit of shafts, bearings, gears, Omnifit 1730 (230L) pulleys, etc. Gaps up to 0.13 mm (0.005”) Temp. range: -54 to 149°C (-65 to 300°F) Loctite 545 Brown Hydraulic sealant Hernon 947 Temp. range: -54 to 149°C (-65 to 300°F) Omnifit 1150 (50M) Loctite 592 White Pipe sealant with Teflon for moderate Hernon 920 pressures. Omnifit 790 Temp. range: -54 to 149°C (-65 to 300°F) Loctite 515 Purple Form-in-place gasket for flexible joints. Hernon 910 Fills gaps up to 1.3 mm (0.05”) Omnifit 10 Temp. range: -54 to 149°C (-65 to 300°F) PART NO. – SIZE 73287 - 10 ml 29311 - .5 ml 17380 - 50 ml 29312 - .5 ml 26685 - 10 ml 73285 - 50 ml 28824 - .5 ml 25316 - 10 ml 29314 - .5 ml 79356 - 50 ml 26695 - 6 ml 73289 - 50 ml 70735 - 50 ml Threadlockers and Sealants Threadlockers and Sealants (continued) Threadlocking adhesives and sealants are specified throughout this manual by a notation of “S” plus a number (S#) and should be used where indicated. Threadlocking compounds normally break down at temperatures above 175°C (350°F). If a screw or bolt is hard to remove, heat it using a small propane torch to break down the sealant. When applying sealants, follow instructions on container. The sealants listed are recommended for use on Wacker equipment. TYPE ( ) = Europe COLOR USAGE Loctite 496 Clear Instant adhesive for bonding rubber, metal Hernon 110 and plastics; general purpose. Omnifit Sicomet 7000 For gaps up to 0.15 mm (0.006”) Read caution instructions before using. Temp. range: -54 to 82°C (-65 to 180°F) Loctite Primer T Aerosol Fast curing primer for threadlocking, Hernon Primer 10 Spray retaining and sealing compounds. Must Omnifit VC Activator be used with stainless steel hardware. Recommended for use with gasket sealants. PART NO. – SIZE 52676 - 1oz. 2006124-6 oz. Torque Values Torque Values Metric Fasteners (DIN) TORQUE VALUES (Based on Bolt Size and Hardness) 8.8 10.9 WRENCH SIZE 12.9 Size Nm ft.lb. Nm ft.lb. Nm ft.lb. Metric Inch Metric Inch M3 1.2 *11 1.6 *14 2.1 *19 5.5 7/32 2.5 – M4 2.9 *26 4.1 *36 4.9 *43 7 9/32 3 – M5 6.0 *53 8.5 6 10 7 8 5/16 4 – M6 10 7 14 10 17 13 10 – 5 – M8 25 18 35 26 41 30 13 1/2 6 – M10 49 36 69 51 83 61 17 11/16 8 – M12 86 63 120 88 145 107 19 3/4 10 – M14 135 99 190 140 230 169 22 7/8 12 – M16 210 155 295 217 355 262 24 15/16 14 – M18 290 214 405 298 485 357 27 1-1/16 14 – M20 410 302 580 427 690 508 30 1-1/4 17 – 1 ft.lb. = 1.357 Nm * = in.lb. 1 inch = 25.4 mm Torque Values Torque Values (continued) Inch Fasteners (SAE) Size Nm ft.lb. Nm ft.lb. Nm ft.lb. Metric Inch Metric Inch No.4 0.7 *6 1.0 *14 1.4 *12 5.5 1/4 – 3/32 No.6 1.4 *12 1.9 *17 2.4 *21 8 5/16 – 7/64 No.8 2.5 *22 3.5 *31 4.7 *42 9 11/32 – 9/64 No.10 3.6 *32 5.1 *45 6.8 *60 – 3/8 – 5/32 1/4 8.1 6 12 9 16 12 – 7/16 – 3/32 5/16 18 13 26 19 33 24 13 1/2 – 1/4 3/8 31 23 45 33 58 43 – 9/16 – 5/16 7/16 50 37 71 52 94 69 16 5/8 – 3/8 1/2 77 57 109 80 142 105 19 3/4 – 3/8 9/16 111 82 156 115 214 158 – 13/16 – – 5/8 152 112 216 159 265 195 24 15/16 – 1/2 3/4 271 200 383 282 479 353 – 1-1/8 – 5/8 1 ft.lb. = 1.357 Nm * = in.lb. 1 inch = 25.4 mm Wacker Construction Equipment AG · Preußenstraße 41 · D-80809 München · Tel.: +49-(0)89-3 54 02 - 0 · Fax: +49 - (0)89-3 54 02-3 90 Wacker Corporation · P.O. Box 9007 · Menomonee Falls, WI 53052-9007 · Tel. : (262) 255-0500 · Fax: (262) 255-0550 · Tel. : (800) 770-0957 Wacker Asia Pacific Operations · Skyline Tower, Suite 2303, 23/F · 39 Wang Kwong Road, Kowloon Bay, Hong Kong · Tel. +852 2406 60 32 · Fax: +852 2406 60 21