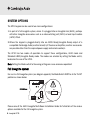
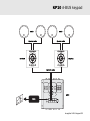
1
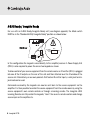
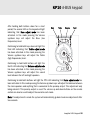
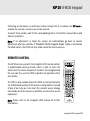
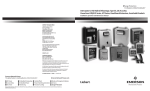
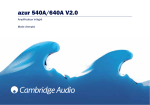
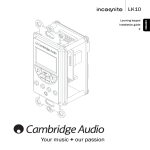
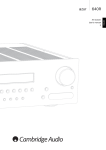
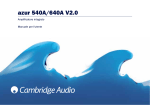
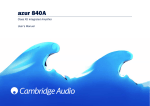
KP10
A-BUS keypad
Installation Guide
CONTENTS
Introduction.......................................................3
System options.................................................4
Installation notes..............................................8
Rear panel connections.................................10
Keypad controls..............................................12
Operating instructions....................................14
Local source selection....................................16
Remote control................................................17
Technical specifications.................................18
Limited warranty.............................................19
2 Incognito KP10
KP10 A-BUS keypad
INTRODUCTION
Thank you for purchasing this Cambridge Audio Incognito product. Incognito is a cost-effective,
modular based system using standard Cat-5 or Cat-6 cable to distribute hi-fi quality sound and
video around a home.
The KP10 is an in-wall, A-BUS TM compatible amplified keypad with buttons for control of speaker
volume levels, Standby/On and source select (with compatible equipment), as well as having an
IR window for receiving remote control signals. The KP10 can connect to A-BUS hubs, A-BUS
Ready receivers, or to the Incognito Ready outputs of Cambridge Audio receivers and amplifiers
using Cat-5 wiring. The KP10 then connects to speakers using conventional speaker cable.
The KP10 keypad fits into any wall and is available with different finishes to compliment various
decorative schemes. The KP10 is fitted on the wall by fixing it into a standard single UK 47mm
electrician’s back-box. All knock-outs in the back-box should be removed to provide maximum
ventilation. Care should be taken in choosing a site for the KP10, and always refer to the
precautions in this guide. Bear in mind it is not always preferable to fit the KP10 next to a light
switch, particularly if the faceplates will differ.
Thanks for taking the time to read this manual, we do recommend you keep it for future
reference.
Matthew Bramble
Technical Director
Incognito A-BUS keypad 3
SYSTEM OPTIONS
The KP10 keypad can be used in two main configurations:
1. As part of a full Incognito system, where it is plugged into an Incognito hub (AH10), perhaps
with other Incognito accessories such as a video switching unit (VH10) or local input module
(LM10) fitted.
2. Where the keypad is plugged directly into an A-BUS Ready/Incognito Ready output of a
compatible Cambridge Audio (or other brand) A/V Receiver or Amplifier, no other accessories
are possible other than the required power supply and remote control/s.
The KP10 has two modes of operation to support these configurations, AH10 mode and
Standard A-BUS/Incognito Ready mode. The modes are selected by setting the Mode switch,
located on the rear of the KP10.
Note: Setting the Mode switch to the wrong setting can cause erroneous operation!
Full Incognito system
For use in a full Incognito system (see diagram opposite) the Mode Switch MUST be in the "AH10"
position as shown below:
KP10-EU rear
Mode
Std. A-BUS/
Incognito
Ready
AH10
Mode
Std. A-BUS/
Incognito
Ready
AH10
Please consult the AH10 Incognito Multi-Room Installation Guide for full details of the various
options available for the full Incognito system.
4 Incognito KP10
KP10 A-BUS keypad
SS10
SS10
Speaker cable
Speaker cable
KP10-EU
KP10-EU
Cat-5/5e cable
AH10
PS10
Incognito A-BUS keypad 5
A-BUS Ready / Incognito Ready
For use with an A-BUS Ready/Incognito Ready unit (see diagram opposite) the Mode switch
MUST be in the "Standard A-BUS/Incognito Ready" position as shown below:
KP10-EU rear
Mode
Std. A-BUS/
Incognito
Ready
AH10
Mode
Std. A-BUS/
Incognito
Ready
AH10
In this configuration the keypad is wired directly to the amplifier/receiver. A Power Supply Unit
(PS10) is also required to power the one or two keypads as shown.
To allow control of your source equipment from the remote rooms an IR emitter (IR10) is plugged
into one of the IR outputs on the rear of the unit and then attached over the IR window of the
source unit. Alternatively, on our own products that feature IR emitter Inputs, a mini-jack to minijack lead can be used.
Commands received by the keypads can now be sent back to the source equipment via the
amplifier. It is then possible to control the source equipment from the remote rooms by using the
source equipment's own remote controls or through a learning remote. The Incognito LR10
Learning Remote can fully control the keypads, “learn” the source's remote controls and change
source input on the amplifier etc.
6 Incognito KP10
KP10 A-BUS keypad
SS10
SS10
Speaker cable
Speaker cable
LR10
KP10-EU
KP10-EU
Cat5/5e cable
PS10
CAP5
Multi-Room
Protection LED
indicators:
IR1
IR3
IR2
IR4
azur 640A Integrated Amplifier V2.0
Impedance 4 - 8 ohms
Right
Left
A
Off
B
On
Left
Power
Designed in London, England
www.cambridge-audio.com
Right
Max Power Consumption: 700W
IR Emitter
PSU
In
In
Fault requiring
service (DC)
Keypad 1
Control Bus
Keypad 2
In
Out
Mains Voltage Selector Switch (50 / 60Hz)
Over temperature
International Patent Pending LeisureTech Electronics Pty Ltd
Temporary overload
Pre-Out
Tape In
Rec Out 1
Rec Out 2
AV / MD
DVD
Tuner / DAB
CD
Aux
Power AC
Pre-Out
Tape In
Rec Out 1
Rec Out 2
AV / MD
DVD
Tuner / DAB
CD
Aux
Loudspeaker short
Left
Vol
Left
Auto
Amplifier
(eg 640A V2.0)
Clipping
Right
A
Left
B
Right
Left
Right
Please refer to
your User's Manual
for more information
Manufactured in an
ISO9002 approved facility
Right
Impedance 4 - 8 ohms
Loudspeaker Terminals
Important
Please ensure that loudspeaker terminals are fully tightened
Veuillez s'assurer que les bornes de l'enceinte sont entièrement serrées
Caution Risk of electric shock. Do not open. Avis Risque de choc electrique. Ne pas ouvrir. Achtung Vorm öffnen des gërates. Netzstecker ziehen.
Mini-jack lead
IR10
azur 640C
Compact Disc Player
Open
Close
Standby / On
Class 1 Laser Product
Luokan 1 Laserplaite
Klass 1 Laserapparat
Power Off
In
Out
IR Emitter
In
Max Power Consumption: 18W
Right
Power AC
azur 640C Compact Disc Player V2.0
Left
Caution
Risk of electric shock
Do not open
Avis
Risque de choc electrique
Ne pas ouvrir
Achtung
Vorm offnen des gerates
Netzstecker ziehen
Right
Line Output
Manufactured in an
ISO9002 approved facility
Designed in London, England
Digital Outputs
Left
On
CD player
(eg 640C V2.0)
Skip
Scan
Stop
Line Output
Control Bus
Mains Voltage Selector Switch (50 / 60Hz)
Play
Pause
S/P DIF
Co-axial
Toslink
Optical
www.cambridge-audio.com
Incognito A-BUS keypad 7
INSTALLATION NOTES
The KP10 is fitted on the wall by fixing it into a standard UK 47mm depth single-gang
electrician’s back-box (pattress). All knock-outs in the back-box should be removed to provide
maximum ventilation.
Where it is desired to fit a mains lighting switch etc next to a keypad, a barrier-box or two single
back-boxes must be used (bear in mind it is not preferable to fit the keypad next to a light-switch
particularly if the faceplate styles will differ). Only a qualified electrician should attempt such
installations.
Avoid fitting the KP10 where there is line of sight to another KP10. In such situations both
keypads may pick up the same commands from a remote control and it will be difficult to control
each zone independently.
Avoid fitting the KP10 where there is line of sight to the source equipment for the system. In such
situations the source equipment may pick up the same IR commands directly as are picked up
by the keypad and sent to the source equipment. This can interfere with the remote operation of
the source equipment.
Do not fit the keypad in areas directly lit by strong sunlight or where it will be strongly lit by
fluorescent tubes. These can be sources of infra-red energy which can interfere with the remote
control operation of the system. Some plasma televisions can radiate a lot of infra-red energy
and care should be taken if fitting a KP10 near a plasma screen television. Avoid placing the
KP10 near to dimmer switches or other items, which generate a lot of electrical noise.
8 Incognito KP10
KP10 A-BUS keypad
Safety precautions
Care should be taken when choosing the site for a KP10, the keypad must never be installed in a
back-box which also contains mains wiring or in areas of high humidity.
The KP10 runs on 24 V DC supplied through the connecting cable. As such there is no mains
voltage present in the KP10 and the unit is often safe to fit in areas where only extra low voltage
(ELV) equipment is permitted. However, it is imperative that you always check the wiring
regulations in force for your application and area.
Faceplates
The KP10 faceplate system is based on the 50 x 50 ‘easy-clip’ module standard and is
interchangeable with the wide range of faceplates made by manufacturers such as MK Electric,
RPP etc that conform to this standard. If it is desired to fit another faceplate, it can be replaced
by gently prising apart the KP10 faceplate and snapping on another in its place.
Fitting the keypad
Remove the supplied faceplate from the KP10 by gently prising apart. It will “pop” off. Connect
each wire in the Cat-5 cable to its respective terminal in the screw-down connector on the back
of the KP10 (refer to the Cat-5 to KP10 screw-down connectors diagram in the ‘Rear panel
connections’ section of this guide). The recommended maximum length for use with standard
Cat-5 cable is 30m from hub to keypad in total (screened Cat-5 cable can also be used). After
making the wiring connections, fit the KP10 to the back-box with the two supplied M3.5x20
screws. Gently push the faceplate back on to the module.
Note: If in doubt about any aspect of installation or wiring, seek professional advice from a
qualified installer.
Incognito A-BUS keypad 9
REAR PANEL CONNECTIONS
orange
green
orange / white
green / white
blue
blue / white
brown / white
brown
1
L+ L - R - R+
1
Cat5 to KP10 punch down connectors
A Cat-5 cable (terminated with an RJ45 jack
plug) is used to connect the KP10 to an AH10
hub or A-BUS Ready receiver. The KP10 has
punch down connectors for the eight
individual conductors of the Cat-5 cable (use a
small flat-bladed screwdriver). See below for
the EIA/TIA 568A wiring standard:
6
1 2 3 4 5 6 7 8
2
3
1
4
2
5
View from
contact end
1
2
3
4
5
6
7
8
green/white
green
orange/white
blue
blue/white
orange
brown/white
brown
4
R+ R - L- L+
3
Gather pairs, trim and
insert into RJ45 plug
10 Incognito KP10
Crimp wires
securely in place
KP10 A-BUS keypad
2
Gain adjust
The maximum output of the KP10 can be limited by turning these down. Alternatively, if the sound
level is too quiet, the Gain can be turned up.
3
Mode switch
Selects between AH10 mode and Standard A-BUS Ready/Incognito Ready mode.
4
Speaker output
Connect to a pair of speakers with two runs of standard high-quality speaker cable. Speakers of
at least 88 dB SPL for 1W @ 1 metre efficiency should be used with the KP10. Speakers from 4–8
ohms can be used. The Incognito SS10 speakers are an ideal match.
5
LK10 option
Allows control of source equipment via an LK10 Learning Keypad.
6 Preamp output
A preamp output is provided for optional use driving a powered subwoofer or auxiliary amplifier.
Connection from the preamp output to other equipment should be by screened audio cable (see
diagram below).
Line-in/Line-out
connections
on subwoofer
Screened audio cable
Preamp
output
connections
on rear of
KP10
Incognito A-BUS keypad 11
KEYPAD CONTROLS
3
4
5
2
6
1
The six LEDs indicate the function status
of the KP10. Listed below are each of the
functions of the corresponding LEDs:
1
Minimum volume / Source select
2 Volume / Source select / Bass adjust
/ Local Source Selection Mode
8
3 Volume / Source select / Treble adjust
/ Local Source Selection Mode
11
7
9
4 Volume / Source select / Balance
adjust / Local Source Selection Mode
5 Volume / Source select / Fader adjust
/ Local Source Selection Mode
10
12
6
Maximum volume / Source select
For full instructions on volume adjustment,
source selection, sound adjustment and
local source selection modes, refer to the
‘Operating instructions’ section of this
guide.
12 Incognito KP10
KP10 A-BUS keypad
7 Standby/On
Press to switch the keypad between On and Standby mode. By pressing and holding the
Standby button for about 2 seconds, all KP10s connected to the AH10 hub will be turned
off. If the KP10 is connected to a Cambridge Audio Incognito Ready Amplifier rather than
an AH10 hub, the amplifier will be turned off.
8 Volume up
Press to increase the volume or other sound adjustment.
9 Source select (right)
Use this key to select the current active source.
Volume down
Press to decrease the volume or other sound adjustment.
10
Source select (left)
Use this key to select the current active source.
11
IR window
Point the Incognito LR10 Learning Remote towards this window. A small flashing LED
behind this window indicates operation.
12
Incognito A-BUS keypad 13
OPERATING INSTRUCTIONS
Important!
As mentioned previously, the KP10 can be switched between two modes of operation; a
standard A-BUS mode for compatibility with other manufacturers A-BUS Ready equipment
(Standard A-BUS/Incognito Ready mode), and an Incognito A-BUS hub mode (AH10 mode).
When used with other manufacturers A-BUS Ready equipment the keypad MUST be switched to
“Standard A-BUS/Incognito Ready” mode or they will not work.
Volume adjustment
Volume is adjusted using the volume up and volume down buttons on the keypad or remote; this
is indicated on the keypad by the intensity of the blue LED lights, there are four levels of intensity.
Source selection
The Source left and right buttons allow you to choose from multiple connected sources. The LED
display will indicate which source is selected.
Sound adjustment modes
Pressing the Power/Standby button while holding the Volume down key activates the sound
adjustment modes, the four central LEDs on the keypad will then light in sequence to indicate
each of the four sound adjustment modes; Bass, Treble, Balance and Fader. These modes can
also be activated using the 'Select' button on the remote control.
14 Incognito KP10
KP10 A-BUS keypad
After holding both buttons down for a short
period, the second LED on the keypad will light
indicating that Bass adjust mode has been
activated. In this mode pressing the Volume
up/down keys will adjust the Bass (low
frequencies) level.
Bass
Treble
Balance
Fader
Continuing to hold both keys down will light the
third LED indicating that Treble adjust mode
has been activated. In this mode pressing the
Volume up/down keys will adjust the Treble
(high frequencies) level.
Continuing to hold both buttons will light the
fourth LED indicating that Balance adjust mode
has been activated. In this mode pressing the
Volume up/down keys will adjust the sound
level between the left and right speakers.
Continuing to hold both buttons will light the fifth LED indicating that Fader adjust mode has
been activated. In this mode pressing the Volume up/down keys will adjust the balance between
the main speakers and anything that is connected to the preamp output. This adjustment only
being relevant if the preamp output is used. The volume up and down buttons on the remote
control can also be used to adjust the sound in each mode.
Note: If no adjustment is made the system will automatically go back to volume adjustment after
two seconds.
Incognito A-BUS keypad 15
LOCAL SOURCE SELECTION
Note: This feature is only available if the KP10
is part of a full Incognito multi-room system with
one or two Local Input Modules (LM10) fitted.
2
3
4
5
The local source selection mode will need to be
activated to configure the KP10 correctly. This
mode is only available when the Mode Switch is
set to “AH10” mode. LM10s can only be used in
this mode. Please refer to your LM10
Installation Guide for more information.
Pressing the Select left or right buttons on the
keypad allows you to rotate through all six
sources as default. However, it is possible to
allow the addition of one or two local sources by
accessing Local source selection mode. To
enter this mode press the Volume up button
simultaneously with the Power button for four seconds; the LED display will then scroll through
the sequence shown in the illustration right and described as follows:
After holding both buttons down for a short period, LED 2 will light indicating that Sources 1–6
(default) are available for selection.
Continuing to hold both keys down will light LED 3 indicating that Sources 1–6 + Local source 1
mode is available for selection.
Continuing to hold both buttons will light LED 4 indicating that Sources 1–6 + Local source 1 +
Local source 2 mode is available for selection.
16 Incognito KP10
KP10 A-BUS keypad
Continuing to hold Volume up and Power buttons will light LED 5, to indicate that Off mode is
available for selection, and no source will be selected.
To select these modes, wait till the corresponding LED is lit and then release Power and
Volume up buttons.
Note: If no adjustment is made the system will automatically go back to volume
adjustment after two seconds. If “Standard A-BUS/Incognito Ready” mode is selected on
the Mode switch, the KP10 will only rotate round the main 6 sources.
REMOTE CONTROL
The KP10 can be used with the Incognito LR10 remote control,
a sophisticated learning remote which is able to learn the
codes of all the source equipment remotes. Once programmed
the user can thus use the LR10 to perform all operations from
one remote.
The LR10 is also suitable where the KP10 is to be connected to
the A-BUS Ready outputs of AV receivers and amplifiers instead
of one of our hubs as it can learn the relevant source change
commands etc of the receiver or amplifier as well as the source
equipment.
Note: Please refer to the Incognito LR10 manual for further
information.
Incognito A-BUS keypad 17
TECHNICAL SPECIFICATIONS
Input impedance
Frequency response
THD
S/N ratio
Volume control range
Bass control range
Treble control range
Balance control range
Preamp output
IR pass through
Speaker impedance
Power requirement
45 k ohms
20Hz – 20kHz +/- 1dB
<0.2% @ 1W, 20Hz – 20 kHz
> 80 dB ‘A’ weighted
- 80 dB, 36 steps
+/- 16 dB, 2 dB steps
+/- 16 dB, 2 dB steps
+/- 40 dB, 9 steps either way
Variable level, follows volume setting
34–40 kHz and 54–58 kHz
modulation frequencies supported
4–8 ohms
24 V DC @ 1A max (supplied by hub)
This guide is designed to make installing and using this product as easy as possible. Information in this document has been carefully
checked for accuracy at the time of printing; however, Cambridge Audio's policy is one of continuous improvement, therefore design and
specifications are subject to change without prior notice. If you notice any errors please feel free to email us at:
[email protected]
This document contains proprietary information protected by copyright. All rights are reserved. No part of this manual may be
reproduced by any mechanical, electronic or other means, in any form, without prior written permission of the manufacturer. All
trademarks and registered trademarks are the property of their respective owners.
Incognito and Incognito Ready are trademarks of Cambridge Audio Ltd. All rights reserved.
© Copyright Cambridge Audio Ltd 2005
A-BUS and A-BUS Ready are registered trademarks of LeisureTech Electronics Pty Ltd Australia.
18 Incognito KP10
KP10 A-BUS keypad
LIMITED WARRANTY
Cambridge Audio warrants this product to be free from defects in materials and workmanship (subject to the terms set forth
below). Cambridge Audio will repair or replace (at Cambridge Audio’s option) this product or any defective parts in this
product. Warranty periods may vary from country to country. If in doubt consult your dealer and ensure that you retain proof
of purchase.
To obtain warranty service, please contact the Cambridge Audio authorised dealer from which you purchased this product. If
your dealer is not equipped to perform the repair of your Cambridge Audio product, it can be returned by your dealer to
Cambridge Audio or an authorised Cambridge Audio service agent. You will need to ship this product in either its original
packaging or packaging affording an equal degree of protection.
Proof of purchase in the form of a bill of sale or receipted invoice, which is evidence that this product is within the warranty
period, must be presented to obtain warranty service.
This warranty is invalid if (a) the factory-applied serial number has been altered or removed from this product or (b) this
product was not purchased from a Cambridge Audio authorised dealer. You may call Cambridge Audio or your local country
Cambridge Audio distributor to confirm that you have an unaltered serial number and/or you purchased from a Cambridge
Audio authorised dealer.
This warranty does not cover cosmetic damage or damage due to acts of God, accident, misuse, abuse, negligence, commercial
use, or modification of, or to any part of, the product. This warranty does not cover damage due to improper operation,
maintenance or installation, or attempted repair by anyone other than Cambridge Audio or a Cambridge Audio dealer, or
authorised service agent which is authorised to do Cambridge Audio warranty work. Any unauthorised repairs will void this
warranty. This warranty does not cover products sold AS IS or WITH ALL FAULTS.
REPAIRS OR REPLACEMENTS AS PROVIDED UNDER THIS WARRANTY ARE THE EXCLUSIVE REMEDY OF THE
CONSUMER. CAMBRIDGE AUDIO SHALL NOT BE LIABLE FOR ANY INCIDENTAL OR CONSEQUENTIAL DAMAGES FOR
BREACH OF ANY EXPRESS OR IMPLIED WARRANTY IN THIS PRODUCT. EXCEPT TO THE EXTENT PROHIBITED BY LAW,
THIS WARRANTY IS EXCLUSIVE AND IN LIEU OF ALL OTHER EXPRESS AND IMPLIED WARRANTIES WHATSOEVER
INCLUDING, BUT NOT LIMITED TO, THE WARRANTY OF MERCHANTABILITY AND FITNESS FOR A PRACTICAL PURPOSE.
Some countries and US states do not allow the exclusion or limitation of incidental or consequential damages or implied
warranties so the above exclusions may not apply to you. This warranty gives you specific legal rights, and you may have other
statutory rights, which vary from state to state or country to country.
Incognito A-BUS keypad 19
Incognito KP10- EU
www.cambridge-audio.com
Part No. AP18303/2