1
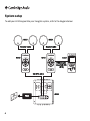
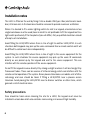
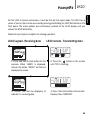
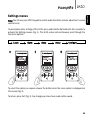
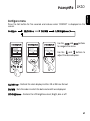
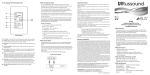
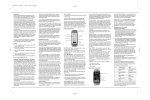
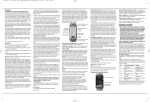
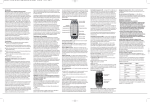
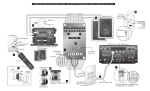
Learning keypad
Installation guide
2
ENGLISH
LK10
Contents
Introduction.....................................................3
System setup...................................................4
Installation notes............................................6
Keypad overview.............................................8
On-screen display............................................9
Cloning from the remote control...................10
Settings menus.............................................13
Troubleshooting............................................18
Limited warranty...........................................19
2
Introduction
Thank you for purchasing this Cambridge Audio Incognito product. Incognito is a costeffective, modular based multi-room system using standard Cat-5/5e or Cat-6 cable to
distribute hi-fi quality sound around a home. Optionally, video can also be distributed using
co-axial cable and a VH10 video hub.
The LK10 in-wall learning keypad must be used with the Incognito KP10 A-BUS™ audio
keypad and LR10 learning remote.
The LK10 keypad clones learnt IR codes and macros from the LR10 remote which once
transferred allow the LK10 to be used to control your source equipment conveniently from
the wall.
The LK10 is fitted on the wall by fixing it into a standard double J-box electrician’s back-box
and double Decora™ style faceplate (not included) next to a KP10 keypad. All knock-outs in
the back-box should be removed to provide maximum ventilation. Care should be taken in
choosing a site for the LK10, always refer to the precautions in this guide.
Thank you for taking the time to read this manual, we do recommend you keep it for future
reference.
Matthew Bramble, Cambridge Audio Technical Director
and the LK10 design team.
3
ENGLISH
LK10
System setup
To add your LK10 keypad into your Incognito system, refer to the diagram below:
SS10
SS10
Speaker cable
Speaker cable
KP10
LK10
KP10
Ribbon cable
(supplied with
LK10)
Cat-5/5e cable
PS10
4
AH10
Shift
Fav-1
(Set)
Menu
Title
Exit
The LK10 should be placed next to the KP10, using a double J-Box and double Decora™
faceplate (not supplied).
Rear view
Front view
2
1
1
KP10 connector - Connects the LK10 to the KP10 with the supplied ribbon cable.
2
I.C.P - In-circuit programming socket, used to upgrade keypad software when necessary.
5
ENGLISH
LK10
Installation notes
The LK10 is fitted on the wall by fixing it into a double USA-type J-Box (electrician’s backbox). All knock-outs in the back-box should be removed to provide maximum ventilation.
Where it is desired to fit a mains lighting switch etc next to a keypad, a barrier-box or two
single back-boxes must be used (bear in mind it is not preferable to fit the keypad next to a
light-switch particularly if the faceplate styles will differ). Only a qualified electrician should
attempt such installations.
Avoid fitting the LK10/KP10 where there is line of sight to another LK10/KP10. In such
situations both keypads may pick up the same commands from a remote control and it will
be difficult to control each zone independently.
Avoid fitting the LK10/KP10 where there is line of sight to the source equipment for the
system. In such situations the source equipment may pick up the same IR commands
directly as are picked up by the keypad and sent to the source equipment. This can
interfere with the remote operation of the source equipment.
Do not fit the keypad in areas directly lit by strong sunlight or where it will be strongly lit by
fluorescent tubes. These can be sources of infra-red energy which can interfere with the
remote control operation of the system. Some plasma televisions can radiate a lot of infrared energy and care should be taken if fitting a LK10/KP10 near a plasma screen
television. Avoid placing the LK10/KP10 near to dimmer switches or other items, which
generate a lot of electrical noise.
Safety precautions
Care should be taken when choosing the site for a LK10; the keypad must never be
installed in a back-box which also contains mains wiring or in areas of high humidity.
6
ENGLISH
LK10
Power requirement
The LK10 runs on 24 V DC (@ 250mA max) supplied through the connecting cable from
the KP10 keypad. As such there is no mains voltage present in the KP10 and the unit is
often safe to fit in areas where only extra low voltage (ELV) equipment is permitted.
However, it is imperative that you always check the wiring regulations in force for your
application and area.
Faceplates
The LK10 faceplate system is based on the Decora TM standard and is interchangeable with
the wide range of faceplates made by manufacturers such as Leviton etc that conform to
this standard. If it is desired to fit another faceplate, it can be replaced by gently prising
apart the LK10 faceplate and snapping on another in its place.
Approvals
This product complies with European Low Voltage (73/23/EEC) and
Electromagnetic Compatibility (89/336/EEC) Directives when used and installed
according to this instruction manual. For continued compliance only Cambridge
Audio accessories should be used with this product and servicing must be referred to
qualified service personnel.
The crossed-out wheeled bin is the European Union symbol for indicating separate
collection for electrical and electronic equipment. This product contains electrical
and electronic equipment which should be reused, recycled or recovered and
should not be disposed of with unsorted regular waste. Please return the unit or
contact the authorised dealer from whom you purchased this product for more
information.
7
Keypad overview
Buttons numbered 1-8 have dual functions, which
are controlled by the Shift button. These buttons
generate IR codes or macros cloned from the
buttons of the same name on the LR10 learning
remote (see later section on Cloning).
PM
SHARED
EDIT SLEEP LEARN
11
1
3
2
4
Shift
Fav-1
9
(Set)
5
8
Menu
7
Title
10
6
Primary functions
1 Play
2 Skip forward
3 Skip backward
4 Scan backward
5 Scan forward
6 Stop
7 Pause
8 Fav-1 (Favourite)
9 Set (Settings)
10 Cloning port
11 Display screen
Secondary functions
Enter
Up
Down
Left
Right
Exit
Title
Menu
Shift
Exit
Note: The actual functions of the buttons are
completely dependent on the codes taught into
the LR10 remote.
For full instructions on Shift/Settings, learning
buttons and the cloning port, please refer to the ‘Operating instructions’ and ‘Keypad
setup’ sections of this guide.
8
LK10
1
2
ENGLISH
On-screen display
3
PM
5
4
SHARED
6
EDIT SLEEP LEARN
7
8
9
10
1
2
3
4
5
6
7
8
9
10
Week days - The bar over a letter indicates the day of the week.
Alarm - Displayed when the alarm function is set.
IR - Indicates when an infra-red signal is sent from the LK10.
Time - Displays current time. ‘PM’ appears when 12 hour clock is set.
Date - Can be set as Month/Date or Date/Month.
Shared - Displayed when sharing a source with another zone connected to the same
AH10 hub.
Edit - Displayed when in Edit mode (Settings menu).
Sleep - Displayed when the sleep function is set.
Learn - Displayed when in Learn/Clone mode.
Name bar - Displays the name of the source, button or function.
For full instructions on these functions, please refer to the ‘Keypad setup’ section of this
guide.
9
Cloning from the remote control
The LK10 can only be used to control source equipment once it
has been cloned from the LR10. This transfers the necessary IR
codes and macros into the LK10. The Incognito LR10 is a
sophisticated learning remote which is able to learn the codes of
all the source equipment from their own remotes.
Once the LR10 itself has been programmed the user can clone all
macros and programmed information from the LR10 to the LK10,
allowing the keypad to also perform the same operations (IR
codes, macros, button names and clock settings).
Note: Only the learning buttons highlighted on the remote are
cloned to the LK10.
Please refer to the LR10’s own manual for full details on how to teach
codes into the LR10, advice on macros etc. Once the LR10 is fully
programmed/setup, you can clone it into the LK10.
To begin cloning, plug the supplied connection
cable into the cloning port on the LK10 and
LR10, then put the LK10 into Learn mode.
Set the LR10 to transmit (the LK1O will default
to Receiving mode).
On the back of the LR10 press the Edit button
4 times (using a paperclip or similar) to enter
Clone mode. ‘REC/TRX’ will appear on both
displays.
10
PM
SHARED
Shift
Fav-1
(Set)
Menu
EDIT SLEEP LEARN
Title
Exit
For the LK10 to receive commands, it must be first put into Learn mode. The LK10 has a
series of menus that can be accessed by pressing and holding the Shift/Set button on the
front panel. The menu options are continuously scrolled on the LK10 display until you
release the Shift/Set button.
Follow the next steps to complete the cloning operation:
LK10 keypad - Receiving data
1
LR10 remote - Transmitting data
2
1. Press and hold the Set button for five
seconds. When ‘LEARN’ is displayed,
release the button. ‘READY’ will then be
displayed on screen.
4
2. Press the
button on the remote
until ‘TRX’ is flashing.
3
4. ‘RXING..’ will then be displayed, to
indicate it is receiving data.
3. Press the Enter button on the remote.
Display shows ‘SENDING’.
11
ENGLISH
LK10
Cloning from the remote control
After approximately 7 minutes the keypad display should show ‘COMPLETE’ and return to
normal operation. All data has been transferred.
If the clone fails the keypad will show ‘ERROR’ or ‘TIMEOUT’. Put the transmitting LR10
remote back into Clone mode and repeat the process.
Note: Once the cloning process has been started it must be completed, as it overwrites the
software in the receiving LK10 keypad.
12
Settings menus
Note: You still use your KP10 keypad to control audio functions (volume adjustment, source
selection etc).
To personalise other settings of the LK10, press and hold the Set button for four seconds to
activate the Settings menus (Fig. 1). The LK10 screen will continuously scroll through the
five menu options:
Learn
Alarm
1
Sleep
Setup
2
Shift
Fav-1
(Set)
Menu
Title
Exit
Configure
3
Shift
Fav-1
(Set)
Menu
Title
Exit
Shift
Fav-1
(Set)
Menu
Title
Exit
To select the option you require release the button when the menu option is displayed on
the screen (Fig. 2).
To return, press Exit (Fig. 3). Any changes you have have made will be saved.
13
ENGLISH
LK10
Settings menus
Alarm menu
Press the Set button for five seconds and release when ‘ALARM?’ is displayed on the
screen.
Alarm
Hour
Minute
Days
Source
On/Off
Use the
and
to navigate the menu.
buttons
Use the
and
buttons to
adjust the desired option.
Shift
Fav-1
(Set)
Menu
Title
Exit
Note: When a Source is
selected, it will display the
default Source programmed into
the KP10 keypad.
Days
When selecting ‘DAYS’, use the
and
Monday to Friday, weekend or everyday.
keys to scroll to single day,
On/Off
When the alarm is selected on, the Alarm icon
14
will appear on the display.
Sleep menu
This menu allows you to set the time at which the LK10 will automatically switch off.
Press the Set button for five seconds and release when ‘SLEEP?’ is displayed on the screen.
Sleep
Hour
Minute
On/Off
Use the
and
to navigate the menu.
buttons
Use the
and
buttons to
adjust the desired option.
Shift
Fav-1
(Set)
Menu
Title
Exit
15
ENGLISH
LK10
Settings menus
Setup menu
This menu lets the user manually set the time and date of the LK10. Press the Set button
for five seconds and release when ‘SETUP?’ is displayed on the screen.
Setup
Hour
Minute
Date/Month
Month/Date
Year
Use the
and
to navigate the menu.
buttons
Use the
and
buttons to
adjust the desired option.
Shift
Fav-1
(Set)
Menu
Title
Exit
Note: The time and date will also be set automatically after a download from the LR10.
16
Configure menu
Press the Set button for five seconds and release when ‘CONFIG?’ is displayed on the
screen.
Configure
12/24 Hour
DD/MM
LCD Brightness
Use the
and
to navigate the menu.
buttons
Use the
and
buttons to
adjust the desired option.
Shift
Fav-1
(Set)
Menu
Title
Exit
12/24 Hour - Controls the clock display in either 12 or 24 hour format.
DD/MM - Sets the order in which the date and month are displayed.
LCD Brightness - Controls the LCD brightness level; Bright, dim or off.
17
ENGLISH
LK10
Troubleshooting
If the LK10 becomes locked and/or ‘ERROR’ appears on the display due to a power
interuption or during cloning, follow these steps:
1. Unplug the power to the system and plug back in after one minute.
2. When the power resumes, the LK10 will display distorted text.
3. Clone the LR10 to the LK10 without entering Learn mode.
4. When the LR10 has finished sending, repeat Step 1.
Note: Time and date will not be updated in the LK10.
Visit www.cambridge-audio.com and register to receive notification of future hardware and software
releases.
This guide is designed to make installing and using this product as easy as possible. Information in this
document has been carefully checked for accuracy at the time of printing; however, Cambridge Audio's
policy is one of continuous improvement, therefore design and specifications are subject to change
without prior notice. If you notice any errors please feel free to email us at: [email protected]
This document contains proprietary information protected by copyright. All rights are reserved. No part of
this manual may be reproduced by any mechanical, electronic or other means, in any form, without prior
written permission of the manufacturer. All trademarks and registered trademarks are the property of
their respective owners.
Incognito and Incognito Ready are trademarks of Cambridge Audio Ltd. All rights reserved.
© Copyright Cambridge Audio Ltd 2007
A-BUS and A-BUS Ready are registered trademarks of LeisureTech Electronics Pty Ltd Australia.
18
Limited warranty
Cambridge Audio warrants this product to be free from defects in materials and workmanship (subject to
the terms set forth below). Cambridge Audio will repair or replace (at Cambridge Audio’s option) this
product or any defective parts in this product. Warranty periods may vary from country to country. If in
doubt consult your dealer and ensure that you retain proof of purchase.
To obtain warranty service, please contact the Cambridge Audio authorised dealer from which you
purchased this product. If your dealer is not equipped to perform the repair of your Cambridge Audio
product, it can be returned by your dealer to Cambridge Audio or an authorised Cambridge Audio service
agent. You will need to ship this product in either its original packaging or packaging affording an equal
degree of protection.
Proof of purchase in the form of a bill of sale or receipted invoice, which is evidence that this product is
within the warranty period, must be presented to obtain warranty service.
This warranty is invalid if (a) the factory-applied serial number has been altered or removed from this
product or (b) this product was not purchased from a Cambridge Audio authorised dealer. You may call
Cambridge Audio or your local country Cambridge Audio distributor to confirm that you have an unaltered
serial number and/or you purchased from a Cambridge Audio authorised dealer.
This warranty does not cover cosmetic damage or damage due to acts of God, accident, misuse, abuse,
negligence, commercial use, or modification of, or to any part of, the product. This warranty does not cover
damage due to improper operation, maintenance or installation, or attempted repair by anyone other than
Cambridge Audio or a Cambridge Audio dealer, or authorised service agent which is authorised to do
Cambridge Audio warranty work. Any unauthorised repairs will void this warranty. This warranty does not
cover products sold AS IS or WITH ALL FAULTS.
REPAIRS OR REPLACEMENTS AS PROVIDED UNDER THIS WARRANTY ARE THE EXCLUSIVE REMEDY OF
THE CONSUMER. CAMBRIDGE AUDIO SHALL NOT BE LIABLE FOR ANY INCIDENTAL OR CONSEQUENTIAL
DAMAGES FOR BREACH OF ANY EXPRESS OR IMPLIED WARRANTY IN THIS PRODUCT. EXCEPT TO THE
EXTENT PROHIBITED BY LAW, THIS WARRANTY IS EXCLUSIVE AND IN LIEU OF ALL OTHER EXPRESS AND
IMPLIED WARRANTIES WHATSOEVER INCLUDING, BUT NOT LIMITED TO, THE WARRANTY OF
MERCHANTABILITY AND FITNESS FOR A PRACTICAL PURPOSE.
Some countries and US states do not allow the exclusion or limitation of incidental or consequential
damages or implied warranties so the above exclusions may not apply to you. This warranty gives you specific
legal rights, and you may have other statutory rights, which vary from state to state or country to country.
19
ENGLISH
LK10
Cambridge Audio
Gallery Court
Hankey Place
London SE1 4BB
England
© 2007 Cambridge Audio Ltd
AP20830/1
www.cambridge-audio.com