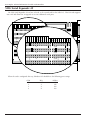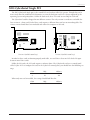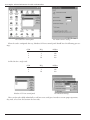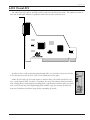
1
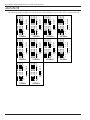
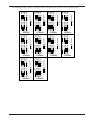
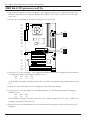
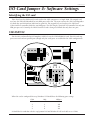
revision 0.2.8.7
PCComplete Technical Notes
for Sable Computers
Table of Contents
Table of Contents ........................................................................................................................................a
Foreword .....................................................................................................................................................c
Obtaining PCComplete Service ..................................................................................................................d
Processor Jumper Settings
Identifying the main board .........................................................................................................................1
Identifying the AMD-K6 speed ...................................................................................................................1
Identifying the Pentium II/III (Slot 1) speed ..............................................................................................1
Identifying the Pentium III (FPGA) speed .................................................................................................1
Identifying the Celeron (Slot 1) speed ........................................................................................................1
Identifying the Celeron (Socket 370/PPGA) speed ....................................................................................2
Underclocking for compatibility .................................................................................................................2
ASUS TXP4-X ..............................................................................................................................................2
ASUS P5A ....................................................................................................................................................3
ASUS P2L97 ................................................................................................................................................4
ASUS P2B ....................................................................................................................................................4
ASUS P2B-F .................................................................................................................................................5
ASUS P2-99 .................................................................................................................................................6
AMD K6-2/333 processor stall fix ...............................................................................................................8
I/O Card Jumper & Software Settings
Identifying the I/O card .............................................................................................................................11
STB DSP/550 .............................................................................................................................................11
SIIG Serial Expander 4S ............................................................................................................................12
SIIG CyberSerial Dual PCI ........................................................................................................................13
SIIG CyberSerial Single PCI ......................................................................................................................15
LAVA SSerial-PCI .......................................................................................................................................17
Power Selection Switch
Power selection switch ..............................................................................................................................19
BIOS Settings
Information about using BIOS ..................................................................................................................21
Recommended BIOS settings ....................................................................................................................21
Standard CMOS Setup ...............................................................................................................................21
BIOS Features Setup ..................................................................................................................................22
Chipset Features Setup .............................................................................................................................23
Power Management Setup .........................................................................................................................24
PNP and PCI Setup ...................................................................................................................................25
Password Prompts
This guide was created exclusively for Sable Technologies by PCComplete Corporate Sales.
Written by Darryl Wattenberg with Fred Hodge, Marshall Miller, and Patrick Obloy.
© PCComplete, 1998-2000, All rights reserved
a
PCComplete Technical Information for Sable Techs/Installers
Windows NT .............................................................................................................................................27
BIOS passwords .........................................................................................................................................27
Clearing BIOS passwords once they have been set ...................................................................................27
Video Driver/Black Screen Problem
Overview ...................................................................................................................................................29
Solution .....................................................................................................................................................29
Supported resolutions and frequencies .....................................................................................................30
KDS VS-4D 14" monitor ...........................................................................................................................30
OptiQuest Q41 & Viewsonic E40 14" monitors ......................................................................................30
OptiQuest Q55 & Viewsonic E655 15" monitors ....................................................................................30
Viewsonic E771 17" monitor ....................................................................................................................30
Problems with Monitor Viewable Size
Screen too wide .........................................................................................................................................31
Problems Changing Video Driver
Overview ...................................................................................................................................................33
Solution .....................................................................................................................................................33
Booting from CD-ROM
Without a ZIP drive ..................................................................................................................................35
With a ZIP drive ........................................................................................................................................35
pcAnywhere notes
Start with Windows option .......................................................................................................................37
PCComplete Assembled Sable Computers and the Year 2000
The main board .........................................................................................................................................39
Windows NT Workstation 4.0 ..................................................................................................................39
Appendix
Web sites for drivers & updates ..................................................................................................................i
Memory upgrades on PCComplete computers ...........................................................................................ii
Hard Drive Master Versions .......................................................................................................................iii
b
revision 0.2.8.7
Foreword
This technical information has been assembled for use by Sable Installers and Technicians. The information
in this guide is targeted for people with technical knowledge of PC hardware and Windows NT. As such, we
ask that this information not be distributed to end users without a technical background.
Information in this guide is the most current available at time of printing. As with the rest of the computer
industry, this information is subject to change on a regular basis. We have provided revision numbers in the
top right corner of the right-hand pages to help you identify the age of this information. Please do not make
and/or distribute copies of this guide. Contact Darryl at “[email protected]” or by calling 248/5454211 for additional copies of this technical information.
If you know of an issue with a PCComplete computer which should be added to this guide, please let us
know. The best way to contact us with additions is by e-mail at “[email protected]” or by fax at 248/5454284 (attention Darryl). If neither option is available, call Darryl at 248/545-4211.
c
PCComplete Technical Information for Sable Techs/Installers
Obtaining PCComplete Service
PCComplete has developed special warranties and service plan for the Sable computers. These include
original warranty and extended warranty (for machine 2-3 years old) for PCComplete assembled computers,
and the extended service agreement for PCComplete and non-PCComplete assembled computers. These warranties and service agreement allow for a loaner PC to be sent (only after review and approval by
PCComplete technician) by basic overnight service to the customer name under the warranty/service agreement. Other shipping methods may be available at additional cost to the customer. Some upgrade customers
do not have any of these warranties or service agreements in place. To reduce the cost for customers needing
replacement PCs during the Y2K transition, this special 30 day parts only warranty was developed.
Information about the type of coverage and expiration of that coverage may be obtained through
PCComplete. The Annual Extended Warranty Agreement and Annual Extended Service Agreement enrollment kits are avalible on the PCComplete web site in the “Products” section under the “For Sable
Customers” topic.
Before calling for service on a PCComplete assembled POS computer, please have the following information available:
•
customer’s company name
•
computer serial number (located on the back of the computer)
•
customer contact information (including the person with whom you have been working with)
•
pcAnywhere phone number for the computer in question
•
complete description of the problem and any action taken
During normal business hours contact PCComplete by calling 248/545-4211. After hours please use the
pager support by calling 800/354-5322 and punching in the customer’s phone number.
d
revision 0.2.8.7
Processor Jumper Settings
Identifying the main board
Before setting the speed of the processor, it is necessary to identify the type of board which you are working on. An AMD K-6 or K6-2 should be using either the ASUS TXP4-X or P5A main boards. Intel Pentium II
computers may use one of five main boards (P2L97, P2B, P2B-F, P2-99, or P3B-F). Intel Celerons may use
any Slot 1 board (P2L97, P2B, P2B-F, P2-99, or P3B-F) though a slot one adapter is required on some
333MHz and higher processors. Pentium IIIs are restricted to 100MHz Slot 1 boards (P2B, P2B-F, P2-99, or
P3B-F). On all of the main boards the model is printed in white ink. It is generally easier to check the BIOS
information for the main board model and revision. Power on the computer and check in the lower left corner of the screen. There will be a string of characters on the last line and it should include either
“<TXP4X>”, “<<P5A>>”, “<P2L97>”, “<<P2B>>”, “<<P2B-F>>”, or “<<P2-99>>” in roughly the middle.
Identifying the AMD-K6 speed
There are two different types of AMD-K6 processors. To identify the difference, look at the top of the fan
over the processor. Some of the K6 processors will have a silver foil sticker in the center of the fan which is
located top of the processor which will have the speed and voltage settings printed on it. Others will not
have a silver sticker in the center of the fan. In this case the fan must be removed from the processor. On the
top of the processor, stamped in the metal plate, is the speed and voltage information. Once this information
has been obtained, make sure to secure the processor fan to the processor and verify that it is tight and cannot be slipped or bumped off.
Identifying the Pentium II/III (Slot 1) speed
The Pentium II/III slot 1 processor is the least difficult to identify its speed. Look at the top of the processor (the edge facing out of the case) and look at the first line of the imprinted codes. There will be a space
about three-quarters of the way into the line. Look at the six numbers just before that space. The first three
indicate the speed, the last three indicate the cache size. Thus, a 333MHz processor’s first line could look like
this; “80523PX333512 SL2S5” while a 266MHz processor could look like this; “B80522P266512 SL2QB.”
Identifying the Pentium III (FPGA) speed
Later models of the Pentium III processor where shipped in a socket 370 configuration called “FPGA.”
Though no FPGA boards have been used in Sable systems to date, the FPGA processors are installed in to a
Slot 1 adapter card for installation in to the standard Slot 1 main boards. Identification of the processor speed
requires removal of this slot 1 adapter, and the processor fan. It is not recommended that you attempt this as
it can could serious problems with the heat dissipation of the processor (the thermal putty placed between
the heatsync and the processor will no be properly intact). Additionally, all of the Pentium III processors
have the locked multiplier prohibiting modification to the processor's operating speed. It is suggested that
Pentium III processors not be modified in the field. If there is a need to do so, contact a PCComplete technician for more information.
Identifying the Celeron (Slot 1) speed
The Slot 1 Celeron has shipped from PCComplete in one speed – 333MHz. If you do however need to
check the speed of the processor it is located on the back side of the card to the left side. It should have a
1
PCComplete Technical Information for Sable Techs/Installers
white background with the second line of text reading similar to this, “333/66 COSTA RICA”. The “333” is
the processor speed. This processor is set exactly the same as the Pentium II.
Identifying the Celeron (Socket 370/PPGA) speed
More recent Celeron based systems from PCComplete use Socket 370 (a.k.a. PPGA) processors. When
installed on the Slot 1 main boards they use a Socket 370 to Slot 1 adapter. To check the speed of the processor will require that the processor be removed from the adapter. First, remove the fan from the adapter card.
The processor should now be exposed. While holding the processor, lift the processor release lever away
from the adapter card. Carefully remove the processor from the socket and look at the underside of the
processor. Below the Intel and Celeron logos is a line of text (ie. B80524P333) which is the processor’s ID.
The last three digits of this line is the processor’s speed. Be extremely careful when replacing the processor.
Underclocking for compatibility
Though this is not recommended by chip makers, it has been known to work as a temporary solution in
some cases. This practice works only on AMD K6 and early Intel Pentium II machines shipped by
PCComplete. Newer Intel processors have locked their multiplier, so regardless of which multiplier you
select, it will continue to operate at its predetermined setting even if the board says otherwise. Changing the
bus speed is not recommended as it will frequently result in an unstable system and may case damage to
many of the system’s components. It is recommended that processors be configured based on their actual
speed and the setting in this book for reliability and stability.
ASUS TXP4-X
The following jumper settings are only for AMD-K6 processors on the ASUS TXP4-X main board.
BF2
BF1
BF0
3
2
1
3
2
1
3
2
1
VID2
VID1
VID0
VID2
VID1
VID0
3
2
1
266MHz
2
FS2
FS1
FS0
BF2
BF1
BF0
FS2
FS1
FS0
3
2
1
3
2
1
300MHz
revision 0.2.8.7
ASUS P5A
The following jumper settings are only for AMD-K6 & K6-2 processors on the ASUS P5A main board.
1 2 3
FS0
FS1
FS2
FS3
1 2 3
BF0
BF1
BF2
1 2 3
FS0
FS1
FS2
FS3
1 2 3
BF0
BF1
BF2
1 2 3
1 2 3
VID0
VID1
VID2
VID3
VID0
VID1
VID2
VID3
K6/266MHz
K6/300MHz
1 2 3
FS0
FS1
FS2
FS3
1 2 3
BF0
BF1
BF2
1 2 3
FS0
FS1
FS2
FS3
1 2 3
BF0
BF1
BF2
1 2 3
1 2 3
VID0
VID1
VID2
VID3
VID0
VID1
VID2
VID3
K6-2/266MHz
1 2 3
FS0
FS1
FS2
FS3
1 2 3
BF0
BF1
BF2
K6-2/300MHz
1 2 3
FS0
FS1
FS2
FS3
1 2 3
BF0
BF1
BF2
1 2 3
1 2 3
VID0
VID1
VID2
VID3
VID0
VID1
VID2
VID3
K6-2/333MHz
K6-2/350MHz
The following jumper settings are only for Intel Pentium processors with MMX on the ASUS P5A main
board.
1 2 3
FS0
FS1
FS2
FS3
1 2 3
BF0
BF1
BF2
1 2 3
FS0
FS1
FS2
FS3
1 2 3
VID0
VID1
VID2
VID3
P55C 200MHz
1 2 3
BF0
BF1
BF2
1 2 3
VID0
VID1
VID2
VID3
P55C 233MHz
3
PCComplete Technical Information for Sable Techs/Installers
ASUS P2L97
The following jumper settings are only for Intel Pentium II and Celeron processors under 350MHz on the
ASUS P2L97 main board.
FS0
FS1
FS2
FS0
FS1
FS2
FS0
FS1
FS2
1
2
3
1
2
3
1 2 3
1 2 3
1 2 3
BF3
BF2
BF1
BF0
BF3
BF2
BF1
BF0
266MHz
1
2
3
300MHz
BF3
BF2
BF1
BF0
333MHz
ASUS P2B
The following jumper settings are only for Intel Pentium II processors on the ASUS P2B main board.
FS3
FS2
FS1
FS0
FS3
FS2
FS1
FS0
FS3
FS2
FS1
FS0
1
2
3
1
2
3
1
2
3
BF3
BF2
BF1
BF0
BF3
BF2
BF1
BF0
BF3
BF2
BF1
BF0
1
2
3
1
2
3
1
2
3
266MHz
300MHz
333MHz
FS3
FS2
FS1
FS0
FS3
FS2
FS1
FS0
FS3
FS2
FS1
FS0
1
2
3
1
2
3
1
2
3
BF3
BF2
BF1
BF0
BF3
BF2
BF1
BF0
BF3
BF2
BF1
BF0
1
2
3
1
2
3
1
2
3
350MHz
400MHz
450MHz
(FS3 is only used on main board version 1.10 and higher.
For earlier board versions only set jumpers FS0, FS1, and FS2)
4
revision 0.2.8.7
ASUS P2B-F
The following jumper settings are only for Intel Pentium II/III processors on the ASUS P2B-F main board.
333MHz
FS0
FS1
FS2
FS3
450MHz
AGPFS
1
2
3
1
2
3
BF0
BF1
BF2
BF3
400MHz
1
2
3
BF0
BF1
BF2
BF3
BF0
BF1
BF2
BF3
1
2
3
1
2
3
AGPFS
AGPFS
1
2
3
1
2
3
1
2
3
350MHz
FS0
FS1
FS2
FS3
FS0
FS1
FS2
FS3
1
2
3
AGPFS
1
2
3
1
2
3
BF0
BF1
BF2
BF3
1
2
3
BF0
BF1
BF2
BF3
BF0
BF1
BF2
BF3
266MHz
1
2
3
AGPFS
AGPFS
1
2
3
1
2
3
1
2
3
FS0
FS1
FS2
FS3
FS0
FS1
FS2
FS3
FS0
FS1
FS2
FS3
1
2
3
1
2
3
500MHz
The following jumper settings are only for Intel Celeron processors on the ASUS P2B-F main board.
333MHz
FS0
FS1
FS2
FS3
433MHz
AGPFS
1
2
3
1
2
3
BF0
BF1
BF2
BF3
400MHz
BF0
BF1
BF2
BF3
BF0
BF1
BF2
BF3
1
2
3
1
2
3
AGPFS
AGPFS
1
2
3
1
2
3
1
2
3
366MHz
FS0
FS1
FS2
FS3
FS0
FS1
FS2
FS3
1
2
3
AGPFS
1
2
3
1
2
3
BF0
BF1
BF2
BF3
1
2
3
BF0
BF1
BF2
BF3
BF0
BF1
BF2
BF3
300MHz
1
2
3
AGPFS
AGPFS
1
2
3
1
2
3
1
2
3
FS0
FS1
FS2
FS3
FS0
FS1
FS2
FS3
FS0
FS1
FS2
FS3
1
2
3
1
2
3
1
2
3
466MHz
5
PCComplete Technical Information for Sable Techs/Installers
ASUS P2-99
The following jumper settings are only for Intel Pentium II/III processors on the ASUS P2-99 main board.
FS3
FS2
FS1
FS0
AGPFS
FS3
FS2
FS1
FS0
1
2
3
AGPFS
1
2
3
BF3
BF2
BF1
BF0
800MHz
BF3
BF2
BF1
BF0
1
2
3
1
2
3
1
2
3
AGPFS
700MHz
BF3
BF2
BF1
BF0
BF3
BF2
BF1
BF0
1
2
3
1
2
3
AGPFS
AGPFS
1
2
3
1
2
3
600MHz
FS3
FS2
FS1
FS0
FS3
FS2
FS1
FS0
1
2
3
AGPFS
550MHz
BF3
BF2
BF1
BF0
1
2
3
1
2
3
450MHz
FS3
FS2
FS1
FS0
AGPFS
500MHz
1
2
3
1
2
3
BF3
BF2
BF1
BF0
BF3
BF2
BF1
BF0
1
2
3
1
2
3
400MHz
FS3
FS2
FS1
FS0
AGPFS
1
2
3
1
2
3
1
2
3
1
2
3
BF3
BF2
BF1
BF0
1
2
3
350MHz
FS3
FS2
FS1
FS0
1
2
3
6
1
2
3
BF3
BF2
BF1
BF0
BF3
BF2
BF1
BF0
333MHz
1
2
3
AGPFS
AGPFS
1
2
3
1
2
3
1
2
3
FS3
FS2
FS1
FS0
FS3
FS2
FS1
FS0
FS3
FS2
FS1
FS0
1
2
3
1
2
3
650MHz
1
2
3
revision 0.2.8.7
The following jumper settings are only for Intel Celeron processors on the ASUS P2-99 main board.
FS3
FS2
FS1
FS0
FS3
FS2
FS1
FS0
FS3
FS2
FS1
FS0
FS3
FS2
FS1
FS0
BF3
BF2
BF1
BF0
BF3
BF2
BF1
BF0
BF3
BF2
BF1
BF0
FS3
FS2
FS1
FS0
FS3
FS2
FS1
FS0
FS3
FS2
FS1
FS0
FS3
FS2
FS1
FS0
AGPFS
AGPFS
AGPFS
AGPFS
BF3
BF2
BF1
BF0
BF3
BF2
BF1
BF0
BF3
BF2
BF1
BF0
BF3
BF2
BF1
BF0
533MHz
500MHz
AGPFS
AGPFS
AGPFS
AGPFS
BF3
BF2
BF1
BF0
FS3
FS2
FS1
FS0
FS3
FS2
FS1
FS0
AGPFS
AGPFS
BF3
BF2
BF1
BF0
BF3
BF2
BF1
BF0
600MHz
566MHz
1
2
3
1
2
3
1
2
3
1
2
3
1
2
3
1
2
3
1
2
3
1
2
3
1
2
3
466MHz
433MHz
1
2
3
1
2
3
1
2
3
1
2
3
1
2
3
1
2
3
1
2
3
1
2
3
1
2
3
400MHz
366MHz
1
2
3
1
2
3
1
2
3
1
2
3
333MHz
300MHz
1
2
3
1
2
3
1
2
3
1
2
3
1
2
3
1
2
3
1
2
3
1
2
3
7
PCComplete Technical Information for Sable Techs/Installers
AMD K6-2/333 processor stall fix
1. Shut down the computer and after the power is off, unplug the power to the computer and remove the
monitor’s connection to the computer. Remove the computer’s cover (there are six screws on the minitower case).
123
BS2
BS1
BS0
123
FS0
FS1
FS2
FS3
B A C K
O F
C O M P U T E R
2. Remove the screw holding in the video card. Remove the video card.
3. Locate the “FS” series of jumpers. They should be immediately under the card which you just removed
(see illustration below). The jumpers should be set to:
FS0
FS1
FS2
FS3
1-2
2-3
2-3
2-3
(FS0 should be the jumper toward the top of the case and the 1-2 position being toward the back of the
case.)
4. Replace the video card (make sure it is completely seated) and fasten it down.
5. Locate the “BS” series of jumpers near the RAM and drives (see the illustration below).The jumpers
should be set to:
BS2
BS1
BS0
2-3
2-3
1-2
(BS2 should be the jumper toward the top of the case – which is opposite the “FS” series – and the 1-2
position is toward the back of the case.)
6. Replace the cover and fasten down all six screws. Reconnect the monitor’s cable and the power to the
computer.
8
revision 0.2.8.7
7. Make sure all cables are connected and secure, then power on the computer, press and hold the “Delete”
key to enter BIOS.
8. Use the arrow keys to select “BIOS Features Setup” and press the “Enter” key. Use the arrow keys again to
select the “Quick Power On Test,” use the “Page Up” key to set it to “Disable”. Press “Esc” to return to the
main BIOS screen. Press “F10” to save and exit, confirm with “y” and press return.
9. Allow the computer to run through it’s tests and confirm that the processor still reads an AMD K6-2/333
and that the correct amount of RAM is displayed.
10. After the O/S loads and everything appears to be working correctly, restart the computer and enter the
BIOS again. Use the arrow keys to select “BIOS Features Setup” and press the “Enter” key. Use the arrow
keys again to select the “Quick Power On Test,” use the “Page Up” key to set it to “Enable”. Press “Esc” to
return to the main BIOS screen. Press “F10” to save and exit, confirm with “y” and press return.
9
PCComplete Technical Information for Sable Techs/Installers
10
revision 0.2.8.7
I/O Card Jumper & Software Settings
Identifying the I/O card
There have been five different I/O cards used in the Sable computers as of April 2000. The original card
used was the STB DSP/550 which has two DB9 ports and is ISA. The next card was the SIIG Serial Expander
4S which has one DB9 and one DB25 and is again ISA. The original PCI card used was the SIIG Dual
CyberSerial PCI controller which has two DB9 ports. The SIIG Single CyberSerial PCI controller has only one
DB9 port per card. Currently, the LAVA SSerial-PCI card is being used which also only have one port.
STB DSP/550
J7
J12
The first I/O card installed in PCComplete’s Sable PCs was the STB DSP/550 I/O card. This ISA card supports two serial and one parallel port (though only the serial ports are enabled for the Sable configuration).
IRQ
2 3 2 3
5 4 5 4
IRQ
When the card is configured this way, Windows NT should have the following port settings:
COM
1
2
3
4
IRQ
4
3
5
9
Address
3f8
2f8
3e8
2e8
It should also be noted that with this configuration DOS and Windows95 will not be able to use COM4.
11
PCComplete Technical Information for Sable Techs/Installers
SIIG Serial Expander 4S
S4
S4_IRQ
460800
230400
115200
IRQ15
IRQ12
IRQ11
IRQ10
IRQ9
IRQ7
IRQ5
IRQ4
IRQ3
S3
270 COM12
460800
268 COM10
368 COM9
260 COM8
S3_IRQ
2E0 COM7
S3
3E0 COM6
S2
2F0 COM5
S2_IRQ
2E8 COM4
S2
3E8 COM3
S1
2F8 COM2
S1_IRQ
3F8 COM1
S1
360 COM11
230400
115200
IRQ15
IRQ12
IRQ11
IRQ10
IRQ9
IRQ7
IRQ5
IRQ4
IRQ3
270 COM12
360 COM11
268 COM10
368 COM9
260 COM8
2E0 COM7
3E0 COM6
2F0 COM5
2E8 COM4
3E8 COM3
2F8 COM2
3F8 COM1
The SIIG Serial Expander 4S card was selected as the second card for the Sable PCs. This ISA card supports
two serial and allows for an upgrade to use two additional serial ports.
S4
S1
S1_IRQ
S1
S2
S2_IRQ
S2
S3
S3_IRQ
S3
S4
S4_IRQ
S4
When the card is configured this way, Windows NT should have the following port settings:
COM
1
2
3
4
12
IRQ
4
3
5
9
Address
3f8
2f8
3e8
2e8
revision 0.2.8.7
SIIG CyberSerial Dual PCI
The SIIG CyberSerial is the first PCI serial card used on Sable POS systems. Though this card is more costly than the traditional ISA alternatives, PCI is better supported by the operating system and pcAnywhere.
These PCI cards use only one IRQ for both COM ports.
The CyberSerial card has shipped in two different version. The early version is a mid-size card while the
second version is a short card. Each of these cards require different drivers and are not interchangeable. The
correct version should have been included with either the computer or I/O card.
FAST SERIAL
SI I G
1 6 - B yte B u ffe r
16550
1 6 - B yte B u ffe r
FAST SERIAL
CYBER
16550
CYBER
H ig h Sp e e d Se r ia l P o r t
PCI
H ig h Sp e e d Se r ia l P o r t
PCI
SIIG
V2.0
Version 1 (at 50% actual size)
Version 2 (at 50% actual size)
Unlike the ISA cards, the PCI cards require a software driver. The CyberSerial card uses a control panel
called “Cyber PCI” to configure the card. In the Cyber PCI control panel, you should have the following settings:
COM
3
4
The Cyber PCI control panel
IRQ
10
10
Address
3e8
2e8
The Advanced Port Settings
13
PCComplete Technical Information for Sable Techs/Installers
When the card is configured this way, Windows NT Ports control panel should have the following port settings:
COM
1
2
3
4
Windows NT’s Port control panel
14
IRQ
4
3
10
10
Address
3f8
2f8
3e8
2e8
The Advanced Settings
revision 0.2.8.7
SIIG CyberSerial Single PCI
The SIIG CyberSerial Single port is the second PCI card used on Sable POS systems. Though this card is
more costly than the traditional ISA alternatives or even the dual port card, PCI is better supported by the
operating system and pcAnywhere. Unlike the dual cards, these PCI cards use one IRQ for each card.
The CyberSerial card has shipped in two different version. The early version is a mid-size card while the
later version is a short card. Each of these cards require a different driver and are not interchangeable. The
correct version should have been included with either the computer or I/O card.
V2.0
V3.0
1 6 - B yte B uff e r
Hi g h S p eed Ser i al Po r t
SIIG
Version 2 (at 50% actual size)
FAST SERIAL
PCI
16550
CYBER
SIIG
Version 3 (at 50% actual size)
In order for these cards to function properly with Sable, it is vital that at least one PCI slot be left open
between two of these cards.
Unlike the ISA cards, the PCI cards require a software driver. The CyberSerial card uses a control panel
called “Cyber PCI” to configure the card. In the Cyber PCI control panel, you should have the following settings:
COM
IRQ
Address
3
5
3e8
4
10
2e8
When only one card is installed, the settings should look like this:
COM
3
IRQ
10
Address
3e8
15
PCComplete Technical Information for Sable Techs/Installers
The Cyber PCI control panel
The Advanced Port Settings
When the card is configured this way, Windows NT Ports control panel should have the following port settings:
COM
1
2
3
4
IRQ
4
3
5
10
Address
3f8
2f8
3e8
2e8
IRQ
4
3
10
Address
3f8
2f8
3e8
Or like this for a single card:
COM
1
2
3
Windows NT’s Port control panel
The Advanced Settings
These cards maybe added individually to add one extra serial port. In order to ensure proper operation,
they need at least one slot between the two cards.
16
revision 0.2.8.7
LAVA SSerial-PCI
The LAVA SSerial-PCI port is the fifth serial I/O card used on Sable POS systems. The switch was made to
this card in mid-April 2000 due to problems with TCAs on other serial I/O cards.
CANADA
In order for these cards to function properly with Sable, it is vital that at least one PCI slot
be left open between two of these cards (see the illustration to the right).
Unlike the ISA cards, the PCI cards require a software driver. The LAVA SSerial-PCI card
uses a control panel called “LavaPort” to configure the card. This software must be installed
from a floppy disk to work properly. Installing from a CD-ROM or hard drive will cause problems. If you do not have the original floppy disk available, copy the contents the directory
from the CD-ROM or hard drive image before attempting the install.
17
PCComplete Technical Information for Sable Techs/Installers
In the LavaPort control panel, you should not have to change anything. If the setting do not match the
screen shot below, remove the software and reinstall the driver from the floppy drive and not the CD-ROM or
hard drive copy.
The LavaPort control panel after a proper installation
When the card is configured this way, Windows NT Ports control panel should have the following port settings:
COM
1
2
3
4
IRQ
4
3
Default
Default
Address
3f8
2f8
Default
Default
IRQ
4
3
Default
Address
3f8
2f8
Default
Or like this for a single card:
COM
1
2
3
Windows NT’s Port control panel
The Advanced Settings
These cards maybe added individually to add one extra serial port. In order to ensure proper operation,
they need at least one slot between the two cards.
18
revision 0.2.8.7
Power Selection Switch
Power selection switch
115
On the back of the power supply is a switch to select between 115 and 230 volt current. This switch must
be set for the 115 volt setting or the computer will not function properly.
Occasionally, this switch has changed positions in shipping, so it is advisable to double check the power
switch before turning on the computer.
19
PCComplete Technical Information for Sable Techs/Installers
20
revision 0.2.8.7
BIOS Settings
Information about using BIOS
To access the BIOS, hold down the “delete” key during the memory count (right after the computer is powered on).
Once in BIOS, use the arrow keys to navigate through the menus. The “Enter” key will select the current
highlighted menu. Generally, the “page up” and “page down” keys will cycle through options. To return to
the main menu from any of the sub-menus, press the “esc” key.
To determine which main board you are working with, check at the top center of the screen. In parens –
“()” – will be the main board type (TXP4-X, P5A, P2L97, P2B, P2B-F, or P2-99). Newer main boards (including the P3B-F) will have a completely different look. Since only a few of those have been shipped so far they
will be covered in later revisions to this tech note.
Motherboard Type
ROM PCI/ISA BIOS (XXXXXXXX)
CMOS SETUP UTILITY
AWARD SOFTWARE, INC.
STANDARD CMOS SETUP
SUPERVISOR PASSWORD
BIOS FEATURES SETUP
USER PASSWORD
CHIPSET FEATURES SETUP
IDE HDD AUTO DECTECTION
POWER MANAGEMENT SETUP
SAVE & EXIT SETUP
PNP AND PCI SETUP
EXIT WITHOUT SAVING
LOAD BIOS DEFAULTS
LOAD SETUP DEFAULTS
Esc : Quit
F10 : Save & Exit Setup
: Select Item
(Shift)F2 : Change Color
Time, Date, Hard Disk Type...
Recommended BIOS settings
The following are simulations of the BIOS screens for the recommended settings on Sable computers. These
settings will vary from main board to main board but are generally the similar. When there are differences
between the main board, check under each screen for which main board it is associated with (see above for
assistance on identifying the board you are working with).
All of these settings are modified from the BIOS Default settings. Under each of the screen shots will be a
list of the settings for each of these screens which change from these default settings. When attempting to
restore the BIOS to their optimal condition, it is recommended that the “LOAD BIOS DEFAULTS” be used
before changing any of the following settings.
Standard CMOS Setup
This screen will vary in its settings based on the type of hard drive installed in the system.
21
PCComplete Technical Information for Sable Techs/Installers
ROM PCI/ISA BIOS (XXXXXXXX)
CMOS SETUP UTILITY
AWARD SOFTWARE, INC.
Date (mm:dd:yy) : Fri, Oct 9 1998
Time (hh:mm:ss) : 13 : 15 : 41
HARD DISKS
Primary Master
Primary Slave
Secondary Master
Secondary Slave
:
:
:
:
TYPE
SIZE
User
None
None
None
3241
0
0
0
Drive A : 1.44M, 3.5 in.
Drive B : None
Floppy 3 Mode Support : Disabled
CYLS HEAD PRECOMP LANDZ SECTOR
Video
: EGA/VGA
Halt On : All Errors
ESC : Quit
F1 : Help
785
0
0
0
128
0
0
0
0
0
0
0
6703
0
0
0
MODE
63
0
0
0
LBA
----------
Base Memory:
Extended Memory:
Other Memory:
640K
31744K
384K
Total Memory:
32768K
: Select Item
(Shift)F2 : Color
PU/PD/+/- : Modify
TXP4-X, P5A, P2L97, P2B, P2B-F & P2-99
The only issue on this screen are the settings for the drives under Primary Master. Except for the Primary
Master, all drives should be set for “None.” (“Auto” will not cause any problems with the operation of the
computer though it does slow it down during power-up.)
BIOS Features Setup
ROM PCI/ISA BIOS (<TXP4-X>)
BIOS FEATURES SETUP
AWARD SOFTWARE, INC.
Virus Warning
:
CPU Internal Cache
:
External Cache
:
Quick Power On Self Test
:
HDD Sequence SCSI/IDE First:
Boot Sequence
:
Boot Up Floppy Seek
:
Floppy Disk Access Control :
IDE HDD Block Mode Sectors :
Security Option
:
PS/2 Mouse Function
:
PCI/VGA Palette Snoop
:
OS/2 Onboard Memory > 64M :
Disabled
Enabled
Enabled
Enabled
IDE
A,C
Enabled
R/W
Disabled
Setup
Auto
Disabled
Disabled
Video
C8000
CC000
D0000
D4000
D8000
DC000
ROM BIOS
- CBFFF
- CFFFF
- D3FFF
- D7FFF
- DBFFF
- DFFFF
ROM PCI/ISA BIOS (<<P5A>>)
BIOS FEATURES SETUP
AWARD SOFTWARE, INC.
Shadow
Shadow
Shadow
Shadow
Shadow
Shadow
Shadow
Boot up NumLuck Status
Typematic Rate Setting
Typematic Rate (Char/Sec)
Typematic Delay (Msec)
ESC
F1
F5
F6
F7
:
:
:
:
:
Quit
Help
Old Values
Load BIOS
Load Setup
:
:
:
:
:
:
:
Enabled
Disabled
Disabled
Disabled
Disabled
Disabled
Disabled
:
:
:
:
On
Disabled
6
250
Boot Virus Warning
:
CPU Internal Cache
:
External Cache
:
Quick Power On Self Test
:
HDD Sequence SCSI/IDE First:
Boot Sequence
:
Boot Up Floppy Seek
:
Floppy Disk Access Control :
IDE HDD Block Mode Sectors :
HDD S.M.A.R.T. capability :
PS/2 Mouse Function
:
OS/2 Onboard Memory > 64M :
: Select Item
PU/PD/+/- : Modify
(Shift)F2 : Color
Defaults
Defaults
Virus Warning
:
CPU Level 1 Cache
:
CPU Level 2 Cache
:
CPU Level 2 Cache ECC Check:
BIOS Update
:
Quick Power On Self Test
:
HDD Sequence SCSI/IDE First:
Boot Sequence
:
Boot Up Floppy Seek
:
Floppy Disk Access Control :
IDE HDD Block Mode Sectors :
HDD S.M.A.R.T. capability :
PS/2 Mouse Function
:
OS/2 Onboard Memory > 64M :
Disabled
Enabled
Enabled
Disabled
Disabled
Enabled
IDE
A,C
Enabled
R/W
Disabled
Disabled
Auto
Disabled
P2L97
Quit
Help
Old Values
Load BIOS
Load Setup
Disabled
Enabled
Disabled
Disabled
Disabled
Disabled
Disabled
Disabled
On
Disabled
6
250
Setup
: Select Item
PU/PD/+/- : Modify
(Shift)F2 : Color
Defaults
Defaults
ROM PCI/ISA BIOS (<<P2B>>)
BIOS FEATURES SETUP
AWARD SOFTWARE, INC.
PCI/VGA Palette Snoop
Video ROM BIOS Shadow
C8000 - CBFFF Shadow
CC000 - CFFFF Shadow
D0000 - D3FFF Shadow
D4000 - D7FFF Shadow
D8000 - DBFFF Shadow
DC000 - DFFFF Shadow
Boot up NumLuck Status
Typematic Rate Setting
Typematic Rate (Char/Sec)
Typematic Delay (Msec)
Security Option
ESC
F1
F5
F6
F7
:
:
:
:
:
:
:
:
:
:
:
:
:
:
:
:
:
:
P5A
ROM PCI/ISA BIOS (<P2L97>)
BIOS FEATURES SETUP
AWARD SOFTWARE, INC.
: 266Mhz
PCI/VGA Palette Snoop
Video ROM BIOS Shadow
C8000 - CBFFF Shadow
CC000 - CFFFF Shadow
D0000 - D3FFF Shadow
D4000 - D7FFF Shadow
D8000 - DBFFF Shadow
DC000 - DFFFF Shadow
Boot up NumLuck Status
Typematic Rate Setting
Typematic Rate (Char/Sec)
Typematic Delay (Msec)
Security Option
ESC
F1
F5
F6
F7
TXP4-X
CPU Internal Core Speed
Disabled
Enabled
Enabled
Enabled
IDE
A,C
Enabled
R/W
Disabled
Disabled
Auto
Disabled
:
:
:
:
:
Quit
Help
Old Values
Load BIOS
Load Setup
:
:
:
:
:
:
:
:
:
:
:
:
:
Disabled
Enabled
Disabled
Disabled
Disabled
Disabled
Disabled
Disabled
On
Disabled
6
250
Setup
: Select Item
PU/PD/+/- : Modify
(Shift)F2 : Color
Defaults
Defaults
CPU Internal Core Speed
: 400Mhz
Boot Virus Detection
:
CPU Level 1 Cache
:
CPU Level 2 Cache
:
CPU Level 2 Cache ECC Check:
BIOS Update
:
Quick Power On Self Test
:
HDD Sequence SCSI/IDE First:
Boot Sequence
:
Boot Up Floppy Seek
:
Floppy Disk Access Control :
IDE HDD Block Mode Sectors :
Security Option
:
PS/2 Mouse Function
:
PCI/VGA Palette Snoop
:
OS/2 Onboard Memory > 64M :
Disabled
Enabled
Enabled
Disabled
Disabled
Enabled
IDE
A,C
Enabled
R/W
Disabled
System
Auto
Disabled
Disabled
Video
C8000
CC000
D0000
D4000
D8000
DC000
ROM BIOS
- CBFFF
- CFFFF
- D3FFF
- D7FFF
- DBFFF
- DFFFF
Shadow
Shadow
Shadow
Shadow
Shadow
Shadow
Shadow
Boot up NumLuck Status
Typematic Rate Setting
Typematic Rate (Char/Sec)
Typematic Delay (Msec)
ESC
F1
F5
F6
F7
:
:
:
:
:
Quit
Help
Old Values
Load BIOS
Load Setup
:
:
:
:
:
:
:
Enabled
Disabled
Disabled
Disabled
Disabled
Disabled
Disabled
:
:
:
:
On
Disabled
6
250
: Select Item
PU/PD/+/- : Modify
(Shift)F2 : Color
Defaults
Defaults
P2B (similar to P2B-F & P2-99)
The “Quick Power On Self Test” can optionally be changed to “Enabled.” Again, this does not effect the
operation of the computer but does improve the speed at power on. If you suspect a memory problem make
sure to set this option to “Disabled.”
22
revision 0.2.8.7
On the P2L97, P2B, P2B-F, and P2-99, we recommend disabling the “BIOS Update” option. This will avoid
any accidental corruption of the BIOS.
We have found that by setting the Boot Sequence to “C Only” we eliminate several service calls a week.
This eliminates the possibility of having the customer accidentally leave a back-up or restore floppy in the
drive which prevents the computer from booting. If booting from floppy or CD-ROM is necessary, this can be
enabled more quickly than a single service call would normally take.
Chipset Features Setup
ROM PCI/ISA BIOS (<TXP4-X>)
CHIPSET FEATURES SETUP
AWARD SOFTWARE, INC.
Auto Configuration
DRAM Read Burst Timing
DRAM Write Burst Timing
DRAM R/W Leadoff Timing
DRAM RAS# Precharge Time
Refresh RAS# Assertion
Fast EDO Path Select
Speculative Leadoff
SDRAM RAS# Timing
SDRAM CAS# Latency
SDRAM Speculative Read
Passive Release
Delayed Transaction
16-bit I/O Recovery Time
8-bit I/O Recovery Time
Video BIOS Cacheable
Memory Hole At Address
:
:
:
:
:
:
:
:
:
:
:
:
:
:
:
:
:
Disabled
x444
x444
11T/7T
4T
4T
Disabled
Disabled
3T/5T/8T
3T
Disabled
Disabled
Disabled
4 BUSCLK
8 BUSCLK
Enabled
None
ROM PCI/ISA BIOS (<<P5A>>)
CHIPSET FEATURES SETUP
AWARD SOFTWARE, INC.
Onboard FDC Controller
Onboard FDC Swap A & B
Onboard Serial Port 1
Onboard Serial Port 2
Onboard Parallel Port
Parallel Port Mode
ECP DMA Select
UART2 Use Infrared
Onboard PCI IDE Enable
IDE Ultra DMA Mode
IDE0 Master PIO/DMA Mode
IDE0 Slave PIO/DMA Mode
IDE1 Master PIO/DMA Mode
IDE1 Slave PIO/DMA Mode
ESC
F1
F5
F6
F7
:
:
:
:
:
Quit
Help
Old Values
Load BIOS
Load Setup
:
:
:
:
:
:
:
:
:
:
:
:
:
:
Enabled
No Swap
3F8H/IRQ4
2F8H/IRQ3
378H/IRQ7
Normal
Disabled
Disabled
Both
Auto
Auto
Auto
Auto
Auto
: Select Item
PU/PD/+/- : Modify
(Shift)F2 : Color
Defaults
Defaults
TXP4-X
P2L97
ESC
F1
F5
F6
F7
:
:
:
:
:
Quit
Help
Old Values
Load BIOS
Load Setup
:
:
:
:
:
:
:
:
:
:
:
:
3F8H/IRQ4
2F8H/IRQ3
378H/IRQ7
Normal
Disabled
Disabled
Both
Auto
Auto
Auto
Auto
Auto
: Select Item
PU/PD/+/- : Modify
(Shift)F2 : Color
Defaults
Defaults
ROM PCI/ISA BIOS (<<P2B>>)
CHIPSET FEATURES SETUP
AWARD SOFTWARE, INC.
Onboard FDC Controller
Onboard FDC Swap A & B
Onboard Serial Port 1
Onboard Serial Port 2
Onboard Parallel Port
Parallel Port Mode
ECP DMA Select
UART2 Use Infrared
Onboard PCI IDE Enable
IDE Ultra DMA Mode
IDE0 Master PIO/DMA Mode
IDE0 Slave PIO/DMA Mode
IDE1 Master PIO/DMA Mode
IDE1 Slave PIO/DMA Mode
ESC
F1
F5
F6
F7
Onboard Serial Port 1
Onboard Serial Port 2
Onboard Parallel Port
Parallel Port Mode
ECP DMA Select
UART2 Use Infrared
Onboard PCI IDE Enable
IDE Ultra DMA Mode
IDE0 Master PIO/DMA Mode
IDE0 Slave PIO/DMA Mode
IDE1 Master PIO/DMA Mode
IDE1 Slave PIO/DMA Mode
P5A
ROM PCI/ISA BIOS (<P2L97>)
CHIPSET FEATURES SETUP
AWARD SOFTWARE, INC.
EDO Auto Configuration
: Disabled
EDO Read Burst Timing
: x333
EDO Write Burst Timing
: x333
EDO RAS Precharge Time
: 4T
EDO RAS to CAS Delay
: 2T
SDRAM Configuration
: 12ns SDRAM
SDRAM RAS to CAS Delay
: Auto
SDRAM RAS Precharge Time : Auto
MA Wait State
: Auto
SDRAM Banks Close Policy : Arbitration
16-bit I/O Recovery Time : 4 BUSCLK
8-bit I/O Recovery Time : 8 BUSCLK
Graphics Aperture Size
: 64MB
Video Memory Cache Mode : UC
PCI 2.1 Support
: Enabled
Memory Hole At 15M-16M
: Disabled
DRAM are 64 (Not 72) bits wide
Data Integrity Mode
: Non-ECC
SDRAM Configuration
: By SPD
SDRAM CAS Latency
: 3T
SDRAM RAS Precharge Time : 3T
SDRAM RAS to CAS Delay
: 3T
Enhanced Page Mode Count : Disabled
Internal Page Detection : Disabled
SDRAM Pipe Function
: Disabled
SDRAM x111-2111 Mode
: Enabled
I/O Recovery Time
: 2 BUSCLK
Graphics Aperture Size
: 64MB
Frame Buffer Posted Write: Enabled
Force PCI_66 GAT Mode
: Enabled
AGP BUS Turbo Mode
: Enabled
Passive Release
: Enabled
Delayed Transaction
: Disabled
Memory Hole At 15M-16M
: Disabledx
DRAM are 64 (Not 72) bits wide
Data Integrity Mode
: Disabled
Onboard FDC Controller
: Enabled
Onboard FDC Swap A & B
: No Swap
:
:
:
:
:
Quit
Help
Old Values
Load BIOS
Load Setup
:
:
:
:
:
:
:
:
:
:
:
:
:
:
Enabled
No Swap
3F8H/IRQ4
2F8H/IRQ3
378H/IRQ7
Normal
Disabled
Disabled
Both
Auto
Auto
Auto
Auto
Auto
: Select Item
PU/PD/+/- : Modify
(Shift)F2 : Color
Defaults
Defaults
SDRAM Configuration
: By SPD
SDRAM CAS Latency
: 2T
SDRAM RAS to CAS Delay
: 3T
SDRAM RAS Precharge Time : 3T
DRAM Idle Timer
: 16T
SDRAM MA Wait State
: Normal
Snoop Ahead
: Enabled
Host Bus Fast Data Ready : Enabled
16-bit I/O Recovery Time : 1 BUSCLK
8-bit I/O Recovery Time : 1 BUSCLK
Graphics Aperture Size
: 64MB
Video Memory Cache Mode : UC
PCI 2.1 Support
: Enabled
Memory Hole At 15M-16M
: Disabled
DRAM are 64 (Not 72) bits wide
Data Integrity Mode
: Non-ECC
Onboard FDC Controller
Onboard FDC Swap A & B
Onboard Serial Port 1
Onboard Serial Port 2
Onboard Parallel Port
Parallel Port Mode
ECP DMA Select
UART2 Use Infrared
Onboard PCI IDE Enable
IDE Ultra DMA Mode
IDE0 Master PIO/DMA Mode
IDE0 Slave PIO/DMA Mode
IDE1 Master PIO/DMA Mode
IDE1 Slave PIO/DMA Mode
ESC
F1
F5
F6
F7
:
:
:
:
:
Quit
Help
Old Values
Load BIOS
Load Setup
:
:
:
:
:
:
:
:
:
:
:
:
:
:
Enabled
No Swap
3F8H/IRQ4
2F8H/IRQ3
378H/IRQ7
Normal
Disabled
Disabled
Both
Auto
Auto
Auto
Auto
Auto
: Select Item
PU/PD/+/- : Modify
(Shift)F2 : Color
Defaults
Defaults
P2B (similar to P2B-F & P2-99)
For added performance, the “Video BIOS Cacheable” should be set for “Enabled.” This option should be
changed only if using an older video card or software which may conflict with this option.
To increase the performance of disk operations, the “IDE Ultra DMA Mode” should be set for “Enabled.”
Provided that the hard drive which shipped from PCComplete is the only one installed, this should not cause
any problems.
23
PCComplete Technical Information for Sable Techs/Installers
Power Management Setup
ROM PCI/ISA BIOS (<TXP4-X>)
POWER MANAGEMENT SETUP
AWARD SOFTWARE, INC.
Power Management
Video Off Option
Video Method
ROM PCI/ISA BIOS (<<P5B>>)
POWER MANAGEMENT SETUP
AWARD SOFTWARE, INC.
: Disable
: Susp.Stby -> Off
: V/H SYNC+Blank
Power Management
Video Off Option
Video Method
: Disable
: Suspend -> Off
: V/H SYNC+Blank
** PM Timers **
HDD Power Down
: Disable
Doze Mode
: Disable
Standby Mode
: Disable
Suspend Mode
: Disable
** PM Timers **
HDD Power Down
: Disable
Doze Mode
: Disable
Standby Mode
: Disable
Suspend Mode
: Disable
** Power Up Control
PWR Button < 4
:
PWR Up On Modem Act
:
AC PWR Loss Restart
:
Automatic Power Up
:
** Power Up Control
PWR Button < 4 secs
:
PWR Up On Modem Act
:
Wake On LAN
:
Automatic Power Up
:
**
Soft Off
Disabled
Disabled
Disabled
ESC
F1
F5
F6
F7
:
:
:
:
:
Quit
Help
Old Values
Load BIOS
Load Setup
**
Soft Off
Disabled
Disabled
Disabled
: Select Item
PU/PD/+/- : Modify
(Shift)F2 : Color
Defaults
Defaults
** Fan Monitor **
Chassis Fan Speed :
Ignore
CPU Fan Speed
: 3970RPM
Power Fan Speed
:
Ignore
** Thermal Monitor **
CPU Temperature
: 27°C/ 80°F
MB Temperature
: 27°C/ 80°F
** Voltage Monitor **
VCORE Voltage
:
2.2V
+3.3V Voltage
:
3.5V
+5V
Voltage
:
5.0V
+12V Voltage
:
12.1V
-12V Voltage
:
-11.3V
-5V
Voltage
:
-5.1V
ESC
F1
F5
F6
F7
TXP4-X (similar to P2-99)
:
:
:
:
:
Quit
Help
Old Values
Load BIOS
Load Setup
: Select Item
PU/PD/+/- : Modify
(Shift)F2 : Color
Defaults
Defaults
P5A
ROM PCI/ISA BIOS (<P2L97>)
POWER MANAGEMENT SETUP
AWARD SOFTWARE, INC.
Power Management
Video Off Option
Video Method
: Disable
: Suspend -> Off
: V/H SYNC+Blank
** PM Timers **
HDD Power Down
: Disable
Suspend Mode
: Disable
** Power Up Control
PWR Button < 4
:
PWR Up On Modem Act
:
AC PWR Loss Restart
:
Wake On LAN
:
Automatic Power Up
:
**
Soft Off
Disabled
Disabled
Disabled
Disabled
** Fan Monitor **
Chassis Fan Speed :
Ignore
CPU Fan Speed
: 3970RPM
Power Fan Speed
:
Ignore
** Thermal Monitor **
MB Temperature
: 27°C/ 80°F
** Voltage Monitor **
VCORE Voltage
:
2.8V
+3.3V Voltage
:
3.5V
+5V
Voltage
:
5.0V
+12V Voltage
:
12.1V
-12V Voltage
:
-11.3V
-5V
Voltage
:
-5.1V
ESC
F1
F5
F6
F7
:
:
:
:
:
Quit
Help
Old Values
Load BIOS
Load Setup
: Select Item
PU/PD/+/- : Modify
(Shift)F2 : Color
Defaults
Defaults
P2L97 (similar to P2B & P2B-F)
To avoid annoying and inconvenient power-ups at night, the “PWR Up On Modem Act” option should be
“Disabled.” When enabled, this option will turn the computer on when a ring on the modem is detected.
While this could be a nice feature for users wanting to call in from a remote location after hours, it does provide a sizable security hole and what may seem like random power-ups. Leave this option “Enabled” only
with extreme caution.
On computers with monitoring it is advised that the applicable fan, thermal and power monitors be
enabled. This includes the “CPU Fan Speed,” the “MB Temperature,” and all six of the voltage options. On
some of the AMD K6-2, Celeron, and Pentium II/III machines the CPU fan does not connect directly to the
main board so it can’t return data for the “CPU Fan Speed.” In this case leave the monitor set to “Ignore.”
24
revision 0.2.8.7
PNP and PCI Setup
ROM PCI/ISA BIOS (<TXP4-X>)
PNP AND PCI SETUP
AWARD SOFTWARE, INC.
PNP OS Installed
Slot 1 (RIGHT) IRQ
Slot 2 IRQ
Slot 3 IRQ
Slot 4 (LEFT) IRQ
PCI Latency Timer
:
:
:
:
:
:
No
Auto
Auto
Auto
Auto
0 PCI Clock
DMA
DMA
DMA
1 Used By ISA : No/ICU
3 Used By ISA : No/ICU
5 Used By ISA : No/ICU
ISA MEM Block BASE : No/ICU
SYMBIOS SCSI BIOS
USB IRQ
IRQ
IRQ
IRQ
IRQ
IRQ
IRQ
IRQ
IRQ
IRQ
IRQ
3
4
5
7
9
10
11
12
14
15
Used
Used
Used
Used
Used
Used
Used
Used
Used
Used
By
By
By
By
By
By
By
By
By
By
ISA
ISA
ISA
ISA
ISA
ISA
ISA
ISA
ISA
ISA
:
:
:
:
:
:
:
:
:
:
No/ICU
No/ICU
Yes
No/ICU
Yes
No/ICU
No/ICU
No/ICU
No/ICU
No/ICU
ROM PCI/ISA BIOS (<<P5A>>)
PNP AND PCI SETUP
AWARD SOFTWARE, INC.
ESC
F1
F5
F6
F7
TXP4-X
:
:
:
:
:
Quit
Help
Old Values
Load BIOS
Load Setup
PNP OS Installed
Slot 1 IRQ
Slot 2 IRQ
Slot 3/Audio IRQ
Slot 4/5 IRQ
PCI Latency Timer
:
:
:
:
:
:
No
Auto
Auto
Auto
Auto
0 PCI Clock
IRQ
IRQ
IRQ
IRQ
IRQ
IRQ
IRQ
IRQ
IRQ
IRQ
:
:
:
:
:
:
:
:
:
:
No/ICU
No/ICU
Yes
No/ICU
Yes
No/ICU
No/ICU
No/ICU
No/ICU
No/ICU
: Auto
: Disabled
: Select Item
PU/PD/+/- : Modify
(Shift)F2 : Color
Defaults
Defaults
3
4
5
7
9
10
11
12
14
15
Used
Used
Used
Used
Used
Used
Used
Used
Used
Used
By
By
By
By
By
By
By
By
By
By
ISA
ISA
ISA
ISA
ISA
ISA
ISA
ISA
ISA
ISA
DMA
DMA
DMA
1 Used By ISA : No/ICU
3 Used By ISA : No/ICU
5 Used By ISA : No/ICU
ISA MEM Block BASE : No/ICU
SYMBIOS SCSI BIOS
USB Function
USB IRQ
VGA BIOS Sequence
ESC
F1
F5
F6
F7
:
:
:
:
:
Quit
Help
Old Values
Load BIOS
Load Setup
:
:
:
:
Auto
Disable
Disabled
PCI/AGP
: Select Item
PU/PD/+/- : Modify
(Shift)F2 : Color
Defaults
Defaults
P5A, P2L97, P2B, P2B-F, & P2-99
On the P5A main board, the BIOS default is for “Slot 3/Audio IRQ” to be set for IRQ 5. This must be
changed to “Auto” to avoid a conflict with COM3.
The “PCI Latency Timer” should be left at “0 PCI Clock” to avoid problems.
When using an ISA serial card, the “IRQ # Used By ISA” options for 5 and 9 should be “Yes.” If the PCI
card is being used, leave both of these options on “No/ICU.”
25
PCComplete Technical Information for Sable Techs/Installers
26
revision 0.2.8.7
Password Prompts
Windows NT
Windows NT prompts for a username and password at log-on. The default for pre-loaded software to to
have both the “Sable” and “administrator” passwords empty. Remember that you should always log in as
“Sable” while running the POS.
BIOS passwords
It is possible (and fairly easy) for someone to set passwords on the BIOS. There are two different types of
BIOS passwords. One will restrict the access to change the BIOS while the other can actually lock-out use of
the computer from a start-up or reboot if the password is not entered correctly. We do not recommend setting either type of password. However, if the computer is in an area where it may be prone to pranksters
entering passwords and therefore inhibiting use of the computer, you will want to set a “SUPERVISOR PASSWORD” (not a “USER PASSWORD”). Refer to the main board manual for further assistance.
Clearing BIOS passwords once they have been set
The only way to remove a BIOS password once it has been set is to completely clear the BIOS. This process
restores all the computer’s settings to their factory defaults (not the operating system’s settings). To accomplish this requires that the computer be opened.
For more information about conducting this procedure contact PCComplete technical support.
27
PCComplete Technical Information for Sable Techs/Installers
28
revision 0.2.8.7
Video Driver/Black Screen Problem
Overview
In a few cases, users have either improperly configured their display adapter or had software corrupt the
driver. The result is frequently a black screen after Windows NT loads. If the user selects VGA Mode the
monitor will work properly, but only at 640 by 480 at 16 colors.
Solution
The best method to correct this problem is through pcAnywhere. If pcAnywhere is not set to start with
Windows have the customer restart the computer in VGA mode and configure pcAnywhere to start with
Windows. Restart the computer normally. Call in through pcAnywhere and go to the display properties. Set
the monitor for “640 by 480” at “60 Hertz” and click on the apply button. The customer should now have an
image on their monitor. Have them set the desired resolution and refresh rate, then hit test. Verify with the
customer that they can see the test graphic on the monitor. If the client can see the graphic, click “Apply,”
have the customer close the display properties and verify that they can see everything. To be safe, restart the
PC and have them complete log-in again. If the screen blacks out again, repeat the process in the
“Administrator” user account.
Use the “Test” button after selecting the resolution and refresh rate.
If you are not able to log in through pcAnywhere, restart the computer in VGA mode. From VGA mode,
remove the video drivers and install them from the original disk in both “Administrator” and “Sable.” This
will reset any improperly configured settings and replace any corrupted drivers.
29
PCComplete Technical Information for Sable Techs/Installers
To avoid future problems the display adapter must be set for modes supported by the monitor. The manual
for the monitor should provide a list of compatible resolutions and refresh rates (note that all refresh rates
will not work at all resolutions). The safest resolution is 640x480 with a refresh rate of 60Hz (most multisyncing monitors support this mode). When using any other settings, make sure that the user always tests
any resolution or refresh rate before setting it.
Another common problem is installing software not designed for Windows NT 4.0 (ie. Windows 95/98
software). Many of these programs can corrupt the video drivers in Windows NT, if not the operating system
itself. Never install software which does not specifically support Windows NT 4.0.
Supported resolutions and frequencies
Any monitor will support only specific resolutions at specific frequencies. The owners manual for the monitor should list all of these video modes. Below are listings for common monitors shipped from PCComplete.
This information is from the manufacturer’s technical support departments and may have errors. It is always
important to test the settings before accepting them.
KDS VS-4D 14" monitor
Resolution
640 x 480
800 x 600
1024 x 768
Frequency (Vertical)
60/70/75/85 Hz
75/85 Hz
60 Hz
OptiQuest Q41 & Viewsonic E40 14" monitors
Resolution
640 x 480
800 x 600
1024 x 768
Frequency (Vertical)
50-90 Hz
50-76 Hz
50-76 Hz
OptiQuest Q55 & Viewsonic E655 15" monitors
Resolution
640 x 480
800 x 600
1024 x 768
1280 x 1024
Frequency (Vertical)
50-160 Hz
50-100 Hz
50-87 Hz
50-66 Hz
Viewsonic E771 17" monitor
Resolution
640 x 480
800 x 600
1024 x 768
1280 x 1024
30
Frequency (Vertical)
50-120 Hz
50-108 Hz
50-87 Hz
50-66 Hz
revision 0.2.8.7
Problems with Monitor Viewable Size
Screen too wide
Though the cause of this problem is not known, installers have have luck with this simple procedure. From
display properties, change the resolution (is it is currently at 640 by 480 change it to 800 by 600, if current
resolution is 800 by 600 change it to 640 by 480). Click the test button. When the Display properties window reappears set the desired resolution and refresh rate. Again, click test. If the test image looks correct,
click on the “Yes” button when prompted. The display width should be correct now.
31
PCComplete Technical Information for Sable Techs/Installers
32
revision 0.2.8.7
Problems Changing Video Driver
Overview
A problem has been encountered while trying to install or change video drivers on Sable POS computers.
This problem will only occur if pcAnywhere is installed. Though Symantec’s technical support claims to provide an alternate method which does not require the removal of pcAnywhere, we have not been able to do so
successfully. Therefore it is necessary to remove pcAnywhere from the system before installing or changing a
video driver.
Solution
Warning: This process involves three restarts and cannot be performed remotely.
Before starting this process, make sure that you have both the video driver and the pcAnywhere installation
CD-ROM.
With the POS stopped click the “Start” button and select “Shut Down.” When prompted, select “Close all
programs and log in as a different user” and click “Yes.” Log back in to the system as “Administrator.”
Enter the control panel (double clicking the left mouse button on the “My Computer” icon, then choose
control panel). Open the “Add Remove Programs” icon. Highlight “pcAnywhere32” from the list and click
the “Add/Remove…” button. A dialog box will open listing the directory where pcAnywhere is located and
asking if you want to remove it. Click the “Yes” button. Another dialog box will open asking if you want to
remove shared files, click the “No to all” button. The program will then be removed and a box will open asking if you want to restart the computer, select “Yes.” Wait for the system to restart. When prompted, login as
“Administrator” again.
With pcAnywhere removed you can now install the appropriate video driver.
Once the video driver is installed and configured (this should all happen as the Administrator user) you
will need to reinstall pcAnywhere. Insert the pcAnywhere CD into the drive and wait for the menu to load.
When the install screen appears select “Install Software” and the installation will begin. The installation is
routine with no changes needed to the default directory or preferences. Simply follow the on screen prompts
to complete the installation. The computer will then ask if you wish to restart, click “yes” and wait for the
system to reboot. Log in as “Administrator” again. Open pcAnywhere and a dialog box will open asking you
to choose the modem to use. Select the modem you wish to configure and click “Next.” You can now close
pcAnywhere and reboot the system. Log in as “Sable.” This should complete the configuration and you can
start the POS.
33
PCComplete Technical Information for Sable Techs/Installers
34
revision 0.2.8.7
Booting from CD-ROM
Without a ZIP drive
Without a ZIP drive installed, enter BIOS and change the boot sequence to “CD-ROM, C, A.” (For more
information see the BIOS section of this publication or the User Manual from the main board.)
With a ZIP drive
In order to boot from the CD-ROM drive with a ZIP drive installed, the ZIP drive must be temporarily disabled. This process involves opening the case.
35
PCComplete Technical Information for Sable Techs/Installers
36
revision 0.2.8.7
pcAnywhere notes
Start with Windows option
Do not leave this option selected – it will corrupt the Windows telephony.dll.
37
PCComplete Technical Information for Sable Techs/Installers
38
revision 0.2.8.7
PCComplete Assembled Sable
Computers and the Year 2000
The main board
All PCs shipped under the Sable Computer program should be Y2K compliant. To verify, check the BIOS
revision against the chart below. In many cases, the machine will not be compliant if the BIOS revision is not
as recent as the ones listed below, but will still work properly after December 31, 1999.
Main board
TXP4-X
P5A
P2L97
P2B
P2B-F
P2-99
BIOS
0108
1001
1001
1002
1006
1009
If the BIOS version of the PCComplete assembled computer does not meet or exceed these revisions, contact PCComplete. It may be necessary to perform a software upgrade on the BIOS. While this information is
available on the ASUS web site (http://www.asus.com/), you may want to consult with a technician at
PCComplete about how to enable BIOS updating as PCComplete normally disables this option before the PC
is shipped. Should you attempt to upgrade the machine, remember to disable the BIOS updating to avoid the
possibility of a virus attacking the BIOS.
Windows NT Workstation 4.0
Windows NT Workstation 4.0 is Y2K compliant with Service Pack 4. While the Service Pack 3 has been
loaded on all Windows NT Workstation computers shipped from PCComplete, this only corrected for most
of the Y2K problems. You may need to install the Service Pack 4 for full Y2K compliance. More information
about this issue can be found at:
http://www.microsoft.com/technet/topics/year2k/product/user_view4614EN.htm
Below is the URL for downloading the NT 4 Service Pack 4. This installer is very large (about 17.6MB) and
and should not be downloaded unless there are no alternatives.
http://www.microsoft.com/ntserver/nts/downloads/recommended/NT4SvcPk4/default.asp
To order the CD, point your browser to;
http://www.microsoft.com/ntserver/nts/downloads/recommended/NT4SvcPk2CDorder.asp
or call 800/370-8758.
Service Pack 6 has been released but not yet tested with the Sable POS systems. This new updater is said to
fix more problems with the year 2000 which existed in the previous service packs. More information will be
available at a later date.
39
PCComplete Technical Information for Sable Techs/Installers
40
revision 0.2.8.7
Appendix
Web sites for drivers & updates
Though we include drivers with all computers, you may have to download them at some point (either
because the user has misplaced or damaged the driver or a newer version may be required). The following
are some good places to look for the drivers.
Hardware Drivers/Updates
Motherboard
ASUStek
Display Adapter
ASUStek
Biostar
Jaton
nVIDIA
S3
I/O Card
SIIG
LAVA
Software Drivers/Updates
Windows NT
pcAnywhere
McAfee VirusScan
Microsoft
Symantec
http://www.asus.com/support.asp
http://www.asus.com/support.asp
http://www.biostar-usa.com/
http://www.jaton.com/
http://www.nvidia.com/
http://www.s3.com/customer_care.htm
http://www.siig.com/driver.htm
http://www.lavalink.com/LIBRARY/TECHSUPPORT.HTML
http://www.microsoft.com/
http://www.symantec.com/us.index.html
i
PCComplete Technical Information for Sable Techs/Installers
Memory upgrades on PCComplete computers
All computers supplied through the Sable program and that are covered in this Technical Note are capable
of using PC100 168-pin SDRAM 3.3 volt DIMMs. Some earlier computers delivered by PCComplete to Elias
Brother restaurants use EDO 72-pin SIMMs. The chart below should list all main boards used by
PCComplete in systems for the Sable POS and what their RAM requirements are.
Motherboard
Pentium/AMD K6
8500TVX (Elias)
VX97 (Elias)
TXP4 (Elias)
TXP4-X
P5A
P5A-B (Upgrades)
Pentium II/III & Celeron
P2L97
P2B
P2B-F
P3B-F
P2-99
No. of slots
Module Type
4 (added in pairs)
EDO 72-pin SIMM
4 (added in pairs)
EDO 72-pin SIMM (60 or 70 ns)
4 (added in pairs) -orEDO 72-pin SIMM (60 or 70 ns)
2
SDRAM 168-pin 3.3 volt DIMM
Both SIMM and DIMM can not be used at the same time! (Most were SIMM)
4 (added in pairs) -orEDO 72-pin SIMM (60 or 70 ns)
2
SDRAM 168-pin 3.3 volt DIMM
Both SIMM and DIMM can not be used at the same time! (Most were DIMM)
3
PC100 SDRAM 168-pin 3.3 volt DIMM
3
PC100 SDRAM 168-pin 3.3 volt DIMM
3
3
4
4
2
SDRAM 168-pin 3.3 volt DIMM
PC100 SDRAM 168-pin 3.3 volt DIMM
PC100 SDRAM 168-pin 3.3 volt DIMM
PC100 SDRAM 168-pin 3.3 volt DIMM
PC100 SDRAM 168-pin 3.3 volt DIMM
Information about a specific computer can be obtained through PCComplete with the serial number from
the back of the computer. This serial number should have six digits, a dash, then four more digits.
Serial Number:
000000-0000
PC Complete
C o r p o r a t e
ii
S a l e s
revision 0.2.8.7
Hard Drive Master Versions
The first version of the Sable POS hard drive shipped by PCComplete did not have any identifier. Version 2
and later have the drive label set by default to the master drive’s version number, and a text file with information about the master drive.
(same as above, but with PCI I/O card software pre-installed)
iii
PCComplete Technical Information for Sable Techs/Installers
iv
revision 0.2.8.7
v
PCComplete Technical Information for Sable Techs/Installers
vi