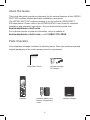
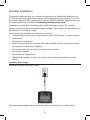
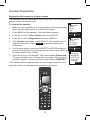
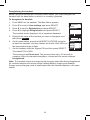
1
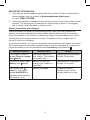
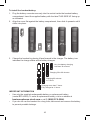
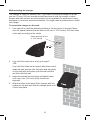
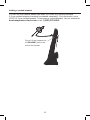
Quick Start Guide
VSP601
DECT SIP Cordless Handset
Important Safety Information
This symbol is to alert you to important operating or servicing
instructions that may appear on the product or in this user’s manual.
Always follow basic safety precautions when using this product to
reduce the risk of injury, fire, or electric shock.
Important Safety Instructions
When using your telephone equipment, basic safety precautions should always be
followed to reduce the risk of fire, electric shock and injury, including the following:
1. This product should be installed by a qualified technician.
2. This product should only be connected to the host equipment and never
directly to the network such as Public Switch Telephone Network (PSTN) or
Plain Old Telephone Services (POTS).
3. Read and understand all instructions.
4. Follow all warnings and instructions marked on the product.
5. Unplug this product from the wall outlet before cleaning. Do not use liquid or
aerosol cleaners. Use a damp cloth for cleaning.
6. Do not use this product near water such as near a bath tub, wash bowl,
kitchen sink, laundry tub or swimming pool, or in a wet basement or shower.
7. Do not place this product on an unstable table, shelf, stand or other unstable
surfaces.
8. Slots and openings in the back or bottom of the handset are provided for
ventilation. To protect them from overheating, these openings must not be
blocked by placing the product on a soft surface such as a bed, sofa or rug.
This product should never be placed near or over a radiator or heat register.
This product should not be placed in any area where proper ventilation is not
provided.
9. This product should be operated only from the type of power source indicated
on the marking label. If you are not sure of the type of power supplied at the
premises, consult your dealer or local power company.
10. Do not allow anything to rest on the power cord. Do not install this product
where the cord may be walked on.
11. Never push objects of any kind into this product through the slots in the
handset because they may touch dangerous voltage points or create a short
circuit. Never spill liquid of any kind on the product.
2
12. To reduce the risk of electric shock, do not disassemble this product, but take
it to an authorized service facility. Opening or removing parts of the handset
other than specified access doors may expose you to dangerous voltages or
other risks. Incorrect reassembling can cause electric shock when the product
is subsequently used.
13. Do not overload wall outlets and extension cords.
14. Unplug this product from the wall outlet and refer servicing to an authorized
service facility under the following conditions:
A. When the power supply cord or plug is damaged or frayed.
B. If liquid has been spilled onto the product.
C. If the product has been exposed to rain or water.
D.
If the product does not operate normally by following the operating
instructions. Adjust only those controls that are covered by the
operation instructions. Improper adjustment of other controls may
result in damage and often requires extensive work by an authorized
technician to restore the product to normal operation.
E. If the product has been dropped and the telephone base and/or
handset has been damaged.
F. If the product exhibits a distinct change in performance.
15. Avoid using a telephone (other than cordless) during an electrical storm.
There is a remote risk of electric shock from lightning.
16. Do not use the telephone to report a gas leak in the vicinity of the leak. Under
certain circumstances, a spark may be created when the adapter is plugged
into the power outlet, or when the handset is replaced in its cradle. This is a
common event associated with the closing of any electrical circuit. The user
should not plug the phone into a power outlet, and should not put a charged
handset into the cradle, if the phone is located in an environment containing
concentrations of flammable or flame-supporting gases, unless there is
adequate ventilation. A spark in such an environment could create a fire or
explosion. Such environments might include: medical use of oxygen without
adequate ventilation; industrial gases (cleaning solvents; gasoline vapors;
etc.); a leak of natural gas; etc.
17. Only put the handset of your telephone next to your ear when it is in normal
talk mode.
18. The power adapters are intended to be correctly oriented in a vertical or floor
mount position. The prongs are not designed to hold the plug in place if it is
plugged into a ceiling, under-the-table or cabinet outlet.
19. Use only the power cord indicated in this manual.
3
20. In wall mounting position, make sure to mount the telephone base on the wall
by aligning the eyelets with the mounting studs of the wall plate. Then slide the
telephone base down on both mounting studs until it locks into place. Refer to
the full installation instructions in the User Guide.
21. CAUTION: Keep small metallic objects such as pins and staples away from the
handset receiver.
SAVE THESE INSTRUCTIONS
4
Compliance
FCC part 15
This device complies with Part 15 of the FCC rules. Operation is subject to the
following two conditions: (1) This device may not cause harmful interference, and (2)
this device must accept any interference received, including interference that may
cause undesired operation.
This equipment has been tested and found to comply with the limits for a Class A
digital device, pursuant to Part 15 of the FCC Rules. These limits are designed to
provide reasonable protection against harmful interference when the equipment is
operated in a commercial environment. This equipment generates, uses, and can
radiate radio frequency energy and, if not installed and used in accordance with
the instruction manual, may cause harmful interference to radio communications.
Operation of this equipment in a residential area is likely to cause harmful
interference in which case the user will be required to correct the interference at the
user’s expense.
Privacy of communications may not be ensured when using this phone.
Warning: Changes or modifications to this equipment not expressly approved by
the party responsible for compliance could void the user’s authority to operate the
equipment.
Caution: To maintain the compliance with the FCC’s RF exposure guideline, place
the base unit at least 20 cm from nearby persons.
For body-worn operation, this handset has been tested and meets the FCC RF
exposure guidelines when used with the accessories supplied or designated for
this product. Use of other accessories may not ensure compliance with FCC RF
exposure guidelines.
This Class A digital apparatus complies with Canadian requirements:
CAN ICES-3 (A)/NMB-3(A).
Cet appareil numérique de la classe A est conforme à la norme CAN ICES-3 (A)/
NMB-3(A) du Canada.
This device complies with Industry Canada license-exempt RSS standard(s).
Industry Canada
Operation is subject to the following two conditions: (1) this device may not cause
harmful interference, and (2) this device must accept any interference received,
including interference that may cause undesired operation of the device.
Privacy of communications may not be ensured when using this telephone.
The term ‘’IC:‘’ before the certification/registration number only signifies that the
Industry Canada technical specifications were met.
This product meets the applicable Industry Canada technical specifications.
5
About this Guide
This quick start guide provides a reference for the external features of the VSP601
DECT SIP cordless handset and basic installation instructions.
The VSP601 DECT SIP cordless handset is for use with the VSP600 DECT
SIP base station. Please refer to the VSP600/VSP601 User Guide for complete
installation and operation instructions. You can download the guide from
businessphones.vtech.com.
For customer service or product information, visit our website at
businessphones.vtech.com or call 1 (888) 370-2006.
Parts Checklist
Your telephone package contains the following items. Save your sales receipt and
original packaging in the event warranty service is necessary.
Quick start guide
Quick Start Guide
Handset
Handset charger
DC adapter
Handset battery and
battery compartment
cover
6
Handset charger
Quick Reference Guide
Cordless handset external features
MESSAGE LED
Flashes when a line has
a new voice message.
HEADSET JACK
2.5 mm jack for connecting
a corded headset.
SOFT KEYS
Perform the actions
indicated by the onscreen labels.
VOL p DIR
While in menus, press p
to scroll up the menu.
Press to display the
Directory.
TRANSFER
Press to start
transferring a call.
CONF
Press to start a
conference call.
TALK
Press to start
making a call.
VOL q CID
While in menus, press q
to scroll down the menu.
Press to display the Call
history.
HOLD
Press to put a call on hold.
On back:
• BELT CLIP
• SPEAKER
MENU/SELECT
Press to display the main
menu.
Press to select a menu item.
OFF/CANCEL
Press to end a call.
Press to cancel an operation
and leave a menu.
INT
Press to start making
an intercom call.
Dial pad and audio controls
DIAL PAD
REDIAL/PAUSE
Press to redial a number
or enter a pause when
programming a phone number.
MUTE/DELETE
During a call, press to
prevent your voice from
being heard.
While entering numbers
or letters, press to delete
previous character.
SPEAKER
Press to use the handset
speakerphone.
7
Handset Installation
This section assumes that your network infrastructure is established and that your
IP PBX phone service has been ordered and configured for your location. For more
information about IP PBX configuration, see the VSP600/VSP601 Administrator and
Provisioning Manual, available at businessphones.vtech.com.
Installation involves both the the handset and the handset charger. The handset
charger is powered using the supplied power adapter. The charger can be placed on a
flat surface or mounted on a wall.
Avoid placing the handset and charger too close to:
•
Communication devices such as television sets, DVD players, or other cordless
telephones
•
Excessive heat sources
•
Noise sources such as a window with traffic outside, motors, microwave ovens,
refrigerators, or fluorescent lighting
•
Excessive dust sources such as a workshop or garage
•
Excessive moisture
•
Extremely low temperature
•
Mechanical vibration or shock such as on top of a washing machine or work
bench
Installing the charger
Install the charger as shown below.
Plug the power adapter into an electrical outlet not controlled by a wall switch.
8
IMPORTANT INFORMATION
1. Use only the power adapter supplied with this product. To order a replacement
power adapter, visit our website at businessphones.vtech.com
or call 1 (888) 370-2006.
2. The power adapter is intended to be correctly oriented in a vertical or floor mount
position. The prongs are not designed to hold the plug in place if it is plugged
into a ceiling, under-the-table or cabinet outlet.
Battery installation and charging
Install the battery as shown on the following page. Once you have installed the
battery, the screen indicates the battery status (see the table below). If necessary,
place the handset in the charger to charge the battery. For best performance, keep
the handset in the charger when not in use. The battery is fully charged after 11
hours of continuous charging.
If the screen is blank, you need to charge the handset without interruption for at least
30 minutes to give the handset enough charge to use the telephone for a short time.
When the battery is low, the handset shows Low battery and a flashing .
Battery indicators
Battery Status
Action
The screen is blank or
shows Place in charger
and flashes.
The battery has no or
little charge. The handset
cannot be used.
Charge without interruption
(at least 30 minutes).
The screen shows Low
battery and flashes.
Battery has enough
charge to be used for a
short time.
Charge without interruption
(at least 30 minutes).
Full battery icon ( )
appears. The screen
shows HANDSETx (x
represents the handset
ID number 1 to 6).
Battery is charged.
To keep the battery
charged, place it in the
charger when not in use.
9
To install the handset battery:
1. Plug the battery connector securely into the socket inside the handset battery
compartment. Insert the supplied battery with the label THIS SIDE UP facing up
as indicated.
2. Align the cover flat against the battery compartment, then slide it upwards until it
clicks into place.
3. Charge the handset by placing it face forward in the charger. The battery icon
indicates the charge status as the battery charges.
Very low battery charging
less than 30 minutes.
Charging 30 to 80 minutes.
Charging 80 minutes
to 7 hours.
Charging more than 7 hours.
Fully charged at 11 hours.
IMPORTANT INFORMATION
•
Use only the supplied rechargeable battery or replacement battery
(model BT164392). To order a replacement battery, visit our website at
businessphones.vtech.com or call 1 (888) 370-2006.
•
If you do not use the handset for a long time, disconnect and remove the battery
to prevent possible leakage.
10
Wall mounting the charger
The charger is ready for tabletop use. If you want to mount the charger on a wall,
use two 10 mm (3/8 inch) screws and wall anchors to hold the charger in place.
Screws and wall anchors are not provided, but are available for purchase in many
hardware or consumer electronics retailers. You might need a professional to install
the charger.
To mount the charger on the wall:
1. Use a pencil to mark the desired positions of the two holes on the wall. Make
sure the space between the two holes is 30 mm (1 3/16 inches). Drill two holes
in the wall according to the marks.
Screw spacing 30 mm
(1 3/16 inches)
2. If you drill the holes into a stud, go to step 3.
-ORIf you drill the holes into an object other than a stud,
insert the wall anchors into the holes and tap gently
on the ends with a hammer until the wall anchors
are flush with the wall.
3. Insert the screws into the holes and tighten them
until only 6 mm (1/4 inch) of the screws are
exposed.
4. Align the holes at the back of the charger with the
screws on the wall and slide the charger down until
it locks into place.
11
Adding a corded headset
You can use this handset hands-free when you install any industry-standard
2.5 mm corded telephone headset (purchased separately). For best results, use a
VTECH 2.5 mm corded headset. To purchase a corded headset, visit our website at
businessphones.vtech.com or call 1 (888) 370-2006.
Plug a 2.5 mm headset into
the HEADSET jack on the
side of the handset.
12
Handset Registration
Registering the handset to the base station
The handset must be registered to the VSP600 DECT SIP cordless base station in
order to make and receive calls.
To register the handset:
Main Menu
1. Make sure the handset has a charged battery before proceeding. Intercom
Features
Make sure the base station is connected to power.
2. Press MENU on the handset. The Main Menu appears.
3. Press q to scroll to User settings and press SELECT.
4. Press q to scroll to Registration and press SELECT.
5. With Handset highlighted, press SELECT. The handset screen
displays instructions. Press NEXT to continue reading the
instructions.
6. On the base station, press the HANDSET LOCATOR button for
at least four seconds, and then release the button. Both LEDs on
the base station begin to flash.
Status
User settings
BACK ENTER
User settings
Key Tone
Edit PIN code
Edit VLAN ID
Registration
BACK ENTER
Press and
7. Press the # key on the handset. The screen shows Please wait... hold HANDSET
LOCATOR key
The process takes up to 10 seconds to complete. When the first
at base for
handset registers, it beeps and the screen displays HANDSET 1.
If the handset fails to register, place it in the charger again for a few
seconds, remove it and repeat the registration procedure.
HANDSET
1
11:26PM 01/01
LINE
MENU
13
4 seconds
NEXT
Deregistering the handset
Before using the handset with a different base station, you must deregister the
handset from the base station to which it is currently registered.
To deregister the handset:
1. Press MENU on the handset. The Main Menu appears.
2. Press q to scroll to User settings and press SELECT.
3. Press q to scroll to Registration and press SELECT.
4. Press q to highlight Deregistration and press SELECT.
The handset screen displays a list of registered handsets.
5. Highlight the name of the handset you want to deregister, and
then press SELECT .
5HJLVWUDWLRQ
+DQGVHW
'HUHJLVWUDWLRQ
%$&.
(17(5
Deregistration
HANDSET
6. On the base station, press the HANDSET LOCATOR button for
at least four seconds, and then release the button. Both LEDs on HANDSET
HANDSET
the base station begin to flash.
7. On the handset, enter the System PIN and then press SELECT.
The default PIN is 0000.
HANDSET
BACK
1
2
3
4
SELECT
The screen shows Please wait. The process takes up to 10 seconds to
complete. When the handset deregisters, it beeps and the screen displays
Unregistered.
Note: The handset enters an energy-saving charging mode after being deregistered.
All cordless telephone functions except handset-battery charging are disabled.
Energy-saving charging mode is deactivated after the handset registers to the base
station.
14
Maintenance
Taking care of your telephone
•
Your base station and cordless handset contain sophisticated electronic parts,
so you must treat them with care.
•
Avoid rough treatment.
•
Place the handset down gently.
•
Save the original packing materials to protect your products if you ever need to
ship them.
Avoid water
•
You can damage your cordless telephone if it gets wet. Do not use the handset
in the rain, or handle it with wet hands. Do not install the base station and
handset near a sink, bathtub or shower.
Electrical storms
•
Electrical storms can sometimes cause power surges harmful to electronic
equipment. For your own safety, take caution when using electric appliances
during storms.
Cleaning your telephone
•
Your products have a durable plastic casing that should retain its luster for many
years. Clean it only with a soft cloth slightly dampened with water or a mild soap.
•
Do not use excess water or cleaning solvents of any kind.
Remember that electrical appliances can cause serious injury if used when you
are wet or standing in water. If the telephone base should fall into water, DO NOT
RETRIEVE IT UNTIL YOU UNPLUG THE POWER CORD FROM THE WALL, then
pull the unit out by the unplugged cord.
Technical Specifications
RF frequency band
1921.536–1928.448 MHz
Channels
5
Operating temperature
32–122 °F (0–50 °C)
Power requirements
Handset charger: 6.0 Vdc @ 300 mA
Handset: 2.4 V 550/750 mAh, Ni-MH battery pack
15
VTECH COMMUNICATIONS LTD.
A member of THE VTECH GROUP OF COMPANIES.
Distributed in the U.S.A. by VTech Communications Inc., Beaverton, Oregon 97008.
VTech is a registered trademark of VTech Holdings Limited.
Copyright © 2014 for VTECH COMMUNICATIONS LTD. All rights reserved.
Printed in China. Version 3, 04/14