1
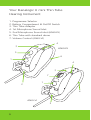
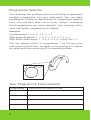
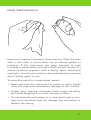
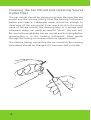
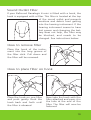
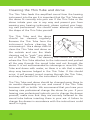
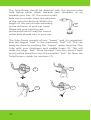
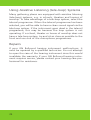
USER GUIDE
Danalogic 6 BTE
6060-DI
4060-VI
DANALOGIC 6 MINI
BEHIND-THE-EAR
PERSONAL HEARING SYSTEM
Congratulations with your new fully-digital GN ReSound
hearing instrument!
This booklet describes the functionality of all mini-BTE
(Behind-The-Ear) models in the Danalogic 6 product
line. The functionality depends on the model; your
hearing care professional will highlight the features of
your particular hearing instrument.
GN ReSound’s advanced technology and customized
programmes, selected by your hearing care professional, will bring the best possible hearing solution to
your family life, and your professional and social activities.
Your hearing instrument has been adjusted to your
individual hearing loss. Please familiarize yourself with
the information in this booklet. Proper understanding
and use of your new GN ReSound hearing instrument
will allow you to derive maximum hearing benefit.
This instruction covers the following Danalogic 6 mini
BTE products: 6060-DI and 4060-VI.
Danalogic 6 is a trademark of GN ReSound.
2
Contents
page
Your Danalogic 6 mini Hearing Instrument
4
Programme Selector
8
Your Programme Environments
8
Directionality
9
Stand-by Function
9
On/Off Function
10
SmartStart
10
Volume Control
11
Direct Audio Input (DAI)
12
Inserting and removing the Instrument
13
Low Battery Warning
15
Changing the Battery
15
Battery Warning Information
16
Daily Maintenance
17
Cleaning the Ear Mould and replacing
Sound Outlet Filter
18
Cleaning the Thin Tube and Dome
20
The Domes
21
How to mount the Tulip-Dome
21
Telephone Use
23
Using Assistive Listening Systems
24
Repairs
24
Troubleshooting Guide
26
General Precautions
28
Technical Data
29
Key Word Index
30
3
Your Danalogic 6 mini Hearing Instrument
1. Programme Selector
2. Battery Compartment & On/Off Switch
3. Sound Outlet
4. 1st Microphone Sound Inlet
5. 2nd Microphone Sound Inlet (6060-DI)
6. Volume Control (4060-VI)
4
5
1
3
4060-VI
4
6
2
6060-DI
1
3
2
4
8.
Left/Right indicator
(Right=Red, Left=Blue)
9.
Battery lock
10. Model
11. Manufacturer
11
10
6060-DI
9
8
5
Your Danalogic 6 mini Thin Tube
Hearing Instrument
1.
2.
3.
4.
5.
6.
7.
Programme Selector
Battery Compartment & On/Off Switch
Thin Tube Adaptor
1st Microphone Sound Inlet
2nd Microphone Sound inlet (6060-DI)
Thin Tube with standard dome
Volume Control (4060-VI)
4
3
6060-DI
5
6
1
4
3
7
1
2
6
4060-VI
2
6
8.
Left/Right indicator
(Right=Red, Left=Blue)
9.
Battery lock
10. Model
11. Manufacturer
11
10
6060-DI
9
8
7
Programme Selector
Your hearing care professional has most likely programmed
multiple programmes into your instrument. You can select
programmes simply by depressing the programme selector
once. You will then hear one or more “beeps”, indicating
which programme you have selected. Your hearing instrument will switch programmes as follows:
Examples:
3 programmes: 1→ 2, 2 → 3, 3 → 1
With optional telecoil: 1 → 2, 2 → 3, 3 → T, T → 1
With Direct Audio Input: 1 → 2, 2 → 3, 3 → DAI, DAI → 1
You can always return to programme 1 by turning your
instrument off and then on again or by placing it in standby mode and then returning to its operating mode.
Your Programme Environments
Programme
8
Description of when to use
Telecoil
See section “Telephone Use” for a detailed description of
this function. ReSound Danalogic 6 BTE instruments are all
equipped with a telecoil in their standard version.
Directionality
ReSound Danalogic 6 6060-DI mini is equipped with two
microphones and thus offers directionality. That is a function
which enables better speech understanding in noisy
situations. This function focuses on speech in front of you
while sounds coming from the back or the side are suppressed. Directionality is available as an option in the custom
programmes. Please ask your hearing care professional about
this feature.
Stand-by Function
To put the instrument into stand-by mode, hold down the
programme selector for 5 seconds. You will hear a series of
beeps, and the device is now in stand-by mode. Before
returning to functional mode, you will need to wait approximately 5 seconds. After waiting, press the programme
selector down once. Please note that the instrument is using
a small amount of power when it is in stand-by mode.
9
On/Off Function
ReSound Danalogic 6 mini is equipped with an on/off switch
integrated into the battery compartment. When the battery
compartment is fully closed, the instrument is turned on in
its functional mode and programme 1 will be activated.
Partially open the battery door until it snaps into the offposition. The instrument is then switched off. Whenever you
are not wearing the instrument, remember to turn it off to
reduce battery consumption.
SmartStart
SmartStart allows you to put the instrument on the ear without annoying sounds like squealing. It delays the switch on
time 10 seconds after closing the battery compartment, and
is indicated by a beep every second after closing the battery
compartment. This function can be activated or deactivated
by your hearing care professional.
10
Volume Control
The ReSound Danalogic 6 mini 4060-VI, offer a volume control allowing you to turn the volume up and down. When
wearing the instrument, you can increase the volume by
turning the volume control wheel up, and reduce volume by
turning it down.
Up
Down
For each volume step, you will hear a “beep” signal indicating the change. If you reach the upper or lower limit of the
volume control range, there will be a different type of
“beep” signal with a lower pitch.
Please note that your instrument has been fitted by your
hearing care professional and that your hearing loss has
required a certain amount of amplification. This means that
you may not be able to increase the volume as much as you
can decrease it.
11
Direct Audio Input (DAI)
ReSound Danalogic 6 mini offers you the possibility of direct,
undisturbed connection to facilities such as television, radio
and remote microphone via the Direct Audio Input socket.
Often, this will improve sound quality. The sound source is
connected to your instrument with a cable or a wireless FM
system to the audio shoe. The audio shoe will connect with
a “click” to the hearing instrument and switch to Direct
Audio Input automatically.
12
Inserting and removing the instrument
- standard Ear mould
Inserting the instrument
• With the battery door opened in the off
position take the ear mould between
thumb and index finger and position
its ‘point’ in your ear canal. Now,
slide the ear mould all the way
into your ear with a gentle,
twisting movement.
Insertion can be easier if you
gently pull your auricle backwards with your other hand.
• Turn the top-part of the ear mould
gently backwards and forwards
so that it fits behind the fold
of skin above your ear canal.
• Place the hearing instrument
behind your ear. Move the ear
mould up and down and press
gently to ensure it is positioned
correctly in the ear. Opening and
closing your mouth can ease insertion. You will feel when the ear
mould is positioned correctly.
• When correctly positioned switch on your instrument by
closing the battery door.
13
Inserting and removing the instrument
- Thin Tube
Inserting the instrument
• Hang the instrument over the top
of the ear.
• Grasp the Thin Tube where it bends and push the dome
into your ear canal. The dome should
be placed far enough into the ear
that the sound tube lies flush
with your head. When the dome
is placed appropriately, you
should not see the Thin Tube sticking out when you look directly
into a mirror.
• If the device whistles, the most likely
reason is that the dome is not placed
correctly in the ear canal. Other reasons can be buildup of earwax in
the ear canal, or that the sound
tube connection to the instrument
has become loose, in which case the
sound tube must be changed. It is also
possible that the instrument settings are
not optimal. If you have ruled out other reasons for the
instrument squealing, it is recommended to contact your
hearing care professional.
14
Low Battery Warning
When the battery voltage/power decreases to a low level, the
instrument will inform you by a soft low-battery-warning signal (beep-beep). The signal indicates you should replace the
battery, and for this reason we recommend that you always
have a spare battery. The battery-warning signal will be
repeated every 5-10 minutes until the battery runs out of
power. The instrument will then automatically switch off.
Changing the Battery
Open the battery compartment by turning the instrument
off, and then using your fingernail to open it completely.
After removing the old battery, insert the new one with the
“+” (flat) side facing the “+” on the battery door. It should
fit in like a puzzle piece. The battery door should close very
easily. Never use force to close the door as this may damage
your hearing instrument.
Always use a size 13 Zinc-Air battery. Please note that if the
battery is weak, the hearing instrument performance will be
reduced. Removing the battery when you are not wearing
the instrument will help prevent corrosion of the battery
contacts.
“-”
15
Battery Warning Information
Batteries contain dangerous substances and should be disposed of carefully in the interest of your safety and for the
environment.
• Do NOT attempt to recharge batteries which are not
specifically designated rechargeable as they may leak or
explode.
• Do NOT attempt to dispose of batteries by burning them.
• Keep batteries away from small children and pets.
• Do NOT place batteries in your mouth.
If swallowed, see a physician immediately.
16
Daily Maintenance
Keep your hearing instrument clean and dry. Wipe the case
with a soft cloth or tissue after use to remove grease or
moisture. If the instrument has been exposed to high
humidity or perspiration, enclose it (with the ear mould) in a
sealed container together with a drying agent (desiccant)
overnight. Consult your hearing care professional concerning
which drying agent to use.
To avoid the need for unwarranted repairs:
• Never immerse the instrument in water or other liquids
since this may cause permanent damage to the circuitry.
• Protect your hearing instrument from rough handling,
and avoid dropping it on hard surfaces or floors.
• Do not leave the instrument in or near direct heat or sunlight since excessive heat can damage the instrument or
deform the casing.
17
Cleaning the Ear Mould and replacing Sound
Outlet Filter
The ear mould should be cleaned regularly. Remove the ear
mould and the silicone tubing from the hearing instrument
before you clean it. Lukewarm water should be enough to
clean wax off the ear mould. If ear wax is stuck in the sound
canal of the ear mould, the cleaning loop or a syringe with
lukewarm water can easily be used to “push” the wax out.
Be sure to thoroughly dry the ear mould and its tubing before
reconnecting it to the hearing instrument. Blow gently
through the tubing to remove moisture trapped inside.
The silicone tubing connecting the ear mould to the hearing
instrument should be changed if it becomes stiff or brittle.
18
Sound Outlet Filter
If your ReSound Danalogic 6 mini is fitted with a hook, the
hook is equipped with a filter. This filter is located at the top
of the sound outlet and prevents
moisture and debris from getting
into the hearing instrument. If the
hearing instrument seems to have
lost power and changing the battery does not help, the filter may
be blocked, and needs to be
changed. See instructions below:
How to remove filter
Place the hook of the instrument into the long groove of
the filter stick. Pull down and
the filter will be removed.
How to place filter on hook
Place the hook on one filter
and push gently. Rock the
hook back and forth until
the filter is released.
Now take the hook with the
filter attached and press it in
the hole at the end of the
filter. The filter will now be
fastened.
19
Cleaning the Thin Tube and dome
The Thin Tube feeds the amplified sound from the hearing
instrument into the ear. It is important that the Thin Tube and
the dome fit correctly into your ear. If the Thin Tube or the
dome irritate your ear in any way and prevent you from
wearing your hearing instrument, please contact your hearing care professional. You should never attempt to modify
the shape of the Thin Tube yourself.
The Thin Tube and the dome
should be cleaned regularly.
Remove the Thin Tube from the
instrument before cleaning by
unscrewing it. Use a damp cloth to
clean the Thin Tube and dome on
the outside and use the black
cleaning rod to “push” any debris
out of the Thin Tube. The cleaning rod should be inserted
where the Thin Tube attaches to the instrument and pushed
all the way through the sound tube and out through the
dome. It is not recommended to submerge or rinse the Thin
Tube and dome with water, as there is a risk that a water
drop may become lodged in the Thin Tube. If this should
occur, it will prevent sound coming through the Thin Tube,
and may be harmful for the instrument's electronics.
The Thin Tube and dome should be changed every three to
six months depending on use and sooner if the Thin Tube
becomes stiff or brittle. We recommend that you have your
hearing care professional change the dome for you. If your
hearing care professional instructs you to change the domes
yourself, make sure that they are securely fastened to the
sound tube before inserting them in your ear. A failure to
change the domes in accordance with the instructions could
result in injury.
20
The Domes
How to mount the standard Dome
The Original Open Dome is mounted on the Thin Tube by
pushing it over the grooves on the Thin Tube.
How to mount the Tulip-Dome
(1) + (2) The Tulip-Dome is mounted on the Thin Tube by
pushing it over the grooves on the Thin Tube.
1
2
21
The Tulip-Dome should be directed with the sound outlet
hole facing either down towards your shoulders or up
towards your hair. (3) The sound outlet
hole can turn both ways; the direction
of the sound outlet hole affects the
length of the sound tube according
3
to the entrance of your ear canal.
Please ask your hearing care
professional which way the sound
outlet hole should turn in your ear.
The Tulip-Dome consists of two “leaves” and it is important
that the largest “leaf” is the outermost “leaf” (4). This can
easily be done by pushing the “leaves” away from the Thin
Tube with your forefinger and middle finger (5). This will
make the large “leaf” bend forward. Then you push it back
and it will be placed on top of the smaller “leaf” (6). Now the
Tulip-Dome is ready for insertion (7).
5
4
6
22
7
Telephone Use
Your hearing instrument is equipped with an induction coil
(telecoil) which picks up magnetic emanations from a hearing instrument compatible telephone. Your hearing care
professional can activate the telecoil. By selecting the telecoil
programme, the hearing instrument will only pick up the
sounds coming from the telephone.
When using the telecoil programme, the receiver of the telephone should be held as shown in the drawing. You may
need to move the handset around slightly to find the best
reception.
If you do not wish to have a telecoil programme, you may
still use the phone while wearing your hearing instrument.
Many hearing instruments will whistle (feedback) when in
close proximity to a telephone. To reduce the potential for
this problem, your hearing instrument is equipped with an
adaptive digital feedback suppression (Stabilizer DFS) system
which allows for use of the telephone while greatly reducing
the chance of feedback. Hold the phone close to the top
microphone of the hearing instrument, but not directly on it.
If there is feedback, it may take a few seconds for the instrument to adapt.
Using the telephone, while wearing your hearing instrument, may require some practice.
23
Using Assistive Listening (tele-loop) Systems
Many gathering places are equipped with assistive listening
(tele-loop) systems, e.g. in schools, theatres and houses of
worship. To take advantage of a tele-loop system, select the
telecoil programme. When the telecoil programme has been
selected, you will be able to hear a clean sound signal via the
tele-loop system. If the instrument goes dead in the telecoil
programme, this may be because the loop system is not
operating. If a school, theater or house of worship does not
have a tele-loop system, try and sit as close as possible to the
front and use one of the microphone programmes.
Repairs
If your GN ReSound hearing instrument malfunctions, it
must be repaired by a qualified technician. Do not attempt
to open the case of the hearing instrument since this would
invalidate the warranty. If your GN ReSound hearing instrument requires service, please contact your hearing care professional for assistance.
24
25
TROUBLESHOOTING GUIDE
SYMPTOM
No sound
CAUSE
• Not turned on
• Dead battery
• Battery improperly inserted
• Blocked ear mould
• Blocked sound outlet filter
Not loud
enough
• Loose ear mould
• Blocked ear mould
• Change in hearing
• Excessive ear wax
• Blocked sound outlet filter
• Volume set too low
Whistles
• Loose ear mould
• DFS needs re-initialization
Sound not clear
• Weak battery
or distorted
• Poorly fitting ear mould
• Hearing instrument damaged
• Hearing instrument settings
not optimal
If there are any other problems not mentioned in this
guide, please contact your hearing care professional.
26
POSSIBLE REMEDY
•
Turn on
•
Replace battery
•
Insert battery properly
•
Clean ear mould blockage
•
Change filter or consult
your hearing care professional
•
Reinsert carefully
•
Clean ear mould
•
Consult your hearing care professional
•
Consult your physician
•
Change filter or consult
your hearing care professional
•
Consult your hearing care professional
•
Remove and reinsert
•
Consult your hearing care professional
•
Replace battery
•
Consult your hearing care professional
•
Consult your hearing care professional
•
Consult your hearing care professional
27
General Precautions
• Consult a physician if you find a foreign object in your ear
canal, if you experience skin irritation or if excessive ear
wax accumulates with the use of the hearing instrument.
• Different types of radiation, e.g. from NMR, MRI or CT
scanners, may damage the hearing instrument.
Therefore, do not wear the hearing instrument during
these or other corresponding scanning procedures. Other
types of radiation (burglar alarms, room surveillance systems,
radio equipment, mobile telephones, etc) contain less
energy and will not damage the hearing instrument. They
could however momentarily affect the sound quality or
create strange sounds from the hearing instruments.
• Warning: Do not wear the hearing instrument in mines or
other explosive areas, unless those areas are certified for
hearing instrument use.
28
Technical Data
Maximum Output (2cc Coupler / IEC 60118-7)
6060-DI
125 dB SPL (Typical)
6060-DI Thin Tube
128 dB SPL (Typical)
4060-VI
125 dB SPL (Typical)
4060-VI Thin Tube
128 dB SPL (Typical)
29
Key Word Index
Assistive listening (tele-loop) systems
24
Battery change
15
Battery compartment
4,6,10,15
Cerumen/earwax
18
Cleaning the instrument
17
Directionality
Direct audio input (DAI)
Ear Mould / Dome
Environmental programmes
9
11
6,12,13,17,18,20,21,22
8
Low battery warning
15
Maintenance
17
On/off switch
4,6,10
Programme Selector
4,6,8
SmartStart
10
Sound outlet filter
19
Stand-by mode
9
Technical data
29
Telecoil use
Telephone use
9,23,24
23
Troubleshooting guide
26-27
User operated controls
4,6,8,9,10
30
31
Worldwide headquarters:
Australia
GN ReSound A/S
GN ReSound Pty. Ltd.
Lautrupbjerg 9 • P.O. Box 130
Unit R1 Regent Park Estate
DK-2750 Ballerup, Denmark
391 Park Road
Tel.: +45 45 75 11 11
Regent Park NSW 2143
Fax: +45 45 75 11 19
Tel.: 02 9743 9707
www.gnresound-group.com
Fax: 02 9743 7472
www.gnresound.com.au
GN ReSound Ltd.
New Zealand
1 Landscape Close
GN ReSound (NZ) Ltd.
Weston Business Park
12 Parkway Drive
Weston-on-the-Green
Mairangi Bay
Oxon OX25 3SX
Auckland
Tel.: 0 1869 343 500
Tel.: (free) 0800 900 126
Fax: 0 1869 343 466
Fax: (free) 0800 007 695
www.gnresound.co.uk
www.gnresound.co.nz
Any issues relating to the EU Medical
Device Directive 93/42/EEC should be
directed to GN ReSound A/S.
15714481-GB-07.02 Rev. A
United Kingdom