1
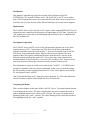
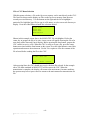
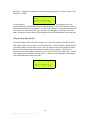
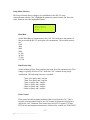
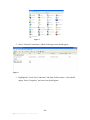
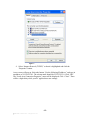
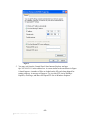
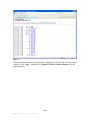
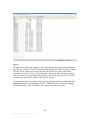
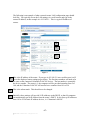
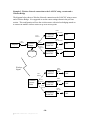
LANCNC FTP LAN network data server for CNC Controls 2008-2009 Calmotion LLC, All rights reserved Calmotion LLC 9909 Topanga Canyon Blvd. #322 Chatsworth, CA 91311 www.calmotion.com -12008-2009 Calmotion LLC, All rights reserved Introduction This manual is intended to provide a description of the Calmotion LANCNCUNIVERSAL CNC network FTP data server. The LANCNC is an FTP server with at least 2 GB of local memory stored on a removable SD card. Data can be accessed over a LAN network as well as directly off the SD card when the card is used with a computer. Requirements The LANCNC device will work with a CNC control with a standard DB25 RS-232 serial connection to the control box for the purposes of input/output of CNC data. Typically, the CNC manufacturer refers this as read and punch tape functions. Power is obtained from the CNC machine tool. Description of Operation The LANCNC acts as an FTP server for file storage that an operator can access at the control panel on a CNC. Connection to the FTP server can be done with standard software tools that are provided with most PC’s. No logon is required as the LANCNC FTP Server accepts anonymous logins. Special software is not required. The most popular of these are Explorer and Internet Explorer from Microsoft. Anyone on the network can drag and drop files to the CNC server where they can be transferred to machine memory or drip fed (DNC). Conversely, files residing in CNC memory can be sent to the data server where they can be accessed by anyone on the network. File information is stored on an SD card resident on the LANCNC. A 2 GB SD card is provided as standard. Other sizes may be substituted. In the event of a network outage, the SD card may be removed and inserted into a PC. Files can be added or stored at the PC and replaced in the LANCNC. Note: Files should follow the 8.3 format for proper operation. E.g. File name should not exceed 8 characters and the suffix should not exceed 3 characters. Navigating the Menus There are three buttons on the panel of the LANCNC device. Two square buttons bracket a round button in the center. The square round buttons are used to control the cursor in order to highlight options from a menu or file selection. The cursor is typically shown bracketing items with > and < symbols. The center button typically selects the options or files highlighted with the > and < symbols. -22008-2009 Calmotion LLC, All rights reserved Main Menu The following is the main menu displayed upon application of power. The outer round buttons are used to adjust the item to be selected either up or down. The center button is used to select the function that is highlighted with the > < symbols. The descriptions of each function are described later in the manual. Select:>CNC to File< File to CNC DNC v3.92 SETUP CNC to File Menu Selection With this selection, CNC data can be sent directly to the local ftp server memory. The file name used to transmit CNC data is generated automatically*. If a different name file name is desired, select ‘Dir’. ‘Dir’ will display the directory. A different file name can be typed in by selecting [type File]. to file: CNC16.TXT Dir Start Cancel Shown in the above screen display, the file name CNC16.TXT has been automatically generated by the LANCNC control. Press the button under the Start option to prepare the ftp server memory storage to receive a file from the CNC. Press the button under the Cancel option to return to the main menu without creating a file. Once the “Start” has been pressed, a file send operation (punch) from the CNC should be initiated. *More about the Automatic File Name Selection: All files saved to the ftp server memory storage use a file name with the following structure: CNC####.TXT. The number will be the next number in the sequence of the files found on the ftp server. If the largest sequence numbered file name number found is CNC15.TXT, then the next file name created will be CNC16.TXT. -32008-2009 Calmotion LLC, All rights reserved File to CNC Menu Selection With this menu selection, a file on the ftp server memory can be sent directly to the CNC. The first files shown on the display are files on the ftp server memory from the most recently accessed directory. Use the buttons on the right and the left to highlight a particular file, highlight [type file] to type in a file name, or select a new sub directory to display. Press the center button to make the selection desired. [type file] CNC16.TXT >MOLD.TXT< NEXTJOB<DIR> Shown in this example screen above, the MOLD.TXT file is highlighted. Select the center key to prepare the file to be sent. A new screen will appear showing the file to be sent along with a Start and Cancel display. Before pressing the Start button, prepare the CNC control to receive a file. When the CNC is ready to accept a file, press the center button associated with the Start button on the screen. Press the right button to cancel this operation and return to the main menu. Use the View option to view the contents of the file selected before sending the file to the CNC. to CNC: MOLD.TXT View Start Cancel After pressing Start, the CNC should now receive the data file selected. In the example above, file data contained in MOLD.TXT will be sent to the CNC. When the transmission is complete, the display will return to the main menu. On some machines, the operator may have to press cancel to return to the main menu after transmission of a file. -42008-2009 Calmotion LLC, All rights reserved DNC* Menu Selection With DNC selection, a file on the ftp server memory can be sent directly to the CNC while the control is in Automatic mode. This function provides a way to ‘run’ a program off the ftp server memory. The first files shown on the display are files on the ftp server memory from the most recently selected directory. Use the buttons on the right and the left to highlight a particular file, highlight [type file] to type in a file name, or select a new sub directory to display. Press the center button to make the selection desired. *(DNC, Direct Numerical Control, may not be available on all CNCs. Check with the machine’s User Manual to determine if this is available on the CNC control). [type file] CNC16.TXT >MOLD.TXT< NEXTJOB<DIR> Shown in this example screen shot, the MOLD.TXT file is highlighted and selected. Press the Start button. This will prepare the LANCNC for DNC or “drip feed operation”. Next, place the CNC in Automatic or DNC mode. The LANCNC will begin sending the file when the CNC is put in DNC or Automatic Mode. It is important to prepare the LANCNC first when using software handshaking. Auto-rewind: Once a file has been sent to the control, the LANCNC will “rewind” to the beginning of the program. In order to repeat the file, simply press start again to machine another part as many times as desired. Press the right button to cancel this operation and return to the main menu. DNC:MOLD.TXT Opt. Start Cancel Select Options to display the options menu as shown below in the example. The options menu allows for mid-tape starts and preparatory lines to be added to the file that has been selected. DNC Options Menu Midtape Cont. Prepdata Use the Mid-tape start option to do a block search of the file selected for DNC. DNC will start at the block of NC code that contains the mid-tape text entered. For example, suppose the operator were to type in N1000.2. DNC will begin when a block that contains "N1000.2" is found. Note: An N word can be added to a single line of the file in order to establish a starting block number. Use the Preparatory data option to insert text before the file that is selected for DNC. For example, the operator might want to make a tool change prior to running a file or position -52008-2009 Calmotion LLC, All rights reserved the Z axis. To do this, the operator would enter the appropriate NC codes to make a tool change like T4M6. Preparatory Data: T4M6 (delete=Left/Right) Scroll Cont. Next The mid-tape or preparatory text can be typed using the left and the right buttons under the display. The Scroll function is used to increment to another letter or number. Use the Next function to accept that character and move to the next character in the text. Use the Cont. function to accept this as the file name. A character can be deleted by pressing the Left and Right buttons at the same time. Using the [type file] function Directory listings on the LANCNC always have a [type file] option in the directory list. This function allows the operator to insert characters to various functions. When selected, a file name can be typed to either create a new file name or access an existing file name. The Scroll function is used to increment to another letter or number. Use the Next function to accept that character and move to the next character in the file name. Use the Cont. function to accept this as the file name. A character can be deleted by pressing the Left and Right buttons at the same time. File Name: A (delete=Left/Right) Scroll Cont. Next -62008-2009 Calmotion LLC, All rights reserved Setup Menu Selection The Setup selection allows settings to be established for the RS-232 serial communication with the CNC. Highlight the parameter option from the list. Press the center button to select the highlighted option. >Baud Rate< Flow Control End Of Block Delay Baud Rate Set the Baud Rate to communicate to the CNC. The baud rate is the number of bits per second the RS-232 serial port will communicate. The available choices are: 1200 2400 4800 9600 19,200 38,400 57,600 115,200 Data/Parity/Stop Set the number of Data, Parity and Stop bits used for serial communication. This setting is typically fixed on a CNC. Refer the CNC’s manual for the proper combination. The following choices are available: 7 data, Even parity and 1 stop bit 7 data, Even parity and 2 stop bit 7 data, no parity and 1 stop bit 7 data, no parity and 2 stop bit 8 data, no parity and 1 stop bit 8 data, no parity and 2 stop bit Flow Control Flow control sets the streaming method of data to and from the CNC. This is typically a fixed method. Refer to the CNC manual to determine which type is used by the CNC. Hardware flow control uses two RS-232 signals (CTS and RTS) to start and stop data transmission. Software flow control uses XON/XOFF -72008-2009 Calmotion LLC, All rights reserved characters to start and stop data transmission. Software flow control is the preferred and easiest method to implement. This method is recommended. to CNC: MOLD.TXT XON XOFF Cancel When the Software flow control method is used, the current XON or XOFF that has been received during transmission will be displayed on the right of the display. Use this feedback to determine if the LANCNC unit is receiving XON or XOFF characters. End of Block Char End of block sets the format for end of block characters. The most common end of block is the carriage return/ line feed used by most PC computers. The next most common is the Teletype end of block, which is line feed/carriage return. This parameter value will be the end of block that is used when sending data to the CNC. When data is received from a CNC, a carriage return/line feed end of block is always used so the file can be viewed when view the file using a computer. The following choices are available: CR LF LF CR LF CR CR LF CR None/binary Use the ‘None/binary’ for controls that do not use text files or a file that does not contain control characters. For example, Mazak has an optional non-G code file system that will not work in text mode. The LANCNC will transfer those files when the binary option is selected. End of Block Delay Delay set a pause at the end of a block of data. Typically, this is set to ‘no delay’ to ensure the fastest data communication at the selected baud rate. Choose a delay if the CNC manufacturer requests a delay at the end of a block or if the CNC is losing blocks of data in the program. This feature is typically used for older CNC’s with low communication and baud rate capability. -82008-2009 Calmotion LLC, All rights reserved Start of Tx This sets the character that will be sent prior to sending data in the selected file. The most common character used is the percent, %. Choose a setting as specified in the CNC manual. If your file already contains a % at the beginning, set to none so duplicate % signs are not sent. The following choices are available: % null char none Use the null character for controls the need an ASCII char 0 to be used as the start character. End of Tx This function sets the character that will be sent after sending data in the selected file. The most common character used is the percent, %. Choose the setting as specified by the CNC manual. The following choices are available: % null char none Use the null character for controls the need an ASCII char 0 to be used as the end character. Probe RS-232 This function shows the current RS-232 levels present. This can be used to help diagnosis serial issues. Start Rx This sets how the LANCNC will initiate receiving a file. Some machines require an initial XON to begin the transmission. Most machines do not, so the ‘automatic’ setting will work for most machines. -92008-2009 Calmotion LLC, All rights reserved Notes: The LANCNC does not support long Windows type file names. Use a DOS type 8.3 file format with the LANCNC. 8.3 filenames have at most eight characters, optionally followed by a "." and a filename extension of at most three characters. Deciding on a network configuration There are several ways to design a network. Some knowledge and experience with setting up networks is highly suggested. The simplest example shown below is of a peerto-peer network where there are only two devices connected. The other examples shown below expand the number of computers and LANCNC possible on the network. Using the simple peer-to-peer network is a good starting point when setting up a new network or before integrating the LANCNC and CNC into a larger company network. The following are the suggested manufacturers of routers and access points: Belkin 4-Port Cable/DSL Gateway Router F5D5231-4 Belkin Wireless G Router F5D7230-4 (this can be configured as an access point) Belkin Wireless G Router P57612-G (this can be configured as an access point) Example 1, Simple Peer-to-peer Network connection to the LANCNC The diagram below shows a simple peer-to-peer configuration of integrating a computer (i.e. desktop or laptop computer running Windows, MAC or Linux OS), the Calmotion LANCNC controller and a CNC. This simple setup is good starting point when setting up a new network or before integrating it into a larger company network. Computer CAT5 Ethernet Calmotion LANCNC DB25 RS-232 Serial CNC The LANCNC has a factory default ftp server address of 192.168.2.111. Direct connection to a Windows XP PC out of the box with an Ethernet cable can be achieved by following the subsequent procedures: 1. Select Control Panel from the Windows Start button. The screen should look like Figure 3 below. - 10 2008-2009 Calmotion LLC, All rights reserved Figure 1 2. Select “Network Connections” and the following screen should appear. Figure 2 3. Highlight the “Local Area Connection” and right click the mouse. A box should appear. Select “Properties” and a new box should appear. - 11 2008-2009 Calmotion LLC, All rights reserved Figure 3 4. Select “Internet Protocol (TCP/IP)” so that it is highlighted and click the “Properties” button. A new screen will pop up. Select the button “Use the following IP address:” and type in an address of 192.168.2.101. The sub-net mask should be 255.255.255.0. Click “OK”. The “Local Area Connection Properties” menu will be displayed. Click “Close”. There will be a slight delay while your PC applies these new settings. - 12 2008-2009 Calmotion LLC, All rights reserved Figure 4 5. You may exit from the Control Panel. Start Internet Explorer and type ftp://192.168.2.111 in the address bar. A screen similar to the one shown in Figure 8 should appear. A number of files are loaded on the SD card when shipped for testing purposes. A message will appear “To view this FTP site in Windows Explorer, click Page, and then click Open FTP Site in Windows Explorer”. - 13 2008-2009 Calmotion LLC, All rights reserved Figure 5 Follow the instructions that come up in Internet Explorer to view the files in an ftp viewer window. (Click “Page”, and then click “Open FTP Site in Windows Explorer” in the drop down box.) - 14 2008-2009 Calmotion LLC, All rights reserved Figure 6 The figure above shows the display on a PC when the ftp site has been opened from the previous step. At this screen, files can transferred from any file folder on your PC and the FTP site. If you wish to create a new directory on the FTP site, create a file folder somewhere on your PC such as “My Documents”. Select the folder and drag and drop with your mouse to the ftp window shown above. The file directory as well as any files inside the directory will be copied to the LANCNC ftp site. As an alternate, there are a number of ftp software programs that are available that offer additional ftp options for managing your files. Additional features offered are logging file transfer activity, data rate transfer, and comparisons of directory data. - 15 2008-2009 Calmotion LLC, All rights reserved Example 2, Wired Network connection to the LANCNC using a router The diagram below shows a wired network configuration using a network router. The router connects multiple networking devices together. Calmotion LANCNC CAT5 Ethernet CAT5 Ethernet Computer Router CAT5 Ethernet Calmotion LANCNC CAT5 Ethernet Calmotion LANCNC The Internet DB25 RS-232 Serial CNC DB25 RS-232 Serial CNC DB25 RS-232 Serial CNC The IP address of the router is required to setup the LANCNC. There maybe some changes on the router also. The following are the suggested settings on the router: DHCP enabled (On) IP Address: 192.168.2.1 Subnet Mask 255.255.255.0 IP Pool Starting Address 192.168.2.2 IP Pool Ending Address 192.168.2.100 Using these settings on the router will allow computers on the network to automatically get their own IP addresses in the range of 192.168.2.2 to 192.168.2.100. And it leaves 192.168.2.101 and above to be available to static IP address like the LANCNC devices. It is important to note that only one device can use an IP address at a time. The router, computers, printers, and LANCNC devices need to have their own number in the network range provided by the IP address and Subnet Mask. In the suggested settings above the only address available to the network devices is between 192.168.2.1 and 192.168.2.254. The following is and example of IP addresses that could exist: 192.168.2.1 is the Belkin Routers IP address (fixed in the router settings) 192.168.2.2 is a desktop computer IP address (automatically provided by the DHCP) 192.168.2.3 is a laptop computer IP address (automatically provided by the DHCP) 192.168.2.4 is a printer IP address (automatically provided by the DHCP) 192.168.2.101 is a Calmotion LANCNC IP address (set in LANCNC.INI on the SD card) 192.168.2.102 is a Calmotion LANCNC IP address (set in LANCNC.INI on the SD card) 192.168.2.103 is a Calmotion LANCNC IP address (set in LANCNC.INI on the SD card) - 16 2008-2009 Calmotion LLC, All rights reserved The following is an example of what a network router LAN configuration page should look like. You typically access the LAN settings via a web browser and type in the routers IP address, in this example it is 192.168.2.1. This is a typical IP address of routers. A B C Figure 7 A This is the IP address of the router. If you type in 192.168.2.1 into a web browser it will access the displayed router settings pages shown. The first three numbers will need to be the same on the connected Calmotion LANCNC devices. The last number is essentially the device number. The router is 1, the computers will be provided a number from 2 to 100, and the Calmotion LANCNC will need to have a number from 101 to 254. B This is the subnet mask. This should never be changed. C Basically, these settings will provide 99 IP addresses to the DHCP, so that 99 computers can automatically get an IP address from the router’s DHCP. It also frees up IP addresses from 101 to 254 to static IP address devices, i.e. Calmotion LANCNC. - 17 2008-2009 Calmotion LLC, All rights reserved Example 3, Wireless Network connection to the LANCNC using a router and a Wireless Bridge The diagram below shows a Wireless Network connection to the LANCNC using a router and a Wireless Bridge. It is suggested to use the router settings shown in the previous section. This configuration will use the wireless router with wireless bridging turned on to connect to another wireless router set up as an access point. DB25 RS-232 Serial Calmotion LANCNC CAT5 Ethernet Computer CAT5 Ethernet DB25 RS-232 Serial CAT5 Ethernet Wireless Router CNC CAT5 Ethernet The Internet Calmotion LANCNC CNC DB25 RS-232 Serial Calmotion LANCNC Wireless Signal Calmotion LANCNC CAT5 Ethernet Wireless Access Point CAT5 Ethernet CAT5 Ethernet Calmotion LANCNC Calmotion LANCNC - 18 2008-2009 Calmotion LLC, All rights reserved CNC DB25 RS-232 Serial CNC DB25 RS-232 Serial CNC DB25 RS-232 Serial CNC Use the following step-by-step procedure to setup the router and then the access point. These settings are based on using a Belkin Wireless G router and access point: Router Configuration 1. Open a Web Browser 2. In the address bar type http://192.168.2.1 3. Click on Wireless Bridge in the left hand column under Wireless 4. Enter your password if any and click Submit 5. Check the box that says Enable Wireless Bridging, click Apply Changes. 6. Click Home, note the WLAN MAC address under LAN settings Access Point Configuration. 1. Open a Web Browser 2. In the address bar type http://192.168.2.254 3. Click on Wireless Bridge in the left hand column under Wireless 4. Enter your password if any and click Submit 5. Check the box that says, Enable Wireless Bridging 6. Check the box that says, Enable ONLY specific Access Points to connect and enter the WLAN MAC address from the router, click Apply Changes. Note: The channel must be identical on both the router and the access point. It is important that the router and access point use the same Channel, SSID, and security settings. The access point will become another device on the routers network. When both devices are using the same wireless communication parameters, they will be able to communicate with each other. Changing the IP address on the LANCNC device The LANCNC defaults to IP address 192.168.2.111. If a different IP address is desired, use a PC to create a text file on SD card with the file name LANCNC.INI in the root directory. This file must be text only and have carriage returns at end of each line. To change the IP address of the LANCNC to 101, the contents of the LANCNC.INI file should look like this: IP IP IP IP address=192.168.2.101 mask=255.255.255.0 gateway=0.0.0.0 dns=0.0.0.0 Remember the last number on the IP address will be that CNC’s “number.” To access the files on that CNC’s LANCNC file server, type in “ftp:192.168.2.101” in a web browser to view the directory contents stored on the machines 1GB SD card. Revision History: Rev 3.92 Initial release - 19 2008-2009 Calmotion LLC, All rights reserved