1
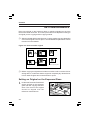
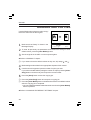
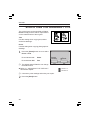
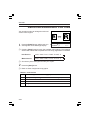
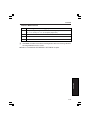
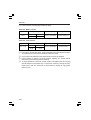
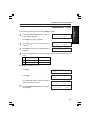
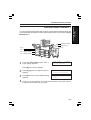
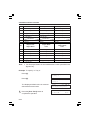
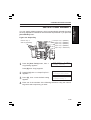
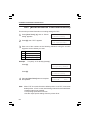
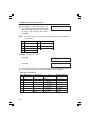
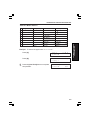
RICOH MP01 Copy Application Reference Operating Instructions Read this manual carefully before you use this product and keep it handy for future reference. For safety, please follow the instructions in this manual. Important Parts of this manual are subject to change without prior notice. In no event will the company be liable for direct, indirect, special, incidental, or consequential damages as a result of handling or operating the machine. Trademarks Microsoft, Windows, and MS-DOS are registered trademarks of Microsoft Corporation in the United States and/or other countries. PostScript is registered trademark of Adobe System Incorporated. Other product names used herein are for identification purposes only and might be trademarks of their respective companies. We disclaim any and all rights in those marks. TABLE OF CONTENTS TABLE OF CONTENTS 1. SETTING UP THE COPY APPLICATION.............................. 1-1 OVERVIEW............................................................................................. 1-2 Personal Computer ............................................................................ 1-2 Printer ............................................................................................... 1-2 Scanner ............................................................................................ 1-2 SETTING UP THE COPY APPLICATION ................................................... 1-3 Installing the Copy Application ............................................................ 1-3 Changing the Printer Configuration ..................................................... 1-4 Uninstalling the Copy Application ....................................................... 1-4 ACCESSING THE COPY APPLICATION ................................................... 1-5 Starting Up the Copy Application ......................................................... 1-5 Exiting the Copy Application ............................................................... 1-5 2. OPERATION SCREEN AND OPERATION PANEL ............... 2-1 OVERVIEW............................................................................................. 2-2 OPERATION SCREEN ............................................................................ 2-3 OPERATION PANEL (Option) .................................................................. 2-4 3. ORIGINALS ...................................................................... 3-1 ORIGINALS ............................................................................................ 3-2 Recommended Originals .................................................................... 3-2 Sizes and Scanning Area ................................................................... 3-3 SETTING ORIGINALS.............................................................................. 3-4 Setting an Original on the Exposure Glass ........................................... 3-4 Using the Auto Document Feeder (ADF) .............................................. 3-5 4. COPYING ........................................................................ 4-1 ORIGINAL SIZE COPYING ....................................................................... 4-2 ADJUSTING IMAGE DENSITY ................................................................. 4-4 Automatic Image Density Control ........................................................ 4-4 Manual Image Density Control ............................................................ 4-5 SPECIFYING THE ORIGINAL TYPE ......................................................... 4-6 SELECTING A PAPER SOURCE ............................................................. 4-7 i TABLE OF CONTENTS SELECTING PAPER FROM THE BYPASS TRAY ...................................... 4-8 When using the default paper size ...................................................... 4-8 When using the special paper size ...................................................... 4-8 REDUCED/ENLARGED COPYING ........................................................ 4-10 COLLATING ......................................................................................... 4-12 TWO-SIDED COPYING .......................................................................... 4-13 STAPLING ............................................................................................ 4-15 5. CHANGING THE DEFAULT SETTINGS ................................ 5-1 OVERVIEW............................................................................................. 5-2 IMAGE DENSITY ..................................................................................... 5-4 ORIGINAL TYPE ..................................................................................... 5-5 AUTO RESET TIME ................................................................................. 5-6 REDUCTION/ENLARGEMENT RATIO ...................................................... 5-7 COPY RATIO RESET .............................................................................. 5-9 PAPER TRAY PRIORITY ....................................................................... 5-11 OUTPUT TRAY PRIORITY ..................................................................... 5-13 AUTO TRAY SWITCH ............................................................................ 5-15 6. CHANGING THE PRINTER CONFIGURATION .................. 6-1 OVERVIEW............................................................................................. 6-2 TIFF (Bi-directional Communication) ......................................................... 6-4 OPTIONS (Non Bi-directional Communication) .......................................... 6-5 SPECIFYING THE PAPER SIZE (Non Bi-directional Communication) ......... 6-7 Special Paper Size Setting ............................................................... 6-10 7. ERROR MESSAGES............................................................ 7-1 ERROR MESSAGES IN THE MESSAGE BOX ........................................... 7-2 CONTROL PANEL MESSAGES ............................................................... 7-3 INDEX ii 1. SETTING UP THE COPY APPLICATION 1-1 SETTING UP THE COPY APPLICATON SETTING UP THE COPY APPLICATION SETTING UP THE COPY APPLICATION OVERVIEW Before installing this Copy Application, you must install the following drivers to control the Printer and the Scanner. p p TIFF driver (version 1.03 or later) CFM TWAIN driver (version 5.00.0118 or later) After installing this Copy Application, you can connect specified printer, scanner, and PC to make copies. The system requirements for setting up the Copy Application are outlined below. Personal Computer A personal computer with the following configuration is required to run the Copy Application. Personal Computer PC AT Compatible Operating System Microsoft Windows 95 Interface SCSI device and ASPI compatible host adapter (for connection of scanner) Unused COM port (for connection of scanner when optional Copy Panel is used) Unused parallel port (for connection of printer) RAM 16 MB or more Hard Disk Free Space 240 MB or more Printer The printer included with the Copy Application Scanner Aficio IS01 1-2 SETTING UP THE COPY APPLICATION Installing the Copy Application 1 After starting Microsoft Windows 95, insert the disk labeled “Copy Application set up program disk” into the computer’s disk drive. 2 Run “\Setup.exe” from the disk. When the setup screen is displayed, click the [Next] button. 3 Next, the “Choose destination location” screen is displayed. If the directory in which you want to install the program is correct, click the . [Next] botton, and skip step 4 Note: Install the Copy Application on to a disk with 200 MB or more free disk space available. If you want to select another directory, click the [Browse] button. 4 5 If the [Browse] button is clicked, the “Choose directory” screen is displayed. Select the directory in which you want to install the program and click the [OK] button. If the [Cancel] button is clicked, the directory selection is stopped. If the set directory name is new, a message is displayed. If this is OK, click the [OK] button. The “Setup option” screen is displayed. After setting the following items, click the [Next] button. The installation is started. Language: Select from English (US), English (UK), French, German, and Italian. Operation panel selection: Click the check box if an external operation panel is to be used. Operation panel port number selection: If the operation panel check box has been clicked, select a port number from 1 to 4. Note : When installing an additional external operation panel after the installation is completed, uninstall the program and install it again. * Refer to “Uninstall the Copy Application” in this chapter. 1-3 SETTING UP THE COPY APPLICATON SETTING UP THE COPY APPLICATION SETTING UP THE COPY APPLICATION 6 7 A message is displayed just before the installation is completed. If the [Yes] button is clicked, a shortcut for the Copy Application is created in the Startup folder. If the [No] button is clicked, it is not created. When the installation is completed, the completion screen is displayed. Click the [OK] button. Changing the Printer Configuration If your printer is set for bi-directional communication, it is not necessary to perform the printer settings again. If it is not set for bi-directional communication, before using the copy application for the first time, you must specify the size of the paper loaded in each paper tray and any options that are installed. Once these settings are made, it is not necessary to change them unless the configuration (paper trays and options) of the machine itself is changed. * Refer to “CHANGING THE PRINTER CONFIGURATION” chapter. Uninstalling the Copy Application 1 2 3 1-4 The copy application can be uninstalled with either of the following methods. p Select the name of the copy application from the “Add/remove application” function in the “Control panel”. p Select “Uninstall copy application” from the “Copy application” item in the program menu. The uninstall confirmation message is displayed. If this is OK, click the [Yes] button. The uninstallation is started. When the uninstallation is completed, click the [OK] button. ACCESSING THE COPY APPLICATION Starting Up the Copy Application While Microsoft Windows 95 is running, click “Start”, “Program” and then select the name of the Copy Application. The Copy Application is started. Exiting the Copy Application Click the copy application icon which is displayed in the task bar indicator area and select “Exit”. 1-5 SETTING UP THE COPY APPLICATON SETTING UP THE COPY APPLICATION SETTING UP THE COPY APPLICATION 1-6 OPERATION SCREEN AND OPERATION PANEL OPERATION SCREEN AND OPERATION PANEL 2. OPERATION SCREEN AND OPERATION PANEL 2-1 OPERATION SCREEN AND OPERATION PANEL OVERVIEW The Copy function is controlled from the Operation Screen on your PC or the optional external Operation Panel, after starting the Copy Application. Note : When installing an optional external operation panel after the Copy Application is installed, uninstall the Copy Application and install it again. * Refer to “SETTING UP THE COPY APPLICATION” chapter. 2-2 OPERATION SCREEN AND OPERATION PANEL OPERATION SCREEN The screen that appears immediately after the Copy Application starts up is called the “Operation Screen”. Copy machine functions can be performed using the mouse to click the buttons in the Operation Screen. p The Message Display shows the operational status of the machine and error messages. p All functions and controls are identical for both the Operation Panel and the Operation Screen. Figure 1-1. Operation Screen User Tools key Check Display and indicator indicator Message Display Clear Modes key Clear Modes User Tools: Check Display Clear/ Stop Ratio 100% Paper 2:A4: Ready 1 Auto Quantity Image Density Start Collate Staple Duplex F1 Ratio Paper lmage Density Photo F2 F3 F4 F5 Enter Function keys and indicators Numeric keypad Start key Clear/Stop key 2-3 OPERATION SCREEN AND OPERATION PANEL Note : Whenever you see an expression like “press a key” in this manual, it means that you should click an on-screen button with the mouse. OPERATION SCREEN AND OPERATION PANEL OPERATION PANEL(Option) If you are using the optional Operation Panel, all instructions in this manual for the Operation Panel apply to the Operation Screen. Note : In this case, an expression like “press a key” means that you should actually press the corresponding button with your finger. p The Message Display shows the operational status of the machine and error messages. p All functions and controls are identical for both the optional Operation Panel and the Operation Screen. 2-4 OPERATION SCREEN AND OPERATION PANEL Figure 1-2. Operation Panel: Inch Version Check Display indicator Function keys and indicators Message Display Clear Modes key Numeric keypad Start key Clear/Stop key Figure 1-3. Operation Panel: Metric Version User Tools key and indicator Check Display indicator Function keys and indicators Message Display Clear Modes key Numeric keypad Start key Clear/Stop key 2-5 OPERATION SCREEN AND OPERATION PANEL User Tools key and indicator OPERATION SCREEN AND OPERATION PANEL 2-6 ORIGINALS ORIGINALS 3. ORIGINALS 3-1 ORIGINALS ORIGINALS Recommended Originals Table 3-1. Sizes and Weights Metric Version Exposure glass Auto document feeder Size Up to A3 (297 × 420 mm) Weight _ Maximum : 297 × 432 mm A3L - A5KL Maximum : 297 × 432 mm 52 - 105 g/m2 (14 - 28 lb) Inch Version Exposure glass Auto document feeder Size Up to 11" × 17" (279 × 432 mm) Maximum : 11.7" × 17" Weight _ 11" × 17"L - 5½" × 8½"KL Maximum : 11.7" × 17" 52 - 105 g/m2 (14 - 28 lb) p You can place up to about 50 originals (80 g/m2, 20 lb) in the document feeder. p If you use sizes other than those above, you must specify the vertical and horizontal dimensions. R Avoid the following p Placing the following types of originals into the Auto-Document Feeder can cause feeding problems or damage to the originals. Place the following types of originals directly on the exposure glass. ♦ Originals of sizes other than those shown above ♦ Originals with staples or paper clips attached ♦ Perforated or torn originals ♦ Curled, folded, or creased originals ♦ Pasted originals ♦ Originals with any kind of coating, such as thermosensitive 3-2 paper, aluminum foil, carbon paper, or conductive paper ♦ Originals with indexes, tags, or other projecting parts ♦ Sticky originals such as translucent paper paper, art ORIGINALS ♦ Thin and soft originals ♦ Originals of inappropriate weight (See the above table.) ♦ Originals in bound form such as books ♦ Transparent originals such as OHP transparencies or translucent paper Sizes and Scanning Area Figure 3-1. Exposure glass Reference position Horizontal size Vartical size Maximum Original Size ORIGINALS Figure 3-2. Auto Document Feeder Horizontal size Vartical size Maximum Original Size Note : When an original is placed on the exposure glass or in the Auto Document Feeder correctly, anything within the margins (4.2 mm or 1/6 inch from each edge) will not be copied. 3-3 ORIGINALS SETTING ORIGINALS Place one original on the exposure glass or multiple originals into the Auto Document Feeder as shown. The correct procedure to use depends on the type of original you are copying and the copying method. p Align the original with the rear left corner. Copying results may vary depending on how the original is set into place. See the detailed explanations of each function for further details. Figure 3-3. How to set the original <Originals> p <Set in document feeder> <Set on exposure glass> Before copying an original that includes corrections with correction fluid or writing with ink, make sure that the original is completely dry. Moist fluid or ink can stain the glass and cause blotches or spots. Setting an Original on the Exposure Glass 1 Lift the Auto Document Feeder and set the original on the exposure glass with the copying side face down. The corner of the original should be aligned with the reference mark as shown. Reference mark Scale 3-4 ORIGINALS 2 Lower the Auto Document Feeder, taking care that the original does not move. Using the Auto Document Feeder (ADF) p p Originals of different sizes cannot be copied at the same time. If your originals are very thin, copy them one-by-one by setting them on the exposure glass (do not use the ADF). Attempting to copy several sheets of thin originals using the ADF may cause multiple feeding. Setting Originals in the ADF Adjust the document guide to match the size of the originals. Straighten up the edges of the originals and set them in the ADF with the copying side face up. Document Note 1: When copying in Duplex, Collate or Staple, set the originals in page order in the ADF. Note 2: Duplex, Collate and Staple can be copied only from the ADF. Duplex, Collate and Staple are options. 3-5 ORIGINALS 1 ORIGINALS 3-6 COPYING COPYING 4. COPYING 4-1 COPYING ORIGINAL SIZE COPYING Use the following procedure to produce a copy that is the same size as the original. 1 Make sure that “Ready” is shown in the Message Display. 2 To clear all previously set parameters and initialize all settings to their default values, press the [Clear Modes] button. 3 Set the originals in the ADF or on the exposure glass. 100% Ready 1:8½×11K 1 Auto *Refer to “ORIGINALS” chapter. p 4 5 If you want to leave the default values as they are, skip steps 4 and 5. Make settings as described in the appropriate chapters of this manual. Use the numeric keypad to input the number of copies you want. If you make a mistake while inputting the number of copies, press the [Clear/ Stop] button to clear the entry and re-input the correct number. 6 Press the [Start] button to start the copying job. p Press the [Clear/Stop] button to interrupt the copying job. p Press the [Clear Modes] button to initialize the machine to its default values after the copying job is completed. ♦ You can redefine the default values that are shown when the [Clear Modes] button is pressed. *Refer to “CHANGING THE DEFAULT SETTINGS” chapter. 4-2 COPYING p The machine automatically returns to its default settings if the machine is not operated for a specific amount of time following a copying job. ♦ The Auto Reset can be set in 10 seconds increments between 0 and 180. COPYING *Refer to “CHANGING THE DEFAULT SETTINGS” chapter. 4-3 COPYING ADJUSTING IMAGE DENSITY There are two methods that can be used to adjust the density of the copied image, automatic and manual. Automatic Image Density Control With this method, the machine automatically adjusts the image density. This function works well when contrast of the original is good. 1 Make sure that the “Auto” is shown for the Image Density setting in the Message Display. 100% Ready 1:8½×11K p If it isn’t, press the [Image Density] button until “Auto” appears. *Refer to “Manual Image Density Control” in this chapter. p Choose any other settings and make your copies. 2 Press the [Start] button. 4-4 1 Auto COPYING Manual Image Density Control You can also adjust the image density manually. Use this function to obtain a clear copy when the contrast of the original is poor, or at any other time you want to adjust the image density. 1 Press the [Image Density] button to select the desired density. p Each press of [Image Density] causes the Density setting on the Message Display to change in the following sequence: AutoàVery LightàLightàNomalà 100% Ready 1:8½×11K 1 Auto 100% Ready 1 1:8½×11K Very Light 100% Ready 1:8½×11K 1 Light ßVery DarkßDarkß p Choose any other settings and make your copies. 100% Ready 1:8½×11K 1 Normal 100% Ready 1:8½×11K 1 Dark 100% Ready 1 1:8½×11K Very Dark Press the [Start] button. COPYING 2 4-5 COPYING SPECIFYING THE ORIGINAL TYPE The original type can be specified as Text or Photo to help produce clearer copies based on the characteristics of the original. Text Use this setting when copying text, tables and/or line drawings. Photo original Text original Photo Use this setting when copying photographs or drawings. 1 Press the [Photo] button once to select Photo or Text. Photo indicator Lit: Photo Photo indicator Off: Text Collate Image Density p The default value is Text. You can change the default value. *Refer to “CHANGING THE DEFAULT SETTINGS” chapter. p Choose any other settings and make your copies. 2 4-6 Press the [Start] button. Photo indicator Lit indicator off COPYING SELECTING A PAPER SOURCE Any of the machine’s paper trays can be specified as the paper source for the copying job. 1 p Press the [Paper] button until the paper size you want is shown on the Message Display. Press the [Clear Modes] button to select the default paper tray. p 100% Ready 1:8½×11K 1 Auto 100% Ready 2:8½×11L 1 Auto 100% Ready 1 p Choose any other settings and make your copies. 2 Press the [Start] button. COPYING You can use paper other than that available 3:11×17L Auto in the machine’s paper trays, using the Bypass Tray. *Refer to “SELECTING PAPER FROM THE BYPASS TRAY” in this chapter. 4-7 COPYING SELECTING FROM THE BYPASS TRAY When using the default paper size 1 p 2 Press the [Paper] button until “B:<paper size>” appears in the Message Display. 100% Ready 1:8½×11K 1 Auto Choose any other settings and make your copies. 100% Ready B:8½×13L 1 Auto Press the [Start] button. p The size of paper in the Bypass tray can be specified as a default value. *Refer to “CHANGING THE DEFAULT SETTINGS” chapter. When using the special paper size 1 2 3 p Press the [Paper] button until “B:<paper size>” appears in the Message Display. 1 Auto Press the numeric keypad’s [#] key. Use the numeric keypad to input the vertical dimension (length across feeding direction) of the paper in the Bypass Tray. Use [*/.] to input a decimal point. Odd Size (3.5~12à#) Vert.:______inch The vertical dimension of the paper can be specified to any value in the following range. Inch Version Metric Version 4-8 100% Ready B:8½×13L 3.5" to 12" (in 0.01inch increments) 90mm to 297mm (in 1mm increments) COPYING Example:To set a vertical dimension of 11.5. Press [1], [1], [*/.] and then [5]. p Press [#]. Use the numeric keypad to input the horizontal dimension (length along feeding direction) of the paper in the Bypass Tray. Use [*/.] to enter a decimal point. Odd Size (5.8~17à#) Horiz.:______inch The horizontal dimension of the copying paper can be specified to any value in the following range. Inch Version Metric version 5.8" to 17" (in 0.01inch increments) 148mm to 432mm (in 1mm increments) Example:To set a horizontal dimension of 14.5. Press [1], [4], [*/.] and then [5]. Odd Size (5.8~17à#) Horiz.:__14.5inch 6 Press [#], and the dimensions you input appears. 7 Press [#]. p B:* Choose any other settings and make your copies. 8 Press the [Start] button. Vert.:__11.5inch Horiz.:__14.5inch 100% Ready 1 Auto COPYING 4 5 Odd Size (3.5~12à#) Vert.:__11.5inch 4-9 COPYING REDUCED/ENLARGED COPYING You can also produce an enlarged or reduced version of the original. 1 Press the [Ratio] button until the ratio you want appears in the Message Display. p 100% copying 1:8½×11K 1 Auto Pressing [Ratio] steps through the available ratio settings. The following are the ratio values that are preset when the Copy Application is installed. Inch Version 100% à93% à77% à65% à129% à Metric Version 100% à93% à82% à71% à141% à p Choose any other settings and make your copies. 2 Press the [Start] button. p Ratio vs. Sizes of original and copy paper. Table 4-1. Inch Version Ratio Size of original à Size of copy paper 93% (For providing a margin on four sides of an original.) 77% 8 1/ 2" × 14" à 8 1 / 2" × 11" 65% 11" × 17" à 8 1 / 2" × 11" 8 1/ 2" × 11" à 11" × 17" 129% 4-10 COPYING Table 4-2. Metric Version Ratio Size of original à Size of copy paper 93% (For providing a margin on four sides of an original.) 11" × 14" à B4 (11" × 14" is computer paper size.) 82% B4 à A4 B5 à A5 B6 à A6 71% A3 à A4 A4 à A5 A5 à A6 B4 à B5 B5 à B6 141% A4 à A3 A5 à A4 A6 à A5 B5 à B4 B6 à B5 COPYING p Use Ratio to select the reduction/enlargement ratio from among values in the range between 37% to 150%. * Refer to “CHANGING THE DEFAULT SETTINGS” chapter. 4-11 COPYING COLLATING Use Collate when making more than one copy of a set of originals. An optional Printer Hard Disk is necessary to collating. 1 1 Set the originals in the ADF. 2 3 1 2 3 1 2 3 1 2 3 Document guide *Refer to “ORIGINALS” chapter. Note : Duplex, Collate and Staple can be copied only from the ADF. 2 3 If the “Collate” indicator is not already on, press the [Collate/Staple/Duplex] button until it lights. Use the numeric keypad to input the number of copies you want. p Press [Clear/Stop] if you need to clear this setting. p Choose any other settings and make your copies. 4 Collate Staple Duplex Ratio indicator Lit indicator off Press the [Start] button. Note : The machine scans the originals and then starts collating copies. 4-12 COPYING TWO-SIDED COPYING An optional Duplex Unit is required for twosided copying. One-sided originals can be copied onto both sides of the paper. 1 2 1 2 Note : Both sides of two-sided originals can not be copied. 1 Set the originals in the ADF. Document guide *Refer to “ORIGINALS” chapter. Note : Duplex, Collate and Staple can be copied only from the ADF. 2 3 If the “Duplex” indicators is not on, press the [Collate/Staple/Duplex] button until it lights. Press the [Start] button. Collate Staple Duplex Ratio Note : The machine scans the originals and then starts collating copies. indicator Lit COPYING indicator off 4-13 COPYING p You can select an original direction (Top to Top/Top to Bottom). Align the top and bottom edges of originals when setting, as shown in the illustration. Top to Top ABC Top to Bottom Top to Top A B Top to Bottom Set A3L, B4L, 11" × 17"L or 8 1/2" × 14"L originals as shown in the illustration. Top to Top Top to Bottom 4-14 ABC p COPYING STAPLING Use Staple when making copies stapled as shown. Stapling is made one by one. An optional Finisher and a Printer Hard Disk are required for stapling. 1 Set the originals in the ADF. Document guide *Refer to “ORIGINALS” chapter. p The relationship between the position of the staple and the set direction of the original is as follows. <Set in the document feeder> <Copy> Note : Duplex, Collate and Staple can be copied only from the ADF. Press the [Collate/Staple/Duplex] button until “Staple” indicator lights. Note : When “Staple” is selected, “Collate” is automatically selected at the same time. p Choose any other settings and make your copies. 3 Press the [Start] button. Collate Staple Duplex Ratio indicator Lit indicator off Note : The machine scans the originals and then starts stapling copies. 4-15 COPYING 2 COPYING p For this mode, the following limitations apply: Table 4-3. Metric version Paper Size A4K Paper weight Maximum Minimum 80 g/m2 64 g/m2 Stapler Capacity Shift tray capacity from 2 to 20 sheets 30 sets (80 g/m2) Stapler Capacity Shift tray capacity from 2 to 20 sheets 30 sets (20 lb) Table 4-4. Inch Version Paper Size 1:8½×11K p p p p 4-16 Paper weight Maximum Minimum 20 lb 17 lb Post cards, translucent paper, OHP transparencies, and adhesive labels, and paper that is curled or low stiffness cannot be used. Copy paper with different sizes and directions cannot be stapled. If the number of copies is over the Stapler capacity, the copies will be delivered to the shift tray without stapling. To avoid problems caused by curled copies, load paper with the copying side face down in the paper tray. If copies are curled, try turning the copy paper over in the tray. If there is no improvement, change to copy paper with less curl. 5. CHANGING THE DEFAULT SETTINGS 5-1 CHANGING THE DEFAULT SETTINGS CHANGING THE DEFAULT SETTINGS CHANGING THE DEFAULT SETTINGS OVERVIEW All of the machine settings are returned to their defaults whenever Auto Reset is performed, or you press the [Clear Modes] button. p You can change the default values of the following parameters. • • • • • • • • 5-2 IMAGE DENSITY ................................................... ORIGINAL TYPE .................................................... AUTO RESET TIME............................................... REDUCTION/ENLARGEMENT RATIO ................. COPY RATIO RESET ............................................ PAPER TRAY PRIORITY ...................................... OUTPUT TRAY PRIORITY .................................... AUTO TRAY SWITCH ............................................ (see page 5-4) (see page 5-5) (see page 5-6) (see page 5-7) (see page 5-9) (see page 5-11) (see page 5-13) (see page 5-15) Table 5-1. shows the operation flow and the available selections in changing default settings. Table 5-1. Note 1: Shading indicates the factory default values. Note 2: (FD) shows that copies are delivered with copying side face down. (FU) shows that copies are delivered with copying side face up. 5-3 CHANGING THE DEFAULT SETTINGS CHANGING THE DEFAULT SETTINGS CHANGING THE DEFAULT SETTINGS IMAGE DENSITY The default image density can be set to Auto, Very Light, Light, Normal, Dark or Very Dark. 1 Press the [User Tools] button, then “1: Copy setting” appears. User Tools (1~2à #) 1:Copy Setting Press [#], then “Copy” appears. 2 Press [0], [6], then “06: Image Density” appears. Copy (00~11à #) 06:Image Density 3 Press [#], then the current default setting appears. Image Density(1~6à #) 1:Auto 4 Enter one of the numbers of the following selections using the numeric keypad to set the default image density to the level you want. No. Selected item No. Selected item 1 Auto 4 Normal 2 Very Light 5 Dark 3 Light 6 Very Dark Example : To specify “3: Light”. Press [3]. Image Density(1~6à #) 3:Light 5 5-4 Press [#]. Image Density *Light The displayed default value is renewed after about three seconds. Copy (00~11à #) 06:Image Density Press the [User Tools] button to complete the operation. 100% Ready 1:8½×11K 1 Light ORIGINAL TYPE The default original type can be set to Photo or Text. 1 Press the [User Tools] button, then “1: Copy setting” appears. User Tools (1~2à #) 1:Copy Setting Press [#], then “Copy” appears. 2 Press [0], [7], then “07: Photo Original” appears. Copy 3 Press [#], then the current default setting appears. Photo Orig. 4 Enter [1] or [2] using the numeric keypad to set the default original type you want. No. Selected item 1 Off (Text orig.) Text mode 2 On Photo mode (00~11à #) 07:Photo Original (1~2à #) 1:Off (Text Orig.) Note Example : To specify “2: On”. Press [2]. Photo Original 2:On Press [#]. Photo Original *On 5 The displayed default value is renewed after about three seconds. Copy (00~11à #) 07:Photo Original Press the [User Tools] button to complete the operation. 100% Ready 1:8½×11K 1 Auto 5-5 CHANGING THE DEFAULT SETTINGS CHANGING THE DEFAULT SETTINGS CHANGING THE DEFAULT SETTINGS AUTO RESET TIME The default auto-reset time can be specified in 10-second increments within the range between 0 and 180. 1 Press the [User Tools] button, then “1: Copy setting” appears. User Tools (1~2à #) 1:Copy Setting Press [#], then “Copy” appears. 2 Press [0], [8], then “08: Auto Reset” appears. Copy (00~11à #) 08:Auto Reset 3 Press [#], then the current default setting appears. Auto Reset(0~180à #) 4 Enter the leading two digits of the time you want to set as the default using the numeric keypad. Note : Entering “0 (zero)” disables Auto Reset. 60:Sec. Auto Reset(0~180à #) 00:Sec. [Off] Example : To specify 120 seconds. 5 5-6 Press [1] and then [2]. Auto Reset(0~180à #) 120:Sec. Press [#]. Auto Reset *120 Sec. The displayed default value is renewed after about three seconds. Copy Press the [User Tools] button to complete the operation. 100% Ready (00~11à #) 08:Auto Reset 1:8½×11K 1 Auto REDUCTION/ENLARGEMENT RATIO This software is provided with five default reduction/enlargement ratios each for the Inch Version and Metric Version .The default ratios are named copy ratio A, B, C, D and E, each of which can be changed in 1% increments within the range between 37 % to 150 %. 1 Press the [User Tools] button, then “1: Copy Setting” appears. User Tools (1~2à #) 1:Copy Setting Press [#], then “Copy” appears. 2 Select one of the five copy ratios. Copy (00~11à #) 01:Ratio A Enter one of the numbers of the following selections using the numeric keypad to select the ratio. No. Selected item No. Selected item 01 Ratio A 04 Ratio D 02 Ratio B 05 Ratio E 03 Ratio C Example : To select “01:Ratio A”. 3 Press [0], [1], then “01: Ratio A” appears. Copy (01~11à #) 01:Ratio A Press [#], then current default setting appears. Ratio A 100% (37~150à #) Enter the ratio you want to assign as the copy ratio’s default using the numeric keypad. Example: To specify the default ratio as 120%. Press [1], [2] and then [0]. Ratio A (37~150à #) 120% Press [#]. Copy Ratio A *120% 5-7 CHANGING THE DEFAULT SETTINGS CHANGING THE DEFAULT SETTINGS CHANGING THE DEFAULT SETTINGS 4 5-8 The displayed default value is renewed after about three seconds. Copy (00~11à #) 01:Ratio A Press the [User Tools] button to complete the operation. 100% Ready 1:8½×11K 1 Auto COPY RATIO RESET All the ratios (Ratio A~E) can be returned to its default settings, set when the Copy Application is installed. 1 Press the [User Tools] button, then “Copy Setting” appears. User Tools (1~2à #) 1:Copy Setting Press [#], then “Copy” appears. 2 Press [0], [0], then "00: Copy Ratio Reset" appears. 3 Enter [2] using the numeric keypad to reset ratio. If you don’t want to reset time, press [1], [#]. No. Copy (00~11à #) 00:Copy Ratio Reset Selected item 1 No 2 Yes Example : To specify “2: Yes”. Press [2]. Reset Ratio (1~2à #) 2:Yes Press [#]. Reset Ratio *Yes 4 The displayed default value is renewed after about three seconds. Copy (00~11à #) 00:Copy Ratio Reset Press the [User Tools] button to complete the operation. 100% Ready 1:8½×11K 1 Auto 5-9 CHANGING THE DEFAULT SETTINGS CHANGING THE DEFAULT SETTINGS CHANGING THE DEFAULT SETTINGS p The default values are as follows. Table 5-2. Inch Version % Ratio A Ratio B Ratio C Ratio D Ratio E 100 93 77 65 129 Size of original à Size of copy paper Original size coping (For providing a margin on four sides of an original.) 8½"x14" à 8½"x11" 11"x17" 8½"x11" à 8½"x11" à 11"x17" Table 5-3. Metric Version Ratio A Ratio B Ratio C Ratio D Ratio E 5-10 % 100 93 82 71 141 Size of original à Size of copy paper Original size coping (For providing a margin on four sides of an original.) 11" × 14" à B4 (11" × 14" is computer paper size.) B4 à A4 B5 à A5 B6 à A6 A3 à A4 A4 à A5 A5 à A6 B4 à B5 B5 à B6 A4 à A3 A5 à A4 A6 à A5 B5 à B4 B6 à B5 PAPER TRAY PRIORITY You can specify default paper saurce which is automatically selected when the Copy Application is started, the Auto Reset is performed or you press the [Clear Modes] button. Envelope Feeder Bypass Tray LCT Tray 1 Tray 2 Tray 3 (Paper Bank) Tray 4 (Paper Bank) 1 Press the [User Tools] button, then “1: Copy Setting” appears. User Tools (1~2à #) 1:Copy Setting Press [#], then “Copy” appears. 2 Press [0], [9], then “09: Paper Tray Prio.” appears. Copy 3 Press [#], then the current default setting appears. Tray Priority(0~6à #) 1:Tray 1 4 Enter one of the numbers of the following selections using the numeric keypad to select paper tray you want. (01~11à #) 09:Paper Tray Prio. 5-11 CHANGING THE DEFAULT SETTINGS CHANGING THE DEFAULT SETTINGS CHANGING THE DEFAULT SETTINGS No. Standard +Duplex Unit +Paper Bank 1 Tray 1 Not selectable Tray 1 2 Tray 2 Tray 2 Tray 2 3 Bypass Tray *1 Bypass Tray *1 Tray 3 4 Tray 4 5 Bypass Tray *1 6 No. +Duplex Unit +Paper Bank +Paper Bank +LCT +Duplex Unit +Paper Bank +LCT 1 Not selectable Tray 1 Not selectable 2 Tray 2 Tray 2 Tray 2 3 Tray 3 Tray 3 Tray 3 4 Tray 4 Tray 4 Tray 4 5 Bypass Tray *1 LCT LCT Bypass Tray *1 Bypass Tray *1 6 Note : *1 The Envelope Feeder can be installed at the location specified for the Bypass Tray. Example: To specify “2: Tray 2”. 5 5-12 Press [2]. Paper Tray 2:Tray 2 Press [#]. Paper Tray *Tray 2 (1~2à #) The displayed default value is renewed after about three seconds. Copy (01~11à #) 09:Paper Tray Prio. Press the [User Tools] button to complete the operation. 100% Ready 2:8½×11L 1 Auto OUTPUT TRAY PRIORITY You can specify default output tray which is automatically selected whenever the Copy Application is started or the Auto Reset is performed or you press the [Clear Modes] button. Figure 5-2. Output Tray External Tray or Shift Tray (Finisher) Output Tray 5 (Mailbox) Output Tray 4 (Mailbox) Output Tray 3 (Mailbox) Output Tray 2 (Mailbox) Output Tray 1 / Standard Tray 1 Press the [User Tools] button, then “1: Copy Setting” appears. User Tools (1~2à #) 1:Copy Setting Press [#], then “Copy” appears. 2 Press [1], [1], then “11: Output Tray Prio.” appears. Copy (01~11à #) 11:Output Tray Prio. 3 Press [#], then current default setting appears. Tray Prio. (1~7à #) 1:Output Tray 1 4 Enter one of the numbers of the following selections using the numeric keypad to select output tray you want. 5-13 CHANGING THE DEFAULT SETTINGS CHANGING THE DEFAULT SETTINGS CHANGING THE DEFAULT SETTINGS No. Standard +Mailbox +Finisher +Mailbox +FInisher 1 Standard Tray(FD) Output Tray1(FD) Standard Tray1(FD) Output Tray1 (FD) 2 External Tray (FU) Output Tray2(FD) Shift Tray1(FU) Output Tray2 (FD) 3 Output Tray3(FD) Shift Tray1(FU) Output Tray3 (FD) 4 Output Tray4(FD) Output Tray4 (FD) 5 Output Tray5(FD) Output Tray5 (FD) 6 External Tray(FU) Shift Tray1(FU) 7 Shift Tray1(FD) (FD): Copies are delivered with copying side face down. (FU): Copies are delivered with copying side face up. Example : To specify “2: External Tray (FD)”. (For standard machines.) 5 5-14 Press [2]. Output Tray (1~2à #) 2:External Tray (FD) Press [#]. Output Tray *External Tray (FD) The displayed default value is renewed after about three seconds. Copy (01~13à #) 06:Image Density Press the [User Tools] button to complete the operation. 100% Ready 1:8½×11K 1 Auto AUTO TRAY SWITCH You can specify whether or not Auto Tray Switch is enabled. If it is enabled, the paper supply is automatically switched to another tray which has the same size in the same direction when the paper in a tray runs out in the middle of a copy job. 1 Press the [User Tools] button, then “1: Copy Setting” appears. User Tools (1~2à #) 1:Copy Setting Press [#], then “Copy” appears. 2 Press [1], [0], then “10: Auto Tray Switch” appears. Copy (01~11à #) 10:Auto Tray Switch 3 Press [#], then the current default setting appears. Tray Switch 1:Off 4 Enter [1] or [2] using the numeric keypad to set the default you want. No. (1~2à #) Selected item 1 Off 2 On Example : To specify “2: On”. Press [2]. Tray Switch (1~2à #) 2:On 5 Press [#]. Auto Tray Switch *On The displayed default value is renewed after about three seconds. Copy (00~12à #) 10:Auto Tray Switch Press the [User Tools] button to complete the operation. 100% Ready 1:8½×11K 1 Auto 5-15 CHANGING THE DEFAULT SETTINGS CHANGING THE DEFAULT SETTINGS CHANGING THE DEFAULT SETTINGS 5-16 CHANGING THE PRINTER CONFIGURATION CHANGING THE PRINTER CONFIGURATION 6. CHANGING THE PRINTER CONFIGURATION 6-1 CHANGING THE PRINTER CONFIGURATION OVERVIEW The printer configuration settings are different depending on whether or not your printer is set for bi-directional communication. Note: It is not necessary to perform these settings again so long as the machine’s configuration is not changed. If your printer is set for bi-directional communication: Since the information already set on the printer side for the printer peripheral equipment options and paper size can be communicated, it is not necessary to perform the settings again from the copy application side. p You can change the default settings of the following parameter. • TIFF ......................................................................... (see page 6-4) If your printer is not set for bi-directional communication: It is necessary to set the options settings and paper size settings before using the Copy Application for the first time. p You can change the default settings of the following parameters. • OPTIONS ................................................................ (see page 6-5) • SPECIFYING THE PAPER SIZE ......................... (see page 6-7) 6-2 CHANGING THE PRINTER CONFIGURATION Table 6-1 shows the operation flow and available selections in changing printer configuration. CHANGING THE PRINTER CONFIGURATION Table 6-1 Note: Shading indicates the factory default values. 6-3 CHANGING THE PRINTER CONFIGURATION TIFF (Bi-directional Communication) This section provides information on making settings for TIFF. 1 Press [User Tools], [2], then “2: Printer Config” appears. User Tools (1~2à #) 2:Printer Config 2 Press [#], then “TIFF” appears. TIFF (0~2à #) 1:Hi-Speed(300dpi) 3 Enter one of the numbers of the following selections using the numeric keypad to set the default you want. No. Selected item 0 Off 1 Hi-Speed (300dpi) 2 Hi-Quality (400dpi) Example : To specify “2: Hi-Quality (400 dpi)”. Press [2]. TIFF (0~2à #) 1:Hi-Quality(400dpi) 4 Press [#]. User tool (0~2à #) 2:Printer Config Press the [User Tools] button to complete the operation. 100% Ready 1:8½×11K 1 Auto Note: When TIFF is turned off and the default printer is not TIFF, it becomes default printer. If PCL is used, the following restrictions are established. ♦ 400dpi output is not possible. ♦ The printing speed becomes slow. ♦ Set the output option settings from the printer driver. 6-4 CHANGING THE PRINTER CONFIGURATION OPTIONS (Non Bi-directional Communication) This section provides information on making settings for installed options. Figure 6-1. Options Finisher CHANGING THE PRINTER CONFIGURATION Mailbox Envelope Feeder LCT Hard Disk (built-in) Paper Bank Duplex Tray 6-5 CHANGING THE PRINTER CONFIGURATION 1 Press [User Tools],[2], then “2: Printer Config” appears. User Tools (1~2à #) 2:Printer Config 2 Press [#], [1], then “1: Option” appears. Printer 1:Option Use the numeric keypad to input the number that corresponds to the installed option you want to set. After inputting the number, press [#]. Option Set (1~8à #) 1:Paper Bank 3 No. Selected item No. (1~2à #) Selected item 1 Paper Bank 5 Finisher 2 LCT 6 Duplex Tray 3 Envelope Feeder 7 Hard Disk 4 Mailbox 8 TIFF Example : To select “2:LCT”. Press [2]. Option 2:LCT (1~8à #) Press [#]. 4 Enter [2] using the numeric keypad to set the option. If you don’t want to set the option, press [1]. No. Selected item 1 Not installed 2 Installed Example : To select “2: Installed”. Press [2]. 6-6 LCT (1~2à #) 2:Installed CHANGING THE PRINTER CONFIGURATION 5 Press [#]. Options 2:LCT Press the [User Tools] button to complete the operation. 100% Ready 1:8½×11K (1~8à #) 1 Auto SPECIFYING THE PAPER SIZE (Non Bidirectional Communication) This section provides information on specifying the paper size. Figure6-2. Printer paper tray Envelope Feeder Bypass Tray Paper Tray 1 Paper Tray 2 Paper Tray 3 Paper Tray 4 LCT 1 Press [User Tools], [2], then “2: Printer Config” appears. User Tools (1~2à #) 2:Printer Config 2 Press [#],[2], then “2: Paper Size” appears. Printer (1~2à #) 2:Paper Size 6-7 CHANGING THE PRINTER CONFIGURATION Repeat the above procedure to select a different installed option. CHANGING THE PRINTER CONFIGURATION 3 Press [#], then “Paper Size” appears. Use the numeric keypad to input the number that corresponds to the paper tray you want to select. After inputting the number, press [#]. Paper Size (0~6à #) 0:Bypass Tray Note : The paper trays you can select here depend on the options installed on your machine. No. Selected item No. Selected item 0 Bypass Tray 4 Tray 4 1 Tray 1 5 LCT 2 Tray 2 6 Envelope Feeder 3 Tray 3 Example : To select “2: Tray 2”. Press [2]. Paper Size 2: Tray 2 (0~6à #) Press [#]. Tray 2 (1~7à #) 2:A4K 4 Specify the paper size for the selected paper tray. The paper size you can set is different for the Inch Version and Metric Version different. Table 6-2. Inch Version No. Bypass Tray Tray1~Tray4 8½ × 13 L A4K A4 L 11 × 17 L 8½ × 13 L A4 K A4 L 11 × 17 L 7 8½ × 14 L 8½ × 11 L 11 × 8½ K 8½ × 14 L 8½ × 11 L 11 × 8½ K 8 Special Paper Size 1 2 3 4 5 6 6-8 LCT 11×8½ L A4 K Envelope Feeder 4 1 8× 9½ L 3 78 × 7½ L C5 Env. L C6 Env. L DL Env. L CHANGING THE PRINTER CONFIGURATION Table 6-3. Metric Version Bypass Tray Tray1~Tray4 A3 L A4K A4 L A3 L A4 K A4 L 7 A5 K 8 × 13 L 8½ × 11 L 11 × 8½ K A5 K 8 × 13 L 8½ × 11 L 11 × 8½ K 8 Special Paper Size 1 2 3 4 5 6 LCT Envelope Feeder A4 K 11 × 8½ K 41 8× 9½ L 47 8× 7½ L C5 Env. L C6 Env. L DL Env. L CHANGING THE PRINTER CONFIGURATION No. Example : To select the paper size “4: 11 x 17 L ”. Press [4]. Press [#]. 5 Press the [User Tools] button to complete the operation. Tray 2 4:11x17L (1~7à #) Paper Size 2:Tray 2 (0~6à #) 100% Ready 1 1:8½×11K Auto 6-9 CHANGING THE PRINTER CONFIGURATION Special Paper Size Setting A paper size other than that selected can be set in the Bypass Tray. 1 Press [User Tools], [2], then “2: Printer Config” appears. User Tools (1~2à #) 2:Printer config. 2 Press [#], [2], then “2: Paper Size” appears. Printer (1~2à #) 2:Paper Size 3 Press [#], then “Paper Size” appears. Paper Size (0~6à #) 0:Bypass Tray Press [0], then “0: Bypass Tray” appears. 4 5 p Press [#], [8], then “Special Paper Size” appears. Bypass Tray (1~8à #) 8:Special Paper Size Press [#], then “Size” appears. Use the numeric keypad to input the vertical dimention (Length across feeding direction) of the paper in the Bypass Tray. Use [*/.] to input a desimel point. Size Vert: (3.5~12à #) inch The vertical dimention of the paper can be specified to any value in the following range. Inch Version 3.5" to 12" (in 0.01 inch increments) Meteric Version 90mm to 297mm (in 1mm increments) 6-10 CHANGING THE PRINTER CONFIGURATION Example: To set a vertical dimention of 11.5. 7 p Size Vert: (3.5~12à #) 11.5inch Press [#]. Size (5.8~17à #) Horiz: inch Use the numeric keypad to input the holizontal dimention (Length along feeding direction) of the paper in the Bypass Tray. Use [*/.] to enter a decimal point. The holizontal dimention of the paper can be specified to any value in the following range. Inch Version 5.8" to 17" (in 0.01 inch increments) Meteric Version148mm to 432mm (in 1mm increments) Example: To set a holizontal dimention of 14.5. Press [1], [4], [*/.], and then [5]. Size Horiz: 8 Press [#], and the dimentions you input to appears. Vert: Horiz: 9 Press [#]. Paper Size A Press the [User Tools] button to Complete the opration. (5.8~17à #) 14.5inch 11.5inch(#) 14.5inch (0~6à #) 0:Bypass Tray 100% Ready 1:8½×11K 1 Auto 6-11 CHANGING THE PRINTER CONFIGURATION 6 Press [1], [1], [*/.] and then [5]. CHANGING THE PRINTER CONFIGURATION 6-12 ERROR MESSAGES ERROR MESSAGES 7. ERROR MESSAGES 7-1 ERROR MESSAGES ERROR MESSAGES IN THE MESSAGE BOX Inifile or Copy Application Failure. Please reinstall Copy Application. Uninstall the Copy Application, and then, install it again. Press [OK] to close the message box. Copy Application is busy. The Copy Application can’t be closed, as it is processing the copying job. Wait until “Ready” appears in the message display on the Control Panel, then exit the Copy Application. Press [OK] to close the message box. Application Duplicate or Failure. Please close af01prin, af01scan, af01opep and af01aplm by Ctrl+Alt+Del. Press [OK] to close the message box. Press [Ctrl] + [Alt] + [Del] to open the message box. Press the [End task] button in the message box to complete the sub process, and then restart the Copy Application or reinstall it. Aficio IS01 is not installed. Please install TWAIN driver. Install the TWAIN driver (version 5.00.0118 or later). Press [OK] to close the message box. Aficio MP01 TIFF driver is not installed. Please install TIFF driver. Install the TIFF driver (version 1.03 or later). Press [Yes] to exit the Copy Application. Press [No] to start the Copy Application. An old version of TWAIN driver is installed. Please re-install CFM TWAIN driver version 5.00.0118 or later. Install the TWAIN driver version 5.00.0118 or later. Press [OK] to close the message box. 7-2 ERROR MESSAGES CONTROL PANEL MESSAGES Printer Error See printer display Problem with the Printer. Check the Printer display. File I/O Error Check PC disk File access operation has failed. Try again. If access fails again, quit the Copy Application, restart Windows 95, and then restart the Copy Application. Insufficient PC disk Space Quit the Copy Application, and then restart it. If this message appears again, it means there is not enough space available on the computer’s hard disk. PC Memory is not sufficient Copy application Error (Check Printer) Printer problem due to an unknown cause during execution of the Copy Application. Quit the Copy Application and then restart it. Remove misfed Orig from ADF ADF (Auto Document Feeder) is misfed. Remove the misfed document and repeat the operation. Note: This message will change to “Ready” in a few seconds. Even if “Ready” displays, check the Error indicator on the Scanner. Close Document Feeder cover Upper ADF (Auto Document Feeder) cover is open. Close the cover. 7-3 ERROR MESSAGES Try again. If access fails again, quit the Copy Application, restart Windows 95, and then restart the Copy Application. If this message appears again even if another application is not running, it means that available computer RAM is insufficient. ERROR MESSAGES Scanner not connect Check Scanner No response from Scanner. Quit the Copy Application, restart the Windows 95 and then restart the Copy Application. If this message appears again, turn off the Scanner and the Computer, and then check the connection between them. Printer not connect Check Printer No response from Printer. Quit the Copy Application, restart the Windows 95 and then restart the Copy Application. If this message appears again, turn off the Printer and the Computer, and then check the connection between them. Max copy entry Press start to copy A maximum of 100 pages of original can be set on the ADF. Although the copying is temporarily stopped, if the [Start] button is pressed, the copying is continued. Note: If the Staple mode has been set, the staples are automatically released. If the Collate mode has been set, the copy block up to page 100 and the copy block from page 101 and collated separately. TWAIN Used by Other Application Press the [Clear Modes] button to clear the error, then close the other application that is using the Scanner. 7-4 INDEX INDEX INDEX Index-1 INDEX INDEX A Auto Document Feeder (ADF), 3-5 Auto Reset, 4-3, 5-6 AUTO TRAY SWITCH, 5-15 Automatic Image Density Control, 4-4 B Bi-directional communication, 6-2 Bypass Tray, 4-8, 5-11, 6-7 C Changing the Printer Configuration, 1-4 Check Display indicator, 2-3, 2-5 Clear Modes, 4-2 Clear Modes key, 2-3, 2-5 Clear/Stop, 4-2 Clear/Stop key, 2-3, 2-5 Collate, 4-12 Collate/Staple/Duplex, 4-12, 4-13, 4-15 CONTROL PANEL MESSAGES, 7-3 COPY RATIO RESET, 5-9 D Exposure Glass, 3-4 External Tray, 5-13 F Finisher, 5-13, 6-5 Function keys, 2-3, 2-5 H Hard Disk, 6-5 Hard Disk Free Space, 1-2 I IMAGE DENSITY, 4-4, 5-4 Installing the Copy Application, 1-3 Interface, 1-2 L LCT, 5-11, 6-5, 6-7 M Mailbox, 5-13, 6-5 Manual Image Density Control, 4-5 Message Display, 2-3, 2-5 DEFAULT SETTINGS, 5-1 Duplex, 4-13 Duplex Tray, 6-5 E Envelope Feeder, 5-11, 6-5, 6-7 ERROR MESSAGES, 7-1 ERROR MESSAGES IN THE MESSGE BOX, 7-2 Exiting the Copy Application, 1-5 Index-2 N Non bi-directional communication Numeric keypad, 2-3, 2-5 O Operating System, 1-2 OPERATION PANEL, 2-4 INDEX OPERATION SCREEN, 2-3 Staple, 4-15 OPTIONS, 6-5 ORIGINAL SIZE COPYING, 4-2 ORIGINAL TYPE, 4-6, 5-5 ORIGINALS, 3-2 Start, 4-2 Start key, 2-3, 2-5 Starting Up the Copy Application, 1-5 Output Tray, 5-13 Output Tray Prio., 5-13 T Text, 4-6 TIFF, 1-2, 6-4 P Paper, 4-7 Paper Bank, 5-11, 6-5 PAPER SIZE, 6-7 PAPER SOURCE, 4-7 Paper Tray, 6-7 Paper Tray Prio., 5-11 PCL, 6-4 Personal Computer, 1-2 Photo, 4-6 Photo Original, 5-5 Printer, 1-2 Tray, 5-11 Tray Priority, 5-11 Tray Switch, 5-15 TWAIN, 1-2 U Uninstalling the Copy Application , 1-4 User Tools, 5-3, 5-4, 6-3 User Tools key, 2-3, 2-5 PRINTER CONFIGURATION, 6-1 R RAM, 1-2 Ratio, 4-10, 5-7 REDUCED/ENLARGED COPYING, 4-10 REDUCTION/ENLARGEMENT RATIO, 5-7 INDEX Reset Ratio, 5-9 S Scanner, 1-2 Scanning Area, 3-3 SETTING ORIGINALS, 3-4 Shift Tray, 5-13 Special Paper Size, 4-8, 6-10 Standard Tray, 5-13 Index-3 INDEX Index-4 Worldwide Ricoh Location U.S.A. RICOH CORPORATION 5 Dedrick Place West caldwell, New Jersey 07006 (TEL)973-882-2000 Spain RICOH ESPAÑA S.A. Guitard, 45 08014 Barcelona (TEL)490-09-60 Netherlands RICOH EUROPE B.V. Groenelaan 3 P.O.Box114 1180 AC - Amstelveen Holland (TEL)020-5474111 Italy RICOH ITALIA S.p.A. Via della Metallurgia, 12 (zona Basson) - 37139 VERONA (TEL)045-851 00 44 United Kingdom RICOH U.K. LTD. Ricoh House 1 Plane Tree Crescent,Feltham, Middlesex,TW13 7HG (TEL)181-261-4000 Hong Kong RICOH HONG KONG LTD. 23/F.,China Overseas Building 139,Hennessy Road, Wan Chai, Hong Kong (TEL)2862-2888 Germany RICOH DEUTSCHLAND GMBH Mergenthalerallee 38-40 65760 Eschborn (TEL)(06196)906-0 Singapore RICOH ASIA PACIFIC PTE. LTD. #15-01/02 The Heeren, 260 Orchard Road, Singapore 238855 (TEL)65-830-5888 France RICOH FRANCE S.A. 383, Avenue du Général de Gaulle B.P.307, 92143 Clamart Cedex (TEL)01-4094-3838 RICOH COMPANY, LTD. 15-5, 1 chome, Minami-Aoyama Printed in Japan UE USA G0208630 Minato-ku, Tokyo Telephone: Tokyo 3479-3111 Copyright 1997, Ricoh Co., Ltd.