1
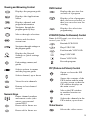
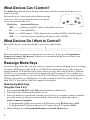
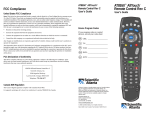
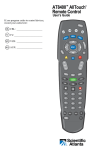
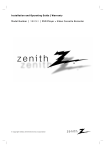
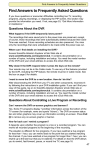
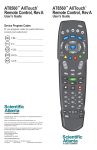
AT8450™ Rev A AllTouch®
Remote Control
User’s Guide
If you program codes to control devices,
record your codes here:
CBL: ______________________
TV: _______________________
DVD: _____________________
AUX: _____________________
PIP
CH
1
In This Guide
Welcome to the Ultimate Control Experience! ..................................................................................... 3
How Does a Universal Remote Control Work? .................................................................................. 3
Where Do I Start? ............................................................................................................................. 3
Important Information About Power Control ........................................................................................ 3
Quick Reference ............................................................................................................................... 4
What Devices Can I Control? ............................................................................................................ 6
What Devices Do I Want to Control? .................................................................................................. 6
Reassign Mode Keys ........................................................................................................................ 6
Program the Remote to Control My Devices ...................................................................................... 7
What If None of the Codes Work? ...................................................................................................... 8
Which Code Worked? ....................................................................................................................... 9
Change Power Control ................................................................................................................... 10
Change Volume Control .................................................................................................................. 12
Change Channel Control ................................................................................................................ 13
Change VCR/VOD Programming .................................................................................................... 14
Put It Back the Way I Got It .............................................................................................................. 15
Code Tables ................................................................................................................................... 16
FCC Compliance ............................................................................................................. Back Cover
2
Welcome to the Ultimate Control Experience!
Your new AT8450™ AllTouch® Universal Remote Control (remote) is a true universal remote,
functioning as four remotes in one. As one example, you can use this remote to operate
your TV, VCR or DVD player, cable box, and audio receiver.
How Does A Universal Remote Control Work?
You tell the remote which type of device you want to operate using the four keys arched
across the top of the remote. These keys, known as mode keys, are labeled CBL, TV, DVD,
and AUX. Each mode key is associated with a specific device. As an example, if you want
the remote to operate your TV, you simply press the TV key. Other keys you press on the
remote thereafter should operate your TV. Want to switch the remote to operate a different
device? Just press the mode key for the next device you want to operate. In this guide, you
will learn which types of devices you can control and how to program the remote to control
your specific devices.
Note: Some remote keys may not operate in all modes. You can even program your remote
to assign specific functions, such as channel control, to operate one device only. You will
learn more about these advanced functions later in this guide.
Where Do I Start?
Before you begin programming your remote, complete the following initial setup tasks.
Install the Batteries
The remote requires two AA batteries (alkaline recommended). A diagram in the battery
compartment of the remote indicates proper placement of the batteries. When batteries are
properly installed, the light on the remote blinks each time a key is pressed.
Visit the Quick Reference
Timing is often important when you program advanced features. Therefore, knowing where
certain keys are on the remote gives you an edge in pressing the right key at the right time.
Find a Place to Store Your Remote
Keeping up with one remote is much easier than keeping up with four remotes. However, it
is still a good idea to find a storage location for your remote. The AT8450 AllTouch Remote
Control is not a toy. It should be kept out of the reach of children under the age of 6 years.
Important Information About Power Control
Scientific-Atlanta strongly recommends that you turn off your cable box every time you
turn off your TV. To make this easier, you can program your remote to turn both devices
on or off at the same time. After you program the remote to control your favorite
entertainment devices, see Change Power Control to learn more about programming
your remote to control power for the TV and cable box at the same time.
3
Quick Reference
Device Control
Viewing and Browsing Control
Sound Control
DVR Control
VCR/VOD (Video-on-Demand) Control
Numeric Keys
PIP
Video Source
CH
PIP (Picture-in-Picture) Control
T11281
Device Control
Powers on or off
Adjusts volume
Controls AUX functions
Mutes sound
Controls DVD functions
Controls TV functions
Controls Cable functions
4
Sound Control
Viewing and Browsing Control
Displays the program guide
Displays the Applications
Menu
Displays channel and
program information
Navigates through the
program guide by days
Moves through selections
Selects and deselects
screen item
DVR Control
Replays the previous few
seconds of a program
Displays a list of programs
that you have recorded, so
that you can select one for
viewing
Displays live television
programming
VCR/VOD (Video-On-Demand) Control
Note: In DVD mode, use these keys to
control your VCR.
Rewinds VCR/VOD
Navigates through settings or
the program guide
Plays VCR/VOD
Fast forwards VCR/VOD
Displays the General
Settings or Quick settings
menus
Stops VCR/VOD
Exits settings, menus, and
guides
Records program
Selects options in menus
and the program guide
Selects channel, up or down
Views favorite channels
Returns to last channel
viewed
Numeric Keys
Enters channel numbers
and remote codes (also
enters your parental
control PIN)
Reserved for future use
Reserved for future use
Pauses VCR/VOD
PIP (Picture-In-Picture) Control
Opens or closes the PIP
window
Swaps the contents of the
PIP window and the main
viewing screen so that the
PIP window displays on
the main screen
Moves the PIP window
to another location on
the screen
Selects the channels in the
PIP window, up or down
Video Source
Selects the video source
5
What Devices Can I Control?
The mode keys arched across the top of the remote tell the remote which device you
want to operate.
Each mode key is associated with different groups
of devices. You can use each mode key to control
one of its associated devices:
Mode Key
Associated Devices
CBL .......... cable boxes, HDTV tuners, and satellite receivers
T11282
TV ............. TVs and HDTVs
DVD .......... DVD players, VCRs, digital video recorders (DVRs), and CD players
AUX .......... receivers, tuners, and Home Theater in a Box (HTIB)
What Devices Do I Want to Control?
Record the devices (including brand) you want to control here:
1_____________________________ 3_____________________________
2_____________________________ 4_____________________________
Does each mode key relate to only one of your devices? If yes, go to Program the
Remote to Control My Devices. Otherwise, reassign the mode keys to match your
combination of devices.
Reassign Mode Keys
If you are a big movie fan, you may want to control two video recording devices. Perhaps
you have a DVD player and a VCR, or a VCR/DVD combination device. How can you
control both the VCR and the DVD player when you only have one DVD key? With the
AT8450, you can reassign a mode key to operate in a different mode. For example, you
can reassign the AUX key to operate the VCR in DVD mode. Then, you can program the
DVD key to control your DVD player. You can reassign the AUX key, the DVD key, or
both. The TV key and the CBL key cannot be reassigned.
Reassigning Mode Keys
(Program Code 9 9 2)
1. Press and hold SELECT and CBL until all mode keys blink twice.
2. Press 9 9 2. The CBL mode key blinks twice.
3. Press the mode key associated with the type of device you want to control, and then
press the mode key that you want to change. All mode keys blink three times.
Some Common Examples
• To program the AUX key to operate in DVD mode, press DVD and then AUX.
• To program the DVD key to operate in TV mode, press TV and then DVD.
4. When finished, go to Program the Remote to Control My Devices.
6
Program the Remote to Control My Devices
Try to use your remote to control your devices. If the remote does not work for a device,
you can assign a different device code to the appropriate mode key. If the remote provides
only limited functionality for a device, you can look for a code that provides more functionality. Before you begin, make sure you know the brand name of the device you want to
control.
Note: Some remote keys may be assigned to operate one device type only. For example,
volume control may be assigned to the TV only. If this is the case, you can reprogram
power, volume, and channel control using procedures later in this guide.
Assigning a Different Device Code to a Mode Key
1. Find the codes for your brand of device in the appropriate setup code list at the end
of this guide. For example, look under TV Group if you need to program the remote
to operate your TV.
2. Turn on your device.
3. Press and hold SELECT and the appropriate mode key until all of the mode keys
blink twice. For example, to set up the TV, press and hold SELECT and TV.
Note: If you reassigned mode keys, you may, for example, press SELECT and DVD
to program the DVD mode key with a TV code.
4. Enter the first setup code for the device. All mode keys blink twice to indicate that
the code entry was accepted.
5. Point the remote at the device, and press POWER,
, or
to test the device.
6. Did the device operate correctly?
• If yes, write down the code that worked on the cover of this guide.
You may need it again if the device code is accidentally erased.
• If no, repeat these steps using a different setup code.
Note: If none of the codes listed for your brand of device operate the device
correctly, go to What If None of the Codes Work for instructions.
7. Repeat this procedure for each mode key you want to program.
7
What If None of the Codes Work?
If none of the codes listed for your brand of device operate the device correctly, you can
search through the code library for a valid code.
Improving Your Reaction Time
When you search the code library, you need to be ready to press SELECT as soon as the
remote turns off your device. Therefore, make sure you are familiar with the location of the
SELECT key before you begin this procedure.
Sizing Up The Libraries
The mode keys blink twice when the remote reaches the last code in a library. You
do not need to count codes. However, knowing the size of each library will help you
determine how long it will take to cycle through all of the codes in the library. Each
library contains the following number of codes:
• CBL mode: 22
• TV mode: 219
•
DVD mode: 206
• AUX mode: 37
Searching the Code Library
(Program Code 9 9 1)
1. Turn on the device.
2. Press and hold SELECT and the appropriate mode key (CBL, TV, DVD, or AUX) until
the mode keys blink twice. For example, to search for a TV code, press and hold
SELECT and TV at the same time.
Note: If you reassigned mode keys, you may, for example, press SELECT and
DVD to search for a TV code to assign to the DVD mode key.
3. Press 9 9 1. The mode key you selected in step 2 blinks twice.
. The remote automatically tests
4. Point the remote toward the device, and press
each code in its library, beginning with the most common codes. The mode key
blinks once each time the remote transmits a new code. The mode key blinks twice
when it reaches the last code.
5. As soon as the device powers off, press SELECT.
6. Verify the new code is correct by pressing POWER.
7. Did the device power on again?
• If yes, press SELECT to assign the code.
• If no, complete the following steps:
a) Turn the device on.
b) Press
or
to step forward or back to the correct code.
c) When the device turns off, press SELECT to assign the code.
8. Go to Which Code Worked to identify the code that controls your device. After you
identify the code, record the code in the space provided on the cover of this guide.
8
Which Code Worked?
Find out which code programmed the mode key to control your device.
Finding the Code That Worked
(Program Code 9 9 0)
1. Press and hold SELECT and the appropriate mode key (CBL, TV, DVD, or AUX) until
all mode keys blink twice.
2. Press 9 9 0. The mode key you selected in step 1 blinks twice.
3. Press 1; then, count the number of times the mode key blinks. The number of blinks
indicates the first digit in the code. For example, 4 blinks indicates the first digit in
the code is 4. If the mode key does not blink, the digit is 0.
4. Press 2; then, count the number of times the mode key blinks. This number indicates
the second number in the code.
5. Press 3; then, count the number of times the mode key blinks. This number indicates
the third number in the code.
6. Press 4; then, count the number of times the mode key blinks. This number indicates
the fourth number in the code.
Note: After all four numbers in the code are identified, all mode keys blink three times.
7. Record the code in the space provided on the cover of this guide. You may need it
again if the device code is accidentally erased.
9
Change Power Control
Your remote was originally programmed in one of the following ways:
•
The remote controls power for only one device at a time. For example, in CBL mode
the POWER key controls the cable box only. However, in TV mode, the POWER key
controls the TV only.
•
The remote controls power for either one device or for multiple devices at once,
based on the selected mode. For example, in CBL mode, the POWER key controls
both the cable box and the TV at the same time.
Before you change how power control works, try your remote to see how the power control
currently works. When trying out your remote, keep in mind that the remote provides a
temporary override for power control. For example, if you press the TV key and then the
POWER key within 3 seconds, the remote turns on the TV only, regardless
of the programmed power settings. To see how the remote is originally programmed,
wait at least 5 seconds before pressing the POWER key after you press any mode key.
Does your remote already control power for your cable box and TV at the same time?
If not, Scientific-Atlanta strongly recommends that you program the remote to turn off
the cable box each time you turn off your TV. Turning off the cable box is especially
important for high-end cable boxes that contain hard drives for recording and storing
TV programs and movies. Not only will you reduce wear and tear from the hard disk
spinning constantly, but you’ll also conserve electricity. As long as the cable box remains
plugged in, the cable box will receive programming updates, and, if applicable, record
programs and movies.
Controlling Power for Multiple Devices at Once
(Program Code 9 9 8)
1. Press and hold SELECT and CBL until all mode keys blink twice.
2. Press 9 9 8. The CBL key blinks twice.
3. Press the mode key for the first device in the group of devices you want to power on
and off at once. The CBL key blinks twice.
4. Press the mode key for the second device in your power group. The CBL key blinks
twice.
5. If you want the remote to control power for multiple devices at once, press the mode
keys for the next devices you want to add to the power group. The CBL key blinks
twice after each mode key is pressed.
6. Press SELECT to save your power settings. All mode keys blink three times.
10
Want An Example?
If you want to control power for the TV and the cable box at the same time, you would do
the following.
1. Press and hold SELECT and CBL until all mode keys blink twice.
2. Press 9 9 8. The CBL key blinks twice.
3. Press TV. The CBL key blinks twice.
4. Press CBL. The CBL key blinks twice.
5. Press SELECT. All mode keys blink three times.
In this example, the remote will function in the following ways:
• When you are in TV mode or CBL mode, the POWER key controls both the cable
box and the TV.
• When you are in DVD mode, the POWER key controls the DVD device only.
• When you are in AUX mode, the POWER key controls the auxiliary device only.
Controlling Power for One Device at a Time
(Program Code 9 9 8)
1. Press and hold SELECT and CBL until all mode keys blink twice.
2. Press 9 9 8. The CBL key blinks twice.
3. Press SELECT to save your power settings. All mode keys blink three times.
After you select a mode, the POWER key controls the device assigned to that mode.
For example, in TV mode, the remote controls power for the TV only.
Important Power Tips
• Scientific-Atlanta strongly recommends that you program the remote to turn off the
cable box each time you turn off your TV.
• When you “turn off” the cable box using the remote control, you are actually putting
the box in a power saving mode. As long as the cable box remains plugged in, it will
continue to receive programming updates and, if applicable, record programs and
movies.
• If your POWER key controls multiple devices at once, the remote returns to the CBL
mode after the devices are powered on or off.
• If your POWER key controls multiple devices at once, you can override this setting
by pressing the desired mode key and then pressing POWER within 3 seconds. For
example, if you press the DVD key and then the POWER key within 3 seconds, the
remote turns just the DVD on or off, regardless of the programmed power settings.
11
Change Volume Control
Your remote was originally programmed in one of the following ways:
•
•
The remote controls volume for one device, such as your TV, whether the remote is
in TV, DVD, or CBL mode. The AUX mode always retains separate volume control.
The remote controls volume for different devices, depending on the mode key you
press. For example, in CBL mode, the volume keys control the cable box. However,
in TV mode, the volume keys control the TV.
Try your remote to see how the volume control currently works. The volume keys
include , , and MUTE. If you want to change the volume control, complete the
procedure that fits your needs.
Controlling Volume for One Device
(Program Code 9 9 3)
Note: If you want to assign volume control to a Scientific-Atlanta cable box, complete
the following prerequisite steps. Press SETTINGS to access the General Settings
on-screen menu. Then, verify that the Audio: Volume Control setting is set to Variable.
1. Press and hold SELECT and CBL until all mode keys blink twice.
2. Press 9 9 3. The CBL key blinks twice.
3. Press the mode key for the device the volume keys should control. For example, if
you want to control volume through your TV, press TV. All mode keys blink
three times.
Notes:
• The volume keys control only one device whether you are in CBL, TV, or DVD mode.
•
In AUX mode, the remote always controls volume for the device assigned to
the AUX key.
Controlling Volume for Different Devices
(Program Code 9 9 3)
1. Press and hold SELECT and CBL until all mode keys blink twice.
2. Press 9 9 3. The CBL key blinks twice.
3. Press SELECT. All mode keys blink three times.
Result: After you select a mode, the volume keys control the device assigned to that
mode. For example, in TV mode, the volume keys control volume for the TV only.
12
Change Channel Control
Your remote was originally programmed in one of the following ways:
• The remote controls channels for a single device, such as the cable box, whether the
remote is in CBL, DVD, or TV mode. The AUX mode always retains separate channel
control.
• The remote controls channels for different devices, depending on the mode key you
press.
Try your remote to see how the channel control currently works. The channel keys
include , , Digits 0-9, LAST, and FAV. If you want to change the channel control,
complete the procedure that fits your needs.
Tip: Consider programming the remote to control channels for just the cable box to ensure
you do not accidentally tune off the proper channel for the TV (usually channel 3 or 4).
Controlling Channels For One Device
(Program Code 9 9 7)
1. Press and hold SELECT and CBL until all mode keys blink twice.
2. Press 9 9 7. The CBL key blinks twice.
3. Press the mode key associated with the device you want the channel keys to control.
For example, if you want to assign channel control to your TV only, press TV. All
mode keys blink three times.
Notes:
• The channel keys now always control the device associated with the mode you selected
in this step, whether in TV, CBL, or DVD mode.
• In AUX mode, the remote always controls channels for the device assigned to the AUX
key.
Controlling Channels For Different Devices
(Program Code 9 9 7)
1. Press and hold SELECT and CBL until all mode keys blink twice.
2. Press 9 9 7. The CBL key blinks twice.
3. Press SELECT. All mode keys blink three times.
Result: The channel keys now control the device associated with the mode key you select.
For example, in TV mode, the channel keys control the TV, but in CBL mode, the channel
keys control the cable box.
13
Change VCR/VOD Programming
Your remote was originally programmed in one of the following ways:
•
The Rewind, Play, Fast Forward, Stop, Pause, and Record keys are known as transport
keys. These keys are programmed, by default, to transmit the codes for the Explorer®
8000™ series Home Entertainment Server video-on-demand (VOD) or digital video
recorder (DVR) functions when in CBL mode.
•
The transport keys control different devices, depending on the mode key you press.
You can choose to override the default settings for the transport keys so that the transport
keys operate a different device when you have selected Cable (CBL) mode.
Try your remote to see how the transport keys currently work. If you want to change the
settings for the transport keys, complete the procedure that fits your needs.
Changing VCR/VOD Programming
(Program Code 9 9 9)
1. Press and hold CBL and SELECT until all mode keys blink twice.
2. Press 9 9 9. The CBL key blinks twice.
3. Press the DVD mode key associated with the device you want the transport
keys to now control. All mode keys blink three times.
Results:
• The transport keys now always control the device associated with the mode you
selected in this step (DVD).
•
Pressing Play starts the VCR, the DVD, or the device that has been reassigned to AUX.
•
In AUX mode, the remote always controls channels for the device assigned to the AUX
key.
Restoring Default VCR/VOD Settings
(Program Code 9 9 9)
1. Press and hold CBL and SELECT until all mode keys blink twice.
2. Press 9 9 9. The CBL key blinks twice.
3. Press CBL. All mode keys blink three times.
Result: The transport keys are restored to their default settings.
Example: Pressing Play in CBL mode starts the DVR.
14
Put It Back the Way I Got It
Return specific advanced functions or all advanced functions back to their original
settings. Choose the procedure that fits your needs.
Important: Your cable service provider may have programmed the dual power control
feature for your convenience. Therefore, if you reset the power control, you may need
to program the remote to control the power for the cable box and TV at the same time.
Resetting Mode Keys (Program Code 9 9 2)
You can reprogram the DVD key and the AUX key to operate in their original modes.
1. Press and hold CBL and SELECT until all mode keys blink twice.
2. Press 9 9 2. The CBL key blinks twice.
3. Do one of the following:
• If you are returning the DVD key to its original state, press DVD twice.
• If you are returning the AUX key to its original state, press AUX twice.
All mode keys blink three times.
4. Repeat this procedure if you want to return both keys to their original modes.
Resetting Device Codes and Mode Keys (Program Code 9 7 7)
Follow this procedure to return programmed device codes and mode keys to their original
settings. This procedure erases device codes you programmed. In addition, this procedure returns all reassigned mode keys to their original operation.
This reset procedure does not reset any changes you made to power, volume, or channel
control.
1. Press and hold SELECT and CBL until all mode keys blink twice.
2. Press 9 7 7. All mode keys blink three times. Then, after a few seconds the CBL key
blinks twice.
Resetting Power, Volume, and Channel Control (Program Code 9 8 0)
Follow this procedure to return power, volume, and channel control to their original
settings. This reset procedure does not reset any device codes you programmed or affect
mode key reassignments.
1. Press and hold SELECT and CBL until all mode keys blink twice.
2. Press 9 8 0. All mode keys blink three times.
Resetting All Changes (Program Code 9 8 1)
Follow this procedure to return the remote completely back to its original settings.
1. Press and hold SELECT and CBL until all mode keys blink twice.
2. Press 9 8 1. All mode keys blink three times. Then, after a few seconds the CBL key
blinks twice.
15
Code Tables
If the remote does not recognize your device, you can find codes for your device by
brand. With combination devices (such as a TV with a built-in DVD player), you have
separate codes for each device component. Therefore, for ease of use, the combination
device codes are listed first. All other code tables are organized by devices assigned to
each mode (CBL, TV, DVD, AUX).
Combination Devices
If you have a combination device, you may need to reassign the AUX key to operate one
of the devices. See Reassign Mode Keys for more information. The following tables
provide some examples of combination devices. If your combination device is not listed,
simply look for the codes for each separate device.
DVD/VCR Combo Codes
Brand
Go Video
Go Video
JVC
RCA
Samsung
Sanyo
Zenith
DVD Code
2141
2147
2142
2143
2144
2145
2146
AUX (VCR) Code
2038
2044
2039
2040
2041
2042
2043
Model
DVR5000
DVR4200
HRXVC1U
VC125HF
DVD-V2000
DVW5000
XBV243
TV/DVD Combo Codes
Brand
Broksonic
RCA
Sansui
Toshiba
TV Code
1181
1182
1185
1183
DVD Code
2148
2149
2196
2150
Model
SC975
BD20TF10
MD20FL3
Tuner/CD Combo Codes
Bose
3034
CBL Group: Cable, HDTV Tuner, and Satellite Devices
HDTV Tuner Codes
Cable Codes
Panasonic
Philips
RCA
Scientific-Atlanta 0000, 0001, 0002, 0003,
0004, 0005
ABC
0010
GE
0010
Gemini
0011
General Instruments 0010
Hitachi
0010
Jerrold
0010, 0011
Motorola
0007
Pioneer
0009
Proscan
0010
Signature
0010
Starcom
0011
Stargate
0011
16
0021
0022
0017
Satellite Codes
Dish Network
Dishnet
Echostar
GE
Hughes
Philips
Proscan
RCA
Sony
Zenith
0016
0013
0014
0012
0015
0023
0012
0012
0019, 0020
0024
TV Group: TVs and HDTVs
TV Codes
Admiral
Aiko
Akai
Amtron
Anam
National
AOC
Apex
Audiovox
Bell &
Howell
Broksonic
Carver
Celebrity
Citizen
Colortyme
Contec/Cony
Craig
Crosley
Crown
Curtis Mathes
Daewoo
Daytron
Dimensia
Dumont
Electroband
Electrohome
Emerson
Envision
Fisher
Fujitsu
Funai
Gateway
GE
Goldstar
Hallmark
TV Codes
TV Codes
1001, 1139, 1159
1014
1002
1034
1003, 1034
1004,
1007,
1153
1180,
1034
1001,
1181
1000
1002
1004,
1014,
1087,
1004,
1010,
1034
1034
1000
1034
1000,
1013,
1062,
1160,
1004,
1014,
1103,
1004,
1053
1004,
1002
1002,
1006,
1004,
1019,
1022,
1025,
1028,
1031,
1034,
1037,
1040,
1101,
1143,
1004,
1041,
1062,
1040
1034,
1237
1003,
1018,
1046,
1132,
1145,
1004,
1010,
1048,
1127,
1004,
Hitachi
1005, 1006,
1140, 1141,
1184, 1186
Infinity
JBL
JC Penney
1042, 1062
1006,
1034,
1137,
1006,
1011,
1004,
1042,
1087,
1167
1005,
1015,
1137,
1006,
1008,
1062,
1160
1009
1012,
1006,
1053,
1137,
1006,
1016,
1151
1137
1004,
1018
1010,
1021,
1024,
1027,
1030,
1033,
1036,
1039,
1062,
1142,
1168
LG
Logik
Luxman
LXI
Majestic
Marantz
Megatron
Memorex
MGA
Mitsubishi
1043,
1040
1004,
1044,
1053,
1133,
1161
1005,
1017,
1049,
1137,
1006
Kawasho
Kenwood
Kloss
Novabeam
KTV
Magnavox
1122
1003,
1017,
1006,
1020,
1023,
1026,
1029,
1032,
1035,
1038,
1042,
1137,
1152,
1006
1042,
1144
Jensen
JVC
1006,
1045,
1072,
1134,
1006,
1047,
1126,
1138
Montgomery
Ward
Motorola
MTC
Multitech
Multivision
NAD
NEC
Nikko
Onwa
Optimus
1004,
1011,
1051,
1110,
1113,
1116,
1119,
1143,
1169
1000
1000
1004,
1008,
1044,
1049,
1072,
1104,
1145
1004,
1010,
1045,
1055,
1129,
1002,
1004,
1034,
1034,
1142
1005
1001
1004,
1000,
1053,
1062,
1000,
1008,
1058,
1065,
1107,
1001
1000,
1050,
1006,
1001,
1042,
1004,
1017,
1067,
1004,
1017,
1067,
1102
1001
1003,
1004,
1087
1034
1070
1006,
1147,
1003,
1006,
1006,
1034
1147,
1006,
1012,
1052,
1111,
1114,
1117,
1120,
1154,
1010,
1050,
1109,
1112,
1115,
1118,
1121,
1166,
Optonica
Orion
Panasonic
Philco
Philips
1005,
1011,
1045,
1053,
1086,
1137,
1006
1011,
1051,
1056,
1146,
1004,
1006,
1057,
1006,
1018,
1048,
1061,
1087,
1138,
1012,
1054,
1128,
1168
1006
1017
1058
1059, 1137,
1006
1006,
1060,
1145
1004,
1017,
1063,
1073,
1108
1004,
1066
1050
1005,
1062
1005,
1018,
1068
1005,
1018,
1068,
Pioneer
Portland
Price Club
Prism
Proscan
Proton
Quasar
Radio Shack
Radio Shack/
Realistic
RCA
1042,
1061,
1006,
1057,
1064,
1106,
1006,
Realistic
Runco
Sampo
Samsung
1006,
1006,
1043,
Sansui
Sanyo
1006,
1043,
1069,
Scott
Sears
1139
1005, 1006,
1060, 1061,
1166
1004, 1005,
1009
1014
1166
Sharp
Signature
Sony
1079, 1139
1031, 1152
1003, 1045,
1162
1000, 1003,
1005, 1006,
1010, 1017,
1058, 1063,
1000, 1003,
1008, 1010,
1057, 1058,
1071, 1072,
1074
1004, 1006,
1076, 1143,
1166
1004, 1005,
1014, 1137
1087
1045
1053, 1145
1004, 1006,
1077
1003, 1045,
1078, 1162
1042, 1062
1004, 1006,
1034, 1042,
1062, 1079,
1138
1003, 1004,
1006, 1007,
1053, 1080,
1082, 1083,
1085, 1105,
1145, 1148,
1151, 1155,
1167, 1170,
1042, 1062
1122
1004, 1006,
1138
1004, 1005,
1010, 1013,
1086, 1087,
1137, 1138,
1152, 1185
1004, 1041,
1062, 1068,
1090, 1135,
1004, 1006,
1020, 1031,
1040
1000, 1004,
1011, 1012,
1040, 1041,
1043, 1053,
1060, 1061,
1091, 1092,
1145, 1150
1004, 1006,
1022, 1025,
1093, 1094,
1100, 1137,
1001
1002, 1157,
1165
1136,
1004,
1008,
1057,
1065
1004,
1017,
1063,
1073,
1075,
1147,
1006,
1010,
1059,
1010,
1053,
1137,
1005,
1017,
1081,
1084,
1143,
1149,
1163,
1182
1137,
1006,
1017,
1088,
1156
1042,
1089,
1144
1010,
1034,
1006,
1017,
1042,
1055,
1062,
1144,
1010,
1079,
1095,
1139
1164,
17
TV Codes
Soundesign
Starlite
Sylvania
Symphonic
Tandy
Tatung
Technics
Techwood
Teknika
Telecaption
Toshiba
Totevision
Universal
Vidikron
Wards
Yamaha
Zenith
1004,
1034,
1034
1000,
1008,
1058,
1065,
1131
1029,
1139
1003
1045
1004,
1000,
1005,
1010,
1014,
1064,
1137,
1097
1042,
1062,
1097,
1131,
1137
1044,
1000
1000,
1005,
1020,
1044,
1058,
1072,
1099
1004,
1017
1001,
1123,
1158
1006, 1008,
1040
DVR Codes
1004,
1017,
1063,
1073,
1006,
1057,
1064,
1096,
1034, 1150
1006,
1001,
1006,
1011,
1034,
1087,
1162
1045
1004,
1008,
1012,
1040,
1136,
1060, 1061,
1087, 1091,
1098, 1130,
1183
1072
1001,
1006,
1029,
1053,
1063,
1073,
1004,
1017,
1040,
1057,
1064,
1079,
1005, 1006,
1004, 1122,
1124, 1125,
Panasonic
Philips
Pioneer
RCA
Sampo
Samsung
Sharp
Sony
Thomson
Toshiba
Zenith
Dish Network
Echostar
Philips
ReplayTV
Sony
TiVo
Toshiba
Zenith
1223
1193, 1236
1175, 1194
1195, 1206, 1207,
1208, 1209
1179, 1192, 1203,
1211, 1221
1201, 1212
1216, 1218, 1234
1198, 1202, 1215
1220
1178, 1232
1197
1174, 1176, 1177,
1226, 1227, 1229,
1231
1171
1172, 1173
1225, 1233, 1235
Kenwood
2186
2037
2036, 2185, 2187
2188, 2192, 2178
2189
2177
2190
2191
KLH
Kodak
LG
Logik
LXI
Magnavox
Marantz
Admiral
Aiko
Aiwa
Akai
Audiovox
Bell &
Howell
Broksonic
Calix
Canon
Capehart
Carver
CCE
Citizen
Colortyme
Craig
Curtis Mathes
Daytron
Dimensia
Electrohome
Emerson
Fisher
Fuji
Funai
Garrard
GE
Go Video
Goldstar
Gradiente
Harman
Kardon
Harwood
Hitachi
JC Penney
Jensen
18
VCR Codes
JVC
VCR Codes
Daewoo
HDTV Codes
Daewoo
Hitachi
JVC
Mitsubishi
DVD Group: DVR, VCR, CD,
and DVD Devices
2035, 2047
2018
2017
2002, 2003, 2004,
2031, 2032
2010
2007
2008, 2179
2010
2014, 2015
2030
2000
2018, 2024
2009, 2010,
2012, 2013,
2045
2005
2009, 2010,
2024
2005, 2009,
2013, 2014,
2025, 2046
2011, 2017,
2030, 2045
2030
2025, 2046
2010, 2019
2002, 2008,
2011, 2014,
2019, 2026,
2007, 2016,
2021
2003, 2014
2017
2017
2001, 2009,
2015, 2025,
2038, 2044,
2005, 2010,
2017
2000, 2005
2024
2022,
2031
2005,
2008,
2014,
2023,
2022,
MGA
Minolta
Mitsubishi
Montgomery
Ward
Motorola
MTC
Multitech
2011,
2018,
2016,
2012,
2015,
2018,
2010,
2017,
2032
2020,
2014,
2046
2184
2013
2023, 2029,
2006,
2009,
2015,
2024,
2023,
Matsushita
Memorex
2007,
2010,
2022,
2029
2031
NEC
Nikko
Noblex
Olympus
Optimus
Optonica
Panasonic
Pentax
Pentex
Research
Philco
Philips
Pioneer
Portland
Proscan
Quasar
Radio Shack
Radio Shack/
Realistic
Radix
RCA
Realistic
Ricoh
2005,
2013,
2039
2005,
2012,
2033
2024
2010,
2010
2024
2010
2000,
2028
2000,
2007,
2014
2014
2007,
2014,
2028,
2019,
2022,
2019,
2026,
2035,
2014,
2009
2009,
2024
2005,
2012,
2033
2010
2009
2014
2010,
2027
2014,
2012,
2029
2013
2006, 2007,
2031, 2033,
2006, 2007,
2013, 2031,
2014
2014, 2015,
2005, 2006,
2012, 2013,
2009,
2016,
2035,
2026,
2023,
2022,
2032,
2047
2010,
2017,
2047
2032
2029
2023,
2033
2035, 2047
2012, 2017,
2006, 2007,
2013, 2031,
2035, 2047
2015, 2180
2022, 2023,
2014, 2015
2000, 2014,
2176
2006, 2022,
2012, 2030,
2001, 2025,
2014, 2015
2010, 2027,
2007, 2009,
2014, 2015,
2017, 2019,
2021, 2027,
2010
2001, 2002,
2014, 2022,
2025, 2029,
2046, 2183
2007, 2009,
2011, 2014,
2016, 2017,
2020, 2021,
2035, 2047
2034
2027,
2033
2045
2046
2047
2010,
2016,
2020,
2035
2009,
2023,
2040,
2010,
2015,
2019,
2027,
VCR Codes
Runco
Samsung
Sansui
Sanyo
Scott
Sears
Sharp
Shintom
Signature
Singer
Sony
STS
Sylvania
Symphonic
Tandy
Tashiko
Tatung
Teac
Technics
Teknika
Toshiba
Totevision
Unitech
Vector
Research
Video
Concepts
Wards
XR-1000
Yamaha
Zenith
CD Codes
ADC
Aiwa
Akai
Emerson
Fisher
GE
Hitachi
JVC
Kenwood
Marantz
Mitsubishi
Nakamichi
NEC
Onkyo
Panasonic
Pioneer
RCA
Sanyo
DVD Codes
CD Codes
2028
2004, 2009, 2011,
2041
2006, 2031, 2033
2007, 2009, 2016,
2042
2008, 2011, 2026
2007, 2010, 2014,
2016, 2020, 2021,
2022, 2023, 2029
2019, 2027, 2035,
2045, 2047
2003, 2023, 2024
2035, 2047
2014, 2024, 2034
2003, 2181
2014, 2029
2000, 2014, 2015,
2017, 2026, 2182
2017
2007
2010
2031
2017, 2031
2014
2010, 2014, 2017
2011, 2020, 2022,
2026, 2032
2009, 2010
2009
2005, 2006, 2011,
2012
2005, 2006, 2011,
2012, 2032
2000, 2009, 2010,
2011, 2014, 2016,
2017, 2019, 2022,
2023, 2024, 2027,
2029, 2035, 2047
2014, 2017, 2024
2005, 2006, 2007,
2013, 2031
2003, 2028, 2034,
2043
2166
2151
2167
2152
2153
2169
2154
2155
2156
2158
2170
2172
2157
2159
2160
2161
2162
2175
Sears
Sherwood
Sony
Teac
Technics
Toshiba
Yamaha
2168
2173
2163
2174
2164
2171
2165
DVD Codes
Aiwa
Alpine
Apex
Audiovox
BOSE
Broksonic
Clarion
Classic
Daewoo
Denon
Emerson
Fisher
Funai
GE
Go Video
GPX
Hitachi
JVC
Kenwood
Konka
Koss
Lasonic
Magnavox
Memorex
Mintek
Mitsubishi
NAD
Nakamichi
Norcent
Onkyo
Oritron
Panasonic
Philips
Pioneer
Proscan
Qwestar
RCA
Sampo
Samsung
Sansui
Sanyo
*Use
2057, 2070
2071
2068, 2069, 2072,
2073, 2199, 2205
2204
2140
2074, 2148
2075
2076
2077
2078, 2079, 2080,
2081
2082, 2083
2084
2083
2048, 2085*, 2086
2141, 2147
2087
2056, 2088, 2089,
2090, 2091
2050, 2058, 2092,
2142
2093
2059, 2060
2206
2197
2051, 2094, 2195
2095
2096
2052
2082
2097
2098, 2099
2100
2114
2061, 2101, 2102,
2103, 2104, 2105,
2106, 2080, 2200
2051, 2067, 2107
2053, 2108, 2109,
2110, 2111
2048, 2112
2113, 2114
2048, 2049*, 2115,
2143, 2149, 2202,
2203
2116
2117, 2118, 2119,
2144
2120, 2196
2062, 2121, 2145
when testing this code.
Sharp
Sherwood
Sony
2122,
2124
2054,
2125,
2128,
2083,
2130
2131
2132
2055,
2134,
2207
2136,
2066,
Sylvania
Teac
Technics
Techwood
Toshiba
Yamaha
Zenith
2123, 2198
2063, 2064,
2126, 2127,
2129
2201
2065, 2133,
2135, 2150,
2137, 2138
2139, 2146
AUX Group: Receivers,
Tuners, Home Theater in a
Box (HTIB)
Receiver/Tuner Codes
Aiwa
3000, 3001, 3002,
3003, 3004, 3014,
3020
3033, 3034
3000
3000, 3013
Bose
Carver
Harman
Kardon
JBL
JVC
Kenwood
Linn
Maganvox
Marantz
Onkyo
Panasonic
Philips
Pioneer
RCA
3013
3005
3006
3000
3000
3000
3015
3016, 3017
3000
3012*
3007, 3022,
3023, 3032
3000
3019
3008, 3009, 3018
3016, 3017
3000, 3012*
3010, 3011, 3012*
Sansui
Sherwood
Sony
Technics
Wards
Yamaha
*Use
or
when testing this code.
Home Theater in a Box Codes
Bose
JBL
JVC
Koss
Onkyo
Panasonic
Philips
Pioneer
RCA
Sony
3033
3027
3028
3026
3029
3030
3025
3031
3024
3021
19
FCC Compliance
United States FCC Compliance
Note: This device has been tested and found to comply with the limits for a Class B digital device,
pursuant to part 15 of the FCC Rules. These limits are designed to provide reasonable protection against
such interference in a residential installation. This equipment generates, uses, and can radiate radio
frequency energy. If not installed and used in accordance with the instructions, it may cause harmful
interference to radio communications. However, there is no guarantee that interference will not occur in a
particular installation. If this equipment does cause harmful interference to radio or television reception,
which can be determined by turning the equipment OFF and ON, the user is encouraged to try to correct
the interference by one or more of the following measures:
•
Reorient or relocate the receiving antenna.
•
Increase the separation between the equipment and receiver.
•
Connect the equipment into an outlet on a circuit different from that to which the receiver is
connected.
•
Consult the cable company or an experienced radio/television technician for help.
Any changes or modifications not expressly approved by Scientific-Atlanta could void the user’s
authority to operate the equipment.
The information shown in the FCC Declaration of Conformity paragraph below is a requirement of the
FCC and is intended to supply you with information regarding the FCC approval of this device. The phone
numbers listed are for FCC-related questions only and not intended for questions regarding the connection
or operation for this device. Please contact your cable service provider for any questions you may have
regarding the operation or installation of this device.
FCC Declaration of Conformity
This device complies with Part 15 of FCC Rules. Operation is subject to the following two conditions: 1) the
device may not cause harmful interference, and 2) the device must accept any interference received, including
interference that may cause undesired operation.
AT8450 AllTouch Remote Control
Scientific-Atlanta, Inc.
5030 Sugarloaf Parkway
Lawrenceville, Georgia 30044 USA
Telephone: 770-236-1077
Canada EMI Regulation
This Class B digital apparatus complies with Canadian ICES-003.
Cet appareil numérique de la class B est conforme à la norme NMB-003 du Canada.
© 2004 Scientific-Atlanta, Inc. All rights reserved.
AllTouch, Explorer, Scientific-Atlanta, and the Scientific-Atlanta logo are registered trademarks of Scientific-Atlanta, Inc.
8000 and AT8450 are trademarks of Scientific-Atlanta, Inc. All other trademarks shown are trademarks of their respective
owners.
Product and service availability subject to change without notice.
Scientific-Atlanta, Inc.
5030 Sugarloaf Parkway
P.O. Box 465447
Lawrenceville, GA 30042
www.scientificatlanta.com
June 2004
4001707 Rev A
20