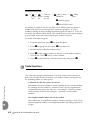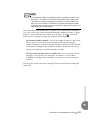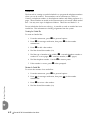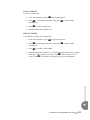
1
This manual is provided to you by ElectSys; a certified dealer that installs
and supports Tadiran systems. Call us at 717-665-2141
or visit www.electsys.biz
TM
Emerald ICE
Digital Key
Telephone System
HD Voicemail User Guide
The information contained in this document is proprietary and is subject to all relevant
copyright, patent and other laws protecting intellectual property, as well as any specific
agreement protecting TADIRAN TELECOM, INC. (herein referred to as the “Manufacturer”)
rights in the aforesaid information. Neither this document nor the information contained
herein may be published, reproduced or disclosed to third parties, in whole or in part, without
the express, prior, written permission of the Manufacturer. In addition, any use of this
document or the information contained herein for any purposes other than those for which it
was disclosed is strictly forbidden.
The Manufacturer reserves the right, without prior notice or liability, to make changes in
equipment design or specifications.
Information supplied by the Manufacturer is believed to be accurate and reliable. However, no
responsibility is assumed by the Manufacturer for the use there of nor for the rights of third
parties which may be affected in any way by the use thereof.
Any representation(s) in this document concerning performance of the Manufacturerʹs
product(s) are for informational purposes only and are not warranties of future performance
either express or implied. The Manufacturerʹs standard limited warranty, stated in its sales
contract or order confirmation form, is the only warranty offered by the Manufacturer in
relation thereto.
This document may contain flaws, omissions or typesetting errors; no warranty is granted nor
liability assumed in relation thereto unless specifically undertaken in the Manufacturerʹs sales
contract or order confirmation. Information contained herein is periodically updated and
changes will be incorporated into subsequent editions. If you have encountered an error, please
notify the Manufacturer. All specifications are subject to change without prior notice.
© Copyright by TADIRAN TELECOM, INC., 2004.
All rights reserved worldwide.
Record of Revisions
Revision
Date of Issue
Supercedes
Initial Release
February 1, 2004
N/A
Revision A
March 30, 2004
February 1,
2004
Major Changes - Brief Description
Changes to name of product.
Contents
Chapter 1 Introduction . . . . . . . . . . . . . . . . . . . . . . . . . . . . . . . . . . . . . . . . . . . . . . . . . . . . . . . . . . . . . . . . . . . . . . . . . . . 1-1
1.1 About Simplicity for ICE . . . . . . . . . . . . . . . . . . . . . . . . . . . . . . . . . . . . . . . . . . . . . . . . . . . . . . . . . . . . . 1-1
1.2 Learning the System . . . . . . . . . . . . . . . . . . . . . . . . . . . . . . . . . . . . . . . . . . . . . . . . . . . . . . . . . . . . . . . . . 1-3
The * Key . . . . . . . . . . . . . . . . . . . . . . . . . . . . . . . . . . . . . . . . . . . . . . . . . . . . . . . . . . . . . . . . . . . . . . . . . 1-3
The # Key . . . . . . . . . . . . . . . . . . . . . . . . . . . . . . . . . . . . . . . . . . . . . . . . . . . . . . . . . . . . . . . . . . . . . . . . . 1-3
Interrupting . . . . . . . . . . . . . . . . . . . . . . . . . . . . . . . . . . . . . . . . . . . . . . . . . . . . . . . . . . . . . . . . . . . . . . . . . . . 1-3
1.3 House to Use this Guide . . . . . . . . . . . . . . . . . . . . . . . . . . . . . . . . . . . . . . . . . . . . . . . . . . . . . . . . . . . . . 1-4
1.4 About this Manual . . . . . . . . . . . . . . . . . . . . . . . . . . . . . . . . . . . . . . . . . . . . . . . . . . . . . . . . . . . . . . . . . . 1-4
1.5 Document Conventions . . . . . . . . . . . . . . . . . . . . . . . . . . . . . . . . . . . . . . . . . . . . . . . . . . . . . . . . . . . . . . 1-5
Chapter 2 Getting Started. . . . . . . . . . . . . . . . . . . . . . . . . . . . . . . . . . . . . . . . . . . . . . . . . . . . . . . . . . . . . . . . . . . . . . . . . 2-1
2.1 Setting Up Your Mailbox . . . . . . . . . . . . . . . . . . . . . . . . . . . . . . . . . . . . . . . . . . . . . . . . . . . . . . . . . . . . . 2-1
2.2 Accessing Your Mailbox. . . . . . . . . . . . . . . . . . . . . . . . . . . . . . . . . . . . . . . . . . . . . . . . . . . . . . . . . . . . . . 2-2
2.3 Broadcast Messages . . . . . . . . . . . . . . . . . . . . . . . . . . . . . . . . . . . . . . . . . . . . . . . . . . . . . . . . . . . . . . . . . 2-2
2.4 Erased Message Notices. . . . . . . . . . . . . . . . . . . . . . . . . . . . . . . . . . . . . . . . . . . . . . . . . . . . . . . . . . . . . . 2-2
2.5 Confirmation Notices . . . . . . . . . . . . . . . . . . . . . . . . . . . . . . . . . . . . . . . . . . . . . . . . . . . . . . . . . . . . . . . . 2-3
2.6 Disconnecting from the System . . . . . . . . . . . . . . . . . . . . . . . . . . . . . . . . . . . . . . . . . . . . . . . . . . . . . . . 2-3
TC
Chapter 3 Basic Operations. . . . . . . . . . . . . . . . . . . . . . . . . . . . . . . . . . . . . . . . . . . . . . . . . . . . . . . . . . . . . . . . . . . . . . . 3-1
3.1 Listening To Your Messages . . . . . . . . . . . . . . . . . . . . . . . . . . . . . . . . . . . . . . . . . . . . . . . . . . . . . . . . . . 3-1
3.2 Playback Controls . . . . . . . . . . . . . . . . . . . . . . . . . . . . . . . . . . . . . . . . . . . . . . . . . . . . . . . . . . . . . . . . . . . 3-3
3.3 Options while Listening. . . . . . . . . . . . . . . . . . . . . . . . . . . . . . . . . . . . . . . . . . . . . . . . . . . . . . . . . . . . . . 3-3
Skipping a Message . . . . . . . . . . . . . . . . . . . . . . . . . . . . . . . . . . . . . . . . . . . . . . . . . . . . . . . . . . . . . . . . . . . . . 3-4
Canceling Play of Messages . . . . . . . . . . . . . . . . . . . . . . . . . . . . . . . . . . . . . . . . . . . . . . . . . . . . . . . . . . . . . . 3-4
Replaying a Message . . . . . . . . . . . . . . . . . . . . . . . . . . . . . . . . . . . . . . . . . . . . . . . . . . . . . . . . . . . . . . . . . . . . 3-4
Saving a Message . . . . . . . . . . . . . . . . . . . . . . . . . . . . . . . . . . . . . . . . . . . . . . . . . . . . . . . . . . . . . . . . . . . . . . 3-4
Erasing a Message . . . . . . . . . . . . . . . . . . . . . . . . . . . . . . . . . . . . . . . . . . . . . . . . . . . . . . . . . . . . . . . . . . . . . . 3-5
Reply to a Message . . . . . . . . . . . . . . . . . . . . . . . . . . . . . . . . . . . . . . . . . . . . . . . . . . . . . . . . . . . . . . . . . . . . . 3-5
Envelope Information . . . . . . . . . . . . . . . . . . . . . . . . . . . . . . . . . . . . . . . . . . . . . . . . . . . . . . . . . . . . . . . . . . . 3-6
Send a Copy to Someone Else . . . . . . . . . . . . . . . . . . . . . . . . . . . . . . . . . . . . . . . . . . . . . . . . . . . . . . . . . . . . . 3-7
Sending A Message . . . . . . . . . . . . . . . . . . . . . . . . . . . . . . . . . . . . . . . . . . . . . . . . . . . . . . . . . . . . . . . . . . . . . 3-7
Delivery Options . . . . . . . . . . . . . . . . . . . . . . . . . . . . . . . . . . . . . . . . . . . . . . . . . . . . . . . . . . . . . . . . . . . . . . . 3-8
Dial By Name . . . . . . . . . . . . . . . . . . . . . . . . . . . . . . . . . . . . . . . . . . . . . . . . . . . . . . . . . . . . . . . . . . . . . . . . 3-10
3.4 Changing Your Personal Greeting . . . . . . . . . . . . . . . . . . . . . . . . . . . . . . . . . . . . . . . . . . . . . . . . . . . . 3-11
Emerald ICE HD Voicemail Mailbox User Guide
v
Chapter 4 Additional Operations . . . . . . . . . . . . . . . . . . . . . . . . . . . . . . . . . . . . . . . . . . . . . . . . . . . . . . . . . . . . . . . . . . . 4-1
4.1 Listening To Your Greeting . . . . . . . . . . . . . . . . . . . . . . . . . . . . . . . . . . . . . . . . . . . . . . . . . . . . . . . . . . 4-1
4.2 Erasing Your Greeting . . . . . . . . . . . . . . . . . . . . . . . . . . . . . . . . . . . . . . . . . . . . . . . . . . . . . . . . . . . . . . . 4-1
4.3 Recording Your Name. . . . . . . . . . . . . . . . . . . . . . . . . . . . . . . . . . . . . . . . . . . . . . . . . . . . . . . . . . . . . . . 4-2
4.4 Temporary Greeting . . . . . . . . . . . . . . . . . . . . . . . . . . . . . . . . . . . . . . . . . . . . . . . . . . . . . . . . . . . . . . . . 4-2
4.5 Recording A Temporary Greeting. . . . . . . . . . . . . . . . . . . . . . . . . . . . . . . . . . . . . . . . . . . . . . . . . . . . . 4-3
4.6 Listen To Your Temporary Greeting . . . . . . . . . . . . . . . . . . . . . . . . . . . . . . . . . . . . . . . . . . . . . . . . . . . 4-3
4.7 Erase Your Temporary Greeting . . . . . . . . . . . . . . . . . . . . . . . . . . . . . . . . . . . . . . . . . . . . . . . . . . . . . . 4-4
4.8 Personal Access Code . . . . . . . . . . . . . . . . . . . . . . . . . . . . . . . . . . . . . . . . . . . . . . . . . . . . . . . . . . . . . . . 4-4
4.9 Secretary Mailbox Access Code . . . . . . . . . . . . . . . . . . . . . . . . . . . . . . . . . . . . . . . . . . . . . . . . . . . . . . . 4-5
4.10 Guest Mailboxes. . . . . . . . . . . . . . . . . . . . . . . . . . . . . . . . . . . . . . . . . . . . . . . . . . . . . . . . . . . . . . . . . . . 4-6
Create a Guest Mailbox . . . . . . . . . . . . . . . . . . . . . . . . . . . . . . . . . . . . . . . . . . . . . . . . . . . . . . . . . . . . . . . . . . 4-6
Erase a Guest Mailbox . . . . . . . . . . . . . . . . . . . . . . . . . . . . . . . . . . . . . . . . . . . . . . . . . . . . . . . . . . . . . . . . . . . 4-6
Sending a Message to a Guest Mailbox . . . . . . . . . . . . . . . . . . . . . . . . . . . . . . . . . . . . . . . . . . . . . . . . . . . . . . 4-7
Instruct Your Guest on How to Retrieve the Message . . . . . . . . . . . . . . . . . . . . . . . . . . . . . . . . . . . . . . . . . . 4-7
4.11 Group Distribution Lists. . . . . . . . . . . . . . . . . . . . . . . . . . . . . . . . . . . . . . . . . . . . . . . . . . . . . . . . . . . . 4-7
Establishing a Personal Group List . . . . . . . . . . . . . . . . . . . . . . . . . . . . . . . . . . . . . . . . . . . . . . . . . . . . . . . . . 4-8
Listing Members . . . . . . . . . . . . . . . . . . . . . . . . . . . . . . . . . . . . . . . . . . . . . . . . . . . . . . . . . . . . . . . . . . . . . . . 4-9
Erasing Existing Lists . . . . . . . . . . . . . . . . . . . . . . . . . . . . . . . . . . . . . . . . . . . . . . . . . . . . . . . . . . . . . . . . . . . 4-9
Modifying Existing Lists . . . . . . . . . . . . . . . . . . . . . . . . . . . . . . . . . . . . . . . . . . . . . . . . . . . . . . . . . . . . . . . . 4-10
4.12 Outdial Operations . . . . . . . . . . . . . . . . . . . . . . . . . . . . . . . . . . . . . . . . . . . . . . . . . . . . . . . . . . . . . . . 4-10
Outdial Bins . . . . . . . . . . . . . . . . . . . . . . . . . . . . . . . . . . . . . . . . . . . . . . . . . . . . . . . . . . . . . . . . . . . . . . . . . . 4-12
4.13 Outdial Administration . . . . . . . . . . . . . . . . . . . . . . . . . . . . . . . . . . . . . . . . . . . . . . . . . . . . . . . . . . . 4-14
Add An Outdial Schedule . . . . . . . . . . . . . . . . . . . . . . . . . . . . . . . . . . . . . . . . . . . . . . . . . . . . . . . . . . . . . . . 4-14
Review an Outdial Schedule . . . . . . . . . . . . . . . . . . . . . . . . . . . . . . . . . . . . . . . . . . . . . . . . . . . . . . . . . . . . . 4-15
Erase an Outdial Schedule . . . . . . . . . . . . . . . . . . . . . . . . . . . . . . . . . . . . . . . . . . . . . . . . . . . . . . . . . . . . . . . 4-16
Modify an Outdial Schedule . . . . . . . . . . . . . . . . . . . . . . . . . . . . . . . . . . . . . . . . . . . . . . . . . . . . . . . . . . . . . 4-16
Turn Outdial On/Off . . . . . . . . . . . . . . . . . . . . . . . . . . . . . . . . . . . . . . . . . . . . . . . . . . . . . . . . . . . . . . . . . . . 4-17
Answering An Outdial Call . . . . . . . . . . . . . . . . . . . . . . . . . . . . . . . . . . . . . . . . . . . . . . . . . . . . . . . . . . . . . 4-17
Things to Know About the Outdial Schedule . . . . . . . . . . . . . . . . . . . . . . . . . . . . . . . . . . . . . . . . . . . . . . . . 4-18
4.14 Checking Message Delivery . . . . . . . . . . . . . . . . . . . . . . . . . . . . . . . . . . . . . . . . . . . . . . . . . . . . . . . . 4-19
TC
Chapter 5 Expert Mode . . . . . . . . . . . . . . . . . . . . . . . . . . . . . . . . . . . . . . . . . . . . . . . . . . . . . . . . . . . . . . . . . . . . . . . . . . . 5-1
5.1 Auto Listen/Skip . . . . . . . . . . . . . . . . . . . . . . . . . . . . . . . . . . . . . . . . . . . . . . . . . . . . . . . . . . . . . . . . . . . 5-1
Auto Listen / Skip . . . . . . . . . . . . . . . . . . . . . . . . . . . . . . . . . . . . . . . . . . . . . . . . . . . . . . . . . . . . . . . . . . . . . . 5-1
Auto Listen / Save . . . . . . . . . . . . . . . . . . . . . . . . . . . . . . . . . . . . . . . . . . . . . . . . . . . . . . . . . . . . . . . . . . . . . . 5-2
Auto Listen / Erase . . . . . . . . . . . . . . . . . . . . . . . . . . . . . . . . . . . . . . . . . . . . . . . . . . . . . . . . . . . . . . . . . . . . . . 5-2
5.2 Auto Scan Envelope Information . . . . . . . . . . . . . . . . . . . . . . . . . . . . . . . . . . . . . . . . . . . . . . . . . . . . . 5-3
5.3 Mass Auto Delete. . . . . . . . . . . . . . . . . . . . . . . . . . . . . . . . . . . . . . . . . . . . . . . . . . . . . . . . . . . . . . . . . . . 5-3
vi
Emerald ICE HD Voicemail Mailbox User Guide
About Emerald ICE HD Voicemail
Emerald ICE HD Voicemail is a compact, high-performance voice processing system
that connects to a business phone system. It offers businesses the ability to
exchange information through the telephone without requiring simultaneous
participation by the caller and the receiver. The system converts human speech to
digital signals, stores them on a disk, and converts the digital signals on the disk
back to human speech as required.
System users can send voice messages to other users. Since almost half of all
phone transactions need only one-way communications, the voice mail function
streamlines business communication.
When you are not available or prepared to receive calls, you may forward calls to
the system. The system answers the phone, takes messages, and stores the
messages for retrieval at any time, and from any place.
The basic Simlicity for Coral system includes the ability to:
•
Send messages in telephone answering and voice mail mode.
•
Send copies of messages.
•
Send messages to multiple destinations and group distribution list.
•
Obtain a summary count of messages waiting for review.
•
Erase, reply, save, or skip a message.
•
Receive envelope information indicating the date, time, and sender.
•
Change recorded name, personal greeting, and access code.
Introduction
1.1
Introduction
1
1
Emerald ICE HD Voicemail Mailbox User Guide
1-1
In addition, the system provides:
•
Playback controls when sending or reviewing messages.
•
Delivery options when sending or replying to messages.
•
Dial-by-name addressing for messages.
•
Secretary mailbox and Guest mailbox.
•
Temporary greeting.
In order to simplify storing, two queues are used. The New message queue stores
all messages which have not been listened to by the user. The Saved message
queue is used to store messages for future action.
As messages are recorded, they need to be stored in such a way that they can be
retrieved efficiently. Simlpicity stores messages in mailboxes. Each user is assigned
a mailbox number for private use. Each mailbox is protected by a user-defined
access code. Thus, the user is the only one who can retrieve messages left in their
mailbox. When a user uses their mailbox for the first time, a tutorial walks them
through the process of setting up a mailbox. The user is prompted to record their
name and to change the temporary access code assigned by the system.
In addition to their own mailbox, users can have Guest Mailboxes (depending
upon mailbox parameters). These mailboxes provide for limited voice mail
capabilities between the user and their guest. However, the first guest mailbox,
called the Secretary Mailbox, can only listen to the envelope information of the
messages in the userʹs mailbox. The Secretary Mailbox cannot listen to the userʹs
messages. Messages cannot be sent to or sent by the Secretary Mailbox.
More than one person can use the system features. Each port allows one user
access to the system. A port is a path to the system. For example, up to four users
could be recording or listening to messages at the same time with a four port
system. Since not all users would be accessing the system at the same time,
multiple users can be supported. User commands are just one digit long. They do
not have to be memorized since the system is constantly prompting users about
what to do. Experienced users can interrupt prompts and can even skip ahead
several steps if they know what they want to do.
1
Introduction
Using a Touch-Tone phone, you can receive or send messages from any location
through your voice mailbox. If you are busy in your office or away on a business
trip, customers, vendors or other employees can leave you detailed messages in
your voice mailbox. Protected by your access code, these messages are completely
confidential.
1-2
Emerald ICE HD Voicemail Mailbox User Guide
Learning the System
The best way to learn how to use the system is to experiment. Nothing you do
can hurt the system. Send messages to yourself. Access the personal options and
change them. (No changes are permanent except for deleting a message - you can
always correct them.)
The system is programmed to respond when any of the 12 keys are pressed. If no
key is pressed in response to a prompt, the system assumes the user is confused.
The system repeats the userʹs options. If there is still no response, the system
automatically transfers a non-user to an attendant, or politely disconnects a user
from the call.
The system counts the number of errors (incorrect key presses) that a user makes.
If the count exceeds a certain number (usually 3) the caller is politely
disconnected. The system does this to allow as many users on the system as
possible. Donʹt get discouraged. Look in this manual to get more information;
then call back.
The * Key
Press * whenever you want to cancel what you are doing.
* allows you to skip personal greetings and introductory prompts. It gets you
directly to the recording tone.
While listening to a prompt, press * to ʺback upʺ to the previous menu. At the
Main menu, press * to disconnect.
The # Key
Press # whenever you want to complete a step, or send a message.
# can also be used to denote the end of a variable length number like an access
code. This keeps the system from having to wait to determine if you are finished
entering digits.
Interrupting
You can interrupt most prompts if you know what you want to do. You can even
enter several commands at once.
Emerald ICE HD Voicemail Mailbox User Guide
1-3
Introduction
Press # twice to skip a message.
1
1.2
1.3
House to Use this Guide
This guide provides you with easy-to-follow instructions on how to get the most
from the features of the system. It is divided into several sections. To start using
the system quickly, read through the Getting Started, and Basic Operation sections.
After you have used the system for a short while, read the remainder of this guide
to learn the other features and capabilities of system.
This guide is designed for all the system features. Some system features
are optional and may not be installed in your system.
1.4
About this Manual
•
Section 1 - Introduction - this section provides a general description of Simlicity for Coral, a description of this manual and the conventions used
throughout.
•
Section 2 - Getting Started- This section provides descriptions of how to
setup mailboxes, accessing the mailbox, broadcast messages, erased message
notices, confirmation notices and disconnecting from the system.
•
Section 3 - Basic Operations- This section provides descriptions of how to
listen to messages, the playback controls, options while listening and changing personal greetings.
•
Section 4 - Additional Operations- This section provides descriptions of
additional information when listening to messages, erasing greetings,
recording your name and temporary greetings, changing the personal accses
code, accessing the secretary mailbox, using guest mailboxes, setting up
group distribution lists, outdial operations, and checking message delivery.
•
Section 5 - Expert Mode - This section provides descriptions of the Auto listing/skip feature, auto scanning of the envelope information and mass-auto
delete.
1
Introduction
The Emerald ICE HD Voicemail Mailbox User Guide is divided into the following
sections:
1-4
Emerald ICE HD Voicemail Mailbox User Guide
1.5
Document Conventions
The following conventions are used throughout this manual.
Conventions
Convention
Description
Normal
Used in body text throughout this manual.
Normal, Italic
Used in referencing sections, telephone features
and voice recordings or prompts.
Bold, Italic
Used in describing the fields in PC screens and
other form names or items.
Normal, Bold
Used to describe filenames, device names and
specific areas of PC screens.
Press
Means to press a specific key. (e.g. press ESC
means to press and release the Escape key.)
Enter
Means to type or push a button on the
telephone keypad.
123
Indicates the keystrokes that are required to be
entered on a telephone.
PC Keyboard Keys
Indicated to show keystrokes required to be
entered on a PC keyboard.
Introduction
(Telephone Keys)
1
Table 1-1
Emerald ICE HD Voicemail Mailbox User Guide
1-5
Introduction
1
1-6
Emerald ICE HD Voicemail Mailbox User Guide
Setting Up Your Mailbox
The first time you enter your mailbox, the system system provides a tutorial which
allows you to create your access code, and record your name.
You will need the following information from your system administrator to set up
your mailbox: the number to reach the system system, your mailbox number, and
your temporary access code. Once you have this information, follow these steps:
1. Call the system system: ______.
2. If you hear the system greeting, press # + your mailbox number. With
some telephone systems this step will not be required.
3. When asked for your temporary access code enter ____.
4. Listen to the tutorial. When prompted, select and enter a new personal
access code. A personal access code can be any length up to nine digits.
However, your system administrator may program a minimum and/or
maximum length for personal access codes. This code should be a number
that is easy for you to remember, but difficult for someone else to guess.
Avoid using your extension number, birthday, etc.. If you wish, record the
number you have selected as your access code here ____________. You can
change your access code at any time.
5. When prompted, record your name.
6. When prompted, record your greeting. If a personal greeting is not
recorded during the tutorial, the system will use a standard greeting
anytime your mailbox is called: ʺ(Your recorded name) is not available. At the
tone please record your message. At the end of your message you may hang up or
press one for more options.ʺ
Your mailbox is now set up and ready to use. You may wish to change your
personal greeting from time to time. To change your personal greeting, read the
section Changing Your Personal Greeting on Page 3-11.
Emerald ICE HD Voicemail Mailbox User Guide
2-1
Getting Started
2.1
Getting Started
2
2
2.2
Accessing Your Mailbox
1. Call the system system.
2. If you hear the system greeting, press # + your mailbox number. With
some telephone systems this step will not be required.
3. Enter your personal access code. If there is a system broadcast message, it
is played. The system prompts you to repeat the message, or erase and
continue. If there are any delivery notification messages waiting they are
played. The system will then tell you if you have any messages waiting to
be heard. The main mailbox menu is then played.
2.3
Broadcast Messages
Broadcast messages are recorded by the system administrator and are sent to all
users. These messages contain important announcements about the system (e.g.,
ʺThe following system enhancements will be available to all Users effective...ʺ) or the
company (e.g., ʺTomorrow will be half-day holiday.ʺ) Users must listen to the
broadcast messages. After listening, the broadcast message may be deleted.
2.4
Erased Message Notices
2
Getting Started
An erased message notice informs a user that a message was automatically erased,
or is about to be erased. An erased message notice may be skipped. Users cannot
save these messages and skipping them simply saves users from having to listen
to the entire notice.
2-2
Emerald ICE HD Voicemail Mailbox User Guide
2.5
Confirmation Notices
Users may request confirmation from the system regarding the status of messages
they sent. There are two types of confirmation available:
A positive confirmation of receipt. - This notice indicates that the message
sent by the user was reviewed by the recipient. This notice is generated only
if the original message was sent with the ʺproof of deliveryʺ option.
A notification of an undelivered message. - This notice indicates that a
message has resided in the recipientʹs mailbox for X days and that it has not
been listened to. The number of days (ʺXʺ) is determined on a per mailbox
basis by the system administrator via Class of Service . This notice may be
generated only if the original message was sent with the ʺundelivered message
notificationʺ delivery option. Confirmation notice may be skipped.
Disconnecting from the System
When you have finished using the system, press * until the system says, ʺExiting
the system. Goodbye.ʺ
If you attempt to disconnect while there are new messages in your mailbox, the
system plays a message, ʺCheck your mailbox for new messages.ʺ
Press 1 if you wish to listen to the new message.
Getting Started
Press * to disconnect from the system.
2
2.6
Emerald ICE HD Voicemail Mailbox User Guide
2-3
Getting Started
2
2-4
Emerald ICE HD Voicemail Mailbox User Guide
Listening To Your Messages
Messages in your mailbox come from several places:
•
From non-users who leave messages in the telephone answering mode.
•
From other users.
•
From special limited-use users called guest users.
Messages are presented to you in the following order:
1. Broadcast messages.
2. Confirmation messages.
3. New messages (priority messages first).
4. Skipped messages.
5. Saved messages.
After the last new message has been presented to you, the system searches the
mailbox to see if there are any remaining new messages to be reviewed. In
particular, if new messages arrive during message review, they are presented in
the same order as before(priority, normal, etc.) but are labeled ʺskipped.ʺ Thus, if
a new priority message arrives after the user has passed priority messages during
message playback, this new message is played after all other new messages and is
labeled skipped.
Basic Operations
3.1
Basic Operations
-
3
3
Emerald ICE HD Voicemail Mailbox User Guide
3-1
To listen to the messages in your mailbox:
1. At the main menu, press 1. The system plays your messages. After
each message is played, the system asks you what to do with the message.
Available Options:
1 - Replay - repeats the complete message
2 - Save -keeps the message in your mailbox for future reference
3 - Erase- allows you to discard the message
4 - Reply - allows you to record a reply to the message with a single
keystroke
5- Envelope - plays the time and date the message was sent, and where
the message originated from.
6 - Send a Copy- allows you to forward a copy of the message to another
user. When you send a copy, you may choose to send the copy with
introductory comments.
Erase, Save, and Reply are the most common options, and the system prompts you
for these actions. To hear prompts for the other actions, press the desired option.
For advanced options, press 0.
3
Basic Operations
You may cancel message playing while listening to messages by dialing *. Any
message not completely reviewed remains in the new message queue. If a user
forgets to dial * to cancel play and just hangs up, all partially listened to and
unheard messages also remain in the new message queue.
3-2
Emerald ICE HD Voicemail Mailbox User Guide
3.2
Playback Controls
As you become more and more comfortable leaving & /receiving voice messages,
the length and complexity of message increases. Sometimes an important phone
number is embedded in a three-minute message. As you become more
experienced, you will want to control the playback of the messages you received.
The system playback controls are designed to give exactly that flexibility. With
playback controls, you can scan through a long message to find a phone number
without listening to the whole message. After dialing 1 to listen to a message,
you can press:
1 - Rewind to the beginning of the message.
7 - Rewind 5 seconds.
8 - Pause and restart the message.
9 - Forward 5 seconds.
## - Skip to the next message.
Options while Listening
In addition to the playback controls, you can press the following keys for any of
the listening options while the message is playing. For example, you donʹt have
to listen to the entire message before deciding you want envelope information or
to erase the message etc.
2 - Save the message in your mailbox for future reference
3 - Erase the message
4 - Reply to the message
Basic Operations
5 - Envelope information
6 - Send copy
3
3.3
Emerald ICE HD Voicemail Mailbox User Guide
3-3
Skipping a Message
Users with limited time may use the skip feature to scan through their messages,
or to look for an important message from a certain person. There are two
variations on this form of message scanning:
•
Listen to the first few seconds of each message, then skip to the next message. Repeat this process for each message.
•
Listen to message envelope information as soon as each message begins to
play,then skip to the next message. It is not necessary to the entire envelope.
The envelope information for messages may also be scanned through use of
the secretary access code.
A user may skip to the next message at any time by dialing # twice. Skipping a
message means that it retains its original place in the new message queue. It is
available for review as a skipped message during this session or as a new message
in a subsequent session.
For example:
1 Listening →During Review → ## → Next Message
1 Listening → 5 → Listen to envelope info → ## → Next message
Canceling Play of Messages
You may cancel message playing while listening to messages by dialing *. Any
message not completely reviewed remains in the new message queue. If a user
forgets to dial * to cancel play and just hang up, all partially listened to
messages also remain in the new message queue.
Replaying a Message
At the end of a message ( when the system prompts with the ʺAfter Listening...ʺ
menu ) you can replay that message in its entirety.
Basic Operations
1 Listening → End of message → 1 → Message replays
Saving a Message
If the message needs to be acted on later, it may be saved. Saved messages are
kept in a separate queue. They will be played after new messages.
3
1 Listening → 2 → Message is saved
The procedures for returning a message to storing a new message are the same.
3-4
Emerald ICE HD Voicemail Mailbox User Guide
Erasing a Message
If the message does not require action, it should be erased. Erasing messages
keeps the mailbox clear and reduces the need for system storage capacity.
1 Listening → 3 → Message is erased
Once a message has been erased, it cannot be retrieved.
Reply to a Message
A user can send a reply to a message by dialing one key. If the message has been
copied from another user, the reply can be sent to the person who originally sent
the message, or to the person who sent the copy of the message. Replies may only
be sent to messages from users received in the voice mail mode.
Therefore, Users should enter their own mailbox before sending message, so
recipients may conveniently reply.
1 → 4 → 1 Reply to →Record # → # Message →# To send
Acceptable
your reply
1 Listen to 0 For delivery
reply
options
2 Erase and
re-record
Continue
3
recording
Cancelreply
*
Basic Operations
originator
reply
3
sender
2 Reply to
Emerald ICE HD Voicemail Mailbox User Guide
3-5
Envelope Information
A user may need to know details about a message: who sent it, the time and date
it was delivered, the length of the message, and whether it is priority and/or
confidential. This information is called the envelope information. This
information can be programmed by the system administrator to play automatically
either before or after you hear the message. In addition, the envelope information
can be heard at any time while listening to the message by pressing 5. If this is
done, after playing the envelope information the system automatically returns the
user to the point at which the envelope information was requested.
1 Listening → 5 → Listen to envelope information → Return to message
The time and date stamp on a new message always relates to message delivery.
For messages sent from another mailbox user, the system prompts for your choice
of the sender or the person who originated the message.
Once a message is saved, the time and date stamp refers to the time it was first
saved. This time and date stamp allows the user to know how much longer the
message can stay in the mailbox before it is automatically deleted. Listening to a
message and re-saving it does not change the time and date stamp nor when the
system automatically erases the message.
3
Basic Operations
To skip envelope information and return to message review, press: ##.
3-6
Emerald ICE HD Voicemail Mailbox User Guide
Send a Copy to Someone Else
You may wish to send a copy of a message to another user. In this situation, you
can record introductory remarks and send the remark plus a copy of the message
to another user. Copies may be sent to one or more Users, including group
distribution lists. You may send copies of messages that are received in either the
voice mail mode or telephone answering mode.
1 → 6 → 1 Send with → Record → # Enter the → # Delivery
comments comments
destination
options
2 Send without comment
Sending A Message
2 Record → # → # Message →Enter destination, → # Send message
Acceptable mailbox, or
message
Listen
to
group
list, or
1
message guest mailbox
2 Erase and
re-record
destination
3 Continue
recording
* Cancel message
0 Delivery
options
* Cancel
To send a message:
1. At the main menu, press 2 to send a message. The system prompts you
to begin recording your message.
2. Record the message. You can press the * key at any point in the
recording to erase the message and start over.
3. Press # to end the message. The system prompts you to send the
message if it is acceptable and gives you a chance to listen to the message
you have just re-recorded, to continue recording, or to erase and begin
again.
3
5. Enter the destination. The destination is the mailbox number of the person
who is to receive the message. A destination can also be a personal or
system group distribution list number, or a guest mailbox. Messages may
be sent to any of these individually or in combination with other
destinations. Once you enter the mailbox number, the system plays back
the name of the person whose mailbox you have selected. If you have
selected the wrong destination, press the * key and enter a new number.
Basic Operations
4. When the message is acceptable, press #.
Emerald ICE HD Voicemail Mailbox User Guide
3-7
6. After the system plays the name of the destination, you are prompted to
send the message or press 0 for more options. These options are
delivery options. Messages may be marked priority, or confidential. Proof
of delivery can be requested. The message may be marked at a future
time. See Delivery Options on Page 3-8 for more details. Once the message
and delivery options are correct, press #. The system prompts you for
more destinations.
7. Press * if there are no more destinations, or continue from step 5.
Delivery Options
1 Confidential
2 Priority
3 Proof of→→ 1 Proof of delivery
delivery
2 Notification of non-delivery
4 Specify delivery time
* Cancel
Did you ever want to know exactly when a message was received? Did you ever
send a private message and want to prevent the recipient from passing the
message to other people? Want to send a message for delivery at a later date?
Mark a Message priority? Delivery options allow you to control how your
message is sent. These options are prompted after you have selected a destination.
You select delivery options after the destination is entered and before the message
is sent. Once selected, a delivery option may be canceled by dialing its number
again (e.g., dialing 2 the first time marks a message priority; dial 2 again
removes the priority marking). It is, therefore, possible to have different delivery
options for different destinations.
Confidential
A user may mark a message confidential and thereby the recipient from sending a
copy of the message to any other subscribe.
Priority
A user may mark a message for priority delivery. New priority messages will be
presented for review after broadcast message, but ahead of non-priority message
in the recipientʹs mailbox.
Basic Operations
Proof of Delivery
3
If it is important for a user to know precisely when a message is received, proof of
delivery may be requested. When the recipient listens to the message, the user
who sent the message will be sent a short message giving the date and time the
recipient listened to the message. The confirmation notice appears before the main
menu in the userʹs mailbox.
3-8
Emerald ICE HD Voicemail Mailbox User Guide
Undelivered Message Notification
Users may request that the system notify them if messages they sent are not
listened to within a per-set period of time. If the allotted time period passes and a
message remains un-heard, the sender receives an ʺundelivered message
notificationʺ with the name of the intended recipient. The time interval used for
the undelivered message notification feature is specified by the system
administrator.
Messages may be marked for proof of delivery or undelivered message
notification, but not both.
For purposes of proof of delivery, undelivered message notification, and check
receipt, a message is considered ʺreceivedʺ ( actually listened to ) if the user listens
to the entire message. If a user skips a message at any time before the end of the
message, cancels listening to the message, or hangs up before the end of the
message, it is not considered received. Often the most important information can
be included as an afterthought at the end of a message. For this reason, it is
important to know whether the entire message was actually heard.
Use of this option on too many messages may result in a userʹs mailbox becoming
inundated with confirmations. It should only be used when it is essential to know
exactly when a message has been received.
Specified Delivery Time
Users may tell the system to deliver messages at a specific time in the future. This
feature is especially useful for reminder messages or when information must be
released at a specific time in the future.
The system first asks whether the user wishes to specify a date (e.g., January 31st)
or just the day of the week within the next week (e.g., Wednesday). A user can
dial 1 to specify a date or 2 to specify a day in the coming week.
Delivery 4 →
options
Enter → #
delivery
Send →
message
destinations
More
To enter the delivery time:
If over a week:
Basic Operations
Dial 1 then: Dial 2 then:
Select month
3
(Jan=1, July=7, the first two letters
Dec.=12, etc.)
(Sunday = 78, Friday =37, on the DTMF pad, etc.)
Emerald ICE HD Voicemail Mailbox User Guide
3-9
Select date
(01 to 31)
Set the hour and the minutes as either 3 or 4 digits.
Set 2:00 as 200
Set 10:15 as 1015
Press 1 for AM or 2 for PM.
Since most people are not familiar with 24-hour format, the system only accepts
time in 12-hour clock format. Users must set the time for future delivery in the
time zone of the systemʹs location.
Usersʹ Classes of Service determine whether or not they may specify delivery time
for messages and the number of days in advance that messages may be sent.
Different delivery options can apply to different destinations.
When sending to multiple destinations, the option(s) assigned to the previous
destination (e.g., confidential, priority, proof of delivery and specify delivery time)
apply to the next destination. To cancel a previous option, dial the number of that
option again before sending the message to the next destination. This action turns
the option off. In this way, the same message can be sent to two people with it
going to one person as ʺPriority,ʺ to another as ʺConfidential,ʺ and to a third as
ʺPriorityʺ and ʺConfidential.ʺ Any combination of the options is possible.
Dial By Name
2 → Record your # → # Message → # Spell → # Send
Message
1
2
3
*
Acceptable
name
Listen to
Delivery
0
Message
options
Erase and * Cancel
re-record
destination
Continue recording
Cancel Message
message
Basic Operations
Have you ever recorded a message and realized you can’t find your mailbox
directory? This experience can be extremely frustrating for users who end up
hanging up, losing the message they recorded, looking for a directory and then
restarting the whole process. The Dial-By-Name feature allows users to easily send
messages without memorizing mailbox numbers.
3
After you finish recording the message, dial # twice to spell a name. The
system needs only enough letters to uniquely identify the mailbox, so you may not
need to spell the full name. As soon as the system finds an exact match for the
name, the name is played to confirm the destination. Use the keys on your
telephone to spell the last name of the person to receive the message. For
example, Smith Bob is entered as: 76484262 .
Dial 7 to enter a Q, and dial 9 to enter a Z.
3-10
Emerald ICE HD Voicemail Mailbox User Guide
Changing Your Personal Greeting
3
→ 1 → 2
→ 2
→ Record your→ #
Greetings Record
Mailbox
Mailbox
greeting greeting
Your mailbox greeting is played to outside callers who enter a system mailbox in
the telephone answering mode. This greeting enables you to give callers
information about you schedule and to encourage callers to leave detailed
messages. To change your greeting or name, simply enter personal options from
the mailbox menu by pressing 3 and select 1 for Greetings.
The system administrator can limit the length of a greeting.
If a mailbox greeting has not been recorded, the system uses your recorded name
and creates a standard system greeting.
A good mailbox greeting encourages callers to leave detailed messages (not just
name and phone number) and gives them additional information that might be
needed. It should present the kind of professional image that is appropriate for
your particular organization. You may wish to include an instruction to dial 0
to reach an operator. For example,ʺ Hello, this is Jim Smith. I am sorry I am not able
to receive your call, but if you leave a detailed message along with your name and number,
I will be prepared to help you when I call you back. If you must talk to someone
immediately, please dial zero and someone will help you.ʺ
To change your mailbox greeting:
1. At the main menu, press 3 for personal options.
2. Press 1 for greetings.
3. Press 2 for record.
4. Press 2 for mailbox greeting.
Basic Operations
5. Record your greeting, then press #..
3
3.4
Emerald ICE HD Voicemail Mailbox User Guide
3-11
Basic Operations
3
3-12
Emerald ICE HD Voicemail Mailbox User Guide
4
4.1
Additional Operations
Listening To Your Greeting
3
→ 1
→ 1
Greeting Listen
You may use personal options to listen to your recorded greeting. To listen to
your mailbox greeting:
1. At the main menu, press 3 for personal options.
2. Press 1 for greetings.
3. Press 1 for listen.
4. Press 2 for mailbox greeting.
Erasing Your Greeting
→ 1
→
Greeting
1
Erase
The standard system greeting may be chosen at any time by erasing your recorded
greeting without recording a new one. To erase your mailbox greeting:
1. At the main menu, press 3 for personal options.
2. Press 1 for greetings.
3. Press 3 for erase.
Additional Operations
3
4. Press 2 for mailbox greeting.
4
4.2
Emerald ICE HD Voicemail Mailbox User Guide
4-1
4.3
Recording Your Name
3
→ 1
→ 2
→ 1 → Record your→ #
Greeting Record
Name Name
You record your name the first time you use your mailbox. The recording of the
name will be used:(1) to verify destinations, (2) as part of a system-generated
personal greeting, or (3) as verification when someone is creating or editing group
lists. you may change the way your name is recorded at any time.
To record your name:
1. At the main menu, press 3 for personal options
2. Press 1 for greeting
3. Press 2 for record
4. Press 1 for name
5. Record your name, then press #
4.4
Temporary Greeting
3 → 1
→ 2
→ 3
Greetings Record
→ Record# → 2Activate your
your
temporary
greeting
greeting
3Deactivate your
temporary
greeting
4
Additional Operations
As customers and users begin to appreciate the speed of information flow with
voice mail, it is important to warn them that it may take longer than usual to
respond to the message. The temporary greeting allows you to give a special
notice to outside callers and users. The temporary greeting plays in place of the
mailbox greeting when calls are answered in the telephone answering mode. The
greeting should emphasize that you will not be checking in for messages
frequently. It might be used to direct callers to someone who could help them by
either telling them an extension number or via the Zero Destination.
4-2
Emerald ICE HD Voicemail Mailbox User Guide
The prompting for telephone answering is slightly different if the caller has a
temporary greeting. Callers hear the temporary greeting and are then prompted
with the usual prompts.
When users enter their mailboxes while a temporary greeting is in effect, they hear
a message from the system that a temporary greeting is in effect. The system
prompts users to:
1 - listen to the greeting.
2 - retain the greeting.
3 - deactivate the greeting.
4.5
Recording A Temporary Greeting
To record a temporary greeting:
1. At the main menu, press 3 for personal options.
2. Press 1 for greetings, then press 2 for record.
3. Press 3 for temporary greeting.
4. Record the greeting, then press #..
5. Press 2 to activate the greeting.
The temporary greeting can be deactivated without being erased. To deactivate
the greeting, when the system prompts you that a temporary greeting is in effect,
press 3.
Additional Operations
Listen To Your Temporary Greeting
To listening to your existing Temporary Greeting:
1. At the main menu, press 3 for personal options.
2. Press 1 for greetings, then press 1 for listen.
3. Press 3 for temporary greeting.
Emerald ICE HD Voicemail Mailbox User Guide
4
4.6
4-3
4.7
Erase Your Temporary Greeting
To erase your temporary greeting:
1. At the main menu, press
3 for personal options.
2. Press 1 for greeting, then press 3 for erase.
3. Press 3 for temporary greeting.
4.8
Personal Access Code
3 → 2 → 2 → Create /→ 0 → Mailbox → Enter → #
Modify
code
access
code
access
There is one access code that is associated with each user mailbox. Each access
code may be from 1 to 9 digits long. The system administrator can program a
minimum and maximum length for mailbox access codes. Zero should not be
used as the first digit. An initial, temporary access code is given to each user and
is used to enter the system for the very first time. It should not be used again.
Your access code should represent numbers that are easy for you to remember yet
not easily guessed by other people. You are strongly discouraged from using
birthdays, employee numbers, social security numbers, etc., since these numbers
could be readily guessed by others. You are encouraged to change your access
code frequently.
To change your access code, use the personal options menu:
1. From the main menu, press 3.
Additional Operations
2. Press 2 for access code, then press 2 to create/modify an access code.
3. Press 0 for mailbox access code.
4
4. Enter the access code you have decided on, then press #.
4-4
Emerald ICE HD Voicemail Mailbox User Guide
Secretary Mailbox Access Code
3 → 2 → 2 → Create/→ 0 → Secretary → Enter → #
Modify
access
code
access
code
Using a secretary mailbox is another method of accessing your mailbox with its
own access code, instead of the regular mailbox access code. Only the envelope
information of messages in your mailbox can be played. The actual messages
cannot be played. This is useful if you wish to have someone check the messages
in your mailbox without letting them hear the actual message. Messages cannot
be sent or received by secretary mailboxes.
To add a secretary mailbox access code:
1. From the main menu, press 3 for personal options.
2. Press 2 for access codes, then press 2 for create/modify.
3. Press 1 for secretary access code.
4. Enter the desired access code, and then press
#.
To delete a secretary mailbox access code:
1. From the main menu, press 3 for personal options.
2. Press 2 for access code, then press 3 for erase.
Additional Operations
3. Press 1 for secretary access code.
4
4.9
Emerald ICE HD Voicemail Mailbox User Guide
4-5
4.10
Guest Mailboxes
Do you have a customer or vendor who is impossible to reach? Do you travel
frequently and need to stay in touch with your family? Guest mailboxes can help
you stay in touch with people outside your company. You may use up to 8 guest
mailboxes depending upon your mailboxʹs class of services.
There are three steps to using a guest mailbox:
1. Create the mailbox by establishing a guest access code to your mailbox.
2. Send a message to the guest mailbox.
3. Instruct your guest how to obtain the message.
Create a Guest Mailbox
Guest mailboxes are created using the personal options menu:
1. From the main menu, press 3 for personal options.
2. Press 2 for access codes, then press 2 for create/modify.
3. Press the digit 2-9 corresponding to the guest number. 2 for
guest-2ʹs access code, etc. (Guest 1 is reserved for the secretary mailbox).
4. Enter the desired access code, and then press #.
Erase a Guest Mailbox
To erase a guest mailbox access code:
1. From the main menu, press 3 for personal options.
Additional Operations
2. Press 2 for access codes, then press 3 for erase.
4
3. Press the digit 2-9 corresponding to the guest number to be deleted.
4-6
Emerald ICE HD Voicemail Mailbox User Guide
Sending a Message to a Guest Mailbox
To send a message to a guest mailbox:
1. Record your message.
2. When prompted for the destination, press 8 plus the guest number
2-9. For example, to send a message to guest number 3, press 8
3.
Instruct Your Guest on How to Retrieve the Message
Give your guest the following instructions:
1. Call the access number: _____________________.
2. Enter # and your mailbox number: _______________.
3. Listen to your name.
4. Enter the access code assigned to the guest.
5. Listen to the message and respond as required.
Group Distribution Lists
3 → 3 → Group → 1 List →
Enter list
members
number (11-29)
2 Establish list
3 Erase list
4 Modify list
Group Distribution Lists allow users to record a message once and send it
simultaneously to multiple destinations. Messages are recorded and sent like any
other message and may have delivery options like confidential, priority, etc.
Each user, depending on his or her class of service, may be allowed to create and
use up to 18 lists of up to 25 users each. In addition, users may be given access to
system group lists. These lists have names that are recorded by the user or, in the
case of system group lists, by the system administrator. The lists also have
numbers that are used as destinations when sending messages. Personal group
lists are numbered from 11 to 29 and system group lists are numbered from 30 to
79. An example of a personal group list might be:
Additional Operations
lists
4
4.11
Emerald ICE HD Voicemail Mailbox User Guide
4-7
Regional Managers11
Kevin Jones 3922
Dan Smith 3267
Jim Fields
3721
Group lists may NOT be linked together, but users may send the same message to
several group lists in succession, if required.
To send a message to one of your distribution lists, enter the 2-digit distribution
list number followed by # when prompted for the destination. You will hear
the name of the list you have recorded to confirm that you are about to send a
message to that list of people. You can always change a distribution list by
deleting or adding any voice mailbox you wish.
Establishing a Personal Group List
3 → 3 → 2 → Dial list → Record → # → 1 Add or Erase
Group
name
list(11-29)
Create number group
Mailboxes
list
Rename
2
Group
list→
* When
done
To create a Personal Group list:
1. From main menu, press 3 for personal options.
2. Press 3 for group lists, then press 2 to establish list.
3. Enter the desired 2-digit list number (11-29), and then press #.
4
Additional Operations
4. Press 1 to add mailbox numbers to the new list. Press * when you
have finished adding mailboxes.
4-8
Emerald ICE HD Voicemail Mailbox User Guide
Listing Members
3
→ 3 → 1
→ List → Dial list → 3 Delete number
members number
(11-29)
7 Play previous
name
If you forget the names of a particular list, the list of names may be listened to.
To play the mailboxes in a Personal Group list:
1. From the main menu, press 3 for personal options.
2. Press 3 for group lists, then press 1 for list members.
3. Enter the desired 2-digit list number (11-29), and then press #.
4. Press 3 to delete a mailbox number while the list is playing.
5. Press 7 to repeat the previous entry in the list.
Erasing Existing Lists
3
→ 3 Group list → 3 → Erase List → Dial list
number (11-29)
Users may erase an entire personal group distribution list. To erase a Personal
Group list:
1. From the main menu, press 3 for personal options.
2. Press 3 for group lists, then press 3 to erase.
4
Additional Operations
3. Dial the desired 2-digit list number (11-29).
Emerald ICE HD Voicemail Mailbox User Guide
4-9
Modifying Existing Lists
3 → 3 → 4 → Dial list → 1 Add or Erase → * When
Group
lists
Modify number
list
(11-29)
Mailboxes
done
2 Rename group
# Record New name
By selecting to modify a list, you can either add or delete a particular personʹs
mailbox from the list or ask the system to rename the group list. If a userʹs
mailbox is already on the list, dialing the number again will remove it. If it is not
on the list, the address will be added. The recorded name of a list can be changed
or re-recorded at any time without affecting the contents of the list.
To modify a Personal Group list:
1. From the main menu, press 3 for personal options.
2. Press 3 for group lists, then press 4 to modify a list.
3. Dial the desired 2-digit list number (11-29).
4. Press 1 to add mailbox numbers to the list, or erase mailbox numbers
from the list. Press * when you have finished.
5. Press 2 to rename the list. Record the new name, then press #.
4.12
Outdial Operations
You can use the optional outdial feature to have the system call and notify you
that a new message has been received in your mailbox. Before you begin to use
the outdialing feature you must specify:
Additional Operations
A schedule of when the system can call you.
Each mailbox user may establish 2 outdial schedules and an override schedule
for weekdays and for weekends. Schedules 1 and 2 can be programmed to
accommodate time gaps in the same day. For example,ʺ I want the system to
call me at home from 6:00 am to 8:00 pm .ʺ Schedule 3 is the override
schedule.
4
The telephone number where you can be reached.
This number may be a telephone system (or Centrex) extension, a local or long
distance telephone number, or the telephone number and dialing sequence of
a pager.
4-10
Emerald ICE HD Voicemail Mailbox User Guide
If the telephone number is a telephone system extension, be aware of call
forwarding. The outdial call should be call forwarded back to the system.
Otherwise, the outdial message will be recorded as a new message, and
may cause a new outdial. Check with your system administrator to make
certain the timer for call forward on no answer is longer than the timer for an
unanswered call (usually 4 rings).
The system allows each mailbox user to specify up to 9 outdial bins ( numbered
1-9), each of which can contain an extension number, telephone number, or pager
sequence. Each outdial bin may contain up to 46 digits. A mailbox user may
insert a pause ( required in some pager sequences) by dialing *.
An alternate telephone number. This can be skipped if desired. If the system
fails to reach you at the primary bin destination after the programmed
number of attempts, it will automatically attempt to notify you at the alternate
bin destination using the same number of attempts. If after this, the system
sill has not reached you, no further attempts are made.
The type of message that causes an outdial call. A user can specify: all new
messages, or only priority new messages. In addition, a user can limit
outtalking to messages from a member of a group list, or from a particular
mailbox.
4
Additional Operations
How long the system waits after a message has been received before placing the
outdial call.
Emerald ICE HD Voicemail Mailbox User Guide
4-11
Outdial Bins
The first task in creating an outdial schedule is to program the telephone numbers
where you can be reached. These numbers can be extensions on a PBX ( or
Centrex), a telephone number, or the telephone number and dialing sequence of a
pager. These numbers are stored in the system memory in locations called outdial
bins. You may store up to 9 telephone numbers. These bins are labeled 1 - 9.
Do not include the dial access code (e.g., 9 ) needed to reach an outside line in an
outdial bin. This information is already programmed into the system.
Creating An Outdial Bin
To create an Outdial bin:
1. From the main menu, press 3 for personal options.
2. Press 4 for message notification, then press 2 for bin number
maintenance.
3. Press 2 to add a bin number.
4. Dial the desired bin number (1-9).
5. Dial the type of number to be added ( 1 - external telephone number or
number for a voice pager, 2 - extension number, or 3 - pager).
6. Dial the telephone number. Use the * to insert a pause.
7. If the number is correct, press # when prompted.
Review An Outdial Bin
To review the contents of an outdial bin:
1. From the main menu, press 3 for personal options.
2. Press 4 for message notification, then press 2 for bin number
maintenance.
3. Press 1 to review a bin number.
4
Additional Operations
4. Dial the desired bin number (1-9).
4-12
Emerald ICE HD Voicemail Mailbox User Guide
Erase An Outdial Bin
To erase an outdial bin:
1. From the main menu, press 3 for personal options.
2. Press 4 for message notification, then press 2 for bin number
maintenance.
3. Press 3 to erase a bin number.
4. Dial the desired bin number (1-9).
Modify An Outdial Bin
To modify the contents of an outdial bin:
1. From the main menu, press 3 for personal options.
2. Press 4 for message notification, then press 2 for bin number
maintenance.
3. Press 4 to modify a bin number.
4
Additional Operations
4. Dial the desired bin number (1-9). The system plays the current contents
of the bin. If the contents are correct, dial #. If the contents are not
correct, dial *. The system will prompt you for new information.
Emerald ICE HD Voicemail Mailbox User Guide
4-13
4.13
Outdial Administration
The outdial administration selection is used to program the schedules used by
outdial when attempting to reach a user. Each user can program an outdial
schedule for weekdays and a schedule for weekends. Both the weekday and
weekend schedule can be divided into 2 schedules (schedule 1 and schedule 2).
This allows you to program gaps in the day. The schedules are allowed to
overlap. In addition, there is an override schedule (schedule 3) for weekdays and
one for weekends. When the override schedule is programmed, it takes place of
schedule 1 and 2.
Each schedule is programmed with:
•
A start and stop time. The outdial bin number containing the telephone
number where a user can be reached.
•
The number of times to attempt to reach a user.
•
An alternate bin number (optional).
•
The type of message ( all or priority) which causes an outdial.
•
How long after a message has been received to place the outdial.
•
Message senders who cause an outdial (Users in a particular group list, a
specific mailbox number, or any new message).
Add An Outdial Schedule
To add an outdial schedule:
1. From the main menu, press 3 for personal options.
2. Press 4 for message notification, then press 3 for outdial
administration.
3. Press 2 to add a schedule.
Additional Operations
4. Press 1 for weekly schedule, or press 2 for a weekend schedule.
5. Dial the number of the schedule to be programmed(1, 2, or 3 override schedule).
Schedule 4 - Wakeup is not used at this time.
4
6. Dial the time when you will start accepting calls as a 3-digit or 4-digit
number in 24- hour clock format (military time). For example, 2 P.M. is
entered as 1400.
4-14
Emerald ICE HD Voicemail Mailbox User Guide
7. Dial the time when you will stop accepting calls as a 3- digit or 4- digit
number in 24- hour clock format (military time). For example, 8 P.M. is
entered as 2000.
8. Dial the desired bin number (1-9).
9. Dial the number of attempts to reach you ( this number must be at least 1).
10. Dial an alternate bin number if desired, press 0 for no alternate, or press
# to skip.
11. Press 1 for all messages, or press 2 for only priority messages.
12. Dial how long the system is to wait after receiving a non-priority message
before outcalling to you. Dial 1-9 for hours, or 10-99 for
minutes. Dial 00 for immediate notification. (The system skips the
step if the requested notification is for Priority message only.)
13. Dial how long the system is to wait after receiving a priority message
before outcalling to you. Dial 1-9 for hours, or 10-99 for
minutes. Dial 00 for immediate notification.
14. Dial a group list number, a mailbox number, or # for all users.
Review an Outdial Schedule
To review an outdial schedule:
1. From the mail menu, press 3 for personal options.
2. Press 4 for message notification, then press 3 for outdial
administration.
3. Press 1 to review a schedule.
4. Press 1 for a weekly schedule, or press 2 for a weekend schedule.
4
Additional Operations
5. Dial the number of the schedule to be reviewed ( 1,2, or 3 (
Override Schedule)). Schedule 4 - Wakeup is not used at this time.
Emerald ICE HD Voicemail Mailbox User Guide
4-15
Erase an Outdial Schedule
To erase an outdial schedule:
1. From the main menu, press 3 for personal options.
2. Press 4 for message notification, then press 3 for outdial
administration.
3. Press 3 to erase a schedule.
4. Press 1 for a weekday schedule, or press 2 For a weekend schedule.
5. Dial the number of the schedule to be erased ( 1,2, or 3 (Override
Schedule)). Schedule 4 - Wakeup is not used at this time.
Modify an Outdial Schedule
To modify an outdial schedule:
1. From the main menu, press 3 for personal options.
2. Press 4 for message notification, then press 3 for outdial
administration.
3. Press 4 to modify a schedule.
4. Press 1 for weekday schedule, or press 2 for a weekend schedule.
4
Additional Operations
5. Dial the number of the schedule to be modified ( 1, 2, or 3 (
Override Schedule)). Schedule 4 - Wake up is not used at this time. The
system plays the schedule, and requests confirmation for each entry. press
# if the entry is correct, or press * and change the entry as needed.
4-16
Emerald ICE HD Voicemail Mailbox User Guide
Turn Outdial On/Off
Once the desire outdial schedules have been programmed, outdial can be turned
on and off whenever desired. Outdial ON/OFF is a toggle. If outdial is on, this
procedure turns it off. If outdial is off, this procedure turns it on.
To Turn outdial ON or OFF:
1. From the main menu, press 3 for personal options.
2. Press 4 for message notification, then press 1.
Answering An Outdial Call
When the system places an outdial call, it waits until it detects that the call has
been answered. As soon as the call is answered the system plays ʺ This is the (
recorded company name). If you are an operator, please transfer this call to ( recorded
mailbox name). If ( recorded mailbox name ) cannot be reached at this number, please dial
star, and please have (recorded mailbox name) call the ( recorded company name) voice
mail system. If you are ( recorded mailbox name), dial your access code now.ʺ
The system uses your recorded name as part of the outdial greeting. If your
name is not recorded, the system will use your mailbox number as part of the
greeting. For this reason, make certain you have recorded your name for
your mailbox.
Dial your access code, then press # and listen to your messages.
4
Additional Operations
If an outdial call is answered and whoever answers the call dials a * in
response to the outdial greeting ( indicating the called party is not at that
number ), the system automatically turns off outdial. A message is then left
in the user's mailbox that outdial has been turned off. Outdial remains off
until the user turns it back on. See section Turn Outdial ON / OFF.
Emerald ICE HD Voicemail Mailbox User Guide
4-17
Things to Know About the Outdial Schedule
When a call is received in your mailbox, the system first checks to see if outdial
notification is turned on. If it is, the system checks to see if you are using the
mailbox ( no outdial will be made if you are using your mailbox when a message
is received ). If not, the system checks your outdial schedule to determine if the
message received matches the message type ( priority, all, from group list, etc. ) of
a schedule. The system then determines when to begin the outdial process.
If there is nothing programmed for ʺnormal messages call afterʺ or ʺpriority
message call afterʺ ( depending upon the type of message), the system queues the
outdial process immediately and follows the schedule(s) in effect at the time (
weekday, weekend, schedule, etc.).
If there is a value programmed for ʺnormal messages call afterʺ or ʺpriority
message call afterʺ, that value is added to the time the message is received and
then compared to the schedule start and stop times. If the time falls within the
schedule, the outdial process is queued for the delayed delivery time. If the time
falls outside of the start and stop time, the system queues the outdial for the next
schedule time you are available for an outdial call based on all outdial schedules
for the mailbox.
If you retrieve all new messages from your mailbox while an outdial is in queue,
the outdial attempt will be cancelled.
The system knows an outdial was successful when your mailbox access code is
dialed. If the system was not successful on an outdial attempt, the system waits
five minutes before the next attempt, until the number of attempts programmed
on the schedule is reached. The system then repeats the process for an alternate
bin if one is programmed. If after all attempts the system was not successful in
reaching you, a message is left in your mailbox informing you of the failed
attempt to outdial to you.
4
Additional Operations
If the system is dialing a pager number (Tel Type 3), the system will call the
pager the number of times programmed for attempts, or until the mailbox is
accessed and a valid access code is entered.
4-18
Emerald ICE HD Voicemail Mailbox User Guide
Checking Message Delivery
The system gives you an opportunity to determine whether or not your messages
have been received. The check delivery feature of the system allows you to check
for proof of delivery by directing the system to play any message from you which
have not been listened to in a specified userʹs mailbox. This after - the - fact
method of confirmation generally provides much greater flexibility and
convenience.
After dialing the mailbox number, the system confirms the name of the person
whose mailbox is being checked.
The total number of messages not listened to will be given. If a message has not
been received, the system plays back any unheard messages in the mailbox, and
gives the user an opportunity to erase the messages.
To check to see if a message has been listened to by the recipient:
1. From the main menu, press 4 for check delivery.
2. Dial the desired mailbox number, or press # to use spell by name. The
system tells you how many of your messages have not been played by the
recipient. The unheard messages are then played. After each message, the
system will prompt you to take action on the message. Your choices are:
Replay the message
2
Erase the message. This is useful when you have second thoughts
about a message you have sent.
3
Envelope information
#
Continue to the next message
Additional Operations
1
4
4.14
Emerald ICE HD Voicemail Mailbox User Guide
4-19
Additional Operations
4
4-20
Emerald ICE HD Voicemail Mailbox User Guide
Auto Listen/Skip
Expert mode is a series of automatic features designed for experienced voice mail
users.
The auto mode can be changed back to the normal mode at any time by dialing
0.
Auto Listen / Skip
1 → #1 → Listen to the message
When messages are listened to using Auto Listen/Skip, the system plays all
messages one after the other until interrupted by the user. messages listened to in
this fashion are considered skipped, and appear as new messages the next time
the user listens to messages.
To auto listen to the messages in your mailbox, and then skip to the following
messages:
1. At the main menu, press 1.
2. Press #1. The system plays your messages. After the message is
played it is placed in the skipped message queue.
Expert Mode
5.1
Expert Mode
5
5
Emerald ICE HD Voicemail Mailbox User Guide
5-1
Auto Listen / Save
1 → #2 → Listen to the message
When messages are listened to using Auto Listen/Save, the system plays all
messages one after the other until interrupted by the user. Messages listened to in
this fashion are saved after they are played.
To auto listen to the messages in your mailbox, and then save them:
1. At the main menu, press 1.
2. Press #2. The system plays your messages. After the message is
played, it is placed in the saved message queue.
Auto Listen / Erase
1 → #3 → Listen to → Message erased the message after play
When messages are listened to using Auto Listen/Erase, the system plays all
messages one after the other until interrupted by the user. Messages listened to in
this fashion are erased after they are played. After Auto Listen/Erase is selected, the
system plays a message to remind the user that the message will be automatically
deleted after being played, and then prompts for confirmation.
To auto listen to the messages in your mailbox, then erase them:
1. At the main menu, press 1.
2. Press #3. The system plays your messages. After the message is
played, it is erased.
5
Expert Mode
Erased messages cannot be recovered.
5-2
Emerald ICE HD Voicemail Mailbox User Guide
5.2
Auto Scan Envelope Information
The envelope information of all messages can be played without listening to the
messages themselves. While the envelope information is playing any of the
playback commands can be used. The envelope information can be interrupted
and the message played, saved, replied to, etc. After the interruption, the system
then continues playing envelope information for the remaining messages.
To auto listen to the information only of the messages in your mailbox:
1. At the main menu, press 1.
2. Press #5. The system plays the envelope information for each
message. If you wish to listen to the message, press 1. If you wish to
send a copy to someone else, press 6.
Mass Auto Delete
If you wish to empty your mailbox of all messages, you can use mass auto delete.
To empty your mailbox of all messages:
1. At the main menu, press 1.
2. Press #*. The system erases all messages in your mailbox.
Expert Mode
All messages in your mailbox will be erased and CANNOT be recovered.
5
5.3
Emerald ICE HD Voicemail Mailbox User Guide
5-3
Expert Mode
5
5-4
Emerald ICE HD Voicemail Mailbox User Guide
USA Headquarters
Tadiran Telecom, Inc.
4 Tri Harbor Court
Port Washington, NY 11050
Tel. +1-516-632-7200, Fax. +1-516-632-7210
Visit us at our website http://www.tadiran-us.com
Email: [email protected]
E me ra l d I C E HD Vo i c ema i l Ca rd
M ai l bo x U se r G u i de
Re vi s i o n A