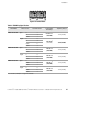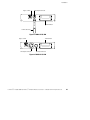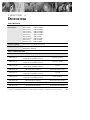
1
Powerware 9125 ® 9 PowerPass Distribution Module User’s Guide For use with Two-in-One, 2500-3000 VA Models www.powerware.com Class A EMC Statements FCC Part 15 NOTE This equipment has been tested and found to comply with the limits for a Class A digital device, pursuant to part 15 of the FCC Rules. These limits are designed to provide reasonable protection against harmful interference when the equipment is operated in a commercial environment. This equipment generates, uses, and can radiate radio frequency energy and, if not installed and used in accordance with the instruction manual, may cause harmful interference to radio communications. Operation of this equipment in a residential area is likely to cause harmful interference in which case the user will be required to correct the interference at his own expense. ICES-003 This Class A Interference Causing Equipment meets all requirements of the Canadian Interference Causing Equipment Regulations ICES-003. Cet appareil numérique de la classe A respecte toutes les exigences du Reglement sur le matériel brouilleur du Canada. EN50091-2 Some configurations are classified under EN50091-2 as “Class-A UPS for Unrestricted Sales Distribution.” For these configurations, the following applies: WARNING This is a Class A-UPS Product. In a domestic environment, this product may cause radio interference, in which case, the user may be required to take additional measures. Powerware and PowerPass are registered trademarks of Powerware Corporation. . Copyright 2002 Powerware Corporation, Raleigh, NC, USA. All rights reserved. No part of this document may be reproduced in any way without the express written approval of Powerware Corporation. Table of Contents TABLE OF CONTENTS 1 Introduction . . . . . . . . . . . . . . . . . . . . . . . . . . . . . . . . . . . . . . . . . . . . . . . . . . . . 1 Safety Warnings . . . . . . . . . . . . . . . . . . . . . . . . . . . . . . . . . . . . . . . . . . . . . . . . . . . . . . . . . . . . . 1 2 Installation . . . . . . . . . . . . . . . . . . . . . . . . . . . . . . . . . . . . . . . . . . . . . . . . . . . . . 13 Inspecting the Equipment . . . . . . . . . . . . . . . . . . . . . . . . . . . . . . . . . . . . . . . . . . . . . . . . . . . . . . . PDM Setup . . . . . . . . . . . . . . . . . . . . . . . . . . . . . . . . . . . . . . . . . . . . . . . . . . . . . . . . . . . . . . . . . Rack-Mount Setup . . . . . . . . . . . . . . . . . . . . . . . . . . . . . . . . . . . . . . . . . . . . . . . . . . . . . . . . . . Tower Setup . . . . . . . . . . . . . . . . . . . . . . . . . . . . . . . . . . . . . . . . . . . . . . . . . . . . . . . . . . . . . . Low-Voltage PDM Installation . . . . . . . . . . . . . . . . . . . . . . . . . . . . . . . . . . . . . . . . . . . . . . . . . . . . High-Voltage PDM Installation . . . . . . . . . . . . . . . . . . . . . . . . . . . . . . . . . . . . . . . . . . . . . . . . . . . . Plug-Receptacle PDM Rear Panels . . . . . . . . . . . . . . . . . . . . . . . . . . . . . . . . . . . . . . . . . . . . . . . . . PDM Hardwired Installation . . . . . . . . . . . . . . . . . . . . . . . . . . . . . . . . . . . . . . . . . . . . . . . . . . . . . Hardwired PDM Rear Panels . . . . . . . . . . . . . . . . . . . . . . . . . . . . . . . . . . . . . . . . . . . . . . . . . . . . . Load Segments . . . . . . . . . . . . . . . . . . . . . . . . . . . . . . . . . . . . . . . . . . . . . . . . . . . . . . . . . . . . . . 13 13 14 15 18 19 20 23 28 30 3 Operation . . . . . . . . . . . . . . . . . . . . . . . . . . . . . . . . . . . . . . . . . . . . . . . . . . . . . . 31 Using Maintenance Bypass . . . . . . . . . . . . . . . . . . . . . . . . . . . . . . . . . . . . . . . . . . . . . . . . . . . . . . 31 4 Specifications . . . . . . . . . . . . . . . . . . . . . . . . . . . . . . . . . . . . . . . . . . . . . . . . . . 33 Powerware® 9125 (2500–3000 VA) PowerPass® Distribution Module User’s Guide : 164201392 Rev B www.powerware.com i Table of Contents ii Powerware® 9125 (2500–3000 VA) PowerPass® Distribution Module User’s Guide : 164201392 Rev B www.powerware.com CHAPTER 1 INTRODUCTION The PowerPass9 Distribution Module (PDM) is designed to operate with a 2500-3000 VA Powerware9 9125 uninterruptible power system (UPS) and allows you to: : Replace or upgrade the UPS without losing power to your equipment (see “Using Maintenance Bypass” on page 31). : Provide surge protection if the UPS is not present. : Provide extra surge protection when the UPS is present. Safety Warnings IMPORTANT SAFETY INSTRUCTIONS SAVE THESE INSTRUCTIONS. This manual contains important instructions that you should follow during installation and maintenance of the PDM. Please read all instructions before operating the equipment and save this manual for future reference. CAUTION : There are NO USER SERVICEABLE PARTS inside the PDM. All repairs and service should be performed by AUTHORIZED SERVICE PERSONNEL ONLY. : To reduce the risk of fire or electric shock, install this PDM in a temperature and humidity controlled, indoor environment, free of conductive contaminants. Ambient temperature must not exceed 40C (104F). Do not operate near water or excessive humidity (95% max). : For PDM models with hardwired outputs, overcurrent protection for the output AC circuit(s) is to be provided by others. : For PDM models with hardwired outputs, suitably rated disconnect switches for the output AC circuit(s) are to be provided by others. Powerware® 9125 (2500–3000 VA) PowerPass® Distribution Module User’s Guide : 164201392 Rev B www.powerware.com 1 Introduction Sikkerhedsanvisninger VIGTIGE SIKKERHEDSANVISNINGER GEM DISSE ANVISNINGER DENNE BRUGERVEJLEDNING INDEHOLDER VIGTIGE SIKKERHEDSANVISNINGER ADVARSEL : Denne PDM indeholder LIVSFARLIG HØJSPÆNDING. Alle reparationer og vedligeholdelse bør kun udføres af en AUTORISERET SERVICETEKNIKER. Ingen af PDM’ens indvendige dele kan repareres af brugeren. : Installér denne PDM i et temperatur- og fugtighedskontrolleret indendørsmiljø, frit for ledende forureningsstoffer for at formindske risikoen for brand og elektrisk stød. Rumtemperaturen må ikke overstige 40C. PDM’en bør ikke betjenes nær vand eller høj fugtighed (maksimalt 95%). : For PDM systemer med hårdledningsudgange, skal overstrømsbeskyttelse for vekslestrømmens udgangskredsløb forsynes af andre. : For PDM systemer med hårdledningsudgange, skal egnede, nominelle afbryderkontakter for vekslestrømmens udgangskredsløb forsynes af andre. 2 Powerware® 9125 (2500–3000 VA) PowerPass® Distribution Module User’s Guide : 164201392 Rev B www.powerware.com Introduction Belangrijke Veiligheidsinstructies BELANGRIJKE VEILIGHEIDSINSTRUCTIES BEWAAR DEZE INSTRUCTIES DEZE HANDLEIDING BEVAT BELANGRIJKE VEILIGHEIDSINSTRUCTIES OPGELET : Deze PDM bevat LEVENSGEVAARLIJKE ELEKTRISCHE SPANNING. Alle reparaties en onderhoud dienen UITSLUITEND DOOR ERKEND SERVICEPERSONEEL te worden uitgevoerd. Er bevinden zich GEEN ONDERDELEN in de PDM die DOOR DE GEBRUIKER kunnen worden GEREPAREERD. : Teneinde de kans op brand of elektrische schok te verminderen dient deze PDM in een gebouw met temperatuur- en vochtigheidregeling te worden geïnstalleerd, waar geen geleidende verontreinigingen aanwezig zijn. De omgevingstemperatuur mag 40C niet overschrijden. Niet gebruiken in de buurt van water of bij zeer hoge vochtigheid (max. 95%). : Voor PDM systemen met vast-bedrade uitgangen, moet de overstroombeveiliging voor wisselstroom uitvoercircuit(s) door anderen worden geleverd. : Voor PDM systemen met vast-bedrade uitgangen, moeten de juiste hoofdschakelaars voor wisselstroom uitvoercircuit(s) door anderen worden geleverd. Powerware® 9125 (2500–3000 VA) PowerPass® Distribution Module User’s Guide : 164201392 Rev B www.powerware.com 3 Introduction Tarkeita Turvaohjeita TÄRKEITÄ TURVAOHJEITA - SUOMI SÄILYTÄ NÄMÄ OHJEET TÄMÄ OPAS SISÄLTÄÄ TÄRKEITÄ TURVAOHJEITA VARO : Tämä PDM sisältää HENGENVAARALLISIA JÄNNITTEITÄ. Kaikki korjaukset ja huollot on jätettävä VAIN VALTUUTETUN HUOLTOHENKILÖN TOIMEKSI. PDM ei sisällä MITÄÄN KÄYTTÄJÄN HUOLLETTAVIA OSIA. : Vähentääksesi tulipalon ja sähköiskun vaaraa asenna tämä PDM sisätiloihin, joissa lämpötila ja kosteus on säädettävissä ja joissa ei ole virtaa johtavia epäpuhtauksia. Ympäristön lämpötila ei saa ylittää 40 C. Älä käytä lähellä vettä ja vältä kosteita tiloja (95 % maksimi). : PDM-järjestelmissä kiintealla asennuksella: kuormana olevien laitteiden ylivirtasuojaus ja erotuskytkimet tulee toteuttaa kuormapiireissa. 4 Powerware® 9125 (2500–3000 VA) PowerPass® Distribution Module User’s Guide : 164201392 Rev B www.powerware.com Introduction Consignes de sécurité CONSIGNES DE SÉCURITÉ IMPORTANTES CONSERVER CES INSTRUCTIONS CE MANUEL CONTIENT DES CONSIGNES DE SÉCURITÉ IMPORTANTES ATTENTION! : Cet onduleur contient des TENSIONS MORTELLES. Toute opération d’entretien et de réparation doit être EXCLUSIVEMENT CONFIÉE A UN PERSONNEL QUALIFIÉ AGRÉÉ. AUCUNE PIÈCE RÉPARABLE PAR L’UTILISATEUR ne se trouve dans l’onduleur. : Pour réduire les risques d’incendie et de décharge électrique, installer l’onduleur uniquement à l’intérieur, dans un lieu dépourvu de matériaux conducteurs, où la température et l’humidité ambiantes sont contrôlées. La température ambiante ne doit pas dépasser 40 C. Ne pas utiliser à proximité d’eau ou dans une atmosphère excessivement humide (95 % maximum). : Pour les models PDM ayant des sorties câblées, la protection contre une surintensité pour le(s) circuit(s) de sortie de courant alternatif doit être fournie par un autre fournisseur. : Pour les models PDM ayant des sorties câblées, les interrupteurs de déconnexion convenables pour le(s) circuit(s) de sortie de courant alternatif doivent être fournie par un autre fournisseur. Powerware® 9125 (2500–3000 VA) PowerPass® Distribution Module User’s Guide : 164201392 Rev B www.powerware.com 5 Introduction Sicherheitswarnungen WICHTIGE SICHERHEITSANWEISUNGEN AUFBEWAHREN. DIESES HANDBUCH ENTHÄLT WICHTIGE SICHERHEITSANWEISUNGEN. VORSICHT! : Die USV führt lebensgefährliche Spannungen. Alle Reparatur- und Wartungsarbeiten sollten nur von Kundendienstfachleuten durchgeführt werden. Die USV enthält keine vom Benutzer zu wartenden Komponente. : Um die Brand- oder Elektroschockgefahr zu verringern, diese USV nur in Gebäuden mit kontrollierter Temperatur und Luftfeuchtigkeit installieren, in denen keine leitenden Schmutzstoffen vorhanden sind. Die Umgebungstemperatur darf 40C nicht übersteigen. Die USV nicht in der Nähe von Wasser oder in extrem hoher Luftfeuchtigkeit (max. 95 %) betreiben. : Für PDM-Systeme mit festverdrahteten Eingängen muß der Überstromschutz für die Ausgangswechselstromkreise anderweitig bereitgestellt werden. : Für PDM-Systeme mit festverdrahteten Ausgängen müssen Trennschalter für die Ausgangswechselstromkreise mit passendem Nennwert anderweitig bereitgestellt werden. 6 Powerware® 9125 (2500–3000 VA) PowerPass® Distribution Module User’s Guide : 164201392 Rev B www.powerware.com Introduction ÐñïåéäïðïéÞóåéò ÁóöÜëåéáò ÓÇÌÁÍÔÉÊÅÓ ÏÄÇÃÉÅÓ ÁÓÖÁËÅÉÁÓ ÖÕËÁÎÔÅ ÁÕÔÅÓ ÔÉÓ ÏÄÇÃÉÅÓ ÔÏ ÐÁÑÏÍ ÅÃ×ÅÉÑÉÄÉÏ ÐÅÑÉÅ×ÅÉ ÓÇÌÁÍÔÉÊÅÓ ÏÄÇÃÉÅÓ ÁÓÖÁËÅÉÁÓ ÐÑÏÓÏ×Ç : Áõôü ôï PDM ðåñéÝ÷åé ÈÁÍÁÔÇÖÏÑÁ ÔÁÓÇ. ¼ëåò ïé åðéóêåõÝò êáé ïé óõíôçñÞóåéò ðñÝðåé íá ãßíïíôáé ÌÏÍÏ ÁÐÏ ÅÎÏÕÓÉÏÄÏÔÇÌÅÍÏ ÃÉÁ ÔÇ ÓÕÍÔÇÑÇÓÇ ÐÑÏÓÙÐÉÊÏ. Ôï PDM ÄÅÍ ÐÅÑÉÅ×ÅÉ ÊÁÍÅÍÁ ÅÎÁÑÔÇÌÁ ÐÏÕ ÍÁ ÌÐÏÑÅÉ ÍÁ ÅÐÉÓÊÅÕÁÓÔÅÉ ÁÐÏ ÔÏ ×ÑÇÓÔÇ. : Ãéá íá ìåéþóåôå ôïí êßíäõíï ðõñêáãéÜò Þ çëåêôñïðëçîßáò, åãêáôáóôÞóôå ôï óõãêåêñéìÝíï PDM óå åóùôåñéêü ÷þñï ìå åëåã÷üìåíç èåñìïêñáóßá êáé õãñáóßá, ï ïðïßïò íá ìçí ðåñéÝ÷åé áãþãéìá õëéêÜ. Ç èåñìïêñáóßá ðåñéâÜëëïíôïò äåí ðñÝðåé íá îåðåñíÜåé ôïõò 40 C. Ìç ÷ñçóéìïðïéåßôå ôï PDM êïíôÜ óå íåñü Þ õðåñâïëéêÞ õãñáóßá (ìÝãéóôç ôéìÞ: 95%). Powerware® 9125 (2500–3000 VA) PowerPass® Distribution Module User’s Guide : 164201392 Rev B www.powerware.com 7 Introduction Avvisi di sicurezza IMPORTANTI ISTRUZIONI DI SICUREZZA CONSERVARE QUESTE ISTRUZIONI QUESTO MANUALE CONTIENE IMPORTANTI ISTRUZIONI DI SICUREZZA ATTENZIONE : la TENSIONE contenuta in questo gruppo statico di continuità è LETALE. Tutte le operazioni di riparazione e di manutenzione devono essere effettuate ESCLUSIVAMENTE DA PERSONALE TECNICO AUTORIZZATO. All’interno del gruppo statico di continuità NON vi sono PARTI RIPARABILI DALL’UTENTE. : Per ridurre il rischio di incendio o di scossa elettrica, installare il gruppo statico di continuità in un ambiente interno a temperatura ed umidità controllata, privo di agenti contaminanti conduttivi. La temperatura ambiente non deve superare i 40C. Non utilizzare l’unità in prossimità di acqua o in presenza di umidità eccessiva (95% max). : Nei sistemi PDM provvisti di uscite cablate, i dispositivi di protezione da sovracorrente per il/i circuito/i a corrente alternata in uscita devono essere forniti da terzi. : Nei sistemi PDM provvisti di uscite cablate, i sezionatori di corrente nominale adeguata per il/i circuito/i a corrente alternata in uscita devono essere forniti da terzi. Viktig Sikkerhetsinformasion FORSIKTIG : Denne PDM’en inneholder LIVSFARLIGE SPENNINGER. All reparasjon og service må kun utføres av AUTORISERT SERVICEPERSONALE. BRUKERE KAN IKKE UTFØRE SERVICE PÅ NOEN AV DELENE i PDM’en. : For å redusere fare for brann eller elektriske støt, bør denne PDM’en installeres i et innendørs miljø med kontrollert temperatur og luftfuktighet som er fritt for ledende, forurensende stoffer. Romtemperaturen må ikke overskride 40C. Den må ikke brukes i nærheten av vann eller ved meget høy luftfuktighet (95% maks.). : For PDM systemer med fastkoplete uttak, må overstrømvern for vekselstrømuttak(ene) stilles til rådighet av andre. : For PDM systemer med fastkoplete uttak, må passende utkoplingsbrytere for vekselstrømuttak(ene) stilles til rådighet av andre. 8 Powerware® 9125 (2500–3000 VA) PowerPass® Distribution Module User’s Guide : 164201392 Rev B www.powerware.com Introduction Regulamentos de Segurança INSTRUÇÕES DE SEGURANÇA IMPORTANTES GUARDE ESTAS INSTRUÇÕES ESTE MANUAL CONTÉM INSTRUÇÕES DE SEGURANÇA IMPORTANTES PERIGO : A PDM contém VOLTAGEM MORTAL. Todos os reparos e assistência técnica devem ser executados SOMENTE POR PESSOAL DA ASSISTÊNCIA TÉCNICA AUTORIZADO. Não há nenhuma PEÇA QUE POSSA SER REPARADA PELO USUÁRIO dentro da PDM. : Para reduzir o risco de incêndios ou choques elétricos, instale a PDM em ambiente interno com temperatura e umidade controladas e livres de contaminadores condutíveis. A temperatura ambiente não deve exceder 40C. Não opere próximo a água ou em umidade excessiva (máx: 95%). : Para sistemas PDM com saídas conectadas, a proteção de sobrecarga para circuitos de saída de corrente alternada deve ser fornecida por outros. : Para sistemas PDM com saídas conectadas, interruptores de desconexão devidamente qualificados para circuitos de saída de corrente alternada devem ser fornecidos por outros. Powerware® 9125 (2500–3000 VA) PowerPass® Distribution Module User’s Guide : 164201392 Rev B www.powerware.com 9 Introduction Предупреждения по мерам безопасности ВАЖНЫЕ УКАЗАНИЯ ПО МЕРАМ БЕЗОПАСНОСТИ СОХРАНИТЕ ЭТИ УКАЗАНИЯ ДАННОЕ РУКОВОДСТВО СОДЕРЖИТ ВАЖНЫЕ УКАЗАНИЯ ПО МЕРАМ БЕЗОПАСНОСТИ ОСТОРОЖНО : В данном ИБП имеются СМЕРТЕЛЬНО ОПАСНЫЕ НАПРЯЖЕНИЯ. Все работы по ремонту и обслуживанию должны выполняться ТОЛЬКО УПОЛНОМОЧЕННЫМ ОБСЛУЖИВАЮЩИМ ПЕРСОНАЛОМ. Внутри ИБП нет узлов, ОБСЛУЖИВАЕМЫХ ПОЛЬЗОВАТЕЛЕМ. : Для снижения опасности пожара или поражения электрическим током устанавливайте ИБП в закрытом помещении с контролируемыми температурой и влажностью, в котором отсутствуют проводящие загрязняющие вещества. Температура окружающего воздуха не должна превышать 40С. Не эксплуатируйте устройство около воды или в местах с повышенной влажностью (макс. 95%). 10 Powerware® 9125 (2500–3000 VA) PowerPass® Distribution Module User’s Guide : 164201392 Rev B www.powerware.com Introduction Advertencias de Seguridad INSTRUCCIONES DE SEGURIDAD IMPORTANTES GUARDE ESTAS INSTRUCCIONES ESTE MANUAL CONTIENE INSTRUCCIONES DE SEGURIDAD IMPORTANTES PRECAUCIÓN : Este SIE contiene VOLTAJES MORTALES. Todas las reparaciones y el servicio técnico deben ser efectuados SOLAMENTE POR PERSONAL DE SERVICIO TÉCNICO AUTORIZADO. No hay NINGUNA PARTE QUE EL USUARIO PUEDA REPARAR dentro del SIE. : Para reducir el riesgo de incendio o de choque eléctrico, instale este SIE en un lugar cubierto, con temperatura y humedad controladas, libre de contaminantes conductores. La temperatura ambiente no debe exceder los 40C. No trabaje cerca del agua o con humedad excesiva (95% máximo). : Para los sistemas PDM con salidas cableadas permanentamente, la protección contra exceso de corriente para el/los circuito(s) de CA de salida será suministrada por terceros. : Para los sistemas PDM con salidas cableadas permanentemente, los interruptores de desconexión debidamente clasificados para el/los circuito(s) de CA de salida serán suministrados por terceros. Powerware® 9125 (2500–3000 VA) PowerPass® Distribution Module User’s Guide : 164201392 Rev B www.powerware.com 11 Introduction Säkerhetsföreskrifter VIKTIGA SÄKERHETSFÖRESKRIFTER SPARA DESSA FÖRESKRIFTER DENNA BRUKSANVISNING INNEHÅLLER VIKTIGA SÄKERHETSFÖRESKRIFTER VIKTIGT : Denna PDM-enhet innehåller LIVSFARLIG SPÄNNING. ENDAST AUKTORISERAD SERVICEPERSONAL får utföra reparationer eller service. Det finns inga delar som ANVÄNDAREN KAN UTFÖRA SERVICE PÅ inuti PDM-enheten. : Minska risken för brand eller elektriska stötar genom att installera denna PDM-enhet inomhus, där temperatur och luftfuktighet är kontrollerade och där inga ledande föroreningar förekommer. Omgivande temperatur får ej överstiga 40C. Använd inte utrustningen nära vatten eller vid hög luftfuktighet (max 95 %). : Överströmsskydd för de utgående växelströmskretsarna ska tillhandahållas av andra för PDM-system med fasta utgångar. : Bortkopplingsswitchar med passande dimensionering för de utgående växelströmskretsarna ska tillhandahållas av andra för PDM-system med fasta utgångar. 12 Powerware® 9125 (2500–3000 VA) PowerPass® Distribution Module User’s Guide : 164201392 Rev B www.powerware.com CHAPTER 2 INSTALLATION This section explains: : : : : : Equipment inspection Rack-mount and tower setup Low-voltage and high-voltage installation PowerPass Distribution Module rear panels Load segments Inspecting the Equipment If any equipment has been damaged during shipment, keep the shipping cartons and packing materials for the carrier or place of purchase and file a claim for shipping damage. If you discover damage after acceptance, file a claim for concealed damage. To file a claim for shipping damage or concealed damage: 1) File with the carrier within 15 days of receipt of the equipment; 2) Send a copy of the damage claim within 15 days to your service representative. PDM Setup NOTE If you are installing the UPS for the first time, follow the instructions in the UPS user’s guide to set up the UPS and any optional Extended Battery Modules (EBMs). Do not connect your equipment to the UPS or start up the UPS before installing the PDM. If the UPS is already installed and operating, prepare your equipment for shutdown and use the following procedure to shut down the UPS: 1. Turn off the equipment that is connected to the UPS. 2. Press and hold the Off button for approximately three seconds. The UPS switches to Standby mode and removes power from the UPS output receptacles. Powerware® 9125 (2500–3000 VA) PowerPass® Distribution Module User’s Guide : 164201392 Rev B www.powerware.com 13 Installation 3. Unplug the UPS from the power outlet; the UPS shuts down in five seconds. All front panel indicators flash briefly prior to shutdown. On 208V or 230V UPS models, disconnect the power cord from the UPS input connector. 4. Disconnect the power cord(s) between the protected equipment and the UPS. 5. If you are installing the PDM in a rack, continue to the following section “Rack-Mount Setup;” otherwise, continue to “Tower Setup” on page 15. Rack-Mount Setup The PDM can be installed in 19-inch racks and needs only 2U of valuable rack space. CAUTION The PDM1 models are heavy (see page 33). A minimum of two people are required to lift the PDM1 model into the rack. NOTE Mounting rails are required for each UPS and PDM cabinet. If rails are not already installed in your rack, contact your local distributor to order a rail kit. Use the following procedure to install the PDM in a rack: 1. Place the PDM on a flat, stable surface with the front of the PDM facing toward you. 2. Attach the mounting handles to the bracket with the screws provided in the accessory kit (see Figure 1). 3. Align the mounting brackets with the screw holes on the side of the PDM and secure with the supplied screws (see Figure 1). Mounting Bracket Mounting Handle Figure 1. Installing the Mounting Brackets 14 Powerware® 9125 (2500–3000 VA) PowerPass® Distribution Module User’s Guide : 164201392 Rev B www.powerware.com Installation NOTE The PDM must be installed above the UPS as shown in Figure 2. 4. Slide the PDM into the rack. 5. For plug-receptacle models, continue to “Low-Voltage PDM Installation” on page 18 or “High-Voltage PDM Installation” on page 19. For hardwired models, continue to “PDM Hardwired Installation” on page 23. PDM UPS Figure 2. Rack-Mount UPS with PDM Tower Setup The PDM must be stabilized with pedestals and/or joining brackets. The tower setup varies depending on the total number of cabinets: 1. For one UPS and one PDM, the pedestals and the joining brackets must be installed. Skip to Step 2. For three or more cabinets, skip to Step 5 to install the joining brackets. 2. Place the PDM cabinet horizontally so that the left end of the unit is accessible (see Figure 3). Figure 3. Installing PDM Pedestals with Two Cabinets Powerware® 9125 (2500–3000 VA) PowerPass® Distribution Module User’s Guide : 164201392 Rev B www.powerware.com 15 Installation 3. Place the UPS cabinet upside down so that the right end of the unit is accessible (see Figure 4). Figure 4. Installing UPS Pedestals 4. Position two of the pedestals over the edge of each cabinet so that the weight of the unit is evenly distributed. Secure the pedestals with the screws provided in the accessory kit. 5. Carefully position the cabinets upright with the air vents at the top (see Figure 5 or Figure 6). Air Vents Figure 5. Pedestals with Two Cabinets 16 Powerware® 9125 (2500–3000 VA) PowerPass® Distribution Module User’s Guide : 164201392 Rev B www.powerware.com Installation NOTE Pedestals are required for one and two cabinet installations. Joining brackets are required for all tower installations. Air Vents Figure 6. Tower Setup 6. Align each joining bracket with the adjacent corner screw holes and secure with the supplied screws (see Figure 7). PDM UPS Joining Bracket Joining Bracket Figure 7. Installing the Joining Brackets (Top View with Pedestals) 7. For plug-receptacle models, continue to the following section, “Low-Voltage PDM Installation” or “High-Voltage PDM Installation” on page 19. For hardwired models, continue to “PDM Hardwired Installation” on page 23. Powerware® 9125 (2500–3000 VA) PowerPass® Distribution Module User’s Guide : 164201392 Rev B www.powerware.com 17 Installation Low-Voltage PDM Installation Use the following steps to install the PDM2-LV-US-P1 model: 1. Verify that the Bypass switch on the PDM is in the NORMAL position (see Figure 8). 2. Plug the UPS power cord into the UPS-input connector on the PDM rear panel. 3. Plug the UPS 5-30 output receptacle (attached cord) into the UPS-output connector on the PDM rear panel. UPS-Input Connector UPS-Output Connector Output Receptacle (L5-30R) PDM Power Cord Output Receptacles (Six 5-20R) Bypass Switch PDM UPS UPS Power Cord UPS Battery Connector UPS Output Receptacle (5-30) Figure 8. Typical Low-Voltage Installation 4. Plug the equipment to be protected into the PDM output receptacles. Distribute the load evenly between the rows of receptacles. DO NOT protect laser printers with the UPS because of the exceptionally high power requirements of the heating elements. 5. Plug the PDM power cord into a power outlet. All UPS front panel indicators flash briefly and the UPS conducts a self-test. When the self-test is complete, the indicator flashes, indicating the UPS is in Standby mode. 6. Start the UPS by pressing the On button. The indicator stops flashing and the bar graph indicators display the percentage of load being applied to the UPS. The UPS is now in Normal mode and supplying power to your equipment. 18 Powerware® 9125 (2500–3000 VA) PowerPass® Distribution Module User’s Guide : 164201392 Rev B www.powerware.com Installation High-Voltage PDM Installation Use the following steps to install the PDM1-HV-US-P1, PDM1-HV-US-P2, PDM1-HV-US-P3, PDM2-HV-US-P1, and PDM2-HV-EU-P2 models: 1. Verify that the Bypass switch on the PDM is in the NORMAL position (see Figure 9). 2. For PDM1 models only, select the input voltage (208V or 240V) using the Voltage Selector switch according to the utility voltage: : Utility voltage 200–208V, select 208V : Utility voltage 220–240V, select 240V NOTE The output of the PDM1 models is 120V (PDM1-HV-US-P1 output is 120/240V), while the UPS and utility input are 200–240V. 3. Verify that the UPS power cord is detached from the UPS input connector. Retain for use in Step 7. 4. Connect the short jumper cable (provided in the accessory kit) from the 16A UPS output receptacle into the UPS-output connector on the PDM. Power Cord Input Connector Bypass Switch PDM-to-UPS Cord Voltage Selector Switch Output Receptacle (L5-30R) PDM Output Receptacles (Six 5-20R) UPS-Output Connector UPS UPS Battery Connector UPS Output Receptacle (16A, IEC 320-C19) UPS Input Connector (16A, IEC-320) Figure 9. Typical High-Voltage Installation (PDM1-HV-US-P2 Shown) Powerware® 9125 (2500–3000 VA) PowerPass® Distribution Module User’s Guide : 164201392 Rev B www.powerware.com 19 Installation 5. Plug the attached PDM-to-UPS cord into the input connector on the UPS rear panel. 6. Plug the equipment to be protected into the PDM output receptacles. Distribute the load evenly between the rows of receptacles. DO NOT protect laser printers with the UPS because of the exceptionally high power requirements of the heating elements. 7. Using the UPS power cord removed in Step 3, plug the cord into the PDM input connector. 8. Plug the other end of the power cord into a power outlet. All UPS front panel indicators flash briefly and the UPS conducts a self-test. When the self-test is complete, the indicator flashes, indicating the UPS is in Standby mode. 9. Start the UPS by pressing the On button. The indicator stops flashing and the bar graph indicators display the percentage of load being applied to the UPS. The UPS is now in Normal mode and supplying power to your equipment. Plug-Receptacle PDM Rear Panels This section shows the rear panels of the plug-receptacle PDM models. UPS-Output Connector Bypass Switch UPS-Input Connector Output Receptacle (L5-30R) PDM Power Cord Output Receptacles (Six 5-20R) Two 20A Fuses Figure 10. PDM2-LV-US-P1 20 Powerware® 9125 (2500–3000 VA) PowerPass® Distribution Module User’s Guide : 164201392 Rev B www.powerware.com Installation Bypass Switch Input Connector Voltage Selector Switch Output Receptacle (L14-30R) UPS-Output Connector Output Receptacles (Six 5-20R) Circuit Breaker PDM-to-UPS Cord 3 Figure 11. PDM1-HV-US-P1 Bypass Switch Voltage Selector Switch Input Connector Output Receptacle (L5-30R) UPS-Output Connector Output Receptacles (Six 5-20R) Two 20A Fuses PDM-to-UPS Cord Figure 12. PDM1-HV-US-P2 Powerware® 9125 (2500–3000 VA) PowerPass® Distribution Module User’s Guide : 164201392 Rev B www.powerware.com 21 Installation Bypass Switch Voltage Selector Switch Input Connector UPS-Output Connector Output Receptacles (Six 5-20R) Two 20A Fuses PDM-to-UPS Cord Figure 13. PDM1-HV-US-P3 Input Connector Bypass Switch Output Receptacle (L6-30R) UPS-Output Connector PDM-to-UPS Cord Figure 14. PDM2-HV-US-P1 22 Powerware® 9125 (2500–3000 VA) PowerPass® Distribution Module User’s Guide : 164201392 Rev B www.powerware.com Installation Input Connector Bypass Switch Output Receptacles (Two 16A, IEC 320-C19) UPS-Output Connector PDM-to-UPS Cord Figure 15. PDM2-HV-EU-P2 PDM Hardwired Installation WARNING Only qualified service personnel (such as a licensed electrician) should perform the electrical installation. Risk of electrical shock. CAUTION : For PDM models with hardwired outputs, overcurrent protection for the output AC circuit(s) is to be provided by others. : For PDM models with hardwired outputs, suitably rated disconnect switches for the output AC circuit(s) are to be provided by others. The PDM requires a dedicated branch circuit that meets the following requirements: : High-voltage models: 20A circuit with short circuit and overcurrent protection; 200–240 Vac : Low-voltage models: 30A circuit with short circuit and overcurrent protection; 120 Vac : Single-phase : 50/60 Hz : Flexible metal conduit is recommended for ease of service and maintenance Powerware® 9125 (2500–3000 VA) PowerPass® Distribution Module User’s Guide : 164201392 Rev B www.powerware.com 23 Installation To hardwire the PDM1-HV-US-HW, PDM2-HV-US-HW, and PDM2-LV-US-HW models: 1. Switch off utility power at the distribution point where the PDM will be connected. Be absolutely sure there is no power. 2. Verify that the Bypass switch on the PDM is in the NORMAL position (see Figure 16 or Figure 17). 3. PDM1-HV-US-HW and PDM2-HV-US-HW: Connect the short jumper cable (provided in the accessory kit) from the 16A UPS output receptacle into the UPS-output connector on the PDM. See Figure 16. Plug the attached PDM-to-UPS cord into the input connector on the UPS rear panel. UPS-Output Connector Terminal Block Bypass Switch PDM PDM-to-UPS Cord Input and Output Wiring UPS UPS Battery Connector UPS Output Receptacle (16A, IEC 320-C19) UPS Input Connector (16A, IEC-320) Figure 16. Typical High-Voltage Hardwired Installation (PDM2-HV-US-HW Shown) 24 Powerware® 9125 (2500–3000 VA) PowerPass® Distribution Module User’s Guide : 164201392 Rev B www.powerware.com Installation 4. PDM2-LV-US-HW: Plug the UPS power cord into the UPS-input connector on the PDM rear panel. Plug the UPS 5-30 output receptacle (attached cord) into the UPS-output connector on the PDM rear panel. UPS-Input Connector Terminal Block UPS-Output Connector Bypass Switch PDM Input and Output Wiring UPS UPS Power Cord UPS Battery Connector UPS Output Receptacle (5-30) Figure 17. Typical Low-Voltage Hardwired Installation 5. Remove the angle bracket from the terminal block cover (see Figure 18). 6. Remove the wiring knockouts as needed for your wiring configuration. Knockouts are available on the ends and bottom of the terminal block cover. Angle Bracket Screws Wiring Access Knockout Terminal Block Cover Wiring Access Knockout Wiring Access Knockouts Figure 18. Wiring Access (PDM2-LV-US-HW Shown) Powerware® 9125 (2500–3000 VA) PowerPass® Distribution Module User’s Guide : 164201392 Rev B www.powerware.com 25 Installation 7. Pull the wires through the conduit, leaving approximately 2 ft (0.5m) of exposed wire. Attach a flexible metal fitting to the end of the conduit. 8. Insert the conduit through the wiring access entry and attach the conduit fitting to the panel. Strip 0.52 (1.5 cm) of insulation from the end of each incoming wire. 9. Connect the input and ground wires to the terminal block according to Figure 19 and Table 1. 10. Connect the output and ground wires to the terminal block according to Figure 19 and Table 1. 26 Powerware® 9125 (2500–3000 VA) PowerPass® Distribution Module User’s Guide : 164201392 Rev B www.powerware.com Installation 1 2 3 4 INPUT 5 6 7 OUTPUT Figure 19. Terminal Block Table 1. PDM Wiring Specifications UPS Model PDM1-HV-US-HW Wire Function Input p Output p PDM2-HV-US-HW Input p Output p PDM2-LV-US-HW Input p Output p Terminal Position L1 2 L2 3 Ground 1 L1 5 L2 4 Neutral 6 Ground 7 L1 2 L2 3 Ground 1 L1 5 L2 6 Ground 7 L1 2 Neutral 3 Ground 1 L1 5 Neutral 6 Ground 7 Terminal Wire Size Rating* Tightening Torque 22.0–13.3 0 13 3 mm2 (14–6 AWG) 16 in lb (2.0 ( Nm)) 2.0 13.3 mm2 2.0–13.3 (14–6 AWG) 16 in lb (2.0 (2 0 Nm) 22.0–13.3 0 13 3 mm2 (14–6 AWG) 16 in lb (2.0 ( Nm)) 22.0–13.3 0 13 3 mm2 (14–6 AWG) 16 in lb (2.0 ( Nm)) 22.0–13.3 0 13 3 mm2 (14–6 AWG) 16 in lb (2.0 ( Nm)) 22.0–13.3 0 13 3 mm2 (14–6 AWG) 16 in lb (2.0 ( Nm)) *Use 2.0 mm2 (14 AWG) 75EC copper wire minimum. Powerware® 9125 (2500–3000 VA) PowerPass® Distribution Module User’s Guide : 164201392 Rev B www.powerware.com 27 Installation 11. For the PDM1-HV-US-HW model, select the input voltage (208V or 240V) using the Voltage Selector switch according to the utility voltage: : Utility voltage 200–208V, select 208V : Utility voltage 220–240V, select 240V 12. Switch the main utility breaker on. All UPS front panel indicators flash briefly and the UPS conducts a self-test. When the self-test is complete, the indicator flashes, indicating the UPS is in Standby mode. 13. Start the UPS by pressing the On button. The indicator stops flashing and the bar graph indicators display the percentage of load being applied to the UPS. The UPS is now in Normal mode and supplying power to your equipment. Hardwired PDM Rear Panels This section shows the rear panels of the hardwired PDM models. Bypass Switch UPS-Output Connector Terminal Block Voltage Selector Switch Circuit Breaker PDM-to-UPS Cord Figure 20. PDM1-HV-US-HW 28 Powerware® 9125 (2500–3000 VA) PowerPass® Distribution Module User’s Guide : 164201392 Rev B www.powerware.com Installation Bypass Switch UPS-Output Connector Terminal Block PDM-to-UPS Cord Figure 21. PDM2-HV-US-HW Bypass Switch Terminal Block UPS-Output Connector UPS-Input Connector Figure 22. PDM2-LV-US-HW Powerware® 9125 (2500–3000 VA) PowerPass® Distribution Module User’s Guide : 164201392 Rev B www.powerware.com 29 Installation Load Segments The PDM plugs into Load Segment 2 on the UPS rear panel. See the UPS user’s guide for more information on load segments. NOTE When the PDM is in Bypass mode, all load segments are switched to utility power and cannot be controlled until the PDM Bypass switch is returned to the NORMAL position. 30 Powerware® 9125 (2500–3000 VA) PowerPass® Distribution Module User’s Guide : 164201392 Rev B www.powerware.com CHAPTER 3 OPERATION The PowerPass Distribution Module allows for the removal of the UPS while providing power to your protected equipment. This Maintenance Bypass feature is useful when replacing the UPS for maintenance or upgrades. Using Maintenance Bypass Use the following procedure to transfer your equipment to Maintenance Bypass (AC Line operation) and remove the UPS: 1. Turn the Bypass switch on the PDM to the BYPASS position. The PDM is now powering your equipment from utility power. 2. Press and hold the Off button for approximately three seconds. The UPS switches to Standby mode. 3. If an optional Extended Battery Module is installed, unplug the EBM cable from the battery connector on the UPS rear panel. 4. For low-voltage models, disconnect the cord from the UPS-output connector on the PDM rear panel. See Figure 8 on page 18. Disconnect the UPS power cord from the UPS-input connector on the PDM rear panel. 5. For high-voltage models, disconnect the jumper cable from the 16A output receptacle on the UPS rear panel. See Figure 9 on page 19. Disconnect the PDM-to-UPS cord from the input connector on the UPS rear panel. 6. Remove the UPS. Powerware® 9125 (2500–3000 VA) PowerPass® Distribution Module User’s Guide : 164201392 Rev B www.powerware.com 31 Operation Use the following procedure to reinstall the UPS and transfer your equipment from Maintenance Bypass (AC Line operation) to the UPS: 1. If an optional EBM is installed, reconnect the EBM cable to the battery connector on the UPS rear panel. 2. For low-voltage models, plug the UPS 5-30 output receptacle (attached cord) into the UPS-output connector on the PDM rear panel. Plug the UPS power cord into the UPS-input connector on the PDM rear panel. All UPS front panel indicators flash briefly and the UPS conducts a self-test. When the self-test is complete, the indicator flashes, indicating the UPS is in Standby mode. 3. For high-voltage models, plug the jumper cable from the UPS-output connector on the PDM into the 16A UPS output receptacle. Plug the attached PDM-to-UPS cord into the input connector on the UPS rear panel. All UPS front panel indicators flash briefly and the UPS conducts a self-test. When the self-test is complete, the indicator flashes, indicating the UPS is in Standby mode. 4. Start the UPS by pressing the On button. The indicator stops flashing. 5. Turn the Bypass switch on the PDM to the NORMAL position. The bar graph indicators display the percentage of load being applied to the UPS. The UPS is now in Normal mode and supplying power to your equipment. 32 Powerware® 9125 (2500–3000 VA) PowerPass® Distribution Module User’s Guide : 164201392 Rev B www.powerware.com CHAPTER 4 SPECIFICATIONS Table 2. Mechanical PowerPass Distribution Module Models PDM Model PDM1-HV-US-P1 PDM1-HV-US-P2 PDM1-HV-US-P3 PDM1-HV-US-HW PDM2-HV-US-P1 PDM2-HV-EU-P2 PDM2-HV-US-HW PDM2-LV-US-P1 PDM2-LV-US-HW For use with PW9125 UPS Models 2500EU and 3000EU 2500EU and 3000EU 2500EU and 3000EU 2500EU and 3000EU 2500EU and 3000EU 2500E and 3000E 2500EU and 3000EU 2500U and 3000U 2500U and 3000U Dimensions (WxDxH) 17.0” x 23.9” x 3.5” (2U) (43.2 x 60.7 x 8.9 cm) Weight PDM1 Models: 76 lb (34.5 kg) PDM2 Models: 20 lb (9 kg) Table 3. Power Connections Model Input Connection to PDM Output Receptacles PDM1-HV-US-P1 16A, IEC 320-C20 input connector Country-specific, detachable power cord (6) 5-20R, (1) L14-30R PDM1-HV-US-P2 16A, IEC 320-C20 input connector Country-specific, detachable power cord (6) 5-20R, (1) L5-30R PDM1-HV-US-P3 16A, IEC 320-C20 input connector Country-specific, detachable power cord (6) 5-20R PDM1-HV-US-HW 30A Terminal block (3 terminals) 30A Terminal block (4 terminals) PDM2-HV-US-P1 16A, IEC 320-C20 input connector Country-specific, detachable power cord (1) L6-30R PDM2-HV-EU-P2 16A, IEC 320-C20 input connector Country-specific, detachable power cord (2) 16A, IEC 320-C19 PDM2-HV-US-HW 30A Terminal block (3 terminals) 30A Terminal block (3 terminals) PDM2-LV-US-P1 6-ft, L5-30P attached power cord (6) 5-20R, (1) L5-30R PDM2-LV-US-HW 30A Terminal block (3 terminals) 30A Terminal block (3 terminals) Powerware® 9125 (2500–3000 VA) PowerPass® Distribution Module User’s Guide : 164201392 Rev B www.powerware.com 33 Specifications Table 4. Technical Overcurrent Protection Isolation Transformer PDM1 Models PDM2 Models Two 20A fuses PDM1-HV-US-P1 and PDM1-HV-US-HW: 15A circuit breaker PDM2-LV-US-P1: Two 20A fuses 3 kVA (208–240): 120/240V None Bypass Switch 30A, 600V Operating Temperature 0°C to 40°C (32°F to 104°F) Storage Temperature -22°C to 55°C (-7°F to 131°F) Relative Humidity Safety Conformance Agency Markings EMC (Class A) 34 5–95% noncondensing UL 1778; CAN/CSA C22.2, No. 107.1, 107.2; NOM-019-SCFI UL 1778 CAN/CSA C22.2, No. 107.1, 107.2 PDM2-HV-EU-P2: EN 50091-1-1, IEC 950 UL, cUL PDM2-HV-EU-P2: NEMKO only FCC Part 15, ICES-003 EN 50091-2, FCC Part 15, ICES-003 Powerware® 9125 (2500–3000 VA) PowerPass® Distribution Module User’s Guide : 164201392 Rev B www.powerware.com