1
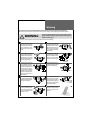
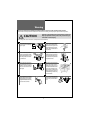
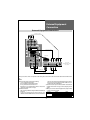
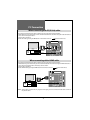
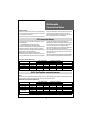
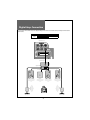
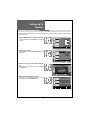
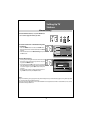
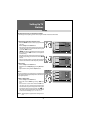
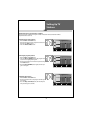
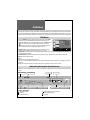
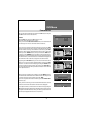
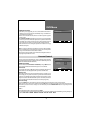
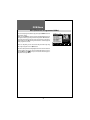
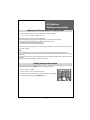
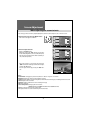
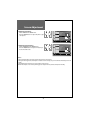
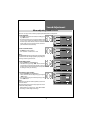
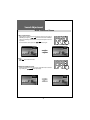
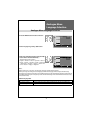
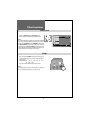
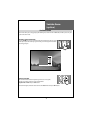
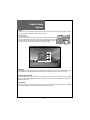
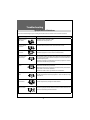
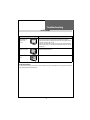
GB LCD TELEVISION INSTRUCTION MANUAL DLT-19W4T DLT-22W4T DLT-20J1T DLT-20J3T DLT-20J9T Helpline Number: 0870 100 2525 Caution CAUTION RISK OF ELECTRIC SHOCK DO NOT OPEN CAUTION : TO REDUCE THE RISK OF ELECTRIC SHOCK, DO NOT REMOVE COVER (OR BACK). NO USER-SERVICEABLE PARTS INSIDE. REFER SERVICING TO QUALIFIED SERVICE PERSONNEL. The lightning flash with arrowhead symbol, within an equilateral triangle, is intended to alert the user to the presence of uninsulated “dangerous voltage” within the product’s enclosure that may be of sufficient magnitude to constitute the risk of an electric shock. The exclamation point within an equilateral triangle is intended to alert the user to the presence of important operating and servicing instructions in the literature accompanying the appliance. WARNING: TO REDUCE THE RISK OF FIRE OR ELECTRIC SHOCK HAZARD, DO NOT EXPOSE THIS APPLIANCE TO RAIN OR MOISTURE. CAUTION : TO PREVENT ELECTRIC SHOCK, MATCH WIDE BLADE OF PLUG TO WIDE SLOT, FULLY INSERT. DISPOSAL OF USED ELECTRICAL & ELECTRONIC EQUIPMENT (Europe only) The meaning of the symbol on the product, its accessory or packaging indicates that this product shall not be treated as household waste. Please dispose of this equipment at your applicable collection point for the recycling of electrical & electronic equipment waste. In the European Union and Other European countries which there are separate collection systems for used electrical and electronic product. By ensuring the correct disposal of this product, you will help prevent potentially hazardous waste to the environment and to human health, which could be caused by unsuitable waste handling of this products. The recycling of materials will help conserve natural resources. Please do not therefore dispose of your old electrical and electronic equipment with your household waste. For more detailed information about recycling of this product, please contact your local city office, your household waste disposal service or the shop where you purchased the product. RoHS (Directive 2002/95/EC) Compliant This environment-friendly product does not contain the EU RoHS restricted substances (Pb, Hg, Cd, Cr6+, PBB, and PBDE). Important Safeguards Please read the following safeguards for your TV and retain for future reference. Always follow all warnings and instructions marked on the television. 1. Read, Retain and Follow All Instructions Read all safety and operating instructions before operating the TV. Retain them safely for future reference. Follow all operations and instructions accordingly. 2. Heed Warnings Adhere to all warnings on the appliance and in the operating instructions. 3. Cleaning Unplug the TV from the wall outlet before cleaning. Do not use liquid, abrasive, or aerosol cleaners. Cleaners can permanently damage the cabinet and screen. Use a lightly dampened cloth for cleaning. 4. Attachments and Equipment Never add any attachment and/or equipment without approval of the manufacturer as such additions may result in the risk of fire, electric shock or other personal injury. 5. Water and Moisture The apparatus most not be exposed to dripping or splashing and no objects filled with liquids, such as vases, should be placed very close to the apparatus. Because they may be splashed when watering the plant. 6. Setting Do not place this TV on an unstable cart, stand or table. Placing the TV on an unstable base can cause the TV to fall, resulting in serious personal injuries as well as damage to the TV. Use only a cart, stand, bracket or table recommended by the manufacturer or salesperson. 7. Ventilation Slots and openings in the cabinet are provided for ventilation and to ensure reliable operation of the TV and to protect it from overheating. Do not cover the ventilation openings in the cabinet and never place the set in a confined space such as a built-in cabinet unless proper ventilation is provided. Leave a minimum 10 cm gap all around the unit. 8. Power Source This TV should be operated only from the type of power source indicated on the marking label. If you are not sure of the type of power supplied to your home, consult your appliance dealer or local power company. 9. Grounding or Polarization This TV is equipped with a polarized alternating current line plug (a plug having one blade wider than the other). This plug will fit into the power outlet only one way.This is a safety feature. If you are unable to insert the plug fully into the outlet, try reversing the plug. If the plug should still fail to fit, contact your electrician to replace your obsolete outlet. Do not defeat the safety purpose of the polarized plug. This is because apparatus with CLASS I construction must be connected to a MAINS socket outlet with a protective earthing connection. 10. Power-Lead Protection Power-supply leads should be routed so that they are not likely to be walked on or pinched by items placed upon or against them, paying particular attention to leads at plugs, wall outlets, and the point where they exit from the TV. MAINS plug which is used as the disconnect device. The disconnect device shall remain readily operable. 11. Lightning For added protection for this TV during a lightning storm, or when it is left unattended and unused for long periods of time, unplug it from the wall outlet and disconnect the antenna or cable system. This will prevent damage to the TV due to lightning and power-line surges. Important Safeguards 12. Power Lines An outside antenna system should not be located in the vicinity of overhead power lines or other electric light or power circuits, or where it can fall into such power lines or circuits. When installing an outside antenna system, extreme care should be taken from touching such power lines or circuits as contact with them might be fatal. 13. Overloading Do not overload wall outlets and extension leads as this can result in a risk of fire or electric shock. 14. Object and Liquid Entry Never push objects of any kind into this TV through openings as they may touch dangerous voltage points or short-out parts that could result in fire or electric shock. Never spill liquid of any kind on or into the TV. 15. Outdoor Antenna Grounding If an outside antenna or cable system is connected to the TV, be sure the antenna or cable system is grounded so as to provide some protection against voltage surges and builtup static charges. Section 810 of the National Electric Code, ANSI /NFPA No. 70-1984, provides information with respect to proper grounding of the mast and supporting structure, grounding of the lead in wire to an antenna discharge unit, size of grounding conductors, location of antenna discharge unit, connection to grounding electrodes, and requirements for the grounding electrode. 16. Servicing EXAMPLE OF ANTENNA GROUNDING "OUFOOBMFBEJOXJSF (SPVOEDMBNQ &MFDUSJD 4FSWJDF &RVJQNFOU /&$OBUJPOBMFMFDUSJDBMDPEF "OUFOOBEJTDIBSHFVOJU /&$TFDUJPO (SPVOEJOHDPOEVDUPST /&$TFDUJPO (SPVOEDMBNQT 1PXFSTFSWJDFHSPVOEJOH &MFDUSPEFTZTUFN /&$BSU QBSUI Do not attempt to service this TV yourself as opening or removing covers may expose you to dangerous voltage or other hazards. Refer all servicing to qualified service personnel. 17. Damage Requiring Service Unplug the TV from the wall outlet and refer servicing to qualified service personnel under the following conditions: (a) When the power-supply lead or plug is damaged. (b) If liquid has been spilled, or objects have fallen into the TV. (c) If the TV has been exposed to rain or water. (d) If the TV does not operate normally by following the operating instructions. Adjust only those controls that are covered by the operating instructions as an improper adjustment of other controls may result in damage and will often require extensive work by a qualified technician to restore the TV to its normal operation. (e) If the TV has been dropped or the cabinet has been damaged. (f) When the TV exhibits a distinct change in performance - this indicates a need for service. 18. Replacement Parts When replacement parts are required, be sure the service technician has used replacement parts specified by the manufacturer or have the same characteristics as the original part. Unauthorized substitutions may result in fire, electric shock or other hazards. 19. Safety Check Upon completion of any service or repair to the TV, ask the service technician to perform safety checks to determine that the TV is in a safe operational condition. 20. Heat The product should be situated away from heat sources such as radiators, heat registers, stoves, or other products (including amplifiers) that produce heat. 21. Disconnection Please place the TV set in such a way that the main plug can be easily disconnected. Warning This section must be read carefully and followed by the user prior to the operation of the product. The manual states important instructions for the user’s own safety, and the proper operation of the product. WARNING Ignoring or disregarding the contents of this section and improper operation of the product may result in the person’s death or serious injury. In case of an accident, please unplug the unit from the outlet immediately. To reduce the risk of electric shock, do not remove cover or back. No user serviceable parts inside. Refer to qualified service personnel for repair. Do not put any object that contains water - for example a vase,flowerpot,etc.-nearto the unit.The water may penetrate into the unit, and be a cause of fire or hazardous electric shock. To prevent fireanddamages to the product, unplug the unit from the outlet during a lightning storm, or when it is left unattended and unused for a long period of time Do not put on or use the product near water and moisturesuch as in a bathroom, washbowl, etc. It may cause fire and electric shock hazards Slots and openings in the case are provided for ventilation to ensure reliable operation of the product. Never put in any items-such as coins, paper, matches- through these openings as they may touch dangerous voltage points that could result in fire or shock hazard. Do not let children hang on to or climb on the product since it may cause serious injury. Hold the plug when unplugging the unit from the outlet. The lead may cause fireorelectric shock if damaged. Do not cause the product to lean or put it in an unstable position because if it falls it may cause serious injury to a person, as well as damage to the product if it falls. Do not put volatile substances such as benzene, naphtha- near the product since it may cause a change in the product’s colour. Do not spill water on to or drop the remote control since it may cause a malfunction. Warning This section must be read carefully and followed by the user prior to the operation of the product. The manual states important instructions for the user’s own safety, and the proper operation of the product. CAUTION Ignoring or disregarding the contents of this section and improper operation of the product may result in the person’s death or serious injury. Please keep the user’s manual in a safe place for future reference. Do not view the TV too closely since it may cause damage to your eyes. Refer servicing to qualified service personnel for cleaning at least once a year since dust inside the TV set may result in a fireormalfunctionof the product. Do not cover the top of the television set.Ventilation will be prevented,and it may cause a fire if the product is internally overheated. The product should be situated away from any heat sourcesuch as radiators, heat registers,stoves,or other products that produce heat. Do not put heavy items on the power lead since it may result in a fire or hazardous electric shock if the lead is damaged. Please be aware of electric wires and cables when installing the antenna. It may be a cause of hazardous electric shock and fire if the antenna touches or falls on the electric wire; thus, it must be installed firmly,and far away from the cables. Do not touch the power lead with moisturised or wet hands when plugging to or unpluggingfromtheoutletsinceitmay cause an electric shock. Do not expose the product to a dusty or moisturised place since it may cause malfunction. Table of Contents Installation and Maintenance Supplied Accessories . . . . . . . . Install Stand . . . . . . . . . . . . . Parts of the Remote Control . . . Name of Each Part . . . . . . . . . Preparation . . . . . . . . . . . . . . Antenna Connection . . . . . . . . External Equipment Connection. PC Connection . . . . . . . . . . . . Multimedia Connection Notes . . Digital Amp. Connection . . . . . . . . . . . . . . . . . . . . . . . . . . . . . . . . . . . . . . . . . . . . . . . . . . . . . . . . . . . . . . . . . . . . . . . . . . . . . . . . . . . . . . . . . . . . . . . . . . . . . . . . . . . . . . . . . . . . . . . . . . . . . . . . . . . . . . . . . . . . . . . . . . . . . . . . . . . . . . . . . . . . . . . . . . . . . . . . . . . . . . . . . . . . . . . . . . . . . . . . . . . . . .8 .9 10 12 14 15 17 18 19 20 . . . . . . . . . . . . . . . . . . . . . . . . . . . . . . . . . . . . . . . . . . . . . . . . . . . . . . . . . . . . . . . . . . . . . . . . . . . . . . . . . . . . . . . . . . . . . . . . . . . . 21 22 24 28 35 Screen Adjustment . . . . . . . . . . . . Sound Adjustment . . . . . . . . . . . . Analogue Menu Language Selection Other Functions . . . . . . . . . . . . . . Sudoku Game (option) . . . . . . . . . . Teletext . . . . . . . . . . . . . . . . . . . Troubleshooting . . . . . . . . . . . . . . Specifications . . . . . . . . . . . . . . . . . . . . . . . . . . . . . . . . . . . . . . . . . . . . . . . . . . . . . . . . . . . . . . . . . . . . . . . . . . . . . . . . . . . . . . . . . . . . . . . . . . . . . . . . . . . . . . . . . . . . . . . . . . . . . . . . . . . . . . . . . . . . . . . . . . . . . . . 36 39 41 42 43 45 46 48 Basic Guide Method To Use Basic Menu To Watch TV . . . . . . . . . . Setting Up TV Stations . . . DVB Menu . . . . . . . . . . . AV Selection . . . . . . . . . . . . . . . . . . . . . . . . . . . . . Application Guide Supplied Accessories Make sure that the following accessories are provided with the product. Remote control Instruction manual Batteries 2 x 1,5V AAA Cover Stand Base * Frame Stand * *) - Screws, Cover Stand Base and Frame Stand are only for DLT-19W4T and DLT-22W4T. For installing stand, see page 9. Install Stand ※ This page is only for DLT-19W4T and DLT-22W4T. 1. Insert Frame Stand into the Cover Stand Base and insert two screws (Ø3 x 12mm ) in the hole at the bottom of the stand and tighten. * Please insert two screws in the hole at the bottom of the stand. 2. Place the TV faced down on a soft cloth or cushion on a table and insert the assemble stand into the metal at the bottom of the TV. 3. Insert two screws (Ø4 x 14 mm) into the holes indicated and tighten. Parts of the Remote Control 1. MUTE : Press this button, and the sound goes off. Press again, and the sound returns. 2. POWER : TV on/off button in STANDBY mode. 3. DVB/Analogue : Each time you press this button, the TV will toggle between DVB & RF Analogue. Also you can come back to the current TV mode from any External mode. 4. AV : Each time you press this button, the TV will cycle through: TV AV1 AV2 Component HDMI PC TV 5. SLEEP : Sleep Timer setting. SLEEP TIMER : OFF 15 30 45 60 75 90 105 120 OFF 6. NUMBER : Using the numbers buttons on this board, you can select programmes directly. 7. S.EFFECT : Using this button, you can listen to the virtual surround sound. The sound will cycle through: Off SPATIAL 3D Panorama Off 8. MTS : You can select sound modes in Mono, Stereo, Dual1, Dual2, NICAM STEREO. This works only in TV mode. 9. VOL : Adjusts the volume. 10. PR/PAGE : Changes the programme on your TV. 11. / : Moves the cursor up/down in the menu. 12. / : Accesses and adjusts items in the menu. 13. OK/SELECT : Auto Tuning Start and Manual Tuning Store. 14. GUIDE (digital mode only): Moves to EGP in DVB mode directly. See page 34. 15. SUBTITLE (digital mode only): Selects the Subtitle On/Off in the DVB MENU directly, or shows the subtitle if it has on in the DVB MENU. See page 31. Parts of the Remote Control 16. LANGUAGE (digital mode only): Moves to multi audio language selection. See page 31. 17. FAVOURITE (digital mode only): Moves to Favourites channel. See page 29. 18. PREV PR : Previous PROGRAMME button in TV mode. 19. MENU : Menu display button. 20. ASPECT : Selects the screen aspect ratio. See page 37. 21. NORMAL : The NORMAL button changes picture mode as follows: Normal Movie Favourite Dynamic Normal 22. RECALL : You can recall the present modes (TV, Video, Component, HDMI, PC) and Signal information. In TV mode, the Programme number and Sound. 23. CANCEL/EXIT (digital mode only): Using this button to move to upper menu or exit the menu. 24. Colour Keys (RED, GREEN, YELLOW, BLUE) : Use on analogue text or DVB-T mode. 25.TEXT (TEXT, REVEAL, T.CANCEL, SIZE, SUBCODE, HOLD, MIX, INDEX): see page 45. 26. GAME (option) : You can play the Sudoku game. Name of Each Part Front LED Indicator DLT-19W4T; DLT-22W4T LED Indicator DLT-20J1T; DLT-20J9T Remote Sensor Remote Sensor AV PR Up/Down Volume Up/Down Volume Up/Down AV PR Up/Down Menu Power On/Off Power On/Off Remote Sensor LED Indicator DLT-20J3T Name of Each Part Rear DLT-20J1T / DLT-20J3T / DLT-20J9T DLT-19W4T / DLT-22W4T (1) Component (2) SCART sockets (3) HDMI inputs (4) Headphone jack (5) Audio Input (L+R) Socket (6) Video Input Socket (7) Digital Audio out coaxial (8) PC Input (9) PC Audio (10) CI socket (11) Aerial jack Preparation Inserting Batteries into the Remote Control Unit To load the batteries, turn the remote control handset over and open the battery compartment. Insert the batteries (Two 1.5V, type R03 or AAA). Make sure that the polarity matches with the (+) and (-) marks inside of the battery compartment. Note: To avoid damage from possible battery leakage, remove the batteries if you do not plan to use the remote control handset for an extended period of time. Mains Connection 1. Plug the end of AC cord into a Power outlet with 220V-240V~,50Hz. Power outlet AC Cord batteries Antenna Connection Aerial Connection CONNECTING THE TV DIRECTLY TO AN AERIAL Connect an aerial cable (75 ohm coaxial cable) to the Aerial terminal on the back of the TV set. DLT-20J1T / DLT-20J3T / DLT-20J9T Aerial Aerial terminal DLT-19W4T / DLT-22W4T Aerial cable Antenna Connection Aerial connection with VCR/DVD Connect your ① aerial cable to the RF (aerial) IN terminal on the VCR/DVD. Connect the RF OUT terminal of the VCR/DVD to the Aerial terminal on the TV set with an ② RF cable. Note: If you wish to use only the Aerial (RF) connection, then you should store the VCR/DVD channel on programme number “ZERO” using the “Manual tuning” function (See page 25). If your VCR/DVD has this facility. Now you can watch the VCR/DVD in TV mode by selecting the programme number “PR00”. Otherwise you will have to use a scart connection from your VCR/DVD to this TV into AV1 or AV2 and select the appropriate AV input on your TV to see VCR/DVD playback. DLT-19W4T / DLT-22W4T DLT-20J1T / DLT-20J3T / DLT-20J9T Aerial terminal RF OUT RF IN VCR/DVD External Equipment Connection External Equipment Connection $PNQPOFOUDBCMF $PNQPOFOUDBCMF 4DBSUDBCMF 4FU5PQ#PY 7$3%7%$BNDPSEFS 7JEFP(BNF )%.*DBCMF "7DBCMF When you connect with a component video cable, please check the colour of the cable between the DVD and TV set. Note: However this will only produce Video output. There1. The meaning of the component marking. fore you must ensure separate Audio cables are con- ‘Y’ is a symbol for ‘Luminance’ nected to the PC AUDIO input. - Pb is a symbol for ‘Picture Blue’ or B-Y 3. Be sure that even if you connect CANAL+ decoder, the - Pr is a symbol for ‘Picture Red’ or R-Y CANAL information message will not display on the * Luminance ‘Y’ is made from Red + Blue + Green and screen. this leaves green for the ‘Y’ input. 4. When you connect external equipment, output will be 2. HDMI connection. as show in the below table. - The meaning of ‘HDMI’ is High Definition Multimedia Interface $POOFDUPS .PEF 0VUQVU "7 57 3' "7 570VU - If your A/V equipment has only DVI output, you "7 .POJUPS0VU 4$"35 should use DVI-to-HDMI cable to connect with this TV. $PNQPOFOU )%.* 1$ /PUIJOH PC Connection When connecting with PC(D-Sub) cable. 1. First adjust resolution of the PC (refer to table in page 19). Using the PC’s original monitor. 2. Then disconnect your monitor from your PC and connect between PC and TV set using the D-sub and Audio cable as shown in the picture below. 3. Turn on the PC and TV set. 4. Select PC mode by pressing the “AV” button on the remote control or ” ” button of the TV set. 1$ #BDLPGUIFUWTFU When connecting with a HDMI cable. 1. First adjust resolution of the PC (refer to table in page 19). Using the PC’s original monitor. 2. Then disconnect your monitor from your PC and connect between PC and TV set using the HDMI and Audio cable as shown in the picture below, if necessary. See note below. 3. Turn on the PC and TV set. ” button of the TV set. 4. Select HDMI mode by pressing the “AV” button on the remote control or ” 1$ #BDLPGUIFUWTFU Note : If the graphic card of the PC only supports a DVI signal, you must connect the Audio cable as shown in the picture above. Multimedia Connection Notes Common notes - If you turn on the TV when the TV is cold, small„flickering” phenomenon can happen. But this is normal and is no malfunction of LCD TV. - Please do not touch or press the LCD screen with your finger or an object like a pen for a long time.It may cause some temporary distortion effects on the screen. - Red, Green or Blue spots may appear on the screen. But monitor performance is not effected. PC Connection Notes - If possible please use the best resolution as show in the table below. * DLT-19W4T, 22W4T : 1440 x 900 at 60Hz * DLT-20J1T,20J3T,20J9T : 640 x 480 at 60Hz - If there is a “Vertical Frequency” setting menu in the [Display] Menu of the PC, adjust the frequency to 60Hz. - If the PC resolution is too high, it may be hard to detect signals. Select a suitable resolution. - HDMI input port receives only digital Signal. - Depending on the graphic card when you plug & unplug the HDMI connection the screen may not display correctly. Restart the computer if this happens. - Depending on graphic card, problems like no signal detected or line noises can occur. If these problems do occur contact the graphic card company for help. - Due to window version, some message may appears on the screen. Then follow the message shown. - If the message “No signal” appears on the screen, please adjust the PC output by referring to the “PC resolution table” below. - When you connect with component, PC(D-Sub), and HDMI, you must check the input resolution of external devices. PC input resolution table in LCD Resolution V-freq 640 x 480 800 x 600 1024x768 1280x768 1440 x 900 60Hz 60Hz 60Hz 60Hz 60Hz DLT-19W4T, 22W4T PC(D-Sub) HDMI o o o o o o o x o x DLT-20J1T, 20J3T, 20J9T PC(D-Sub) HDMI o o x x x x x x x x Remark DVD / Set Top Box connection notes Note : • Please note that 720x480i and 720x576i resolution are not avaible by HDMI input in this LCD TV. These signal will cause problems like no picture, distorted picture or “No signal” message on the screen. Multimedia input resolution table in LCD Resolution V-freq 720 x 480i 720 x 480p 720 x 576i 720 x 576p 60Hz 60Hz 60Hz 60Hz 50Hz 60Hz 50Hz 60Hz 1280 x 720p 1920 x 1080i DLT-19W4T, 22W4T Component HDMI o x o o o x o o o o o o o o o o DLT-20J1T, 20J3T, 20J9T Component HDMI o x o o o x o o o o o o o o o o Remark Digital Amp. Connection If you connect the coaxial output to a digital AMP, you can listen to surround sound, and output will be to the below table. $POOFDUPS $PBYJBM PVUQVU .PEF 57 3' "7 "7 $PNQPOFOU )%.* 1$ 0VUQVU 570VU .POJUPS0VU #BDLPGUIFUWTFU $PBYJBMPVUQVU %JHJUBM".1 - 8PPGFS $FOUSF 4VSSPVOE- 3 4VSSPVOE3 Method To Use Basic Menu Basic Menu - The basic menu appears on the screen if you press the “MENU” button of the remote control. - There are 6 items Picture, Screen, Sound, Install, Function and DVB in the basic menu. - Each item has sub-items under it. If the desired item is selected, the relevant sub-items are displayed upward. 1. Press the “MENU” button. • The main menu appears if you press the “MENU” button. Picture Screen Picture Mode 41 Contrast 51 Sound Colour Install Sharpness 31 Tint Function DVB Dynamic Brightness 31 R N.R. Off Colour Temp Select G 0 Normal Access Exit 2. Press the “/“ button. • You may setup according to the directions on the screen after selecting the desired item by pressing the “/“ button. • If the setup is completed, exit from the menu by pressing the “MENU” button. Picture Screen Picture Mode 41 Contrast 51 Sound Colour Install Sharpness 31 Tint Function DVB Select Dynamic Brightness 31 R N.R. G 0 Off Colour Temp Access Normal Exit P i c t u r e : Adjusts Picture Mode, Brightness, Contrast, Colour, Sharpness, Tint (NTSC only), N.R. (Picture Noise Reduction) and Colour Temperature. S c r e e n : Adjusts Aspect and PC (activated on PC mode only). Sound : Adjusts AVC (Automatic Volume Control), Effect, Balance and Equalizer. I n s t a l l : Adjusts Auto Tuning, Manual Tuning, Setup and Edit. F u n c t i o n : Adjusts Language and Child Lock. D V B : Adjusts DVB Menu and Software Update (activated on DVB-T only). To Watch TV - If the AV1 terminal on the TV set is connected with an external device, which is switched on, the TV will come ON in AV1 mode. Otherwise, TV will come ON in the last mode used. 1. Turning on the TV. a) If the stand-by indicator is red, then the TV set is in stand-by mode. You can switch on using the remote control“POWER”button (press and hold 0,5 second), the NUMBER 0…9 buttons, or PR UP/DOWN buttons. The local PR UP/ DOWN buttons on the TV can also be used. Once on, the stand-by indicator turns to green and the picture appears on the screen. b) If the stand-by indicator is not lit, then the TV set is powered off. You must switch ON the TV set local MAIN POWER switch on the set. If a picture does not appear, then the stand-by indicator will be red. In this case, use the remote control as indicated in a). c) If the stand-by indicator is flashing red, and green then the TV set is in child lock mode. It is necessary to use the remote control POWER button, NUMBER 0…9 buttons, or PR UP/ DOWN buttons. The local PR UP/DOWN buttons on the TV will not function. Once on, the stand-by indicator turns to green and the picture appears on the screen. PR 19 ––––– Mono Full Screen 2. Adjust program. • Select the desired program by pressing the “PR” button or the number button. 3. Adjust volume. • Sound reduces by pressing the “VOL” button. • Sound increases by pressing the “VOL” button. Note : Sound mutes by pressing the “MUTE” ( ) button. 16 4. Turning off the TV. • Pressing the remote control “POWER” button and hold 0,5 second, will switch off the TVto stand-by mode (low power consumption mode) which also allows quick restart by remote control (see above: Turning on the TV). • Pressing the TV set local MAIN POWER button, you can power off the TV set. In this case, you To Watch TV must use the same local “POWER” button to switch on again (see above: Turning on the TV). PR 19 ––––– Mono Full Screen 5. Checking TV operation status. ) button, the status of • Pressing the “RECALL” ( channel or broadcasting currently being watched or entry status of video component is displayed on the screen. Remark: • If a broadcast signal is not present after 10 minutes, the TV set will automatically turn to stand-by mode. ) on this model does not fully • The On/Off switch ( disconnect the TV from the mains supply. Remove the mains plug from the wall socket when the TV set is not used for a prolonged period of time. • When you turn on the MAIN POWER SW the set will be in stand-by or TV on condition. It depends on the last position memory of the power. That means, if you turn off the MAIN POWER SW in stand-by condition, the set will come on in stand-by mode ( ). If you turn off the MAIN POWER SW in TV on condition, set will come on in TV mode ( ). • When you turn off the set, the screen will be dark (monitor out) and stand-by indicator will be red. However to check for OAD (Over-Air-Downloads), the set will automatically operate internally for 10 minutes. Setting Up TV Stations Auto Tuning - All stations that can be received are stored by this method. It is recommended that you use Auto tuning during installation of this set. 1. Press the “MENU” button to select the Install menu. • Move the selection bar to the Install menu with “/” buttons. Picture Picture Mode Dynamic Screen Brightness 41 Contrast 51 Sound Colour Install Sharpness 31 31 Tint Function R N.R. DVB Off Colour Temp Select 2. Select the “Auto Tuning”. • Place the selection bar on Auto Tuning and press the “” button. G0 Normal Access Exit Picture Auto Tuning Access Screen Sound Manual Tuning Access Setup Access Edit Access Install Function DVB Select 3. Select the country you require with the “/” button. • After selecting the country, to start Auto Tuning press the “OK” button. Access Auto Tuning Country Set GB Pr00 Euro Start 4. Please wait until the Edit menu appears. • If you don’t want to edit the programs now, escape from the menu with the “MENU” button. Country Set Exit Picture Edit Screen Sound Install Function DVB Select Delete Exit Prog. Name Channel Skip 00 ––––– C 04 No 01 ––––– C 33 No 02 ––––– C 25 No 03 ––––– C 02 No 04 ––––– C 12 05 ––––– C 21 Move No No Exit Skip Setting Up TV Stations Manual tuning 1. Press the Number buttons (0…9) or the “PR” button to select a program number you want. 2. Locate the selection bar on the Manual tuning at the Install menu. • Press the “MENU” button to select the Install menu. • Move the selection bar to the Install menu with “/” buttons. • Place the selection bar on Manual Tuning and press the “” button. Picture Auto Tuning Access Screen Sound Manual Tuning Access Setup Access Edit Access Install Function DVB Select 3. Execute Manual Tuning. • A tuning screen will appear and cursor will move from left to right / from right to left. If you want to stop tuning press the “MENU” button. • You should press the “OK” button to store a program then the PR number is changed to red. If you don’t want to store the program, press “/“ button to skip the program. • To store another program, select other PR number using “/” buttons and press “/“ buttons. Access Exit Manual Tuning Pr08 Access Euro Exit Note : • If you are unable to get any programs using Auto Tuning due to a poor broadcasting signal, it may still be possible to store channels using the Manual tuning. • If present channel is SECAM L/L’, TV set search SECAM L/L’. And, if present channel is not SECAM L/L’, TV set search all channels except SECAM L/L’. Setting Up TV Stations Setup The Setup menu shows you information as follows: - Channel, System, Frequency, Station name, Program number and Store to PR number. 1. Searching for channels in the Setup menu. • Press the “PR“ buttons to select a program number you want. • Move to Setup in the Install menu. • Search using real channel information (Channel eg.eg. channel 38, System eg. PAL/SECAM and Program eg. 2) with “/“ buttons. • Search: Press and hold for more than 1second the remote control “/” buttons to start up/down manual tuning. • Searching will stop automatically at the next channel found (to stop tuning, press the remote control MENU button). • Also you can directly locate a program by entering the data into the “Channel” or the “Frequency” function. Picture Screen Sound Setup Access Edit Access DVB Select Access Exit Picture Channel C 04 System Euro Screen Frequency 063.75 Sound Name ––––– Install Program 01 Store To 01 Function DVB Select Search Picture Screen 0…9 Change Channel Fine Tune Exit C 04 System Euro Frequency 063.75 Sound Name Install Program 01 Store To 01 B – – – – Function Access Function Note : • If you are unable to get a good picture or sound because of a poor broadcasting signal, adjustment of the fine tuning might improve it. Note : Only English is supported for naming the station. Access Manual Tuning Install 2. Fine tuning. • Move to Setup in the Install menu. • Move the cursor to Frequency by pressing “/” buttons. • Adjust the fine tuning with the“/” buttons. 3. Enter a station name. • Move to Setup in the Install menu. • Move the cursor to Name by pressing “ / ” buttons. • You can enter a station name with the “/” buttons. Also you can by pressing the appropriate key until the character you want appears on the screen. ) on For example, when you press number 1 key ( the remote control repeatedly, the character shown on the screen will change as ‚1 A B C 1. Auto Tuning DVB Select Position 0…9 Change Exit Setting Up TV Stations Edit The Edit menu shows you information as follows: - Program position assignment: Program number and Station name, Real channel number. - Skip information: Yes or No. 1. Deleting the program positions. • Move to Edit in the Install menu. • Move the selection bar to the program number to delete with the “/” buttons. • Press the “Delete” (RED) button. Picture Edit Screen Sound Install Function DVB Prog. Name Channel Skip 00 ––––– C 04 No 01 ––––– C 33 No 02 ––––– C 25 No 03 ––––– C 02 No 04 ––––– C 12 No 05 ––––– C 21 Select Delete No Exit Skip Move 2. Moving the program positions. • Move to Edit in the Install menu. • Press the “Move” (GREEN) button. The program and station name is highlighted in green. • Move the green block to the desired position using the “/” buttons. • Press the “Move” (GREEN) button again, then the program is changed. Picture Edit Screen Sound Install Function DVB Prog. Name Channel Skip 00 ––––– C 04 No 01 ––––– C 33 No 02 ––––– C 25 No 03 ––––– C 02 No 04 ––––– C 12 No 05 ––––– C 21 Select Delete No Exit Skip Move Picture Edit 3. Skipping the Programs. • Move to Edit in the Install menu. • Move the selection bar to the program number you want to skip • Press the “Skip” (YELLOW) button, then the skip area will cycle through : Yes and No. Screen Sound Install Function DVB Select Delete Prog. Name Channel Skip 00 ––––– C 04 No 01 ––––– C 33 No 02 ––––– C 25 No 03 ––––– C 02 No 04 ––––– C 12 No 05 ––––– C 21 Move No Exit Skip DVB Menu The very first time that you switch to DVB mode, the Country selection menu will appear on the screen. Its purpose is to enable you to select the country that will be used for all the OSD (On Screen Display) menus. The user must enter a choice of country before proceeding further. For Spain, also select the region where you locate(“Peninsula”or“Canarian Islands”). If you want to change country later, select “Factory settings” item in “System Parameters” menu (see page 32). DVB Menu - Press the “MENU” button to display the main menu. Then, select DVB menu. You may see the DVB during any DVB menu directory, press MENU OSD. Whenever you need more information press “INFO” button ( ), then you will see more detailed information on the screen. And in some menus, you can use the cyan, yellow, red and green buttons. Those buttons function depend on which menu it is. Picture Screen Sound Favourite Lists Access Configuration Access Parental Control Access EPG Access Install Function DVB Select Access Exit - Favourite List : Lock some channels that are not suited for younger members of the family, skip/add the channel list as you wish. - Configuration : Add new channel, set audio language, subtitle language, as you wish. Upgrade the software. View the signal information. - Parental Control : Enable or Disable the menu protection system and allows the PIN code to be changed. - EPG : Electronic Program Guide. Note : • This menu is activated only in digital mode. • Once you access the DVB menu, the OSD shown screen is different to the Analogue’s one and OSD may seems to be grainy. • When you switch from Analogue to Digital, “No signal” may display on the screen for a while. About the information on the banner - When you select a digital program, an information banner is displayed for a few seconds at the bottom of the screen. 1 $MPDL $IBOOFMOBNF $IBOOFMOVNCFS BBC ONE Now: Next: 57 PS3BEJP 4ZNCPMT 08:50 Fav 1 Breakfast Beat the Burglar /PXOFYUQSPHSBNUJUMF 06:00 - 09:45 09:15 - 10:00 'BWPVSJUFMJTUOVNCFS Symbols description detail information 1SPHSBNUJNF locked channel set in favourite list multi audio language subtitle teletext scramble channel 4JHOBMMFWFMRVBMJUZ DVB Menu Favourite List You can select the desired item by using the “/” buttons and press the “OK” button to enter selected one. Favourite lists CREATE Select Create item and press “OK” button to enter. The menu will be displayed on the screen. Once you enter the Create a Favourite list menu,a new channel list will be created, you can create a maximum of 4 favourites list. Create Access Modify Access Delete Select You can lock or unlock the selected channel by pressing the “RED” button. A locked channel means that the selected channel cannot be viewed without entering in the child lock code. Pressing the “BLUE” button to skip or add the selected channel. If you want to skip or add all, first press the“GREEN” button, then press either the “RED” button to skip all, or the “GREEN” button to add all. A channel selected as a locked appears in the channel list with a lock icon (red button) against the channel name, a channel selected as an added channel appears in the channel list with a add icon (tick) against the channel name. By pressing the “YELLOW” button you can sort the channels in the list. Then you can sort the channels alphabetically by pressing the “RED” button or sort the channels manually by pressing the “BLUE” button If you have locked several channels, by pressing the “YELLOW” button, the locked channels will be placed at the bottom of the Channel list in alphabetical sort. Once you lock a channel, you must enter the PIN Code that is set in the parental control menu at first before the channel is displayed. Access 1 2 3 4 5 6 7 8 9 10 Exit FAV1 five QVC Ch 15 bid-up.tv TCM UK Style Carton Nwk Discovery H&L Discovery Television X Lock Skip Sort/Move Select Skip/Add All Return Exit Lock/Unlock sort Cancel Exit Favourite lists 1 2 3 4 5 6 7 8 9 10 FAV1 five QVC Ch 15 bid-up.tv TCM UK Style Carton Nwk Discovery H&L Discovery Television X Scrambled/ Fla sort Select Move Do you want to save changes? Yes Select Access Access denied Enter PIN code If you skip a channel, it cannot be shown in the list menu (pressing the “OK”button will pop-up the favourite channel list menu when you watch the digital terrestrial television) unless you add it again (in the channel list menu, the skipped channel name is not shown). Return Favourite lists Alfabetical sort When you have completed your editing, press the “MENU” button to save the favourite channel list menu. The next menu will ask if you want to save the changes you have made, using the “/”. If you want to quit the favourite channel list, press the “CANCEL/EXIT“ button to quit. – – – – Exit DVB Menu MODIFY You can modify the favourite list that you have created. The list named “TV” and “RADIO” are the default list and all the favourite lists are made from those. Select a favourite list and press the “OK” button to modify the list as you do in the create a favourite list menu. Favourite lists Create Access Modify Access Delete Select DELETE Select the list name that you want to delete using the “/” buttons, and press the “OK” button to delete the selected favourite list. The popup menu will ask if you confirm or cancel the delete operation. Access Return Exit Return Exit Exit Exit Exit Modify a favourite list Radio TV FAV1 FAV2 FAV3 Note : The default favourite channel list names (RADIO and TV) are not displayed in the list, so you can only delete the list name you created. Select Access Configuration You can select desired item by using the “/” buttons and press the “OK” button to enter selected one. INSTALLATION Use these options If you have moved location or want to rescan for new channels. Press “OK” button to display the Installation menu. - Auto is the function to scan each channel automatically. Press the “OK” button and choose the installation type by using the “/” buttons. and press the “OK” button to start the installation process. If you choose “Add”, the new channels will be added in the channel list. If you choose “New”, the new channels will replace the previous channels in the channel list. If you cancel automatic search before it is completed, the previous list of services is used, if already stored. - Manual is the function to scan for an individual channel. Choose scan type (update or new) and select channel number to be scanned. Configuration Installation Access User Settings Access System Parameters Access Time Settings Access Signal Information Access Conditional Access Access Select Return Access Installation Auto Access Manual Access New Channels Access Select Access Return Installation Installation type Add Select Return Access DVB Menu - New Channels shows the channels that you recently added in the channel list. The type icon of the program is displayed against the channel name. Note : • The DVB system requires a good signal to provide the best picture. For the DVB system, interference can disrupt the flow of data causing the picture to appear to be made up of large blocks or to freeze intermittently. Also if there are no channels in the list after installation, do install process again. • If the picture disappears completely, this could mean that signal quality is very poor. If this happens, you may need to improve your aerial system to provide a better signal. New Channels Select TV 13 ITV1 TV 14 ITV3 Access Return Exit Exit USER SETTINGS - Menu Language You can select DVB menu language among the followings: English, French, German, Italian, Spanish, Danish, Netherland, Greek, Portugal, Turkey. Notes : • When you change the DVB menu language, Analogue menu language will be changed simultaneously. • If the language you selected in this menu is not available among the Analogue OSD languages, then the Analogue OSD will be replaced by English automatically. For example, if you select Turkey for the DVB menu then the Analogue menu will be set to English (also refer “Available Language Table” on page 41). User Settings Menu language English Audio language English Audio language 2 English Subtitles language English Subtitles language 2 English Subtitle display Antenna Power Select Access Off Off Return - Audio language / Audio language 2 This function select which language soundtrack you will hear when switching to a channel broadcasting with multiple soundtracks. Move cursor to the Audio language item and select the desired language by “/” buttons. Also you can set Audio language 2 in the same way as Audio language selection. - Subtitle language / Subtitle language 2 You can selects the subtitle language in this menu. Move cursor to the Subtitle language and select desired language. Also you can set Subtitle language 2 in the same way as Subtitle language selection. - Subtitle display You can toggle between subtitle On and Off. also you can control this with the “SUBTITLE” button on the remote control. - Antenna power (option) If On mode is selected, you can use an external antenna that does not have a 5V adapter power. Be sure that if you don’t use external antenna this menu should be in Off mode to avoid problem like short circuit. DVB Menu SYSTEM PARAMETERS Using the “/” buttons to select the system parameters item and press “OK” button to enter each item. System Parameters System Information Access Factory Settings Access Software Upgrade Access Select - System Information You can see the system information but you cannot modify anything in this menu. Press the “OK” or “MENU” button to return to System Parameters menu. - Software Upgrade Select the Software Upgrade item and press the “OK” button to enter the Software Upgrade menu. And then press the “OK” button to upgrade software. If there is new software, the unit will upgrade itself. Using the “/” buttons to highlight the system parameters item in the configuration menu, then press“OK” button to display the system parameters menu. TIME SETTINGS (option) In this menu you can set time two ways - Auto or Manual. If you select Auto, time will be automatically set by broadcasting signal. In this option time can be different than real time if you receive broadcasts from a different time zone. If you select Manual, you can set time by yourself. SIGNAL INFORMATION Select Signal Information item and press the“OK”button. Cycle through the channel option by using the “/” buttons on the remote control. The signal level and signal quality of the channel that offers the upgrade software can be observed on the two bar graphs. The bar graphs of signal quality and signal level give a good indication of whether the selected channel is likely to be found. If the signal quality bar is high then a digital frequency and digital channels will probably be found. Access Return Exit System Information Device iDTV5105 Plug-in Mbeg Software version - Factory settings If you want to restore all data to initial factory condition, select this option. When you enter this menu a warning message will ask proceed or not. Please note that if you proceed this, all private settings and other user data will be erased. Pan-Euro v6.4.27 Hardware Model ST5105 Hardware Release ST5105 Hardware Version V2.1 Access Return Exit Re-installation confirmation All private settings and other user data will be erased. Do you want to proceed? Yes Select Access Return Exit Time Settings Date and Time 01/01/2007 00:26 Mode Select Auto Access Return Signal Information Channel 05 Frequency 178.750 Level Quality Select Access Return Exit DVB Menu CONDITIONAL ACCESS - This allows you to upgrade your TV set with additional features including access to extra channels (if available) using a conditional access module (eg. TopUp TV). - If there is no CI Card in the slot,“No CI or CA device present” appears on the screen. - The Common Interface menu allows you to access a pay-per-view(PPV) service on your TV set. This feature operates once you have obtained a CI module and a viewing card. If you want to know the PPV service in your region, please contact your nearest PPV provider for detail. - The sub menu shown to the right depends on module and may by different than yours. Multi CI-CA List Top Up TV Select Access Return Exit Note : A Common Interface is available to connect a CAM (conditional access module) and a smartcard. Please contact your service provider to get more information about these modules. The necessary phone number can be found on the digital channels initial page that provide this service. Parental Control You can prevent unauthorized users such, as children, from watching Parental control unsuitable programmes by a digit PIN code that is defined by the user Parental control Disabled (PIN: Personal Identification Number). Channel lock No Maturity level None PARENTAL CONTROL You can select between Enabled and Disabled by using “/” buttons. If you select enabled then the following items can be altered. PIN code change Channel lock Select Access Return Exit If you toggle this option to Yes, the channels you locked in the edit channel list menu can’t be displayed before you enter the PIN Code. Maturity level There are 18 levels in total. If you toggle this option to a number (1-18), for example, you amy select 12, that’s to say, if the channels broadcast material is not suitable for the family members who are under 12 years old, you must enter the PIN Code before you can view them. (The maturity level information should be broadcast with these programs.) PIN Code change Press the “RED” button and enter the previous code by using the 0-9 buttons on the remote control. Then enter the new code twice to confirm. Press the“OK” button to quit the parental control menu and save these alteration. If you don’t want to change to a new PIN Code press the “CANCEL/EXIT” button to quit the parental control menu. Note : • The default PIN Code for parental setting is “0000”. • If you have forgotten your personal password, you can reset to the default password “0000” by pressing the key sequence: RED - RED - GREEN - GREEN - YELLOW - YELLOW - BLUE - BLUE DVB Menu EPG (Electronic Programme Guide) You can check program schedules by pressing the “GUIDE” button on the remote control. When you enter EPG the current program is highlighted and you can navigate channels by pressing the channel up/down “/” buttons to change channels and view the other programmes on the selected channel. Press the “/” navigation buttons to scroll through and show programme content. TV Guide Other days There is a 7day EPG, you can see the other days channel list by using left / right navigation arrow “/” buttons. The short description of the highlighted channel is shown under the image window, and you can see the extended description by pressing the “INFO” button ( ) and you can close this window by pressing this button again. 1 Five Tuesday 09/10 06:00 Breakfast 09:15 Real Rescues 10:00 Homes Live 11:00 To Buy or Not to Buy 11:30 Car Booty 12:15 Bargain Hunt 13:00 BBC News 13:30 BBC London News Select Start your day with all the latest news, sport, business and weather from the BBC’s Breakfast team. Includes regional news at 25 and 55 minutes past each hour. Details Return Exit AV Selection Setting screen modes Adjustment of Screen Size in TV and AV mode - Pressing the “AV” button on the remote control the screen changes as follows: TV AV1 AV2 Component HDMI PC TV - When you select HDMI or PC mode, check the following. 1. For optimum picture quality, use to the computer or set top box outputs as shown below. Using other formats or refresh rates may result in reduced picture quality. * DLT-19W4/22W4 : 1440 x 900 at 60Hz refresh rate * DLT-20J1/20J3/20J9 : 640 x 480 at 60Hz refresh rate 2. If the message “No signal” appears on the screen, adjust the PC output to a format listed in the PC input resolution table on page 19. Note : • The menu disappears if you do not operate any button for about 60 seconds from the menu appearing. • In the case of connecting both composite video signal and S-video signal at the AV3 terminal, the S-video signal has priority. • If sound signal is mono only, connect the white phono plug to the LEFT (L)-terminal of the sound input terminal on the TV. • See page 17 for connection method of Camcorder and Video. Setting various screen modes - User can select various screens designed for a good picture without adjusting The brightness, contrast or colour individually by pressing the “NORMAL” button on the remote controller. • The screen changes as follows: Normal Movie Dynamic Favourite Normal • The screen adjustment status changes as the following screens are displayed sequentially whenever pressing the “NORMAL” button. Screen Adjustment When adjusting the screen to taste - You can enjoy various screens by adjusting Brightness, Contrast, Colour, Sharpness, etc. to the user’s taste. 1. Select “Picture” by pressing the “MENU” button. • The menu screen appears as follows. Picture Picture Mode Dynamic Screen Brightness 51 Colour 31 Install Sharpness Tint Function DVB Picture Screen Off Normal Access Exit Picture Mode Dynamic Brightness 41 Contrast 51 Colour Install Sharpness 31 Tint DVB G0 Colour Temp Sound Function 31 R N.R. Select 2. Select and adjust each item. • Move to the Picture menu. • Whenever pressing the ”/” button, you can select Picture Mode, Brightness, Contrast, Colour, Sharpness, N.R and Colour Temperature EG. Warm (reddish picture) Cool (bluish picture). 41 Contrast Sound 31 R G0 N.R. Off Colour Temp Select Normal Access Exit • The screen appears, as on the right, if pressing the ”/” buttons after selecting items desired to adjust with the ”/” buttons. • You can adjust all items by pressing the ”/” button. Brightness 31 Note : • Picture Mode : Changing the picture mode, Normal Movie Dynamic Favourite • Brightness: Adjusts the whole of screen brighter or darker. • Contrast: Adjusts difference between brightness and darkness between objects and background on the screen. • Colour: Adjusts colour saturation. • Sharpness: Adjusts outline of the screen smoothly or sharply. • N.R : Noise reduction. • Colour Temperature: Changing the tone of colour: Normal: Normal white Warm : Reddish white Cool: Bluish white • Tint only activates when receiving a NTSC signal. • The adjusted levels are stored automatically in Favourite mode. Screen Adjustment Adjustment of Screen Size in TV and AV mode Default ZOOM format will be selected. Otherwise, the preferred mode of the user can be forced by repeated pressing of the remote control “ASPECT” button: The following picture formats is available: DLT-19W4T, 22W4T DLT-20J1T, 20J3T, 20J9T RF, AV1, AV2 MODE COMPONENT, HDMI, PC WIDE, FULL SCREEN 4:3, FULL SCREEN FULL SCREEN DVB-T MODE WIDE, FULL SCREEN Adjustment of the screen in the PC mode 1. Auto Adjustment. • Move to Auto in the Screen menu. • Press the ”/” buttons to detect optimal resolution automatically. Picture Screen PC Auto Adjustment Start H Position Sound Install V Position Phase Frequency Function DVB Select Access Exit 2. Adjustment of the H-Position. • Move to H-Position in the Screen menu. • Press the ”/” buttons to adjust the horizontal position of displayed image until correct. Picture Screen PC Auto Adjustment Start H Position Sound Install V Position Phase Frequency Function DVB Select Access Exit 3. Adjustment of the V-Position. • Move to V-Position in the Screen menu. • Press the ”/” buttons to adjust the vertical position of displayed image until correct. Picture Screen PC Auto Adjustment Start H Position Sound Install V Position Phase Frequency Function DVB Select Access Exit Screen Adjustment 4. Adjustment of the Phase. • Move to Phase in the Screen menu. • Press the ”/” buttons to adjust the phase to get a clear picture. Picture Screen PC Auto Adjustment Start H Position Sound Install V Position Phase Frequency Function DVB Select Access Exit 5. Adjustment of the Frequency. • Move to Frequency in the Screen menu. • Press the ”/” buttons to adjust the frequency to fit the size of the screen. Picture Screen PC Auto Adjustment Start H Position Sound Install V Position Phase Frequency Function DVB Select Access Exit Note : • During the Auto Adjust, you must not alter the screen on the monitor. • During the moving picture, Auto Adjust is unable to work correctly. So you must execute Auto Adjust on a still image. • Auto Adjust works incorrectly on a part graphic card or picture. • When Auto Adjust is not correctly working, you can adjust with H/V position, and phase manually. Sound Adjustment When adjusting sound to taste - The user can enjoy various sounds by adjusting AVC, Effect, Balance and Equalizer. 1. Select AVC Mode. • Select AVC (Auto Volume Correction) On/Off by pressing ”/” button. • Each sound source has its own signal conditions and it’s not so easy to adjust the volume level every time. However if you select AVC On, when the modulation signal is high (as in the adverts) then the sound output will be lowered automatically. Picture AVC On Effect Off Screen Balance Sound L Equalizer R -12 R -12 R -12 Access Install Function DVB Select Access Exit 2. Select Sound Effect Mode. • The Effect changes as follows : Off SPATIAL 3D Panorama Off Picture AVC On Screen Effect Off Balance Sound L Equalizer Access Install Note : • 3D PANORAMA: This function generates virtual surround sound from the left and right speaker by expanding the existing surround system function. Function DVB Select Access Exit 3. Select Balance Mode. • Move to Balance in the Sound menu. • Select Balance by pressing ”/” button, then the sound balance of left and right speaker can be adjusted for equal sound reception from both speakers according to where you are sitting. Picture AVC On Screen Effect Off Balance Sound L Equalizer Access Install Function DVB Select 4. To adjust the audio equalizer. • Move to Equalizer in the Sound menu. • Select and use the relevant frequency by pressing the ”/” button. • You can adjust the degree of the frequency by using the ”/” button. Note : • Whenever you adjust the audio equalizer, it stores in the Favourite mode. • Equalizer: High quality sound range adjustment method used for audio product. 100Hz, 300Hz: Low sound range / 1KHz, 3KHz: Middle sound range / 10KHz: High sound range Access Exit Picture Equalizer Screen Preset Sound Install Normal 100Hz 6 300Hz 6 1kHz 6 3kHz 6 10kHz 6 Function DVB Select Change Exit Sound Adjustment Multi-Sound and Stereo 1. Mono Sound Selection. • During Stereo sound reception if the stereo is weak, you can switch to MONO by pressing the “ ” button. Then the colour of “MONO” character will change to Red. In Mono reception the depth of sound is improved. • To switch back to stereo, press the “ ” button again. PR 19 ––––– Mono Full Screen PR 19 ––––– Mono Full Screen Note : •“ ” only works in RF mode. 2. Adjustment of Bilingual sound. • In bilingual broadcast reception, you can switch from Dual 1 to Dual 2 by pressing the “ ” button repeatedly. PR 19 ––––– Dual 2 Full Screen PR 19 ––––– Dual 1 Full Screen Analogue Menu Language Selection Analogue Menu Language Selection 1. Press the “MENU” button and select “Function”. Picture Screen Language English Child Lock Off Sound Install Function DVB Select Change Exit 2. Select “Language” by pressing “/” button. 3. Select your desired language by pressing the “/” button. Then it will set automatically. The language changes as follows. English German French Spanish Italian Danish Finnish Swedish Greek Norwegian Netherland Portugal Cheskey Polish Romania Russian Magyar Bulgarian Picture Screen Language English Child Lock Off Sound Install Function DVB Select Change Exit Note : • When you first turn on the TV set, the“language selection”is displayed automatically. • When you change the Analogue menu language, the DVB menu language will be changed simultaneously. • The language you selected in this menu is not DVB menu language, then the DVB menu language will be replaced by English automatically. For example, if you select Finnish for Analogue menu then DVB menu will be set to English (see below table). Available Language Table Available in both analogue & digital Only available in analogue Only available in digital English, German, French, Italian, Danish, Portugal, Netherland, Greek, Spanish Finnish, Swedish, Norwegian, Cheskey, Polish, Romania, Russian, Magyar, Bulgarian Turkey Other Functions Child Lock • Move to Child Lock in the Function menu. • Select Child Lock to On using the “” button Picture Screen Note : • If stand-by indicator is flashing red, and green then the TV set is in child lock mode. It is necessary to use the remote control POWER button, NUMBER 0…9 buttons, or PR UP/DOWN buttons to bring the set out of standby mode. The local PR UP/DOWN buttons on the TV set will not function. Once on, the stand-by indicator turns to green and the picture appears on the screen. Sleep • By pressing the “SLEEP” button on the remote controller repeatedly, you can select one of the following settings: Sleep Timer: OFF 15 30 45 60 75 90 105 120 OFF • The set will turn off after the time you select. Note : • If an active signal is not present for about 10 minutes, the set will automatically turn to ST-BY mode. Language English Child Lock Off Sound Install Function DVB Select Change Exit Sudoku Game (option) Sudoku Game - This TV set allows you to enjoy playing the Sudoku game, it offers 3 levels of difficulties, enables you to save your grid and resume it later. ENTERING / EXITING GAME MODE Pressing “GAME” key on your remote handset will switch the TV Set into game mode. If you press the same key in game mode, you will exit game mode without saving your grid. STARTING THE GAME You can either decide to resume your last game or start a new game. To start a new game, move the cursor to desired level: Easy, Normal or Hard and press “OK” button. To recall an old game, move the cursor down to the “Load” menu and press “OK” button. Sudoku Game (option) PLAYING Use direction keys on the remote handset to move cursor to the desired position. Press digit keys to enter a number. It is always possible to overwrite a number previously entered. Trials and errors: - To erase a cell press “0”. - You might want to draw some numbers in a different colour (trial numbers) because you need to fill up more cells to confirm that your option is valid.This can be done by typing twice the same digit. Once you have confirmed the number is correct, you can press again the same digit key to change the colour. NEW GAME At anytime you can ask your TV set to create a new grid. This can be done by moving the cursor to the right hand side on the “New” menu, and pressing “OK” button. Then you will be asked to select a level to create a new grid. ADJUSTING AUDIO VOLUME To control audio volume in game mode, you must move the cursor to the right hand side of the screen on the “Volume” menu. Then pressing “/” key enables you to decrease / increase volume. Press “/” key to exit from this audio adjustment mode. EXIT AND SAVE If you wish to exit the game and save your grid, for further play, move the cursor to the right hand side on the “Exit” menu, and press “OK”. This will close the game and return to normal TV mode. Teletext Teletext SWITCHING TELETEXT ON/OFF Press the “TEXT” button ( ). The index page or the page viewed last will appear. Press the “TEXT” button again to return to the TV mode. NOTE: Teletext works only in TV/AV mode. However digital broadcasts have digital text. To use digital text press the “TEXT” button when in DVB mode. COLOUR BUTTONS IN TOP (Tables Of Pages) NB. not used in the UK /FLOF (Full Level One Feature) TELETEXT A red, green, yellow and blue field is shown at the bottom of the screen. If TOP or FLOF Teletext is transmitted by the station, pressing the corresponding colour button R,G,Y,B on the remote controller, enables you to select the desired page easily. SELECTING PAGES The “NUMBER” buttons are used to enter a page number. The selected page number appears at the top of the screen and the page appears after a short time. The “/” buttons increase or decrease the current page number by 1. INDEX PAGE You can switch directly to the programme preview (with TOP text) or the overview page of the station you are currently viewing by pressing the “INDEX” button ( ). PAGE HOLD Several sub pages can be combined under a page number and are scrolled at an interval determined by the television station. The presence of sub pages is indicated by, for example, 3/6 beneath the time, which means that you are looking at the 3rd page of a total of 6 pages. If you want to look at a sub-page for a longer period of time, press the “HOLD” button ( ). The HOLD symbol appears and the contents of the sub-page shown are kept on the screen and no longer updated or switched to other sub-pages. By pressing the “HOLD” button again, the current sub-page appears. CALLING UP SUB-PAGE DIRECTLY (option) Pressing the “SUBCODE” button ( ) ,“ - - - - “ appears. Enter the sub-page number that you want to call up with the “NUMBER” button, for example, the 2nd page, sequence 0002. The desired sub-page will eventually be displayed on the screen and it will be held there. Meanwhile whilst you are waiting, it is possible to go back to the TV picture by pressing the “T.CANCEL” button ( ) on the remote control and after a while, press the “T.CANCEL” button again to revert back to the saved Teletext sub page. WATCHING TV DURING TELETEXT MODE Some pages are continually updated, for example, stock market reports, sports announcements, and the latest news. If you want to watch television and stay informed at the same time, press “T.CANCEL” button ( ). The regular programme is still visible and the updated Teletext page number appears at the top of the screen. By pressing the “T.CANCEL” button again, the Teletext page appears with the updated information. REVEAL ANSWER This function can be used on certain pages to reveal the solution of riddles. Press the “REVEAL” button ( )to reveal a hidden answer and press again to hide it. DOUBLING CHARACTER SIZE Repeatedly pressing the “SIZE” button ( )doubles the character size in the following order: Upper half of the page Lower half of the page Normal size Upper half of the page CONTRAST CONTROL This is only for teletext display. You can adjust CONTRAST for 4 steps by pressing left (for decreasing) / right (for increasing) cursor key on the remote control (no menu like bargraph will displayed). And leave teletext mode and enter again then changed contrast value will be applied to teletext screen. Troubleshooting Symptoms and Solutions Please check the following list prior to calling Daewoo Electronics Customer Service Centre for assistance. Symptom Check items Neither picture nor sound - Check the contact of sockets is OK. - Check the TV main power is on. Picture is OK but no sound - Check the Volume control is not set to minimum or mute. Sound is OK, but no colour. - Check the colour control and adjust it properly. - Check the program is in colour and not in black & white. The picture has ghost image. - Picture ghost image is caused by signals reflecting from large buildings. To improve move antenna for best reception or instal an aerial with a small pick up foot print. - Check the antenna is installed correctly and if not, adjust the antenna towards the broadcasting transmitter. Picture has“snow noise”. - Check the antenna is installed correctly and if not, adjust the antenna towards the broadcasting transmitter. - Check the antenna or its connection is correct and if not, correct the antenna fault or connection cable fault. - Check if car traffic or neon sign disturbs the sound effect. Stripes on picture. - Check the susceptible interference by other electronic devices such as radio and television and keep magnetic or electronic devices away from the TV. Bad stereo or Dual sound. - Long distance from the station or other radio waves can generate bad sound reception. If so, change the mode to Mono. Remote control does not work. - Check if the batteries in the Remote control are dead. - Check if any object between IR sensor of the TV and the Remote control is not obstructing the infra red beam. Troubleshooting In PC mode Symptom Check items “NO SIGNAL” appears on the screen. - Ensure that the signal cable is firmly connected to PC and TV. - Check the resolution and frequency of your PC. Then, adjust them to optimum condition for LCD TV. - Refer to the table of PC mode input format (If registered resolution and frequency on the table not listed then no picture will be displayed.) Image is not clear. - Adjust the PHASE control. Image is not centred. - Adjust the H-POSITION and V-POSITION control. • AFTER SALES SERVICE Do not hesitate to contact your retailer or service agent if a change in the performance of your product indicates that a faulty condition may be present. Specifications Model Screen Size DLT-19W4T DLT-20J1T/J3T/J9T DLT-22W4T 480mm (diagonal) 510.54mm (diagonal) 558.673mm (diagonal) 16.7 M Display Colour 16:10 4:3 16:10 Resolution 1440 x 900 (WXGA+) 640 x 480 (VGA) 1680 x 1050 (WSXGA+) Pixel Pitch 0.2835 x 0.2835 0.6375 x 0.6375 0.2835 x 0.2835 Aspect Ratio 1000:1 350:1 1000:1 Appearance (W x H x D) w/o stand 476.3 x 346 x 80 514 x 460 x 85 545.4 x 400 x 81 with stand 476.3 x 401.5 x 190 514 x 498 x 239 545.4 x 426 x 81 Weight (Net) w/o stand 4.9 Kg 7.0 Kg 5.6 Kg with stand 5.2 Kg 8.0 Kg 5.9 Kg 42 W 52 W 50 W Contrast Ratio Power Consumption 2.0W + 2.0W Sound Output Terminals AV IN : SCART, COMPOSITE VIDEO, AUDIO L/R, COMPONENT, PC, HDMI HEADPHONE : 3.5mm STEREO MINI-JACK DIGITAL AUDIO OUT: Coaxial ANT. IN : COAXIAL-TYPE Reception Channel VHF BAND I : CH2-CH4 BAND II : CH5-CH12 UHF HYPER BAND : SI’-S3’, S1-S20 BAND IV, V : CH21-CH68 PAL-B/G, D/K, SECAM-L/L’, NTSC(AV input only) AC 220 ~ 240V, 50Hz Power Source ※ Owing to our policy of continuous improvement, specifications may change.