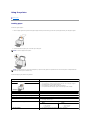
1
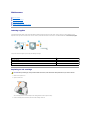
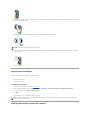
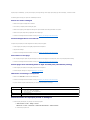
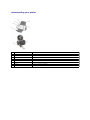
Understanding your printer
Use the:
When you want to:
1
Paper support
Load paper in the printer.
2
Power button
Turn the printer on or off, or cancel a print job.
3
Paper exit tray
Stack paper as it exits the printer.
4
Front cover
Change cartridges.
5
Paper guide
Make sure paper feeds correctly into the printer.
6
Paper feed button
Feed a sheet of paper through the printer.
7
USB cable
Connect your printer to a computer.
8
Power supply
Supply power to the printer.
Appendix
Dell technical support policy
Contacting Dell
Warranty and return policy
Dell technical support policy
Technician-assisted technical support requires the cooperation and participation of the customer in the troubleshooting process and provides for restoration of
the Operating System, application software and hardware drivers to the original default configuration as shipped from Dell, as well as the verification of
appropriate functionality of the computer unit and all Dell-installed hardware. In addition to this technician assisted technical support, online technical support
is available at Dell Support. Additional technical support options may be available for purchase.
Dell provides limited technical support for the printer and any Dell-installed software and peripherals. Support for third-party software and peripherals is
provided by the original manufacturer, including those purchased and/or installed through Software & Peripherals (DellWare), ReadyWare, and Custom Factory
Integration (CFI/DellPlus).
Contacting Dell
You can access Dell Support at support.dell.com. Select your region on the WELCOME TO DELL SUPPORT page, and fill in the requested details to access help
tools and information.
You can contact Dell electronically using the following addresses:
l
l
l
l
l
World Wide Web
www.dell.com/
www.dell.com/ap/ (for Asian/Pacific countries only)
www.euro.dell.com (for Europe only)
www.dell.com/la/ (for Latin American countries)
Anonymous file transfer protocol (FTP)
ftp.dell.com/
Log in as user: anonymous, and use your e-mail address as your password.
Electronic Support Service
[email protected]
[email protected]
[email protected] (for Asian/Pacific countries only)
support.euro.dell.com (for Europe only)
Electronic Quote Service
[email protected]
[email protected] (for Asian/Pacific countries only)
Electronic Information Service
[email protected]
Warranty and return policy
Dell Computer corporation ("Dell") manufactures its hardware products from parts and components that are new or equivalent to new in accordance with
industry-standard practices. For information about the Dell warranty for your printer, refer to your Owner's Manual.
Finding information
Refer to:
When you need help with:
Setup Diagram
Setup information.
Drivers and Utilities CD
Drivers for your inkjet printer.
Documentation and drivers are already installed on your printer when shipped from Dell. You can use the CD to
uninstall/reinstall drivers or access your documentation.
Readme files may be included on your CD to provide last-minute updates about technical changes to your printer or
advanced technical reference material for experienced users or technicians.
Owner's Manual
Information about:
l
l
l
l
l
Express Service Code and Service
Tag number
Basic usage
Creative projects
Ink cartridge ordering information
Setup troubleshooting
General troubleshooting
Express Service Code and Service Tag number.
This label is located on your printer.
Dell Support Web site
Online tools, including:
l
l
l
l
l
Solutions — Troubleshooting hints and tips, articles from technicians, and online courses
Upgrades — Upgrade information for components, such as memory
Customer Care — Contact information, order status, warranty, and repair information
Downloads — Drivers
Reference — Printer documentation and product specifications
You can access Dell Support at support.dell.com. Select your region on the WELCOME TO DELL SUPPORT page, and fill in
the requested details to access help tools and information.
Dell™ Personal Inkjet Printer J740 User's Guide Click the links to the left for information on the features and operation of your printer. For information on other documentation included with your printer, see
Finding information.
To order ink or supplies from Dell:
1.
Double-click the icon on your desktop.
2.
Visit Dell's cartridge ordering Web site at www.dell.com/supplies or order Dell printer supplies by phone.
For best service, have your Dell printer Service Tag available.
For help locating your Service Tag number, see Express Service Code and Service Tag number.
Notes, Notices, and Cautions
NOTE: A NOTE indicates important information that helps you make better use of your printer.
NOTICE: A NOTICE indicates either potential damage to hardware or loss of data and tells you how to avoid the problem.
CAUTION: A CAUTION indicates a potential for property damage, personal injury, or death.
____________________
Information in this document is subject to change without notice.
© 2003 Dell Computer Corporation. All rights reserved.
Reproduction in any manner whatsoever without the written permission of Dell Computer Corporation is strictly forbidden.
Trademarks used in this text: Dell and DELL logo are trademarks of Dell Computer Corporation; Microsoft and Windows are registered trademarks of Microsoft
Corporation.
Other trademarks and trade names may be used in this document to refer to either the entities claiming the marks and names of their products. Dell Computer
Corporation disclaims any proprietary interest in trademarks and trade names other than its own.
____________________
UNITED STATES GOVERNMENT RESTRICTED RIGHTS
This software and documentation are provided with RESTRICTED RIGHTS. Use, duplication or disclosure by the Government is subject to restrictions as set
forth in subparagraph (c)(1)(ii) of the Rights in Technical Data and Computer Software clause at DFARS 252.227-7013 and in applicable FAR provisions: Dell
Computer Corporation, One Dell Way, Round Rock, Texas, 78682, USA.
April 2003 SRV T0669 Rev. A00
Maintenance
Ordering supplies
Replacing an ink cartridge
Aligning the ink cartridges
Cleaning ink cartridge nozzles and contacts
Ordering supplies
Your Dell Personal Inkjet Printer J740 comes with software installed to detect the ink levels in the printer. During a print job, a screen appears on your
computer to warn you if the ink levels are low. To order more ink, follow the instructions on the screen or visit the Dell Web site at www.dell.com/supplies.
Your printer has been designed to print using the following cartridges.
Item:
Part number:
Black ink cartridge
T0601
Color ink cartridge
T0602
Black high yield ink cartridge
T0722
Replacing an ink cartridge
CAUTION: Before performing any of the procedures listed in this section, read and follow the Safety Instructions in your Owner's Manual.
1.
Make sure the printer is on.
2.
Open the front cover.
The ink cartridge carrier moves and stops at the loading position unless the printer is busy.
3.
Press the cartridge carrier tab down, and then lift the cartridge carrier lid.
4.
Remove the old cartridge. Store it in an air-tight container or dispose of it by placing it inside the recycling bag that came with your new ink cartridge and
mailing the recycling bag to Dell.
5.
If you are installing a new cartridge, remove the sticker and tape from the bottom of the cartridge.
NOTICE: Do not touch the gold contact area on the cartridge.
6.
Insert the new cartridge. Make sure the color ink cartridge is secure in the right carrier and the black ink cartridge is secure in the left carrier, and then
snap the lid closed.
7.
Close the front cover.
Aligning the ink cartridges
There are two instances when you will align your ink cartridges.
l
After installing cartridges
l
To improve print quality
To align the ink cartridges:
1.
Load plain paper in the printer. For help, see Loading paper.
2.
Open the Dell Printer Solution Center. Click Start ® Programs ® Dell Printers ® Dell Inkjet Printer J740 ® Dell Printer Solution Center.
3.
From the Maintenance tab, click Align to fix blurry edges.
4.
Click Print.
An alignment page prints, automatically aligning the cartridges.
NOTE: If the alignment page does not print, make sure you have completely removed the stickers and transparent tape from both ink cartridges, and
then try to align the cartridges again.
Cleaning ink cartridge nozzles and contacts
If you are not satisfied with the print quality of your document, make sure you:
l
Use the appropriate paper for the document. For example, use photo paper if you are printing photos.
l
Use paper that is bright white or coated.
l
Select a higher print quality.
a.
From your program, click File ® Print.
The Print dialog box appears.
b.
From the Print dialog box, click Properties, Preferences, or Options.
c.
From the Quality/Speed area on the Quality/Copies tab, select Better or Best.
If your document still does not have the print quality you expect, follow these steps:
1.
2.
Reinsert the ink cartridges:
a.
Remove the ink cartridges. For help, see Replacing an ink cartridge.
b.
Insert the ink cartridges. For help, see Replacing an ink cartridge.
c.
Print your document again.
d.
If print quality has not improved, continue with step 2.
Clean the print nozzles:
a.
Load paper. For help, see Loading paper.
b.
Click Start ® Programs ® Dell Printers ® Dell Inkjet Printer J740 ® Dell Printer Solution Center.
c.
Click the Maintenance tab.
d.
From the Maintenance tab, click Clean to fix horizontal streaks.
e.
Click Print.
A nozzle page prints, forcing ink through the nozzles to clean the clogged nozzles.
f.
g.
3.
Print your document again to verfiy that your print quality has improved.
If you are not satisfied with the print quality, continue with step 3, and then print your document again.
Wipe the ink cartridge nozzles and contacts:
a.
Remove the ink cartridges. For help, see Replacing an ink cartridge.
b.
Dampen a clean, lint-free cloth with water and place it on a flat surface, such as a table.
NOTE: To avoid getting ink on the flat surface, place two sheets of paper under the cloth.
c.
With the nozzles pointing down, gently hold the cartridge against the cloth for about three seconds.
d.
Slowly wipe the nozzles in the direction shown.
e.
With another clean section of the cloth, repeat steps c through d.
f.
Gently hold another clean section of the cloth against the contacts for about three seconds, and then wipe in the direction shown.
g.
With another clean section of the cloth, repeat step f.
h.
Let the nozzles and contacts dry completely.
i.
Reinsert the ink cartridges and wait five minutes before printing.
j.
Clean the ink nozzles. For help see step 2.
k.
Print your document again.
l.
m.
If the print quality does not improve, repeat step 3 up to two more times.
If print quality is still not satisfactory, replace the ink cartridges. For information on ordering supplies, refer to the Owner's Manual, or open the
Dell Printer Solution Center.
Regulatory notices
Federal Communications Commission (FCC) compliance information statement
The Dell Personal Inkjet Printer J740 has been tested and found to comply with the limits for a Class B digital device, pursuant to Part 15 of the FCC Rules.
Operation is subject to the following two conditions: (1) this device may not cause harmful interference, and (2) this device must accept any interference
received, including interference that may cause undesired operation.
The FCC Class B limits are designed to provide reasonable protection against harmful interference in a residential installation. This equipment generates, uses
and can radiate radio frequency energy and, if not installed and used in accordance with the instructions, may cause harmful interference to radio
communications. However, there is no guarantee that interference will not occur in a particular installation. If this equipment does cause harmful interference
to radio or television reception, which can be determined by turning the equipment off and on, the user is encouraged to try to correct the interference by one
or more of the following measures:
Reorient or relocate the receiving antenna.
Increase the separation between the equipment and receiver.
Connect the equipment into an outlet on a circuit different from that to which the receiver is connected.
Consult your point of purchase or service representative for additional suggestions.
The manufacturer is not responsible for any radio or television interference caused by using other than recommended cables or by unauthorized changes or
modifications to this equipment. Unauthorized changes or modifications could void the user's authority to operate this equipment.
To assure compliance with FCC regulations on electromagnetic interference for a Class B computing device, use a properly shielded and grounded cable. Use of
a substitute cable not properly shielded and grounded may result in a violation of FCC regulations.
Any questions regarding this compliance information statement should be directed to:
Dell Products, L.P.
One Dell Way
Round Rock, Texas, USA 78682
Industry Canada compliance statement
This Class B digital apparatus meets all requirements of the Canadian Interference-Causing Equipment Regulations.
Avis de conformité aux normes d'Industrie Canada
Cet appareil numérique de la classe B respecte toutes les exigences du Règlement sur le matériel brouilleur du Canada.
European Community (EC) directives conformity
A declaration of conformity with the requirements of the directives has been signed by the Director of Manufacturing and Technical Support, Lexmark
International, S.A., Boigny, France.
This product satisfies the Class B limits of EN 55022 and safety requirements of EN 60950.
Noise emission levels
The following measurements were made in accordance with ISO 7779 and reported in conformance with ISO 9296.
1-meter average sound pressure, dBA
Printing
51 dBA
The United Kingdom Telecommunications Act 1984
This apparatus is approved under the approval number NS/G/1234/J/100003 for the indirect connections to the public telecommunications systems in the
United Kingdom.
ENERGY STAR
The EPA ENERGY STAR Office Equipment program is a partnership effort with office equipment manufacturers to promote the introduction of energy-efficient
products and to reduce air pollution caused by power generation.
Companies participating in this program introduce products that power down when they are not being used. This feature will cut the energy used by up to 50
percent. Dell is proud to be a participant in this program.
As an ENERGY STAR Partner, Dell International, Inc. has determined that this product meets the ENERGY STAR guidelines for energy efficiency.
Using the printer
Loading paper
Loading paper
To load most types of paper:
1.
Place the paper against the right side of the paper support with the print side facing you and the top of the paper feeding into the paper support.
2.
Squeeze and slide the paper guide to the left edge of the paper.
NOTE: Do not force paper into the printer.
NOTE: To avoid smearing ink, remove each transparency or photo from the paper exit tray before the next one exits the printer. Transparencies and
photos may require up to 15 minutes to dry.
To load other paper types, follow these guidelines.
Load up to:
Make sure:
150 sheets of plain paper
The paper is designed for use with inkjet printers.
l
l
l
l
The
The
The
You
envelopes are loaded vertically against the right side of the paper support.
stamp location is in the upper left corner.
envelopes are designed for use with inkjet printers.
squeeze and slide the paper guide to the left edge of the envelope.
10 envelopes
25 sheets of labels
50 sheets of card stock
The labels are designed for use with inkjet printers.
l
l
The card stock is designed for use with inkjet printers.
The thickness does not exceed 0.025 inches.
10 greeting cards, index cards, postcards, or photo cards
The cards are loaded vertically against the right side of the paper support.
50 sheets of coated, photo, or glossy paper
The glossy or coated side faces you.
10 transparencies
l
l
100 sheets of custom size paper
The transparencies are designed for use with inkjet printers.
The rough side faces you.
Your paper size fits within these dimensions:
Width
¡
¡
10 iron-on transfers
l
76 to 216 mm
3.0 to 8.5 in.
Length
¡
¡
127 to 432 mm
5.0 to 17.0 in.
You follow the loading instructions on the iron-on packaging.
l
20 sheets of banner paper
The blank side faces you.
The banner paper is designed for use with inkjet printers.
Before you begin printing, see the information below about how much paper the printer exit tray can hold.
The printer paper exit tray can hold:
l
150 sheets of paper
l
10 envelopes
l
25 sheets of labels
l
50 cards
l
1 transparency
l
1 sheet of coated, photo, or glossy paper
NOTE: To avoid smearing ink, remove each transparency or photo from the paper exit tray before the next one exits the printer. Transparencies and
photos may require up to 15 minutes to dry.
Printer specifications
Overview
Physical specifications
Environmental specifications
Power consumption and requirements
Operating system support
Memory specifications and requirements
Paper
Cables
Overview
Base memory
16 MB
Maximum memory
16 MB
Emulation
Host based data stream printing
Connectivity
USB
Duty cycle (average)
3000 pages/month
Duty cycle (maximum)
5000 pages/month
Printer life
36,000 pages or one year (Letter size 5% coverage)
Physical specifications
Physical dimension
210mm (H) x 447mm (W) x 312mm (D)
8.3 in. (H) x 17.6 in. (W) x 12.3 in. (D)
Weight
3.16 kg
8.64 lb
Environmental specifications
Temperature/Relative Humidity
The recommended temperature and relative humidity for all conditions
Condition
Temperature
Relative humidity (non-condensing)
Operation
10° to 43° C
50° to 109° F
8% to 80%
Storage
1° to 60° C
34° to 140° F
5% to 90%
Shipping
-40° to 60° C
-40° to 140° F
5% to 100%
Power consumption and requirements
61° to 90° F
40% to 70%
Rated AC input
100V–220V
Rated frequency
50/60 Hz
Minimum AC input
99V AC
Maximum AC input
255V AC
Maximum input current
1.5A
Average power consumption
11.7W
Operating system support
The Dell Personal Inkjet Printer J740 supports:
Microsoft Windows XP
Windows 2000
Memory specifications and requirements
Your operating system must meet the minimum system requirements.
Operating system
Processor speed (Mhz)
RAM (MB)
Hard disk (MB)
Virtual memory (MB)
Windows XP
Pentium 300
128
500
286
Windows 2000
Pentium 200
128
286
286
Paper
See Loading paper for information on what paper sizes and types are supported with your Dell Inkjet Printer J740.
Cables
Your Dell Personal Inkjet Printer J740 uses a Universal Serial Bus (USB) cable.
Troubleshooting
Understanding error messages and flashing lights
Resolving unsuccessful or slow printing
Clearing paper misfeeds or jams
Solving print quality problems
Solving specialty media problems
If your printer has a problem, make sure:
l
Your printer is on.
l
You removed the stickers and tape from the bottom of the ink cartridges. For help, see Replacing an ink cartridge.
l
The paper is loaded correctly. For help, see Loading paper.
l
You installed both of the ink cartridges. The Dell Personal Inkjet Printer J740 will only work if you have both cartridges installed.
If you experience other problems not found in the User's Guide, refer to your Owner's Manual, or open the Dell Printer Solution Center.
Understanding error messages and flashing lights
Use this section to understand printer software error messages on your computer screen and blinking lights on your printer.
Paper Jam message
For help clearing a paper jam, see Printer has a paper jam.
Ink Low message
Ink Low messages appear as the ink levels in your cartridges decrease.
When this message appears, you can:
l
Click OK.
l
Order a new cartridge by contacting the Dell Web site at www.dell.com/supplies.
For more help, refer to the Owner's Manual, or open the Dell Printer Solution Center.
The paper feed button is blinking
If the paper feed button is blinking slowly, the printer is out of paper:
1.
Load paper. For help, see Loading paper.
2.
Press the paper feed button.
If the paper feed button is blinking rapidly, the printer has a paper jam. For help, see Printer has a paper jam.
The power button is blinking
The ink cartridge carrier is stalled.
1.
Check your computer screen for error messages.
2.
Turn the printer off.
3.
Wait a few seconds, and then turn the printer back on.
The paper feed button and the power button are blinking
If the paper feed button and the power button are both blinking:
1.
Open the Dell Printer Solution Center.
2.
Click Help.
3.
Click the Index tab.
4.
From the Help Topics: Dell Personal Inkjet Printer J740 Help dialog box, click the Find tab.
5.
Type Printing Failure message.
6.
Select the Printing Failure message topic from the text box under step 3, and then click Display.
7.
Follow the instructions in the table to resolve printing problems.
Resolving unsuccessful or slow printing
The following topics can help you improve unsuccessful or slow printing.
Printer is plugged in, but does not print
l
Check the printer status:
Windows 2000
1.
2.
3.
l
Windows XP
Click Start ® Settings ® Printers.
From the Printers folder, double-click the Dell J740 printer
icon.
From the Printer menu, make sure:
l Default Printer is selected.
l Pause Printing is not selected.
1.
2.
3.
Click Start ® Control Panel ® Printers and Other Hardware ® Printers and
Faxes.
From the Printers folder, double-click the Dell J740 printer icon.
From the Printer menu, make sure:
l Default Printer is selected.
l Pause Printing is not selected.
Check the printer port:
Windows 2000
1.
2.
3.
Click Start ® Settings ® Printers.
Right-click the Dell J740 printer icon, and then click Properties.
Click the Ports tab.
Windows XP
1.
2.
Click Start ® Control Panel ® Printers and Other Hardware ® Printers
and Faxes.
Right-click the Dell J740 printer icon, and then click Properties.
4.
From the list of ports, select the USB printer port.
If the USB port is not listed, uninstall and then reinstall the printer
software.
5.
6.
l
Click Apply.
Click OK.
3.
4.
5.
6.
7.
Click the Ports tab.
From the list of ports, select the USB printer port.
If the USB port is not listed, uninstall and then reinstall the printer
software.
Click Apply.
Click OK.
Make sure you have not installed multiple copies of the printer software:
a.
Microsoft® Windows® 2000: Click Start ® Settings ® Printers.
Windows XP: Click Start ® Control Panel ® Printers and Other Hardware ® Printers and Faxes.
b.
In the Printers folder, make sure there is only one Dell J740 printer icon.
If you have installed multiple copies of the printer software, uninstall each copy. Then restart the computer, and reinstall the printer software.
After you check these items, try to print a test page.
1.
Click Start ® Programs ® Dell Printers ® Dell Inkjet Printer J740 ® Dell Printer Solution Center.
2.
Click the Maintenance tab.
3.
Click Print a test page.
Test page does not print
l
If the paper is jammed, see Printer has a paper jam.
l
Try printing your test page again. If it still does not print, see Resolving unsuccessful or slow printing.
Alignment page does not print
Make sure:
l
You removed the transparent tape and sticker from the back and bottom of the ink cartridges.
l
You installed the cartridges correctly. For help on installing cartridges, see Replacing an ink cartridge.
l
You loaded the paper correctly and did not force the paper into the printer. For help, see Loading paper.
Printer ejects a blank page after appearing to print
Make sure:
l
You remove the sticker and transparent tape from the back and bottom of the ink cartridges.
l
Your cartridges do not have clogged nozzles. Clean the ink cartridge nozzles and contacts. For help, see Cleaning ink cartridge nozzles and contacts.
Printer prints very slowly
l
l
Close any program not in use.
Check the document you are printing. Photos and graphics may take longer to print than regular text. Documents that are large or that contain
background images may also take longer to print.
l
Check the printer to see if another document is being printed. Print jobs are printed in the order the printer receives them.
l
Decrease the print quality setting to Normal or Quick Print.
NOTE: Higher print quality settings result in better quality documents, but may take longer to print.
Clearing paper misfeeds or jams
The following topics can help you clear misfeeds or jams.
Paper misfeeds or multiple sheets feed
Make sure:
l
Your paper is recommended for inkjet printers.
l
The edges of your paper are not curled.
l
A piece of paper from a previous print job is not jammed.
l
You do not load too many sheets of paper. Depending on the weight of the paper, you can load up to:
¡
150 sheets of plain paper
¡
10 transparencies, envelopes, or cards
¡
25 labels
l
You do not force the paper into printer.
l
The paper guide does not cause the paper to bow.
l
The printer is on a flat, level surface.
l
The printer settings you have chosen are correct for the type of document you are printing.
l
The paper is against the right side of the paper tray.
Printer does not feed envelopes or specialty media
Make sure:
l
Your printer feeds paper without problems. Load the envelopes or specialty media vertically against the right side of the paper tray. Squeeze and slide
the paper guide to the left edge of the envelopes or specialty media.
l
You select the appropriate envelope or specialty media size and the appropriate paper type from the Paper Setup tab of Print Properties.
l
You are using a specialty media or envelope size supported by your printer. For help, see Loading paper.
l
Your software is designed to print envelopes. For help, check your software documentation.
l
The envelope or specialty media is not jammed.
Printer has a paper jam
If the paper is lodged too far into printer and cannot be removed:
1.
Turn the printer off.
2.
Turn the printer back on.
If the printer does not automatically eject the page:
a.
Turn the printer off.
b.
Pull firmly on the paper to remove it.
If you cannot reach the paper, raise the front cover, pull the paper out, and then close the front cover.
c.
Turn the printer on.
NOTE: Do not force the paper into the printer.
Solving print quality problems
If print quality is unsatisfactory, you may need to adjust your margin settings, select a higher print quality, align the ink cartridges, or clean the nozzles.
The following topics can help you improve an unsatisfactory document.
Print is too dark or smudged
l
Make sure the paper is straight and not wrinkled.
l
Let the ink dry completely before handling the paper.
l
Make sure the paper type and paper size settings in the printer software match the paper loaded in the printer.
l
Make sure the print quality setting is appropriate for the paper type.
l
Clean the ink cartridge nozzles and contacts. For help, see Cleaning ink cartridge nozzles and contacts.
Vertical straight lines are not smooth
To improve the print quality of vertical straight lines in tables, borders, and graphs:
l
Select a higher print quality from the Quality/Copies tab of Print Properties.
l
Align the ink cartridges.
l
Clean the ink cartridge nozzles and contacts. For help, see Cleaning ink cartridge nozzles and contacts.
Print smears on the page
l
The next page exiting the printer may be smearing the ink. Remove each page as it exits the printer, and let it dry completely before stacking.
l
Clean the ink cartridge nozzles and contacts. For help, see Cleaning ink cartridge nozzles and contacts.
Printed pages have alternating bands of light and dark print (intermittent printing)
l
Select a higher print quality from the Quality/Copies tab of Print Properties.
l
Reinsert the print cartridges. For help, see Replacing an ink cartridge.
Characters are missing or unexpected
l
Make sure the Dell J740 is selected as the default printer.
l
Clean the ink cartridge nozzles and contacts. For help, see Cleaning ink cartridge nozzles and contacts.
l
If you do not want to print a borderless photo, your margins must fall within these settings:
Margin
Minimum setting
Left and right
l
6.35 mm (0.25 in.) for U.S. Letter, U.S. Legal, Banner Letter, and custom paper sizes
3.175 mm (0.125 in.) for envelopes
3.37 mm (0.13 in.) for most paper sizes
Top
l
1.7 mm (0.067 in.)
Bottom
l
12.7 mm (0.5 in.)
l
l
Printed characters are improperly formed or misaligned
l
Cancel all print jobs and print your job again. To cancel all print jobs:
a.
Windows 2000: Click Start ® Settings ® Printers.
Windows XP: Click Start ® Control Panel ® Printers and Other Hardware ® Printers and Faxes.
b.
Double-click your printer icon.
c.
Select the document you want to cancel.
d.
From the Document menu, click Cancel.
l
Repeat steps c through d for each document.
l
Align the ink cartridges. For help, see Aligning the ink cartridges.
l
Clean the ink cartridge nozzles and contacts. For help, see Cleaning ink cartridge nozzles and contacts.
Colors on the printout differ from the colors on the screen
l
A cartridge may be low on ink. Check the ink levels in the Dell Printer Solution Center.
l
Use a different paper brand. Each paper brand accepts ink differently and prints with color variations.
Select Natural Color as the document color:
1.
With your document open, click File ® Print.
The Print dialog box appears.
2.
From the Print dialog box, click Properties, Preferences, or Options.
3.
From the I Want To menu, click Options ® Quality Options.
4.
Click Select color settings manually.
5.
Select Natural Color.
Colors on the printout are faded
Try the suggestions listed in Colors on the printout differ from the colors on the screen. If the colors still seem faded, clean the ink cartridge nozzles and
contacts. For help, see Cleaning ink cartridge nozzles and contacts.
Photos do not print as expected
l
Use a photo paper designed for inkjet printers.
l
Select a higher print quality from the Quality/Copies tab of Print Properties.
l
Select Photo paper as the paper type.
l
Print a borderless photo:
a.
From the Print Properties dialog box, select the Paper Setup tab.
b.
From the Paper Size area, select Borderless.
c.
From the Paper Size menu, select the correct size.
Solving specialty media problems
The following topics can help solve problems with specialty media.
Glossy/photo papers or transparencies stick together
l
Load one sheet of photo paper or transparency at a time.
l
Use a photo paper or transparency designed for inkjet printers.
l
Remove each page as it exits the printer and let it dry completely before stacking.
Photo papers or transparencies contain white lines
l
Make sure the Dell J740 printer is selected as the default printer.
l
Select a higher printer quality from the Quality/Copies tab of Print Properties.
l
Clean the ink cartridge nozzles and contacts. For help, see Cleaning ink cartridge nozzles and contacts.