1
SMART Meeting Pro® 4.0 SP2
software
SYSTEM ADMINISTRATOR’S GUIDE
Trademark notice
SMART Meeting Pro, Bridgit, SMART Board, SMART Ink, the SMART logo, smarttech and all SMART taglines are trademarks or registered trademarks of
SMART Technologies ULC in the U.S. and/or other countries. Microsoft, Windows, Visual Studio, MSDN, Outlook and Active Directory are either registered
trademarks or trademarks of Microsoft Corporation in the U.S. and/or other countries. All other third-party product and company names may be trademarks of their
respective owners.
Copyright notice
© 2013–2015 SMART Technologies ULC. All rights reserved. No part of this publication may be reproduced, transmitted, transcribed, stored in a retrieval system
or translated into any language in any form by any means without the prior written consent of SMART Technologies ULC. Information in this manual is subject to
change without notice and does not represent a commitment on the part of SMART.
This product and/or use thereof covered by one or more of the following U.S. patents.
www.smarttech.com/patents
01/2015
smarttech.com/kb/170518
Contents
Chapter 1: Welcome
What’s new
Computer requirements
Downloading the installation package and supporting files
Chapter 2: Customizing the installation package
Using SMART Install Manager
Using third-party tools
Chapter 3: Deploying the installation package
Using third-party imaging or remote management software
Using the command line interface
Activating SMART Meeting Pro software
Chapter 4: Configuring the software
Orienting your SMART interactive product after installation
Configuring 4K UHD displays
Configuring Microsoft Exchange settings
1
1
2
3
7
7
16
25
26
27
28
31
31
32
32
Chapter 5: Updating the software
39
Chapter 6: Removing the software
41
Using the user interface
Using the command line interface
Appendix A: Installation parameters
i
smarttech.com/kb/170518
41
42
47
Chapter 1
Welcome
What’s new
Computer requirements
For one- or two-display systems
For three- to eight-display systems
For nine- to sixteen-display systems
Downloading the installation package and supporting files
1
2
2
2
2
3
This guide explains how to deploy SMART Meeting Pro® software.
This guide is intended for IT administrators and others experienced with deploying and
administering software in a networked environment. To use this guide, you must:
l
Know IT terminology such as “registry” and “domain controller”
l
Know how to complete basic administrative tasks in the operating system
l
Have administrative privileges and access to servers
l
Have Internet access
NOTE
You can view an online version of this guide on your computer, tablet or smart phone by going to
onlinehelp.smarttech.com/english/guides/meetingpro/4_0_2 or by scanning the QR code on the
cover.
What’s new
The following are changes to the deployment of SMART Meeting Pro 4.0 SP2 software:
l
The minimum version for Microsoft® .NET Framework has increased to 4.5.1.
l
The minimum version of Microsoft Visual Studio® Tools for Office has increased to
10.0.50903, and there is now a single installation package for this supporting software.
1
smarttech.com/kb/170518
CHAPTER 1
WELCOME
l
A new SMART Product Update (SPU) installation property enables you to push new values for
the Check for updates and Notify users about SMART product updates settings to computers
and ensure the new values are accepted.
Computer requirements
Ensure that all computers to which you plan to deploy SMART Meeting Pro software meet the
minimum requirements for the number of connected displays.
For one- or two-display systems
l
Windows® 7, Windows 8 or Windows 8.1 operating system
l
2 GHz dual-core processor or faster (quad-core recommended)
l
2 GB of RAM (4 GB recommended)
l
1 GB of free hard disk space for minimum installation (additional free space required during
installation)
l
Discrete 128 MB of VRAM and support for Microsoft® DirectX® 10.1 technology
l
Microsoft .NET Framework 4.5.1 Full
l
Microsoft Visual Studio® Tools for Office
For three- to eight-display systems
l
Windows 7, Windows 8 or Windows 8.1 operating system
l
2 GHz dual-core processor or faster (quad-core recommended)
l
4 GB of RAM
l
1 GB of free hard disk space for minimum installation (additional free space required during
installation)
l
Discrete 256 MB of VRAM and support for Microsoft DirectX 10.1 technology
l
Microsoft .NET Framework 4.5.1 Full
l
Microsoft Visual Studio Tools for Office
For nine- to sixteen-display systems
2
l
Windows 7, Windows 8 or Windows 8.1 (64-bit) operating system
l
3 GHz dual-core processor or faster (quad-core recommended)
l
8 GB of RAM or more
smarttech.com/kb/170518
CHAPTER 1
WELCOME
l
1 GB of free hard disk space for minimum installation (additional free space required during
installation)
l
Discrete 512 MB of VRAM and support for Microsoft DirectX 10.1 technology
l
Microsoft .NET Framework 4.5.1 Full
l
Microsoft Visual Studio Tools for Office
Downloading the installation package and
supporting files
If your organization’s computers meet the computer requirements, download the installation
package and supporting files.
To download the installation packages and supporting files
1. Go to smarttech.com/administratordownloads.
2. Click Choose a version under SMART Meeting Pro software , and then select 4.0 SP2 for
Windows.
3. Click Download, and then save the .zip file to a temporary location on your computer when
prompted.
4. Extract the contents of the .zip file to a temporary location on your computer.
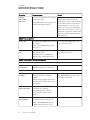
The .zip file contains installation packages and supporting files for the following software:
SMART software
File
Description
Installation package
SMARTMeetingProInstaller.msi
SMART Meeting Pro software installation package
Installation language files
3
2052.mst
Chinese (Simplified) installation language file
1029.mst
Czech installation language file
1030.mst
Danish installation language file
1043.mst
Dutch installation language file
1033.mst
English (U.S.) installation language file
2057.mst
English (UK) installation language file
smarttech.com/kb/170518
CHAPTER 1
WELCOME
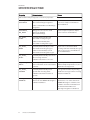
File
Description
1035.mst
Finnish installation language file
1036.mst
French installation language file
1031.mst
German installation language file
1040.mst
Italian installation language file
1041.mst
Japanese installation language file
1044.mst
Norwegian installation language file
1046.mst
Portuguese (Brazil) installation language file
1049.mst
Russian installation language file
1034.mst
Spanish installation language file
1053.mst
Swedish installation language file
Language packs
4
chinese_(simplified)_
handwriting.msi
Chinese language pack
czech_handwriting.msi
Czech language pack
danish_handwriting.msi
Danish language pack
dutch_handwriting.msi
Dutch language pack
english_(united_kingdom)_
handwriting.msi
English (UK) language pack
finnish_handwriting.msi
Finnish language pack
french_handwriting.msi
French language pack
german_handwriting.msi
German language pack
italian_handwriting.msi
Italian language pack
japanese_handwriting.msi
Japanese language pack
norwegian_handwriting.msi
Norwegian language pack
portuguese_(brazil)_
handwriting.msi
Portuguese (Brazil) language pack
russian_handwriting.msi
Russian language pack
spanish_handwriting.msi
Spanish language pack
swedish_handwriting.msi
Swedish language pack
smarttech.com/kb/170518
CHAPTER 1
WELCOME
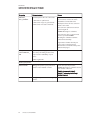
NOTES
o
The installation language files define the language of the installer’s user interface and
the installed software’s icons and shortcuts.They don’t define the installed software’s
user interface language or the handwriting recognition languages. You can deploy only
one installation language file at a time.
o
The language packs define the handwriting recognition languages. You can deploy
multiple language packs at a time.
o
The installed software’s user interface is defined by the computer’s operating system
language if it’s supported, or English (U.S.) if not.
Third-party software
File
Description
dotNetFx451_Full_setup.exe
.NET Framework 4.5.1 installation package *
vstor_redist.exe
Visual Studio Tools for Office installation package
*SMART recommends that you download the latest version of the .NET Framework files from the Microsoft website. For
information on deploying the .NET Framework, refer to the .NET Framework Deployment Guide for Administrators on the
MSDN® website (msdn.microsoft.com/en-us/library/ee390831.aspx).
5
smarttech.com/kb/170518
Chapter 2
Customizing the installation
package
Using SMART Install Manager
Using third-party tools
After downloading the installation package, you can customize it for your organization.
You can customize the installation package using SMART Install Manager.
OR
You can customize the installation package using third-party tools and Windows Installer
properties.
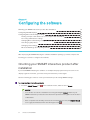
Using SMART Install Manager
SMART Install Manager enables you to customize SMART software installation packages (also
known as MSI files) by publishing MST files. You can then deploy the MSI and MST files to
computers.
To install SMART Install Manager
1. Go to smarttech.com/administratordownloads.
2. Click Choose a version under SMART Meeting Pro software , and then select 4.0 for
Windows.
3. Click Download SMART Install Manager.
4. Click Download, and then save Install Manager.exe to your computer.
5. Double-click Install Manager.exe.
The SMART Install Manager installation wizard appears.
6. Follow the on-screen instructions.
7
smarttech.com/kb/170518
7
16
CHAPTER 2
CUSTOMIZING THE INSTALLATION PACKAGE
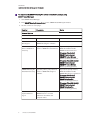
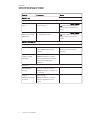
To customize the SMART Meeting Pro software installation package using
SMART Install Manager
1. Start SMART Install Manager.
2. Drag SMARTMeetingProInstaller.msi to the SMART Install Manager window.
3. Set the controls on each page.
Control
Procedure
Notes
General Options
Installation Options
Install SMART Ink
Select to install SMART Ink™.
Install SMART
Meeting Pro
Select to install
SMART Meeting Pro software.
SMART Product
Drivers installation
directory
Type the path to your preferred
folder for SMART Product Drivers.
SMART Meeting Pro Type the path to your preferred
Installation directory folder for SMART Meeting Pro
software.
Start SMART
System Menu at
logon
8
smarttech.com/kb/170518
Select to display the
SMART Board® icon in the
notification area when the
computer starts.
If you don’t specify a folder,
Windows Installer installs
SMART Product Drivers in
[Program Files folder] \
SMART Technologies\
SMART Product Drivers
(32-bit operating systems) or
[Program Files (x86) folder] \
SMART Technologies\
SMART Product Drivers
(64-bit operating systems).
If you don’t specify a folder,
Windows Installer installs
SMART Meeting Pro software in
[Program Files folder] \
SMART Technologies\
SMART Meeting Pro
(32-bit operating systems) or
[Program Files (x86) folder] \
SMART Technologies\
SMART Meeting Pro
(64-bit operating systems).
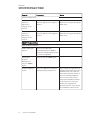
CHAPTER 2
CUSTOMIZING THE INSTALLATION PACKAGE
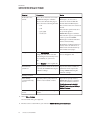
Control
Procedure
Notes
Language Selection
Select the language Select the language packs you
packs you want to
want to install.
install
For more information on
language packs, see
Downloading the installation
package and supporting files on
page 3.
Ensure the language packs are in
the appropriate folder (see
Deploying the installation
package on page 25).
SMART Product Update
Install SMART
Product Update in
Full mode
Select to install
SMART Product Update (SPU) in
Full mode.
In Full mode, users can view the
installed versions of SMART
software as well as their product
keys, and download and install
updates.
Install SMART
Product Update in
Dashboard mode
Select to install SPU in Dashboard
mode.
In Dashboard mode, users can
view only the installed versions
of SMART software and their
product keys.
Do not install
SMART Product
Update
Select to not install SPU.
Check for updates
Type the number of days (1 to 60)
between SPU checks.
This option is available only if
you install SPU in Full mode.
By default, SPU checks for
product updates every 30 days.
9
Notify users about
SMART product
updates
Select to notify users of available
SMART product updates through
the Windows notification area.
This option is available only if
you install SPU in Full mode.
Reset per-user
changes to the
previous two
settings
Select to remove existing Check
for updates and Notify users
about SMART product updates
values the next time the user runs
SPU.
This option enables you to push
new values for these settings to
computers and ensure the new
values are accepted.
smarttech.com/kb/170518
Individual users can still modify
these settings.
CHAPTER 2
CUSTOMIZING THE INSTALLATION PACKAGE
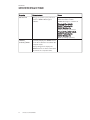
Control
Procedure
Notes
Enable the
Customer
Experience
Program on all
devices
Select to automatically enable the
Customer Experience Program for
all users.
Users can disable the Customer
Experience Program through the
Help menu.
Disable the
Customer
Experience
Program on all
devices
Select to automatically disable the Users can’t enable the Customer
Customer Experience Program for Experience Program through the
all users.
Help menu.
Customer Experience
SMART Product Drivers
Optional Drivers Settings
10
Enable Tablet PC
Support
Select to use Tablet PC
functionality with your SMART
interactive display without having
to connect a Tablet PC.
Start Simple
Network
Management
Protocol (SNMP)
Agent
Select to start the SNMP agent.
Register unsigned
drivers
Select to enable the registration
of unsigned third-party drivers.
smarttech.com/kb/170518
If you enable the registration of
unsigned third-party drivers, the
installation process could ask
users if they trust the makers of
the drivers during installation.
This can cause issues if you
deploy the installation in Silent
mode. Therefore, it’s best to
disable the registration of
third-party drivers if you deploy
the installation in Silent mode.
CHAPTER 2
CUSTOMIZING THE INSTALLATION PACKAGE
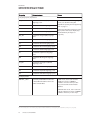
Control
Procedure
Notes
Start SMART Ink at
logon
Select to start SMART Ink when
the user logs on.
You must select Install SMART
Ink in the Installation Options
page for this option to take
effect.
Make SMART Ink
Viewer the default
PDF viewer
Select to make SMART Ink Viewer You must select Install SMART
the default PDF viewer.
Ink in the Installation Options
page for this option to take
effect.
SMART Ink
Optional Ink Settings
SMART Meeting Pro
Meeting Pro Activation
Product key
Type the 25-character product
key for SMART Meeting Pro
software.
Activate SMART
software during
installation
Select to activate
SMART Meeting Pro software
automatically during installation
rather than manually after
installation.
Shortcuts
Install Desktop
shortcut
Select to create shortcuts to
SMART Meeting Pro software on
the desktop.
Launch
Select to start
SMART Meeting Pro SMART Meeting Pro software
at Startup
automatically when the user
logs on.
11
smarttech.com/kb/170518
When the software deploys, the
product key activates the
software.
CHAPTER 2
CUSTOMIZING THE INSTALLATION PACKAGE
Control
Procedure
Notes
Microsoft Exchange and E-mail Server Settings
Enable integration
with Microsoft
Exchange
Select to enable
Microsoft Exchange integration
with SMART Meeting Pro
software.
Auto start
scheduled meeting
at logon
Select to automatically start
scheduled meetings each time a
user starts a new session.
Auto book ad hoc
meeting at logon
Select to automatically book and
start an unscheduled meeting
each time a user starts a new
session if the room resource is
available.
Auto reset room
after meeting end
time
Select to automatically reset the
room five minutes after a
meeting’s scheduled end time.
Use the drop-down menu to
change the delay time.
Auto insert agenda
at meeting start
Select to automatically insert
meeting details into the drawing
area each time a scheduled
meeting starts.
Enable SMTP e-mail Select to configure SMTP email
configuration
settings or the computer’s default
email client.
12
smarttech.com/kb/170518
You must add the room
resource’s unique email address
after installation.
Users can access their
Microsoft Outlook® meeting
details and email Whiteboard
files to themselves or to other
users in SMART Meeting Pro
software.
If you don’t enable
Microsoft Exchange integration
settings, you can still configure
SMTP email settings. Users are
unable to access their Outlook
meeting details, but they can still
email Whiteboard files.
CHAPTER 2
CUSTOMIZING THE INSTALLATION PACKAGE
Control
Procedure
Notes
Sender e-mail
address
Type the sender email address for Users can email Whiteboard files
the SMART Meeting Pro software to themselves or to other users
installation.
from SMART Meeting Pro
software. The software uses this
email address in the Sender
field.
If the computer doesn’t have an
email client installed, enter a do
not reply value. This indicates to
email recipients that they can’t
reply to emails they receive.
SMTP server name
Type the name of the SMTP
server.
Users can email Whiteboard files
to themselves or to other users
from SMART Meeting Pro
software. The software uses this
email server to send the file.
Use the computer’s
default e-mail client
to send e-mail
messages
Select to use the computer’s
default email client to send email
messages.
The default email client must be
properly configured before
email can be sent.
SMART Meeting Pro Collaboration Information
13
Disable remote
collaboration
Select to disable remote
collaboration.
If you select this option, you can
still enable Bridgit software
integration after installation by
specifying a Bridgit server in
SMART Meeting Pro Settings.
Enable Bridgit
integration
Select to enable Bridgit software
integration for SMART
Meeting Pro software remote
collaboration.
If no server name is provided,
Bridgit software integration is
disabled.
Bridgit Server
Type the name of the Bridgit
server (for example,
bridgit.example.com).
The Bridgit server enables
SMART Meeting Pro software to
connect to SMART Meeting Pro
software on other computers.
Access password
Type the access password for the
Bridgit server.
Creation password
Type the creation password for
the Bridgit server.
smarttech.com/kb/170518
CHAPTER 2
CUSTOMIZING THE INSTALLATION PACKAGE
Control
Procedure
Automatically share
primary screen
Select to share the main screen
each time a user starts a new
session.
Show meeting
password on
collaboration bar
Select to show the meeting
password in text on the Bridgit
Collaboration Bar.
Notes
Additional Configuration
Default whiteboard
style
Select Unbound Whiteboard to
present pages in Unbound
Workspace.
OR
Select Classic Whiteboard to
present pages in Classic
Workspace.
In Unbound Workspace, pages
have no defined boundaries, and
the page area can be
significantly larger than the
viewable area. This is beneficial
when users want to use
Whiteboard mode for
brainstorming or to zoom in on
specific details in large, detailed
maps, diagrams or other images.
In Classic Workspace, pages
have defined boundaries, and
the page area is usually the same
as or slightly larger than the
viewable area. This is beneficial
when users want all content to
be visible at the same time in the
viewable area.
SMART recommends that you
select Unbound Workspace.
Default mode
Select Desktop to make
SMART Meeting Pro software
open in Desktop mode.
OR
Select Whiteboard to make
SMART Meeting Pro software
open in Whiteboard mode.
14
smarttech.com/kb/170518
CHAPTER 2
CUSTOMIZING THE INSTALLATION PACKAGE
Control
Procedure
Notes
Default file save
format
Select the default file format that
SMART Meeting Pro software
uses to save whiteboard pages.
Select from the following formats:
If you select Unbound
Workspace, do not select
.notebook as the default file
format. Unbound Workspace
files can’t be saved in .notebook
format.
o
.fcw
o
.pdf
o
.ppt (.pptx)
o
.notebook
Files saved in .pdf format can’t
be opened again in
SMART Meeting Pro software.
Files saved in .ppt or .pptx format
can be opened in SMART
Meeting Pro software but have
reduced functionality.
Regardless of which format you
select, users can still select a
different file format when they
save whiteboard pages.
Ink type
Select Calligraphic to use
calligraphic ink, which smooths
your writing strokes and improves
the readability of your notes.
SMART recommends that you
select calligraphic ink.
OR
Select Regular to use regular ink.
Administrator
password
Type a password that allows users If you leave this box blank, no
to modify the SMART Meeting Pro password will be required to
software settings.
change SMART Meeting Pro
software settings.
Gallery Location
Save Gallery
content added by
user in
Type the path to your preferred
folder for user-added content.
Additional Gallery
Folder
Type the path to additional gallery
folders.
If you don’t specify a folder,
SMART Meeting Pro software
stores user-added content in
[Public documents folder] \
SMART Technologies\Gallery\
Added Content.
4. Select File > Publish.
The Save file dialog box appears.
5. Browse to the location where you extracted SMARTMeetingProInstaller.msi.
15
smarttech.com/kb/170518
CHAPTER 2
CUSTOMIZING THE INSTALLATION PACKAGE
6. Type a name for the MST file in the File name box, and then click Save.
7. Close SMART Install Manager.
Using third-party tools
You can customize SMART software installation packages by creating MST files using a third-party
tool, such as Orca database editor, and the Windows Installer properties.
SMART Meeting Pro software installation package properties
Property
Allowed values
Notes
General properties
Installation properties
TRANSFORMS
[String]: A language MST file for the
installation.
For more information on installation
language files, see Downloading the
installation package and supporting
files on page 3.
Ensure the specified MST file is in
the same folder as the MSI file.
You can also use the TRANSFORMS
property to apply an MST file
created by SMART Install Manager
or a third-party tool.
INSTALL_INK
1 (default): Install SMART Ink.
[Empty string]: Don’t install
SMART Ink
INSTALL_MPRO
1 (default): Install SMART Meeting Pro
software.
[Empty string]: Don’t install
SMART Meeting Pro software.
DRIVERSDIR
16
[String]: The path to your preferred
folder for SMART Product Drivers.
smarttech.com/kb/170518
If you don’t specify a folder,
Windows Installer installs
SMART Product Drivers in
[Program Files folder] \
SMART Technologies\
SMART Product Drivers
(32-bit operating systems) or
[Program Files (x86) folder] \
SMART Technologies\
SMART Product Drivers
(64-bit operating systems).
CHAPTER 2
CUSTOMIZING THE INSTALLATION PACKAGE
Property
Allowed values
Notes
INSTALLDIR
[String]: The path to your preferred
folder for SMART Meeting Pro
software.
If you don’t specify a folder,
Windows Installer installs
SMART Meeting Pro software in
[Program Files folder] \
SMART Technologies\
SMART Meeting Pro
(32-bit operating systems) or
[Program Files (x86) folder] \
SMART Technologies\
SMART Meeting Pro
(64-bit operating systems).
LAUNCH_
SYSTEM_MENU
1 (default): Display the SMART Board
icon in the notification area when the
computer starts.
[Empty string]: Don’t display the
SMART Board icon in the notification
area when the computer starts.
17
smarttech.com/kb/170518
CHAPTER 2
CUSTOMIZING THE INSTALLATION PACKAGE
Property
Allowed values
Notes
Language pack properties1
ZH_CN
1: Install the Chinese (Simplified)
language pack.
CS
1: Install the Czech language pack.
DA
1: Install the Danish language pack.
NL
1: Install the Dutch language pack.
EN_GB
1: Install the English (UK) language
pack.
FI
1: Install the Finnish language pack.
FR
1: Install the French language pack.
DE
1: Install the German language pack.
IT
1: Install the Italian language pack.
JA
1: Install the Japanese language
pack.
NB
1: Install the Norwegian language
pack.
PT_BR
1: Install the Portuguese (Brazil)
language pack.
RU
1: Install the Russian language pack.
ES
1: Install the Spanish language pack.
SV
1: Install the Swedish language pack.
For more information on language
packs, see Downloading the
installation package and supporting
files on page 3.
Ensure the language packs are in the
appropriate folder (see Deploying
the installation package on
page 25).
SPU properties
INSTALL_SPU
1 (default): Install SPU in Full mode.
2: Install SPU in Dashboard mode.
0: Don’t install SPU.
In Full mode, users can view the
installed versions of SMART
software as well as their product
keys, and download and install
updates.
In Dashboard mode, users can view
only the installed versions of SMART
software and their product keys.
1You must deploy the selected language packs with the MSI file (see Deploying the installation package on page 25).
18
smarttech.com/kb/170518
CHAPTER 2
CUSTOMIZING THE INSTALLATION PACKAGE
Property
Allowed values
Notes
SPU_TIME_
FRAME
[Integer]: The time in days (1 to 60)
between SPU checks.
By default, SPU checks for product
updates every 30 days.
This property is applicable only if
you install SPU.
PRODUCT_
NOTIFICATION
1 (default): Notify the user when
updates are available from SPU.
This property is applicable only if
you install SPU.
0: Don’t notify the user when updates
are available from SPU.
INVALIDATE_
HKCU_ INTERVAL
1: Remove existing Check for
updates and Notify users about
SMART product updates values the
next time the user runs SPU.
This property enables you to push
new values for these settings to
computers and ensure the new
values are accepted.
0 (default): Don’t remove existing
Check for updates and Notify users
about SMART product updates
values the next time the user runs
SPU.
Individual users can still modify
these settings.
Customer Experience Program properties
CUSTOMER_
LOGGING
1 (default): Allow users to enable or
disable the Customer Experience
Program.
0: Disable the Customer Experience
Program.
SMART Product Drivers properties
ENABLE_
STPCS
1 (default): Use Tablet PC
functionality with the SMART
interactive product without
connecting a Tablet PC.
[Empty string]: Don’t use Tablet PC
functionality with the SMART
interactive product without
connecting a Tablet PC.
START_SNMP_
SERVICE
19
1: Start the SNMP agent.
0 (default): Don’t start the SNMP
agent.
smarttech.com/kb/170518
If you disable this property, users
don’t have touch support at the
Windows logon screen.
CHAPTER 2
CUSTOMIZING THE INSTALLATION PACKAGE
Property
Allowed values
Notes
INSTALL_
UNSIGNED_
DRIVERS
1: Enable the registration of unsigned
third-party drivers.
If you enable the registration of
unsigned third-party drivers, the
installation process could ask users if
they trust the makers of the drivers
during installation. This can cause
issues if you deploy the installation
in Silent mode. Therefore, it’s best to
disable the registration of third-party
drivers if you deploy the installation
in Silent mode.
0 (default): Disable the registration of
unsigned third-party drivers.
SMART Ink properties
LOSU_INK
1 (default): Start SMART Ink when the
user logs on.
You must install SMART Ink for this
property to take effect.
0: Don’t start SMART Ink when the
user logs on.
DEFAULT_
PDF
1: Set SMART Ink Viewer as the
default PDF viewer.
You must install SMART Ink for this
property to take effect.
0 (default): Don’t set SMART Ink
Viewer as the default PDF viewer.
SMART Meeting Pro software properties
Activation properties
ISX_
SERIALNUM
[String]: A 25-character
SMART Meeting Pro product key.
Shortcut properties
ACTIVATE_
LICENSE
1 (default): Register the product key
and automatically activate the
software.
[Empty string]: Register the product
key but don’t automatically activate
the software.
CREATE_
DESKTOPICONS
1 (default): Include a shortcut to the
software on the desktop.
[Empty string]: Don’t include a
shortcut to the software on the
desktop.
LOSU_
MEETINGPRO
1 (default): Start SMART Meeting Pro
software when the user logs on.
0: Don’t start SMART Meeting Pro
software when the user logs on.
20
smarttech.com/kb/170518
You must include the
ISX_SERIALNUM property for this
property to take effect.
CHAPTER 2
CUSTOMIZING THE INSTALLATION PACKAGE
Property
Allowed values
Notes
Microsoft Exchange integration and email properties
ENABLE_
EXCHANGE
1 (default): Enable
Microsoft Exchange integration.
0: Don’t enable Microsoft Exchange
integration.
EXCHANGE_
RM_EMAIL
[String]: A room resource email
address to link with
Microsoft Exchange.
EX_AUTO_
START
1 (default): Automatically start
scheduled meeting at logon.
You must also add the room
resource’s unique email address
after installation.
Each computer requires a unique
room resource email address.
0: User must manually start
scheduled meeting after logon.
EX_AUTO_
BOOK
1 (default): Automatically book an
unscheduled meeting at logon.
0: User must manually book an
unscheduled meeting after logon.
EX_AUTO_
RESET
If you select 1, an unscheduled
meeting starts automatically at logon
if the room resource is available for
the next 30 minutes.
1 (default): Automatically reset room
after meeting end time.
0: Disable automatic room reset.
EX_RESET_
DELAY
5 (default): Delay time in minutes
before automatic room reset feature
activates.
Type the preferred delay time in
minutes. Only delay values of 1, 5 or
10 minutes are supported.
EX_AUTO_
AGENDA
1 (default): Automatically insert
agenda after meeting starts.
The agenda includes any meeting
details the user typed in the meeting
invitation in Outlook.
0: Disable automatic insertion of
agenda.
EMAIL_
ADDRESS
21
[String]: Type the sender email
address for the SMART Meeting Pro
software installation.
smarttech.com/kb/170518
Users can email Whiteboard files to
themselves or to other users from
SMART Meeting Pro software. The
software uses this email address in
the Sender field if Microsoft
Exchange integration is disabled.
CHAPTER 2
CUSTOMIZING THE INSTALLATION PACKAGE
Property
Allowed values
Notes
EMAIL_
SERVER
[String]: An email server for the
SMART Meeting Pro software
installation (for example,
mail.example.com).
Users can email Whiteboard files to
themselves or to other users from
SMART Meeting Pro software if
Microsoft Exchange integration is
enabled. The software uses this
email server to send the file if
Microsoft Exchange integration is
disabled.
USE_SYSTEM_
EMAIL
0 (default): Don’t use the computer’s
default email client to send email
messages.
The default email client must be
properly configured before email
can be sent if Microsoft Exchange
integration is disabled.
1: Use the computer’s default email
client to send email messages.
Collaboration properties
ENABLE_BRIDGIT
1 (default): Enable Bridgit integration.
0: Don’t enable Bridgit integration.
BRIDGIT_
SERVER_NAME
[String]: The name of the Bridgit
server (for example,
bridgit.example.com).
SERVER_PWD
[String]: The access password for the
Bridgit server.
CREATION_PWD
[String]: The creation password for
the Bridgit server.
ADMIN_PWD
[String]: A password that allows users
to modify the SMART Meeting Pro
software settings.
ENABLEBRIDGIT
AUTOSHARE
1: Share the main screen each time a
user starts a new session.
0 (default): Don’t share the main
screen each time a user starts a new
session.
22
smarttech.com/kb/170518
Bridgit integration enables
SMART Meeting Pro software to
connect to SMART Meeting Pro
software on other computers. For
more information, see
smarttech.com/bridgit.
If no server name is provided, Bridgit
software integration is disabled.
If you don’t specify a value, no
password will be required to change
SMART Meeting Pro software
settings.
CHAPTER 2
CUSTOMIZING THE INSTALLATION PACKAGE
Property
Allowed values
Notes
ENABLEBRIDGIT
1 (default): Show the meeting
SHOWPASSWORD password in text on the Bridgit
Collaboration Bar.
0: Mask the meeting password on
the Bridgit collaboration bar.
Additional properties
UNBOUND
WHITEBOARD
1 (default): SMART Meeting Pro
software presents pages in Unbound
Workspace.
0: SMART Meeting Pro software
presents pages in Classic
Workspace.
In Unbound Workspace, pages have
no defined boundaries, and the
page area can be significantly larger
than the viewable area. This is
beneficial when users want to use
Whiteboard mode for brainstorming
or to zoom in on specific details in
large, detailed maps, diagrams or
other images.
In Classic Workspace, pages have
defined boundaries, and the page
area is usually the same as or slightly
larger than the viewable area. This is
beneficial when users want all
content to be visible at the same
time in the viewable area.
SMART recommends that you use
the default value (1).
DEFAULT_
MEETING_MODE
4 (default): SMART Meeting Pro
software opens in Whiteboard mode.
1: SMART Meeting Pro software
opens in Desktop mode.
23
smarttech.com/kb/170518
CHAPTER 2
CUSTOMIZING THE INSTALLATION PACKAGE
Property
Allowed values
Notes
DEFAULT_
FILE_FORMAT
3 (default): Save files in .fcw format.
If you select Unbound Workspace,
do not select .notebook as the
default file format. Unbound
Workspace files can’t be saved in
.notebook format.
1: Save files in .pdf format.
2: Save files in .ppt or .pptx format.
0: Save files in .notebook format.
Files saved in .pdf format can’t be
opened again in
SMART Meeting Pro software.
Files saved in .ppt or .pptx format
can be opened in SMART
Meeting Pro software but have
reduced functionality.
Regardless of which format you
select, users can still select a
different file format when they save
whiteboard pages.
USE_
CALLIGRAPHIC_
INK
1 (default): Use calligraphic ink, which
smooths your writing strokes and
improves the readability of your
notes.
0: Use regular ink.
Gallery properties
GALLERYDIR
[String]: The path to your preferred
folder for user-added content.
EXTGALLERYDIR
[String]: The path to additional gallery
folders.
24
smarttech.com/kb/170518
If you don’t specify a folder,
SMART Meeting Pro software stores
user-added content in
[Public documents folder] \
SMART Technologies\Gallery\
Added Content.
Chapter 3
Deploying the installation package
Using third-party imaging or remote management software
Using the command line interface
Activating SMART Meeting Pro software
You can deploy the installation packages using third-party imaging or remote management
software.
OR
You can deploy the installation packages using the operating system’s command line interface.
Deploy the installation package and supporting files in the following order:
1. .NET Framework 4.5.1 (if not installed)
2. Visual Studio Tools for Office (if not installed)
3. SMART Meeting Pro software
IMPORTANT
If you want to deploy language packs, you must create a folder named
Support in the same location as the installation package and MST file.
Create a subfolder in the Support folder and name it Languages. Place the
language packs in this subfolder.
This folder structure is created automatically if you extract the contents of the.zip file.
25
smarttech.com/kb/170518
26
27
28
CHAPTER 3
DEPLOYING THE INSTALLATION PACKAGE
Using third-party imaging or remote management
software
The following procedure shows how to deploy SMART software using Group Policy-based
deployment software. For information on deploying SMART software using your organization’s
third-party imaging or remote management software, see the software’s documentation.
NOTE
This procedure may vary depending on your version of Windows operating system and your
system preferences.
To deploy an installation package using Group Policy-based deployment software
1. Copy the MSI file, MST file and Support folder to \\[Domain Controller] \NETLOGON, where
[Domain Controller] is your domain controller.
2. Open Control Panel, double-click Administrative Tools, and then double-click
Active Directory Users and Computers.
The Active Directory Users and Computers window appears.
3. Right-click your domain, and then select Properties.
The Properties dialog box appears.
4. Click the Group Policy tab, and then click Edit.
The Group Policy Object Editor dialog box appears.
5. Browse to Computer Configuration\Software Settings.
6. Right-click Software Installation, select New > Package, browse to and select the MSI file,
and then click OK.
7. In the Deploy Software section, click Advanced, and then click OK.
8. Click the Modifications tab, click Add, and then browse to and select the MST file.
9. Click OK to apply the MST file to the MSI file.
10. In the Deploy Software section, click Advanced, and then click OK.
11. Close all open windows and dialog boxes.
NOTE
The time it takes to deploy the software depends on the size of your network.
26
smarttech.com/kb/170518
CHAPTER 3
DEPLOYING THE INSTALLATION PACKAGE
Using the command line interface
Using the command line interface, you can deploy installation packages in many ways, such as
running commands from the Command Prompt window or by including commands in batch files.
To deploy .NET Framework 4.5.1
Run the following command to deploy the installation package in user interface mode:
[Path]\dotNetFx451_Full_setup.exe /passive /showfinalerror
OR
Run the following command to deploy the installation package in silent mode:
[Path]\dotNetFx451_Full_setup.exe /q
Where [Path] is the path to the dotNetFx451_Full_setup.exe file.
To deploy Visual Studio Tools for Office
Run the following command to deploy the installation package:
[Path]\vstor_redist.exe /q
Where [Path] is the path to the vstor_redist.exe file.
To deploy the SMART Meeting Pro software installation package
Run the following command if you created an MST file to customize the installation package:
msiexec /i "[Path]\SMARTMeetingProInstaller.msi" TRANSFORMS="[MST file]"
[Parameter]
OR
Run the following command if you didn’t create an MST file to customize the installation
package:
msiexec /i "[Path]\SMARTMeetingProInstaller.msi" [Properties] [Parameter]
27
smarttech.com/kb/170518
CHAPTER 3
DEPLOYING THE INSTALLATION PACKAGE
Where
o
[Path] is the path to the SMARTMeetingProInstaller.msi file and MST file.
o
[MST file] is the name of the MST file.
o
[Properties] is a set of properties you can include to customize the installation (see Using
third-party tools on page 16).
o
[Parameter] is the installation parameter (see Installation parameters on page 47).
Activating SMART Meeting Pro software
There are two situations in which the software doesn’t activate completely:
l
Imaging a computer: Before the software can activate properly, each computer you install it
on must have a unique installation ID, and you must activate the software after creating the
image. If you use a computer image or clone a hard drive to set up multiple computers, they
all have the same installation ID as the original computer, which can cause an activation error.
l
Protecting software for computer configurations: If you use system recovery or protection
software, you should activate the software before you lock or freeze the computer for your
users. However, if you can’t, you must activate the software afterward.
Run the activation wizard while connected to the network or complete the following procedure to
activate the software on each computer.
To activate SMART Meeting Pro software
Run the following command:
"C:\Program Files\Common Files\SMART Technologies\SMART Product Update\
activationwizard.exe" --puid meeting_pro --m=[Value] --v=3
--a [Optional flags] --pk [Product key]
Where
o
[Value] is 4 to run the activation wizard in unattended mode.
OR
[Value] is 6 to run the activation wizard in user interface mode.
28
smarttech.com/kb/170518
CHAPTER 3
DEPLOYING THE INSTALLATION PACKAGE
o
o
29
[Optional flags] are optional flags you can include to configure the activation wizard.
Flag
Purpose
--monitor=[Number]
Specify the monitor to display the activation wizard.
--proxy=[Host:Port]
Specify the proxy host and port number to use for
activation.
--proxyuser=[User]
Specify the proxy user name to use for activation.
--proxypassword=[Password]
Specify the proxy password to use for activation.
--locale=[Code]
Display the activation wizard user interface in a
specific language, where [Code] is your language
code.
[Product key] is the software product key.
smarttech.com/kb/170518
Chapter 4
Configuring the software
Orienting your SMART interactive product after installation
Configuring 4K UHD displays
Configuring Microsoft Exchange settings
Adding a unique email address to each computer after installation
Accessing administrator settings
Changing Microsoft Exchange integration settings
Checking registry values
Changing email settings
Microsoft Exchange Server polling intervals
After deploying the SMART Meeting Pro software installation package, you must complete the
following procedures to configure the software.
Orienting your SMART interactive product after
installation
If you install SMART Meeting Pro software on a multiple-display system and your touch on one
display registers on another, you must orient your interactive product again.
Use the following procedure to orient your interactive product using SMART Settings.
To orient multiple interactive products
1. Press the SMART Board icon
in the notification area, and then select Orient.
NOTES
o
You can also access the orientation screen by pressing the Orient button on your
SMART interactive product. See the interactive product’s user’s guide for the location
of this button.
o
If the computer isn’t currently connected to an interactive product, the SMART Board
icon is gray and includes an X in its lower-right corner
31
smarttech.com/kb/170518
.
31
32
32
32
33
34
35
37
38
CHAPTER 4
CONFIGURING THE SOFTWARE
o
Sometimes, the orientation screen appears on the primary interactive product instead
of the interactive product you want to orient. If this happens, press SPACEBAR until the
orientation screen appears on the interactive product you want to orient.
2. Touch the center of each target in the order indicated. The computer registers the point on
the interactive product where you remove your finger or pen tool from the surface.
The orientation procedure involves pressing 4, 9, 12 or 20 targets, depending on the
orientation level you select (see the SMART Meeting Pro software online Help for more
information on changing the orientation level of the interactive product).
Configuring 4K UHD displays
If you’re using SMART Meeting Pro software with a 4K UHD display, set the dots per inch (DPI) to
150. For more information, see the operating system’s Help.
NOTE
If you’re using a customized Windows theme, the DPI setting might not be correct. Select a
default Windows theme and then change the DPI setting before making any customizations.
Configuring Microsoft Exchange settings
SMART Meeting Pro software can integrate with Microsoft Exchange to provide a seamless
meeting experience.
Users can schedule meetings from their personal computers using Microsoft Outlook. When users
include a room resource in their invitations, they can access the meeting details from
SMART Meeting Pro software when they log on to the room resource computer.
Adding a unique email address to each computer after installation
For proper integration of Microsoft Exchange, each computer you install SMART Meeting Pro
software on must have a unique room resource email added in the registry entry. This email
address identifies the room within your Microsoft Exchange Server. This enables users to reserve a
room resource by booking the room in the same way they book other meeting participants.
Complete the following procedure to add a unique room resource email address to the registry
entry of each computer.
32
smarttech.com/kb/170518
CHAPTER 4
CONFIGURING THE SOFTWARE
CAUTION
Use caution when you open the Windows registry editor. If you incorrectly modify the Windows
registry, you can damage your computer’s operating system. Back up your registry before
performing the following procedures.
TIP
For information on configuring a mass deployment of unique room resource email addresses,
see the online Help systems for your network administration tools.
To add an email address to the registry entry after installation
1. Open the Registry Editor.
2. Use the following table to locate the appropriate key for your operating system.
Operating system
Folder location
32-bit
HKEY_LOCAL_MACHINE\Software\SMART Technologies\
SMART Meeting Pro\Version 4.0.1\MSExchange
64-bit
HKEY_LOCAL_MACHINE\Software\Wow6432Node\
SMART Technologies\SMART Meeting Pro\Version 4.0.1\
MSExchange
3. Right-click MeetingRoomEmail, and then select Modify.
4. Type the room resource computer’s unique email address in the Value data box, and then
click OK.
5. Close the Registry Editor window.
6. Restart SMART Meeting Pro software.
Accessing administrator settings
You can change various administrator settings, including your administrator password.
NOTE
The SMART Meeting Pro Settings dialog box is available on each computer that hosts
SMART Meeting Pro software when the software is running.
33
smarttech.com/kb/170518
CHAPTER 4
CONFIGURING THE SOFTWARE
To access the SMART Meeting Pro Settings dialog box
1. Press the SMART Board icon
in the notification area, and then select SMART Settings.
2. Press SMART Meeting Pro Settings.
The SMART Meeting Pro Settings logon dialog box appears.
3. Type your administrator password, and then press OK.
NOTE
There is no password by default.
The SMART Meeting Pro Settings dialog box appears.
To change the administrator password
1. Press the SMART Board icon
in the notification area, and then select SMART Settings.
2. Press SMART Meeting Pro Settings.
The SMART Meeting Pro Settings logon dialog box appears.
3. Press Change Password.
The Change administrator password dialog box appears.
4. Type your current password and new password in the appropriate boxes.
5. Press OK.
Changing Microsoft Exchange integration settings
You can enable Microsoft Exchange integration, change various automatic settings, and configure
a service account.
To change Microsoft Exchange integration settings
1. Open the SMART Meeting Pro Settings dialog box.
2. Press the Microsoft Exchange tab.
3. Select Enable Microsoft Exchange integration.
34
smarttech.com/kb/170518
CHAPTER 4
CONFIGURING THE SOFTWARE
4. Change settings:
Control
Procedure
Room e-mail
address
Type your meeting room resource
email address.
Notes (if any)
Auto start
Select the check box to enable
scheduled
automatic starting of scheduled
meeting at logon meetings.
Auto book ad
hoc meeting at
logon
Select the check box to enable
automatic creation of ad hoc
meetings.
Auto reset room
after meeting
end time
Select the check box to enable the
automatic end-meeting feature,
and then select the delay time (in
minutes) before the meeting
automatically ends from the
drop-down list.
Auto insert
agenda at
meeting start
Select the check box to
automatically insert meeting
details.
Use service
account instead
of logged on
user’s
credentials
Select the check box to use a
In typical installations, you don’t use
service account, and then type your a service account.
domain, user name and password in
the appropriate boxes.
5. Optionally, press Server Settings, manually specify the URL of the Microsoft Exchange and
Active Directory® servers that SMART Meeting Pro software authenticates against, and then
press OK.
NOTE
In typical installations, you don’t manually specify the URL of the Microsoft Exchange and
Active Directory servers.
6. Press OK.
Checking registry values
When you use the SMART Meeting Pro Settings dialog box to configure Microsoft Exchange, the
following registry keys are automatically configured:
l
Meeting room email
l
Service account credentials
35
smarttech.com/kb/170518
CHAPTER 4
CONFIGURING THE SOFTWARE
NOTE
If you didn’t select automatic detection of Microsoft Exchange Server and Active Directory
server options, the Microsoft Exchange Server and Active Directory registry keys are
automatically configured.
Use the following procedure to ensure that the correct registry values were assigned during the
Microsoft Exchange configuration process.
CAUTION
Use caution when you open the Windows registry editor. If you incorrectly modify the Windows
registry, you can damage your computer’s operating system. Back up your registry before
performing the following procedures.
To check the registry key values
1. Log on to the computer hosting SMART Meeting Pro software as an administrator.
2. Open the Registry Editor.
3. Use the following table to locate the appropriate key for your operating system.
Operating system
Folder location
32-bit
HKEY_LOCAL_MACHINE\Software\SMART Technologies\
SMART Meeting Pro\Version 4.0.1\MSExchange
64-bit
HKEY_LOCAL_MACHINE\Software\Wow6432Node\
SMART Technologies\SMART Meeting Pro\Version 4.0.1\
MSExchange
4. Check the following registry key:
36
Name
Description
MeetingRoomEmail
SMART Meeting Pro software uses this registry key for the room
email address. This key is required and should contain the email
address of the meeting room in which SMART Meeting Pro
software is installed.
AuthUsername and
AuthPassword
If you selected Use service account instead of logged-on
user’s credentials in the Microsoft Exchange tab, then registry
keys exist for the service account logon name and password.
smarttech.com/kb/170518
CHAPTER 4
CONFIGURING THE SOFTWARE
Name
Description
AuthADServer and
ConnURL
If you didn’t select automatic detection of Microsoft Exchange
Server and Active Directory server options during
Microsoft Exchange configuration, SMART Meeting Pro
software requires Microsoft Exchange server and Active
Directory addresses.
Changing email settings
If you don’t enable integration with Microsoft Exchange, you can use SMTP email or the computer’s
default email client instead.
NOTE
If you don’t enable Microsoft Exchange integration, you’re unable to use the meeting notification
features of SMART Meeting Pro software. However, you can use SMTP email to send meeting
notes from Whiteboard mode.
To change email settings
1. Open the SMART Meeting Pro Settings dialog box.
2. Press the E-mail tab.
3. If you want to use SMTP email, change settings:
Control
Procedure
Notes (if any)
E-mail address
Type the sender email address.
The email address you enter will
appear in the From field for any
outgoing emails. If the computer
doesn’t have an email client
installed, don’t change the do not
reply default value. This indicates
to mail recipients that they can’t
reply to emails they receive.
SMTP server
name
Type your SMTP server location.
OR
If you want to use the computer’s default email client, select Use system e-mail.
4. Press OK.
37
smarttech.com/kb/170518
CHAPTER 4
CONFIGURING THE SOFTWARE
To restore default email settings
1. Open the SMART Meeting Pro Settings dialog box.
2. Press the E-mail tab.
3. Press Restore Defaults.
4. Press OK.
Microsoft Exchange Server polling intervals
Users can start a scheduled meeting or an unscheduled ad hoc meeting when they log on to a
room resource computer. Depending on the availability of the room resource, meetings can be
started automatically or manually. To enable this, SMART Meeting Pro software polls the
Microsoft Exchange Server that it’s integrated with to retrieve the logged-on user’s calendar and
the times that a room is booked.
SMART Meeting Pro software polls the Microsoft Exchange Server at the following intervals:
l
When SMART Meeting Pro software starts.
l
Every 10 seconds for the first five minutes after the start of a meeting (to enable meeting
rooms to automatically join a Bridgit meeting).
l
Once every minute after the first five minutes of a meeting (to ensure that a user can extend a
meeting only if the room is available beyond the scheduled meeting).
l
When a different user logs on to the room resource computer.
TIP
See the SMART Meeting Pro software online Help for more details on extending a meeting and
adding other meeting rooms to a scheduled meeting.
NOTE
SMART Meeting Pro software polls the Microsoft Exchange Server only for the time stamp that
records the last time a user or room calendar was changed. If the time stamp received from the
server is later than the time stamp saved by SMART Meeting Pro software, then
SMART Meeting Pro software will access the room or user calendar (or both). By using this polling
rate, SMART Meeting Pro software significantly reduces the load on the Microsoft Exchange
Server.
38
smarttech.com/kb/170518
Chapter 5
Updating the software
SMART periodically releases updates to its software. These updates add new features and resolve
issues.
Go to smarttech.com/software to download the latest installation package. SMART provides
updates in MSI file format in the installation package.
After you download an installation package and extract the update files, place the update files in a
location on your network that’s accessible to all the computers you plan to update.
IMPORTANT
You cannot roll back an update after installing it. You must remove the full version of the software
(see Removing the software on page 41), and then install the previous version.
The command line for running an update using a Windows Installer update installation package
varies depending on whether the update is major or minor.
NOTE
The SMART website indicates whether an update is major or minor.
To run a major software update using a Windows Installer update installation package
Run the following command:
msiexec /i "[Path]\[File].msi" [Parameter]
Where
39
o
[Path] is the path to the MSI file.
o
[File] is the name of the MSI file.
o
[Parameter] is the installation parameter (see Installation parameters on page 47).
smarttech.com/kb/170518
CHAPTER 5
UPDATING THE SOFTWARE
To run a minor software update using a Windows Installer update installation package
Run the following command:
msiexec /i "[Path]\[File].msi" REINSTALL=ALL REINSTALLMODE=vomus [Parameter]
Where
40
o
[Path] is the path to the MSI file.
o
[File] is the name of the MSI file.
o
[Parameter] is the installation parameter (see Installation parameters on page 47).
smarttech.com/kb/170518
Chapter 6
Removing the software
Using the user interface
Using the command line interface
41
42
SMART Uninstaller enables you to remove SMART software.
Using the user interface
You can remove SMART software from individual computers using the SMART Uninstaller user
interface.
To remove SMART software
1. In Windows 7 operating system, select Start > All Programs > SMART Technologies > SMART
Tools > SMART Uninstaller.
OR
In Windows 8 operating system, go to the Apps screen and then scroll to and
press SMART Uninstaller.
2. Press Next.
3. Select the check boxes of the SMART software and supporting packages that you want to
remove, and then press Next.
NOTE
SMART Uninstaller automatically removes any supporting packages that are no longer
being used. If you choose to remove all SMART software, SMART Uninstaller automatically
removes all supporting packages, including itself.
TIPS
41
o
To select all software and supporting packages, press Select All.
o
To clear the selection of all software and supporting packages, press Clear All.
smarttech.com/kb/170518
CHAPTER 6
REMOVING THE SOFTWARE
4. Press Uninstall.
SMART Uninstaller removes the selected software and supporting packages.
5. Press Finish.
Using the command line interface
In addition to removing SMART software using the SMART Uninstaller user interface, you can
remove SMART software using the SMART Uninstaller command line interface. This enables you to
automate the removal of SMART software and remove SMART software remotely.
NOTE
SMART recommends that you copy SMART Uninstaller to a temporary location before running
command lines and prefix command lines with start /wait.
To remove all SMART software
1. Copy SMART Uninstaller to a temporary location by running one of the following commands:
o
For 32-bit operating systems:
copy "%CommonProgramFiles%\SMART Technologies\SMART Uninstaller.exe"
"%TEMP%"
o
For 64-bit operating systems:
copy "%CommonProgramFiles(x86)%\SMART Technologies\SMART Uninstaller.exe"
"%TEMP%"
2. Remove all software by running the following command:
start /wait "SMART Uninstaller" "%TEMP%\SMART Uninstaller.exe" --noui
--uninstall-all --uilevel none
3. Delete the copy of SMART Uninstaller in the temporary location by running the following
command:
del "%TEMP%"\SMART Uninstaller.exe"
42
smarttech.com/kb/170518
CHAPTER 6
REMOVING THE SOFTWARE
To remove SMART software by product name
1. Copy SMART Uninstaller to a temporary location by running one of the following commands:
o
For 32-bit operating systems:
copy "%CommonProgramFiles%\SMART Technologies\SMART Uninstaller.exe"
"%TEMP%"
o
For 64-bit operating systems:
copy "%CommonProgramFiles(x86)%\SMART Technologies\SMART Uninstaller.exe"
"%TEMP%"
2. Remove select software by running the following command:
start /wait "SMART Uninstaller" "%TEMP%\SMART Uninstaller.exe" --noui
--uninstall "[Product names]" --uilevel none
Where [Product names] is a comma delimited list of product names.
3. Delete the copy of SMART Uninstaller in the temporary location by running the following
command:
del "%TEMP%"\SMART Uninstaller.exe"
To remove SMART software by product code
1. Copy SMART Uninstaller to a temporary location by running one of the following commands:
o
For 32-bit operating systems:
copy "%CommonProgramFiles%\SMART Technologies\SMART Uninstaller.exe"
"%TEMP%"
o
For 64-bit operating systems:
copy "%CommonProgramFiles(x86)%\SMART Technologies\SMART Uninstaller.exe"
"%TEMP%"
43
smarttech.com/kb/170518
CHAPTER 6
REMOVING THE SOFTWARE
2. Remove select software by running the following command:
start /wait "SMART Uninstaller" "%TEMP%\SMART Uninstaller.exe" --noui
--uninstall-pc [Product codes] --uilevel none
Where [Product codes] is a comma delimited list of product codes.
SMART Meeting Pro software product codes
Version
Product code
2.0
{596BD3B5-DC48-4AD2-A60A-4C39C9852294}
2.1
{4BD7F008-CDD9-454D-8A5B-4FF8BB8FEF02}
2.2
{76F84A17-835E-46C7-9C31-520BAFD5AC9D}
2.3
{E1660294-4C1E-4893-A40D-FFE0051E824F}
3.0
{C75C357C-3368-4142-AC8D-9F528B57373D}
3.1
{0F31DCED-1093-44C8-B606-70C5F108E70B}
3.1 SP1
{A6C3D76B-3CDB-4A35-82B3-E66B9B518152}
4.0
{3AA433E4-4280-4E84-A276-225313E9658C}
4.0 SP1 and SP2
{83DE2F6A-2336-4F2E-A3C5-908A821C754E}
SMART Product Drivers product codes
44
Version
Product code
10.0.124.0
{FF7A64AB-214A-47D1-95E7-742BCBA7F6C9}
10.0.131.0
{FF7A64AB-214A-47D1-95E7-742BCBA7F6C9}
10.0.163.1
{FF7A64AB-214A-47D1-95E7-742BCBA7F6C9}
10.0.165.1
{FF7A64AB-214A-47D1-95E7-742BCBA7F6C9}
10.0.186.2
{FF7A64AB-214A-47D1-95E7-742BCBA7F6C9}
10.0.188.3
{FF7A64AB-214A-47D1-95E7-742BCBA7F6C9}
10.0.232.4
{FF7A64AB-214A-47D1-95E7-742BCBA7F6C9}
10.0.255.5
{FF7A64AB-214A-47D1-95E7-742BCBA7F6C9}
10.0.314.5
{FF7A64AB-214A-47D1-95E7-742BCBA7F6C9}
10.0.392.6
{00C68967-9790-40DA-86F7-FDB248A5CDB1}
10.0.528.7
{AA9C1126-50DD-4993-9CDC-0BED8167293C}
10.0.532.7
{984EAE92-6043-451A-B786-9327FF165310}
smarttech.com/kb/170518
CHAPTER 6
REMOVING THE SOFTWARE
Version
Product code
10.6.48.0
{2623A1E3-478A-4F4A-A522-3A3D784A0C9C}
10.6.106.1
{487F1117-8BDE-4518-A798-015172AE0410}
10.6.175.2
{333B0B76-FC96-4C51-9AF6-B6EFA15ACE99}
10.7.81.0
{1355416A-967D-47C5-823D-D493C3E0B97C}
10.7 SP1
{4CE6C6E8-0DAD-4757-86ED-7FB4035BA98B}
10.8
{67E6410C-1E97-4D03-BEC2-8E83323A6BBD}
11.0
{E3189F44-F7BD-4F96-B756-A0AEFAF61D3A}
11.1
{E91FBB79-D736-4834-A1AB-2A5CDD2DB7E7}
11.2
{22A358FC-AF39-423A-9B2A-6F52B56615C3}
11.5
{B1209081-5D82-4F8A-8318-BE7583B6E265}
12.1
{67F35E75-A186-4F80-B291-8283331D5550}
SMART Ink product codes
Version
Product code
1.0
{4A1F2472-6164-43FA-9D2F-B35E71A8DF32}
1.1
{4A1F2472-6164-43FA-9D2F-B35E71A8DF32}
1.1 SP1
{F0E390A2-AB03-4077-83C4-F12D3A65493D}
1.5
{4B29EB9E-8205-4919-B069-22B531429FFE}
2.2
{67400665-611A-467D-AF52-16174ECE6FEB}
3.0
{ED12A0BE-E9B0-4886-8D18-A214BAD463B0}
SMART Common Files product codes
Version
Product code
10.8
{0E5DD7A3-BE29-430C-970B-C553F4A58C39}
11.0
{ED2455F7-6AA6-4D3C-85E9-A72297DD7051}
11.1
{3D7235B2-3305-4FE1-A9A1-5F8AC2F33122}
11.2
{9057211D-439A-4C0D-95DE-498CF54ADF8C}
12. Delete the copy of SMART Uninstaller in the temporary location by running the following
command:
del "%TEMP%"\SMART Uninstaller.exe"
45
smarttech.com/kb/170518
CHAPTER 6
REMOVING THE SOFTWARE
In addition to the commands in the recommended procedures, you can include the following
commands with SMART Uninstaller.
Command
Description
Notes (if any)
--dry-run
Runs the command line but
doesn’t remove the
software.
This is useful for testing
command lines before
running them.
--locale [Language code]
Displays SMART Uninstaller
in a language other than the
operating system’s
language.
The appropriate language
pack must be installed to
display SMART Uninstaller
in the language.
Specifies the user interface
Where [Level] is none, basic (default), that displays when SMART
Uninstaller removes the
reduced or full
software.
Normally, --uilevel none is
used only in combination
with --noui.
Where [Language code] is a
language code (for example,
fr for French)
--uilevel [Level]
--no-auto-remove
Disables the automatic
This is used only if --noui is
removal of supporting
also included.
packages (for example,
SMART Common Files) that
are no longer required after
the selected packages are
removed.
--noui
Doesn’t display the SMART
Uninstaller user interface.
--uninstall-all
Removes all detected
SMART packages.
--uninstall [Product names]
Removes the specified
products.
Where [Product names] is a comma
delimited list of product names
--uninstall-pc [Product codes]
Where [Product codes] is a comma
delimited list of product codes (see
Removing the software on page 41)
46
smarttech.com/kb/170518
Removes the specified
products.
Normally, --noui is used
only in combination with
--uilevel none.
Appendix A
Installation parameters
Parameter
Use
/q
Hide the installation wizard.
NOTE
This is Silent mode.
/qb
Show a basic installation wizard.
/qb!
Show a basic installation wizard without a Cancel button.
/qb+
Show a basic installation wizard with a dialog box signaling the end of the
installation.
/qb+!
Show a basic installation wizard without a Cancel button but with a dialog box
signaling the end of the installation.
/qr
Show a reduced installation wizard.
/qf
Show the full installation wizard, including a dialog box signaling the end of
the installation or the Fatal Error, User Exit or Exit dialog box.
/qn
Hide the installation wizard and the dialog box signaling the end of the
installation.
/qn+
Hide the installation wizard but show the dialog box signaling the end of the
installation.
47
smarttech.com/kb/170518
SMART TECHNOLOGIES
smarttech.com/support
smarttech.com/support/entsupport
smarttech.com/kb/170518