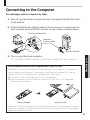
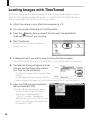
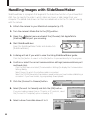
1
Windows
Macintosh
Software Starter Guide
This guide explains the installation method and features of
the software for loading and processing images shot
with a Canon PowerShot Digital Camera on a computer.
Read the agreement in this Guide before using the software on
the CD-ROM in this box. By using the software,
you agree to be bound by the terms of the agreement.
READ CAREFULLY BEFORE USING!
CANON SOFTWARE LICENSE AGREEMENT
IMPORTANT - READ THIS AGREEMENT BEFORE USING THE SOFTWARE ON THE CD-ROM IN THIS
BOX. BY USING THE SOFTWARE, YOU AGREE TO BE BOUND BY THE TERMS OF THIS AGREEMENT.
THIS CD-ROM ALSO CONTAINS THE ULEAD PHOTOIMPACT 4.2 SOFTWARE (THE “ULEAD
SOFTWARE”) WHICH IS PRODUCED AND COPYRIGHTED BY ULEAD SYSTEMS, INC. THE TERMS
OF THIS AGREEMENT DO NOT APPLY TO USE OF THE ULEAD SOFTWARE. THE TERMS FOR USE
OF THE ULEAD SOFTWARE MAY BE FOUND SEPARATELY IN THE FILE APPEARING ON THE CDROM IN THIS BOX.
This is a license agreement (the “Agreement”) between you and Canon Inc. (“Canon”).
IF YOU DO NOT AGREE TO THE TERMS AND CONDITIONS OF THIS AGREEMENT, DO NOT USE
THE SOFTWARE PROGRAM ON THE CD-ROM AND THE USER MANUAL IN THIS BOX (COLLECTIVELY, THE “SOFTWARE”) AND RETURN THE SOFTWARE WITHIN 30 DAYS FROM THE DATE OF
PURCHASE TO YOUR POINT OF PURCHASE FOR A REFUND.
In consideration of the right to use the SOFTWARE, you agree to abide by the terms and
conditions of this Agreement.
1. LICENSE: Canon grants you the non-exclusive right to use the SOFTWARE only on a single
computer. You may physically transfer the SOFTWARE from one computer to another
provided that the SOFTWARE is used on only one computer at a time. You shall not install or
use the SOFTWARE on a network, multiple CPU, multiple site arrangement, or any other
hardware configuration where the SOFTWARE is accessible to more than one CPU or to more
than one user.
YOU SHALL NOT ASSIGN, SUBLICENSE, RENT, LEASE, LOAN, CONVEY OR OTHERWISE USE,
TRANSFER, COPY, TRANSLATE, CONVERT TO ANOTHER PROGRAMMING LANGUAGE, ALTER,
MODIFY, DECOMPILE OR DISASSEMBLE THE SOFTWARE, IN WHOLE OR IN PART, EXCEPT AS
EXPRESSLY PROVIDED IN THIS AGREEMENT.
2. BACK-UP COPY: You may make one copy of the SOFTWARE solely for back-up purposes, or
copy the SOFTWARE onto the permanent storage device (e.g. a hard disk) of your computer
and retain the original for back-up purposes. Any other copying of the SOFTWARE is a
violation of this Agreement. You must reproduce and include the copyright notice on the
back-up copy.
3. SUPPORT AND UPDATES: Canon is not responsible for providing maintenance or support for
use of the SOFTWARE. No updates, fixes or support will be made available for the SOFTWARE.
4. LIMITED WARRANTY AND LIMITATION OF LIABILITY: It is your responsibility to choose,
maintain and match the hardware and software components of your computer system. Thus
Canon does not guarantee uninterrupted service or correction of errors or that the functions
or performance of the SOFTWARE will meet your requirements. THE SOFTWARE IS LICENSED
ON AN “AS IS” BASIS AND WITHOUT WARRANTY OF ANY KIND. The CD-ROM storing the
SOFTWARE is warranted only against defective material under normal use for a period of
ninety (90) days after purchase from an authorized Canon dealer as evidenced by your sales
receipt. Your sole remedy for a defective CD-ROM shall be replacement of the same without
charge when returned by you at your expense to your point of purchase and proven to be
defective upon inspection. The Replacement CD-ROM will be warranted for the remainder
of the original ninety (90) day warranty period of the defective CD-ROM. The limited
warranty does not apply if the failure of the CD-ROM resulted from accident, abuse or
misapplication of the SOFTWARE and shall not extend to anyone other than the original
user of the SOFTWARE.
EXCEPT AS SPECIFICALLY SET FORTH IN THIS PARAGRAPH 4, CANON, CANON’S SUBSIDIARIES,
DISTRIBUTORS AND DEALERS DISCLAIM ALL WARRANTIES, EXPRESS OR IMPLIED, INCLUDING
ANY WARRANTY OF MERCHANTABILITY OR FITNESS FOR A PARTICULAR PURPOSE, WITH
RESPECT TO THE SOFTWARE.
NONE OF CANON OR ANY OF CANON’S SUBSIDIARIES, DISTRIBUTORS OR DEALERS IS LIABLE FOR
ANY DAMAGES HOWSOEVER CAUSED, INCLUDING WITHOUT LIMITATION, DIRECT, CONSEQUENTIAL OR INCIDENTAL LOSS OR DAMAGE INCLUDING LOSS OF PROFITS, EXPENSE OR INCONVENIENCE HOWSOEVER CAUSED OR ARISING OUT OF THE SOFTWARE OR THE USE THEREOF.
NONE OF CANON, OR ANY OF CANON’S SUBSIDIARIES, DISTRIBUTORS OR DEALERS SHALL HAVE
ANY OBLIGATION TO INDEMNIFY YOU AGAINST ANY CLAIM OR SUIT BROUGHT BY A THIRD
PARTY ALLEGING THAT THE SOFTWARE OR THE USE THEREOF INFRINGES ANY INTELLECTUAL
PROPERTY OF SUCH THIRD PARTY.
5. TERM: This Agreement is effective upon your using the SOFTWARE and remains in effect
until expiration of all copyright interests in the SOFTWARE unless earlier terminated. You
may terminate this Agreement by destroying the SOFTWARE. This Agreement will also
terminate without notice to you if you fail to comply with any of the terms of this Agreement and you must then promptly return the SOFTWARE. In addition, Canon may enforce
its other legal rights.
6. U.S. GOVERNMENT RESTRICTED RIGHTS NOTICE: The SOFTWARE is provided with restricted
rights. Use, duplication or disclosure is subject to restrictions as set forth in either
subparagraph (c) (1) (ii) of the Rights in Technical Data and Computer software clause at
DFARs 252.227-7013 or subparagraph (c) (1) and (2) of the Commercial Computer Software
Restricted Rights Clause at FAR 52.227-19, as applicable.
7. SEVERABILITY: In the event that any provision of this Agreement is declared or found to be
illegal by any court or tribunal of competent jurisdiction, such provision shall be null and
void with respect to the jurisdiction of that court or tribunal and all the remaining provisions
of this Agreement shall remain in full force and effect.
8. CONTROLLING LAW: The terms of this Agreement as it relates to purchases of the Software
in the United States of America shall be governed and construed in all respects in accordance
with the laws and regulations of the State of New York, without reference to choice of law
principles. The terms of this Agreement as it relates to purchases of the Software in Canada
shall be governed by the laws of the province of Ontario.
9. OWNERSHIP: All rights, including but not limited to copyrights and trade secret rights, to
the SOFTWARE belong to Canon, its affiliated corporations and third party licensors. Your
use of the SOFTWARE is subject to the United States, Canada and other applicable copyright
and trademark laws and nothing in this Agreement constitutes a waiver of the rights of
Canon, its affiliated corporations and third party licensors under such laws. Nothing
contained in Paragraph 1 shall be construed to give Canon any ownership rights in any
images, graphics or textual material that you save in connection with the Software.
10.ACKNOWLEDGEMENT: BY USING THE SOFTWARE, YOU ACKNOWLEDGE THAT YOU HAVE
READ THIS AGREEMENT, UNDERSTOOD IT, AND AGREE TO BE BOUND BY ITS TERMS AND
CONDITIONS. YOU ALSO AGREE THAT THIS AGREEMENT IS THE COMPLETE AND EXCLUSIVE
STATEMENT OF AGREEMENT BETWEEN YOU AND CANON CONCERNING THE SUBJECT
MATTER HEREOF AND SUPERSEDES ALL PROPOSALS OR PRIOR AGREEMENTS, VERBAL OR
WRITTEN, AND ANY OTHER COMMUNICATIONS BETWEEN THE PARTIES RELATING TO THE
SUBJECT MATTER HEREOF. NO AMENDMENT TO THIS AGREEMENT SHALL BE EFFECTIVE
UNLESS SIGNED BY A DULY AUTHORIZED OFFICER OF CANON.
1
Introduction
Thank you for purchasing a Canon PowerShot A50 digital camera.
The PowerShot A50 Solution Disk supplied in your package contains various software
programs that can be used to load, organize, retouch and process images shot with your
PowerShot A50. We invite you to use this guide and its companion Hardware Guide to
maximize your enjoyment of the new world of high-quality digital imaging.
For instructions on using the Windows® and Macintosh operating systems, please refer to
the manuals that accompanied them.
Disclaimer
While every effort has been made to ensure that the information contained in this Guide is
accurate and complete, no liability can be accepted for any errors or omissions. Canon Inc.
reserves the right to change the specifications of the hardware and software described herein
at any time without prior notice.
No part of this Guide may be reproduced, transmitted, transcribed, stored in a retrieval
system, or translated into any language in any form, by any means without prior written
permission of Canon Inc.
Canon Inc. makes no warranties for damages resulting from corrupted or lost data due to a
mistaken operation or malfunction of the camera, the software, the CompactFlashTM cards
(CF cards), personal computers, peripheral devices, or use of non-Canon CF cards.
Trademark Acknowledgments
•
•
•
•
•
Canon and PowerShot are trademarks of Canon Inc.
Adobe, the Adobe logo and Acrobat Reader are trademarks of Adobe Systems Incorporated.
CompactFlash is a trademark of SanDisk Corporation.
IBM is a registered trademark of International Business Machines Corporation.
Macintosh, Power Macintosh and QuickTime are trademarks of Apple Computer Inc. in the
United States and other countries.
• Microsoft, Windows and Windows NT are registered trademarks of Microsoft Corporation in the
United States and other countries.
• PhotoImpact is a trademark of Ulead Systems, Inc.
• Other names and products not mentioned above may be trademarks or registered trademarks of
their respective companies.
Copyright © 1999 Canon Inc. All rights reserved.
2
Loading Images onto
a Windows Computer
Windows
This chapter introduces the software contained on the PowerShot
A50 Solution Disk, explaining how to install each program and load
images onto the computer. For instructions on using a PC card slot
or PC card reader to load images, refer to the respective on-screen
guides (p. 20).
Bundled Software and Guides ........................................... 4
Computer System Requirements ....................................... 5
Installing the Software....................................................... 6
Connecting to the Computer............................................. 9
Loading Images
Loading Images with ZoomBrowser ..................................... 10
Loading Images with TimeTunnel ......................................... 12
Loading Images with PhotoStitch ......................................... 14
Handling Images with SlideShowMaker ............................... 16
Loading Images with Ulead PhotoImpact ............................. 18
Viewing On-Screen Guides .............................................. 20
Opening the PhotoImpact User Guide .................................. 21
The interaction of your particular computer system with the camera may result in the display
of some messages or dialogs not described herein. Please consult the on-screen guides and
help files accompanying each software program for assistance.
3
Bundled Software and Guides
Action
Search and
Organize
Images
Display Images
Chronologically
Merge Images
into
Panoramas
Edit Camera
Slide Shows
Programs to
Install
ZoomBrowser
+
*TWAIN Driver
TimeTunnel
PhotoStitch
SlideShowMaker
**Acrobat Reader
Where to
Look for
Instructions
Guides
**Acrobat Reader
**Acrobat Reader
**Acrobat Reader
Pages 10-11
of this Guide
Pages 12-13
of this Guide
Pages 14-15
of this Guide
Pages 16-17
of this Guide
Using
ZoomBrowser
(Page 20)
Using
TimeTunnel
(Page 20)
Using
PhotoStitch
(Page 20)
Using
SlideShowMaker
(Page 20)
See the
Help File
See the
Help File
See the
Help File
See the
Help File
Help Files
* For instructions on the TWAIN Driver, please refer to the help file.
** Adobe Acrobat Reader must be installed to view on-screen guides in the Portable Document
Format (PDF). This program can be installed from the PowerShot A50 Solution Disk. Click [About
the On-Screen Software Guides] and [Install Adobe Acrobat Reader] to begin the installation (p. 6).
4
Computer System Requirements
Please install the software on a computer meeting the following
system requirements.
Retouch
Images
Hardware
IBM® PC/AT compatible
OS
**Acrobat Reader
Windows
PhotoImpact
+
*TWAIN Driver
Windows® 95, Windows® 98 or
Windows NT® 4.0
CPU
Pentium or better
RAM
Windows® 95/98: 24 MB or more
Windows NT® 4.0: 32 MB or more
Pages 18-19
of this Guide
Connectors
Standard RS-232C Interface
(For PowerShot A50)
D-SUB 9-Pin Connector
(IBM® PC/AT compatible)
Free Hard Disk Space
PhotoImpact
User Guide
(Page 21)
TWAIN Driver 2.4: 15 MB or more
ZoomBrowser 1.1: 30 MB or more
SlideShowMaker 1.3: 20 MB or more
TimeTunnel 2.4: 30 MB or more
PhotoStitch 2.3: 40 MB or more
Ulead PhotoImpact 4.2: 130 MB or more
Monitor
See the
Help File
640 x 480 pixels, 256 colors or more
(1024 x 768 pixels, 24 bit color or
more recommended)
• A CD-ROM drive is required to install the software.
• QuickTime 3.0 or higher is required to save images in the QuickTime VR
format that have been merged in PhotoStitch.
5
Installing the Software
1. Start your computer.
2. Place the PowerShot A50 Solution Disk in the CD-ROM drive.
The setup menu will automatically display a list of software.
• The setup menu will not display if the [Auto Insert Notification] setting is deselected for
your CD-ROM drive. Use the following procedures to work around this.
Double-click the [My Computer] icon on the desktop to open it and then the CD-ROM icon.
Double-click the [Setup] icon.
3. Click any underlined item.
Click the items with “ - ” to
read about the software.
4. To install a program, carefully read its
description and click the corresponding
[Install...] button.
6
5. Read the dialog contents carefully and proceed
with the installation procedures.
Windows
ZoomBrowser Setup Dialog
6. Click the [Finish] button when the Setup
Complete dialog is displayed.
7. Click the [Contents] or [Back] button
on the toolbar, or the [Return to the
Main Menu] button at the bottom to
return to the main menu.
8. Repeat steps 3 to 7 for each program that you wish to install.
7
9. Click the [Exit] button.
10. Remove the PowerShot A50 Solution Disk from the CD-ROM drive.
About Uninstalling the Software
You can delete the installed programs by clicking the Windows [Start] menu and selecting
[Settings] and [Control Panel]. Double-click the [Add/Remove Programs] icon. ZoomBrowser
can also be uninstalled by clicking the [Start] menu and selecting [Programs], [PowerShot
Utilities ZoomBrowser] and [ZoomBrowser Uninstall].
8
Connecting to the Computer
To Load Images onto the Computer by Cable
1. Shut off the computer and turn the camera’s Mode Dial to the L (Lock) position.
2. Attach the PC interface cable to a serial port (COM port) on your computer
and the DIGITAL terminal on your camera as shown below.
Windows
Serial Port (COM Port)
PC Interface Cable
VID
EO
DIG
ITA
L
DIGITAL Terminal
3. Turn on the computer and start Windows.
This completes the setup required to load camera images onto your computer.
To Load Images Directly from a CompactFlashTM Card (CF Card)
Remove the CF card from the camera and insert it directly into an optional CF card reader, or
insert it directly into an optional PC card reader or the computer’s PC card slot using an
optional PCMCIA adapter (PC card adapter) as shown below.
1. Place the CF card from the camera into the PC card adapter.
2. Insert the assembly into the computer’s PC card slot or a PC card reader attached to the
computer.
➜
Place in Adapter
Insert into Slot
Please refer to the documentation for your computer or PC card reader to ascertain whether
the computer should be turned off or can be left running when the PC card adapter assembly
is inserted into the slot.
9
Loading Images with ZoomBrowser
ZoomBrowser is a visually based image database program. You can sort, search and display
full-sized versions of the images residing on your computer while looking at their
thumbnails. The TWAIN Driver is used to load images into ZoomBrowser from your camera.
1. Attach the camera to the computer (p. 9).
2. Turn the camera’s Mode Dial to the [PC] position.
3. Start ZoomBrowser.
Click the Windows [Start] menu and select [Programs],
[PowerShot Utilities ZoomBrowser] and
[ZoomBrowser].
4. Click the [IMPORT IMAGES] button at the
bottom and select [1: From Canon
PowerShot].
The TWAIN Driver window will appear.
5. Confirm or select the correct camera model
and communication settings (communications port and baud rate).
• Confirm that [PowerShot A50] is showing in the
Camera Model list box. If it is not, click the list
box arrow and select it.
• Click the [Communication Settings] button to
display the Communication Settings dialog.
Select the COM port to which the interface cable
is connected. If you are not sure, click the
[Detect] button. Select the [115.2K] baud rate
(transmission speed) unless you have trouble
establishing a connection. If you have trouble, try progressively slower speeds.
10
6. Click the [Camera] button.
Windows
• If you are loading images from a CF card in a PC card
slot, select the [My Computer] button instead (p. 9).
• The Communication Settings dialog may appear the
first time you use ZoomBrowser. Confirm that the
settings are set according to the instructions in Step 5.
• If images have been recorded in both the “Design rule
for Camera File system format” and the CIFF format on
the same CF card, the Select Folder dialog may also
appear. To load “Design rule for Camera File system
format” images, select the DCIM folder. To load CIFF images, select the DC97 folder.
7. Select the images for loading and click
the [Acquire] button.
• To select all the images in the folder, click the
[Select All] button.
• The acquired images will be temporarily stored
in ZoomBrowser’s Shoebox.
8. Click the [Exit] button to return to the
ZoomBrowser window.
9. Drag and drop the thumbnails
of the acquired images from the
Shoebox to the various sections
of your choice.
• To create a new section, click the
[File] menu and select [New Section].
Input the new section name in the
box and click the [OK] button.
Thumbnail
Refer to the on-screen guide, Using ZoomBrowser, for instructions on creating new sections
and other procedures (p. 20).
11
Loading Images with TimeTunnel
TimeTunnel is an image browsing program. Registered images are displayed in tunnel files
in chronological order using the shooting date and time. You can view your images as if
they were scrolling past you in a time tunnel.
1. Attach the camera to the computer (p. 9).
2. Turn the camera’s Mode Dial to the [PC]
position.
3. Start TimeTunnel.
Click the Windows [Start] menu and select [Programs],
[PowerShot Utilities TimeTunnel] and [TimeTunnel 2.4].
4. A dialog will ask if you wish to view the Using TimeTunnel guide.
Click the [Yes] button to view it or the [No] button to proceed directly to the program.
5. Confirm or select the correct camera model and communication settings
(communications port and baud rate).
• To select the camera model, click the [File] menu and select [Connection Settings] and
[Select Camera Model]. Confirm that [PowerShot A50] is highlighted in the list box. If not,
select it.
• To select the communication settings, click the [File] menu and select [Connection
Settings] and [Communication Settings] to display the Communication Settings dialog.
Select the COM port to which the interface cable is connected. If you are not sure, click
the [Detect] button. Select the [115.2K] baud rate (transmission speed) unless you have
trouble establishing a connection. If you have trouble, try progressively slower speeds.
6. Click the [Connect to Camera] button.
The Camera Model and Communication Settings dialogs may
automatically appear the first time you use TimeTunnel. In this
case, confirm the settings as explained in Step 5.
12
7. Select [Connect to Camera] and click the [OK] button.
A connection to the camera will open and the camera images
will display on the monitor.
• If you are loading images from a CF card in a PC card slot, select the [Connect to
Computer] option instead (p. 9).
Please note that the images have not been saved onto the computer yet with these steps.
Windows
8. Click the [Tunnel] menu and select [New].
The Update Thumbnail dialog will display.
9. Click the [OK] button.
The icon of the new tunnel file you created will display at the
bottom right of the window.
10. Select the images you wish to load
by clicking on them.
• To select all the images on the camera’s
CF card, click the [Select All] button.
11. Click the [Acquire] button.
The selected images will load onto the computer.
Refer to the on-screen guide, Using TimeTunnel, for further instructions (p. 20).
13
Loading Images with PhotoStitch
PhotoStitch is a program for merging images into panoramas. Images can be merged
horizontally, vertically, in matrices or in 360-degree strips. It is easy to shoot images for
merging using the PowerShot A50’s Stitch Assist mode. The following procedures explain
how to load and merge images shot in Stitch Assist mode.
1. Attach the camera to the computer (p. 9).
2. Turn the camera’s Mode Dial to the [PC]
position.
3. Start PhotoStitch Camera Direct.
• Click the Windows [Start] menu and select
[Programs], [PowerShot Utilities PhotoStitch] and
[PhotoStitch Camera Direct 2.3].
• To merge images already residing on your computer,
select [PhotoStitch 2.3] instead of PhotoStitch
Camera Direct.
4. A dialog will ask if you wish to view the Using PhotoStitch guide.
Click the [Yes] button to view it or the [No] button to proceed directly to the program.
5. Confirm or select the correct camera model and
communication settings (communications port
and baud rate).
• Click the [Select Camera Model] button to display the
Camera Model dialog. Confirm that [PowerShot A50]
is highlighted in the list box. If it is not, select it.
• Click the [Communication Settings] button to display
the Communication Settings dialog. Select the COM
port to which the interface cable is connected. If you are not sure,
click the [Detect] button. Select the [115.2K] baud rate (transmission
speed) unless you have trouble establishing a connection. If you have
trouble, try progressively slower speeds.
6. Select [Connect to Camera] and click the [OK]
button.
• If you are loading images from a CF card in a PC card
slot, select the [Connect to Computer] option instead (p. 9).
14
7. Click the [OK] button once you see an image
you wish to merge.
Windows
• If the wrong image appears, click the [Skip] button
until you see the right image.
• The message to the right will appear if QuickTime
3 is not installed on your computer. Read the
message and click the [OK] button.
8. Click the [Merge All] button.
Click the [Next] button as required if you are
merging two images at a time or merging in
manual mode. See the on-screen guide, Using
PhotoStitch, for instructions about merging in
manual mode (p. 20).
9. Click the [Start] button.
The images will begin to automatically
merge. When all have been merged, the
[Save As] dialog will appear.
10. Input a file name, select a file format and click the
[Save] button.
11. To view the merged
image, click the [Yes]
button when the “View
the Merged Image?”
message appears.
Refer to the on-screen guide, Using PhotoStitch, for further instructions (p. 20).
15
Handling Images with SlideShowMaker
SlideShowMaker is a program that augments the slide show function of your PowerShot
A50. You can specify the order in which slides are shown or add images from your
computer. The edited slide shows can then be loaded back onto the CF card for viewing
with the camera.
1. Attach the camera to the computer (p. 9).
2. Turn the camera’s Mode Dial to the [PC]
position.
3. Start SlideShowMaker.
Click the Windows [Start] menu and select
[Programs], [PowerShot Utilities SlideShowMaker]
and [SlideShowMaker 1.3].
4. A dialog will ask if you wish to view the Using SlideShowMaker guide.
Click the [Yes] button to view it or the [No] button to proceed directly to the program.
5. Confirm or select the correct camera model and communication settings
(communications port and baud rate).
• To select the camera model, click the [File] menu and select [Connection Settings] and
[Select Camera Model]. Confirm that [PowerShot A50] is highlighted in the list box. If it is
not, select it.
• To select the communication settings, click the [File] menu and select [Connection
Settings] and [Communication Settings] to display the Communication Settings dialog.
Select the COM port to which the interface cable is connected. If you are not sure, click
the [Detect] button. Select the [115.2K] baud rate (transmission speed) unless you have
trouble establishing a connection. If you have trouble, try progressively slower speeds.
6. Click the [Connect to Camera] button.
7. Select [Connect to Camera] and click the [OK] button.
• If you are loading images from a CF card in a PC card slot,
select the [Connect to Computer] option instead (p. 9).
16
8. Select a show from slide shows 1 to 3.
9. Drag and drop images to add them to the slide show.
Drag images from the area on the left and drop them into the area on the right.
Windows
10. Click the [Save Slide Show to Camera] button.
The slide show will be saved to the CF card in the
camera under the name selected in Step 8.
• Use the camera’s slide show function to view the slide show.
• Refer to the on-screen guide, Using SlideShowMaker, for further instructions (p. 20).
Adding Images from the Computer to a CF Card in a Camera
You can insert images from your computer into a slide show on a CF card in a camera by
clicking the [Export Image File to Camera] button.
Click the [Export Image File to Camera]
button.
Navigate to the appropriate
drive and folder, select the
image(s) and click the
[Open] button.
Specify an image size and image
adjustment option, and click the
[Save to Camera] button.
17
Loading Images with Ulead PhotoImpact
Ulead PhotoImpact is an image retouching program featuring advanced special effects.
The TWAIN Driver is used to load images into PhotoImpact from your camera.
1. Attach the camera to the computer (p. 9).
2. Turn the camera’s Mode Dial to the [PC]
position.
3. Start PhotoImpact.
Click the Windows [Start] menu and select
[Programs], [Ulead PhotoImpact 4.2] and
[PhotoImpact].
4. Click the [File] menu and select [Digital Camera] and
[Select Source].
The Select Source dialog will appear.
5. Click the [Device Type] button, select [Digital Camera] and
click the [OK] button.
6. Click [Canon PowerShot] and the [Select] button.
Steps 4 to 6 are not required from the second time
onward.
7. Click the [File] menu and select [Digital Camera] and [Canon PowerShot].
8. Click the button beside “Click to begin acquiring using
default settings.”
The TWAIN Driver window will appear.
18
9. Confirm or select the correct camera model and
communication settings (communications port and
baud rate).
Windows
• Confirm that [PowerShot A50] is showing in the Camera
Model list box. If it is not, click the list box arrow and
select it.
• Click the [Communication Settings] button to display the
Communication Settings dialog. Select the COM port to
which the interface cable is connected. If you are not sure,
click the [Detect] button. Select the [115.2K] baud rate
(transmission speed) for normal circumstances. Select the
[115.2K] baud rate unless you have trouble establishing a
connection. If you have trouble, try progressively slower speeds.
10. Click the [Camera] button.
• If you are loading images from a CF card in a PC card slot, select the [My Computer]
button instead (p. 9).
• The Communication Settings dialog may appear the first time you use PhotoImpact.
Confirm that the settings are set according to the instructions in Step 9.
• If images have been recorded in both the “Design rule for Camera File system format”
and the CIFF format on the same CF card, the Select Folder dialog may also appear. To
load “Design rule for Camera File system format” images, select the DCIM folder. To load
CIFF images, select the DC97 folder.
11. Select the images for loading and click the
[Acquire] button.
• To select all the images in the folder, click the
[Select All] button.
12. Click the [Exit] button to return to the
PhotoImpact window.
The acquired images will appear in the
PhotoImpact window.
13. Use PhotoImpact to retouch or apply special effects to the images and save
them to the hard disk.
Refer to the help file and the on-screen guide, Ulead PhotoImpact User Guide for further
instructions (pp. 20-21).
19
Viewing On-Screen Guides
On-screen Guides in the Portable Document Format (PDF) which start with the word
‘Using,’ can be accessed by clicking the Windows [Start] button and selecting [Programs],
followed by the program group and the guide name. The PhotoImpact 4.2 User Guide
(UPI4-MANUAL) can also be found on the PowerShot A50 Solution Disk. Please see the
instructions on the next page for viewing it.
To view the electronic files, you must have Adobe Acrobat Reader 3.0 or higher installed
on your computer. You can install it from the PowerShot A50 Solution Disk (p. 4).
Hand Tool
Changes the mouse cursor
into a hand to move the
document around when
you are zoomed in. The
button remains selected
while in use.
Zoom-In Tool
Zooms in on part of a
document. Click the
button and then the area
you wish to zoom. Hold
the [Ctrl] key and click to
zoom back out.
Find Dialog
Searches for pages containing
text you input in the Find dialog.
Link (Red Buttons)
Jumps to a related page.
The cursor changes into
a hand over active links.
Click the link to jump.
Next Page Button
Previous Page Button
Index
Click an index item to jump to it.
Go Back Button
Returns to the page previously diplayed.
You may also use the arrow tools on the toolbar and the keyboard cursor keys to page
through a document.
20
Opening the Ulead PhotoImpact User Guide
The PhotoImpact 4.2 User Guide (UPI4-MANUAL) is contained on the PowerShot A50
Solution Disk. Use the procedures below to view the guide.
1. Place the PowerShot A50 Solution Disk in the CD-ROM drive.
Windows
2. Click the [Exit] button at the bottom of the setup menu.
• This step is not required if the setup menu fails to appear automatically.
3. Double-click the [My Computer] icon on the desktop.
The CD-ROM icon will appear in the window.
4. Right-click the CD-ROM icon and select [Open] from the popup menu.
The CD-ROM contents will display.
5. Double-click the following folders in order:
UPi4, Document, English, and Manual.
6. Double-click the [UPI4-MANUAL] icon.
The PhotoImpact User Guide will open in Adobe Acrobat Reader.
21
22
Loading Images onto
a Macintosh Computer
This chapter introduces the software contained on the PowerShot
A50 Solution Disk, explaining how to install each program and load
images onto the computer. Refer to the respective on-screen guides
(p. 34) for instructions about using a PC card slot or PC card reader
to load images.
Macintosh
Bundled Software and Guides ......................................... 24
Computer System Requirements ..................................... 25
Installing the Software..................................................... 26
Connecting to the Computer........................................... 27
Loading Images
Loading Images with TimeTunnel ......................................... 28
Loading Images with PhotoStitch ......................................... 30
Handling Images with SlideShowMaker ............................... 32
Viewing On-Screen Guides .............................................. 34
The interaction of your particular computer system with the camera may result in the display
of some messages or dialogs not described herein. Please consult the on-screen guides and
help files accompanying each software program for assistance.
23
Bundled Software and Guides
Action
Display Images
Chronologically
Merge Images
into
Panoramas
Edit Camera
Slide Shows
Programs to
Install
TimeTunnel
+
*Plug-In Module
PhotoStitch
+
TimeTunnel
+
*Plug-In Module
SlideShowMaker
**Acrobat Reader
Where to Look
for Loading
Instructions
Guides
**Acrobat Reader
**Acrobat Reader
Pages 28-29
of this Guide
Pages 30-31
of this Guide
Pages 32-33
of this Guide
Using
TimeTunnel
(Page 34)
Using
PhotoStitch
(Page 34)
Using
SlideShowMaker
(Page 34)
See the
Help File
See the
Help File
See the
Help File
Help Files
* For instructions on the Plug-In Module, please refer to the on-screen guide, Using Plug-In
Module (p. 34).
** Adobe Acrobat Reader must be installed to view on-screen guides in the Portable Document Format
(PDF). The program can be installed from the PowerShot A50 Solution Disk. Click [About the OnScreen Software Guides] and [Install Adobe Acrobat Reader] to begin the installation (p. 26).
24
Computer System Requirements
Please install the software on a Macintosh computer meeting the following system
requirements.
Hardware
Power Macintosh
OS
Mac OS 7.5.3 or higher version
QuickTime 2.1 or higher version
CPU
PowerPC
RAM
Macintosh
32 MB or more
Free Hard Disk Space
Plug-In Module 2.4: 15 MB or more
TimeTunnel 1.6: 25 MB or more
PhotoStitch 2.3: 30 MB or more
SlideShowMaker 1.3: 20 MB or more
Monitor
640 x 480 pixels, 256 colors or more
(1024 x 768 pixels, Millions of colors
recommended)
• A CD-ROM drive is required to install the software.
• A PC card reader with a USB interface is required on iMac computers and other Macintosh
computers not equipped with a printer port or modem port.
• Plug-In Module 2.4 is compatible with Adobe Photoshop Ver. 3.0 or higher.
• QuickTime 3.0 or higher, or QuickTime 2.5 and the QuickTime VR Extension 2.0.1 or higher,
is required to save images in the QuickTime VR format that have been merged in PhotoStitch.
25
Installing the Software
1. Start your Macintosh computer.
2. Place the PowerShot A50 Solution Disk into the CD-ROM drive.
3. Double-click the CD-ROM icon.
4. Open the folder of a program you wish to
install by double-clicking it.
Plug-In Module is automatically copied for use
with TimeTunnel.
5. Double-click the installer icon.
Installer Icon for PowerShot Utilities TimeTunnel
6. Read the message in the dialog that appears and click [Install] to proceed
with the installation.
7. When the installation is complete, click the [OK] button.
8. Repeat steps 4 to 7 for each program that you wish to install.
About Uninstalling the Software
You can delete the installed programs by dragging their folders into the Trash. However, be
careful not to accidentally delete any of your images that may be in the program folders.
26
Connecting to the Computer
To Load Images onto the Computer by Cable
1. Shut off your Macintosh computer and turn the camera’s Mode Dial to the L
(Lock) position.
2. Attach the Macintosh interface cable to the printer port or modem port on
your computer and the DIGITAL terminal on your camera as shown below.
Printer or Modem Port
Macintosh
Interface Cable
VID
EO
DIG
ITA
L
DIGITAL Terminal
Macintosh
3. Turn on your Macintosh computer.
This completes the setup required to load camera images onto your computer.
To Load Images Directly from a CompactFlashTM Card (CF Card)
Remove the CF card from the camera and insert it directly into an optional CF card reader, or
insert it directly into an optional PC card reader or the Macintosh computer’s PC card slot
using an optional PCMCIA adapter (PC card adapter) as shown below.
1. Place the CF card from the camera into the PC card adapter.
2. Insert the assembly into the Macintosh computer’s PC card slot or a PC card reader
attached to the computer.
➜
Place in Adapter
Insert into Slot
Please refer to the documentation for your Macintosh computer or PC card reader to ascertain
whether the computer should be turned off or can be left running when the PC card adapter
assembly is inserted into the slot.
27
Loading Images with TimeTunnel
TimeTunnel is program that displays images in order of their shooting date and time
rather as if they are being viewed from within in a time tunnel. The Plug-In Module is
used to load images into TimeTunnel from your camera.
1. Attach the camera to your Macintosh computer (p. 27).
2. Turn the camera’s Mode Dial to the [PC] position.
3. Open the (Apple) menu and select the [Chooser]. Set AppleTalk to
[Inactive] for the port you are using.
4. Start TimeTunnel.
Double-click the TimeTunnel folder and
[TimeTunnel] icon.
5. A dialog will ask if you wish to view the Using TimeTunnel guide.
Click the [Yes] button to view it or the [No] button to proceed directly to the program.
6. The Add Item dialog will appear the first
time you use TimeTunnel after installation. Click the [Cancel] button.
• This step is not required from the second time
onward.
• To load images from the computer, select the
folder containing the images and click the [Add Folder] button or the [Open] button.
7. Open the [Options] menu and select
[Canon PowerShot PPC].
The Plug-In Module window will appear.
• You do not require Steps 8-9 from the
second time onward because the
“Connect to camera?” message will
display, allowing you to click the [Connect]
button to start displaying the images from
the camera’s CF card.
28
8. Confirm or select the correct communication settings
(communications port and baud rate).
• Click the [Communication Settings] button to display the
Communication Settings dialog.
• Select the port to which the interface cable is connected.
• Select the [115.2K] baud rate (transmission speed) unless you have trouble establishing a
connection. If you have trouble, try progressively slower speeds.
9. Click the [Camera] button.
Macintosh
• If you are loading images from a CF card in a PC card slot,
select the [Computer] button instead (p. 27).
• The Communication Settings dialog may automatically
appear the first time you use TimeTunnel. In this case, confirm
the settings as explained in Step 8.
• If images have been recorded in both the “Design rule for
Camera File system format” and the CIFF format on the same
CF card, the Folder Selection dialog may also appear. To load
“Design rule for Camera File system format” images, select
the DCIM folder. To load CIFF images, select the DC97 folder.
10. Select the images you wish to load by clicking
on them. Then click the [Acquire] button.
• To select all the images on the camera’s CF card, click
the [Select All] button.
11. Click the [Quit] button.
The selected images will display in the TimeTunnel
window.
• The acquired images will be saved to the PowerShot
Data folder inside the TimeTunnel folder.
Refer to the on-screen guide, Using TimeTunnel, for further instructions (p. 34).
29
Loading Images with PhotoStitch
PhotoStitch is a program for merging images into panoramas. Images can be merged
horizontally, vertically, in matrices or in 360-degree strips. It is easy to shoot images for
merging using the PowerShot A50’s Stitch Assist mode. To load images from a CF card in
a camera, first start TimeTunnel and use the Plug-In Module to acquire them. The
following procedures explain how to load and merge images shot with the Stitch Assist
mode.
1. Attach the camera to your Macintosh computer (p. 27).
2. Turn the camera’s Mode Dial to the [PC] position.
3. Open the (Apple) menu and select the [Chooser]. Set AppleTalk to
[Inactive] for the port you are using.
4. Start TimeTunnel and acquire the images you wish to merge by following steps
4 to 11 on pages 28 to 29 in the “Loading Images with TimeTunnel” section.
A message stating that images shot in Stitch Assist mode were detected will appear and
ask whether you wish to merge them.
5. Click the [OK] button.
If the images you wish to merge do not appear
immediately, click the [Skip] button. If the correct ones
appear, click the [OK] button. PhotoStitch will start and
display your images.
6. Click the [Merge All] button.
The loaded images will automatically begin merging,
displaying the preliminary results in the Merge
Original Images window.
• The merged image hasn’t actually been created yet
at this point.
7. Click the [Start] button.
The images will begin the final
merge.
30
8. When the merge is complete, input a file name, select a file format, select a
folder and click the [Save] button.
Macintosh
The merged image has now been added to the tunnel file.
Double-click the merged
image in TimeTunnel to
display it at a larger size.
Refer to the on-screen guide, Using PhotoStitch, for further instructions (p. 34).
31
Handling Images with SlideShowMaker
SlideShowMaker is a program that augments the slide show function of your PowerShot
A50. You can specify the order in which slides are shown or add images from your
computer. The edited slide shows can then be loaded back onto the CF card for viewing
with the camera.
1. Attach the camera to your Macintosh computer (p. 27).
2. Turn the camera’s Mode Dial to the [PC] position.
3. Open the (Apple) menu and select the [Chooser]. Set AppleTalk to
[Inactive] for the port you are using.
4. Start SlideShowMaker.
Open the SlideShowMaker folder and double-click
[SlideShowMaker].
5. A dialog will ask if you wish to view the Using SlideShowMaker guide.
Click the [Yes] button to view it or the [No] button to proceed directly to the program.
6. Confirm or select the correct communication settings (communications port
and baud rate).
• Click the [File] menu and select [Communication Settings] to display the Communication
Settings dialog.
• Select the port to which the interface cable is connected.
• Select the [115.2K] baud rate (transmission speed) unless you have trouble establishing a
connection. If you have trouble, try progressively slower speeds.
7. Click the [Connect to Camera] button.
8. Select [Connect to Camera] and click the [OK] button.
If you are loading images from a CF card in a PC card slot, select
the [Connect to Computer] option instead (p. 27).
9. Select a show from slide shows 1 to 3.
32
10. Read the message that appears and click the [OK]
button.
11. Drag and drop images to add them to the
slide show.
Drag images from the area on the left and drop them
into the area on the right.
12. Click the [Save Slide Show to Camera] button.
The slide show will be saved to the CF card in the
camera under the name selected in Step 9.
Macintosh
Use the camera’s slide show function to view the slide show.
Refer to the on-screen guide, Using SlideShowMaker, for further instructions (p. 34).
Adding Images from the Computer to a CF Card in a Camera
You can insert images from your computer into a slide show on a CF card in a camera by
clicking the [Export Image File to Camera] button.
Click the [Export Image File to Camera]
button.
Navigate to the
appropriate drive
and folder, select
the image(s) and
click the [Open]
button.
Specify an image size and image adjustment
option and click the [Save to Camera] button.
33
Viewing On-Screen Guides
On-screen guides in the Portable Document Format (PDF) which start with the word
‘Using’ can be accessed by double clicking its icon in the respective program’s folder.
To view the on-screen guides, you must have Adobe Acrobat Reader 3.0 or higher installed
on your computer. You can install it from the PowerShot A50 Solution Disk (p. 26).
Hand Tool
Changes the mouse cursor
into a hand to move the
document around when
you are zoomed in. The
button remains selected
while in use.
Zoom-In Tool
Zooms in on part of a
document. Click the
button and then the area
you wish to zoom. Hold
the [Ctrl] key and click to
zoom back out.
Find Dialog
Searches for pages containing
text you input in the Find dialog.
Link (Red
Buttons)
Jumps to a related
page. The cursor
changes into a
hand over active
links. Click the
link to jump.
Next Page
Button
Previous Page
Button
Index
Click an index item to jump to it.
Go Back Button
Returns to the page
previously diplayed.
You may also use the arrow tools on the toolbar and the keyboard cursor keys to page
through a document.
34
Canon Customer Support
Canon Inc.
30-2 Shimomaruko 3-chome, Ohta-ku, Tokyo
146-8501, Japan
NORTH AMERICA
Canon U.S.A., Inc.
Canon Customer Care Center
Phone (US): 1-800-423-2366 (Automated Support: 24 hours/day, 7 days/week)
Canon Canada Inc.
Phone (Canada): 1-800-OK-CANON (1-800-652-2666) (24 hours/day, 7days/week)
EUROPE
Canon (UK) Ltd.
Helpdesk
Tel No.: 0990 143 723 (Calls may be recorded.)
Fax No.: 0990 143 340
BBS No.: 0990 143 350
Canon France S.A.
Hotline: (1) 41 99 70 70
Tél:
(1) 41 99 77 77
Télécopie: (1) 41 99 79 51
Canon S.A.V. Photo Video France
Hotline: (1) 49 04 01 00
Télécopie: (1) 49 04 01 01
Canon Deutschland GmbH
Canon-Hotline-Service
Customer-Support: 02151/349-555
Telefax: 02151/349-588
Info-Desk: 02151/349-566
Info-Desk Fax: 02151/349-599
Mailbox: 02151/349-577
Canon Italia S.p.A.
Pront Canon: 02 8249 2000
BBS: 02 8249 2099
OCEANIA
Canon Australia Pty. Ltd.
Info-Line: (02) 9805 2864
Canon New Zealand Ltd.
Info-Line: 0900-522666
ASIA
Canon Singapore Pte. Ltd.
79 Anson Road, #09-01 / 06, Singapore 079906
Phone: (65) 532 4400
Fax: (65) 221 7577
Canon Hongkong Co., Ltd.
Phone: 852-2739-0802
Fax: 852-2369-7701
Canon Marketing Services
2 Alexandra Road, #04-01A, Delta House, Singapore 159919
Phone: (65) 273 5311 Fax: (65) 273 6786
Canon Marketing (Malaysia) Sdn. Bhd.
13A Jalan 219, 46100 Petaling Jaya, Selangor D.E., Malaysia
Phone: (60) 757 7210 Fax: (60) 757 7832
Canon Marketing (Thailand) Co., Ltd.
2nd Floor, Indosuez House, 152 Wireless Road, Bangkok 10330 Thailand
Phone: (662) 651 4000, Ext. 454 Fax: (662) 651 4095
35
Ulead Customer Support
INTERNATIONAL
Ulead Systems, Inc. (Taiwan)
Tel: +886-2-8787-6740
Fax: +886-2-8787-6741
Internet: [email protected]
NORTH AND SOUTH AMERICA
Ulead Systems, Inc. (USA)
Tel: +1-310-523-9393
Fax: +1-310-523-9399
Internet: [email protected]
EUROPE
Germany Ulead Support Center
Tel: +49-2602-917-329
Fax: +49-2602-917-327
Internet: [email protected]
France Centre d’Assistance Ulead
Tel: +33-1-49-46-23-46
Fax: +33-1-49-46-23-49
Internet: [email protected]
BIT (UK) Limited
Tel: +44-1420-83811
Fax: +44-1420-80657
Internet: [email protected]
World Wide Web http://www.ulead.com
36
H-IE-022-V1
0599Nixx
© 1999 CANON INC.
PRINTED IN JAPAN