1
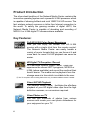
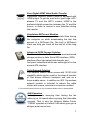
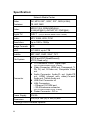
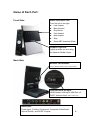
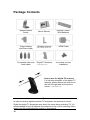
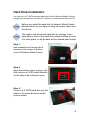
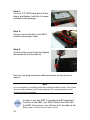
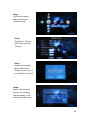
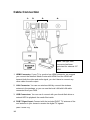
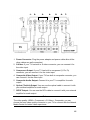
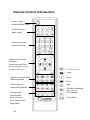
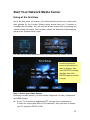
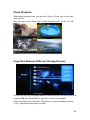
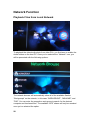
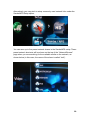
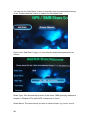
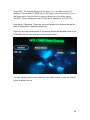
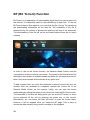
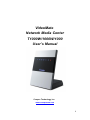
VideoMate Network Media Center T1000W/1000W/1000 User’s Manual Compro Technology, Inc. www.comprousa.com 1 Table of Contents Safety Instruction ............................................................... 4 Import Precautions ............................................................. 5 Product Introduction........................................................... 6 Package Contents ........................................................... 10 Hard Disk Installation ....................................................... 11 Remote Control Introduction ............................................ 16 Start Your Network Media Center .................................... 17 Setup Network Media Center .......................................... 22 TV Watch and Record (DVB-T) ....................................... 23 Playback Media Files (Video/Audio/Photo) ..................... 25 Network Function ............................................................. 28 BT (Bit Torrent) Function .................................................. 32 Web/Internet Function ..................................................... 34 Firmware Upgrade ........................................................... 35 Frequently Asked Questions (FAQ) ................................. 36 Troubleshooting ............................................................... 37 2 Copyright © 2001-2009. Compro Technology, Inc. No part of this document may be copied or reproduced in any form or by any means without the prior written consent of Compro Technology, Inc. Compro, VideoMate, Poladyne, Play with Power, and the Compro logo are trademarks of Compro Technology, Inc. Other names and marks are trademarks of their respective owners. COMPRO makes no warranties with respect to this documentation and disclaims any implied warranties of merchantability, quality, or fitness for any particular purpose. The information in this document is subject to change without notice. COMPRO reserves the right to make revisions to this publication without obligation to notify any person or entity of any such changes. Compro Technology, Inc. Tel. +886 2 2918 0169, Fax +886 2 2915 2389 4/F, No.12, Alley 6, Lane 45, Pao Shin Road Hsintein City, Taipei, Taiwan. www.comprousa.com 3 Safety Instruction Please follow the steps below to protect your Network Media Center: Please place the Network Media Center on a level surface and out of direct Sun shine. Please keep the Network Media Center inside house and away from water, dust, or humidity products. Please keep the Network Media Center with wall and other devices in about 15 cm to get better heat transfer. Please do not drop the Network Media Center body to the floor, it may cause the damage to main parts and hard disk inside. Please do not disassemble or remodel the produt, it may cause damage or fire. Do not shake, move or disturb the unit when it is in operation, as such actions may result in the malfunction of the device. 4 Import Precautions Before you start to use the Network media center, please follow the notes below to properly use it: Please make sure that the unit is in powered off status when attached or detaching any cables. Should you want to use the record function of the unit, you must format the hard drive via the setup menu, which will wipe out all of the data on the drive and the file system will be EXT-3. In order to use EXT-3 file system on a Windows system, you must install a special driver and we suggest EXT2FSD. Please use either the HDMI or component output for the best video quality. Remember to periodically backup the data on the hard drive. We do not provide warranty or being held responsible for any loss of data on any storage devices attached to the Network Media Center. Whenever you update the firmware on the unit, it may reset all of the settings on the unit. You may need to re-enter all of the associated customized settings. Please beware that the wireless network, on applicable models, is meant for Internet purpose only. For the best movie playback performance over the network, a physical 10/100 LAN is highly recommended. You may encounter stutter or stoppage when trying to playback high definition content over the wireless network. ※ The wireless network feature is only for Network Media Center T1000W/1000W 5 Product Introduction The silver sleek bodyline of the Network Media Center contains the innovative operating system and a powerful H.264 processor which is capable of showing brilliant and vivid 1080P Full HD movies. The fast wireless network ensures a clutter-free Internet connection to the world. To satisfy the growing number of digital HDTV, the Network Media Center is capable of decoding and recording of MPEG-2 or H.264 digital TV streams where available. Key Features: Full HD H.264 Color Gamut Experience Now you can enjoy the brilliant Full HD H.264 movies with a single click from the remote control. The Network Media Center can easily handle a variety of movie formats that you can throw at it and come back for more! Full HD playback can never be easier. HD Digital TV Reception / Record On VideoMate Network Media Center , users can experience the vibrant HDTV programs, MPEG2 or H.264 (where available) and record the media at their heart’s desire. The media can be playback from the storage area at a time which is suitable to the user. ※ The TV reception and recording feature are only for Network Media Center T1000W Direct AVCHD Playback The Network Media Center facilitates the effortless playback of your HD digital video clips from the high definition cameras, no conversions required. Show Photos on TV You can pull hundreds of photos from various sources and create your own photo slideshows for your enjoyment on your TV. 6 Pure Digital HDMI Video/Audio Transfer VideoMate Network Media Center is equipped with HDMI output. To get the most out of your huge LCD / plasma TV and the HDTV content, HDMI is the preferred digital connection between the TV and the source, in order to ensure a zero distortion during the transfer. Standalone BitTorrent Machine Nothing is more annoying and wasteful than having the computer on while downloading the last few percent of a BitTorrent file. The built in BitTorrent client can help you finish off the last bit of the long file. Advanced SATA Storage Solution The Network Media Center offers the most advanced storage solution to date, Serial ATA interface. SATA interface offers light-speed data transfer and fool-proof connectors which was unthought-of on the ancient ATA interface Total Network Solution The Network Media Center comes with 10/100 LAN capability which can be used for the share & transfer of files across different machines and acts as a home media server. In addition an 802.11g wireless network module is included to reduce the cable clutter and a more convenient connection method. ※ The wireless network feature is only for Network Media Center T1000W/1000W 0dB Operation Nothing is more annoying than having the fan whizzing at full speed when enjoying that intimidate moment. That is why the Network Media Center T1000W operates at a silent 0 dB which gives you a whisper-quiet movie time. 7 Specification: Network Media Center Video Container: AVI, MPG, ISO*, VOB*, IFO*, MOV(H.264), TS, ASF, MKV Video: MPEG 1/2/4, WMV9(MP@HL), H.264([email protected]), AVCHD, VC-1(MP@HL) Digital TV: DVB-T Audio: MP3, WMA, WAV, PCM Resolution: Up to 1920 x 1080p Image Formats: JPG HDD: 3.5” SATA, up to 1TB Subtitle SRT, SMI*, SUB*, SSA*, TXT File System: (Only for Network Media Center T1000W) FAT32 and EXT(Read/Record), NTFS (Read only) TV Connector: DVB-T signal input (Only for Network Media Center T1000W) Connector Video Connector: HDMI out, Component (Y, Pb, Pr) out, S-Video out, Composite Video out Audio Connector: Audio-FL out, Audio-FR out, HDMI (shared with video),Co-axial Audio out, Toslink Audio out USB Port Connector x3 LAN Connectors -- Ethernet 10/100M port -- WLAN antenna connector (Only for Network Media Center T1000W) Power Connector : DC in Power Supply 12V/4A 270 (H) x 180 (W) x 180 (D) mm Dimension * Through future firmware updates. 8 Name of Each Part: Front Side: Status Indiciators LED: Front the left to the right: Last chapter, Back forward Play/Pause Fast forward Next chapter Stop Record/BT download (Red) Compro Logo LED: Lights up when you are using the Network Media Center. Back Side: Wireless LAN Antenna (Only for Network Media Center T1000W/1000W) From the left to the right: HDMI Output, LAN Input, USB Port x3, DVB-T Antenna Input (NMC T1000W only) Back Panel: Power Input, S-Video, Component, Composite Video/Audio, Optical(Toslink), and SPDIF Outputs 9 Package Contents Network Media Center Power Adaptor and Power cable Composite video and audio cable User’s Manual Wireless Antenna Remote Control With Batteries HDMI Cable ( NMCT1000W/1000W only) Digital TV Antenna ( NMCT1000W only) 4x Screws for HDD Installation How to use the digital TV antenna: For the best reception of this digital TV antenna, please extend the antenna to the left and right side as the picture shown. ( NMCT1000W only) Note In order to receive digital terrestrial TV broadcast, the antenna is crucial. Digital terrestrial TV broadcast uses about the same wave as analog TV. It’s recommended to have a fishbone-like antenna on the roof for receiving. More detail is on the troubleshooting chapter in this manual. 10 Hard Disk Installation You can put a 3.5” SATA interface hard disk into the Network Media Center to storage your media files, record the TV shows, or download the files from BT. Before you install the hard disk to Network Media Center, please make sure you have un-plug the power cable from the device. The system will format the hard disk for storage. If you have data or files on the hard disk, please backup or copy it to other place, or all the data will be cleared after format. Step 1: Use screwdriver to loosen the 4 screws on the corner of bottom cover of Network Media Center. Step 2: Open the bottom cover, and you will find a picture of HDD install direction on the other side of bottom cover. Step 3: Put your 3.5” SATA hard disk into the frame in the same direction as the picture shown. 11 Step 4: Put your 3.5” SATA hard disk into the frame, and fasten it with the 4 screws included in the package. Step 5: Connect your hard disk to the SATA interface and power cable. Step 6: Put the bottom cover back and tighten the screws by the screwdriver. Now you can plug the power cable and power on the device to enjoy it. Note It’s not necessary to install the hard disk to Network Media Center. But if there is no hard disk installed, the BT download and TV record/schedule record function will not be available. In order to use the DVB-T recording and BT download functions of the NMC, you MUST format the HDD with the NMC. By doing so, you will lose all of the data on the drive. (DVB-T recording is only for NMC T1000W ) 12 Step1: Click into the setup menu and choose “System Setup” Step2: Choose the “Format HDD” item and click “Format”. Step3: System will warning about disk format. Please choose “Yes” if you confirm to format it. Step4: System will show the percent of formatting, after formatting, it will back to the main menu. 13 Cable Connection 1. 2. 3. 4. Note: The right USB connector had been optimized for external 2.5” HDD 1. HDMI Connector: If your TV or monitor has HDMI connector, we suggest you connect the Network Media Center with HDMI. And the HDMI can transmit both the video and audio signal, you don’t have to connect any other cable for audio output. 2. LAN Connector: You can use wireless LAN by connect the wireless antenna in the package, or you can use the local LAN with LAN cable connected from your HUB. 3. USB Connectors: You can use it connect with your thumb flash drive or extenal HDD to playback the media files inside. 4. DVB-T Signal Input: Connect with the included DVB-T TV antenna of the roof-antenna in your house to receive the digital TV signals. (NMC T1000W only) 14 1. 2. 3. 4. 5. 6. 7. 1. Power Connector: Plug the power adaptor and power cable after all the other cables are well connectted. 2. S-Video: If your TV has built-in S-video connector, you can connect it for the video input. 3. Component Output: If your TV has built-in component (Y, Pb, Pr) connector, you can connect it for the video input. 4. Composite Video Output: If your TV has built-in composite connector, you can connect it for the video input. 5. Composite Audio Output: Connect it to your TV or amplifier for audio output. 6. Optical (Toslink) Output: You can use the optical cable to connect it with your external amplifier for audio output. 7. SPDIF Output: You can use the RCA cable to connect it with your external amplifier for audio output. Note The video quality: HDMI > Component > S-Video > Composite, you can choose the best video quality connector in your TV to connect with the Netwok Media Center for better video experience. 15 Remote Control Introduction Power On/Off Network Media Center Function key for Basic control Number keys and letters input keys Channel and Volume Up/Down, Arrow keys and Enter (Channel Up/Down are only for NMC T1000 only) TV (NMC T1000W only) Video Short key to direct switch different features Control keys for video/audio playback Music Photo Web Schedule Recording (NMC T1000W only) Function keys: Video Subtitle Audio Channel Zoom Video/Photo Setup Menu 16 BT Download Home Menu Start Your Network Media Center Using at the first time Up on the first power on session, you will be asked to select your country and then greeted by the Compro Wizard which should take you 5 minutes to complete the unit setup. You can exit the Wizard at any time by pressing the “cancel” button on screen. You can also re-enter the Wizard at a later stage by going to the “System Setup” page. You can use the arrow and Enter keys to process setup by remote control Use the arrow keys, move to the place you want to change, then click ENTER to change the data, then click ENTER again to set the change. Step 1: Select your Video Output: Choose your video source, you can choose Composite, S-video, Component, and HDMI Output. If your TV or monitor is traditional CRT, you can chooe composite or S-Video for output (with 480i or 576i resolution), then you have o choose your TV system is NTSC or PAL. 17 If your TV or monitor is the latest LCD/PDP, it can provies Component Video and HDMI output, support from 480i, 480p, 576i, 576p, 720p50, 720p60, 1080i50, 1080i60, 1080p50, 1080p60 resolutions output. If you choose the wrong output mode or un-connect port, it screen will be black in about 30 sec, then return to the last screen. Step 2: Select Your Video Resolution Select your resolution in Component or HDMI output mode. 18 Select your TV system (NTSC or PAL) in Composite or S-Video output mode. (NMC T1000W only) Step 3: Select the Video Aspect Ratio You Want Step 4: Select Your Audio Output Port 19 Step 5: Internet Setup (Wireless LAN is only for NMC T1000W/1000W) If you want to use the internet related features, you can setup the internet in here, or setup later in the Main Menu Setup Network page. Default is wired with automatic (DHCP) mode. If you are using fixed IP, you can setup the IP address later in the Network Setup page. If you choose the wireless LAN, it will scan all the available wireless access point. You can choose the one in your house. If your access point has setup security, you can use remote control to key-in 20 the WEP or WPA key. Note You can press the Previous/NUM key on the lower-right of number keys to switch between Caps, Caps Lock, and NUM. And input the number or letters. Step 6: Digital TV Setup (NMC T1000W only) Before setup the digital TV, please make sure the digital TV antenna has been attached to the device. You can select you country/area, then Scan all the available channels. After setup the TV channel, all the setup will be complete for use. 21 Setup Network Media Center Setup Menu In the Setup Menu bar, you can do the setup below: System Setup: Setup Date, Time, Format HDD, Setup Wizard, or Firmware Upgrade Profile: You can setup Language, Subtitle On/Off, Slide Show Delay Time, Default Subtitle Language and Light Dimmer. Also, you can rese all the setting to factory default. DTV: Setup digital TV as Wizard. (NMC T1000W only) TV Output: Setup Video and Audio output connector and modes. (NMC T1000W only) 22 Network: You can setup more detail about your own LAN in here. TV Watch and Record (DVB-T) (NMC T1000W only) There are 4 features in the TV bar: Watch TV Scehdule: Setup for Schedule Recording Recorded TV: Playback Recorded TV Files EPG (Electrical Programming Guide) Available Keys for TV Control: Mute Short-key for EPG Back to previous screen and Main Menu Click Enter to select EPG or Channel Guide Volume Up/Down Channel Up/Down Arrow Key Enter/Confirm Back to Main Menu Recording while watching TV Playback recorded files Repeat mode Controls in EPG Audio Channel Select Zoom Screen (2X/4X/8X/16X/20X) Setup DTV 23 In the schedule recording setup, you can setup the Channel, Time, Recording type (Once o select from weekly day), and action after recording. In the EPG screen, you can use the 4 color keys (the at the bottom of the remote control) and arrow keys to check the upcoming programs. You and click the “Record” button on the remote to directly setup the schedule recording. 24 Playback Media Files (Video/Audio/Photo) Network Media Center provides video, audio, photo, and recorded TV files playback from installed hard disk, USB device, or the shared files from local network. Available Keys for Media Playback Control: Mute Go to the certain of time while watching video Direct seeking keys Back to previous screen and Main Menu Play/Pause in video playback Play/Pause slide show in photo Right: Skip forward 1 minute Left: Skip back 10 seconds Volume Up/Down Arrow Key Enter/Confirm Short-key for Video, Music, and Photo Back to Main Menu Video, audio playback controls Quick switch to next photo Repeat mode Audio Channel Select (firmware upgrade) Zoom Screen (2X/4X/8X/16X/20X) Profile Setup 25 Video Playback Network Media Center supports the format below for playback Video Container: AVI, MPG, ISO, VOB, MOV(H.264), TS, ASF, MKV MPEG 1/2/4, WMV9(MP@HL), H.264([email protected]), AVCHD, VC-1(MP@HL) When you are watching the video, you can click the number key on the remote to direct jump to the percentage of video. (ex. 2 for 20%, 4 for 40% of video playback) Or you can click “Go To” button on the remote to jump in specific time. Video: Music Playback 26 Photo Playback While watch the photo files, you can click “Stop” or “Enter” key to turn slide show On/Off. Also, you can use the “Zoom” key to zoom the photo to 2x, 4x, 8x, 16x, 20x Copy files Between Different Storage Devices You can use the copy and paste feature to backup the file from internal HDD to external USB flash drive/HDD, or copy file to internal for playback. Select the folder or file, then click “Right Arrow” to open the dialog, choose “ copy”, and paste to the folder you want. 27 Network Function Playback Files from Local Network To playback the video/audio photo from other PCs, you first have to enable the share folders on the host PC. Once you’ve selected the “Network” icon, you will be presented with the following options: The network browser will automatically show all of the available Samba “Workgroups” on the network, in this case “WORKGROUP”, “MSHOME”, and “FNS”. You can enter the respective work group to search for the desired computer and its shared files. The available “NFS” shares will only be revealed once you’ve selected the option. 28 Alternatively, you may wish to setup commonly used network links under the Samba/NFS Setup option. You can save up to five preset network shares in the Samba/NFS setup. These preset network shortcuts will be shown on the top of the “Network Browse” page when you are searching for the available media on the network, as shown below (in this case, the name of the share is called “test”). 29 You can use the “Add Share” button to manually enter the associated settings or the “Browse Network” button to search for the desired link. Once in the “Add Share” page, you can enter the associated parameters as follows. Share Type: This denotes the protocol of the share, SMB generally means the shares on Windows PCs while NFS corresponds to Linux. Share Name: The name which you wish to call the share, e.g. music, movie. 30 Share URL: The network location of the share. You can either enter the IP address of the shared PC (SMB only) or the folder name of the share. E.g. in the figure above, the user wish to create a direct link to the folder called “test4241” which is shared on the PC with the IP address of 192.168.0.50. User Name / Password: These two rows only needs to be entered should the desired destination is password protected. Once the user had confirmed all of the setting, he/she will be taken back to the NFS/SMB with the type and name of the share shown. You can edit the short cut by clicking on the “Edit” button or use the “Delete” button to delete the link. 31 BT (Bit Torrent) Function Bit Torrent is an application for downloading legal files from various peers on the internet. It is especially useful in the transferring of large files. To use the Bit Torrent client of this machine, you must first find the “torrent” file containing the downloading information for the said file. The availability of the file is determined by the number of speeds and peers at the time of the download. The downloading of the file will not be successful should there be no active seeders. In order to use the bit torrent function, the Network Media Center must be connected to an active internet connection. The speed of the download will be affected by the number of available seeds and peers for the respective torrent. Note: Only three torrents will be actives at any given time. To add a torrent task, you must first download a desired .torrent file from the internet. After the download is completed, transfer the .torrent file to the Network Media Center via the network. Lastly, you can start the torrent downloading by adding the torrent to the torrent list under the Bit Torrent menu. The download of torrents will being when you are at the BT screen or when you’ve powered off the unit by pressing the power key on the remote. Alternatively, you can press the start all button to start the torrent tasks, however, it will be stopped once you exited the BT page. This is done to ensure the data integrity during video recording or file playback. 32 Only three files will be downloaded simultaneously and the BT will only commence when you are under the main BT page or when the NMC had been powered off via the remote button. During this state, the “Compro” and “Play” logo will be lit up. This is a perfectly normal situation. 33 Web/Internet Function The Network Media Center offers a variety of pre-designed websites playback on the television set. We will make editions to the list of available websites in order to maximize users viewing pleasure. Please do keep in mind that Network Media Center does not contain the full browser as you would normally get on a PC since each website needs to be customized for the proper display on the television set. In order to use the internet function, the Network Media Center must be connected to an active internet connection. You can browser pre-designated websites with the Network Media Center. Please use the navigation pad to move about the user interface and the number keys for entering text. 34 Use the arrow key to select the video type you want. (Featured, Most Viewed…) Mumber key 1, 2, 3, 4 o select video for Today, This Week, This Month, or All Time. Also, you can direct key-in the name for search video from YouTube. Firmware Upgrade You can download the latest firmware from Compro’s web site. www.comprousa.com Please unzip the files and copy to your USB flash drive, USB external HDD. And go to the Main Manu Setup System Setup page, you can click the Firmware Upgrade button to upgrade firmware. 35 Frequently Asked Questions (FAQ) 1. Why does my NMC’s light stay on after I’ve powered off the unit via the remote? Answer: The NMC’s Compro and Play logo will stay lit should you have bit torrent files loaded. The unit will commence background download during power off. You can interrupt the download anytime by pressing the power button again. 2. How can I copy files via NMC? Answer: In the file browser mode, press the “right” navigation key and a menu will pop out asking for the operating mode. Please select the desired mode then navigate to the target director and repeat the steps above. 3. Why do I see mosaic pictures on my *.mkv files? Answer: The Compro NMC supports *.mkv files with H.264 with [email protected] level. There are files encoded with [email protected] level which may cause the machine to show non-intended results. 4. Why is there no video output on the TV screen? Answer: You can try to press the “TV Output” key on the remote controller which will reset the TV signal and the video will be available on all output connectors. Note: Please wait for 1minute after you’ve press the TV Output key. 36 Troubleshooting When you are using the Network Media Center, you may encounter various issues of setup, network, or playback. The following pages contain the list of troubleshooting procedures which should help you overcome any difficulties. The guide is divided into three sections: System Setup Network Video/Audio/Photo Playback, TV, and Misc Issues. Trobule with System Setup 1. How do I access the Wizard again? Please go to “System Setup” in main menu, then click the “run” button in the “Setup Wizard” 37 2. How do I setup shared folders on my PC? You can setup up the share folder in your Windows XP or Vista system PC and then you can directly playback video/audio/photo contents from PC in Network Media Center, please follow the steps below to setup share folder: Note The share folder setup in here only support SMB (Samba) mode network streaming. After the setup of your share folder, please select SMB to explore your shared forder. Share folders in Windows XP: Before you setup share folders, please first open “My Computer” select “Tools” in the toolbar, then select “Folder Options” “View” tab. Please check the “Use simple file sharing” is select or not. 38 If the “Use simple file sharing” has been select. When you are the first time to share folder, please click the “Network Setup Wizard” and follow the Wizard step by step to setup your network. After setup, please restart your system. After restart the system, you can select the folder for sharing again. You will find the sharing setup is different. And now you can select to share this folder. When the folder has been shared, you can see it as the pictures below. 39 If the “Use simple file sharing” has not been select. When you are the first time to share folder, you will find the sharing properties is different. Please select “Share this folder” And check the Permissions is setup to “everyone”. If not, you can add it by click “Add” “Advanced” ”Find Now”, then select “Everyone”. 40 Share folders in Windows Vista: There are 2 ways you can share the files from PC to Network Media Center. 1. Direct share the folder with video/audio/photo files. Select the folder you want to share, right-click mouse and select “Share”. Choose “Everyone (All user in the list)” and press “Add” to add the permission 41 account to open the folder. Then press the “Share” button to confirm. 2. Copy video/audio/photo file the Public folder. 42 Copy files to Public Music, Pictures, or Videos folder After share the folder or copy files to Public folder, please to go “Control Panel” “Network and Sharing Center”, turn on the “File sharing” (if using share folder) or “Public folder sharing”, and turn off the “Password protected sharing” items. Now you can find the files in your Network Media Center. 43 Trouble with Network 1. How do I access the NMC from PC? Please go to the “Network setup” section, find the IP address Type the IP address in file explorer to use the HDD on the NMC. 2. Why is my wireless connection slow? The wireless network connection is primarilry focused on the internet viewing than HD movie streaming. Please use LAN cable connection or copy the HD movie files to the HDD of Network Media Center. 3. Can I use both of my wired and wirelss network together? The current configuration is for either wired or wireless, not both. 44 Video/Audio/Photo Playback, TV, and Misc Issues 1. Why is there no audio? There are some possible solutions for audio: a. Please check the audio output connector & connection type in the setting Main Menu Setup TV Output Setup b. Please check the format of audio, PCM for 2 channel & without AMP c. Pleasde check the audio is RAW for external AMP or not. d. If you’re using DTS down-mix to 2x channels, it is not supported. 2. Why is there no video? Please check the output format & type, if the connection matches the setting or HDMI 45 Also, it may be setting to the wrong resolution, you can press the "TV output" on the remote to switch the resolution. 3. Why is there no album art? Please check that you've got the album art in the same folder as the MP3. Note: do not put picture sizes larger than 1MB as the album art as it is not supported. 46 4. Why is there stutter when I try to stream 1080p 40GB files over the network? a. It is recommend that you do not stream any files over 30GB for a 2 hour movie. Please copy the files to the internal HDD of Network Media Center for better playback quality. b. If you are using wireless, we do not recommend streaming any content over 480p. 5. How do I get the TV channel guide & Teletext in DVB-T broadcast? Please press the "enter" key during the viewing of DVB-T channels and follow the on-screen instruction. 47 Contacting Compro Technical Support Before you submit an email for support, please check the troubleshooting list above. You may fill out the form (http://comprousa.com/en/form.htm) or directly email to [email protected] All specifications and information are subject to change without notice P/N 3GA0310487 48