1
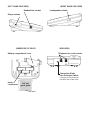
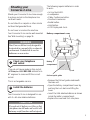
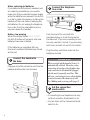
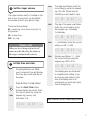
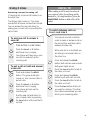
Converse
2-line Telephone
User Guide
Please open this page for a further
‘at a glance’guide to your Converse 2-Line.
Please open this page for an ‘at a glance’
guide to your Converse 2-Line.
At a glance
Quickdial directory label
Lets you keep a reference of
the phone numbers stored in
the Quickdial memories
LCD Display
Includes clock
Handset park
When the Converse 2-line is wall
mounted, you can hook the
handset over this if you need to
move away from the phone
during a call.
Quickdial memory buttons
Lets you dial stored numbers.
Function
Lets you access the phone’s functions.
Handset hook
Used to hold the handset in
place when wall mounted
F
n
unctio
Line 1
Lets you select Line 1 when
answering or making calls.
Shift
Line 2
Lets you select Line 2 when
answering or making calls.
Speaker
Line 1
Line 2
nference
Co
us
Line 2 Ringer LED
Red - Lights up when a call
comes in on Line 2
Line 2 In use and Hold LEDs
Red when Line 2 is being used
Green when a Line 2 caller is put
on Hold
2
4
PQRS
7
3
JKL
MNO
5
TUV
8
ll
Re
2
ca
H
GHI
DEF
ol
6
WXYZ
9
di
al
free
ds
0
Loudspeaker LED
Red - Lights up when the
loudspeaker is switched on
Conference
Lets you hold a 3-way
conference with two other
callers.
Pause
Lets you insert a pause. Used
when connected to a
switchboard/PBX or storing
numbers in the memory.
d
Re
Line 1 In use and Hold LEDs
Red when Line 1 is being used
Green when a Line 1 caller is put
on Hold
1
ABC
Ha
n
Line 1 Ringer LED
Red - Lights up when a call
comes in on Line 1
e
Pa
Loudspeaker
Enables handsfree operation.
Shift
Lets you switch between the two
10-number memories.
Recall
Used when connected to a
switchboard/PBX or using BT
Select Services.
Hold
Lets you put a caller on hold.
Redial
Redials the last number dialled.
Microphone
For hands-free operation.
Handsfree
Press to hear your caller
over the loudspeaker.
(RIGHT HAND SIDE VIEW)
(LEFT HAND SIDE VIEW)
Handset line socket
Loudspeaker volume
Ringer volume
(UNDERSIDE OF BASE)
Battery compartment cover
(END VIEW)
Telephone line cord sockets
Connection Mode
Line Selection Switch
Lets you set the phone for
use with one or two lines.
Battery
compartment
Pull out
quick guide
Lock
In this guide
At a glance
2
Installing your
Converse 2-Line
4
Using your
Converse 2-Line
8
Help
16
Maintenance
17
Technical information
18
Wall mounting
19
Index
21
3
Installing your
Converse 2-Line
EMERGENCY CALLS
The emergency services can be contacted in
the UK by dialling 999. You may also dial
112 which is valid in any country that is a
member of the European community.
If your Converse 2-Line is connected to a
PBX (switchboard), you may have to dial
an access number before 999 to contact the
emergency services. Some switchboards
cannot dial out during a power failure.
Unpacking your
Converse 2-Line
Check that your Converse 2-Line is
complete.
When you unpack you should have:
• Converse 2-Line
base unit.
• Converse 2-Line
handset.
For your records
Date of purchase:
• Coiled handset
connection cord.
Place of purchase:
• 2 telephone
line cords.
Serial number (on the underside of the base station):
Purchase price
For warranty purposes, proof of purchase is
required, so please keep your receipt.
4
• 3 x AA alkaline
batteries.
• Screws and wall plugs
for wall mounting.
Situating your
Converse 2-Line
Situate your Converse 2-Line close enough
to a phone socket so the telephone line
cords will reach.
Do not stand it on carpets or other similar
surfaces that generate fibres.
The following require batteries in order
to work:
• In Use/Hold LED.
• Loudspeaker.
• 3-Way Conference button.
• One-touch memories.
• Redial button.
• Hold button.
• LCD Display and clock.
Do not cover or enclose the machine.
Your Converse 2-Line can be wall mounted.
See ‘Wall mounting’ on page 19.
Battery compartment cover
WARNING
Your Converse 2-Line is only designed to
be operated in a normal office or domestic
environment. It should not be used in
bathrooms or near water.
1
Check your telephone
wall socket
If you do not have a modern style socket,
call Freefone 0800 800 150 and ask for a
BT engineer to come and fit the correct
socket.
This is a chargeable service.
2
Install the batteries
Your Converse 2-Line is designed for use
with 3 x AA size alkaline batteries.
Battery
compartment
Lock
Pull-out quick guide
• Remove the Pull-out guide underneath
the base unit.
• Open the battery compartment cover by
pushing the Lock back and lifting the
cover.
• Insert the 3 AA alkaline batteries as shown
inside the battery compartment.
• Replace the cover and click into place.
Please note
If you do not fit batteries or if they go f lat,
your phone can still make and receive calls
but many useful functions will not operate.
5
When replacing old batteries
If you have stored One-touch numbers and
are replacing low batteries, you need to
make sure that you maintain a power supply
while the batteries are removed. You do this
in order to retain the memory by taking the
handset off the hook before removing the
old batteries. Do not unplug the telephone
line cords. Once the new batteries are in,
you can replace the handset.
Batter y low warning
When the display flashes LOW BATTERY ,
the HOLD button will not work until new
batteries have been installed.
If the batteries go completely flat, any
One-touch numbers that have been stored
will be lost.
3
Connect the handset to
the base
Plug one end of the coiled line cord into the
handset and the other into the base.
4
Connect the telephone
line cords
Push the end of the cord with the
transparent plug on it into the socket on
the base unit. If you are connecting to one
line only, use the L1 socket. If you are using
both lines, use both L1 and L1/L2 sockets.
Plug the other end of the cords into the
telephone sockets.
Please note
When you pick up the handset, Line 1 is
automatically selected. Therefore, when
connecting to two lines, the telephone line
cord connected to L1 should be plugged
into the most frequently used line. This
will save you having to press a Line button
in order to answer the majority of calls.
See ‘Making and receiving calls’ page 8’.
5
Set the connection
mode switch
• If connecting to one telephone line only,
set the Connection Mode switch to 1x.
• For two lines, set the Connection Mode
switch to 2x.
6
DIAL
Set the ringer volume
6
The ringer volume switch is located on the
side of your Converse 2-Line and affects
the volume at which your phone rings.
07-18 12:00
HI– a loud ring. Your phone is pre-set to
this position.
LO– a quiet ring.
DIAL
When one line is being used and a call
comes in on the other line, the volume of
the ringer is automatically reduced.
Set the time and date
Press buttons in order shown
F
n
Press the FUNCTION button.
Display flashes the month. Enter
the correct month by using the
keypad, eg: January = 01,
December = 12.
01-01
12:00
AM
LOWER
TH
Display now flashes TIME. Enter
the correct time by using the
keypad, e.g.: 0515 = 5.15.
07-18 05:15
Providing batteries are fitted,
your Converse 2-Line will display
the time, day, month and day of
the week.
SU
LOWER
AM now flashes. Enter the correct
setting. 1= AM, 2 = PM.
07-18 12:00
DIAL
DIAL
AM
TH
Please note
unctio
LOWER
The day of the week now flashes.
Enter the correct day by using
the keypad, e.g.: 1= Sunday,
7 = Saturday.
07-18 12:00
OFF– no ring.
7
AM
SU
DIAL
There are three settings
The date now flashes. Enter the
correct day by using the keypad,
e.g.: 09 = 9th. Please note for
Feb 29th you will need to reset.
AM
LOWER
TH
The display gives you 15 seconds
to complete each setting. If you
do not press any button in that
time, the display returns to
normal and you must start again
from the beginning.
Your Converse 2-Line is now ready for use.
AM
LOWER
7
Using your Converse 2-Line
To make a call on Line 1
To receive a call on Line 2
The phone rings and the red
Line 2 Ringer light flashes.
Press buttons in order shown
Lift the handset and listen for the
dial tone. The Line 1 red light
comes on.
Line 2
Release the Line 2 button and
speak.
To end the call, replace the
handset.
Dial the number you require.
To end the call, replace the
handset.
To make a call on Line 2
Line 2
To put a call on hold
Press and hold down the Line 2
button and lift the handset.
When a call is placed on hold,
you cannot hear your caller and
they cannot hear you.
The Line 2 red light comes on.
Release the Line 2 button.
During a call:
H
Dial the number you require and
listen for the dialling tone.
old
To end the call, replace the
handset.
To receive a call on Line 1
The phone rings and the red Line
1 Ringer light flashes.
Lift the handset and speak.
To end the call, replace the
handset.
8
Press and hold down the Line 2
button and lift the handset.
Press and release the HOLD
button.
The IN USE light changes from red
to green and the call is on hold.
Line 1
Line 2
To take the call off hold, press
the Line 1 or 2 button (depending
on which line you are using. The
green light changes back to red
and you can talk to your caller.)
Please note once the alarm is set
it will come on daily, unless you
switch it off manually by resetting
the alarm.
To redial the last number called
Press buttons in order shown
Your Converse 2-Line will hold
the last number dialled – up to 31
digits – in its memory.
f r ee
Han
ds
Line 2
l
Re
dia
Lift the handset or press the
HANDSFREE button (to dial on
Line 2, press and release the
LINE 2 button while you do this).
Owners label.
You can write your phone number(s) on
the card under the handset. Remove the
plastic cover with a pencil or similar.
Press the REDIAL button.
To switch the alarm on and off
1
ABC
2
Press the FUNCTION button
three times. Display shows the
current alarm setting.
Press 1 to select AM or 2 to
select PM.
Use the keypad to enter the time
at which you want the alarm to go
off, e.g.: 0500 = 5-o-clock.
Shift
Press the SHIFT button to switch
the alarm on and off. The display
will only show when the alarm is
switched on.
The loudspeaker enables handsfree
operation – where you can make and receive
calls without picking up the handset. You
hear the caller through the built in speaker.
Adjust the loudspeaker volume by sliding
the switch on the right hand side of the base.
To make a handsfree call on
Line 1
ds
f r ee
Han
F
n
unctio
Using the loudspeaker
for handsfree operation
Press the HANDSFREE button.
The Speaker light and Line 1 light
both come on.
Adjust the VOLUME switch and
listen for the dial tone.
DIAL
ds
Han
You can use your Converse 2-Line
as an alarm clock. The display
gives you 15 seconds to complete
each setting. If you do not press
any button in that time, the display
returns to normal and you must
start again from the beginning.
f r ee
Dial the number your require.
To end the call, press the
HANDSFREE button. The Speaker
and Line 1 lights go out.
9
To make a handsfree call on
Line 2
To switch from handset to
handsfree
Press buttons in order shown
f r ee
Han
ds
Press and hold down the Line 2
button.
Press the HANDSFREE button.
The Speaker light and Line 2 light
both come on. Release the Line 2
button.
ds
Han
Line 2
During a call:
f r ee
Press the HANDSFREE button.
The Speaker light comes on.
Place the handset on the base.
Your call is now on the loudspeaker.
Adjust the VOLUME switch and
listen for the dial tone.
DIAL
Han
d
e
sfre
Dial the number your require.
To end the call, press the
HANDSFREE button. The Speaker
and Line 2 lights go out.
To put a handsfree call on hold
When a call is placed on hold,
you cannot hear your caller and
they cannot hear you.
During a call:
Press and release the HOLD
button. The IN USE light changes
from red to green and the call is
on hold.
Line 1
To take the call off hold, press the
Line 1 or 2 button (depending on
which line you are using again.
The green light changes back to
red and you can talk to your caller.
H
old
Line 2
10
To switch from handsfree to
handset
During a call, you may wish to
keep your conversation more
private.
Lift up the handset. The Speaker
light goes out.
Continue your call using the
handset.
Using 2 Lines
Answering a second, incoming call
If, during a call, a second call comes in on
the other line:
The Ringer light comes on. The ringer
sounds but at a lower volume than normal.
You can answer the new call either by
ending your current call or by putting the
call on hold.
USEFUL TIP
When ending a call in order to return to
your original caller, do not hang up the
handset or, (if using handsfree) press the
HANDSFREE button as both calls will be
ended.
To switch between calls on
Line 1 and Line 2
You can put one call on hold in
order to make or answer a call on
the second line, and then switch
between the two calls.
To end one call to answer a
new call
Press buttons in order shown
H
To put a call on hold and answer
a new call
old
Line 1
Line 2
Han
d
e
sfre
Press and release the HOLD
button. The green Hold light
comes on. Your current caller is
put on hold.
Press the Line 1 or 2 button –
whichever line is ringing.
Your phone will pick up the
incoming call.
End the new call and return to
your original caller by pressing
the Line button of the call that is
on hold.
While one call is on hold and you
are talking to a second caller on
the other line:
H
Line 2
Press the Line 1 or 2 button –
whichever line is ringing.
Your phone will hang up on your
current line and pick up the
incoming call.
old
Line 1
Press and release the HOLD
button. Both calls are now on hold.
Both green lights are on.
Press the Line 1 button to talk to
the caller on Line 1.
old
Press and release the HOLD
button to put both calls on hold.
Line 2
Press the Line 2 button to talk to
the caller on Line 2.
Line 1
Press the Line button of the call
you want to continue. The other
line is disconnected and you can
talk to your remaining caller.
H
Line 1
11
3-Way Conference Calls
H
You can hold a conference call with two
other callers on separate lines.
3-Way Conference Calls will not work on
the loudspeaker.
To end one call only
old
Line 1
To make a 3-Way Conference
Call
Line 2
Press buttons in order shown
Make your first call on Line 1.
When connected, press and release
the HOLD button. The caller on
Line 1 is put on hold.
Line 2
Press the Line 2 button and dial
the number you want.
nference
Co
When the second caller answers
press the CONF button. You can
now speak to both callers at the
same time.
H
old
H
To speak privately to one line only
old
Press and release the HOLD
button. Both callers are put on
hold.
Line 1
Line 2
nference
Co
12
Press the Line 1 or 2 button to
talk to the call on that line.
Press the CONF button to resume
your conference call.
Press and release the HOLD
button. Both callers are put on
hold.
Press the Line 1 if you want to end
the call on Line 1 or the Line 2
button if you want end the call on
Line 2 .
Say goodbye to that caller.
Line 1
Press the Line button of the call
you want to continue. The other
line is disconnected and you can
talk to your remaining caller.
PLEASE NOTE
It is possible that you may notice a loss of
sound quality on Conference calls, due to
your Converse 2-Line regulating the
audible variations of 3-way calls.
Should this reach unacceptable levels, BT’s
3-Way Calling Select Service can provide
an alternative method without sound
problems. You need to subscribe to this and
it is a chargeable service.
Using the Quickdial
memory buttons
To store a pause
You can store up to a total to 20 phone
numbers in two separate memories using
the M1-M10 Quickdial buttons.
au
se
P
10 numbers can be stored in M1-M10
LOWER and a further 10 in M1-M10 UPPER.
Each stored number can be a maximum of
20 digits.
For example if connected to an
office telephone system where
you have to dial a 9 to get an
outside line, when storing a
number:
The Quickdial directory label has two
panels for each button so you can enter a
reference name next to each button for the
Upper and Lower Quickdial memories.
WXYZ
9
To store a number
Some switchboards/PBXs can
take a short time to pick up an
outside line. You can insert a
pause in the number to allow for
this delay. A Pause can be
inserted in the phone number by
pressing the PAUSE button at the
appropriate place.
Press 9, then the PAUSE button,
then the number you want to store.
Press buttons in order shown
Shift
Press the SHIFT button to select
the UPPER or LOWER memory.
F
Press the FUNCTION button twice.
Display flashes DIAL NUMBER.
n
unctio
DIAL
Dial the number you want to store
(20 digits maximum).
unctio
Press the FUNCTION button to
store the number – you get a short
beep to confirm.
F
Press the Quickdial button under
which you want to store the
number. If a number has already
been stored, it is shown on the
display.
n
•
Store the next number by starting
from ‘Press SHIFT’ above.
13
To view another Quickdial
number
To dial a Quickdial number
Press buttons in order shown
Press the Quickdial M1-M10
button you want. The number is
dialled.
PLEASE NOTE
If you press the Quickdial M1-M10
button you want it will be automatically
dialled out.
To view numbers stored in
the memories
F
n
unctio
Shift
•
14
Press the FUNCTION button twice.
Press the SHIFT button to display
UPPER or LOWER.
Press the Quickdial memory
button (M1-M10) you want to view.
The stored number is displayed.
Shift
•
Press the FUNCTION button twice.
Press the SHIFT button to display
UPPER or LOWER.
Press the Quickdial memory
button (M1-M10) you want to
delete. The stored number is
displayed.
old
Press and release the HOLD
button. Display shows ERASE.
unctio
Press the FUNCTION button to
delete – you get a beep to
confirm – or the HANDSFREE
button to cancel.
n
If dialling a Quickdial number
when using the loudspeaker,
remember to check that Line 1 is
free as this line is automatically
selected in preference to Line 2.
Check which line you wish to use.
unctio
n
•
Press the SHIFT button (if
necessary) to select the UPPER or
LOWER memory and listen for the
dial tone.
Press the SHIFT button to select
UPPER or LOWER if necessary,
then press the M1-M10 Quickdial
button you want.
To delete numbers stored in the
Quickdial memories
F
Shift
•
H
Line 2
Lift the handset or press the
HANDSFREE button. (To dial on
Line 2, press and release the
Line 2 button after you have
pressed the Handsfree button.)
F
Han
d
e
sfre
Shift
Last number redial
l
Re
dia
f r ee
Han
ds
Lift handset and press the REDIAL
button.
Re
l
dia
Press the HANDSFREE and
REDIAL buttons.
Auto redial
Re
dia
l
Press the REDIAL button, speaker
light come on, loudspeaker comes
on and the number is dialled
automatically.
You may need to wait for a few
seconds before the number is
redialled.
IMPORTANT
Batteries must be installed to use the
Quickdial memory. If the batteries go
completely flat, all One-touch numbers that
have been stored will be lost. To avoid the
losing stored numbers, take the handset off
the hook while removing old batteries and
inserting new ones.
Using the Recall button
This button signals a time break recall and
is used when your phone is connected to
a switchboard/PBX and BT Select
Services. Contact your switchboard/PBX
supplier for further information.
15
Help
If you have trouble making or receiving
calls, try checking the telephone line by
replacing your Converse 2-Line with a
known working product.
Phone does not ring for incoming calls
Check that the Ringer Volume switch is not
set to off.
Handsfree calls on the speaker are
quiet
Check that the Speaker Volume switch is
not in the minimum position .
One of the IN USE lights is always on
If you have only one line connected to your
phone, check that it is connected to the
socket on the base marked L1 and that the
Connection Mode switch is set to x1.
Cannot get Line 2
Check that both telephone line cords are
connected and ‘clicked’ into place.
Check that the Connection Mode switch is
set to x2.
No lights come on
Check that batteries are fitted and that they
are not low on power.
HOLD does not work.
The HOLD button requires battery power
in order to work. It will stop working when
the display shows LOW BATTERY.
16
Display only works when handset is
lifted
Batteries need replacing immediately.
3-Way Conference Calls are quiet
In some circumstance, the volume and
quality of 3-Way Conference Calls may be
affected due to your Converse 2-Line
regulating the audible levels of 3-way calls.
If these levels become unacceptable then
BT’s Select Service 3-Way Calling will give
you an effective alternative.
Maintenance
General
Simply clean the Converse 2-Line with a
damp cloth (not wet) or an antistatic wipe.
Never use a dry cloth as this may cause a
static shock.
Service
If you have to return your
Converse 2-Line
Pack the Converse 2-Line securely,
preferably in the original packaging. All parts
must be returned including line cords and
original batteries. We cannot take
responsibility for goods damaged in transit.
Within guarantee
If you experience a problem with your
Converse 2-Line you should contact the
Converse 2-Line Helpline 0845 6031616.
If the problem is not remedied, you will be
advised to contact your original point of
purchase.
Some retailers offer extended warranty
schemes for cover outside the initial
12-month period. Please ask them for details.
Outside warranty
If your Converse 2-Line needs repair after
the warranty period has ended, contact the
Converse 2-Line Helpline 0845 6031616
for information on our recommended repair
agents.
17
Technical information
Environment
Your Converse 2-Line should be kept free of
dust, moisture, high temperature, vibration
and should not be exposed to direct sunlight.
It should not be used in bathrooms or near
water.
WARNING
Your Converse 2-Line is only designed to
be operated in a normal office or domestic
environment where the relative humidity
does not exceed 60%.
How many phones can you have?
All items of telephone equipment have a
Ringer Equivalence Number (REN), which
is used to calculate the number of items
that may be connected to a telephone line.
Your Converse 2-Line has a REN of 1. A
total REN of 4 is allowed. If the total REN
of 4 is exceeded, the telephones may not
ring. With different telephone types there
is no guarantee of ringing, even when the
REN is less than 4.
18
Connection information
Your Converse 2-Line may be connected to
public networks in the United Kingdom.
It may also be connected to switching systems
that use tone(MF) signalling, with timed
break recall. If in doubt, your switch supplier
of maintainer should be able to offer help.
Advice on connection to BT switching systems
can be obtained by contacting the Converse
2-Line Helpline 0845 6031616.
Generally, your Converse 2-Line can be
connected to any switchboard where a
simple, modern telephone can be used to
make and receive calls.
Wall mounting
Your Converse 2-Line can be wall-mounted
using the screws and wall plugs provided.
• Replace the bracket as shown.
Before you wall mount your Converse
2-Line, check that:
• the wall can support the weight of the
phone
• the position you choose leaves sufficient
space so that the phone is clear of any
obstruction on the wall, such as a shelf
or cupboard.
• Slide the wall mounting bracket out
from the base unit by pressing down on
the two retaining clips and pulling it
towards you.
CLIP 1
CLIP 2
• Now slot into position and push in.
CLIP 1
CLIP 2
19
• Use the wall mounting template below
for marking the drill holes.
• Drill two holes for the screws and insert
the wall plugs (if required).
• Insert the screws leaving about 4mm
free on which to hang the phone.
83mm
• Plug the line cords into the telephone
sockets.
• Place the holes on your wall mounting
bracket over the screws and gently slide
the phone down to make sure it is
securely in place.
• Now slide out and rotate the handset
hook so that you can hang up the
handset when the phone is wall mounted.
• If you need to put the handset down
during a conversation, place it on the
handset park clip at the top of the phone.
20
Index
Alarm On/Off 9
At a glance
2
Auto redial15
Batteries
compartment 5
installing 5
low warning
6
replacing 6
Caller on hold 11
Call on hold
8
Conference calls
end one call only
12
speak privately to one line 12
3-way call 12
Emergency calls4
End one call to answer a new call11
Guarantee 17
Handsfree
9
handsfree call Line 1 9
handsfree call Line 2 10
handsfree call on hold
10
switch from handset to handsfree
delete
14
dial 14
pause
13
redial
15
store 13
view 14
Recall
15
Receive a call 8
Redial
9
Return your Converse 2-Line
Ringer volume 7
Switch between calls 11
Technical information 18
Time and date 7
Wall mounting 19/20
17
10
switch from handsfree to handset
10
Help 16
Installing 4
Last number redial
Make a call
8
Mode switch
7
Phone socket 5
Pull out guide 5
Quickdial
auto redial 15
15
21
Offices in Europe, North America,
Japan and Asia Pacific.
The telecommunications services described in this publication
are subject to availability and may be modified from time to time.
Services and equipment are provided subject to British
Telecommunications plc’s respective standard conditions of contract.
Nothing in this publication forms any part of any contract.
Touchtone™ is a registered trade mark of
British Telecommunications plc in the UK.
© British Telecommunications plc 1998.
Registered Office: 81 Newgate Street, London EC1A 7AJ.
Registered in England No. 1800000.
Printed in Singapore. Converse 2-Line Issue 1 (9/98) 4.
Designed by The Art & Design Partnership Limited.
CE compliant to 89/336/EEC
(EMC Directive) & 73/23/EEC
(Low Voltage Directive)
APPROVED for connection to
telecommunication systems specified
in the instructions for use subject to
the conditions set out in them