1
Seiko Instruments Inc.
SMART LABEL PRINTER
ADMINISTRATION NOTES
7.1
DOCUMENTATION
SLP 100/410
SLP 200/420
SLP 240/430
SLP 440/450
SLP 620/650/650SE
© 2012 Seiko Instruments Inc.
Table of Contents
Table of Contents ..................................................................................................................................... 2 About this Document ............................................................................................................................... 3 Fine Print ................................................................................................................................................. 3 Default Paths............................................................................................................................................ 4 PrivateDocuments ............................................................................................................................................. 4 PrivateData ........................................................................................................................................................ 4 PublicDocuments ............................................................................................................................................... 4 PublicData .......................................................................................................................................................... 4 ProgramFiles ..................................................................................................................................................... 4 Notes ................................................................................................................................................................... 4 Specifying Alternate Paths ...................................................................................................................... 6 Program Configuration Settings ............................................................................................................. 6 External Label Processing....................................................................................................................... 7 Remote Desktop Connection ................................................................................................................... 8 Smart Label Run-time Diagnostic Logging ............................................................................................ 9 Turn driver debugging on ................................................................................................................................ 9 Turn driver debugging off ................................................................................................................................ 9 System Printer Driver Run-time Diagnostic Logging .......................................................................... 10 Turn driver debugging on .............................................................................................................................. 10 Turn driver debugging off .............................................................................................................................. 10 System Printer Driver Polling On or Off .............................................................................................. 11 Turn driver polling on .................................................................................................................................... 11 Turn driver polling off .................................................................................................................................... 11 Changing Printer’s Serial Baud Rate Settings ..................................................................................... 12 Launching SmartLabel in another language ....................................................................................... 14 Silent Installation ................................................................................................................................... 14 2D Barcodes: .......................................................................................................................................... 15 Page 2
About this Document
This document is intended for system administrators and advanced users to customize the Smart Label
Printer to their environment.
Fine Print
This SII software is supplied to you by Seiko Instruments Inc. ("SII") in consideration of your
agreement to the following terms, and your use, installation, modification or redistribution of this SII
software constitutes acceptance of these terms. If you do not agree with these terms, please do not use,
install, modify or redistribute this SII software.
In consideration of your agreement to abide by the following terms, and subject to these terms, SII
grants you a personal, non-exclusive license, under SII's copyrights in this original SII software (the
"SII Software"), to use, reproduce, modify and redistribute the SII Software, with or without
modifications, in source and/or binary forms; provided that if you redistribute the SII Software in its
entirety and without modifications, you must retain this notice and the following text and disclaimers
in all such redistributions of the SII Software. Neither the name, trademarks, service marks or logos of
SII may be used to endorse or promote products derived from the SII Software without specific prior
written permission from SII. Except as expressly stated in this notice, no other rights or licenses,
express or implied, are granted by SII herein, including but not limited to any patent rights that may be
infringed by your derivative works or by other works in which the SII Software may be incorporated.
The SII Software is provided by SII on an "AS IS" basis. SII MAKES NO WARRANTIES,
EXPRESS OR IMPLIED, INCLUDING WITHOUT LIMITATION THE IMPLIED WARRANTIES
OF NON-INFRINGEMENT, MERCHANTABILITY AND FITNESS FOR A PARTICULAR
PURPOSE, REGARDING THE SII SOFTWARE OR ITS USE AND OPERATION ALONE OR IN
COMBINATION WITH YOUR PRODUCTS.
IN NO EVENT SHALL SII BE LIABLE FOR ANY SPECIAL, INDIRECT, INCIDENTAL OR
CONSEQUENTIAL DAMAGES (INCLUDING, BUT NOT LIMITED TO, PROCUREMENT OF
SUBSTITUTE GOODS OR SERVICES; LOSS OF USE, DATA, OR PROFITS; OR BUSINESS
INTERRUPTION) ARISING IN ANY WAY OUT OF THE USE, REPRODUCTION,
MODIFICATION AND/OR DISTRIBUTION OF THE SII SOFTWARE, HOWEVER CAUSED
AND WHETHER UNDER THEORY OF CONTRACT, TORT (INCLUDING NEGLIGENCE),
STRICT LIABILITY OR OTHERWISE, EVEN IF SII HAS BEEN ADVISED OF THE
POSSIBILITY OF SUCH DAMAGE.
Page 3
Default Paths
After a normal installation, the Smart Label application program uses the following paths to locate and
save files:
PrivateDocuments
Windows special folder ID: CSIDL_PERSONAL
Typical path: C:\Documents and Settings\UserName\My Documents\
Files:
Smart Label Printer\LABELS.SLL
Label Library (Optional – created by end user)
PrivateData
Windows special folder ID: CSIDL_APPDATA
Typical path: C:\Documents and Settings\UserName\Application Data\
Files:
Smart Label Printer\SlpConfig.xml
Smart label Printer\SEIKOSLP.INI
Smart Label Printer\SEIKOSLP.SLP
Smart Label Printer\SLPAdmin.xml
Printer and global program settings (primary location)
Configuration settings – created by program
Program default settings – created by program
Optional – created by Administrator (see below)
PublicDocuments
Windows special folder ID: CSIDL_COMMON_DOCUMENTS
Typical path: C:\Documents and Settings\All Users\Documents\
Files:
Smart Label Printer\LABELS.SLL
Label Library (data base)
PublicData
Windows special folder ID: CSIDL_COMMON_APPDATA
Typical path: C:\Documents and Settings\All Users\Application Data\
Files:
Smart Label Printer\SlpConfig.xml
Printer and global program settings (secondary location)
Smart Label Printer\SlpLabels.xml
Label type data
Smart Label Printer\*.log
Various log files – created by program
ProgramFiles
Windows special folder ID: CSIDL_PROGRAM_FILES
Typical path: C:\Program Files\Seiko Instruments Inc\Smart Label Printer <version>\
Files:
Default Labels.sll
Factory default Label Library (data base)
Notes
1) Files are installed by the Setup program, except as noted (i.e., “created by …” ).
2) If the user does not specify a label library, the application software will look for a file with the
default name (LABELS.SLL) in the PrivateDocuments folder. If not found, the software will then look
in the PublicDocuments folder.
Page 4
3) If the path to the label library is changed, the Smart Label program may still look for the file in the
original location. This is because the path of the current label library is saved in the SlpConfig.xml file.
You may also need to change the path specified in that file.
Page 5
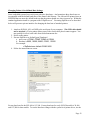
Specifying Alternate Paths
Some installations may require that files are stored at a specific location (e.g., a different drive, file
server, etc.). This may be accomplished by specifying the installation-specific paths in a special file
named SLPAdmin.xml.
During startup, the application looks for this file at PrivateData\Smart Label Printer\SLPAdmin.xml. If
the file is not found there, it will then look at PublicData\Smart Label Printer\SLPAdmin.xml. If the
file is not found in either place, the default paths described above are used.
SLPAdmin.xml is a Unicode file, which can be created using the Windows NotePad utility (be sure to
use “Save As”, instead of “Save”, and set “Encoding” to Unicode). The file has the following format:
<?xml version="1.0"?>
<SLP_Admin version="1.0">
<Paths>
<PrivateDocuments>C:\Documents and Settings\UserName\My Documents</PrivateDocuments>
<PublicDocuments>C:\Documents and Settings\All Users\Documents</PublicDocuments>
<PublicData>C:\Documents and Settings\All Users\Application Data</PublicData>
<PrivateData>C:\Documents and Settings\UserName\Application Data</PrivateData>
</Paths>
</SLP_Admin>
Note that any, or all, of the four paths may be specified in this file. A path specified in this file will
override the corresponding default path. Likewise, any path(s) not defined in this file will assume the
default setting (as described in “Default Paths”, above). Furthermore, an administrator may place this
file in both PrivateData and PublicData folders, so some paths can be specified for individual users,
and others paths specified for all users.
Program Configuration Settings
Printer and SmartCapture settings for the Smart Label program (SmartLabel.exe) are stored in a file
name SLPConfig.xml. By default, this file is located in PublicData\Smart Label Printer folder (e.g.,
C:\Documents and Settings\All Users\Application Data\Smart Label Printer\SLPConfig.xml).
Some installations may desire to have these settings saved on a per-user basis. This can be
accomplished by copying the SLPConfig.xml file from the PublicData folder to the desired
PrivateData folder (e.g., PrivateData \Smart Label Printer\SLPConfig.xml).
Note that the Smart Label program looks for this file in the PrivateData folder and, if not found there,
in the PublicData folder. Therefore, any users that do not have a private SLPConfig.xml file will use
the “global” settings in the PublicData folder.
Page 6
External Label Processing
The Smart Label program is capable of executing a user-defined program each time a label is printed.
This allows some additional processing to be performed for each printed label (e.g., add to a database,
create a form letter, etc.). This feature is implemented by adding a “RunOnPrint” section to the
SLPAdmin.xml file:
<?xml version="1.0"?>
<SLP_Admin version="1.0">
<RunOnPrint>
<Enable>1</Enable>
<InfoFilePath>C:\Temp</InfoFilePath>
<ExecuteProgram>C:\Windows\Notepad.exe</ExecuteProgram>
<Wait>0</Wait>
</RunOnPrint>
</SLP_Admin>
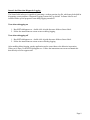
There are four settings for Run-On-Print, defined are follows:
Setting
Enable
InfoFilePath
ExecuteProgram
Wait
Description
Set to 1 to enable, or 0 to disable, the RunOn-Print feature.
Path to where the Label Information file will
be stored. The file name is in the format,
“Label_2322022955_0001.xml” and the last
four digits (e.g., “0001”) are incremented for
each label.
Path to the user program to execute. The
program will be executed with a command
line that includes the path of the Label
Information file. For example,
C:\Windows\Notepad.exe
Label_2322022955_0001.xml
Set to 0 to allow the Smart Label program to
continue while the user program executes.
Set to 1 to have the Smart Label program
wait until the user program terminates before
continuing, effectively preventing multiple
instances of the user program.
When executed, the user program will be passed one parameter, which is the name of the Label
Information file. The file should be deleted after the contents are read, to prevent the accumulation of
obsolete files.
The user program should read the Label Information file, delete the file, process the information, and
exit as fast as possible. If another label is printed while the user program is still executing, a second
instance of the program will be started. This could cause problems.
Page 7
Ideally, the user program should be written so that it detects when a second instance is started, and
handles the situation gracefully. Alternatively, the Smart Label program can wait for the user program
to terminate, by setting Wait to 1. Note that using the wait feature will reduce printer throughput to the
extent determined by the execution time of the user program.
Remote Desktop Connection
If users create a printer connection in a Citrix, shared VNC, or similar environment, the printer name
may be decorated each time a user creates a new session. The decoration is usually a suffix following
the printer name. To delimit the actual printer name from the decoration, SLP will look for a “#”
character between the real name and the suffix. If the SLP software is unable to connect to a printer in
such an environment, try appending a “#” character to the printer name, so it appears between the
printer name and the suffix (e.g., “Smart Label Printer 450# (from P51_MUSTANG) in session 3”).
Administrators should give all label printers unique names on their network so the SLP software can
find the default printer correctly.
Page 8
Smart Label Run-time Diagnostic Logging
The Smart Label software is capable of generating a verbose run-time log file, which may be helpful in
diagnosing certain problems. Diagnostic logging is turned off, by default. In Smart Label is now
installed with a special program to turn debug logging on and off.
Turn driver debugging on
1. Run SLPTechSupport.exe – double click it inside the same folder as Smart Label.
2. Follow the instructions on-screen to turn on debug logging.
Turn driver debugging off
1. Run SLPTechSupport.exe – double click it inside the same folder as Smart Label.
2. Follow the instructions on-screen to turn off debug logging.
After enabling debug logging, run the application and re-create/observe the behavior in question.
When you’re done, re-run SLPTechSupport.exe. Follow the instructions on-screen to transmit this
data directly to Seiko support staff.
Page 9
System Printer Driver Run-time Diagnostic Logging
Driver debug logging should only be used to capture the state of the driver when a failure is expected.
The log file will grow even when the printer is idle, and there is no limit to the size. This will also have
a slight impact on system performance.
You must have administrator privileges to perform the following commands. (On Vista, you will need
to right-click on the Command Prompt icon, and select "Run as administrator" when opening the
prompt to restart the spooler. You will also need to run the .reg files as administrator, which means you
either should run regedit as admin and import the .reg file, or run the .reg files from an elevated
command prompt.)
The .reg files may be found at C:\Program Files\Seiko Instruments Inc\Smart Label Printer <current
version>\Admin\.
Turn driver debugging on
Run SLPDriverDebugOn.reg - either double click, or on Vista, type the name of the file (with path if
necessary) in an elevated command prompt.
Agree to the prompts about changing the registry.
Open a command prompt (or use the current elevated prompt if Vista).
Execute the following 2 lines in the command prompt:
net stop spooler
net start spooler
The debug file will be written to C:\slp<version_number>.log.
Turn driver debugging off
Run SLPDriverDebugOff.reg - either double click, or on Vista, type the name of the file (with path if
necessary) in an elevated command prompt.
Agree to the prompts about changing the registry.
Open a command prompt (or use the current elevated prompt if Vista).
Execute the following 2 lines in the command prompt:
net stop spooler
net start spooler
Page 10
System Printer Driver Polling On or Off
Idiosyncrasies found in some installations of Windows may preclude these systems from printing via
the System Printer Driver after waking from Hibernate. Turning off the System Printer Driver’s ability
to poll for printer status solves this issue. (Printer status can be found in the printer’s queue.) The reg
files below will enable or disable polling in the System Printer Driver.
The .reg files may be found at C:\Program Files\Seiko Instruments Inc\Smart Label Printer <current
version>\Admin\.
Turn driver polling on
Run SLPDriverIdlePollingOn.reg- either double click, or on Vista, type the name of the file (with path
if necessary) in an elevated command prompt.
Agree to the prompts about changing the registry.
Open a command prompt (or use the current elevated prompt if Vista).
Execute the following 2 lines in the command prompt:
net stop spooler
net start spooler
Turn driver polling off
Run SLPDriverIdlePollingOff.reg- either double click, or on Vista, type the name of the file (with path
if necessary) in an elevated command prompt.
Agree to the prompts about changing the registry.
Open a command prompt (or use the current elevated prompt if Vista).
Execute the following 2 lines in the command prompt:
net stop spooler
net start spooler
Page 11
Changing Printer’s Serial Baud Rate Settings
Some embedded systems have serial ports with slow baud rates. And sometimes these baud rates are
incompatible with the default baud rates of the Smart Label Printers. The 440 and 450 printers have an
EEPROM that can store the default baud rate that the printer should use when it powers up. Within the
standard application install is a program called “SlpSelect.exe”. Executing SlpSelect.exe as described
below will present a private interface for changing the baud rate of attached printers.
1. Attach an SLP 440, 450, or 650SE to the serial port of your computer. (The USB cable should
not be attached.) If your printer did not come with a serial cable please contact support. You
may qualify for a free serial cable from Seiko Instruments Inc.
2. Power on the printer.
3. Execute SlpSelect.exe /default [port] [baudrate]
a. port is one of COM1, COM2, COM3 or COM4
b. baudrate is 9600, 19200, 38400, 57600, 115200
For example:
> SlpSelect.exe /default COM1 9600
4. Follow the instructions on-screen.
Factory baud rate for the SLP 440 is 115,200. Factory baud rate for early SLP 450 models is 38,400
and 115,200 for later models. To test the baud rate change with the system level printer driver, use the
Page 12
following settings for serial printing (substituting baud rate) and then print a small page with
Notepad.exe.
Page 13
Launching SmartLabel in another language
When the SmartLabel application launches, the language the user interface appears in is determined by
the language preference of your operating system. The choice of language can be overridden.
Launch SLP with a specific language by using the /Lang=xxx command line switch, where xxx is
one of the following:
CNY
DEU
ENU
ESP
FRA
ITA
JPN
NLD
PTB
RUS
(Simplified Chinese)
(German)
(US English)
(Spanish)
(French)
(Italian)
(Japanese)
(Dutch)
(Brazilian Portuguese)
(Russian)
Note that, when using this language override switch, text provided directly from Windows will still
appear in the current system language. This includes:
Text in most common dialogs (e.g., File Open)
Buttons in message boxes (e.g., OK, Cancel, Yes, No, etc.)
System error text in some error message boxes (e.g., "Access denied.")
Tip: Make a shortcut to the slpwin.exe and add the /LANG=xxx to the end of the target field in the
shortcut properties.
Silent Installation
The SmartLabel Printer Driver can be installed with our installer silently, without a user interface. To
do this, utter the following command on the command-line:
setupSlpInstaller.exe /s /v"/qn ADDLOCAL=Driver"
“Driver” may be replaced by any feature name. Feature names include:
•
•
•
Application
Driver
All (default)
Page 14
2D Barcodes
Below are the details for the Advanced "Mode" and "Security" settings for 2D barcode formats
supported by Smart Label.
Maxicode
Maxicode Mode Settings:
4 - Any data up to 84 data characters automatically split between primary and secondary messages.
5 - Any data up to 68 data characters automatically split between primary and secondary messages.
Enhanced error correction used.
Maxicode Security Settings:
N/A
PDF417
PDF417 Mode Settings:
0 - EXC Alpha
1 - EXC Lower
2 - EXC Mixed
3 - EXC Punctuation.
4 - Binary/ASCII Plus
5 - Numeric mode
- For most applications, the Mode parameter should be set to 0.
- EXC (Extended Alphanumeric Compaction mode) - allows encoding of all printable ASCII
characters into about 2 characters per codeword. Within the EXC mode there are several submodes:
- EXC Alpha - starts in upper case
- EXC Lower - starts in lower case
- EXC Mixed - numeric and other punctuation
- EXC Punctuation - punctuation & bracket characters.
- Binary/ASCII Plus mode - allows encoding of 256 international characters including the full ASCII
set plus any 8-bit value in the range 0 - 255. This mode allows encoding approximately 1.2 bytes per
codeword and so is considerable less efficient than EXC mode.
- Numeric mode - allows encoding of a string of digits with a density of approximately 2.95 digits per
codeword. Recommended where more than 13 digits are to be encoded. Numeric mode symbols may
not contain non-numeric characters.
- The maximum capacity of PDF417 symbols is approximately as follows:
- Numeric mode - maximum capacity 2700 digits*
Page 15
- Alphanumeric text - maximum capacity 1800 characters*
- Byte values - maximum capacity 1100 bytes
* Note that capital letters, punctuation, mode shifts and new lines/paragraphs reduce these value.
PDF417 Security Settings:
0-0
1-2
2-6
3 - 14
4 - 30
5 - 62
6 - 126
7 - 154
8 - 510
One of PDF417's most valuable features is its ability to allow correction of errors. This ability is
provided by the inclusion of additional codewords within the symbol, so that the data codewords may
be reconstructed even if some are defaced or misread.
The number of damaged codewords (Nmax) which may be recovered depends on the security level
(which in turn determines the number of additional characters included in the symbol).
Datamatrix
Datamatrix Mode Settings:
0 - Square
1 - Rectangular
DataMatrix is a two dimensional matrix symbology which is made up of square modules arranged
within a finder pattern. DataMatrix symbols may be square or rectangular.
Datamatrix Security Settings:
DataMatrix symbols can include a user-selected amount of error-correction data.
For Square symbols the Security Level setting may be in the range 0 - 24, while for Rectangular
symbols the allowed range is 0 - 6.
Notes:
DataMatrix symbols can encode the entire ASCII character set and uses multiple encoding modes
which are, in order of efficiency:
Double digits - maximum capacity 3100 digits
Alphanumeric text - maximum capacity 2300 characters*
Page 16
Byte values - maximum capacity 1550 bytes
*Note that capital letters, punctuation and new lines/paragraphs reduce this value.
dLSoft 2D barcode products support only ECC200 symbols - the older ECC140 and below are not
supported. Also at this time ECI and Appended symbols are not supported.
If the first data character is FNC1 (ASCII 232) the remaining data is treated as EAN/UCC data; i.e.
brackets are removed from the data. Any AIs included in the data that are NOT fixed length should be
terminated with a FNC1 character. (The FNC1 character may be entered from the keyboard by holding
down the <Alt> key and typing 0232 on the numeric keypad.)
The industry standard Macro sequences [)><RS>05<GS> and [)><RS>06<GS> are supported (where
<RS> represents ASCII 30 and <GS> is ASCII 29).
The following character translations are made for data following the [)> start sequence:
String
<ET>
<FS>
<GS>
<RS>
<US>
Converted to
ASCII 4
ASCII 28
ASCII 29
ASCII 30
ASCII 31
Page 17