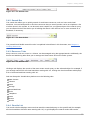
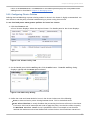
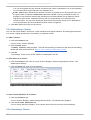
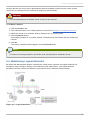
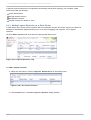
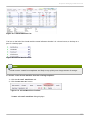
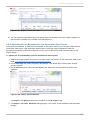
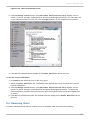
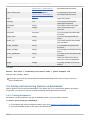
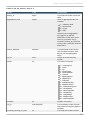
1
Red Hat Enterprise Virtualization
for Servers 2.2
Administration Guide
System Administration for Red Hat Enterprise Virtualization for Servers
Edition 2
Red Hat Documentation TeamSusan Burgess
David Jorm
Red Hat Enterprise Virtualization for Servers 2.2 Administration Guide
System Administration for Red Hat Enterprise Virtualization for Servers
Edition 2
Red Hat Do cumentatio n Team
Red Hat Engineering Services and Operatio ns
Susan Burgess
Red Hat Engineering Co ntent Services
[email protected] m
David Jo rm
Red Hat Engineering Co ntent Services
djo [email protected] m
Legal Notice
Copyright © 2010 Red Hat, Inc.
T his document is licensed by Red Hat under the Creative Commons Attribution-ShareAlike 3.0 Unported
License. If you distribute this document, or a modified version of it, you must provide attribution to Red
Hat, Inc. and provide a link to the original. If the document is modified, all Red Hat trademarks must be
removed.
Red Hat, as the licensor of this document, waives the right to enforce, and agrees not to assert, Section
4d of CC-BY-SA to the fullest extent permitted by applicable law.
Red Hat, Red Hat Enterprise Linux, the Shadowman logo, JBoss, MetaMatrix, Fedora, the Infinity Logo,
and RHCE are trademarks of Red Hat, Inc., registered in the United States and other countries.
Linux ® is the registered trademark of Linus T orvalds in the United States and other countries.
Java ® is a registered trademark of Oracle and/or its affiliates.
XFS ® is a trademark of Silicon Graphics International Corp. or its subsidiaries in the United States
and/or other countries.
MySQL ® is a registered trademark of MySQL AB in the United States, the European Union and other
countries.
Node.js ® is an official trademark of Joyent. Red Hat Software Collections is not formally related to or
endorsed by the official Joyent Node.js open source or commercial project.
T he OpenStack ® Word Mark and OpenStack Logo are either registered trademarks/service marks or
trademarks/service marks of the OpenStack Foundation, in the United States and other countries and
are used with the OpenStack Foundation's permission. We are not affiliated with, endorsed or
sponsored by the OpenStack Foundation, or the OpenStack community.
All other trademarks are the property of their respective owners.
Abstract
T his document is a guide for the systems administrator of a Red Hat Enterprise Virtualization for
Servers system.
Table of Contents
Table of Contents
.Preface
. . . . . . . . . . . . . . . . . . . . . . . . . . . . . . . . . . . . . . . . . . . . . . . . . . . . . . . . . . . . . . . . . . . . . . . . . . . . . . . . . . . . . . . . . . .8. . . . . . . . . .
1. About this Guide
8
1.1. T he Red Hat Enterprise Virtualization Documentation Suite
8
1.2. Audience
8
2. Document Conventions
8
2.1. T ypographic Conventions
9
2.2. Pull-quote Conventions
10
2.3. Notes and Warnings
11
3. We Need Feedback!
11
.Chapter
. . . . . . . . 1.
. . .Introduction
. . . . . . . . . . . . . . . . . . . . . . . . . . . . . . . . . . . . . . . . . . . . . . . . . . . . . . . . . . . . . . . . . . . . . . . . . . . . . . .13
...........
1.1. Red Hat Enterprise Virtualization Architecture
13
1.1.1. System Components
13
1.1.1.1. About the Components
14
1.1.1.2. About the Virtual Machines
14
1.1.1.3. About SPICE
14
1.2. T erminology for Red Hat Enterprise Virtualization Resources
14
1.2.1. Data Centers
14
1.2.2. Storage
14
1.2.3. Clusters
14
1.2.4. Hosts
15
1.2.5. Virtual Machines
15
1.2.6. T emplates
15
1.2.7. Snapshots
15
1.2.8. Events and Monitors
15
1.2.9. Reports
15
1.3. Administration of the Red Hat Enterprise Virtualization Platform
15
1.3.1. Quick Start
16
1.3.2. Maintaining the Red Hat Enterprise Virtualization Platform
17
.Chapter
. . . . . . . . 2.
. . .Getting
. . . . . . . . Started
. . . . . . . . . . . . . . . . . . . . . . . . . . . . . . . . . . . . . . . . . . . . . . . . . . . . . . . . . . . . . . . . . . . . . . 18
............
2.1. Prerequisites
18
2.1.1. Configuring Internet Explorer security settings
18
2.2. Logging In
20
2.3. Installing the ActiveX Component
22
2.4. Understanding the User Interface
22
2.4.1. Header Bar
22
2.4.2. Search Bar
23
2.4.3. Resource T abs
23
2.4.4. Results List
23
2.4.4.1. Customizing the Results Grid
24
2.4.4.1.1. Sorting the Results List
24
2.4.4.1.2. Rearranging Column Order
25
2.4.4.1.3. Adjusting Column Widths
25
2.4.4.2. Selecting Resources
25
2.4.4.3. Working with Resources
26
2.5. Using the Details Pane
29
2.5.1. Parts of the Details Pane
29
2.6. Bookmarks Pane
30
2.7. T ags Pane
30
. . . . . . . . . 3.
Chapter
. . .Managing
. . . . . . . . . . Data
. . . . . .Centers
. . . . . . . . . . . . . . . . . . . . . . . . . . . . . . . . . . . . . . . . . . . . . . . . . . . . . . . . . . . . . . .31
...........
1
Red Hat Enterprise Virtualization for Servers 2.2 Administration Guide
3.1. Prerequisites for Setting up a Data Center
3.2. Working with Data Centers
3.2.1. Creating a New Data Center
3.2.2. Configuring a Data Center
3.2.2.1. Using the Guide Me facility
3.2.2.2. Allocating Storage Domains for a Data Center
3.2.2.3. Maintaining a Data Center
3.2.2.4. Editing Data Center Details
3.2.3. Removing a Data Center
3.3. Working with Clusters
3.3.1. Creating a New Host Cluster
3.3.2. Configuring Cluster Policies
3.3.3. Maintaining a Cluster
3.3.4. Removing a Cluster
3.4. Maintaining Logical Networks
3.4.1. Adding Logical Networks to a Data Center
3.4.2. Editing Logical Networks
3.4.3. Maintaining Logical Networks in a Cluster
3.4.4. Mapping Logical Networks to Physical Interfaces
31
31
32
34
34
34
35
36
37
37
38
41
42
42
43
44
45
46
48
.Chapter
........4
. ...Managing
. . . . . . . . . . .Storage
. . . . . . . . . . . . . . . . . . . . . . . . . . . . . . . . . . . . . . . . . . . . . . . . . . . . . . . . . . . . . . . . . . . 4. .9. . . . . . . . . .
4.1. Understanding Storage Domains
49
4.1.1. Understanding Virtual Disks
50
4.1.2. T he Storage Pool Manager
51
4.1.3. Multipathing
52
4.2. Adding Storage Domains to a Data Center
52
4.2.1. Adding NFS Storage
55
4.2.2. Adding iSCSI Storage
56
4.2.3. Adding FCP Storage
61
4.2.4. Example - Adding a Multipath Storage Domain
64
4.3. Attaching Storage Domains to a Data Center
67
4.3.1. Attaching Disk Image Storage
68
4.3.2. Attaching ISO Image Storage
68
4.3.2.1. Uploading ISO Images using the ISO Uploader
69
4.3.3. Attaching an Export Storage Domain
71
4.4. Maintaining Storage Domains
72
4.4.1. Moving Storage Domains to Maintenance Mode
72
4.4.2. Editing Storage Domains
74
4.4.3. Activating Storage Domains
75
4.5. Deleting Storage Domains
76
4.5.1. Detaching Storage Domains from a Data Center
76
4.5.2. Removing Storage Domains
77
.Chapter
. . . . . . . . 5.
. . .Managing
. . . . . . . . . . Hosts
. . . . . . . . . . . . . . . . . . . . . . . . . . . . . . . . . . . . . . . . . . . . . . . . . . . . . . . . . . . . . . . . . . . . 80
............
5.1. About Red Hat Enterprise Virtualization Hosts
80
5.1.1. Securing Hosts
80
5.1.2. Viewing Hosts
80
5.1.2.1. Viewing General Information on Hosts
80
5.1.2.2. Viewing Virtual Machines on Hosts
81
5.2. Adding Hosts
82
5.2.1. Prerequisites
82
5.2.2. Adding Red Hat Enterprise Virtualization Hypervisor Hosts
82
5.2.3. Adding Red Hat Enterprise Linux Hosts
83
5.2.3.1. Preparing Red Hat Enterprise Linux Hosts
83
5.2.3.2. T o Add a Host
87
5.2.4. Activating a Host
90
2
Table of Contents
5.3. Managing Host Network Interfaces
5.3.1. Editing Network Interfaces
5.3.1.1. Editing Host Network Interfaces
5.3.1.2. Editing Management Network
5.3.2. Configuring Network Interfaces
5.3.2.1. Bonding Network Interfaces
5.3.2.2. Detaching NICs
5.3.2.3. Saving Host Network Configuration
5.4. Maintaining Hosts
5.4.1. Moving a Host into Maintenance Mode
5.4.2. Editing Host Details
5.5. Configuring Power Management and Fencing
5.5.1. Setting the Parameters for Fencing
5.5.1.1. Using Power Management
5.5.2. Manually Fencing or Isolating a Host
5.6. Customizing Hosts
5.7. Deleting a Physical Host
90
91
91
92
94
94
95
96
97
97
98
99
100
101
102
103
105
.Chapter
. . . . . . . . 6.
. . .Managing
. . . . . . . . . . Virtual
. . . . . . . .Resources
. . . . . . . . . . . . . . . . . . . . . . . . . . . . . . . . . . . . . . . . . . . . . . . . . . . . . . . . . . . 106
.............
6.1. About Virtual Machines
106
6.1.1. Supported Virtual Machines
106
6.1.2. Virtual Machine Performance Parameters
107
6.1.3. Understanding Virtual Machine Storage
107
6.2. Creating New Virtual Machines
108
6.2.1. Creating Virtual Machines from Existing T emplates
108
6.2.2. Creating New Virtual Machines without a T emplate
111
6.2.3. Cloning Virtual Machines from Existing T emplates
118
6.3. Completing the Configuration of the Virtual Machine
120
6.4. Installing Operating Systems onto Blank Virtual Machines
124
6.5. Logging into Virtual Machines
127
6.5.1. Logging into Windows Virtual Machines using SPICE
127
6.5.2. Logging into Virtual Machines with Remote Desktop (RDP)
128
6.5.3. Logging into Virtual Machines with VNC
128
6.5.4. Console Window Menu Extension for Administrators
129
6.6. Managing Virtual Machines
130
6.6.1. Editing Virtual Machines
130
6.6.2. Powering Virtual Machines On
131
6.6.3. Shutting Down or Pausing Virtual Machines
131
6.6.4. Migrating Virtual Machines
132
6.6.5. Moving Virtual Machines within a Data Center
134
6.6.6. Removing Virtual Machines
134
6.7. Using Virtual Machine Snapshots
134
6.7.1. Creating Snapshots of Virtual Machines
135
6.7.2. Restoring Virtual Machines from Snapshots
137
6.7.3. Deleting Snapshots
138
6.8. Exporting and Importing Virtual Resources
138
6.8.1. Overview of the Export-Import Process
139
6.8.2. Exporting Virtual Machines
142
6.8.3. Importing Virtual Machines into the Destination Data Center
145
6.9. Backing Up Virtual Resources
146
6.10. Removing Virtual Machines
147
.Chapter
. . . . . . . . 7.
. . .Using
. . . . . . T. .emplates
. . . . . . . . . . . . . . . . . . . . . . . . . . . . . . . . . . . . . . . . . . . . . . . . . . . . . . . . . . . . . . . . . . . . .14
. . .8. . . . . . . . . .
7.1. Creating T emplates from Existing Virtual Machines
148
7.1.1. Sealing a Windows T emplate with Sysprep
150
7.2. Editing T emplates
151
3
Red Hat Enterprise Virtualization for Servers 2.2 Administration Guide
7.3. Copying T emplates to a Different Storage Domain
7.4. Deleting T emplates
7.5. Exporting and Importing T emplates
7.5.1. Exporting T emplates
7.5.2. Importing the T emplates
7.6. Backing Up T emplates
152
152
153
153
155
156
.Chapter
. . . . . . . . 8.
. . .Managing
. . . . . . . . . . Users
. . . . . . . . . . . . . . . . . . . . . . . . . . . . . . . . . . . . . . . . . . . . . . . . . . . . . . . . . . . . . . . . . . . 157
.............
8.1. Managing Roles
157
8.1.1. Configuring User Roles
158
8.1.2. Assigning User Roles
162
8.2. Adding Users and Groups
164
8.3. Managing User Access
165
8.3.1. Viewing General Information
165
8.3.2. Managing a User's Virtual Machines
166
8.3.3. Managing Event Notifiers
168
8.4. Removing Users
169
.Chapter
. . . . . . . . 9.
. . .Locating
. . . . . . . . . Resources
. . . . . . . . . . . . . . . . . . . . . . . . . . . . . . . . . . . . . . . . . . . . . . . . . . . . . . . . . . . . . . . . . . . . 171
.............
9.1. Using the Search Syntax
171
9.1.1. Query Construction and Auto-Completion
171
9.1.2. Result-T ype Options
172
9.1.3. Search Criteria
172
9.1.3.1. Wildcards
174
9.1.3.2. Multiple Criteria
174
9.1.4. Determining Sort Order
174
9.2. Searching for Resources
174
9.2.1. Searching for Data Centers
174
9.2.2. Searching for Clusters
175
9.2.3. Searching for Hosts
175
9.2.4. Searching for Storage
177
9.2.5. Searching for Virtual Machines
177
9.2.6. Searching for Pools
179
9.2.7. Searching for T emplates
179
9.2.8. Searching for Users
180
9.2.9. Searching for Events
181
9.3. Saving and Accessing Queries as Bookmarks
182
9.3.1. Creating Bookmarks
182
9.3.2. Editing Bookmarks
183
9.3.3. Deleting Bookmarks
184
.Chapter
. . . . . . . . 10.
. . . . Monitoring
. . . . . . . . . . . .Red
. . . . Hat
. . . . Enterprise
. . . . . . . . . . . .Virtualization
. . . . . . . . . . . . . . . . . . . . . . . . . . . . . . . . . . . . . . . . . . . . 185
.............
10.1. Using the Monitoring T ools
185
10.1.1. Monitoring Storage
186
10.1.2. Monitoring Hosts
186
10.1.3. Monitoring Virtual Machines
186
10.1.4. Viewing the Event List
187
10.1.5. Viewing Alert Information
189
.Chapter
. . . . . . . . 11.
. . . . Reporting
. . . . . . . . . . .from
. . . . .the
. . . .History
. . . . . . . .Database
. . . . . . . . . . . . . . . . . . . . . . . . . . . . . . . . . . . . . . . . . . . . . . . . 191
.............
11.1. Overview
191
11.1.1. T racking Configuration
191
11.1.2. Recording statistical history
192
11.2. Connecting to the History Database
192
11.3. Example Reports
192
11.3.1. Resource utilization on a single host
192
4
Table of Contents
11.3.2. Resource utilization across all hosts
11.4. Configuration Views
11.4.1. cluster_configuration_view_2_2
11.4.2. host_configuration_view_2_2
11.4.3. host_interface_configuration_view_2_2
11.4.4. vm_configuration_view_2_2
11.4.5. vm_disk_configuration_view_2_2
11.4.6. vm_interface_configuration_view_2_2
11.5. History Views
11.5.1. host_history_view_2_2
11.5.2. host_interface_history_view_2_2
11.5.3. vm_interface_history_view_2_2
11.5.4. vm_disk_history_view_2_2
11.5.5. vm_history_view_2_2
193
195
195
196
196
197
199
199
200
200
202
203
204
206
.Chapter
. . . . . . . . 12.
. . . . Using
......T
. .ags
. . . . . . . . . . . . . . . . . . . . . . . . . . . . . . . . . . . . . . . . . . . . . . . . . . . . . . . . . . . . . . . . . . . . 209
.............
12.1. Managing T ags
209
12.2. Attaching T ags to Objects
211
12.3. Searching for Objects Using T ags
212
.Chapter
. . . . . . . . 13.
. . . .Configuring
. . . . . . . . . . . . .Red
. . . . Hat
. . . . Enterprise
. . . . . . . . . . . .Virtualization
. . . . . . . . . . . . . .Management
. . . . . . . . . . . . . . . . . . . . . . . . . . . . . 213
.............
13.1. Using the Configuration T ool
213
13.1.1. Database Connection
214
13.1.2. Directory Services
214
13.1.3. Setting Local Variables for Sys prep
215
13.1.4. Configuring Storage
216
13.1.5. Setting the Host Parameters
216
13.1.6. Securing the System
217
13.1.7. Setting the Load Balancing Policy
218
13.1.8. Miscellaneous
218
13.1.9. Setting up Event Notification
219
13.2. Configuring USB Device Policy
220
13.2.1. Adding a USB Policy
221
13.2.2. Removing a USB Policy
222
13.2.3. Searching for USB device Policies
223
13.2.4. Export a USB Policy
223
13.2.5. Import USB Policy
224
.Chapter
. . . . . . . . 14
. . . .. Upgrading
. . . . . . . . . . . Red
. . . . .Hat
. . . . Enterprise
. . . . . . . . . . . .Virtualization
. . . . . . . . . . . . . . . . . . . . . . . . . . . . . . . . . . . . . . . . . . . . 225
.............
14.1. Prerequisites
225
14.1.1. Installing Powershell 2.0
225
14.1.2. Backup the Red Hat Enterprise Virtualization Manager database
226
14.2. Upgrading the Red Hat Enterprise Virtualization Manager
227
14.3. Upgrading to Red Hat Enterprise Virtualization 2.2
230
14.3.1. Preparing to Upgrade
231
14.3.2. Performing a Live Upgrade
231
14.3.2.1. Upgrading Red Hat Enterprise Virtualization Manager
231
14.3.2.2. Upgrading the Hosts, Clusters and Data Center
232
14.3.2.3. Upgrading the Virtual Machines
234
14.3.2.3.1. Updating Virtual Machines without RHEV-APT
235
14.3.2.3.2. Updating Virtual Machines with RHEV-APT
235
.Importing
. . . . . . . . . .virtual
. . . . . . .machines
. . . . . . . . . . with
. . . . .virt-v2v
. . . . . . . . . . . . . . . . . . . . . . . . . . . . . . . . . . . . . . . . . . . . . . . . . . . . . . . . 236
.............
A.1. Converting a Virtual Machine
236
A.1.1. Preparing to Convert a Virtual Machine
237
A.1.2. Converting Virtual Machines
239
5
Red Hat Enterprise Virtualization for Servers 2.2 Administration Guide
A.1.2.1. virt-v2v
A.1.2.2. Converting a Local Xen Virtual Machine
A.1.2.3. Converting a Remote Xen Virtual Machine
A.1.2.4. Converting a Local KVM Virtual Machine
A.1.2.5. Converting a VMware ESX Virtual Machine
A.1.3. Importing and running the Converted Virtual Machine
A.1.4. Configuration Changes
A.1.4.1. Configuration Changes for Linux Virtual Machines
A.1.4.2. Configuration Changes for Windows Virtual Machines
A.1.5. Scripting the v2v process
A.1.6. Scripted bulk v2v process
239
240
241
241
241
242
242
242
243
244
245
.Red
. . . .Hat
. . . . Enterprise
. . . . . . . . . . . .Linux
. . . . . .Host
. . . . .Package
. . . . . . . . . and
. . . . .Port
. . . . .Requirements
. . . . . . . . . . . . . . . . . . . . . . . . . . . . . . . . . . . . . .24
. . .8. . . . . . . . . .
B.1. Using Red Hat Network to Acquire the Required Packages for Red Hat Enterprise Linux 5.4
and higher Hosts
248
B.2. Required Ports
249
. . . . . Virtual
KVM
. . . . . . . .Machine
. . . . . . . . .T. iming
. . . . . . Management
. . . . . . . . . . . . . . . . . . . . . . . . . . . . . . . . . . . . . . . . . . . . . . . . . . . . . . . . . . . . 250
.............
. . . . . . . . . . . . .Red
Configuring
. . . . .Hat
. . . .Enterprise
. . . . . . . . . . . Linux
. . . . . . 5.4
. . . . or
. . .higher
. . . . . . .virtual
. . . . . . . machines
. . . . . . . . . . to
. . . use
. . . . SPICE
. . . . . . . . . . . . 253
.............
.Log
. . . .Files
. . . . . . . . . . . . . . . . . . . . . . . . . . . . . . . . . . . . . . . . . . . . . . . . . . . . . . . . . . . . . . . . . . . . . . . . . . . . . . . . . . . . 255
.............
E.1. Red Hat Enterprise Virtualization Hypervisor Logs
255
E.1.1. Log Files Lists
255
E.1.2. Accessing Standard Linux system logs with sosreport
255
E.2. Red Hat Enterprise Virtualization Manager Logs
256
.Red
. . . .Hat
. . . . Enterprise
. . . . . . . . . . . .Virtualization
. . . . . . . . . . . . . .Open
. . . . . .Virtualization
. . . . . . . . . . . . . . Files
. . . . . .Format
. . . . . . . . . . . . . . . . . . . . . . . . . . . . 258
.............
F.1. Envelope
258
F.2. References Element
260
F.3. Network Section Elements
261
F.4. Disk Section Elements
261
F.5. Section Content Elements
261
. . . . . . . . . . . References
Additional
. . . . . . . . . . . . . . . . . . . . . . . . . . . . . . . . . . . . . . . . . . . . . . . . . . . . . . . . . . . . . . . . . . . . . . . . . . . . . . 265
.............
. . . . . . . . . .History
Revision
. . . . . . . . . . . . . . . . . . . . . . . . . . . . . . . . . . . . . . . . . . . . . . . . . . . . . . . . . . . . . . . . . . . . . . . . . . . . . . . 266
.............
6
Table of Contents
7
Red Hat Enterprise Virtualization for Servers 2.2 Administration Guide
Preface
Red Hat Enterprise Virtualization for Servers is a richly featured virtualization management solution for
servers that provides fully integrated management across virtual servers featuring live migration, high
availability, system scheduling, power management, image management, snapshots, thin provisioning,
and monitoring.
Red Hat Enterprise Virtualization for Servers does not limit the amount of memory, cores or any other
feature of the physical hardware in virtual machines and offers unmatched scalability in the management
of large numbers of virtual servers.
1. About this Guide
T his guide describes how to setup, configure and manage Red Hat Enterprise Virtualization for Servers.
It assumes that you have successfully installed the Red Hat Enterprise Virtualization manager and
hosts.
1.1. The Red Hat Enterprise Virtualization Documentation Suite
T he Red Hat Enterprise Virtualization documentation suite provides information on installation,
development of applications, configuration and usage of the Red Hat Enterprise Virtualization platform
and its related products.
Red Hat Enterprise Virtualization Hypervisor Release Notes contain release specific information for
Red Hat Enterprise Virtualization Hypervisors.
Red Hat Enterprise Virtualization Manager Release Notes contain release specific information for
Red Hat Enterprise Virtualization Managers.
Red Hat Enterprise Virtualization for Servers Installation Guide describes the installation
prerequisites and procedures. Read this if you need to install Red Hat Enterprise Virtualization for
Servers. T he installation of hosts, manager and storage are covered in this guide. You will need to
refer to the Red Hat Enterprise Virtualization for Servers Administration Guide to configure the
system before you can start using the platform.
Red Hat Enterprise Virtualization for Servers Administration Guide (the book you are reading)
describes how to setup, configure and manage Red Hat Enterprise Virtualization for Servers. It
assumes that you have successfully installed the Red Hat Enterprise Virtualization manager and
hosts.
Red Hat Enterprise Virtualization Hypervisor Deployment Guide describes how to deploy and install
the hypervisor. Read this guide if you need advanced information about installing and deploying
Hypervisors. T he basic installation of Hypervisor hosts is also described in the Red Hat Enterprise
Virtualization for Servers Installation Guide.
Red Hat Enterprise Virtualization Manager API Guide describes how to use the command line
functions to set up and manage virtualization tasks. Use this guide if you do not wish to use the
graphical user interface, and prefer using the command line.
1.2. Audience
T his documentation suite is intended for Linux or Windows system administrators who need to manage
a virtual environment using Red Hat Enterprise Virtualization platform. An advanced level of system
administration, preferably including familiarity with virtual machine data center operations, is assumed.
T his document is not intended for beginners.
2. Document Conventions
8
Preface
T his manual uses several conventions to highlight certain words and phrases and draw attention to
specific pieces of information.
In PDF and paper editions, this manual uses typefaces drawn from the Liberation Fonts set. T he
Liberation Fonts set is also used in HT ML editions if the set is installed on your system. If not, alternative
but equivalent typefaces are displayed. Note: Red Hat Enterprise Linux 5 and later include the Liberation
Fonts set by default.
2.1. Typographic Conventions
Four typographic conventions are used to call attention to specific words and phrases. T hese
conventions, and the circumstances they apply to, are as follows.
Mono-spaced Bold
Used to highlight system input, including shell commands, file names and paths. Also used to highlight
keys and key combinations. For example:
T o see the contents of the file m y_next_bestselling_novel in your current working
directory, enter the cat m y_next_bestselling_novel command at the shell prompt
and press Enter to execute the command.
T he above includes a file name, a shell command and a key, all presented in mono-spaced bold and all
distinguishable thanks to context.
Key combinations can be distinguished from an individual key by the plus sign that connects each part of
a key combination. For example:
Press Enter to execute the command.
Press Ctrl+Alt+F2 to switch to a virtual terminal.
T he first example highlights a particular key to press. T he second example highlights a key combination:
a set of three keys pressed simultaneously.
If source code is discussed, class names, methods, functions, variable names and returned values
mentioned within a paragraph will be presented as above, in m ono-spaced bold. For example:
File-related classes include filesystem for file systems, file for files, and dir for
directories. Each class has its own associated set of permissions.
Proportional Bold
T his denotes words or phrases encountered on a system, including application names; dialog box text;
labeled buttons; check-box and radio button labels; menu titles and sub-menu titles. For example:
Choose System → Preferences → Mouse from the main menu bar to launch Mouse
Preferences. In the Buttons tab, select the Left-handed m ouse check box and click
Close to switch the primary mouse button from the left to the right (making the mouse
suitable for use in the left hand).
T o insert a special character into a gedit file, choose Applications → Accessories →
Character Map from the main menu bar. Next, choose Search → Find… from the
Character Map menu bar, type the name of the character in the Search field and click
Next. T he character you sought will be highlighted in the Character T able. Double-click
this highlighted character to place it in the T ext to copy field and then click the Copy
button. Now switch back to your document and choose Edit → Paste from the gedit menu
9
Red Hat Enterprise Virtualization for Servers 2.2 Administration Guide
bar.
T he above text includes application names; system-wide menu names and items; application-specific
menu names; and buttons and text found within a GUI interface, all presented in proportional bold and all
distinguishable by context.
Mono-spaced Bold Italic or Proportional Bold Italic
Whether mono-spaced bold or proportional bold, the addition of italics indicates replaceable or variable
text. Italics denotes text you do not input literally or displayed text that changes depending on
circumstance. For example:
T o connect to a remote machine using ssh, type ssh username@ domain.name at a shell
prompt. If the remote machine is exam ple.com and your username on that machine is
john, type ssh john@ exam ple.com .
T he m ount -o rem ount file-system command remounts the named file system. For
example, to remount the /hom e file system, the command is m ount -o rem ount /hom e.
T o see the version of a currently installed package, use the rpm -q package command. It
will return a result as follows: package-version-release.
Note the words in bold italics above — username, domain.name, file-system, package, version and
release. Each word is a placeholder, either for text you enter when issuing a command or for text
displayed by the system.
Aside from standard usage for presenting the title of a work, italics denotes the first use of a new and
important term. For example:
Publican is a DocBook publishing system.
2.2. Pull-quote Conventions
T erminal output and source code listings are set off visually from the surrounding text.
Output sent to a terminal is set in m ono-spaced rom an and presented thus:
books
books_tests
Desktop
Desktop1
documentation
downloads
drafts
images
mss
notes
photos
scripts
stuff
svgs
svn
Source-code listings are also set in m ono-spaced rom an but add syntax highlighting as follows:
10
Preface
static int kvm_vm_ioctl_deassign_device(struct kvm *kvm,
struct kvm_assigned_pci_dev *assigned_dev)
{
int r = 0;
struct kvm_assigned_dev_kernel *match;
mutex_lock(&kvm->lock);
match = kvm_find_assigned_dev(&kvm->arch.assigned_dev_head,
assigned_dev->assigned_dev_id);
if (!match) {
printk(KERN_INFO "%s: device hasn't been assigned before, "
"so cannot be deassigned\n", __func__);
r = -EINVAL;
goto out;
}
kvm_deassign_device(kvm, match);
kvm_free_assigned_device(kvm, match);
out:
mutex_unlock(&kvm->lock);
return r;
}
2.3. Notes and Warnings
Finally, we use three visual styles to draw attention to information that might otherwise be overlooked.
Note
Notes are tips, shortcuts or alternative approaches to the task at hand. Ignoring a note should
have no negative consequences, but you might miss out on a trick that makes your life easier.
Important
Important boxes detail things that are easily missed: configuration changes that only apply to the
current session, or services that need restarting before an update will apply. Ignoring a box
labeled 'Important' will not cause data loss but may cause irritation and frustration.
Warning
Warnings should not be ignored. Ignoring warnings will most likely cause data loss.
3. We Need Feedback!
If you find a typographical error in this manual, or if you have thought of a way to make this manual
better, we would love to hear from you! Please submit a report by email to the author of the manual,
Susan Burgess ([email protected] ). When submitting a bug report, be sure to mention the
11
Red Hat Enterprise Virtualization for Servers 2.2 Administration Guide
manual's identifier: Administration_Guide.
If you have a suggestion for improving the documentation, try to be as specific as possible when
describing it. If you have found an error, include the section number and some of the surrounding text so
we can find it easily.
12
Chapter 1. Introduction
Chapter 1. Introduction
Red Hat Enterprise Virtualization provides IT departments with the tools to meet the challenges of
managing complex environments. Red Hat Enterprise Virtualization's state-of-the-art virtualization
platform enables administrators to reduce the cost and complexity of large deployments, for example, for
thousands of virtual machines. Red Hat Enterprise Virtualization platform includes:
High availability to quickly configure virtual machines for fault tolerance
Live migration to move virtual machines between physical hosts without interruption
System scheduler to create policies to dynamically balance compute resources
Power saver to create policies to conserve power and cooling costs
Image manager to create, manage and provision virtual machines
Storage virtualization to consistently access common storage from any host.
Ability to convert existing virtual machines on foreign hypervisors to Red Hat Enterprise Virtualization
platform.
1.1. Red Hat Enterprise Virtualization Architecture
Red Hat Enterprise Virtualization platform consists of three components:
Red Hat Enterprise Virtualization Hypervisor - based on Kernel Virtual Machine (KVM), is a thin
virtualization layer deployed across the server's infrastructure. Because it is a core part of the Linux
kernel, KVM is a highly efficient means of providing virtualization.
Agents and tools include VDSM which runs in the hypervisor or host providing local management
for virtual machines, networks and storage.
Red Hat Enterprise Virtualization platform management infrastructure allows users to view
and manage all the system components, machines and images from a single powerful interface. T he
management system GUI provides a comprehensive range of features including powerful search
capabilities, resource management, live migrations and provisioning.
Figure 1.1. Red Hat Enterprise Virtualization Platform Overview
1.1.1. System Components
T he various components work seamlessly together to enable the system administrator to setup,
13
Red Hat Enterprise Virtualization for Servers 2.2 Administration Guide
configure and maintain the virtualized environment through a meaningful graphical interface.
1.1.1.1. About the Components
Red Hat Enterprise Virtualization platform consists of one or more hosts (either Red Hat Enterprise
Virtualization Hypervisors or Red Hat Enterprise Linux 5.5 and higher systems) and a Manager. T he
virtual machines are hosted on the hosts. T he system and all its components are managed through a
centralized management system.
Red Hat Enterprise Virtualization Hypervisor or Red Hat Enterprise Linux 5.5 and higher hosts run
the user's Windows XP virtual machines. T he hypervisor also includes a resource optimization layer that
allows for better desktop interactivity and management.
Red Hat Enterprise Virtualization Manager provides a graphical user interface that controls the
platform. It manages provisioning, connection protocols, user session logon/logoffs, virtual machine
images and the high availability/clustering systems. Red Hat Enterprise Virtualization Manager runs on a
Windows 2003 or Windows 2008 server.
1.1.1.2. About the Virtual Machines
Red Hat Enterprise Virtualization platform enables you to create virtual machines that perform the same
functions as physical machines. Using a standard Web browser, users can run virtual machines that
behave like physical desktops.
1.1.1.3. About SPICE
T he SPICE protocol allows the virtual machine to be connected to the host, with physical PC-like
graphics performance. It supplies video quality (30+ frames per second), bi-directional audio (for softphones/IP phones), bi-directional video (for video telephony/video conferencing) and USB redirection
from the client’s USB port into the virtual machine. SPICE also supports connection to multiple monitors
with a single virtual machine.
1.2. Terminology for Red Hat Enterprise Virtualization Resources
T he Red Hat Enterprise Virtualization platform manages the following resources within the management
infrastructure to create a powerful, scalable virtual environment.
1.2.1. Data Centers
A data center is a logical entity that defines the set of resources used in a specific environment. It is a
collection of a number of clusters of virtual machines, storage and networks. T he data center is the
highest level container for all physical and logical resources within a managed virtual environment.
1.2.2. Storage
A data center relies on adequate and accessible physical storage. Red Hat Enterprise Virtualization
Manager provides an abstracted view of the physical storage assigned to a data center, that enables
planners and administrators to easily monitor and manage storage requirements.
A storage pool is a logical entity that contains a standalone image repository of a certain type, either
iSCSI, or Fiber Channel, or NFS. Each storage pool may contain several storage domains, for virtual
machine disk images and for ISO images. Storage Domains are a resource in Red Hat Enterprise
Virtualization Manager.
1.2.3. Clusters
A cluster is a set of physical hosts that are treated as a resource pool for a set of virtual machines.
14
Chapter 1. Introduction
Hosts in a cluster share the same network infrastructure and the same storage. T hey are a migration
domain within which virtual machines can be moved from host to host.
1.2.4. Hosts
A host is a physical server that runs either Red Hat Enterprise Virtualization Hypervisor or Red Hat
Enterprise Linux 5.5 and higher, and hosts one or more virtual machines. Hosts are grouped into
clusters. Virtual machines can be migrated from one host to another within a server cluster.
1.2.5. Virtual Machines
Virtual machines can be used as virtual servers. Virtual servers can be also grouped into Clusters.
Virtual machines can be migrated from one physical host to another within a cluster.
1.2.6. Templates
A template is a model virtual machine with a unique configuration and settings. A virtual machine that is
based on a particular template acquires the configurations and settings of the template. T emplates are
used to conveniently and efficiently create a set of identical virtual machines.
1.2.7. Snapshots
A snapshot is a view of a virtual machine's operating system and all its applications at a given point in
time. It can be used to save the settings of a virtual machine before an upgrade, or before new
applications are installed. In case of problems, the parameters from the snapshot can be used to restore
the virtual machine to the state before the upgrade or installation.
1.2.8. Events and Monitors
Alerts, warnings, or other notices about activities within the system help the administrator to monitor the
performance and running of various resources. Monitoring details can be displayed in both graphic and
textual fashion.
1.2.9. Reports
Red Hat Enterprise Virtualization Manager now includes a data warehouse that collects monitoring data
for hosts, virtual machines and storage, allowing customers to analyze their environment and create
reports using any query tool that supports SQL.
1.3. Administration of the Red Hat Enterprise Virtualization
Platform
T his section provides a high level overview of the tasks and responsibilities of a system administrator
for the Red Hat Enterprise Virtualization platform. T he tasks are divided into two general groups:
Configuring a new logical data center is the most important task of the system administrator.
Designing a new data center requires an understanding of capacity planning and definition of
requirements. T ypically this is determined by the solution architect, who provides the requirement to
the system architect. Preparing to set up the virtualized environment is a significant part of the set
up, and is usually part of the system administrator's role.
Maintaining the data center, including performing updates and monitoring usage and performance to
keep the data center responsive to changing needs and loads.
T he procedures to complete these tasks are described in detail in later sections of this guide.
15
Red Hat Enterprise Virtualization for Servers 2.2 Administration Guide
1.3.1. Quick Start
T his section provides an overview of the practical steps needed to start using Red Hat Enterprise
Virtualization platform. It is recommended that you take the time to read this guide before attempting to
carry out these steps.
Note:
Red Hat Enterprise Virtualization platform provides a default data center and a default cluster.
Figure 1.2. Setting up Red Hat Enterprise Virtualization
A typical workflow to create an optimum virtual environment for a data center that is easy to maintain and
manage is:
1. Setup, configure and add hosts to the system. A cluster must have a minimum of one host, and
storage requires one active host before a domain can be activated. Refer Chapter 5, Managing
Hosts.
2. Setup, configure and define Storage. It is recommended that data centers have a minimum of two
storage domains, one to store disk images of the guests and one to store the ISO images. T his
must be defined at the level of the data center. Refer Chapter 4, Managing Storage.
3. Upload ISO files onto the defined storage domains. T his is essential as it enables the swift and
agile creation of appropriate virtual machines as required. Refer Section 4.3.2, “Attaching ISO
Image Storage”.
16
Chapter 1. Introduction
Image Storage”.
4. Define clusters. A cluster is a group of hosts. Grouping hosts into a cluster allows resources to be
shared across the cluster. Grouping also allows segmentation between groups (for example,
resources are not shared between HR and finance). Refer Section 3.3, “Working with Clusters”.
5. Define Logical Networks for the data center, cluster and the hosts. Refer Section 3.4, “Maintaining
Logical Networks”.
6. Define virtual machines by installing an operating system and applications using the Run Once
function. Refer Section 6.2, “Creating New Virtual Machines”.
7. Define templates from customised virtual machines. T his enables the user to create large
numbers of identical virtual machines quickly and efficiently. Refer Chapter 7, Using Templates.
1.3.2. Maintaining the Red Hat Enterprise Virtualization Platform
T his section describes how to maintain a Red Hat Enterprise Virtualization platform.
T he administrator's tasks include:
Managing physical and virtual resources such as hosts and guests. T his includes upgrading or
adding hosts, importing domains, and converting virtual machines created on foreign hypervisors
Monitoring the overall system resources for potential problems such as extreme load on one of the
virtual machines, insufficient memory or disk space, and taking any necessary actions (such as
migrating virtual machines to other hosts to lessen the load, freeing resources, for example, by
shutting down machines).
Responding to the new requirements of virtual machines (for example, upgrading the operating
system for a set of desktops or allocating more memory to a specific server).
Managing customized object properties (T ags).
Managing searches saved as public bookmarks.
T roubleshooting for specific users or virtual machines or overall system functionality.
Generating general and specific reports
T hese tasks are described in detail in later sections of this guide.
17
Red Hat Enterprise Virtualization for Servers 2.2 Administration Guide
Chapter 2. Getting Started
2.1. Prerequisites
It is assumed that
Red Hat Enterprise Virtualization platform is successfully installed as described in the Red Hat
Enterprise Virtualization for Servers Installation Guide.
You can access the administration portal via a Windows client.
Disable Internet Explorer Enhanced Security Configuration
If the administration portal is running on Windows Server 2003 or Windows Server 2008 R2,
Internet Explorer Enhanced Security Configuration (IE ESC) must be disabled. For instructions,
refer to Section 2.1.1, “Configuring Internet Explorer security settings”
T his document describes the administration portal. T he administration portal allows you to monitor,
create and maintain the whole virtualized system using a graphical interface.
Before attempting to work on the Red Hat Enterprise Virtualization platform, it is recommended that you
read Chapter 1, Introduction, in particular Section 1.3.1, “Quick Start”.
2.1.1. Configuring Internet Explorer security settings
Before accessing the web administration portal, the default security settings for Internet Explorer have to
be modified. T his is to enable proper functioning of the administration portal on Windows Server 2003
and Windows Server 2008 R2. T he following procedure explains how to turn off Internet Explorer's
Enhanced Security Configuration.
Procedure 2.1. T o disable Internet Explorer Enhanced Security Configuration
1. Click Start → Administrative T ools → Server Manager.
2. T he Server Manager window displays. Under Server Sum m ary, navigate to the Security
Inform ation section and click Configure IE ESC.
18
Chapter 2. Getting Started
Figure 2.1. Configure IE ESC on the Server Manager
3. Select Off for Administrators and Users to disable the security configuration.
Figure 2.2. Disable IE ESC
Next, add the administration server to Internet Explorer's list of trusted sites. T his procedure enables
19
Red Hat Enterprise Virtualization for Servers 2.2 Administration Guide
Internet Explorer to validate the website's security certificate and allow access to the administration
portal.
Procedure 2.2. T o add administration portal to T rusted Sites zone
1. Navigate to the administration portal login page at: https://<Server IP>/RHEVManager/.
2. On the Internet Explorer menu bar, click T ools → Internet Options.
3. T he Internet Options dialog box displays. Click on the Security tab and select T rusted
sites.
Figure 2.3. Add to T rusted Sites
4. T he Sites button is now available. Click on it to display the T rusted sites dialog box.
5. T he URL for your administration portal should appear in the textbox under Add this website
to the zone. Click Add to move the site to the list of trusted zones, then click Close.
6. Refresh the website to access the administration portal.
For more information on Internet Explorer Enhanced Security Configuration go to
http://support.microsoft.com/kb/815141
2.2. Logging In
20
Chapter 2. Getting Started
Only users with administrative privileges can log in to the administration portal.
If you are using a Windows machine and this is the first time that anyone has logged into the Red Hat
Enterprise Virtualization, an ActiveX component automatically installs a client. T his is to enable you to log
onto the administration portal. Installing the ActiveX component is described in the following section.
T o log in as an Administrator:
1. Navigate to the login page at: http://<Server IP>/RHEVManager/.
Figure 2.4 . Login Page
2. Enter the User Nam e. Use the exact user name assigned to you during installation.
3. Enter your Password.
4. Select the correct Dom ain.
5. Click Login.
You have successfully logged into Red Hat Enterprise Virtualization platform. T he administration portal
displays.
21
Red Hat Enterprise Virtualization for Servers 2.2 Administration Guide
2.3. Installing the ActiveX Component
T he ActiveX component is automatically installed when the Administrator logs in for the first time.
Similarly, if an updated component becomes available, it is automatically installed at login.
In many Windows systems, installing the ActiveX component causes the browser to issue a security
warning.
T o accept the installation of the ActiveX component :
Click Yes when the ActiveX Notification message displays.
T he ActiveX component is installed on the browser.
Upon successful installation, the Red Hat Enterprise Virtualization page displays.
2.4. Understanding the User Interface
T his section describes the components of the graphical interface.
Figure 2.5. User Interface Elements of the Administration Portal
Legend
1 - Header
2 -Search Bar
3 - Resource T abs
4 - Results List
5 - Details Pane
6 - Bookmarks Pane
7 - Alerts/Events Pane
2.4.1. Header Bar
T he Header Bar contains the name of the current logged in user and the Sign out button. About
provides access to version information and Configure allows you to configure user roles.
22
Chapter 2. Getting Started
Figure 2.6. T he Header Bar
2.4.2. Search Bar
T he search bar allows you to quickly search for and locate resources, such as hosts and virtual
machines. You can build queries to find the resources that you need. Queries can be as simple as a list
of all the hosts in the system, or can be much more complex. As you type each part of the search query,
you are offered choices that assist you in building the search. Use the star icon to save a search as a
bookmark, if necessary.
Figure 2.7. T he Search Bar
T he powerful and flexible search function is explained in detail later in this document, see Chapter 9,
Locating Resources.
2.4.3. Resource Tabs
Every resource, such as a Host or a Cluster, can be managed using the appropriate tab. Additionally, the
Events and Monitoring tabs allow you to manage and view events across the entire system.
Figure 2.8. T he Header Bar
Clicking a tab displays the results of the most recent search query on the selected object. For example, if
you recently searched for all virtual machines starting with "M", clicking the virtual machines tab displays
a list of all virtual machines starting with "M".
Red Hat Enterprise Virtualization platform uses the following tabs:
Data Centers
Clusters
Hosts
Storage
Virtual Machines
Pools
T emplates
Users
Events
Monitor
2.4.4. Results List
T he results window displays resources that match the searched query on the specific tab (for example,
all virtual machines with their name starting with 'XP'). A grid displays the search results that can be
23
Red Hat Enterprise Virtualization for Servers 2.2 Administration Guide
sorted by column. Additionally, the order of columns and column widths can be modified.
You can perform a task on an individual item, multiple items, or all the items in the results list, by
selecting the items(s) and then clicking the relevant action button. If multiple selection is not possible, the
button is disabled.
Details of a selected item display in the details pane.
Figure 2.9. Results List
2.4 .4 .1. Customizing the Results Grid
T he information displayed in the results grid can be customized according to your requirements, to make
it more meaningful for the changing needs of a large virtualized enterprise. For example, if you wished to
locate all over-allocated hosts, it would be convenient to have these at the head of the list. T he results
list can be:
Sorted
Rearranged (the column order)
Adjusted to fit (the column width)
Grouped by a specific property
Note
T he customization is valid for the current tab and session only. It is not persistent.
2.4 .4 .1.1. Sorting the Results List
Sort the results in the grid in either ascending or descending order, according to the information in any
column.
T o sort the list:
Select the column on which the list is to be sorted. Click the header of the column.
T he list is sorted alphabetically and an arrow in the column header indicates the sort order (ascending
24
Chapter 2. Getting Started
or descending).
2.4 .4 .1.2. Rearranging Column Order
T he order of the columns in the grid can be changed.
T o change the location of a column:
Click and hold down the header of the column that you want to relocate and drag it to the column
where you want it to appear.
2.4 .4 .1.3. Adjusting Column Widths
You can change the width of any column. For example, you may want to display more columns on the
screen, or to display the contents of a column with longer items.
T o adjust column width:
Select the vertical line separating one column header from the next and drag it to the position of the
desired column width.
2.4 .4 .2. Selecting Resources
It is possible to select an individual resource or multiple items in the results list. T he Details Pane (see
Section 2.5, “Using the Details Pane”), displays extensive details about the first selected item. Any
subsequent action is applied to all the selected items (see Section 2.4.4.3, “Working with Resources”).
T o select an individual resource
Click the item in the grid.
T he details of the selected item appear in the Details Pane.
Figure 2.10. Results List with a Single Selected Item
T o select multiple items:
Click the first item, press Shift and then click the last item. You can also use the Ctrl key to select
multiple separate items.
All the items between the first and last item are selected, and any subsequent action applies to the
set of selected items. T he Details Pane displays the details of the first item selected.
25
Red Hat Enterprise Virtualization for Servers 2.2 Administration Guide
Figure 2.11. Results List with Multiple Selected Items
2.4 .4 .3. Working with Resources
Actions buttons are provided to enable you to work with any selected resource (for example, a data
center or a host). Permissible actions differ from resource to resource, and also according to the state of
the resource. T he action buttons are enabled/disabled according availibility of the action for the resource
in its current state.
T he action buttons appear under each tab, or can be seen by right-clicking an item in the results list.
T he Guide Me buttons displays on the Data Center and Cluster tabs, and provides a context sensitive
lists of actions.
T he following table describes the action buttons available for each object.
26
Chapter 2. Getting Started
T able 2.1. Action Button Descriptions
T ab
Button
Description
Data Centers
New
Opens the New Data Center
dialog, to add configuration
details for a new data center.
Edit
Opens the Edit Data Center
dialog, to edit data center
details.
Remove
Removes the selected data
center from the system.
Guide Me
Displays the Guide Me dialog,
with prompts on suitable
configuration steps.
New
Opens the New Cluster dialog,
to add configuration details for a
new cluster.
Edit
Opens the Edit Cluster dialog, to
edit cluster configuration details.
Remove
Removes the selected cluster
from the system.
Guide Me
Displays the Guide Me dialog,
with prompts on suitable
configuration steps.
New
Opens the New Host dialog, to
allow addition of a new (preconfigured) host to the system.
Edit
Opens the Edit host dialog, to
edit host properties.
Remove
Deletes a host from the system.
Activate
Activates a host, is the opposite
of Maintenance.
Maintenance
Brings a host down for
maintenance.
Approve
Approves an automatically
discovered host.
Power Management
Displays a list of options to
Restart, Start or Stop power
management.
Assign tags
Assigns specific tags to the
host.
New Domain
Opens the New Domain dialog,
to set/create configuration
details for a new Storage
domain.
Import
Opens the New Preconfigured
Domain dialog, to set/create
configuration details for an
external domain to be imported
Clusters
Hosts
Storage
27
Red Hat Enterprise Virtualization for Servers 2.2 Administration Guide
into the system.
Virtual Machines
Edit
Opens the Edit Storage dialog,
to change details.
Remove
Removes the selected storage
domain from the system.
New Desktop
Opens the New Desktop dialog,
to set/create configuration
details for a new virtual desktop.
Edit
Opens the Edit Virtual Machine
dialog, to edit configuration
details.
Remove
Removes the selected virtual
machine from the system.
Runs or resumes the selected
virtual machine.
Opens the Run Once dialog, to
specify parameters for running
the virtual machine for a single
run. T he parameters are not
saved for subsequent runs.
Puts the virtual machine into
suspended mode.
Shuts down the virtual machine.
Connect to virtual machine
display.
Pools
28
Migrate
Migrates the virtual machine to
another host in the same host
cluster.
Make T emplate
Opens the New T emplate
dialog, to create a template from
the selected virtual machine.
Export
Opens the Export dialog, to
export virtual machines.
Move
Opens the Move Virtual Machine
dialog, to move virtual machine
to a different storage domain.
Guide Me
Displays the Guide Me dialog,
with prompts on suitable
configuration steps.
Assign T ags
Assigns specific tags to the
virtual machine.
New
Opens the New Pool dialog, to
set/create configuration details
for a new virtual pool of
desktops.
Edit
Opens the Edit Pool dialog, to
edit pool details.
Remove
Removes the selected pool from
the system.
Chapter 2. Getting Started
T emplates
Users
Edit
Opens the Edit T emplate dialog,
to edit template details.
Remove
Deletes the selected template
from the system.
Export
Exports template to the Export
domain.
Copy
Opens the Copy T emplate
dialog, to copy the template to a
different storage pool.
Add
Opens the Add User dialog, to
add a user from the Active
Directory.
Remove
Deletes the selected user from
the system.
Assign T ags
Opens the Assign T ag dialog, to
assign tags to the user.
2.5. Using the Details Pane
Detailed information about a selected item in the Results grid displays in the Details Pane. If multiple
items are selected, the Details pane displays information on the first selected item only.
Figure 2.12. Desktop Details Pane
2.5.1. Parts of the Details Pane
T he Details Pane consists of:
T able 2.2. Parts of the Details Pane
Part
Description
T abs
T abs appropriate to the selected resource
display in the Details Pane. For example, typical
tabs are General, Logical Network, Snapshots,
Applications, History, and Monitor. T oDo tabs may
display to prompt users to complete actions.
Actions
Actions that can be performed on the selected
resource.
Properties
Lists configuration details and statistics of the
selected item.
History T ab
Lists event notifications.
Monitor T ab
Displays CPU, Memory and Network usage.
29
Red Hat Enterprise Virtualization for Servers 2.2 Administration Guide
2.6. Bookmarks Pane
Bookmarks are used to save frequently-used or complicated searches for repeated use. Bookmarks can
be added, edited, or removed.
Figure 2.13. Bookmarks Pane
2.7. Tags Pane
Tags are used to filter queries and resources in the virtualized system. It is a quick way to mark and
later find objects. For example, a user can create groups of resources by tagging the individual
resources. For example, each host in the Sales department may be tagged as being in the "Sales"
group. A user can then track their status by simply using the tag "Sales" to display all hosts, or may
perform an upgrade on all Sales hosts at a time when additional sales are expected
In the T ags Pane, tags can be added, edited, or removed.
Figure 2.14 . T ags Pane
30
Chapter 3. Managing D ata Centers
Chapter 3. Managing Data Centers
A Red Hat Enterprise Virtualization platform requires the initial creation and definition of the various
resources in the system, followed by the tasks of managing and monitoring them regularly. T his section
describes how to create and manage data centers, clusters and networking.
A typical workflow has the following interconnected stages, for most stages default values and entities
are provided.
Creating a new data center
Creating a new host cluster
Configuring the networks
Adding and configuring storage
Adding new hosts.
For a brief overview of terminology, see Section 1.2, “T erminology for Red Hat Enterprise Virtualization
Resources”.
3.1. Prerequisites for Setting up a Data Center
Before you create a new data center, it is recommended that the following resources be prepared. T he
following tasks must be done at the host level, not from the Red Hat Enterprise Virtualization platform.
1. Setup and configure hosts. A host can be a Red Hat Enterprise Virtualization Hypervisor or a Red
Hat Enterprise Linux 5.5 and higher host. A cluster needs a minimum of one host, and at least one
active host is required to connect the system to a storage pool.
2. Setup, configure and define storage. It is recommended that data centers have a minimum of two
storage domains, one to store disk images of the virtual machines and one to store ISO images.
Set up the storage domains of the type required for the data center; NFS, iSCSI or FCP. For
example, for an NFS data center, create and mount the export directories.
3. Set up logical networks for the data center, cluster and the hosts. It is recommended that you have
the IP addresses/domain names available for reference.
3.2. Working with Data Centers
T his section describes how to configure, create and manage data centers. T he data center is the
highest level container for all physical and logical resources within a managed virtual environment. T he
data center is a collection of clusters of hosts. It owns the logical network (that is, the defined subnets
for management, guest network traffic and storage network traffic) and the storage pool.
Figure 3.1. Data Centers
31
Red Hat Enterprise Virtualization for Servers 2.2 Administration Guide
Red Hat Enterprise Virtualization contains a default data center at installation. Enterprises can choose
whether they need or already have additional data centers, and they can be managed from the single
administration portal because the Red Hat Enterprise Virtualization platform can manage multiple data
centers. For example, an organisation may have different data centers for different physical locations,
business units, or for reasons of security. If you do not require additional data centers, you can proceed
with configuring the default data center, the easiest way to do this is to use the Guide Me facility.
3.2.1. Creating a New Data Center
A data center is a logical grouping of clusters of hosts. If you wish to create an additional data center,
use the instructions in this section; if you wish to configure the existing default data center, see
Section 3.2.2, “Configuring a Data Center”.
T o create a data center:
1. Click the Data Centers tab.
A list of data centers display.
Figure 3.2. Data Centers T ab
2. Click the New button. T he New Data Center dialog displays.
32
Chapter 3. Managing D ata Centers
Figure 3.3. New Data Center Dialog
3. Enter the Nam e and Description of the data center.
4. Select the storage T ype of the data center. Select the storage appropriate to your data center;
one of the following:
NFS
iSCSI
FCP
5. Select the Com patibility Level of the data center, from either 2.1 or 2.2.
6. Click OK.
7. T he Guide Me dialog displays a list of configuration tasks that must be completed before the
data center can be activated. T he data center configuration tasks can be done immediately or
later. See Section 3.2.2.1, “Using the Guide Me facility”.
Figure 3.4 . New Data Center Guide Me Dialog
Click Configure Later to close the dialog.
33
Red Hat Enterprise Virtualization for Servers 2.2 Administration Guide
8. T he new data center is added to the system, and appears in appropriate searches or lists of
datacenters, with a status of Uninitialized.
9. An uninitialized data center typically requires further configuration, for example, storage domains
must be attached to it. Either click the Configure Storage button on the Guide Me dialog or
select the new data center in the list, and click the Storage tab in the Details pane. You can
define existing storage for the data center, or attach existing storage domains to the data center.
3.2.2. Configuring a Data Center
T his section describes how to manage, configure and maintain a data center.
3.2.2.1. Using the Guide Me facility
T o set up a data center a number of tasks must be completed in sequence. Red Hat Enterprise
Virtualization platform provides prompts in the form of context sensitive Guide Me dialogs, buttons and
icons. T he Guide Me dialog allows you to directly perform the required tasks. T he Guide Me dialog is
context sensitive, and only displays the actions that are appropriate to the resource that is being
configured. T he Guide Me dialog can be accessed at any time by clicking the Guide Me button on the
resource toolbar.
Figure 3.5. New Data Center Guide Me Dialog
3.2.2.2. Allocating Storage Domains for a Data Center
A data center requires storage before clusters can be allocated to it. T his section describes how to
define a storage pool for a data center. T he pool must contain storage domains for disk images and ISO
images. Only ISO storage domains can be shared between data centers. Every data center must have
its own data domain. T his section assumes that storage pools have been set up in readiness for the
data center. Refer Section 3.1, “Prerequisites for Setting up a Data Center”. Creating and setting up
storage domains are described in Chapter 4, Managing Storage.
Note
A data center is of a single storage type (iSCSI, FCP or NFS) only.
34
Chapter 3. Managing D ata Centers
T o attach storage domains to a data center:
1. Select the data center in the list, and click the Storage tab in the Details pane, or use the Guide
Me facility. See Section 3.2.2.1, “Using the Guide Me facility”.
Figure 3.6. Storage T ab for a Data Center
2. From the existing available storage domains, attach at least one disk image domain, using the
Attach Dom ain button; and one ISO storage domain using the Attach ISO button.
Note
T he disk image or data domain must be attached before the ISO domain.
3. Click the Activate button to attach the storage domain for the new data center. T he storage
domains display in the Storage Pool on the Details pane for the data center.
Figure 3.7. Storage T ab for a Data Center
Note:
If your enterprise uses only Linux, and the preferred method of booting virtual machines is using a
PXE server, an ISO domain is not strictly necessary. Using a PXE server is not described in this
document.
3.2.2.3. Maintaining a Data Center
T his section describes now to manage, configure and maintain a data center. T he Details tab of the
Data Center allows you to maintain, edit or configure the Storage, Clusters and Logical Networks of the
data center. Managing clusters, networks and storage is described in greater detail later in this
35
Red Hat Enterprise Virtualization for Servers 2.2 Administration Guide
document.
T o maintain a data center:
1. Click the Data Center tab.
A list of data centers displays.
If the required data center is not displayed, perform a search (see Chapter 9, Locating
Resources).
2. Select the data center.
3. You can now use the buttons on the menu bar of the main Results page, or the tabs on the
Details pane to make the required changes.
T he Details panel displays information about the Storage, Logical Networks and Clusters that
comprise the data center. Select the tab that you wish to edit.
Figure 3.8. Details Panel Buttons
4. Perform any required maintenance tasks using the enabled buttons.
T he Details pane displays information about the Storage, Logical Networks and Clusters that
comprise the data center.
3.2.2.4 . Editing Data Center Details
You can edit the general details of a data center.
T o edit data center details:
1. Click the Data Center tab.
A list of data centers is displayed.
If the required data center is not visible, perform a search (see Chapter 9, Locating Resources).
2. Select the data center that you want to edit, and click the Edit button.
T he Edit Data Center dialog displays. T he Edit Data Center dialog is identical to the
New Data Center dialog and allows you to change the Nam e, Description, T ype and
Com patibility Level of the data center.
3. Edit details, as required (see Section 3.2.1, “Creating a New Data Center”). You cannot change the
T ype of an active Data Center.
4. Click Save.
T he details of the data center are updated in the Data Center tab.
Note:
If you have changed the Storage type (of an inactive data center only), ensure that you define the
storage domains for the data center. See (see Section 3.2.2.2, “Allocating Storage Domains for a
Data Center”)
36
Chapter 3. Managing D ata Centers
3.2.3. Removing a Data Center
Data Centers that are not in use can be permanently removed. Deleting unused data centers saves
system resources, as existing hosts are checked (or pinged) at fixed intervals.
Data centers can only be removed if there are no running hosts within any cluster belonging to the data
center.
Note:
T he clusters, hosts and storage domains are not removed, and can be allocated to a different
data center.
T o remove a data center:
1. Click the Data Centers tab.
2. If the required data center is not visible, perform a search (see Chapter 9, Locating Resources).
3. Select the data center to be removed. Ensure that there are no running hosts in any cluster. You
can use the Rem ove button or right-click on the data-center and select Rem ove.
4. Click the Rem ove button.
A message prompts you to confirm removal.
Figure 3.9. Data Center Removal Dialog
5. Click OK.
T he data center is deleted and is no longer displayed on the Data Centers tab.
3.3. Working with Clusters
T his section describes how to create, activate and manage host clusters in a data center. A cluster is a
collection of physical hosts that share the same storage domains and have the same type of CPU.
Because virtual machines can be migrated across hosts in the same cluster, the cluster is the highest
level at which power and load-sharing policies can be defined. T he Red Hat Enterprise Virtualization
platform contains a default cluster in the default data center at installation.
Every cluster in the system must belong to a data center, and every host in the system must belong to a
37
Red Hat Enterprise Virtualization for Servers 2.2 Administration Guide
cluster. T his enables the system to dynamically allocate a virtual machine to any host in the applicable
cluster, according to policies defined on the Cluster tab and in the Configuration tool during runtime,
thus maximizing memory and disk space, as well as virtual machine uptime. For more information on the
Configuration tool, see Chapter 13, Configuring Red Hat Enterprise Virtualization Management.
At any given time, after a virtual machine runs on a specific host in the cluster, the virtual machine can be
migrated to another host in the cluster using Migrate. T his can be very useful when a host is shut
down for maintenance. T he migration to another host in the cluster is transparent to the user, and the
user continues working as usual. Note that a virtual machine cannot be migrated to a host outside the
cluster.
3.3.1. Creating a New Host Cluster
Before creating a new cluster, ensure that there is at least one host available to be assigned to it. T he
hosts in a cluster all run the same type of CPU. For example, there can be a cluster of R&D Hosts, and a
cluster of QA Hosts.
Important
T he default rhevm network cannot be modified once a cluster has been attached to a data
center. Any configuration required for the rhevm network, such as enabling VLAN tagging, must
be performed before a cluster is attached, and the data center is still in the Uninitialized
state. See Section 3.4.2, “Editing Logical Networks” for instructions to configure the rhevm
network.
T o create a new host cluster:
1. Click the Clusters tab. A list of clusters displays.
Figure 3.10. Cluster T ab
2. Click the New button on the Clusters tab.
T he New Cluster dialog displays.
38
Chapter 3. Managing D ata Centers
Figure 3.11. New Cluster
3. Enter the cluster Nam e and Description. T he name should not include spaces.
4. Select an existing Data Center from the list.
5. Define the permitted Mem ory Over Com m it.
T his field allows you to define how much of the host's memory can be used in excess of the
permitted memory for a virtual machine in the cluster. For example, all virtual machines will not be
using the full amount of allocated memory all the time. Memory overcommit allows virtual machines
that require additional memory at a certain time to use memory that is not being used at that time
by other virtual machines.
Select from None(100%), Desktop Load (200%) or Server Load(150%).
6. Select the CPU Nam e for hosts in this cluster. All hosts must run the same type of CPU. T he CPU
Nam e list displays all the CPU types supported by Red Hat Enterprise Virtualization.
7. Select the Com patibility Level of the data center, from either 2.1 or 2.2.
8. Click OK. T he new host cluster is added to the data center and displays on the Cluster tab.
T he New Cluster - Guide Me dialog displays. For more information on this feature, see
Section 3.2.2.1, “Using the Guide Me facility”.
39
Red Hat Enterprise Virtualization for Servers 2.2 Administration Guide
Figure 3.12. New Cluster
9. T he Guide Me tab prompts you to add hosts to the new cluster. Click the Configure Hosts
button, the New Host dialog displays.
Figure 3.13. New Host Dialog
Enter the details of the host to assign to the cluster. Click OK to close the New Host dialog and
40
Chapter 3. Managing D ata Centers
return to the Clusters tab. T he Hosts tab on the Details pane displays the newly added hosts.
Adding hosts is described in Chapter 5, Managing Hosts.
3.3.2. Configuring Cluster Policies
Defining the load-balancing or power sharing modes for hosts in the cluster is highly recommended. You
can choose to set the policy on either load balancing or power saving, but not both.
T o set load and power management policies for hosts in a cluster:
1. Click the Clusters tab.
A list of clusters displays. Select the required cluster. T he Details pane for the cluster displays.
Figure 3.14 . Cluster Policy T ab
2. On the Details pane click the Policy tab. Click the Edit button. T he Edit Policy dialog
displays, typically with the None option selected.
Figure 3.15. Edit Policy Dialog
3. Define the Load and Power Mode for hosts in the cluster. Select one of the following:
None; to have no load or power sharing between hosts. T his is the default mode.
Even Distribution; to evenly distribute the processing load across all hosts in the cluster.
T he host's CPU load is measured and used to apply the policy. Use the blue slider to specify
the Maxim um Service Level a host is permitted to have. For example, a host that has
reached the maximum service level defined will not have further virtual machines started on it.
41
Red Hat Enterprise Virtualization for Servers 2.2 Administration Guide
You can also specify the time interval in minutes that a host is permitted to run at the maximum
service level before virtual machines are migrated off it.
Power Sharing; to distribute the amount of power consumed across all running hosts. Use
the green slider to specify the Minim um Service Level a host is permitted to have. For
example, a host that has reached the minimum service level defined virtual machines will be
migrated to other hosts, enabling the hosts with low usage levels to be switched off to
conserve power. You can also specify the time interval (in minutes) that a host is permitted to
run at the minimum service level before a power down is triggered.
4. Click OK to define the policy for the cluster.
3.3.3. Maintaining a Cluster
You can edit cluster details, view hosts, virtual machines and logical networks, and add logical networks
to a cluster. Logical Networking is described in a separate section.
T o edit a cluster:
1. Click the Clusters tab.
A list of server clusters displays.
2. Click the Edit button.
T he Edit Cluster dialog displays. T he Edit Cluster dialog is identical to the New Cluster dialog.
Modify the fields as described in Section 3.3.1, “Creating a New Host Cluster”
3. Click OK.
T he changes to the server cluster details are displayed in the list.
T o view hosts in a cluster:
1. Click the Clusters tab. A list of server clusters displays. Select the appropriate cluster. T he
Details pane displays.
2. Click the Hosts tab. A list of hosts displays.
Figure 3.16. T he Hosts tab on the Cluster Details Pane
T o view virtual machines in a cluster:
1. Click the Clusters tab.
A list of clusters displays. Select the appropriate cluster. T he Details pane displays.
2. Click the Virtual Machines tab.
A list of virtual machines displays. T his includes both virtual servers and virtual desktops.
3.3.4. Removing a Cluster
42
Chapter 3. Managing D ata Centers
Clusters that are not in use can be permanently removed. Deleting unused clusters saves system
resources, as existing hosts are checked (or pinged) at fixed intervals.
Warning
It is recommended that the default cluster should not be removed.
T o remove a cluster:
1. Click the Cluster tab.
2. If the required cluster is not visible, perform a search (see Chapter 9, Locating Resources).
3. Select the cluster to be removed. Ensure that there are no running hosts.
4. Click the Rem ove button.
A message prompts you to confirm removal. T he dialog lists the clusters that are selected for
removal.
5. Click OK.
T he cluster is deleted and disappears from the Clusters tab.
Note:
T he hosts and storage domains can still be used, and allocated to a different cluster.
3.4. Maintaining Logical Networks
By default the Management network is defined for a data center. However new logical networks, for
example for data, storage or display can be defined by the administrator. T he logical networks
parameters will also need to be edited if a new network card is added to the data center.
Figure 3.17. Logical Networks
43
Red Hat Enterprise Virtualization for Servers 2.2 Administration Guide
In general, logical networks are assigned by functionality and physical topology. For example, a data
center may have the following:
Guest data network
Storage network access
Management network
Display network (for SPICE or VNC)
3.4.1. Adding Logical Networks to a Data Center
A data center must contain all the networks that its constituent clusters and hosts need to use. Red Hat
Enterprise Virtualization platform allows you to use VLAN ID tagging and supports ST P in logical
networks.
Click the Data Centers tab, and select the appropriate data center.
Figure 3.18. Logical Networks T ab
T o add a logical network:
1. Select the data center. Click the Logical Networks tab in the Details pane.
Figure 3.19. List of Data Centers
2. Click the New button. T he New Logical Network dialog displays.
44
Chapter 3. Managing D ata Centers
Figure 3.20. Logical Networks T ab
3. Enter the Nam e, Network address, Subnet, Default gateway and Description.
4. Select ST P support if ST P support is required.
5. Select the Enable VLAN tagging check box if required. Enter the VLAN ID in the text box.
Note
Ensure that the VLAN has been configured correctly across the network, that is, configure
your routers accordingly.
6. Click OK. T he New Logical Network dialog closes and the logical network displays on the
Logical Networks tab.
3.4.2. Editing Logical Networks
Logical networks can be changed when the need arises. For example, new NICs may be added to
improve reliability or enhance performance, or you may need to re-route networks to work more
efficiently. Existing logical networks can be edited from within the system.
Important
T he default rhevm network cannot be modified once a cluster has been attached to a data
center. Any configuration required for the rhevm network, such as enabling VLAN tagging, must
be performed before a cluster is attached, and the data center is still in the Uninitialized
state.
T o edit a logical network:
1. Select the data center. Click the Logical Networks tab in the Details pane.
2. Click the Edit button. T he Edit Logical Network dialog displays. T he fields are identical
45
Red Hat Enterprise Virtualization for Servers 2.2 Administration Guide
to the New Logical Network dialog. See Figure 3.20, “Logical Networks T ab”.
3. Change the Nam e, Network address, Subnet, Default gateway and Description as
required.
4. Select the ST P check box if required
5. Select the Enable VLAN tagging check box if required, and enter the VLAN ID.
6. Click OK to change the details and close the dialog.
T o remove a logical network:
1. Select the data center. Click the Logical Networks tab in the Details tab.
2. Click the Rem ove button.
A message prompts you to confirm removal.
3. Click OK. T he logical network is deleted and disappears from the Logical Networks tab.
3.4.3. Maintaining Logical Networks in a Cluster
T he management and storage subnets are defined by default when a cluster is created, however these
can be edited and added to during maintenance. Each cluster defines the logical networks that every
host must connect to. T hese networks are usually functional groups like: Guest data, Storage traffic,
Management, Control (migration) and Display (for SPICE)
Each Cluster may have a different set of logical networks but all the logical networks must exist in the
Data Center definition. All hosts in the Cluster must have the same network configuration.
T o manage logical networks in a cluster:
1. Click the Clusters tab. T he list of clusters displays.
2. Select the appropriate cluster. Click the Logical Networks tab in the Details pane.
Figure 3.21. Logical Networks T ab
3. Click the Manage Networks button on the Logical Networks tab. T he Manage Network
dialog displays. A list of available networks displays in the dialog.
Figure 3.22. Manage Network Dialog
46
Chapter 3. Managing D ata Centers
4. Select from the available Networks displayed and click OK.
T he logical network displays on the Logical Networks tab. If further configuration is required,
the T oDo Icon and instruction displays in the Details tab.
Figure 3.23. Logical Networks T ab
T o use a logical network as a display network for SPICE:
1. Click the Clusters tab. T he list of clusters displays.
2. Select the appropriate cluster. Click the Logical Networks tab in the Details pane.
3. Select the network to be used as the display network for SPICE. For more information on the
SPICE protocol, see Section 1.1.1.3, “About SPICE”.
Figure 3.24 . Logical Networks T ab
4. Click the Set as Display button.
5. Click OK. T he role of the network appears as Display in the pane. T he selected network will be
used for SPICE/vnc traffic.
T o remove a logical network from a cluster:
1. Select the cluster. Click the Logical Networks tab in the Details tab.
2. Click the Manage Networks button. T he Manage Network dialog displays.
Figure 3.25. Manage Networks Dialog
3. De-select the network that is to be removed.
4. Click OK.
47
Red Hat Enterprise Virtualization for Servers 2.2 Administration Guide
T he logical network is deleted from the Logical Networks tab.
3.4.4. Mapping Logical Networks to Physical Interfaces
Once a logical network has been created and added to a cluster, it must be attached to a physical
interface on each host in the cluster. For each host:
1. Click on the Hosts tab and select the host. Click on the Network Interfaces tab and select
the physical interface to map to. Click Edit / Add VLAN.
Figure 3.26. Host Network Interfaces T ab
2. Select the logical network to map to this interface and click OK.
Figure 3.27. Edit Network Interface
3. T he mapping between the logical network and physical interface will now appear in the Network
Interfaces tab for the host.
48
Chapter 4. Managing Storage
Chapter 4. Managing Storage
Red Hat Enterprise Virtualization uses a centralized storage system for virtual machine disk images, ISO
files and snapshots. Storage networking can be implemented using Network File System (NFS), Internet
Small Computer System Interface (iSCSI) or Fibre Channel Protocol (FCP). T his section describes how to
set up and manage the variety of storage types that can be used in the Red Hat Enterprise Virtualization
platform. Setting up storage is a vital prerequisite for a new data center because a data center cannot be
initialized unless storage domains are attached and activated.
A Red Hat Enterprise Virtualization system administrator needs to create, configure, attach and maintain
storage for the virtualized enterprise. A familiarity with the storage types and their use is highly
recommended. T his document does not describe the concepts, protocols, requirements or general
usage of NFS, iSCSI or FCP. It is recommended that you read your storage array vendor's guides, and
refer to Red Hat Enterprise Linux 5.5 Online Storage Reconfiguration Guide for more information on
managing storage, if necessary.
T he Red Hat Enterprise Virtualization platform enables administrators to assign and manage storage
effectively and efficiently. T he Storage tab on the Red Hat Enterprise Virtualization platform provides
an efficient graphical way to view and manage networked storage. T he Storage Results list displays all
the storage domains, and the Details pane enables access to general information about the domain.
Red Hat Enterprise Virtualization platform has three types of domains:
Data domains hold the disk images of all the virtual machines running in the system, operating
system images and data disks. In addition, snapshots of the virtual machines are also stored in the
data domain. T he data cannot be shared across data centers, and the data domain must be of the
same type as the data center. For example, a data center of a iSCSI type, must have an iSCSI data
domain. A data domain cannot be shared between datacenters.
ISO domains store ISO files (or logical CDs) used to install and boot operating systems and
applications for the virtual machines. Because an ISO domain is a logical entity replacing a library of
physical CDs or DVDs, an ISO domain removes the data center's need for physical media. An ISO
domain can be shared across different data centers.
An Export domain is a temporary storage repository that is used to copy/move images between data
centers and Red Hat Enterprise Virtualization Manager installations. In addition, the export domain
can be used to backup virtual machines. An Export domain can be moved between data centers,
however, it can only be active in one data center at a time.
4.1. Understanding Storage Domains
Setting up, managing and monitoring storage is essential for a data center to function efficiently at all
times. A storage domain is a collection of images that have a common storage interface. A storage
domain contains complete images of the virtual machines including templates and snapshots. A storage
domain can be either for block devices (SAN - iSCSI or FCP) or files (NAS - NFS). On NFS, all virtual
disks, templates and snapshots are simple files. On SAN (iSCSI/FCP), the LUNs are aggregated into a
logical entity called a Volume Group (VG). T his is done via LVM (Logical Volume Manager) See Red Hat
Enterprise Linux Logical Volume Manager Administration Guide for more information on LVM. Each virtual
disk, template or snapshot is a Logical Volume (LV) on the VG.
Virtual disks can have one of two formats, either Qcow2 or Raw. T he type of storage can be either
Sparse or Preallocated. Snapshots are always sparse but can be taken for disks created either as raw
or sparse.
Virtual machines that share the same storage domain can be migrated between hosts that belong to the
same cluster.
49
Red Hat Enterprise Virtualization for Servers 2.2 Administration Guide
4.1.1. Understanding Virtual Disks
Virtual disks are of two types, Sparse or Pre-allocated, and each behaves in a different manner. T he
available formats are either Raw or qCow2.
1. Preallocated or Sparse (also referred to as T hin Provisioning)
A Preallocated virtual disk has reserved storage of the same size as the virtual disk itself. T his
results in better performance because no storage allocation is required during runtime.
On SAN (iSCSI, FCP) this is achieved by creating a block device with the same size as the virtual
disk. On NFS this is achieved by filling the backing file with zeros and assuming that backing
storage is not Qcow2 and does not de-duplicate zeros (If these assumptions are incorrect, do not
select Sparse for NFS virtual disks).
For sparse virtual disks backing storage is not reserved and is allocated as needed during
runtime. T his allows for storage over commitment under the assumption that most disks are not
fully utilized and storage capacity can be utilized better. T his requires the backing storage to
monitor write requests and can cause some performance issues. On NFS backing storage is
achieved simply by using files. On SAN this is achieved by creating a block device smaller than the
virtual disk's defined size and communicating with the hypervisor to monitor necessary allocations.
T his does not require support from the underlying storage devices.
2. Raw
For raw virtual disks the backing storage device (file/block device) is presented as is to the virtual
machine with no additional layering in between. T his gives better performance but has several
limitations.
T he possible combinations of storage types and formats are described in the following table.
50
Chapter 4. Managing Storage
T able 4 .1. Permitted Storage Combinations
Storage
Format
T ype
Note
NFS or iSCSI/FCP
Raw or Qcow2
Sparse or
Preallocated
NFS
Raw
Preallocated
A file whose initial size
is the size defined for
the virtual disk and has
no formatting
NFS
Raw
Sparse
A file whose initial size
is close to zero and
has no formatting
NFS
Qcow2
Preallocated
A file whose initial size
is the size defined for
the virtual disk and has
qcow2 formatting
NFS
Qcow2
Sparse
a file whose initial size
is close to zero and
has qcow2 formatting
SAN
Raw
Preallocated
A block device whose
initial size is the size
defined for the virtual
disk and has no
formatting
SAN
Qcow2
Preallocated
A block device whose
initial size is the size
defined for the virtual
disk and has qcow2
formatting. Not useful,
but possible.
SAN
Qcow2
Sparse
A block device whose
initial size is much
smaller than the size
defined for the VDisk
(currently 1GB) and
has qcow2 formatting
and for which space is
allocated as needed
(currently in 1GB
increments)
4.1.2. The Storage Pool Manager
T he Storage Pool Manager (SPM) coordinates all the metadata changes across the datacenter. T his
includes creating, deleting and manipulating virtual disks (Images), snapshots, and templates, and
allocating storage for sparse block devices (on SAN). T he SPM role is granted by the Red Hat
Enterprise Virtualization Manager and can be migrated between any host in a data center. T his means
that all hosts in a data center must have access to all the storage domains defined in the data center.
Red Hat Enterprise Virtualization Manager ensures that the SPM is always available and in case of
errors will try to move the SPM role to a different host. T his means that if the host that is running as the
SPM has problems accessing the storage, the Manager will automatically check if there is another
51
Red Hat Enterprise Virtualization for Servers 2.2 Administration Guide
available host that can access the storage and will move the SPM over to that host. When the SPM
starts, it tries to ensure that it is the only host that was granted the role, therefore it will acquire a
storage-centric lease. T his process can take some time.
4.1.3. Multipathing
Multipathing is supported in Red Hat Enterprise Virtualization Manager by default. Setting up a
multipathed storage domain is described later in this section. T o configure multipathing for Red Hat
Enterprise Virtualization Hypervisor hosts, see Red Hat Enterprise Virtualization Hypervisor Deployment
and Installation Guide. For more information on Multipathing in Red Hat Enterprise Linux, see Red Hat
Enterprise Linux DM-Multipath Guide.
Warning
Do not add user_friendly_names and aliases to a m ultipath.conf file on a Red Hat
Enterprise Virtualization Hypervisor.
4.2. Adding Storage Domains to a Data Center
Use the Storage tab to add or edit storage domains, activate, deactivate or detach a storage domain
from a data center, and maintain and delete storage domains. T his section describes how to add a
storage domain to the system. T he next section describes how to configure the storage for your Red
Hat Enterprise Virtualization platform.
T here are two ways of adding storage domains to the Red Hat Enterprise Virtualization platform, you
can set up and add a new storage domain; or you can import an existing ISO or Export domain from
another installation of Red Hat Enterprise Virtualization Manager.
While any available host in the data center can be used to add or configure a storage domain (using the
Use Host field), all Storage Domains defined in the data center must be reachable by all the hosts in
the data center. If a host is unable to access a Storage Domain that host is likely to become nonoperational. T herefore, when adding new storage domains to an active cluster, ensure that the storage
is reachable from all hosts.
Note
If an ISO storage domain is required, it must be added after at least one data storage domain has
been added.
T o add a new storage domain:
1. Click the Storage tab. T he Storage list and toolbar display.
52
Chapter 4. Managing Storage
Figure 4 .1. T he Storage T ab
2. Click New Dom ain. T he New Domain dialog box displays.
Figure 4 .2. Adding New Storage
3. Enter the Nam e of the storage domain, for example, accounting-server-images. A descriptive name
is recommended.
4. Select the appropriate Dom ain Function. Select one:
Data
ISO
Export
5. Select the appropriate Storage T ype. Select one:
NFS
iSCSI
53
Red Hat Enterprise Virtualization for Servers 2.2 Administration Guide
FCP
Depending on the type of Storage selected, enter the required information in the fields that display.
Details on each setup are described later in this chapter.
Note
NFS is the only storage type available for a new ISO Library. T his may change for future
releases.
6. Select a host in Use host. T o attach a domain, an active host must be selected.
Note
All communication to the storage domain is via the selected host and not from the Red Hat
Enterprise Virtualization Manager. At least one host must be active and have access to the
storage before the storage can be configured.
7. Click OK.
8. T he storage domain displays on the Storage tab.
T o import an existing ISO or Export storage domain:
1. Click the Storage tab. T he Storage list and toolbar display. Refer Figure 4.1, “T he Storage T ab”.
2. Click Im port Dom ain. T he New Domain dialog box displays.
Figure 4 .3. Import Domain
3. Select the appropriate Dom ain Function for the data center. Select either:
ISO
Export
Depending on the Domain Function, options display for the Storage T ype field.
Figure 4 .4 . Additional Fields for an Export Domain
54
Chapter 4. Managing Storage
4. Select the appropriate Storage T ype for the domain. Select one:
NFS. T his is the only option for ISO domains.
iSCSI
FCP
Depending on the type of Storage selected, enter the required information in the fields that display.
Details on each setup are described later in this chapter.
5. Select a host in Use host. T o attach a domain, an active host must be selected.
Note
All communication to the storage domain is via the selected host and not from the Red Hat
Enterprise Virtualization Manager. At least one host must be active and have access to the
storage before the storage can be configured.
6. Click OK.
7. T he storage domain is imported and displays on the Storage tab. T he next step is to attach it to a
data center. T his is described later in this chapter, Section 4.3, “Attaching Storage Domains to a
Data Center”.
4.2.1. Adding NFS Storage
An NFS type storage domain is a mounted NFS share that is attached to a data center. Mount NFS
shares by attaching them to the data center as a storage domain. Once attached, the storage domains
can be used to provide storage for virtualized guest images and ISO boot media. For further information
about using NFS, refer to the Red Hat Enterprise Linux Deployment Guide.
Preparing an NFS Share
T his section outlines how to set up an NFS share with recommended settings.
Ensure NFS is installed.
rpm -q nfs-utils
If the package is not detected, install it using the following commands:
yum install nfs-utils
chkconfig --add nfs
chkconfig nfs on
Determine the NFS share directory. For example, if you intend to share /RHEV/Im ages, enter the
following line into the /etc/exports file.
/RHEV/Images
*(rw)
Restart the NFS service.
T he NFS export directory must be configured for read write access and must be owned by vdsm:kvm.
If these users do not exist on your external NFS server use the following command, assuming that
55
Red Hat Enterprise Virtualization for Servers 2.2 Administration Guide
/RHEV/Im ages is the NFS share.
chown -R 36:36 /RHEV/Images
T o Add NFS Storage:
1. Click the Storage tab. T he Storage list and toolbar display.
2. Click New Storage. T he New Storage dialog box displays.
Figure 4 .5. NFS Storage
3. Enter the Nam e of the domain. A suitably descriptive name is recommended.
4. Select the appropriate Dom ain Function for the data center. Select one of:
Data
ISO
Export
Depending on the Domain Function, options display for the Storage T ype field. For example,
NFS is the only option for an ISO domain.
5. Select the Storage T ype for the domain. Select NFS from:
NFS
iSCSI
FCP
6. Select an active host in the Use host field. T o attach a domain, the name of an active host must
be selected from the list of existing hosts.
Note
All communication to the storage domain is via the selected host and not from the Red Hat
Enterprise Virtualization Manager. At least one host must exist in the system before the
storage can be configured.
7. Enter the Export path of the storage. T he export path can be either an IP address or a
resolvable hostname. For example, 192.168.0.10:/Im ages/ISO or storageserver.labs.com pany.com :/Im ages/ISO.
8. Click OK.
9. T he NFS storage domain displays on the Storage tab. T his may take a few moments.
4.2.2. Adding iSCSI Storage
Red Hat Enterprise Virtualization platform supports iSCSI storage at two levels:
56
Chapter 4. Managing Storage
VG level – Volume Group Level associates a set of predefined Logical Unit Numbers (LUNs) to a
volume group that is assigned to a certain storage domain. Volume Groups cannot be shared
between storage domains.
LUN level – allows an administrator to assign a set of LUNs to a storage domain. LUNs that are
attached to one storage domain cannot be attached to another storage domain.
For information regarding the setup and configuration of iSCSI on Red Hat Enterprise Linux, please refer
to the Online Storage Reconfiguration Guide.
T o Add iSCSI Storage:
1. Click the Storage tab. T he Storage list and toolbar display.
2. Click New Storage. T he New Storage dialog box displays.
Figure 4 .6. New Storage
3. Enter the Nam e of the storage.
4. Select iSCSI as the storage T ype. T he dialog box displays a set of fields appropriate to the iSCSI
type.
57
Red Hat Enterprise Virtualization for Servers 2.2 Administration Guide
Figure 4 .7. Adding iSCSI Storage
5. Select an active host in the Use host field. T o attach a domain, the name of any active host must
be selected from the list of existing hosts.
Note
All communication to the storage domain is via the selected host and not from the Red Hat
Enterprise Virtualization Manager. At least one host must exist in the system before the
storage can be configured.
6. Select either Build New Dom ain or Use Preconfigured Volum e Group. In this step you
can either attach a set of LUNs (create a volume group) or attach an already existing Volume
Group as your storage domain.
7. T o Build New Dom ain:
a. If necessary, to search for LUNs, click the Connect to T arget button.
b. T he Connect to T argets dialog displays, enabling you to define a target on which to
search for LUNs. Enter the requisite information in the fields.
58
Chapter 4. Managing Storage
Figure 4 .8. Adding iSCSI Storage
Enter the IP Address of the iSCSI target.
Enter the Port to connect to.
If required, enter the details for User Authentication.
Click the Discover button to find the targets.
T he targets display in the list of Discovered T argets
Click to either Login to All targets, or Add targets m anually. If adding
manually, select the LUNs from the list.
Click Close. T he targets are now selected, and the LUNs display in the New Storage
dialog.
Figure 4 .9. Adding LUNs
59
Red Hat Enterprise Virtualization for Servers 2.2 Administration Guide
c. A list of LUNs (Logical Unit Numbers) display in the list of Discovered LUNs. Click the
Add button to select the LUNs to add to the storage domain.
d. T he LUNs selected in the previous step display in the Selected LUNs grid. T he set of
LUNs in this list will be assigned to the new storage domain. Use the Rem ove button to
remove LUNs from the Selected LUNs if necessary.
Figure 4 .10. Adding LUNs
e. Click OK to attach the selected LUNs to the iSCSI storage domain.
8. T o Use a Preconfigured Dom ain:
a. In this step you use an existing volume group. Ensure that all tags and LVs have been
removed from the VG before creating the new domain. T he New Storage dialog changes
to display the required fields for the preconfigured domain.
60
Chapter 4. Managing Storage
Figure 4 .11. New Storage - Use Existing Volume group
b. Use the Add a T arget link to connect to an existing storage domain. T he Connect to
T argets dialog displays. See Figure 4.8, “Adding iSCSI Storage”.
c. Select a Volum e Group to connect to. T he Name and Size are displayed. Click the
Expand button to view the LUNs that comprise the VG.
9. Click OK.
10. T he new storage domain displays in the Storage tab.
4.2.3. Adding FCP Storage
Red Hat Enterprise Virtualization platform supports SAN storage. T he system supports physical storage
configuration at two levels:
Volume Group level – associates a set of predefined LUNs to a volume group that is assigned to a
certain storage domain. VG cannot be shared between storage domains.
LUN level – allows an administrator to assign a set of LUNs to a storage domain. LUNs that are
attached to one storage domain cannot be attached to another storage domain.
Red Hat Enterprise Virtualization system administrators need a working knowledge of Storage Area
Networks (SAN) concepts. SAN usually uses Fibre Channel Protocol (FCP) for traffic between hosts and
shared external storage. For this reason, SAN may occasionally be referred to as FCP storage.
For information regarding the setup and configuration of FCP or multipathing on Red Hat Enterprise
Linux, please refer to the Online Storage Reconfiguration Guide and DM-Multipathing Guide.
Warning
Do not add user_friendly_names and aliases to a m ultipath.conf file on a Red Hat
Enterprise Virtualization Hypervisor.
T o Add FCP Storage:
1. Click the Storage tab. T he Storage list and toolbar display.
2. Click New Dom ain. T he New Dom ain dialog box displays.
3. Enter the Nam e of the storage.
4. Select FCP as the storage T ype. T he dialog box displays the appropriate fields.
61
Red Hat Enterprise Virtualization for Servers 2.2 Administration Guide
Figure 4 .12. Adding FCP Storage
5. Select a host in Use host. T o attach a domain, any active host must be selected.
Note
All communication to the storage domain is via the selected host and not from the Red Hat
Enterprise Virtualization Manager. At least one host must be active and have access to the
storage before the storage can be configured.
6. Select either Build New Dom ain or Use Existing Volum e Group.
7. T o Build New Dom ain:
A list of LUNs (Logical Unit Numbers) display in the list of Discovered LUNs. Select one or
more LUNs and click the Add button to select the LUNs to add to the storage domain.
62
Chapter 4. Managing Storage
Figure 4 .13. Adding FCP Storage
T he LUNs selected in the previous step display in the Selected LUNs grid. T he set of LUNs
in this list will be assigned to the new storage domain.
Figure 4 .14 . Selected LUNs
Use the Rem ove button to remove LUNs from the Selected LUNs if necessary.
63
Red Hat Enterprise Virtualization for Servers 2.2 Administration Guide
Click OK to attach the selected LUNs to the storage domain.
8. T o Use Preconfigured Volum e Group:
In this step you use an existing volume group. T he New Storage dialog changes to display
the required fields for the preconfigured domain.
Select a Volum e group to connect to. Ensure that all tags and LVs have been removed
from the VG before creating the new domain. T he Name and Size are displayed. Click the
Expand button to view the LUNs that comprise the Volume group.
9. Click OK.
10. T he new storage domain displays in the Storage list.
4.2.4. Example - Adding a Multipath Storage Domain
T his example describes how to set up an multipath iSCSI Storage Domain for Red Hat Enterprise
Virtualization Manager. Multipathing is inherently supported in Red Hat Enterprise Virtualization
Manager. In this example, each iSCSI path must be defined manually. T o do this, enter an IP for every
port that the iSCSI SAN has. If only a single IP is provided, only a single path to the iSCSI target will be
used.
For information regarding the setup and configuration of iSCSI on Red Hat Enterprise Linux, please refer
to the Online Storage Reconfiguration Guide.
T o Add Multipathed iSCSI Storage:
1. Click the Storage tab. T he Storage list and toolbar display.
2. Click New Dom ain. T he New Dom ain dialog box displays.
Figure 4 .15. New Domain
3. Enter the Nam e of the storage domain.
4. Enter the Dom ain function of the storage domain, as Data, ISO or Export.
5. Select iSCSI as the storage T ype. T he dialog box displays a set of fields appropriate to the iSCSI
type.
64
Chapter 4. Managing Storage
Figure 4 .16. Adding iSCSI Storage
6. Select a host in the Use host field. T o attach a domain, the name of any active host must be
selected from the list.
Note
All communication to the storage domain is via the active host and not from the Red Hat
Enterprise Virtualization Manager. At least one host must exist in the system before the
storage can be configured.
7. Select either Build New Dom ain or Use Preconfigured Volum e Group. In this step you
can either attach a set of LUNs (create a volume group) or attach an already existing Volume
Group as your storage domain. T his example shows you how to build a new domain using a set of
LUNs.
8. If necessary, to search for LUNs, click the Connect to T arget button.
9. T he Connect to T argets dialog displays, enabling you to define a target on which to search
for LUNs. Enter the requisite information in the fields.
65
Red Hat Enterprise Virtualization for Servers 2.2 Administration Guide
Figure 4 .17. Adding iSCSI Storage
a. Enter the IP Address of the iSCSI target.
b. Enter the Port to connect to, or leave it as the default port.
c. If required, enter the details for User Authentication.
d. Click the Discover button to find the targets.
e. T he targets display in the list of Discovered T argets
f. Click to either Login to All targets, or Add targets m anually. If adding manually,
select the LUNs from the list, and click the Login to login.
g. Click OK. T he Connect to T argets dialog closes and the LUNs display in the New
Dom ain dialog.
10. A list of LUNs (Logical Unit Numbers) display in the list of Discovered LUNs. Note that the
Multipathing column will display a number of or above to indicate the number of paths available to
each LUN on the target. Click the check box of the LUN/s to select for addition.
66
Chapter 4. Managing Storage
Figure 4 .18. Adding Multipathed Storage
11. Click the Add button to use the LUNs as a storage domain.
12. T he LUNs selected in the previous step display in the Selected LUNs grid. T he set of LUNs in
this list will be assigned to the new storage domain. Use the Rem ove button to remove LUNs from
the Selected LUNs if necessary.
Figure 4 .19. Adding Multipathed Storage
13. Click OK to attach the selected LUNs to the iSCSI storage domain.
4.3. Attaching Storage Domains to a Data Center
67
Red Hat Enterprise Virtualization for Servers 2.2 Administration Guide
In the previous step, storage domains were created in preparation for attachment to the data center. A
data center must have at least one storage domain in order to be activated. T his section describes the
steps to attach the data domain for virtualized disk images and subsequently the steps to attach an ISO
image storage domain to a specific data center.
4.3.1. Attaching Disk Image Storage
A storage domain must be allocated to a data center to store the disk images and data of virtual
machines.
T o attach a data domain:
1. Click the Data Centers tab. Select the data center to which the storage is to be attached. If the
required data center is not displayed, perform a search (see Chapter 9, Locating Resources).
2. T he Details pane of the selected data center displays. Select the Storage tab.
Figure 4 .20. Data Center Storage T ab
3. Click the Attach Dom ain button to add the storage location where the data and disk images are
stored.
4. T he Attach Storage Dom ain dialog box displays.
5. Select the domain from the Storage Dom ain list. T he names of any existing storage domains,
of the type appropriate for the data center display in the list. For example, if the default data center
has a storage type of NFS, only existing NFS storage domains display in the list, because only
NFS storage domain types can be attached to this particular data center.
6. Click OK. T he new storage domain displays on the Storage tab of the Details pane.
4.3.2. Attaching ISO Image Storage
T ypically, a data center can have a storage domain for ISO images. T he ISO storage domain can only be
attached after at least one data domain is attached.
Note
ISO storage domains can be shared across data centers. All ISO images required for the virtual
machines must exist in the ISO storage domain.
T o configure an ISO storage domain:
68
Chapter 4. Managing Storage
1. Click the Data Centers tab.
Select the data center to which the ISO storage domain is to be attached.
2. T he Details pane displays. Select the Storage tab.
Figure 4 .21. Data Centers
3. Click the Attach ISO button to add the storage location where the images are stored.
4. T he Attach Storage Dom ain dialog box displays.
5. Select the appropriate ISO locations from the Storage Dom ain list.
6. Click the OK. T he new ISO storage domain displays on the Storage tab of the Details pane.
7. Select the new ISO storage domain on the Storage tab of the Details pane, and click the
Activate button.
4 .3.2.1. Uploading ISO Images using the ISO Uploader
If an ISO Domain is defined for a data center, CD-ROM images or ISO images must be available in the
ISO domain for the virtual machines to use. Red Hat Enterprise Virtualization Platform provides an ISO
Uploader tool that ensures that the ISO images are uploaded into the correct directory path, with the
correct user permissions. T he ISO Uploader is described later in this section.
Note
It is assumed that you have access to ISO images, or know how to create them. Creating ISO
images is not described in this document.
T o Upload ISO images:
1. Create or acquire the appropriate ISO images from boot media, and store them in a temporary
directory on the system running Red Hat Enterprise Virtualization Management.
2. Click Start > All Programs > Red Hat > RHEV Manager > ISO Uploader. T he ISO Uploader
tool displays..
69
Red Hat Enterprise Virtualization for Servers 2.2 Administration Guide
Figure 4 .22. T he ISO Uploader
Due to permissions limitations, it appears as if only the Administrator of the Red Hat Enterprise
Virtualization Manager machine can use the ISO Uploader tool. For any user to use the ISO
Uploader tool, right click on ISO Uploader icon and use the Windows Run As.. feature to run the
ISO Uploader tool.
3. Click Add and browse to the directory containing the ISO images.
Figure 4 .23. Adding ISO Images
4. Select the ISO image and click Open. T he ISO image displays in the ISO File List on the ISO
Uploader dialog box.
70
Chapter 4. Managing Storage
5. Enter the correct Data Center and Host details. Click Upload. T he status of the upload displays
as the upload process proceeds.
4.3.3. Attaching an Export Storage Domain
An export domain can be attached to a data center to enable the import or export of virtual machines
from one data center to another. An export domain can also be used to backup virtual machines and
templates. T o import an existing export domain, refer T o import an existing ISO or Export storage
domain:.
Note
At a given time, an export data domain can only be attached to a single data center.
T o attach an export storage domain:
1. Click the Data Centers tab.
Select the data center to which the export storage domain is to be attached.
2. T he Details pane displays. Select the Storage tab.
Figure 4 .24 . Attaching an Export Domain
3. Click the Attach Export button to add the storage location where the images are stored.
4. T he Attach Export Dom ain dialog box displays, if there are export domains available.
Figure 4 .25. Attach Export Domain Dialog
71
Red Hat Enterprise Virtualization for Servers 2.2 Administration Guide
5. Select the export domain from the list.
6. Click the OK. T he new export storage domain displays on the Storage tab of the Details pane, with
a status of Locked, followed by Inactive.
Figure 4 .26. T he Inactive Export Domain
7. Select the new export storage domain on the Storage tab of the Details pane, and click the
Activate button.
8. T he Export domain will be activated in a few moments and display an Active status.
Figure 4 .27. Activated Export Domain
4.4. Maintaining Storage Domains
T his section describes how to maintain storage domains. For example, you may need to do this to
balance the load, improve performance for particular applications, or if storage domains are being
replaced or retired. You can edit, reactivate and update domains. You can also de-activate domains, and
detach them from the cluster and data center. Changing the Storage Domain properties is a sensitive
task as it affects the all the Virtual Machines and Hosts in the Cluster.
Warning
All maintenance tasks need to be approached with extreme care. Proceed with caution before any
parameters on a storage domain are changed. Failure to do so may result in the loss of all data
and images. T here is no guarantee that the images can be recovered.
4.4.1. Moving Storage Domains to Maintenance Mode
Storage Domains in a data center need to be put into maintenance mode in a fixed order. If the data
center also has an ISO domain, the ISO domain must be placed into Maintenance mode before you can
place the Storage domain into maintenance mode.
T o move a storage domain into maintenance mode:
72
Chapter 4. Managing Storage
1. Click the Storage tab. T he Storage page displays the list of existing storage domains, and the
Storage toolbar displays.
Figure 4 .28. T he Storage T ab
If the required storage is not displayed, perform a search (see Chapter 9, Locating Resources).
2. Shut down and move all the virtual machines running on the data domain. See Section 6.6.5,
“Moving Virtual Machines within a Data Center”.
3. Select the ISO storage domain, if any, to place in maintenance mode.
4. On the Details pane, click the Data Center tab. Click the Maintenance button. T he ISO
storage domain is deactivated, and displays as Inactive in the Storage pane.
5. Select the data domain to be moved into maintenance mode. If you attempt to move a data storage
domain into maintenance mode while the ISO domain is still active, a message appears prompting
you to deactivate other data domains.
6. On the Details pane, click the Data Center tab. Click the Maintenance button. T he data
storage domain is deactivated, and appears as Inactive in the Storage pane.
You can now edit, detach, remove or re-activate the inactive storage domains from the data-center.
73
Red Hat Enterprise Virtualization for Servers 2.2 Administration Guide
Note
You can also activate, detach and place domains into maintenance mode using the Storage tab
on the Details pane of the data center it is associated with.
4.4.2. Editing Storage Domains
Inactive or Active Storage Domains in a data center may need to be modified in a dynamically changing
environment.
Warning
All maintenance tasks need to be approached with extreme caution. Proceed with caution before
any parameters on a storage domain are changed. Failure to do so may result in the loss of all
data and images. T here is no guarantee that the images can be recovered.
T o Edit Storage Domains:
1. Click the Storage tab. T he Storage page displays the list of existing storage domains, and the
Storage toolbar displays.
Figure 4 .29. T he Storage T ab
2. Select the required storage domain. Ensure that it is in Maintenance mode.
If the required storage is not displayed, perform a search (see Chapter 9, Locating Resources).
3. Click Edit on the Storage toolbar. T he Edit Storage Dom ain dialog displays. Depending on
the status of the domain, some or all fields in the dialog box are enabled. T he Edit Storage
Dom ain dialog contains the same fields as the New Storage dialog. See Figure 4.2, “Adding
New Storage”.
4. Change the required fields and click OK.
5. You can now activate the storage and check the validity of the configuration. See Section 4.3,
“Attaching Storage Domains to a Data Center”
74
Chapter 4. Managing Storage
Note
You can also activate, detach and place domains into maintenance mode using the Storage tab
on the Details pane of the data center it is associated with.
4.4.3. Activating Storage Domains
Inactive Storage Domains in a data center need to be re-activated before they can be used. At least one
Data Storage domain must be activated before the ISO domain can be activated, if an ISO domain exists.
T o activate storage domains:
1. Click the Storage tab. T he Storage page displays the list of existing storage domains, and the
Storage toolbar displays.
Figure 4 .30. An Inactive Domain
2. Select an inactive data storage domain.
If the required storage is not displayed, perform a search (see Chapter 9, Locating Resources).
3. On the Details pane, click the Data Center tab.
Click Activate button on the toolbar. T he domain is activated, and displays as Active in the
Storage pane.
Note
If you attempt to activate the ISO domain before activating the data domain, an error
message displays, and the domain is not activated.
75
Red Hat Enterprise Virtualization for Servers 2.2 Administration Guide
Figure 4 .31. An Activated Domain
Note
You can also activate, detach and place domains into maintenance mode using the Storage tab
on the Details pane of the data center it is associated with.
4.5. Deleting Storage Domains
T his section describes how to delete storage domains from a data center. For example, you may need to
do this if storage domains are being replaced or retired. T here are two ways to do this, you can choose
to detach storage from a particular data center, or you may choose to remove it altogether from the
system. Storage domains cannot be removed or detached if any virtual machines that reside on it are
running.
Warning
Deleting storage domains is an irreversible process. Proceed with caution before any storage
domains are detached or removed. All images on the storage domain are irreversibly lost on
detachment and removal of a storage domain.
4.5.1. Detaching Storage Domains from a Data Center
T he space available on storage domains that are merely detached from a data center remain available
to be reassigned later, or assigned to other data centers. After detachment the domain will still appear in
the lists of assigned or unassigned storage domains.
T o detach a storage domain from a data center:
1. Click the Storage tab. T he Storage page displays the list of existing storage, and the Details
pane displays.
76
Chapter 4. Managing Storage
2. Select the storage domain to be detached. Ensure that no virtual machines are running on the
domain.
3. Move the storage domain into Maintenance mode. See Section 4.4, “Maintaining Storage
Domains”.
4. On the Details pane, click the Data Centers tab.
5. Click Detach button on the Storage toolbar.
T he Detach Storage dilaog displays a list of the domains selected for detachment.
Figure 4 .32. T he Detach Storage Dialog
6. T he detached storage domain displays in the list of storage domains with a status of Detached.
Note
T o check if the storage location is still available, use the Attach Dom ain or Add ISO button on
the Storage tab in the Details pane of the data center to attach the domain again, if necessary.
Refer Section 4.3, “Attaching Storage Domains to a Data Center”.
4.5.2. Removing Storage Domains
Storage domains that are removed from a data center are also deleted from the system. After deletion
77
Red Hat Enterprise Virtualization for Servers 2.2 Administration Guide
they no longer display in the lists of storage domains, for example in the Add Storage Dom ain dialog
box.
Storage domains that are removed from the system must be fully reconfigured before they can be reused.
Warning
Proceed with caution before any storage domains are detached or removed. All images on the
storage domain are irreversibly lost on detachment and removal of a storage domain.
T o remove a storage domain:
1. Click the Storage tab. T he Storage page displays the list of existing storage domains, and the
Storage toolbar displays.
2. Select the storage domain to be removed. Ensure that no virtual machines are running on the
domain.
3. Move the domain into Maintenance mode to de-activate it. See Section 4.4.1, “Moving Storage
Domains to Maintenance Mode”.
Figure 4 .33. Removing a storage domain
4. Click Remove on the Storage T ool bar.
5. T he Rem ove Storage dialog displays prompting you to confirm removal, and select the host to
be used to effect the removal. Select a host from the listbox.
78
Chapter 4. Managing Storage
Figure 4 .34 . Remove Storage Dialog
6. Click OK. T he storage domain is permanently removed from the system.
7. Click the Storage tab. T he deleted storage domain no longer displays in the list of storage
domains.
Note
T o check that the deleted storage domain is no longer available, use the Add storage
dom ain button on the Storage toolbar. Refer Section 4.2, “Adding Storage Domains to a Data
Center”.
79
Red Hat Enterprise Virtualization for Servers 2.2 Administration Guide
Chapter 5. Managing Hosts
T his section describes how set up and manage the host types that can be used in the Red Hat
Enterprise Virtualization platform. Hosts are the physical servers on which the virtual machines run.
5.1. About Red Hat Enterprise Virtualization Hosts
A host is a physical 64 bit server with the Intel VT or AMD-V extensions running any of the following:
Red Hat Enterprise Virtualization Hypervisor
Red Hat Enterprise Linux 5.4 AMD64/Intel 64 version (exclusively for systems that have been
upgraded from Red Hat Enterprise Virtualization 2.1)
Red Hat Enterprise Linux 5.5 AMD64/Intel 64 version
A physical host on the Red Hat Enterprise Virtualization platform:
Can belong to only one cluster in the system
Must have the same CPU type as other hosts in the cluster. All hosts in a cluster must be either AMD
or Intel. T he different architectures cannot be mixed in a cluster.
Hosts virtual machines that migrate from one identical host to another, as necessary. For more
information on clusters, refer Section 3.3, “Working with Clusters”.
Can have a maximum of 64 physical CPUs.
Can have a maximum of 1 T B RAM.
5.1.1. Securing Hosts
T he Red Hat Enterprise Virtualization Hypervisor has various security features enabled. Security
Enhanced Linux (SELinux) and the iptables firewall are fully configured and on by default.
Administrators can receive the latest security advisories from the Red Hat Enterprise Virtualization
watch list. Subscribe to the Red Hat Enterprise Virtualization watch list to receive new security
advisories for Red Hat Enterprise Virtualization products by email. Subscribe by completing this form:
http://www.redhat.com/mailman/listinfo/rhev-watch-list/
Red Hat Enterprise Virtualization platform uses various network ports for management and other
virtualization features. T hese ports must be open on a Red Hat Enterprise Linux 5.5 host or higher. For
a full list of ports, see Appendix B, Red Hat Enterprise Linux Host Package and Port Requirements
5.1.2. Viewing Hosts
T he Hosts tab provides a graphical view of all the hosts in the system. T he General, Virtual Machines
and Network Interfaces tabs on the Details pane of a selected host provide you with information about
the hardware and software profile of the host, as well a list of the virtual machines currently running on
the host. T he Network Interfaces tab is described in Section 5.3, “Managing Host Network
Interfaces”.
5.1.2.1. Viewing General Information on Hosts
T he General tab on the Details pane provides information on an individual host, including hardware
and software verions, and whether updates are available (in the case of Hypervisor hosts).
T o view general information on a host:
1. Click the Hosts tab. If the host you want to view is not displayed, perform a search (see
80
Chapter 5. Managing Hosts
Chapter 9, Locating Resources).
A list of hosts displays. Select the appropriate host. T he Details pane displays. T he Details pane
displays General Information, Network Interface information and Virtual Machine information.
Figure 5.1. Host Details Pane
2. Click the General tab.
Information displayed includes software version, the host type, CPU type and Memory information,
and the number of active virtual machines. In addition, if an updated version of the host is
available, an Alert appears.
Figure 5.2. Host Details Pane - Part
5.1.2.2. Viewing Virtual Machines on Hosts
T he Virtual Machines tab on the Details pane provides information on virtual machines running on
the host.
T o view a list of virtual machines on a host:
1. Click the Hosts tab. A list of hosts displays. Select the appropriate host. T he Details pane
displays.
Figure 5.3. T he Hosts T ab
81
Red Hat Enterprise Virtualization for Servers 2.2 Administration Guide
2. Click the Virtual Machines tab on the Details pane. A list of virtual machines running on the
host displays. T his includes both virtual servers and virtual desktops. T he list also displays
cluster, network and display information.
3. You can Pause, Stop and Migrate a virtual machine from this tab.
5.2. Adding Hosts
Hosts must be correctly installed before you can add them to the Red Hat Enterprise Virtualization
platform. Before adding hosts ensure that they have been configured correctly with a name, IP address
and network bridge. Once added to the Red Hat Enterprise Virtualization platform, hosts must be either
approved or activated from the Hosts tab on Red Hat Enterprise Virtualization Manager.
Note
If you re-install Red Hat Enterprise Virtualization Manager, you must remove the hosts to enable
them to be reconnected with the correct ssh keys for the new installation of Red Hat Enterprise
Virtualization Manager. In contrast, if you upgrade Red Hat Enterprise Virtualization Manager, the
hosts remain connected, and no action is required from you.
5.2.1. Prerequisites
Before you can add a host to Red Hat Enterprise Virtualization platform, ensure the following criteria
have been met.
T he host is a Red Hat Enterprise Linux certified server.
T he Red Hat Enterprise Virtualization platform only supports 64 bit processors with the Intel VT or
AMD-V extensions. Only the AMD64/Intel 64 version of Red Hat Enterprise Linux 5.4 and higher is
compatible for use with Red Hat Enterprise Virtualization platform.
T he network VLAN is configured for access to the Red Hat Enterprise Virtualization Manager.
If a host is to be highly available, and have power management, out-of-band management must be
set up and configured correctly. In most instances, this requires the presence of a remote access
card (RAC) in the host.
T he BIOS in the host has Intel VT or AMD-V activated.
T he host has been installed with either of the supported operating systems. For detailed information
on installation, including how to install multiple hosts, install from networks, or other advanced
features, refer to the appropriate installation documents. Refer Appendix G, Additional References.
T he host has a resolvable IP address and hostname.
A data partition with a minimum size of 25 GB is recommended to provide temporary storage.
5.2.2. Adding Red Hat Enterprise Virtualization Hypervisor Hosts
During the installation of the Red Hat Enterprise Virtualization Hypervisor on a host, the process
prompts for the IP address of the host running Red Hat Enterprise Virtualization Manager. If the correct
address is provided, the Red Hat Enterprise Virtualization Hypervisor host automatically appears in Red
Hat Enterprise Virtualization Manager, and only needs to be approved. It is also called a pre-registered
host, and is typically a newly configured host.
If the Red Hat Enterprise Virtualization Hypervisor host was installed as a standalone host, and you now
wish to add it to the Red Hat Enterprise Virtualization platform use the process described in the next
section. Refer Section 5.2.3.2, “T o Add a Host”.
82
Chapter 5. Managing Hosts
For more information on installation of the Red Hat Enterprise Virtualization Hypervisor, refer Red Hat
Enterprise Virtualization for Servers Installation Guide or Red Hat Enterprise Virtualization Hypervisor
Deployment Guide.
T o approve a pre-registered host:
1. In the Hosts tab (see Figure 5.4, “List of Hosts”), select the pre-registered host. T his host will
display a status of "Pending Approval".
2. Click the Approve button.
T he approval process is basically a hand shake between the Management server and the host. On
successful conclusion of this process the host's status changes to Up. T he host is now certified and is
part of the Red Hat Enterprise Virtualization platform. Virtual machines can be scheduled to run on the
approved host.
5.2.3. Adding Red Hat Enterprise Linux Hosts
Red Hat Enterprise Virtualization also supports hosts running Red Hat Enterprise Linux 5.5 AMD64/Intel
64 version. T his section describes the preparatory steps for installing the Red Hat Enterprise Linux
host, as well as the steps to manually add the host to the Red Hat Enterprise Virtualization platform.
Adding a host can take some time, as the following steps are completed by the platform: virtualization
capability checks, installation of packages, creation of bridge and a reboot of the host. Use the Details
pane to monitor the hand-shake process as the host and management system establish a connection.
Note
Red Hat Enterprise Linux 5.4 hosts can only be used with a Red Hat Enterprise Virtualization
Manager which was upgraded from version 2.1 to 2.2. T hey can only be attached to data centers
running in version 2.1 compatibility mode. New installations of Red Hat Enterprise Virtualization
Manager 2.2 or data centers running in version 2.2 compatibility mode can only support Red Hat
Enterprise Linux 5.5 hosts. Red Hat Enterprise Virtualization Manager 2.2 in version 2.1
compatibility mode can support Red Hat Enterprise Linux 5.5 hosts.
T he following table shows which versions of Red Hat Enterprise Linux are supported as hosts for each
version of Red Hat Enterprise Virtualization.
Red Hat Enterprise
Linux Version
Red Hat Enterprise
Virtualization 2.1
Red Hat Enterprise
Virtualization 2.2
Red Hat Enterprise
Virtualization 2.2 in
2.1 compatibility
mode
5.4
Supported
Unsupported
Supported
5.5
Unsupported
Supported
Supported
5.2.3.1. Preparing Red Hat Enterprise Linux Hosts
T o ensure a smooth and successful integration of Red Hat Enterprise Linux Hosts and Red Hat
Enterprise Virtualization platform, prepare the host carefully according to the instructions in this section.
Ensure that Red Hat Enterprise Linux 5.5 is correctly installed and configured on the physical host.
Refer to the Red Hat Enterprise Linux Installation Guide for more information.
Only the Base package group is required. All other packages can be removed or not selected.
83
Red Hat Enterprise Virtualization for Servers 2.2 Administration Guide
Important note on fresh installations
Do not select the Virtualization or KVM package groups when installing Red Hat Enterprise
Linux, as they contain packages that are not compatible for use with Red Hat Enterprise
Virtualization.
Ensure that VLANs are configured for access to the Red Hat Enterprise Virtualization Manager.
Ensure the host is correctly subscribed to the appropriate Red Hat Network channels.
Red Hat Enterprise Virt Management Agent (v.5 for x86_64)
RHEL Virtualization (v. 5 for 64-bit x86_64)
Note
If you do not have the appropriate subscription entitlements, contact Red Hat Customer
Service.
Install the fence-agents, kvm -qem u-im g bridge-utils packages required by Red Hat
Enterprise Virtualization Manager to manage Red Hat Enterprise Linux hosts. During installation if the
required additional packages are not found, they will be automatically installed by the Red Hat
Enterprise Virtualization Manager.
Install the required packages with yum :
# yum install bridge-utils fence-agents kvm-qemu-img
Warning
If you are using proprietary directory services or standard directory services with no access to
authentication files for user management, the vdsm package will fail to create the required
system user . T he authentication files required by the useradd command must be accessible
to the installer. Red Hat Directory Server (RHDS) recommends a security policy with a mixture
of local files and LDAP. Following this recommendation will resolve this issue.
Uninstall incompatible packages.
T he Red Hat Enterprise Virtualization management daemon (vdsm ) is currently incompatible with
Xen. T herefore Xen, including all dependencies, should be removed.
Warning
T he following steps will destroy data on all existing virtual machines. It is strongly
recommended to back up or migrate existing virtual machines to other Red Hat Enterprise
Linux servers before proceeding. T his process is not reversible.
Remove the xen and kernel-xen packages with the yum command:
# yum remove xen kernel-xen
Reboot the system. T he reboot effects a return to the default kernel if the Xen kernel was in use;
84
Chapter 5. Managing Hosts
and the reboot disables the default libvirt network bridge.
Add a manual host entry to the /etc/hosts file (on the Red Hat Enterprise Linux 5.5 host) for the
Red Hat Enterprise Virtualization Manager server to enable vdsm and other services to connect
properly to the host.
Because Active Directory uses layered domain names, the Active Directory instance takes the
domain name usually used by a Linux host. For example, if the server running the Red Hat Enterprise
Virtualization Manager has a hostname of server1.exam ple.com , Active Directory uses that
address and creates a sub-address named rhev-m anager.server1.exam ple.com .
Edit the /etc/hosts file on the Red Hat Enterprise Linux Host. T he following screen output sample
resembles the contents of the file:
127.0.0.1
::1
localhost.localdomain localhost
localhost6.localdomain6 localhost6
Append a new line to /etc/hosts with the IP address and both variants of the Red Hat Enterprise
Virtualization Manager domain names. T he following screen output sample resembles the required
contents of the file:
127.0.0.1
::1
10.0.0.1
localhost.localdomain localhost
localhost6.localdomain6 localhost6
server1.example.com rhev-manager.server1.example.com
Open firewall ports on the host.
Red Hat Enterprise Virtualization platform uses a number of network ports for management and other
virtualization features.
T he following steps configure iptables to open the required ports.
Add the required ports as iptables rules. Advanced users can modify rules or use the
iptables -I option instead of iptables -A in order to integrate with existing rules.
# iptables -A INPUT -m state --state ESTABLISHED,RELATED -j ACCEPT
# iptables -A INPUT -p icmp -j ACCEPT
# iptables -A INPUT -i lo -j ACCEPT
# iptables -A INPUT -p tcp --dport 54321 -j ACCEPT
# iptables -A INPUT -p tcp --dport 22 -j ACCEPT
# iptables -A INPUT -p tcp -m multiport --dports 5634:6166 -j ACCEPT
# iptables -A INPUT -p tcp -m multiport --dports 49152:49216 -j ACCEPT
# iptables -A INPUT -j REJECT --reject-with icmp-host-prohibited
# iptables -A FORWARD -m physdev ! --physdev-is-bridged -j REJECT --rejectwith icmp-host-prohibited
Save the modified rules.
# service iptables save
Configure sudo access
T he Red Hat Enterprise Virtualization Manager makes use of sudo to perform operations as root
on the host. T he default configuration stored in /etc/sudoers contains values to allow this. If this
file has been modified since Red Hat Enterprise Linux installation these values may have been
removed. As root run visudo to ensure that the /etc/sudoers contains the default configuration
values. Where it does not they must be added.
85
Red Hat Enterprise Virtualization for Servers 2.2 Administration Guide
# Allow root to run any commands anywhere
root
ALL=(ALL)
ALL
Enable SSH access for root
T he Red Hat Enterprise Virtualization management daemon accesses host machines via SSH. T o do
this it logs in as root with an encrypted key for authentication. T o ensure that SSH is configured
and root is able to use it to access the system follow these additional steps.
Warning
T he first time the Red Hat Enterprise Virtualization Manager is connected to the host it will
install an authentication key. In the process it will overwrite any existing keys which exist in
/root/.ssh/authorized_keys.
T hese steps assume that the openssh-server package is installed on the system. Where the
package is not present use yum to install it.
# yum install openssh-server
Use chkconfig to verify which run-levels SSH is enabled at.
# chkconfig --list sshd
sshd
0:off 1:off 2:on 3:on 4:on 5:on 6:off
It is expected that the SSH daemon shows as on for run-levels 3, 4 , and 5. T his is the default
configuration.
If the configuration on the host differs use chkconfig to enable it for the required run-levels.
T he /etc/init.d/sshd script can then be used to ensure the service is currently started.
# chkconfig --level 345 sshd on
# /etc/init.d/sshd start
T o verify this operation as successful run chkconfig --list sshd again and check the
output. It should now show the daemon as on at run-level 3, 4 , and 5.
In Red Hat Enterprise Linux the default SSH daemon configuration allows remote login by the
root user. T his is also a requirement for the Red Hat Enterprise Virtualization Manager to
successfully access the machine. In some cases an administrator may have disabled this ability.
T o check whether or not this is the case search the /etc/ssh/sshd_config for the value
Perm itRootLogin. T his must be done while logged in as root.
# grep PermitRootLogin /etc/ssh/sshd_config
PermitRootLogin no
Where Perm itRootLogin is set to no the value must be changed to yes. T o do this edit the
configuration file.
# vi /etc/ssh/sshd_config
Once the updated configuration file has been saved the SSH daemon must be told to reload it.
86
Chapter 5. Managing Hosts
# /etc/init.d/sshd reload
Reloading sshd:
[
OK
]
T he root user should now be able to access the system via SSH.
You can now add the correctly installed and configured Red Hat Enterprise Linux host to Red Hat
Enterprise Virtualization platform.
5.2.3.2. T o Add a Host
Before adding a host, ensure you have the correct IP and password of the host. Once you have entered
the requisite details, the following steps are completed by the platform:
Virtualization capability checks
Installation of requisite packages
Creation of bridge
Reboot of the host.
T he process of adding a new host can take some time, the progress can be followed in the Events pane.
1. Click the Hosts tab. T he Hosts tab displays a list of all hosts in the system.
Figure 5.4 . List of Hosts
2. Click the New button. T he New Host dialog displays.
87
Red Hat Enterprise Virtualization for Servers 2.2 Administration Guide
Figure 5.5. New Host Dialog
Enter the details of the new host.
3. Name: a descriptive name for the host.
4. Address: the IP address, or resolvable hostname of the host (provided during installation).
5. Port: the port used for internal communication control between the hosts. A default port is
displayed; change the default only if you are sure that another port can be used.
6. Host Cluster: the cluster to which the host belongs (select from the drop-down list).
7. Root password: the password of the designated host; used during installation of the host.
8. Enable Power Management: Select this checkbox to turn out-of-band (OOB) power
management on. If selected, the information for the following fields must also be provided.
T he Address of the host. T his is usually the address of the remote access card (RAC) on the
host.
A valid User Nam e for the OOB management.
A valid, robust Password for the OOB management.
T he T ype of the OOB management device. Select the appropriate device from the drop down
list.
88
alom
Sun ALOM
apc
APC
bladecenter
IBM Bladecentre Remote Supervisor Adapter
drac5
Dell Remote Access Controller for Dell
Chapter 5. Managing Hosts
computers
eps
Entry-Level Power Supply Specification
ilo
HP Integrated Lights Out standard
ipmilan
Intelligent Platform Management Interface
rsa
IBM Remote Supervisor Adaptor
rsb
wti
WT I PowerSwitch
Click Secure to use SSH to connect to OOB management.
T he Port to connect to OOB management.
Enter the Slot if a Blade server is being configured.
Enter any Options that are needed for the SSH command.
Click the T est button to test the operation of the OOB management solution. Alerts, if any,
appear on the Alerts panel. T he Alerts panel displays on the bottom right corner of the
screen. If there are existing alerts, the Alerts text changes color to brighter red.
Figure 5.6. Alerts T ag
T he Alerts panel can be resized by using the Expand/Collapse button, or dragging the border
upwards/downwards.
Figure 5.7. Alerts Panel Expanded
Red Hat Enterprise Virtualization recommends the configuration of power management on the
hosts. Power management enables the system to fence a troublesome host using an additional
interface.
89
Red Hat Enterprise Virtualization for Servers 2.2 Administration Guide
Note
If the host is required to be Highly Available, power management must be enabled and
configured.
Setting up power management for hosts is described in detail later in this section. Refer
Section 5.5, “Configuring Power Management and Fencing”.
9. Click OK.
T he new host displays in the list of hosts with a status of "Installing". Once installation is
complete, the status of the newly added host is Pending Approval. T he host must be activated for
the status to change to Up.
Note:
View the process of the host installation on the Details pane.
5.2.4. Activating a Host
After a host has been added, or an existing host has been taken down for maintenance, it needs to be
activated before it can be used. Red Hat Enterprise Linux 5.5 and higher hosts need to be activated after
being added or upgraded.
T o activate a host:
1. In the Hosts tab (see Figure 5.4, “List of Hosts”), select the host to be activated.
2. Click the Activate button.
T he host status changes to Up. Virtual machines can now run on the host.
5.3. Managing Host Network Interfaces
T he Network Interface tab on the Details pane of a host, allows you to define the attachment of the
logical network in the Red Hat Enterprise Virtualization Manager to the physical network interface cards
(or NICs) of the host. T his is a simple operation in which you attach one or more of the host's physical
Network Interface Cards (NICs) to a predefined logical network in the cluster.
Note
New logical networks cannot be defined at the host level.
T he management and storage subnets are defined by default in the cluster. T ypically, eth0 is allocated
to the management network interface (which displays as RHEVM) and eth1 is allocated to the storage
network interface (which may display as data). T he Red Hat Enterprise Virtualization platform
automatically detects the attached subnets and networks, so all that is required is to match the logical
network name to the correct subnet.
Each host can support up to 32 interfaces, and these are grouped by logical networks. If the default
settings are not correct, or more subnets need to be added, the Network Interfaces tab can be
used to make changes.
90
Chapter 5. Managing Hosts
5.3.1. Editing Network Interfaces
You can edit the host NICs and the RHEVM Management network using the Network Interfaces tab on a
host's Details pane.
5.3.1.1. Editing Host Network Interfaces
T he Network Interfaces tab displays the name, network name, address, MAC address, speed, and
link status for each interface. T he Edit, Edit Managem ent Network, Bond/Unbond, Detach and
Save Network Configuration buttons enable you to manage host NICs.
T o edit a network interface:
1. Click the Hosts tab. A list of hosts displays. Select the appropriate host. T he Details pane
displays.
Figure 5.8. Host Network Interface T ab
2. Place the host in maintenance mode. See Section 5.4, “Maintaining Hosts”.
3. Click the Network Interface tab on the Details tab. T he Network Interface tab displays
the list of NICs on the host, and a number of buttons.
Figure 5.9. Host Network Interface T ab
4. Click the Edit button. T he Edit Network Interface dialog displays.
91
Red Hat Enterprise Virtualization for Servers 2.2 Administration Guide
Figure 5.10. Host Network Interface T ab
5. T o attach the NIC to a different logical network, select a different Network from the list of
available logical networks.
6. Select the network setting of None, DHCP or Static. For Static setting, provide the IP, Subnet
and Default Gateway information for the host.
7. Select the Check Connectivity check box if necessary.
8. Click OK.
9. Activate the host. See Section 5.2.4, “Activating a Host”.
5.3.1.2. Editing Management Network
T he Network Interfaces tab displays the name, network name, address, MAC address, speed, and
link status for each interface. In the course of editing the host NICs, it may be necessary to check or edit
the Management Network Interface.
Note:
Communication between the Management Server and the host is via the management interface.
Changing the properties of the management interface may cause the host to become
unreachable.
T o edit the management network:
1. Click the Hosts tab. A list of hosts displays. Select the appropriate host. T he Details pane
displays.
92
Chapter 5. Managing Hosts
Figure 5.11. Host Network Interface T ab
2. Place the host in maintenance mode. See Section 5.4, “Maintaining Hosts”.
3. Click the Network Interface tab on the Details tab. T he Network Interface tab displays
the list of NICs on the host, and a number of buttons.
Figure 5.12. Host Network Interface T ab
4. Click the Edit Managem ent Network button. T he Edit Managem ent Network dialog
displays.
Figure 5.13. Edit Management Network Dialog
93
Red Hat Enterprise Virtualization for Servers 2.2 Administration Guide
5. T o attach the RHEVM management network to a different NIC, select a different Interface from
the list of available NICs.
6. Select the network setting of None, DHCP or Static. For Static setting, provide the IP, Subnet
and Default Gateway information for the host.
7. Select the Check Connectivity check box if necessary.
8. Click OK.
9. Activate the host. See Section 5.2.4, “Activating a Host”.
5.3.2. Configuring Network Interfaces
After editing the NICs to ensure that the physical NICs connect to the logical networks, some further
configuration may be necessary. For example, you may want to aggregate links, separate bonded links,
or even detach NICs from the network. When the host is correctly configured and linked to the RHEVM
network, you may want to save the network configuration.
5.3.2.1. Bonding Network Interfaces
Network bonding (also known as link aggregation, NIC bonding) consists of aggregating multiple network
interfaces into a single logical bonded interface that correspond to a single IP address. Network bonding
uses multiple network cables/ports in parallel to increase the link speed beyond the limits of any one
single cable or port, and to increase the redundancy for higher availability. Red Hat Enterprise
Virtualization platform conform to what used to be clause 43 of IEEE 802.3-2005 Ethernet standard,
usually referred to by its working group name of "IEEE 802.3ad".
Red Hat Enterprise Virtualization platform allows bonding of several NICs on a host. For example, if a
host has four NICs but only two logical networks, two of the NICs can be bonded together using 802.3ad
protocol to create a single channel. T his channel can be mapped to a single logical network providing a
higher bandwidth.
Note
Ensure that the NICs have been configured correctly across the network, that is, configure your
routers accordingly.
T o bond host NICs:
1. Click the Hosts tab. A list of hosts displays. Select the appropriate host. T he Details pane
displays.
Figure 5.14 . Host Network Interface T ab
94
Chapter 5. Managing Hosts
2. Place the host in maintenance mode. See Section 5.4, “Maintaining Hosts”.
3. Click the Network Interface tab on the Details tab. T he Network Interface tab displays
the list of NICs on the host, and a number of buttons.
Figure 5.15. Host Network Interface T ab
4. Select the multiple NICs that are to be bonded together.
5. Click the Bond button. T he Bond Network Interface dialog displays.
Figure 5.16. Bond Network Interface Dialog
6. T o create a bonded interface select a Bond from the list.
7. Select the network setting of None, DHCP or Static. For Static setting, provide the IP, Subnet
and Default Gateway information for the host.
8. Select the Check Connectivity check box if necessary.
9. Click OK.
5.3.2.2. Detaching NICs
T he Network Interfaces tab displays the name, network name, address, MAC address, speed, and
95
Red Hat Enterprise Virtualization for Servers 2.2 Administration Guide
link status for each interface. In the course of editing the host NICs, it may be necessary to detach a
particular NIC.
T o detach a NIC:
1. Click the Hosts tab. A list of hosts displays. Select the appropriate host. T he Details pane
displays.
Figure 5.17. Host Network Interface T ab
2. Place the host in maintenance mode. See Section 5.4, “Maintaining Hosts”.
3. Click the Network Interface tab on the Details tab. T he Network Interface tab displays
the list of NICs on the host, and a number of buttons.
Figure 5.18. Host Network Interface T ab
4. Select the NIC (or NICs) to be detached, and click the Detach button. T he Detach Network
Interface dialog displays.
5. T he dialog box lists the NICs selected for detachment.
6. Click OK to confirm the detachment.
7. Activate the host. See Section 5.2.4, “Activating a Host”.
5.3.2.3. Saving Host Network Configuration
When the host is correctly configured and linked to the RHEVM network, you may want to save the
network configuration.
T o save a network interface configuration:
1. Click the Hosts tab. A list of hosts displays. Select the appropriate host. T he Details pane
displays.
96
Chapter 5. Managing Hosts
Figure 5.19. Host Network Interface T ab
2. Place the host in maintenance mode. See Section 5.4, “Maintaining Hosts”.
3. Click the Network Interface tab on the Details tab. T he Network Interface tab displays
the list of NICs on the host, and a number of buttons.
Figure 5.20. Host Network Interface T ab
4. Click the Save Network Configuration button.
5. Click OK. T he host network configuration is saved.
5.4. Maintaining Hosts
T his section describes how to maintain host and upgrade hosts on the Red Hat Enterprise Virtualization
platform. For example, you may have to change the network configuration details of the host, or the host
cluster to which it belongs. All virtual machines are migrated automatically, however the migration
increases the load on the network and on other hosts. If a large number of virtual machines are running
on the host (that is to be moved into maintenance mode), the migration of the virtual machines may take
a considerable amount of time.
Warning
Maintaining hosts may involve the shut down, de-activation and re-start of the physical host.
Moving hosts into Maintenance must be planned and considered carefully.
5.4.1. Moving a Host into Maintenance Mode
Hosts must occasionally be brought down for maintenance. Red Hat Enterprise Virtualization platform
attempts to migrate all the virtual machines running on the host to other hosts automatically. In some
instances this may not be possible, and you may have to manually migrate or shut down a virtual
machine, before the host can be placed in maintenance.
97
Red Hat Enterprise Virtualization for Servers 2.2 Administration Guide
T o move a host into maintenance mode:
1. Click the Hosts tab. A list of hosts displays. If the host you want to edit is not displayed, perform a
search (see Chapter 9, Locating Resources).
2. Select the host. T he Details panel displays information about the host.
Figure 5.21. Host Details Pane
3. Click the Maintenance button to migrate all virtual machines to alternative hosts, and place the
host into maintenance.
T he Status field of the host changes to Preparing for Maintenance, followed by Maintenance.
T he icon changes to indicate that the host is in maintenance.
Figure 5.22. Host Details Pane
4. Perform any required tasks. When the host is ready to be reactivated, click the Activate button
to bring the host back up.
T he Status field of the host changes to Up.
Note
If Red Hat Enterprise Virtualization Manager is unable to communicate with and control the host,
its status displays Non-responsive.
5.4.2. Editing Host Details
You can edit the details of a host, such as its name or network configuration. You can also change the
cluster to which the host belongs.
Before changing the cluster that the host belongs to, you must first place it into maintenance mode (see
Section 5.4.1, “Moving a Host into Maintenance Mode”).
98
Chapter 5. Managing Hosts
Warning
Maintaining hosts may involve the shut down, de-activation and re-start of the physical hosts. If
any virtual machines are running on the host, be aware that you may lose data and configuration
details if the virtual machine have not been shut down. Moving hosts into maintenance must be
carefully planned and executed with due care and consideration.
T o edit host details:
1. Click the Hosts tab. A list of hosts is displayed. If the host you want to edit is not displayed,
perform a search (see Chapter 9, Locating Resources).
2. Select the host that you want to edit. Click the Edit button. T he Edit Host dialog opens.
Figure 5.23. Edit Host Dialog
3. Edit details, as required (see Section 5.2.3, “Adding Red Hat Enterprise Linux Hosts”). Click Save
to save the changes.
T he details of the host are updated in the Hosts tab, and the status changes appropriately.
5.5. Configuring Power Management and Fencing
All hosts on the Red Hat Enterprise Virtualization platform work in a cluster mode and therefore need to
be fenced by the Manager either automatically or manually. T herefore, it is highly recommended, that
administrator configure the fencing parameters and test their correctness from time to time. Hosts can
be fenced automatically using the Power Management parameters, or manually by right clicking on a host
and using the options on the menu. Both methods are described in this section. In a fencing operation, a
host is re-booted, and if the host does not return to an active status within a prescribed time, Red Hat
Enterprise Virtualization Manager marks it as non-responsive and stops checking its status. If the host
is required to run virtual machines that are to Highly Available, power management must be enabled and
configured.
99
Red Hat Enterprise Virtualization for Servers 2.2 Administration Guide
5.5.1. Setting the Parameters for Fencing
T he parameters for host fencing are set using the Power Managem ent fields on the New or Edit Host
dialog. Power management enables the system to fence a troublesome host using an additional
interface such as a Remote Access Card (RAC).
Power management parameters are tested by Red Hat Enterprise Virtualization Manager only when they
are entered by the administrator. If the administrator chooses to ignore alerts about wrong parameters,
or if the parameters are changed on the power-management hardware without the corresponding
change in Red Hat Enterprise Virtualization Manager, fencing is likely to fail when most needed.
T o set up fencing on a host:
1. Click the Hosts tab. T he Hosts tab displays a list of all hosts in the system.
2. Select the host for which you wish to set up fencing and Click the Edit button. T he Edit Host
dialog displays.
Figure 5.24 . New Host Dialog
3. Enable Power Management: Select this checkbox to turn out-of-band (OOB) power
management on. T he fields for Power Management are enabled.
T he Address of the host. T his is usually the address of the remote access card (RAC) on the
host.
A valid User Nam e for the OOB management.
A valid, robust Password for the OOB management.
T he T ype of the fencing device. Select the appropriate device from the drop down list.
100
alom
Sun ALOM
apc
APC
bladecenter
IBM Bladecentre Remote Supervisor Adapter
drac5
Dell Remote Access Controller for Dell
computers
eps
Entry-Level Power Supply Specification
Chapter 5. Managing Hosts
ilo
HP Integrated Lights Out standard
ipmilan
Intelligent Platform Management Interface
rsa
IBM Remote Supervisor Adaptor
rsb
wti
WT I PowerSwitch
Click Secure to use SSH to connect to OOB management.
If needed, enter the Port to connect to the power management device.
Enter the Slot if a Blade server is being configured. Use this only if you would like to manage
the server via slot 2 on the Blade server.
Enter any Options that are needed for the fence-agents commands or ssh command. T his is
free text field that enables the administrator to enter commands that are not available via the
graphical user interface. Red Hat Enterprise Virtualization Manager does not perform any
checks on these options. T his options should only be used by advanced users, as any errors
may cause the host to become unreachable.
Click the T est button to test the operation of the OOB management solution.
Warning
Power management parameters (userid, password, options, etc) are tested by Red Hat
Enterprise Virtualization Manager only when they are entered by the administrator. If the
administrator chooses to ignore alerts about wrong parameters, or if the parameters are
changed on the power management hardware without the corresponding change in Red
Hat Enterprise Virtualization Manager, fencing is likely to fail when most needed.
4. Click OK.
T he new host displays in the list of hosts with a status of "Installing". Once installation is
complete, the status of the newly added host is Pending Approval. T he host must be activated for
the status to change to Up.
5.5.1.1. Using Power Management
Red Hat Enterprise Virtualization recommends the configuration of power management. Power
management enables the system to fence a troublesome host using an additional interface and to
reduce power usage.
Note
If the host is required to be Highly Available, power management must be enabled and configured.
Power Management must be set up when the host is added to the platform, or later, using the Edit
Host dialog. Refer Section 5.5.1, “Setting the Parameters for Fencing”.
Hosts can be fenced using the Power Managem ent button on the Hosts tab.
T o use power management to manage fencing on a host:
1. Select the host on the Hosts tab.
2. Click the Power Managem ent button. Select the appropriate option from the list, Start, Stop or
Restart.
101
Red Hat Enterprise Virtualization for Servers 2.2 Administration Guide
Figure 5.25. T he Power Management Options
5.5.2. Manually Fencing or Isolating a Host
If a host unpredictably goes into an unresponsive state, for example, due to a hardware failure; it can
significantly affect the performance of the system. For example, if the unresponsive host is the Storage
Pool Manager, Red Hat Enterprise Virtualization Manager needs to move this function to an active host.
Administrators can isolate a non-reponsive host from networked storage, and other hosts by manually
rebooting the host. Once the administrator has manually rebooted the host, click the Confirm Host
has been Rebooted option on the right-click submenu, to indicate to the platform that the host has
been manually rebooted. .
Note
At least one host must be up and running in order to test fencing. Do not attempt to test the first
host that is added to a data center, until at least one other host is up and running.
T o manually fence a non-responsive host
1. Click the Hosts tab. If a host is not displayed, perform a search (see Chapter 9, Locating
Resources).
2. Select the host. T he status must display as Not Responding.
3. Manually reboot the host.For example, this could mean physically entering the lab and rebooting
the host.
4. In the Red Hat Enterprise Virtualization Manager, right click and select the Confirm Host has
been rebooted button.
102
Chapter 5. Managing Hosts
Figure 5.26. T he Host Right-click menu
5. A message displays prompting you to ensure that the host has been shut down or rebooted.
Select the Approve Operation check box and click OK.
Figure 5.27. T he Fencing Confirmation Message
6. T he host to be fenced is isolated from the virtualized system, enabling any of its functions to be
automatically transferred to an active host.
7. After the non-responding host is rectified, and is reinstalled or rebooted, click the Activate
button to restore the host status to Up.
5.6. Customizing Hosts
You can assign user defined tags to objects and aggregate these objects into a group; for example you
can create a group of hosts running in a department or location.
103
Red Hat Enterprise Virtualization for Servers 2.2 Administration Guide
T o tag a host:
1. Click the Hosts tab.
A list of hosts is displayed.
2. If the host you want to edit is not displayed, perform a search (see Chapter 9, Locating
Resources).
3. Select the appropriate host, and click the Assign T ags button.
Figure 5.28. T he Assign T ag Button on the Host menu
T he Assign T ags dialog opens. It displays a list of available tags.
Figure 5.29. Assign T ag Dialog
4. Select the required tags.
5. Click Close.
T he tagged host displays in the result of searches for the assigned tag, as shown in the figure.
Figure 5.30. T ag Search Result
104
Chapter 5. Managing Hosts
5.7. Deleting a Physical Host
Hosts that are no longer being used by the Red Hat Enterprise Virtualization platform can be
permanently removed. Deleting unused hosts saves system resources, as existing hosts are checked
(or pinged) at fixed intervals. Ensure that any virtual machines are migrated off the host, or shut down if
they are no longer required.
T o delete a host:
1. Click the Hosts tab. If a host that you want to delete is not displayed, perform a search (see
Chapter 9, Locating Resources).
2. Select the host to be deleted.
3. Place the host into Maintenance mode (see Section 5.4.1, “Moving a Host into Maintenance
Mode”).
4. Click the Rem ove button. A confirmation message displays.
5. Click OK. T he host is removed from Red Hat Enterprise Virtualization platform and deleted from the
Hosts tab.
105
Red Hat Enterprise Virtualization for Servers 2.2 Administration Guide
Chapter 6. Managing Virtual Resources
Virtual machines provide the enterprise with the benefits of high availability, scalability and
interoperability that are expected from virtualized data center. T he Red Hat Enterprise Virtualization
platform supports both virtual servers and virtual desktops. A virtual server in the Red Hat Enterprise
Virtualization platform is a Virtual Machine that runs either a Red Hat Enterprise Linux 5.5 or higher
server or a Windows 2003 or 2008 server. T he Virtual Machines tab on the Red Hat Enterprise
Virtualization platfrom provides an efficient graphical way to view and manage virtual machines. For more
information on virtual machines, virtual disk formats and storage of guest images, refer to Red Hat
Enterprise Linux Virtualization Guide.
Figure 6.1. T he Virtual Machines T ab
Administrative tasks for virtual machines include:
Creating virtual machines manually or from templates.
Starting, suspending and migrating virtual machines.
Backing up and restoring virtual machines by taking a snapshot.
Importing or exporting virtual machines.
Converting virtual machines from foreign hypervisors. Refer Appendix A, Importing virtual machines
with virt-v2v
T his chapter describes how to create and maintain virtual machines. A virtual server fulfils the tasks of a
physical server without the actual hardware. Virtual machines in a cluster can be migrated to other hosts
within the same cluster. Because virtual desktops and virtual servers fulfil different needs, they have
different recommended storage and format parameters. An understanding of how virtual machines
access networked storage is helpful.
6.1. About Virtual Machines
T his section briefly describes the storage, processing and network parameters pf virtual machines in the
Red Hat Enterprise Virtualization platform.
6.1.1. Supported Virtual Machines
Red Hat Enterprise Virtualization presently supports the following virtual machines:
Red Hat Enterprise Linux 3 (32 bit and 64 bit)
Red Hat Enterprise Linux 4 (32 bit and 64 bit)
106
Chapter 6. Managing Virtual Resources
Red Hat Enterprise Linux 5 (32 bit and 64 bit)
Red Hat Enterprise Linux 6 (32 bit and 64 bit)
Windows XP Service Pack 3 and newer (32 bit only)
Windows Server 2003 Service Pack 2 and newer (32 bit and 64 bit)
Windows Server 2008 (32 bit and 64 bit)
Windows Server 2008 R2 (64 bit only)
Windows 7 (32 bit and 64 bit)
Para-virtualized drivers (the virtio drivers) that increase the performance for a virtual machine's block
and network devices are available for the following operating systems and versions.
Para-virtualized drivers support
Windows XP
Windows 7 (32 bit and 64 bit)
Windows Server 2008 (32 bit and 64 bit)
Windows Server 2003 R2 (32 bit and 64 bit)
Red Hat Enterprise Linux 4.8 and newer (32 bit and 64 bit)
Red Hat Enterprise Linux 5.4 and newer (32 bit and 64 bit)
Red Hat Enterprise Linux 6.0 and newer (32 bit and 64 bit)
Note:
If a network interface on a Windows virtual machine is configured using the default network
drivers, the network configuration settings are lost if the Red Hat Enterprise Virtualization paravirtualized network drivers are installed subsequently. T o avoid this issue, you should install the
RHEV para-virtualized network drivers before configuring network interfaces on Windows virtual
machines.
6.1.2. Virtual Machine Performance Parameters
Red Hat Enterprise Virtualization virtual machines can support the following parameters:
Parameter
Number
Note
Virtualized CPUs
16
per virtual machine
Virtualized RAM
256GB
For a 64 bit virtual machine
Virtualized RAM
4GB
per 32 bit virtual machine. Note,
the guest may not register the
entire 4GB. How much RAM the
guest recognizes is limited by
its operating system.
Virtualized storage devices
8
per virtual machine
Virtualized network interface
controllers
8
per virtual machine
Virtualized PCI devices
32
per virtual machine
6.1.3. Understanding Virtual Machine Storage
Red Hat Enterprise Virtualization platform supports three storage types: NFS, iSCSI and FCP. In each
107
Red Hat Enterprise Virtualization for Servers 2.2 Administration Guide
type, a host known as the Storage Pool Manager (SPM) manages access between hosts and storage.
T he SPM host is the only node that has full access within the storage pool; the SPM can modify the
images data, and meta-data and the pool's meta-data.
In an NFS data center, the SPM creates the virtual disk on top of a regular file system, either as a Qcow2
disk for a thin provision (sparse) format, or as a normal disk for a preallocated (RAW) format. For iSCSI
and SAN, the SPM creates a Volume group (VG) on top of the Logical Unit Numbers (LUNs) provided.
During the virtual disk creation, either a preallocated format (RAW) or a T hin Provision (Sparse) format is
created.
For a virtual disk with a preallocated format, a Logical Volume (LV) of the specified size in GB is created.
If necessary, the VM can be mounted on a Red Hat Enterprise Linux 5.4 and higher server using kpartx,
vgscan, vgchange and mount to investigate the VM's processes or problems.
For a virtual disk with a thin provision format, a 512M LV is created initially. T he LV is continuously
monitored by the host on which the VM is running. As soon as the usage nears a threshold the host
notifies the SPM, and the SPM extends the LV by 512M. T he host is responsible for resuming the VM
after the LV has been extended. If the VM goes into a pause state it means that the SPM could not
extend the disk on time. T his can occur if the SPM is too busy or there is not enough storage space.
From a performance point of view, a virtual disk with a preallocated (RAW) format is significantly faster
than a virtual disk with a thin provisioning (Qcow2) format. It is recommended that the thin provision
format be used for non-IO intensive virtual desktops, and the pre-allocated (RAW) format be used for
virtual servers.
6.2. Creating New Virtual Machines
You can create a virtual machine in several ways:
From an existing template. T his is currently not recommended as the best way of creating virtual
servers, as it can significantly downgrade the performance of the platform.
From a blank template. T his is the same as creating a virtual machine from scratch.
As a clone from an existing template.
6.2.1. Creating Virtual Machines from Existing Templates
You can create a virtual machine from an existing template (either created by you, or one that came with
the system). A template is a base virtual machine that is set with a unique configuration and settings. A
virtual machine that is based on a particular template acquires the configurations and settings of the
template. T hus, templates are used to conveniently and efficiently create a set of identical virtual
machines. T he Virtual Machines tab displays a list of existing virtual machines.
108
Chapter 6. Managing Virtual Resources
Figure 6.2. Virtual Machine List
T he icon to the left of the virtual machine name indicates whether it is a virtual server, a desktop or a
part of a desktop pool.
Figure 6.3. Virtual Machine List
Note
Virtual servers created from templates are likely to very quickly use a large amount of storage.
T o create a new virtual machine from an existing template:
1. Click the Virtual Machines tab.
2. Click the New Server button.
Figure 6.4 . Virtual Machines T oolbar
T he New Virtual Machine dialog displays.
109
Red Hat Enterprise Virtualization for Servers 2.2 Administration Guide
Figure 6.5. New Virtual Machine Dialog
3. Select the Datacenter, Host Cluster and optionally the Host on which the desktop is to run.
All templates that exist in the selected cluster display in the list. Select an existing template from
the Based on T em plate list.
4. Enter a suitable Nam e and appropriate Description, and accept the default values inherited
from the template in the rest of the fields. You can change them if needed. See T able 6.1, “New
Virtual Machine Dialog Fields” for field descriptions.
5. When creating virtual machines from templates, additional groups display on the New Virtual
Machine dialog. In the Allocation group, select a storage domain from the Storage
Dom ain and select the Provisioning option as either Thin or Clone. Cloning is described later
in this section.
Figure 6.6. Provisioning
6. Click OK to create the virtual machine. T he virtual machine displays in the Virtual Machines list.
110
Chapter 6. Managing Virtual Resources
Note:
It may take some time for the virtual machine to be created. During this time, the status of the
virtual machine displays as Im age Locked, followed by Down.
6.2.2. Creating New Virtual Machines without a Template
T he Red Hat Enterprise Virtualization platform allows you to create a number of different types of virtual
machines. Like physical machines, virtual machines within a cluster must run the same CPU to enable
the migration of virtual machines within the cluster.
T o create a new virtual machine from a blank template :
1. Click the Virtual Machines tab.
T he Virtual Machines tab displays the existing virtual machines.
Figure 6.7. Virtual Machine List
T he icon to the left of the virtual machine name indicates whether it is a virtual server, a desktop
or a part of a desktop pool.
Figure 6.8. Virtual Machine List
2. Click the New Server button.
Figure 6.9. Virtual Machine T oolbar
111
Red Hat Enterprise Virtualization for Servers 2.2 Administration Guide
T he New Virtual Machine dialog displays. T his dialog box consists of the following groups,
General, Console, High Availability, and Boot Sequence. If you choose Windows as
the operating system, a Windows Sys Prep group also displays.You will need to enter some
information in most the groups, if mandatory information is not entered, on clicking OK, the required
unfilled mandatory fields display with a coloured border. Ensure that you enter the requisite
information in the mandatory fields.
Figure 6.10. New Virtual Machine - General
3. Enter information in the General fields of the New Virtual Machine dialog:
112
Chapter 6. Managing Virtual Resources
T able 6.1. New Virtual Machine Dialog Fields
Field
Description
Notes
Data Center
Select an existing Data Center
from the list.
T he Default data center
displays by default.
Host Cluster
T he name of the host cluster
to which the virtual machine is
attached. It can be hosted on
any physical machine in the
cluster depending on the
policy rules.
T his is the migration domain
for the virtual machine. T he
Default cluster displays by
default.
Default Host
T he name of the host on
which the virtual machine is to
be run.
Or select Auto Assign to run
the virtual machine on any
host in the cluster depending
on the policy rules.
Name
T he name of new virtual
machine. Ensure it is a unique
name.
A virtual machine name must
not contain any spaces, and
must contain at least one
character a-z. T he maximum
length of a virtual machine
name is 15 characters. Follow
the operating system's rules
for virtual machine names.
Description
A meaningful description of
the new virtual machine.
T emplate
Select Blank (the default) to
create a virtual machine from
scratch.
Select an existing template to
create a virtual machine from
an existing model. See
Section 6.2.1, “Creating Virtual
Machines from Existing
T emplates”
Memory Size (MB)
T he amount of memory
assigned to the virtual
machine.
Consider the processing and
storage needs of the
applications that are intended
to run on the virtual machine.
T he maximum allowable
memory for a virtual machine
is 256GB, allowing even the
most memory-intensive
enterprise workloads to be
virtualized. T he total amount
of memory allocated to Virtual
Machines is able to exceed
the amount of physical
memory available to the host
where memory over-commit is
enabled. See Section 13.1.5,
“Setting the Host Parameters”
for more information.
T otal Cores
T he processing power
allocated to the virtual
machine, as CPU Cores, from
It is recommended that you do
not assign too high a number
to a single Virtual Machine, or
113
Red Hat Enterprise Virtualization for Servers 2.2 Administration Guide
1 to 16 on the slider bar.
more cores in total than
actually exist on the physical
host.
CPU Sockets
T he number of CPU sockets
for the virtual machine from 1
to 16 on the slider bar.
It is recommended that you do
not assign too high a number
to a single Virtual Machine, or
more CPUs in total than
actually exist on the physical
host.
Operating System
T he operating system. Valid
values include a range of
Windows and Linux variants.
T his is a display only field, as
no operating system is
actually installed during this
process.
4. If the Operating System chosen was Windows, the Windows Sys Prep group displays. Enter
the following information:
Figure 6.11. New Virtual Machine - Windows Sys Prep
T able 6.2. Windows Sys Prep Fields
Field
Description
Notes
Domain
Enter the domain in which the
virtual machine is to be
created.
If the operating system is
Windows, a domain can be
specified.
T im e Zone
Enter the time zone in which
the virtual machine is to run.
T his is the time zone for the
virtual machine, and not
necessarily the time zone for
the physical host on which the
virtual machine is running.
5. Enter information in the Console fields of the New Virtual Machine dialog:
114
Chapter 6. Managing Virtual Resources
Figure 6.12. New Virtual Machine - Console
T able 6.3. New Virtual Machine Dialog Fields
Field
Description
Notes
Protocol
Define the display protocol to
be used. Select either:
SPICE
VNC
Select SPICE for Windows or
Linux virtual machines. T his is
the recommended protocol. or
select VNC for Linux virtual
machines if desired.
USB Policy
Select Enabled or Disabled to
indicate whether a USB device
can be inserted into the client
machine.
Not Available for virtual
servers.
6. Enter information in the High Availability fields of the New Virtual Machine dialog:
Figure 6.13. New Virtual Machine- High Availibility
115
Red Hat Enterprise Virtualization for Servers 2.2 Administration Guide
7. Enter information in the Boot Sequence fields of the New Server Virtual Machine dialog:
Figure 6.14 . New Virtual Machine - Boot Sequence
T able 6.5. New Virtual Machine Dialog Fields
Field
First Device
116
Description
HardDisk
CD-ROM
Network (PXE)
Notes
After installing a new virtual
machine, the new virtual
machine must go into Boot
mode before powering up.
Select the first device that the
virtual machine must try to
boot the virtual machine:
Hard Disk to boot from
the hard disk (though if
this is a blank virtual
machine, it will obviously
not boot from the hard
disk)
CD-ROM to boot from the
CD
Network (PXE) to boot
from the network.
Second Device
Any two of the following:
Hard Disk
CD-ROM
Network (PXE)
Select the second device for
the virtual machine to use to
boot if the first device is not
available. T he first device
selected in the previous
option does not appear in the
options.
Attach CD
A list of available CD-ROMs
appear if Attach CD is
selected.
Select the appropriate
operating system ISOs
available on the system, as
shown in the example below.
Chapter 6. Managing Virtual Resources
Figure 6.15. New Virtual Machine - CDROMs
8. Click OK.
If all the mandatory fields have been selected, T he New Virtual Machine - Guide Me
dialog displays. (If not, the dialog box does not close, and unfilled fields are indicated with a red
border. Complete all the mandatory fields.)
Figure 6.16. New Virtual Machine Guide Me Dialog
You can use the buttons in the New Virtual Machine - Guide Me dialog immediately, or the
tabs on the Details Pane to complete the configuration. Click Configure Later. T he new virtual
machine is created and displays in the list of virtual machines with the Virtual Server icon and
Status Down icon.
117
Red Hat Enterprise Virtualization for Servers 2.2 Administration Guide
Status Down icon.
Figure 6.17. New Virtual Machine
6.2.3. Cloning Virtual Machines from Existing Templates
You can clone a virtual machine from an existing template (either created by you, or one that came with
the system). A template is a base virtual machine that is set with a unique configuration and settings. A
virtual machine that is cloned from a particular template acquires the configurations and settings of the
template.
T o create a cloned virtual machine from an existing template:
1. Click the Virtual Machines tab.
T he Virtual Machines tab displays a list of existing virtual machines.
Figure 6.18. Virtual Machine List
Note
T he icon to the left of the virtual machine name indicates whether it is a virtual server, a
desktop or a part of a desktop pool.
2. Click the New Server button.
118
Chapter 6. Managing Virtual Resources
Figure 6.19. Virtual Machines T oolbar
T he New Virtual Machine dialog displays.
Figure 6.20. New Virtual Machine Dialog
3. Select an existing template from the Based on T em plate list. All templates that exist in the
cluster display in the list.
4. Enter a suitable Nam e and appropriate Description, and accept the default values inherited
from the template in the rest of the fields. You can change them if needed. See T able 6.1, “New
Virtual Machine Dialog Fields” for field descriptions.
5. In the Allocation group, on the Provisioning field, select the Clone option.
Figure 6.21. Provisioning - Clone
119
Red Hat Enterprise Virtualization for Servers 2.2 Administration Guide
6. Click OK to create the cloned virtual machine. T he virtual machine displays in the Virtual Machines
list.
Note
It may take some time for the virtual machine to be created. During this time, the status of
the virtual machine displays as Im age Locked, followed by Down.
6.3. Completing the Configuration of the Virtual Machine
Use the buttons on the New Virtual Machine - Guide Me dialog to complete the configuration of
the new virtual machine. T he New Virtual Machine - Guide Me provides direct access to
required dialog boxes to continue the configuration.
Figure 6.22. New Virtual Machine Guide Me Dialog
Define the NICs and Virtual Disks:
1. T he New Virtual Machine - Guide Me dialog displays when the OK button is clicked on the
New Virtual Machine dialog.
2. T o set up one or more network interfaces (or NICs) click the Configure Network
Interfaces button. T he New Network Interface dialog displays. You can accept the default
values, or change them if necessary.
120
Chapter 6. Managing Virtual Resources
Figure 6.23. New Network Interface Dialog
Enter or select the Nam e, Network and T ype of the network interface for the new virtual machine.
Note
T he options on the Network and T ype fields are populated by the networks available to
the cluster, and the NICs available to the virtual machine.
T o choose the correct NIC T ype these are the general guidelines
for virtual machines running Linux operating systems, use e1000 or Red Hat VirtIO
for virtual machines running Windows operating systems, use rtl8139.
You can also use dual mode; rtl8139, VirtIO for either operating system.
T he type depends on the drivers that are available for the different types of virtual machines.
T hus the VirtIO drivers are available for Red Hat Enterprise Linux 4.8 and above, and for Windows
virtual machines; while Windows supports rtl8139 without the need for any drivers. For other Linux
machines, or earlier versions of Red Hat Enterprise Linux, use e1000 or rtl8139.
3. If required, select the Specify Custom MAC address check box, and enter the address of the
NIC. Ensure that the MAC address is entered in lower-case.
Example 6.1. MAC address
82:80:00:f5:9d:7c
4. Click OK. T he dialog closes, and the New Virtual Machine - Guide Me dialog re-displays,
with changed context.
121
Red Hat Enterprise Virtualization for Servers 2.2 Administration Guide
Figure 6.24 . New Virtual Machine Guide Me Dialog
If you have additional NICs, uou can add additional network interfaces, by clicking the Add
Another Network Interface button.
5. T o set up one or more virtual disks, on the New Virtual Machine - Guide Me dialog, click
the Configure Virtual Disk button.
6. T he New Virtual Disk dialog box displays. You can accept the default values, or change them
if necessary.
Figure 6.25. New Virtual Disk Dialog
122
Chapter 6. Managing Virtual Resources
Enter the Size of the virtual disk in GB. Ensure that the size is appropriate to the applications
that need to run on the virtual machine.
Select the Storage dom ain where the virtual disk image is to be created.
You can also define the Advanced properties of the Virtual Disk. T hese are:
T able 6.6. New Virtual Machine Dialog Fields
Field
Options
Notes
Disk T ype
Select from System or Data
options.
Select System if the virtual
machine is to be bootable.
Interface
Select the network drivers,
either IDE or PV.
IDE is the default selection
that uses an emulation of the
IDE protocol. Windows 2008
virtual machines require a
IDE drivers. Select PV to use
the para-virtualized drivers.
Format
Select from Pre-allocated or
Thin-Provision.
Pre-allocated or RAW is the
recommended selection for a
virtual machine, where a
block of disk space is
reserved for the virtual
machine.
T hin Provision or Qcow2
option, allocates disk space
on the fly, as and when the
virtual machine requires it.
T hin Provision is the
recommended selection for a
virtual desktop. If you intend
to use the virtual machine as
the basis for a template, the
T hin Provision option must
be selected.
Wipe after delete
Select if the disk is to be
formatted after the virtual
machine is deleted.
Selecting this option ensures
that all data in the virtual
machine is removed after the
virtual machine is deleted.
Is bootable
Select if the disk is to be a
bootable disk.
7. Click OK. T he dialog closes, and the New Virtual Machine - Guide Me dialog re-displays,
with changed context. T here should now be no further mandatory configuration to perform. Click
Configure Later to close the dialog.
123
Red Hat Enterprise Virtualization for Servers 2.2 Administration Guide
Figure 6.26. New Virtual Machine Guide Me Dialog
Once the virtual machine is configured with virtual disk space and one or more network interfaces, the
next step is to install operating systems and applications on it. T he virtual machine displays in the list of
virtual machines on the Virtual Machine tab, with a status of Down.
Figure 6.27. T he New Virtual Machine after Configuration
Note
You can also use the Details Pane on the Virtual Machines tab to add new virtual disks or
network interfaces.
6.4. Installing Operating Systems onto Blank Virtual Machines
A virtual machine that is newly created from the "Blank" template requires an operating system and
applications to be installed on it. Use the Run Once function to install an Operating System and relevant
applications onto the new virtual machine.
124
Chapter 6. Managing Virtual Resources
T he Run Once function allows the Administrator to run the virtual machine in a number of special
modes, such as ACPI support, disable/enable acceleration, and others. Note that running a virtual
machine in these special modes can cause performance degradation.
T o install an operating system onto a virtual machine:
1. Click the Virtual Machines tab.
T he Virtual Machines tab displays the existing virtual machines.
Figure 6.28. Virtual Machine List
2. Select the newly created virtual machine. It should have a status of Down.
3. Click the Run Once button on the Virtual Machines toolbar.
Figure 6.29. Run Virtual Machine Dialog
4. T he Run Virtual Machine dialog displays. T he Run Virtual Machine dialog consists of
three sections, Boot Options to define how the virtual machine is to boot; Display Protocol
to select how the virtual machine is to connect to the system.
125
Red Hat Enterprise Virtualization for Servers 2.2 Administration Guide
Figure 6.30. Run Virtual Machine Dialog
5. Define the Boot Options
Attach Floppy – Use this option typically to install Windows drivers. It is mandatory to
attach the floppy before attempting installation. T he floppy must be attached, and the Boot
from CD option selected to install drivers for the virtual machine.
Attach CD – Select this option to install the operating system and applications from the CD
onto the newly created virtual machine. In this case, select an ISO file from the drop-down list.
Boot Sequence – After installing a new virtual machine, the new virtual machine must go into
Boot mode before powering up. T he Boot sequence can be altered from the previously
selected one by moving the options up or down using the list buttons: Hard Disk to boot from
the hard disk (though if this is a blank virtual machine, it will obviously not boot from the hard
disk), CD-ROM to boot from the CD, or Network (PXE) to boot from the network.
T he selected device displays in disabled mode.
Start in Pause Mode – Select this option to run the virtual machine in Pause mode. In
some instances, the virtual machine needs to be started and then paused to allow the
administrator to connect to the display before the virtual machine goes into timeout. Connection
to a virtual machine in a remote location may take longer than usual; consequently, the SPICE
session may open after a timeout in an executed program has passed. T o avoid such an
occurrence, use the Pause mode. After the remote connection is made, continue the Run from
the SPICE window or from inside SPICE.
Reinitialize sysprep - When a virtual machine runs for the first time, the system
automatically attaches a virtual floppy drive containing the Sysprep configuration file to be used
during Sysprep (relevant only if the virtual machine was sealed with Sysprep). T he
Reinitialize sysprep option allows the Administrator to restart the virtual machine with
the attached floppy and configuration file. (For Windows virtual machines only). T his option
126
Chapter 6. Managing Virtual Resources
may not display for virtual machines that have never been initialized.
Click Run Stateless if the virtual machine is to run in stateless mode. T he stateless mode is
mostly used for virtual desktops. A stateless desktop or server is always created from the
base template, and deleted on shutdown. Everytime the virtual machine is run, a new instance
of the virtual machine is created from the base template. T his type of virtual machine is very
useful when creating virtual machines that need to be used for a short time, or by temporary
staff.
6. Define the Display Protocol
Select SPICE for Windows or Linux virtual machines. T his is the recommended protocol.
Select VNC for Linux virtual machines if desired.
7. Click OK.
T he virtual machine runs with the selected settings. T he status changes to Powering Up, followed by
Up.
Note
T hese parameters only apply to the current run, and do not hold for subsequent runs.
6.5. Logging into Virtual Machines
After creating a virtual machine from either a blank template or existing template, you can log into onto
the virtual machine with either the SPICE, VNC or RDP connection protocols to customize the virtual
machine, install databases or applications, or make changes to the virtual machine. You can also use the
Virtual Machines tab on the Red Hat Enterprise Virtualization platform to make changes. Refer
Section 6.6.1, “Editing Virtual Machines” for details on editing virtual machines from the Red Hat
Enterprise Virtualization platform.
6.5.1. Logging into Windows Virtual Machines using SPICE
Use SPICE to log into Virtual Machines running Windows.
T o customize the virtual machine using SPICE
1. On the Virtual Machines tab select the virtual machine.
2. Click the Console button or click the Console option from the right-click menu.
Figure 6.31. Connection Icon on the Virtual Machine Menu
3. T he SPICE installation process starts if SPICE has not been previously installed. Follow the
prompts to install SPICE, and proceed.
4. SPICE displays the Windows login screen:
127
Red Hat Enterprise Virtualization for Servers 2.2 Administration Guide
Figure 6.32. Virtual Machine Details Pane
5. Enter your Usernam e and Password.
6. Click OK to log onto the virtual machine.
7. It is recommended that you install the SPICE drivers on the virtual machine. See Appendix D,
Configuring Red Hat Enterprise Linux 5.4 or higher virtual machines to use SPICE.
8. Shut down the virtual machine, or logout from Windows in the usual way.
6.5.2. Logging into Virtual Machines with Remote Desktop (RDP)
You can use RDP to log into Windows virtual machines.
T o log into a virtual machine using RDP:
1. Select the virtual machine from the list on the Virtual Machines tab.
2. Click the down arrow on the Console button and select the RDP option or click the RDP option
from the right-click menu.
Figure 6.33. Connection Icon on the Virtual Machine Menu
T he RDP Windows login screen of the virtual machine displays.
3. Enter your username and password, and click OK. You are logged on to the virtual machine.
4. Install/uninstall applications and make the required changes to settings, if needed. If you wish, you
can use the virtual machine to create a template. Refer Chapter 7, Using Templates.
5. Shut down the virtual machine, or logout from the virtual machine.
6.5.3. Logging into Virtual Machines with VNC
You can use VNC to log into virtual machines.
T o log into a virtual machine using VNC:
1. Select the virtual machine from the list on the Virtual Machines tab.
2. Click the Connection Protocol button on the Virtual Machines toolbar, and click the VNC link
from the menu.
128
Chapter 6. Managing Virtual Resources
Figure 6.34 . Connection Icon on the Virtual Machine Menu
T he VNC Windows login screen of the virtual machine displays.
3. Enter your username and password, and click OK. You are logged on to the virtual machine.
4. Install/uninstall applications and make the required changes to settings, if needed. If you wish, you
can use the virtual machine to create a template. Refer Chapter 7, Using Templates.
5. Shut down the virtual machine, or logout from the virtual machine.
6.5.4. Console Window Menu Extension for Administrators
T here are various functions available to the Administrator via the Windows menu.
Note
T he functions available to the Administrator differ from the ones available to the user, while the
user is connected to the console.
T o view the functions available to the Administrator:
1. At the top left corner of the Console window, click the SPICE icon.
2. T he SPICE menu displays.
Figure 6.35. Console Window Menu for Administrators
T he following features are available on the SPICE menu:
1. Send CT RL+ALT +END (or enter Ctrl+Alt+End): to simulate this key sequence as if entered
on the virtual machine.
129
Red Hat Enterprise Virtualization for Servers 2.2 Administration Guide
2. T oggle full screen (or enter Shift+F11): to switch between full-screen and window mode for
the virtual machine.
3. Special Keys : to input special characters (selecting from the list to send a key sequence to the
virtual machine).
4. USB Devices : allows attaching and detaching USB devices currently connected to your client.
5. Change CD : for the list of imported ISO image files found in the /im ages folder.
6. Play, Pause, Stop : to perform these basic virtual machine management operations from the
Console Window menu.
6.6. Managing Virtual Machines
Some maintenance tasks are performed directly on the virtual machine (such as running, pausing, or
stopping), and some maintenance tasks involve other objects (such as migrating a virtual machine to a
different physical host in the same cluster).
Maintenance tasks include:
Editing virtual machine details.
Powering on a virtual machine.
Shutting down or pausing a virtual machine.
Migrating a virtual machine to another host.
Working with snapshots.
Deleting a virtual machine.
Exporting/Importing a virtual machine.
6.6.1. Editing Virtual Machines
You can edit the details of a virtual machine, such as its name or memory size. You cannot change the
host cluster, template or Storage Domain to which the virtual machine belongs. Changes take effect after
the virtual machines are shut down and restarted.
Warning
Be aware that changes to Storage, operating system or networking parameters can adversely
affect the virtual machine. Ensure that you have the correct details before attempting to make any
changes. It is recommended that you take the precaution of backing up the virtual machine before
you make changes.
T o edit virtual machine details:
1. Click the Virtual Machines tab.
2. If the virtual machine you want to edit is not visible in the list, perform a search (see Chapter 9,
Locating Resources).
3. Select the virtual machine.
4. Click the Edit button.
T he Edit Virtual Machine dialog displays. Disabled fields cannot be changed.
130
Chapter 6. Managing Virtual Resources
Figure 6.36. Edit Virtual Machine
5. Edit the required details of enabled fields. Refer Section 6.2.2, “Creating New Virtual Machines
without a T emplate” for details of the fields.
Note
Some fields cannot be changed, and are disabled by default.
6. Click OK.
T he details of the virtual machine are updated in the Virtual Machines tab.
6.6.2. Powering Virtual Machines On
When you power on a virtual machine, the Red Hat Enterprise Virtualization platform automatically
selects the best available host on which to run the virtual machine.
T o power on a virtual machine:
1. Click the Virtual Machines tab.
2. If the virtual machine that you want to edit is not visible in the list, perform a search (see
Chapter 9, Locating Resources).
3. Select the virtual machine with a status of Down.
4. Click
or right-click and select Run.
T he Status of the virtual machine changes to Up. T he display protocol and IP of the selected
host display.
6.6.3. Shutting Down or Pausing Virtual Machines
It is recommended that a virtual machine be shut down from within its console. However, occasionally
there is a need to shut down the virtual machine from the administrator portal. T he Red Hat Enterprise
Virtualization platform provides for an orderly shutdown if the guest tools are installed.
It is best practice that all users are logged off from a Windows virtual machine before shutting down. If
131
Red Hat Enterprise Virtualization for Servers 2.2 Administration Guide
any users are still logged in, the following Windows message displays on the virtual machine, Other
people are logged on to this computer. Shutting down Windows might cause them to lose data. Do you
want to continue shutting down?, and the virtual machine remains with a "Powering Off" status in Red
Hat Enterprise Virtualization Manager.
If a virtual machine can’t be properly shut down, since, for example, the OS is not responsive, you might
need to force a shutdown, which is equivalent to pulling out the power cord of a physical machine.
Warning
Exercise extreme caution when forcing shutdown of a virtual machine, as data loss may occur.
Shutdown of virtual machines should be planned after due consideration, preferably as times that
will least impact users.
T o pause a virtual machine:
1. Click the Virtual Machines tab.
2. If the virtual machine that you want to edit is not visible in the list, perform a search.
3. Select the virtual machine.
4. Click
T he Status of the virtual machine changes to Paused.
Pausing a virtual machine puts it into Hibernate mode, where the virtual machine state is preserved.
Applications continue running, but CPU usage is zero.
T o shut down a virtual machine:
1. Click the Virtual Machines tab.
2. If the virtual machine that you want to edit is not visible in the list, perform a search (see
Chapter 9, Locating Resources).
3. Select the virtual machine.
4. Click
T he Status of the virtual machine changes to Down.
6.6.4. Migrating Virtual Machines
A running virtual machine can be migrated to any host within its designated host cluster. T his is
especially useful if the load on a particular host is too great, and is essential before bringing a server
down for maintenance (migration is automatic in this case). Migration of virtual machines does not cause
any service interruption.
Note
Virtual Machines migrate within their designated host cluster. T he system determines the host to
which the virtual is migrated, according to the Load balancing and Power rules set up in the Policy
Engine. Refer Section 5.5.1.1, “Using Power Management” and Section 3.3.1, “Creating a New
Host Cluster”.
T o migrate a virtual machine to another host:
132
Chapter 6. Managing Virtual Resources
1. Click the Virtual Machines tab.
2. If the virtual machine you want to migrate is not visible in the list, perform a search (see Chapter 9,
Locating Resources).
3. Select the virtual machine.
4. Click the Migrate button.
Figure 6.37. Migrate Virtual Machine
5. T he Migrate Virtual Machine dialog displays.
Figure 6.38. Migrate Virtual Machine
6. Select from Select Host Autom atically or select a destination from the Select
Destination Host list. If you selected Select Destination Host, only active hosts within
the cluster display in the list.
7. Click OK to close the dialog box.
133
Red Hat Enterprise Virtualization for Servers 2.2 Administration Guide
T he virtual machine is migrated to another host in the cluster. Shortly after, the Host column displays
the new host to which the virtual machine has migrated.
6.6.5. Moving Virtual Machines within a Data Center
A virtual machine can be moved to a different Storage Domain within the data center. T he Data Center
requires an additional active data domain in the data center.
T o move a virtual machine to another storage domain:
1. Click the Virtual Machines tab.
2. If the virtual machine you want to migrate is not visible in the list, perform a search (see Chapter 9,
Locating Resources).
3. Select the virtual machine.
4. Shut down the virtual machine.
5. Click the Move button.
6. T he Move Virtual Machine dialog displays. Select from the list of available Storage
Dom ains.
7. Click Close.
T he virtual machine is moved to the different storage domain.
6.6.6. Removing Virtual Machines
Virtual Machines no longer in use can be removed.
Warning
Removing a virtual machine is final and cannot be reversed.
T o remove a virtual machine:
1. Click the Virtual Machine tab.
2. If the virtual machine you want to remove is not visible in the list, perform a search (see Chapter 9,
Locating Resources).
3. Select the virtual machine.
4. Shutdown the virtual machine. T he Rem ove button is only enabled for a virtual machine that has a
status of Down.
5. Click the Rem ove button.
A confirmation message is displays. Click OK.
6. T he virtual machine is removed from the platform and no longer displays on the Virtual
Machines tab.
6.7. Using Virtual Machine Snapshots
A snapshot is a view of a virtual machine's operating system and all its applications at a given point in
time. T he snapshot is a very important tool in managing virtual machines. Whenever the virtual machine
is powered off, you can create a snapshot of a virtual machine's hard drive. If future changes cause a
problem, you can restore the virtual machine to the previous state of any of the snapshots. Restoration
to a snapshot means that you return to the point in time when the snapshot was created. After you
134
Chapter 6. Managing Virtual Resources
restore to that point of time, you cannot return to snapshots created after that time.
For example, given that snapshots were created on Sunday at 8 am, 10 am, 12 pm, and at 3 pm. At 6 pm,
a problem arises on your virtual machine, and you decide to restore the virtual machine to the state of
the snapshot created at 10 am. T his restore automatically erases the snapshots created after 10 am,
meaning the snapshots of 12 pm and 3 pm no longer exist. However, the snapshots taken before the
restoration, in this case at 8 am, still exist.
Warning
When a restoration is performed from a snapshot, all data written to the virtual machine’s hard
drive after the selected snapshot creation point is lost, including subsequent snapshots.
6.7.1. Creating Snapshots of Virtual Machines
T his section describes how to create a snapshot of a virtual machine. You can also Preview, Com m it,
Undo and Delete the snapshot.
T o create a snapshot of a virtual machine:
1. Click the Virtual Machines tab.
2. If the virtual machine for which you want to create a Snapshot is not displayed, perform a search
(see Chapter 9, Locating Resources).
3. Select the virtual machine. Ensure that the virtual machine is powered down and has a status of
Down. On the Details pane, select the Snapshots tab.
Figure 6.39. T he Snapshots tab
4. Click the Snapshots sub-tab, and click the Create button.
135
Red Hat Enterprise Virtualization for Servers 2.2 Administration Guide
Figure 6.4 0. T he Virtual Machines list with Snapshots tab
T he Create Snapshot dialog displays.
Figure 6.4 1. New Snapshot Dialog
5. Enter a description for the snapshot, select all the virtual disks attached to the virtual machine and
click OK.
Figure 6.4 2. New Snapshot Dialog
T he virtual machine's operating system and applications are stored in a snapshot that can be
previewed or restored. T he Status of the virtual machine briefly changes to Image Locked, before
returning to Down.
136
Chapter 6. Managing Virtual Resources
6.7.2. Restoring Virtual Machines from Snapshots
T his section describes how to restore a virtual machine from a snapshot.
T o use a snapshot to restore a virtual machine:
1. Click the Virtual Machines tab.
2. If the virtual machine you want to restore is not visible in the list, perform a search (see Chapter 9,
Locating Resources). Ensure that the virtual machine is powered down and has a status of Down.
3. Click the virtual machine. On the Details Pane, click the Snapshots tab. A list of snapshots
displays.
Figure 6.4 3. Snapshot List
4. Select the snapshot that you want to restore.
T he Snapshot Details display, and the Preview button is enabled.
5. Click Preview to preview the snapshot. T he Status of the virtual machine briefly changes to
Image Locked, before returning to Down.
6. At this point, you can start the virtual machine and it will run with a "hard" drive that is identical to
the snapshot point. After you have checked the snapshot do one of the following:
a. T o restore to this point:
Click Com m it.
T he virtual machine is restored to the state it was in at the time of the snapshot. Also, any
subsequent snapshots are erased.
Figure 6.4 4 . Snapshot List
b. Alternatively, click the Undo button.
137
Red Hat Enterprise Virtualization for Servers 2.2 Administration Guide
Figure 6.4 5. Snapshot List
T he snapshot is discarded.
6.7.3. Deleting Snapshots
T his section describes how to delete a snapshot. Snapshots occupy virtual disk space, and depending
on the installed applications can significantly reduce available disk space.
T o delete a snapshot:
1. Click the Virtual Machines tab.
2. If the virtual machine is not visible in the list, perform a search (see Chapter 9, Locating
Resources). Ensure that the virtual machine is powered down and has a status of Down.
3. Click the virtual machine. On the Details Pane, click the Snapshots tab. A list of snapshots
displays.
Figure 6.4 6. Snapshot List
4. Click Preview to preview the snapshot. T he Status of the virtual machine briefly changes to
Image Locked, before returning to Down.
5. At this point, you can start the virtual machine and it will run with a "hard" drive that is identical to
the snapshot point. After you have checked the snapshot, and are sure that you wish to delete it,
click the Delete button.
T he snapshot is deleted.
6.8. Exporting and Importing Virtual Resources
A virtual machine or a template can be imported or exported to a data center in a different Red Hat
Enterprise Virtualization system. Red Hat Enterprise Virtualization Manager allows you to import and
138
Chapter 6. Managing Virtual Resources
export virtual machines (and templates) stored in Open Virtual Machine Format (OVF). T his feature can
be used in multiple ways:
T o move virtual resources to a different installation of Red Hat Enterprise Virtualization.
T o move virtual resources to a different data center in the same installation of Red Hat Enterprise
Virtualization. T o do this, the original virtual resource must be deleted.
T o back up virtual resources.
T here are two methods of exporting and importing virtual resources:
Exporting or importing a one or more virtual machines or template.
Exporting and importing a domain of virtual machines and templates. Refer T o import an existing ISO
or Export storage domain:.
A virtual machine must be stopped before it can be moved across data centers. If the virtual machine
was created using a template, the template is not automatically exported, however the template must
exist in the destination domain for the virtual machine to work.
6.8.1. Overview of the Export-Import Process
T o export or import resources, an active Export domain must be attached to the data center. T he Export
domain can be thought of as a temporary storage area that contains one directory per virtual machine.
T he directory consists of all the OVF (Open Virtualization Format) files pertaining to the virtual machine.
T he Export domain enables you to add pre-configured virtual machines or domains to a Red Hat
Enterprise Virtualization Manager system. You can also import virtual machines from a different format,
for example, Xen, VMware or Windows virtual machines, using the V2V feature provided. V2V converts
virtual machines and places them in the export domain. For more information on V2V, refer Appendix A,
Importing virtual machines with virt-v2v.
Note
Only one Export domain can be active in the data center. T his means that the domain can be
attached to either the source data center or the destination data center.
T o perform an export-import of virtual resources:
Attach the Export domain to the source data center. See Section 4.3.3, “Attaching an Export Storage
Domain”
139
Red Hat Enterprise Virtualization for Servers 2.2 Administration Guide
Figure 6.4 7. Attach Export Domain
Export the virtual resource to the export domain.
Figure 6.4 8. Export the Virtual Resource
Detach the Export domain from the source data center. See Section 4.5.1, “Detaching Storage
Domains from a Data Center”
14 0
Chapter 6. Managing Virtual Resources
Figure 6.4 9. Detach Export Domain
Attach the Export domain to the destination Data center. See Section 4.3.3, “Attaching an Export
Storage Domain”
Figure 6.50. Attach the Export Domain
Import the virtual resource into the destination data center.
14 1
Red Hat Enterprise Virtualization for Servers 2.2 Administration Guide
Figure 6.51. Import the virtual resource
6.8.2. Exporting Virtual Machines
Exporting virtual resources across data centers requires some preparation, for example, an export
domain should exist, and be attached to the appropriate data center; the virtual machine must be shut
down, and the template requirements need to be considered as well. You will also need to consider
whether you want to export the virtual machine to the new data center and retain the original virtual
machine, or move it to the new data center, and remove it from the source data center. You will also need
to attach or detach the export domain as appropriate.
T o export individual virtual machines to the export domain:
1. Click the Virtual Machines tab.
2. If the virtual machine you want to export is not visible in the list, perform a search (see Chapter 9,
Locating Resources).
3. Select the virtual machine.
4. Shut down the virtual machine. Once the virtual machine is shut down, right click to display the
menu.
14 2
Chapter 6. Managing Virtual Resources
Figure 6.52. Export Button
5. Click the Export option.
Figure 6.53. Export Option
6. T he Export Virtual Machine dialog displays. Select from the list of available options as
appropriate, Force Override and Collapse Snapshots.
Select Force Override to override existing images of the virtual machine which may already
exist on the Export Domain.
Select Collapse Snapshots to create a single export file per disk. Select this option if you wish
to retain both the source and destination versions of the virtual machine.
14 3
Red Hat Enterprise Virtualization for Servers 2.2 Administration Guide
Figure 6.54 . Export Virtual Machine
7. Click OK.
T he export of the virtual machine begins, this can take some time. T he virtual machine displays in
the Virtual Machines list with a Locked Status. Use the Events tab to view the progress.
Figure 6.55. Export Virtual Machine
8. T he Events tab displays that the virtual machine has been exported.
Figure 6.56. T he VM Import T ab
9. T he virtual machine displays on the VM Im port tab of the Export domain.
14 4
Chapter 6. Managing Virtual Resources
Figure 6.57. Export Virtual Machine
10. You can repeat the procedure above to export each virtual machine that you need to migrate, so
that the Export domain has a number of virtual machines.
6.8.3. Importing Virtual Machines into the Destination Data Center
Once the virtual machine, or machines are available in the Export domain, you can import them into the
destination data center. If the destination data center is within the same installation of Red Hat
Enterprise Virtualization, delete the originals from the source data center after exporting them to the
Export domain.
T o Import the Virtual Machine into the Destination Data Center
1. Detach the Export domain from the source data center, and attach it to the destination data center.
Refer T o perform an export-import of virtual resources:
2. On the Storage tab, select the Export data domain. T he Details pane of the Export storage
domain displays.
3. On the Details pane, select the VM Im port tab. Select the virtual machine th that is to be
imported.
Figure 6.58. Import Virtual Machine
T he Im port and Delete buttons are enabled on the VM Im port tab.
4. T he Im port Virtual Machine dialog displays. T he names of the available virtual machines
display.
14 5
Red Hat Enterprise Virtualization for Servers 2.2 Administration Guide
Figure 6.59. Import Virtual Machine
5. Select the name of the virtual machine, and select the Destination Cluster and
Destination Storage of the destination data center.
If you have not deleted the original virtual machine in the source data center, select Collapse
Snapshots. Click OK.
6. T he virtual machine is imported into the destination data center. T his can take some time.
Eventually, the virtual machine displays in the Virtual Machines tab on the Details pane of the
Storage domain belonging to the destination data center.
Figure 6.60. Import Virtual Machine
7. You can now run the virtual machine. Provided the template exists, or if it was created with a blank
template, the virtual machine powers up and start running.
6.9. Backing Up Virtual Resources
Virtual Machines and T emplates may need to be backed up from time to time, for example, before
undertaking maintenance of hosts or storage servers. T o back up virtual machines and templates, use
the Export domain and procedures as described in Section 6.8, “Exporting and Importing Virtual
Resources”.
14 6
Chapter 6. Managing Virtual Resources
6.10. Removing Virtual Machines
Virtual Machines no longer in use can be removed. Virtual machines that are being moved to a different
data center in the same Red Hat Enterprise Virtualization system must be deleted from the source data
center before they can be imported into the destination data center.
Warning
Removing a virtual machine is final and cannot be reversed.
T o remove a virtual machine:
1. Click the Virtual Machine tab.
2. If the virtual machine you want to remove is not visible in the list, perform a search (see Chapter 9,
Locating Resources).
3. Select the virtual machine.
4. Shutdown the virtual machine. T he Rem ove button is only enabled for a virtual machine that has a
status of Down.
5. Click the Rem ove button.
A confirmation message is displays. Click OK.
6. T he virtual machine is removed from the platform and no longer displays on the Virtual
Machines tab.
14 7
Red Hat Enterprise Virtualization for Servers 2.2 Administration Guide
Chapter 7. Using Templates
T emplates are model virtual machines that are used as a convenient and efficient way to create new
virtual machines of the same type and content. T emplates provide a shortcut that reduces the time
required to build virtual machines. A template can contain an operating system only, or can contain all
applications required by a particular department. T emplate details can be edited, and a template can be
deleted if no virtual machines were built from it. T emplates can also be exported and imported across
data centers.
7.1. Creating Templates from Existing Virtual Machines
A template can be created from an existing virtual machine that has been configured to meet the needs
of several individuals in the organization, and has been sealed with Sysprep (Windows machines only)
or a similar tool.
When selecting an existing virtual machine as the source for a template, ensure that the virtual machine
is general enough for this purpose. A virtual machine that is too specific to a particular user or group
may require a lot of changes, and is therefore not practical to use as a template.
T o create a template from an existing virtual machine:
1. Click the Virtual Machines tab.
T he Virtual Machines tab displays a list of all virtual machines in the system.
2. Select the virtual machine that you want to use as a basis for the template definition. Ensure that
the virtual machine is powered down and has a status of Down.
Figure 7.1. Select Virtual Machine
Note:
T ake a snapshot of the Virtual Machine at this stage if you wish to use the virtual machine
(as a virtual machine) after it is used to create a template.
3. Click Make T em plate.
T he New Virtual Machine T em plate displays, with the details of the selected Virtual
Machine.
14 8
Chapter 7. Using Templates
Figure 7.2. New T emplate from Virtual Machine Dialog
4. Enter, accept or change the following information. Name and Description are typically the only
fields in which new information is to be entered. T he rest of the fields are taken directly from the
existing virtual machine.
a. Nam e: Name of the new template.
b. Description: Description of the new template.
c. Host Cluster: T he Host Cluster for the virtual machines using this T emplate.
5. Click OK. T he virtual machine displays a status of "Image Locked" while the template is being
created. T he template is created and added to the T em plates tab. T he template displays the
"Image Locked" status icon, while the template is being created. T his may take a few seconds, or
a minute or two. During this time, the action buttons for the template remain disabled. Once
created, the action buttons are enabled and the template is ready for use. For example, the newly
created template displays in the list of templates in the T emplate field on the New Virtual
Machine dialog.
14 9
Red Hat Enterprise Virtualization for Servers 2.2 Administration Guide
Figure 7.3. New T emplate in List of T emplates
Note
Before a Windows template is ready for application, you must first run sysprep (or a similar tool)
to generalize the Virtual Machine and remove "specific" personalization. In general, templates of
Linux virtual machines do not require sealing.
7.1.1. Sealing a Windows Template with Sysprep
T emplates that have been created for Windows virtual machines must be generalised before use, by
means of a tool such as sysprep. T his section describes how to use sysprep to seal a template before
use. T his ensures that personalizations, such as user security settings are not propagated through the
template.
Important
Do not reboot the virtual machine during this process.
1. Download sysprep to the virtual machine to be created as a template.
T his example uses Windows XP. However, please use the appropriate sysprep utility for the
desktop OS.
T he Windows XP Sysprep tool is available at: WindowsXP-KB838080-SP2-DeployT oolsENU.cab
2. Create a new folder c:\sysprep.
3. Open the WindowsXP-KB838080-SP2-DeployT ools-ENU.cab file and put its contents in
c:\sysprep.
150
Chapter 7. Using Templates
4. Execute sysprep.exe from within the folder. Click OK on the welcome message.
5. T he sysprep tool displays.
Select the following checkboxes:
Don't reset grace period for activation
Use Mini-Setup
Ensure that the Shutdown mode is set to Shut down before clicking Reseal
6. Acknowledge the pop-up window. T he virtual desktop will go through the sealing process and then
shut down automatically.
T he Windows virtual machine has now been sealed, and can be used as a template for Windows virtual
machines.
T o set up local variables for sysprep, see Section 13.1.3, “Setting Local Variables for Sys prep”.
7.2. Editing Templates
You can edit the details of a template, such as its name, description, or memory size. You can also
change the host cluster to which the resulting Virtual Machine belongs.
T he Results list displays the Creation Date and Derived VMs fields indicating when the template
was created and the number of virtual machines that are using a template.
T o edit template details:
1. Click the T em plates tab.
T he T em plates tab displays.
2. If the template you want to edit is not visible on the list, perform a search (see Chapter 9, Locating
Resources).
3. Select the template.
4. Click the Edit button.
5. T he Edit T em plate dialog opens. T his dialog is essentially the same as the Create New
Virtual Machine dialog.
Figure 7.4 . Edit T emplate Dialog
151
Red Hat Enterprise Virtualization for Servers 2.2 Administration Guide
6. Edit details, as required. Refer Section 6.2.2, “Creating New Virtual Machines without a T emplate”.
7. Click OK.
T he details of the template are updated in the T em plates tab.
Note
For a complete description of the fields, see T able 6.1, “New Virtual Machine Dialog Fields”
7.3. Copying Templates to a Different Storage Domain
You can copy a template to a new Storage domain. T his will result in the identical template being
available in a different Storage domain.
Note:
You cannot have two copies of the same template in the same Storage domain.
T o copy a template:
1. Click the T em plates tab.
T he T em plates tab displays.
2. If the template you want to copy is not visible on the list, perform a search (see Chapter 9,
Locating Resources).
3. Select the template.
4. Click the Copy button.
5. T he Copy T em plate dialog displays.
6. Select the Storage Dom ain that you wish to copy the template to.
7. Click OK.
T he details of the template are copied to the new Storage Domain. T he copy of the template
displays the new storage domain in the Dom ain column of the T emplates tab.
7.4. Deleting Templates
Disk space can be conserved by deleting unused templates. T emplates that have been used to build
virtual machines cannot be deleted unless all virtual machines created from the particular template are
first removed.
T o delete a template:
1. Click the T em plates tab.
2. If the template you want to delete is not visible on the list, perform a search (see Chapter 9,
Locating Resources).
3. Select the template.
4. Click the Rem ove button.
152
Chapter 7. Using Templates
A confirmation message displays.
5. Click OK.
T he template is deleted, and removed from the T em plates tab.
7.5. Exporting and Importing Templates
Like a virtual machine, a template can be imported or exported to a different Red Hat Enterprise
Virtualization Manager system. Exporting templates allows you to distribute templates of virtual machines
to users, including users who cannot directly access and use the templates in a specific installation of
Red Hat Enterprise Virtulaization Manager system.
Note
Only one export domain can be active in the data center. T his means that the domain can be
attached to either the source data center or the destination data center.
If a virtual machine was created using a template, the template is not automatically exported, because
the template must exist in the destination domain for the virtual machine to work, the template must also
be exported to the destination data center.
T here are two methods of exporting and importing virtual templates:
Exporting or Importing a one or more templates.
Exporting and Importing a Domain of virtual machines and templates. Refer T o import an existing ISO
or Export storage domain:.
7.5.1. Exporting Templates
Exporting templates to a different installation of Red Hat Enterprise Manager requires some preparation,
for example, an export domain should exist, and be attached to the appropriate data center; any virtual
machines using the templates must be shut down. You will also need to attach or detach the export
domain as appropriate. Refer T o perform an export-import of virtual resources:
T o export individual templates to the export domain:
1. Click the T em plates tab.
2. If the template you want to export is not visible in the list, perform a search to display the template
on the results list.(see Chapter 9, Locating Resources).
Figure 7.5. T he T emplates T ab
153
Red Hat Enterprise Virtualization for Servers 2.2 Administration Guide
3. Ensure that no virtual machines are using the template. Select the template and click Export.
4. T he Export T em plate dialog displays.
Figure 7.6. Export T emplate
5. Click OK.
T he export of the template begins, this can take some time. Use the Events tab to view the
progress. Finally, the template displays in the Virtual Machines list with a Locked Status.
6. On the Storage tab, select the Export data domain. T he Details pane of the Export storage
domain displays. T he successfully exported template displays on the T em plate Im port tab of
the Export domain.
Figure 7.7. T emplate Import
7. You can repeat the procedure above to export each template that you need to migrate, so that the
export domain has a number of templates before you start the import process.
154
Chapter 7. Using Templates
7.5.2. Importing the Templates
Once the templates are available in the export domain, they can be imported into a data center on the
destination setup.
T o Import the T emplate into the Destination Data Center
1. Detach the Export domain from the source data center, and attach it to the destination data center.
Refer T o perform an export-import of virtual resources:
2. On the Storage tab, select the Export data domain. T he Details pane of the Export storage
domain displays.
3. On the Details pane, select the T em plate Im port tab. Select the template that is to be
imported.
Figure 7.8. Import T emplate
T he Im port and Delete buttons are enabled on the T em plate Im port tab.
4. Click Im port. T he Im port T em plate dialog displays. T he names of the available templates
display.
Figure 7.9. Import T emplates
5. Select the name of the template, and select the Destination Cluster and Destination
Storage of the destination data center.
155
Red Hat Enterprise Virtualization for Servers 2.2 Administration Guide
Click OK.
6. A message displays:
Figure 7.10. Import T emplates
You can click Close to close the message box, and check the progress in the Events tab. T he
template is imported into the destination data center. T his can take some time.
7. Eventually, the template displays in the T em plate tab on the Details pane of the Storage domain
belonging to the destination data center. It also displays on the T em plates tab with its changed
cluster information indicating it's new location.
Figure 7.11. Imported T emplate
8. You can now use the template to create new virtual machines, or run existing imported virtual
machines that are based on the template.
7.6. Backing Up Templates
Virtual Machines and T emplates may need to be backed up from time to time, for example, before
undertaking maintenance of hosts or storage servers. T o back up virtual templates, use the Export
domain and export procedures as described in Section 7.5, “Exporting and Importing T emplates”.
156
Chapter 8. Managing Users
Chapter 8. Managing Users
T his section describes how to set up user roles, and manage users on the Red Hat Enterprise
Virtualization platform. Red Hat Enterprise Virtualization manager accesses user information from the
organization's Directory Service (Active Directory). T he system administrator needs to maintain user
access. For example, absent users might need to be logged off, or administrative privileges can be
assigned to specific users. When users leave the organization, access to their desktops should be
removed, and their user accounts should be removed from Red Hat Enterprise Virtualization platform.
Note
Users are not created in Red Hat Enterprise Virtualization platform, but in the Active Directory
domain. Red Hat Enterprise Virtualization Manager can be configured to use multiple Active
Directory domains.
When a user is attached to a desktop or is assigned a role, the user is automatically added to the Red
Hat Enterprise Virtualization platform. A user can be granted permission to log into a desktop;
alternatively, this permission may be removed. In addition, users may be granted the roles of SuperUser,
RHEVMUser, RHEVMPower User and RHEVMVDIUser.
8.1. Managing Roles
Roles are predefined sets of privileges that can be configured from Red Hat Enterprise Virtualization
Manager, permitting access and management to different levels of resources in the datacenter.
Note
T he default roles of SuperUser, RHEVMUser, RHEVMPowerUser and RHEVMVDIUser cannot be
removed from the platform, or privileges cannot be modified, however the name and descriptions
can be changed.
T able 8.1. Red Hat Enterprise Virtualization Default Roles
Role
Privileges
Notes
SuperUser
Full access to all resources and
users.
Can add, remove, and set
access privileges for all the
users and groups, for all
physical and virtual resources in
the datacenter.
RHEVMUser
Read only privileges
View resource state and details.
View all the resource tabs.
RHEVMPowerUser
A set of limited privileges to
allow the user to work with
virtual machines, hosts, pools
and snapshots.
Access to Active Directory, and
management of event
notifications.
RHEVMVDIUser
Access to Virtual Machines and
Pools.
Level of privileges allow the user
to work with virtual machines
and pools, not administer them.
157
Red Hat Enterprise Virtualization for Servers 2.2 Administration Guide
8.1.1. Configuring User Roles
In addition to the default roles, you can set up custom roles that permit actions on objects, such as
virtual machines, hosts and clusters. T he roles can create a granularity of permissions to suit the needs
of a group or set of users. At this time, permissions are set at the object level, for example, a permission
can be set for an action on all virtual machines, not for a particular set of virtual machines.
T o configure Roles:
1. On the Red Hat Enterprise Virtualization Manager menu, click Configure. T he Configure
dialog displays. T he dialog includes a list of default roles, and any custom roles that exist on the
platform.
Figure 8.1. T he Configure Dialog
2. You can create a New role, Edit or Rem ove an existing role. In each case the appropriate dialog
displays. For example, the Edit Role dialog displays if the Edit is clicked.
Figure 8.2. T he Edit Role Dialog
3. Use the Expand Collapse buttons to view more or fewer of the permissions for the listed
objects.
4. For each of the objects, select or deselect the actions you wish to permit/deny for the role you are
158
Chapter 8. Managing Users
setting up.
5. Click Close to apply the changes you have made.
T he following table details the permitted actions for each object in the datacenter that a user may have
access to.
159
Red Hat Enterprise Virtualization for Servers 2.2 Administration Guide
T able 8.2. Permissions Actions on Objects
Object
Action
Virtual Machine (VM)
Add Disk to VM
Add NIC to VM
Attach Group to VM
Attach T ag to VM
Attach User to VM
Change CD
Create Snapshot
Detach Group from VM
Detach T ag from VM
Detach User from VM
Edit VM Disk properties
Edit VM Interface properties
Edit VM properties
Hibernate VMs
Merge Snapshots
Migrate VMs
Migrate VM to a specific Host
Move VM image to a different Storage Domain
New VM
New VM from Blank T emplate
Preview Snapshot
Remove Disks from VM
Remove NIC from VM
Remove NIC from VM
Remove VM
Revert to Snapshot
Run VM
Run VM once
Shutdown VM
Stop VM
Host
Activate Host
Add NICs Bond
Approve Host
Bind physical NIC to Logical network
Commit Netwrok changes
Edit Host properties
Fence Host Manually
Move Host to Maintenance Mode
New Host
Remove Host
Remove NICs Bond
160
Chapter 8. Managing Users
Restart Host
Start Host
Stop Host
Unbind physical NIC from Logical Network
VM T emplate
Add NIC to template
Copy VM T emplate to a different Storage Domain
Edit VM T emplate Interface properties
New VM T emplate
Remove NIC from VM T emplate
Remove VM T emplate
VM Pool
Attach Group to T ime Leased Pool
Attach Group to Pool
Attach User to specific VM from VM Pool
Attach User to T ime Lease Pool
Attach User to VM Pool
Detach Group from T ime Leased Pool
Detach Group from VM Pool
Detach User from T ime Leased VM Pool
Detach User from specific VM from VM Pool
Detach User from VM Pool
Edit VM Pool properties
New VM Pool
Remove VM Pool
Run VM from VM Pool(User Portal)
Active Directory Users and Groups
Login as Administrator
Remove Group
Remove User
Multi-Level Administration
Assign Role to User or Group
Attach Action to Role
Detach Action to Role
Detach Role from user or group
Edit Role Properties
New Role
Remove Role
Cluster
Attach Logical Network to Cluster
Detach Logical Network from Cluster
Edit Cluster properties
Edit Logical Network properties
New Cluster
New Logical Network
Remove Cluster
Remove Logical Network
Set Logical Network for Display Protocol
Storage
Activate Storage Domain
161
Red Hat Enterprise Virtualization for Servers 2.2 Administration Guide
Attach Storage Domain
Destroy Storage Domain
Detach Storage Domain
Edit Data Center properties
Edit SAN Storage Domain configuration
Edit Storage Domain properties
Initialize Datacenter
Move Storage Domain to Maintenance Mode
New Data Center
New NFS Storage Domain
New SAN Storage Domain
Reinitialize Datacenter
Remove Datacenter
Remove Storage Domain
Remove Volume Group
Event Notification
Add Event Subscription
Remove Event Subscription
Import/Export
Export template
Export VM
Import T emplate
Import VM
Remove T emplate from Export Domain
Remove VM from Export Domain
8.1.2. Assigning User Roles
Use the Roles tab on the Users Details pane, to assign privileges based on existing default and
custom roles. User are not created from within the platform, Red Hat Enterprise Virtualization manager
accesses user information from the organization's Directory Service (Active Directory).
Note
Login to the system is verified against the Active Directory records of the organization.
T o add or remove a role:
1. Click the Users tab. T he list of authorised users for Red Hat Enterprise Virtualization for
Desktops platform displays.
162
Chapter 8. Managing Users
Figure 8.3. Users T ab
2. Select the user, or perform a search if the user is not visible on the results list.
3. T he Details pane displays for the selected user. Select the Roles tab. T he Roles tab displays
the existing roles assigned to the user, and the Add and Rem ove role buttons.
Figure 8.4 . T he Users Role T ab
4. T o add a role to the user, click the Add button. T he Add Role dialog displays.
Figure 8.5. T he Users Details Pane
5. Select from the default or custom roles displayed.
6. Click OK. T he assigned role displays on the Role tab for the user.
163
Red Hat Enterprise Virtualization for Servers 2.2 Administration Guide
Figure 8.6. T he Users Roles List
T o remove an assigned role, click the Rem ove button after selecting the user. T he role is removed
without confirmation.
8.2. Adding Users and Groups
Existing users can be added to Red Hat Enterprise Virtualization platform before being assigned roles,
or alloted desktops.
Adding Users
1. Click the Users tab. T he list of authorised users for Red Hat Enterprise Virtualization for
Desktops platform displays.
Figure 8.7. Users T ab
2. Click Add. T he Add Users and Groups dialog displays.
164
Chapter 8. Managing Users
Figure 8.8. Add Users and Groups Dialog Box
3. T he default Search domain displays. If there are more than one search domains, select the
appropriate search domain. You can enter a name or part of a name in the search text field, and
click GO. Or you can click GO to view a list of all users and groups.
4. Select the user or users or group check box, and select the role from the list. T he list displays the
default user roles, SuperUser, RHEVMUser or RHEVMPowerUser or .RHEVMVDIUser. If there
are any custom roles, the custom roles will also display.
5. Click OK. T he added user displays on the Users tab.
8.3. Managing User Access
T he Users Details pane displays information on the status and privileges of users, enabling the system
administrator to assign or change roles, allot virtual machines, set up event notifications and allocate
Active Directory groups.
8.3.1. Viewing General Information
Use the General tab on the Users Details pane, to view information on a selected user.
T o view general user information:
1. Click the Users tab. T he list of authorised users for Red Hat Enterprise Virtualization for
Desktops platform displays.
165
Red Hat Enterprise Virtualization for Servers 2.2 Administration Guide
Figure 8.9. Users T ab
2. Select the user, or perform a search if the user is not visible on the results list.
3. T he Details pane displays for the selected user, usually with the General tab dsiplaying general
information, such as the domain name, email and status of the user.
Figure 8.10. T he Users Details Pane
4. T he other tabs allow you to view and manage groups, roles, virtual machines and event
management for the user.
For example, to view the groups to which the user belongs, click the AD tab. T he AD Groups pane
displays a list of the groups to which the user belongs.
8.3.2. Managing a User's Virtual Machines
T he system administrator can quickly view, allocate and remove desktops allocated or in use by a
selected user. A desktop can only be used by one user at a time.
T o allocate or detach desktops from a user or group:
1. Click the Users tab. T he list of authorised users for Red Hat Enterprise Virtualization for
Desktops platform displays.
2. Select the user, or perform a search if the user is not visible on the results list.
3. T he Details pane displays for the selected user.
Figure 8.11. T he Users Details Pane
166
Chapter 8. Managing Users
4. Click the Virtual Machines tab. T he Virtual Machines tab displays.
Figure 8.12. T he Virtual Machines Pane
5. Click the Add button. T he Add Desktops to User/AD Group dialog displays. You can enter a
name or part of a name in the search text field, and click GO. Or you can click GO to view a list of all
virtual machines.
Figure 8.13. T he Add Desktops Dialog
6. Select from one or more desktops.
Note
Only desktops that are not currently assigned to a user display in the list.
7. Click OK. T he assigned virtual machine displays on the Virtual Machines tab for the user.
A desktop may be detached from a user or a group, when they no longer need to log in to this desktop.
After detachment, the virtual machine is available to be assigned to another user.
T o detach a desktop from a user/user group:
1. In the Users tab, select the user or the user group.
2. On the Virtual Machines tab, select the virtual machines(s) to be removed.
3. Click the Rem ove button. A confirmation message displays.
167
Red Hat Enterprise Virtualization for Servers 2.2 Administration Guide
Figure 8.14 . T he Detach Virtual Machine Message
4. Click OK. T he desktop(s) are detached from the user/user Group.
8.3.3. Managing Event Notifiers
T his section describes how to set up and manage event notifications for users. Events are displayed on
the Events tab, however, users can be notified by email about selected events. For example, a system
administrator might like to know when there is a problem with storage, or a team lead may want to be
modified if virtual machines shut down.
T o set up event notifications:
1. Click the Users tab. T he list of authorised users for Red Hat Enterprise Virtualization for
Desktops platform displays.
2. Select the user, or perform a search if the user is not visible on the results list.
3. T he Details pane displays for the selected user.
Figure 8.15. T he Users Details Pane
4. Click the Event Notifier tab. T he Event Notifier tab displays a list of events for which
the user will be notified, if any.
168
Chapter 8. Managing Users
Figure 8.16. T he Event Notifier Pane
5. Click the Manage Events button. T he Add Event Notification dialog displays a list of
events, for Hosts, Storage, Virtual Machines and General Management events. You can select all,
or pick individual events from the list. Click the Expand button to see complete lists of events.
Figure 8.17. T he Add Events Dialog
6. Click OK. T he selected events display on the Event Notifier tab for the user.
T o cancel event notification:
1. In the Users tab, select the user or the user group.
2. Select the Event Notifier tab. T he details pane displays the events for which the user will
receive notifications.
3. Click the Manage Events button. T he Add Event Notification dialog displays a list of
events, for Hosts, Storage, Virtual Machines and General Management events. T o remove an
event notification, deselect events from the list. Click the Expand button to see the complete lists
of events.
4. Click OK. T he deselected events are removed from the display on the Event Notifier tab for
the user.
8.4. Removing Users
A system administrator will need to remove users, for example, when they leave the company.
169
Red Hat Enterprise Virtualization for Servers 2.2 Administration Guide
Note
A user can only be removed, if all virtual machines have been detached from the user.
T o remove a user:
1. Click the Users tab. T he list of authorised users for Red Hat Enterprise Virtualization for
Desktops platform displays.
Figure 8.18. Users T ab
2. Select the user to be removed.
3. Click the Virtual Machines tab in the Details pane. If the user is running any virtual machines,
remove the virtual machines from the user by clicking the Rem ove button on the Virtual Machines
tab. See T o detach a desktop from a user/user group:.
4. Click the Rem ove button. A message displays prompting you to confirm the removal. Click OK.
5. T he user is removed from Red Hat Enterprise Virtualization for Desktops
Note
All user information is read from the Microsoft Active Directory. Removing a user from the Red Hat
Enterprise Virtualization for Desktops system deletes the record in the Red Hat Enterprise
Virtualization for Desktops database, denying the user the ability to log on to the desktop. It
removes the association in the Active Directory between the desktop and the user. All other user
properties remain intact.
170
Chapter 9. Locating Resources
Chapter 9. Locating Resources
T he Red Hat Enterprise Virtualization for Servers environment is designed to enable the management of
thousands of resources, such as virtual machines, hosts, users, and more. When managing the virtual
desktop environment, it is recommended that large lists of resources, such as virtual machines, are
reduced to a manageable number (for example, 10). T his allows tasks to be performed on the smaller
list, or to select specific items on the list on which to perform a given task.
T o perform a search, enter the search query (free-text or syntax-based) in the Search Bar at the top of
the Red Hat Enterprise Virtualization for Servers screen. Search queries can be saved as a Favorite for
future reuse (Section 9.3, “Saving and Accessing Queries as Bookmarks”), which eliminates the need to
re-enter a search query each time the specific search results are needed.
9.1. Using the Search Syntax
T he syntax of the search queries for the various Red Hat Enterprise Virtualization for Servers resources
is as follows:
result-type: {criteria} [sortby sort_spec]
Each part of the query syntax is explained further below.
See Section 9.1.1, “Query Construction and Auto-Completion” to understand how Red Hat Enterprise
Virtualization for Servers assists with building search queries.
Syntax Examples
T he following examples describe how the search query is used.
Example
Result
Hosts: Vms.status = up
Displays a list of all hosts running virtual
machines that are up.
Vms: domain = qa.company.com
Displays a list of all virtual machines running on
the specified domain.
Vms: users.name = mary
Displays a list of all virtual machines belonging to
users with the username Mary.
Events: severity > normal sortby time
Displays the list of all Events whose severity is
higher than Normal, sorted by time.
9.1.1. Query Construction and Auto-Completion
Red Hat Enterprise Virtualization for Servers has its own syntax for creating search queries.
As you type each part of a search query, a drop-down list of choices for the next part of the search
opens below the Search Bar. You can either select from the list and then continue typing/selecting the
next part of the search, or ignore the options and continue entering your query manually.
For example, the following table specifies how Red Hat Enterprise Virtualization for Servers autocompletion assists in constructing a query:
Hosts: Vm s.status = down
Input
List Items Displayed
Action
h
Hosts (1 option only)
Select Hosts or;
171
Red Hat Enterprise Virtualization for Servers 2.2 Administration Guide
T ype Hosts
Hosts:
All host properties
T ype v
Hosts: v
host properties starting with a v
Select Vm s or type Vm s
Hosts: Vm s
All virtual machine properties
T ype s
Hosts: Vm s.s
All virtual machine properties
beginning with s
Select status or type status
Hosts: Vm s.status
=
Select or type =
=!
Hosts: Vm s.status =
All status values
Select or type down
Example
T he following items are listed by the auto-completion functionality when constructing a host search
query:
Figure 9.1. Query Construction
9.1.2. Result-Type Options
T he Result-type is a Red Hat Enterprise Virtualization for Servers resource. You can search for
resources of any of the following types:
Vm s for a list of virtual machines
Host for a list of hosts
Pools for a list of pools
T em plate for a list of templates
Event for a list of events
Users for a list of users
Cluster for a list of clusters
Datacenter for a list of data centers
Storage for a list of storage domains
As each type of resource has a unique set of properties and a set of other resource types that it is
associated with, each search type has a set of valid syntax combinations. T hese are specified in
Section 9.2, “Searching for Resources”.
9.1.3. Search Criteria
172
Chapter 9. Locating Resources
You can specify the search criteria after the colon in the query. T he syntax of {criteria} is as
follows:
<prop> <operator> <value>
or
<obj-type> <prop> <operator> <value>
Examples
T he following table describes the parts of the syntax:
Part
Description
Values
Example
Note
prop
T he property of
the searched-for
resource. Can
also be the
property of an
resource type
(see obj-type),
or tag (custom
tag).
See the table for
each of the search
types in
Section 9.1.3.1,
“Wildcards”
Status
--
obj-type
An resource type
that can be
associated with
the searched-for
resource.
See the table for
each of the search
types in
Section 9.1.3.1,
“Wildcards”
Users
--
operator
Comparison
operators.
=
--
Value options
depend on objtype.
!= (not equal)
>
<
>=
<=
Value
What the
expression is
being compared
to.
String
Jones
Integer
256
Ranking
normal
Date (formatted
according to
Regional Settings)
Wildcards can
be used within
strings.
"" can be used
to represent
an uninitialized
(empty) string.
Double quotes
should be
used around a
string or date
containing
spaces
173
Red Hat Enterprise Virtualization for Servers 2.2 Administration Guide
9.1.3.1. Wildcards
Wildcards can be used in the <value> part of the syntax for strings. For example, to find all users
beginning with m, enter m * .
9.1.3.2. Multiple Criteria
You can perform a search having two criteria by using the Boolean operators AND and OR. For example:
Vm s: users.nam e = m * AND Vm s.status = Up
T his query returns all running virtual machines for users whose names begin with "m".
Vm s: users.nam e = m * AND Vm s.tag = "paris-loc"
T his query returns all virtual machines tagged with "paris-loc" for users whose names begin with "m".
When two criteria are specified without AND or OR, AND is implied. AND precedes OR, and OR precedes
implied AND.
9.1.4. Determining Sort Order
You can determine the sort order of the returned information by using sortby. Sort direction (ASC for
ascending, DESC for descending) can be included.
For example:
events: severity > norm al sortby tim e desc
T his query returns all Events whose severity is higher than Normal, sorted by time (descending order).
9.2. Searching for Resources
T his section specifies, for each resource, the resource’s unique set of properties as well as the set of
associated resource types.
9.2.1. Searching for Data Centers
T he following table describes all search options for Data Centers.
Property (of resource or
resource-type)
T ype
Description (Reference)
Clusters.clusters-prop
See property types in
Section 9.2.2, “Searching for
Clusters”
T he property of the clusters
associated with the datacenter.
name
String
T he name of the datacenter.
description
String
A description of the datacenter.
type
String
T he type of datacenter.
status
List
T he availability of the
datacenter.
sortby
List
Sorts the returned results by
one of the resource properties.
page
Integer
T he page number of results to
display
174
Chapter 9. Locating Resources
Example
Datacenter: type = nfs and status != up
returns a list of datacenters with:
A storage type of NFS and status other than up
9.2.2. Searching for Clusters
T he following table describes all search options for clusters.
Property (of resource or
resource-type)
T ype
Description (Reference)
Datacenter.datacenter-prop
See property types in
Section 9.2.1, “Searching for
Data Centers”
T he property of the data center
associated with the cluster.
Datacenter
String
T he data center to which the
cluster belongs.
name
String
T he unique name that identifies
the clusters on the network.
description
String
T he description of the cluster.
initialized
String
T rue or False indicating the
status of the cluster.
sortby
List
Sorts the returned results by
one of the resource properties.
page
Integer
T he page number of results to
display
Example
Clusters: initialized = true or nam e = Default
returns a list of clusters which are:
initialized; or
named Default
9.2.3. Searching for Hosts
T he following table describes all search options for hosts.
Property (of resource or
resource-type)
T ype
Description (Reference)
Vms.Vms-prop
See property types in
Section 9.2.5, “Searching for
Virtual Machines”
T he property of the Vms
associated with the host.
T emplates.templates-prop
See property types in
Section 9.2.7, “Searching for
T emplates”
T he property of the templates
associated with the host.
Events.events-prop
See property types in
Section 9.2.9, “Searching for
T he property of the Events
associated with the host.
175
Red Hat Enterprise Virtualization for Servers 2.2 Administration Guide
Events”
Users.users-prop
See property types in
Section 9.2.8, “Searching for
Users”
T he property of the Users
associated with the host.
name
String
T he name of the host.
status
List
T he availability of the host.
cluster
String
T he cluster to which the host
belongs.
address
String
T he unique name that identifies
the host on the network.
cpu_usage
Integer
T he percent of processing
power used.
mem_usage
Integer
T he percentage of memory
used.
network_usage
Integer
T he percentage of network
usage.
load
Integer
Jobs waiting to be executed in
the run-queue per processor, in
a given time slice.
version
Integer
T he version number of the
operating system.
cpus
Integer
T he number of CPUs on the
host.
memory
Integer
T he amount of memory
available.
cpu_speed
Integer
T he processing speed of the
CPU.
cpu_model
String
T he type of CPU.
active_vms
Integer
T he number of Vms currently
running.
migrating_vms
Integer
T he number of Vms currently
being migrated.
committed_mem
Integer
T he percentage of committed
memory.
tag
String
T he tag assigned to the host.
type
String
T he type of host.
datacenter
String
T he datacenter to which the
host belongs.
sortby
List
Sorts the returned results by
one of the resource properties.
page
Integer
T he page number of results to
display
Example
Host: cluster = Default and Vm s.os = windows7
returns a list of hosts which:
176
Chapter 9. Locating Resources
Are part of the Default cluster and host virtual machines running the Windows 7 operating system.
9.2.4. Searching for Storage
T he following table describes all search options for storage.
Property (of resource or
resource-type)
T ype
Description (Reference)
name
String
T he unique name that identifies
the storage on the network.
status
String
T he status of the storage
domain.
datacenter
String
T he data center to which the
storage belongs.
type
String
T he type of the storage.
size
Integer
T he size of the storage.
used
Integer
T he amount of the storage that
is used.
committed
Integer
T he amount of the storage that
is committed.
sortby
List
Sorts the returned results by
one of the resource properties.
page
Integer
T he page number of results to
display
Example
Storage: size > 200 or used < 50
returns a list of storage with:
total storage space greater than 200 GB; or
used storage space less than 50 GB.
9.2.5. Searching for Virtual Machines
T he following table describes all search options for virtual machines (Vms). Vms can be either virtual
servers or virtual desktops.
Property (of resource or
resource-type)
T ype
Description (Reference)
Hosts.hosts prop
See property types in
Section 9.2.3, “Searching for
Hosts”
T he property of the hosts
associated with the virtual
machine.
T emplates.templates-prop
Property types in the bottom
portion of this table as well as
custom tags
T he property of the templates
associated with the virtual
machine.
Events.events-prop
See property types in
Section 9.2.9, “Searching for
Events”
T he property of the events
associated with the virtual
machine.
Users.users-prop
See property types in
Section 9.2.8, “Searching for
T he property of the users
associated with the virtual
177
Red Hat Enterprise Virtualization for Servers 2.2 Administration Guide
Users”
machine.
name
String
T he name of the virtual machine.
status
List
T he availability of the virtual
machine.
ip
Integer
T he IP address of the virtual
machine.
uptime
Integer
T he number of minutes that the
virtual machine has been
running.
domain
String
T he domain (usually Active
Directory domain) that groups
these machines.
os
String
T he operating system on which
the virtual machine was created.
creationdate
Date
T he date on which the virtual
machine was created.
address
String
T he unique name that identifies
the virtual machine on the
network.
cpu_usage
Integer
T he percent of processing
power used.
mem_usage
Integer
T he percentage of memory
used.
network_usage
Integer
T he percentage of network
used.
memory
Integer
T he maximum memory defined.
apps
String
T he applications currently
installed on the virtual machine.
cluster
List
T he cluster to which the virtual
machine belongs.
pool
List
T he virtual machine pool to
which the virtual machine
belongs.
loggedinuser
String
T he name of the user currently
logged in to the virtual machine.
tag
List
T he tags to which the virtual
machine belongs.
datacenter
String
T he data center to which the
virtual machine belongs.
type
List
T he vitual machine type (server
or desktop).
sortby
List
Sorts the returned results by
one of the resource properties
page
Integer
T he page number of results to
display
Example
Vm s: tem plate.nam e = Win* and user.nam e = ""
178
Chapter 9. Locating Resources
Returns a list of VMs, where:
T he template on which the virtual machine is based begins with Win and the virtual machine is
assigned to any user.
Example
Vm s: cluster = Default and os = windowsxp
Returns a list of VMs, where:
T he cluster to which the virtual machine belongs is named Default and the virtual machine is running
the Windows XP operating system.
9.2.6. Searching for Pools
T he following table describes all search options for Pools.
Property (of resource or
resource-type)
T ype
Description (Reference)
name
String
T he name of the pool.
description
String
T he description of the pool.
type
String
T he type of pool.
sortby
List
Sorts the returned results by
one of the resource properties.
page
Integer
T he page number of results to
display
Example
Pools: type = autom atic
returns a list of pools with:
T ype of automatic
9.2.7. Searching for Templates
T he following table describes all search options for templates. Options are offered by Auto-Completion
when typing where appropriate.
Property (of resource or
resource-type)
T ype
Description (Reference)
Vms.Vms-prop
See property types in
Section 9.2.5, “Searching for
Virtual Machines”
T he property of the VMs
associated with the template.
Hosts.hosts-prop
See property types in
Section 9.2.3, “Searching for
Hosts”
T he property of the hosts
associated with the template.
Events.events-prop
See property types in
Section 9.2.9, “Searching for
Events”
T he property of the events
associated with the template.
Users.users-prop
See property types in
T he property of the users
179
Red Hat Enterprise Virtualization for Servers 2.2 Administration Guide
Section 9.2.8, “Searching for
Users”
associated with the template.
name
String
T he name of the template.
domain
String
T he domain of the template.
os
String
T he type of operating system.
creationdate
Integer
T he date on which the template
was created
Date format is mm/dd/yy
childcount
Integer
T he number of Vms created
from the template.
mem
Integer
Defined memory.
description
String
T he description of the template.
status
String
T he status of the template.
cluster
String
T he cluster associated with the
template.
datacenter
String
T he datacenter associated with
the template.
sortby
List
Sorts the returned results by
one of the resource properties.
page
Integer
T he page number of results to
display
Example
T em plate: Events.severity >= norm al and Vm s.uptim e > 0
Returns a list of templates, where:
Events of greater-than-normal severity have occurred on Vms derived from the template, and the
Vms are still running.
Figure 9.2. Sample T emplate Search
9.2.8. Searching for Users
T he following table describes all search options for users.
Property (of resource or
resource-type)
T ype
Description (Reference)
Vms.Vms-prop
See property types in
Section 9.2.5, “Searching for
Virtual Machines”
T he property of the VMs
associated with the user.
Hosts.hosts- prop
See property types in
T he property of the hosts
180
Chapter 9. Locating Resources
Section 9.2.3, “Searching for
Hosts”
associated with the user.
T emplates.templates-prop
See property types in
Section 9.2.7, “Searching for
T emplates”
T he property of the templates
associated with the user.
Events.events-prop
See property types in
Section 9.2.9, “Searching for
Events”
T he property of the events
associated with the user.
name
String
T he name of the user.
lastname
String
T he last name of the user.
usrname
String
T he unique name of the user.
department
String
T he department to which the
user belongs.
group
String
T he group to which the user
belongs.
title
String
T he title of the user.
status
String
T he status of the user.
role
String
T he role of the user.
tag
String
T he tag to which the user
belongs.
pool
String
T he pool to which the user
belongs.
sortby
List
Sorts the returned results by
one of the resource properties.
page
Integer
T he page number of results to
display
Example
Users: Events.severity > norm al and Vm s.status = up or Vm s.status = pause
Returns a list of users where:
Events of greater than normal severity have occurred on their Vms AND the Vms are still running; or
T he users’ VMs are paused.
9.2.9. Searching for Events
T he following table describes all search options you can use to search for events. Auto-completion is
offered for many options as appropriate.
Property (of resource or
resource-type)
T ype
Description (Reference)
Vms.Vms-prop
See property types in
Section 9.2.5, “Searching for
Virtual Machines”
T he property of the Vms
associated with the event.
Hosts.hosts-prop
See property types in
Section 9.2.3, “Searching for
Hosts”
T he property of the hosts
associated with the event.
T emplates.templates-prop
See property types in
T he property of the templates
181
Red Hat Enterprise Virtualization for Servers 2.2 Administration Guide
Section 9.2.7, “Searching for
T emplates”
associated with the event.
Users.users-prop
See property types in
Section 9.2.8, “Searching for
Users”
T he property of the users
associated with the event.
type
List
T ype of the event.
severity
List
T he severity of the Event:
Warning/Error/Normal
message
String
Description of the event type.
time
Integer
T ime at which the event
occurred.
usrname
usrname
T he username associated with
the event.
event_host
String
T he host associated with the
event.
event_vm
String
T he virtual machine associated
with the event.
event_template
String
T he template associated with
the event.
event_storage
String
T he storage associated with the
event.
event_datacenter
String
T he data center associated with
the event.
sortby
List
Sorts the returned results by
one of the resource properties.
page
Integer
T he page number of results to
display
Example
Events: Vm s.nam e = testdesktop and Hosts.nam e = gonzo.exam ple.com
Returns a list of events, where:
T he event occured on the virtual machine named testdesktop while it was running on the host
gonzo.example.com.
9.3. Saving and Accessing Queries as Bookmarks
Search queries can be saved as Bookmarks. T his allows you to sort and display Results lists with a
single click. You can save, edit and remove bookmarks uising the Bookmarks pane.
9.3.1. Creating Bookmarks
Bookmarks can be created for any type of available search, using a number of criteria.
T o save a query string as a bookmark:
1. In the Search Bar, enter the desired search query (see Section 9.1, “Using the Search Syntax”).
2. Click the Bookmark button to the right of the Search Bar.
182
Chapter 9. Locating Resources
Figure 9.3. Saving a Search as a Bookmark
T he New Bookm ark dialog displays. T he query displays in the Search String field. You can
edit it if required.
Figure 9.4 . Bookmark Dialog
3. In Nam e, specify a descriptive name for the search query.
4. Click OK to save the query as a bookmark.
5. T he search query is saved and displays in the Bookm arks pane.
9.3.2. Editing Bookmarks
Bookmarks can be edited for any type of available search, using an existing bookmark.
T o edit a bookmark:
1. Select a bookmark from the Bookm arks pane.
2. T he results list displays the items according to the criteria. Click the Edit button on the Bookmark
pane.
T he Edit Bookm ark dialog displays. T he query displays in the Search String field. Edit the
search string to your requirements.
183
Red Hat Enterprise Virtualization for Servers 2.2 Administration Guide
Figure 9.5. Editing a Bookmark
3. Change the Nam e and Search String as necessary.
4. Click OK to save the edited bookmark.
9.3.3. Deleting Bookmarks
Bookmarks can be deleted.
T o delete bookmark:
1. Select one or more bookmark from the Bookm arks pane.
2. T he results list displays the items according to the criteria. Click the Rem ove button on the
Bookm ark pane.
T he Rem ove Bookm ark dialog displays.
Figure 9.6. Remove a Bookmark
3. Click OK to remove the selected bookmarks.
184
Chapter 10. Monitoring Red Hat Enterprise Virtualization
Chapter 10. Monitoring Red Hat Enterprise Virtualization
After configuring and setting up the Red Hat Enterprise Virtualization platform, it is necessary to monitor
the management environment to ensure optimum performance. For example, viewing the number of
virtual machines currently running or the most recent alerts provides up-to-date information on the
performance and status the many components of the virtual environment. Red Hat Enterprise
Virtualization Manager now includes a data warehouse that collects monitoring data for hosts, virtual
machines and storage, allowing customers to analyze their environment and create reports using any
query tool that supports SQL.
Use the Events and Monitor tabs to view and assess the performance of the Red Hat Enterprise
Virtualization platform at any time. You can also set up email notification to keep track of events, alerts or
any other status issues.
In addition, you can generate textual and graphic reports that provide information on the system. T hese
reports can be shared with managers and others who do not necessarily have access to the
administration portal. Refer Chapter 11, Reporting from the History Database.
Viewing System Information
T he Events and Monitor tabs on Red Hat Enterprise Virtualization management provide a wealth of
information on the state of the system over the previous 24 hours:
Monitor tab displays instant information and statistics of the entire system, generates usage
graphs for Storage; the memory, CPU, and network of the hosts and virtual machines; and lists high
severity warnings.
Events tab lists all warnings, errors, and other events that occur in the system.
10.1. Using the Monitoring Tools
T he Monitor tab gives you an overall picture of the Red Hat Enterprise Virtualization platform
environment. It lists general information (such as the number of hosts and virtual machines currently
running), displays memory usage, CPU usage, and network usage, and lists the high severity events of
the last 24-hour period.
Figure 10.1. Monitor T ab
185
Red Hat Enterprise Virtualization for Servers 2.2 Administration Guide
T he System Monitor comprises:
Graphs of Storage, memory, CPU, and network usage of hosts and virtual machines in the system
Events and Alerts. Both events and alerts can be viewed using the lower panel, which can be resized
as required.
10.1.1. Monitoring Storage
T he Storage pane on the Monitor tab displays the usage graphs of the storage domains. T he usage
graphs for the storage domains display, with a different color for each domain. Move the cursor over the
graph of a storage domain to view the Available, Used and T otal capacity of the storage domain.
Figure 10.2. Monitor Storage
10.1.2. Monitoring Hosts
T he Hosts pane displays the Memory, CPU, and Network Usage graphs of the hosts. Move the cursor
over the graphs of a host to view the CPU, Memory and Network usage of the hosts.
Figure 10.3. Monitor Storage
10.1.3. Monitoring Virtual Machines
T he Virtual Machine pane displays the Memory, CPU, and Network Usage graphs of virtual machines.
Move the cursor over the graphs of a virtual machine to view the CPU, Memory and Network usage of
the virtual machines.
186
Chapter 10. Monitoring Red Hat Enterprise Virtualization
Figure 10.4 . Monitor Virtual Machines
You can also move the cursor over the virtual machine graphs, to view the name of the virtual machine.
Figure 10.5. Monitor Virtual Machines
10.1.4. Viewing the Event List
T he Event List displays all events that occur in the system. T he types of events that appear in the
Events tab are audits, warnings, and errors. In addition, the names of the user, host, virtual machine,
and/or template involved in the event are listed. T his makes it possible to determine the cause of the
event. T he list can be sorted by any of the column headers.
187
Red Hat Enterprise Virtualization for Servers 2.2 Administration Guide
Figure 10.6. Event List
In addition, High Severity Events display in the lower panel of the Monitor tab. Events can also be viewed
in the lowermost panel of both the Monitor and Events tab, by resizing the panel.
Figure 10.7. High Severity Events
T he following table describes the different columns of the Event List:
Column
Description
Event
T he type of event. T he possible event types are:
Audit notification(e.g. log on).
Warning notification.
Error notification.
T im e
T he time that the event occurred.
Message
T he message describing that an event occurred.
188
Chapter 10. Monitoring Red Hat Enterprise Virtualization
User
T he user that received the event.
Host
T he Host on which the event occurred.
Virtual Machine
T he virtual machine on which the event occurred.
T em plate
T he template of the virtual machine where the
event occurred.
10.1.5. Viewing Alert Information
T he Alerts pane lists all events with a severity of Error or Warning. T he system records all events, which
are listed as audits in the Alerts section. Like Events, Alerts can also be viewed in the lowermost panel
of both the Monitor and Events tab, by resizing the panel and clicking the Alert tab. T his tabbed panel
also appears in other tabs, such as the Hosts tab.
Figure 10.8. Alerts T ab
T he following table describes the alerts that can be listed in the Alerts section:
Symbol
Description
An audit of an event in the system.
A warning notification.
An error message.
You can sort the list according to the information in any column by clicking its column header.
189
Red Hat Enterprise Virtualization for Servers 2.2 Administration Guide
Figure 10.9. System Monitor – Alerts
190
Chapter 11. Reporting from the History D atabase
Chapter 11. Reporting from the History Database
Red Hat Enterprise Virtualization includes a comprehensive management history database, which can
be utilized by any reporting application to generate a range of reports at the data center, cluster and
host levels. T his section provides information to enable you to set up queries against the history
database and generate reports.
11.1. Overview
Red Hat Enterprise Virtualization Manager uses Microsoft SQL Server 2005 as a database platform
to store information about the state of the virtualization environment, its configuration and performance.
At install time, Red Hat Enterprise Virtualization Manager creates an SQL Server instance called RHEVM,
with the databases rhevm and rhevm_history. T he rhevm_history database contains configuration
information and statistical metrics which are collated over time from the rhevm operational database. T he
configuration data in the rhevm database is examined every minute, and changes are replicated to the
rhevm_history database. T racking the changes to the database provides information on the objects in
the database, enabling the user to analyze performance, enhance performance and resolve difficulties.
RHEVM History Service
T he replication of data in the rhevm_history database is performed by the RHEVM History
Service. T his service must be manually configured to start automatically in the service manager
before building reports.
Since the rhevm_history database schema may change over time, a set of database views is included to
provide a versioned API with a consistent structure. A view is a virtual table composed of the result set
of a database query. T he definition of a view is stored in the database as a SELECT statement. T he
result set of the SELECT statement populates the virtual table returned by the view. A user can use this
virtual table by referencing the view name in T ransact-SQL statements the same way a table is
referenced.
Note
Queries and reports should be created using the views listed below, not the underlying tables
directly.
11.1.1. Tracking Configuration
T here are three types of changes that are tracked. T hese are when:
A new entity is added to the rhevm database - the synchronization service replicates the change to
the rhevm_history database.
An existing entity is updated - the synchronization service replicates the change to the
rhevm_history database.
An entity is removed from the rhevm database - the corresponding entity is flagged as removed in
the rhevm_history database. Removed entities are only flagged as removed. In order to maintain
correctness of historical reports and representations, they are not physically removed.
T he configuration tables in the rhevm_history database differ from the corresponding tables in the
rhevm database in several ways. T he most apparent difference is that they contain fewer
191
Red Hat Enterprise Virtualization for Servers 2.2 Administration Guide
configuration columns. T his is because certain configuration items, such as the number of VCPU
cores a given VM has, are tracked as a statistical quantity in the rhevm_history database rather than as
a configuration item. T his allows the value to be correlated with other statistical quantities and
incorporated into accounting reports. All configuration tables contain a create_date field indicating when
the entity was added to the system, and a delete_date date which may indicate the date the entity was
removed from the system.
11.1.2. Recording statistical history
Statistical history is recorded in tables named with the suffix _history. T he synchronization service
collects data into these tables every minute. T he data is recorded with a temporal resolution of one
minute and kept for the last 60 minutes, then aggregated to hourly resolution for another 24 hours, then
to daily resolution. In order to allow the last 60 minutes of data to be visible at one minute resolution, the
system will only aggregate data from the previous hour. T herefore, up to 120 minutes of data with a one
minute resolution may be kept. Similarly, 48 hours of hourly resolution data may be kept. All history
tables contain a history_id column to uniquely identify a row, and an aggregation_level column which
indicates the amount of aggregated data the row represents (minute, hour, day).
11.2. Connecting to the History Database
T he rhevm_history database resides within the RHEVM instance of SQL Server created by the Red Hat
Enterprise Virtualization Manager installer. T o connect to the database, use an SQL Server compatible
query or reporting tool with the settings:
T able 11.1. Using Windows Authentication
Server Name
YOURRHEVSERVER\RHEVM
Authentication
Windows Authentication
User name
Administrator
T able 11.2. Using SQL Server Authentication
Server Name
YOURRHEVSERVER\RHEVM
Authentication
SQL Server Authentication
User name
sa
Password
password set at install time
11.3. Example Reports
T he following examples provide an introduction to the kind of reports which can be produced by querying
the rhevm_history database. T he database gives users access to a rich data set, enabling a variety of
complex reporting scenarios. T hese examples illustrate only basic reporting requirements.
11.3.1. Resource utilization on a single host
T his example produces a resource utilization report for a single host. Usage percentages for CPU,
memory and network are shown with a one minute temporal resolution. T his kind of report is useful for
gaining insight into the load factor of an individual host over a short period of time. T he report is defined
by the following SQL query. Note that the values provided for the host_name and history_datetime
components of the where clause should be substituted with appropriate values for your environment.
192
Chapter 11. Reporting from the History D atabase
Example 11.1. Report query for resource utilization on a single host
select history_datetime as DateTime, cpu_usage_percent as CPU,
memory_usage_percent as Memory, network_usage_percent as Network
from host_configuration_view_2_2, host_history_view_2_2
where host_configuration_view_2_2.host_id = host_history_view_2_2.host_id
and host_name = 'jellybean.example.com'
and aggregation_level = 0
and history_datetime >= 'Apr 14 2010 18:45'
and history_datetime <= 'Apr 14 2010 21:45'
T his query will return a table of data with one row per minute:
T able 11.3. Resource utilization for a single host example data
DateT ime
CPU
Memory
Network
2010-04-14 18:45
42
0
25
2010-04-14 18:46
42
0
25
2010-04-14 18:47
42
1
21
2010-04-14 18:48
33
0
25
2010-04-14 18:49
33
0
0
2010-04-14 18:50
25
1
0
T hese data can be composed into a graph or chart using third party data analysis and visualization
tools such as OpenOffice.org Calc and Microsoft Excel. For this example, a line graph showing the
utilization for a single host over time is a useful visualization. Figure 11.1, “Single host utilization line
graph” was produced using the Chart Wizard tool in OpenOffice.org Calc.
Figure 11.1. Single host utilization line graph
11.3.2. Resource utilization across all hosts
193
Red Hat Enterprise Virtualization for Servers 2.2 Administration Guide
T his example produces an aggregated resource utilization report across all hosts in the Red Hat
Enterprise Virtualization Manager environment. Aggregated usage percentages for CPU, memory and
network are shown with an hourly temporal resolution. T his kind of report reveals utilization trends for
the entire environment over a long period of time, and is useful for capacity planning purposes. T he
report is defined by the following SQL query. Note that the values provided for the history_datetime
components of the where clause should be substituted with appropriate values for your environment.
Example 11.2. Report query for resource utilization across all hosts
select datepart(dd, history_datetime) as Day, datepart(hh, history_datetime) as
Hour, avg(cpu_usage_percent) as CPU, avg(memory_usage_percent) as Memory,
avg(network_usage_percent) as Network
from host_configuration_view_2_2, host_history_view_2_2
where host_configuration_view_2_2.host_id = host_history_view_2_2.host_id
and aggregation_level = 0
and history_datetime >= 'Apr 15 2010'
and history_datetime < 'Apr 16 2010'
group by datepart(dd, history_datetime), datepart(hh, history_datetime)
order by datepart(dd, history_datetime), datepart(hh, history_datetime)
T his query will return a table of data with one row per hour:
T able 11.4 . Resource utilization across all hosts example data
Day
Hour
CPU
Memory
Network
15
0
39
0
25
15
1
38
0
25
15
2
37
0
25
15
3
35
0
5
15
4
35
0
0
15
5
36
0
0
T hese data can be composed into a graph or chart using third party data analysis and visualization
tools such as OpenOffice.org Calc and Microsoft Excel. For this example, a line graph showing the
total system utilization over time is a useful visualization. Figure 11.2, “T otal system utilization line
graph” was produced using the Chart Wizard tool in OpenOffice.org Calc.
194
Chapter 11. Reporting from the History D atabase
Figure 11.2. T otal system utilization line graph
11.4. Configuration Views
T his section describes the configuration views available to the user for querying and generating reports.
11.4.1. cluster_configuration_view_2_2
A list of host clusters in the system.
T able 11.5. cluster_configuration_view_2_2
Name
T ype
Description
cluster_id
int
T he unique ID of the cluster in
the system
cluster_name
nvarchar(40)
Name of the cluster (same as in
the edit dialog)
Description
nvarchar(255)
As displayed in the edit dialog
cpu_name
nvarchar(255)
As displayed in the edit dialog
datacenter_id
uuid
T he unique identifier of the
datacenter this cluster resides
in. T his is for future use, as the
datacenter information is not
synchronized to the history
database in this version
compatibility_version
nvarchar(40)
As displayed in the edit dialog
create_date
datetime
T he date this entity was added
to the system
delete_date
datetime
T he date this entity was deleted
from the system
195
Red Hat Enterprise Virtualization for Servers 2.2 Administration Guide
11.4.2. host_configuration_view_2_2
A list of all hosts in the system.
T able 11.6. host_configuration_view_2_2
Name
T ype
Description
host_id
int
T he unique ID of the host in the
system
host_name
nvarchar(255)
Name of the host (same as in
the edit dialog)
ip_address
nvarchar(40)
As displayed in the edit dialog
host_unique_id
nvarchar(128)
T his field is a combination of the
host physical UUID and one of
its MAC addresses, and is used
to try and detect hosts already
registered in the system
fqn_or_ip
nvarchar(255)
T he host's DNS name or its IP
address for Red Hat Enterprise
Virtualization Manager to
communicate with (as displayed
in the edit dialog)
vdsm_port
int
As displayed in the edit dialog
cluster_id
int
T he unique id of the cluster that
this host belongs to.
host_type
int
subnet_mask
nvarchar(255)
As displayed in the edit dialog
cpu_flags
nvarchar(max)
T he CPU flags reported from
the host. T hese are used to
verify the host can
accommodate the cluster CPU
level.
create_date
datetime
T he date this entity was added
to the system
delete_date
datetime
T he date this entity was deleted
from the system
11.4.3. host_interface_configuration_view_2_2
T his view contains the list of interfaces for hosts in the system.
196
0 – RHEL Host
2 – RHEV Hypervisor Node
Chapter 11. Reporting from the History D atabase
T able 11.7. host_interface_configuration_view_2_2
Name
T ype
Description
host_interface_id
uuid
T he unique ID of this interface in
the system
host_id
int
Unique ID of the host this
interface belongs to
mac_address
nvarchar(20)
T he interface MAC address
interface_name
nvarchar(50)
T he interface name as reported
by the host
network_name
nvarchar(50)
T he logical network associated
with the interface
bond
bit
A flag to indicate if this interface
is a bond interface
bond_name
nvarchar(50)
T he name of the bond this
interface is part of (if it is part of
a bond)
vlan_id
int
As displayed in the edit dialog
gateway
nvarchar(20)
As displayed in the edit dialog
type
int
create_date
datetime
T he date this entity was added
to the system
delete_date
datetime
T he date this entity was deleted
from the system
0
1
2
3
- rtl8139_pv
- rtl8139
- e1000
- pv
11.4.4. vm_configuration_view_2_2
T his view contains the list of VMs in the system.
197
Red Hat Enterprise Virtualization for Servers 2.2 Administration Guide
T able 11.8. vm_configuration_view_2_2
Name
T ype
Description
vm_id
uuid
T he unique ID of this VM in the
system
vm_name
nvarchar(255)
T he name of the VM
template_id
uuid
T he unique id of the template
this VM is derived from. T he
field is for future use, as the
templates are not synchronized
to the history database in this
version
operating_system
int
description
nvarchar(255)
As displayed in the edit dialog
ad_domain
nvarchar(4)
As displayed in the edit dialog
cluster_id
int
T he unique ID of the cluster this
VM belongs to
initialized
bit
A flag to indicate if this VM was
started at least once (for
sysprep initialization purposes)
auto_suspend
bit
As displayed in the edit dialog
usb_policy
int
As displayed in the edit dialog
time_zone
nvarchar(40)
As displayed in the edit dialog
stateless
bit
As displayed in the edit dialog
fail_back
bit
As displayed in the edit dialog
default_host
int
As displayed in the edit dialog,
the ID of the default host in the
system
auto_startup
bit
As displayed in the edit dialog
high_availability
int
As displayed in the edit dialog
create_date
datetime
T he date this entity was added
to the system
delete_date
datetime
T he date this entity was deleted
from the system
198
0 - Unassigned
1 - WindowsXP
3 - Windows2003
4 - Windows2008
5 - OtherLinux
6 - Other
7 - RHEL5
8 - RHEL4
9 - RHEL3
10 - Windows2003x64
11 - Windows7
12 - Windows7x64
13 - RHEL5x64
14 - RHEL4x64
15 - RHEL3x64
Chapter 11. Reporting from the History D atabase
11.4.5. vm_disk_configuration_view_2_2
T his view contains the list of virtual disks for the VMs in the system.
T able 11.9. vm_disk_configuration_view_2_2
Name
T ype
Description
disk_id
uuid
T he unique ID of this disk in the
system
description
nvarchar(max)
As displayed in the edit dialog
format
int
As displayed in the edit dialog
3 - Unassigned
4 - COW
5 - RAW
disk_type
int
As displayed in the edit dialog.
Only System and data are
currently used.
0
1
2
3
4
5
- Unassigned
- System
- Data
- Shared
- Swap
- T emp
create_date
datetime
T he date this entity was added
to the system
delete_date
datetime
T he date this entity was deleted
from the system
11.4.6. vm_interface_configuration_view_2_2
T his view contains the list of virtual disks for the VMs in the system
199
Red Hat Enterprise Virtualization for Servers 2.2 Administration Guide
T able 11.10. vm_interface_configuration_view_2_2
Name
T ype
Description
vm_interface_id
uuid
T he unique ID of this interface in
the system
vm_id
uuid
T he ID of the VM this interface
belongs to
mac_address
nvarchar(20)
As displayed in the edit dialog
interface_name
nvarchar(50)
As displayed in the edit dialog
network_name
nvarchar(50)
As displayed in the edit dialog
create_date
datetime
T he date this entity was added
to the system
delete_date
datetime
T he date this entity was deleted
from the system
11.5. History Views
T his section describes the history views available to the user for querying and generating reports.
11.5.1. host_history_view_2_2
T his view contains the historical statistics for the hosts in the system
200
Chapter 11. Reporting from the History D atabase
T able 11.11. host_history_view_2_2
Name
T ype
Description
history_id
bigint
T he unique ID of this row in the
table
aggregation_level
tinyint
Level of aggregation this row
contains:
0
1
2
3
– collection level
– minute level
– hourly
– daily
Several rows of aggregation
may appear, as per the
dimensions of the view. In this
view, host_id, status,
software_version, ksm_state
and total_vms_vcpus are used
as dimensions for the
aggregation. If in the same day
the host changed status, the
results would be aggregated
daily per status, version, etc. each of the dimensions.
history_datetime
datetime
T he timestamp of this history
row (rounded to minute, hour,
day as per the aggregation
level)
host_id
int
Unique ID of the host in the
system
status
int
Status of the host:
0 - Unassigned
1 - Down
2 - Maintenance
3 - Up
4 - NonResponsive
5 - Error
6 - Installing
7 - InstallFailed
8 - Reboot,
9 - PreparingForMaintenance
10 - NonOperational
11 - PendingApproval
12 - Initializing
13 - Problematic
software_version
varchar(43)
T he version of the host
active_vms
int
T he average number of active
VMs for this aggregation
total_vms
int
T he average number of all VMs
201
Red Hat Enterprise Virtualization for Servers 2.2 Administration Guide
on the host for this aggregation
ksm_cpu_percent
int
CPU percentage ksm on the
host is using
total_vms_vcpus
bigint
T otal number of VCPUs
allocated to the host
cpu_cores
int
Number of cores the host has
cpu_usage_percent
decimal
Used CPU percentage on the
host
physical_memory
int
Amount of RAM installed on the
host
memory_usage_percent
int
Percentage of used memory on
the host
11.5.2. host_interface_history_view_2_2
T his view contains the historical statistics for the host physical and logical network interfaces in the
system
202
Chapter 11. Reporting from the History D atabase
T able 11.12. host_interface_history_view_2_2
Name
T ype
Description
history_id
bigint
T he unique ID of this row in the
table
aggregation_level
tinyint
Level of aggregation this row
contains:
0
1
2
3
– collection level
– minute level
– hourly
– daily
Several rows of aggregation
may appear, as per the
dimensions of the view. In this
view, interface_id and host_id
are used as dimensions.
history_datetime
datetime
T he timestamp of this history
row (rounded to minute, hour,
day as per the aggregation
level)
interface_id
uuid
Unique identifier of the interface
in the system
host_id
int
Unique ID of the host in the
system
bytes_received_rate
decimal
Rate of bytes per second
received
bytes_transmitted_rate
decimal
Rate of bytes per second
transmitted
speed
int
T he average speed of the
interface during the aggregation
in Mbps
11.5.3. vm_interface_history_view_2_2
T his view contains the historical statistics for the vm network interfaces in the system
203
Red Hat Enterprise Virtualization for Servers 2.2 Administration Guide
T able 11.13. vm_interface_history_view_2_2
Name
T ype
Description
history_id
bigint
T he unique ID of this row in the
table
aggregation_level
tinyint
Level of aggregation this row
contains:
0
1
2
3
– collection level
– minute level
– hourly
– daily
Several rows of aggregation
may appear, as per the
dimensions of the view. In this
view, interface_id and vm_id are
used as dimensions.
history_datetime
datetime
T he timestamp of this history
row (rounded to minute, hour,
day as per the aggregation
level)
interface_id
uuid
Unique identifier of the interface
in the system
vm_id
uuid
Unique ID of the VM in the
system
bytes_received_rate
decimal
Rate of bytes per second
received
bytes_transmitted_rate
decimal
Rate of bytes per second
transmitted
speed
int
T he average speed of the
interface during the aggregation
in Mbps
type
int
T he type of the virtual interface:
0
1
2
3
11.5.4. vm_disk_history_view_2_2
T his view contains the historical statistics for the vm disks in the system
204
- rtl8139_pv
- rtl8139
- e1000
- pv
Chapter 11. Reporting from the History D atabase
T able 11.14 . vm_disk_history_view_2_2
Name
T ype
Description
history_id
bigint
T he unique ID of this row in the
table
aggregation_level
tinyint
Level of aggregation this row
contains:
0
1
2
3
– collection level
– minute level
– hourly
– daily
Several rows of aggregation
may appear, as per the
dimensions of the view. In this
view, vm_id, disk_id, status,
interface and type are used as
dimensions.
history_datetime
datetime
T he timestamp of this history
row (rounded to minute, hour,
day as per the aggregation
level)
vm_id
uuid
Unique ID of the VM in the
system
disk_id
uuid
Unique ID of the disk in the
system
actual_size
bigint
T he actual size allocated to the
disk
size
bigint
T he defined size of the disk
interface
int
disk_type
int
status
int
read_rate
int
Read rate to disk in bytes per
second
write_rate
int
Write rate to disk in bytes per
second
0 - IDE
1 - SCSI (not supported)
2 - VirtIO
0 - Unassigned
1 - System
2 - Data
0
1
2
3
4
- Unassigned
- OK
- LOCKED
- INVALID
- ILLEGAL
205
Red Hat Enterprise Virtualization for Servers 2.2 Administration Guide
11.5.5. vm_history_view_2_2
T his view contains the historical statistics for the vm's in the system
206
Chapter 11. Reporting from the History D atabase
T able 11.15. vm_history_view_2_2
Name
T ype
Description
history_id
bigint
T he unique ID of this row in the
table
aggregation_level
tinyint
Level of aggregation this row
contains:
0
1
2
3
– collection level
– minute level
– hourly
– daily
Several rows of aggregation
may appear, as per the
dimensions of the view. In this
view, vm_id, status, vm_ip,
currently_running_on_host and
current_user_name are used as
dimensions.
history_datetime
datetime
T he timestamp of this history
row (rounded to minute, hour,
day as per the aggregation
level)
vm_id
uuid
Unique ID of the VM in the
system
status
int
T he status of the VM:
-1 - Unassigned
0 - Down
1 - Up
2 - PoweringUp
3 - PoweredDown
4 - Paused
5 - MigratingFrom
6 - MigratingT o
7 - Unknown
8 - NotResponding
9 - WaitForLaunch
10 - RebootInProgress
11 - SavingState
12 - RestoringState
13 - Suspended
14 - ImageIllegal
15 - ImageLocked
16 - PoweringDown
monitors
int
Number of monitors
vm_ip
nvarchar(255)
T he IP address of the first NIC.
Only shown if the guest agent is
installed.
currently_running_on_host
int
T he unique ID of the host this
207
Red Hat Enterprise Virtualization for Servers 2.2 Administration Guide
VM is running on
current_user_name
nvarchar(255)
Name of logged in user to VM
console, if guest agent is
installed
up_time
decimal
T he uptime of the VM
vm_last_up_time
datetime
T he last time the VM was
running
vm_last_boot_time
datetime
T he last time the VM was
started
total_vcpus
int
Number of VCPUs the VM has
cpu_usage_percent
int
T he percentage of the CPU in
use by the VM
memory_size
int
Defined memory for the VM
memory_usage_percent
int
Percentage of used memory on
the VM
208
Chapter 12. Using Tags
Chapter 12. Using Tags
Once your Red Hat Enterprise Virtualization platform is setup and configured to your requirements, you
can customize the way you work with it using tags. T he key advantage to using tags is the ability to
search for hosts or virtual machines according to predefined user tags, and filter the display according
to specific tags. T his is very useful when there are lots of objects and the Administrator would like to
concentrate in a specific set of objects. T his section describes how to create and edit tags, assign them
to hosts or virtual machines and search using the tags as a criteria. T ags can be arranged in a
hierarchy that matches the structure or needs of the enterprise.
12.1. Managing Tags
Red Hat Enterprise Virtualization T ags can be created, modified, and removed using the T ags pane.
Figure 12.1. T he T ags Pane
T o create a T ag:
1. Click the Resource tab for which you wish to create a tag, for example, Hosts.
2. Click the T ags tab. Select the node under which you wish to create the tag. For example, to create
it at the highest level, click the root node, in this example.T he New button is enabled.
3. Click New on the T ags pane. T he New T ag dialog box displays.
209
Red Hat Enterprise Virtualization for Servers 2.2 Administration Guide
Figure 12.2. T he New T ag Dialog
4. Enter the Nam e and Description of the new tag.
5. Click OK. T he new tag is created and displays on the T ags tab.
T o modify a T ag:
1. Click the T ags tab. Select the tag that you wish to modify. T he buttons on the T ags tab are
enabled.
2. Click Edit on the T ags pane. T he Edit T ag dialog box displays.
3. You can change the Nam e and Description of the tag.
4. Click OK. T he changes in the tag display on the T ags tab.
T o delete a T ag:
1. Click the T ags tab. T he list of tags display.
2. Select the T ag(s) to be deleted. T he Rem ove T ag(s) dialog box displays.
210
Chapter 12. Using Tags
Figure 12.3. T he Remove T ag Dialog
3. T he tag, or list of tags are displayed in the dialog box. Check that you are sure about the removal.
T he message warns you that removing the tag will also remove all descendants of the tag.
4. Click OK. T he new tag is removed and no longer displays on the T ags tab. T he tag is also
removed from all the objects that it was attached to.
12.2. Attaching Tags to Objects
T ags can be attached to Hosts and Virtual Machines only.
T o add or remove a T ag to/from one or more object instances:
1. Search for the object(s) that you wish to tag/untag so that they are among the objects displayed in
the results list (see Chapter 9, Locating Resources).
2. Select one or more objects on the Results list.
3. Click the Assign T ags button on the tool bar or right-click menu option.
Figure 12.4 . Assign T ag Option
4. A dialog box provides a list of T ags. Select the check box to assign a tag to the object. Or,
deselect the check box to detach the tag from the object.
211
Red Hat Enterprise Virtualization for Servers 2.2 Administration Guide
Figure 12.5. Assign T ags
5. Click Ok. T he specified tag is now added/removed as a custom property of the selected object(s).
12.3. Searching for Objects Using Tags
A user-defined tag can be a property of any object (for example, a virtual server or a host), and a search
can be conducted to find it.
T o search for objects using T ags:
Follow the search instructions in Chapter 9, Locating Resources, and enter a search query using
“tag” as the property and the desired value or set of values as criteria for the search.
T he objects tagged with the tag criteria that you specified are listed in the results list.
212
Chapter 13. Configuring Red Hat Enterprise Virtualization Management
Chapter 13. Configuring Red Hat Enterprise Virtualization
Management
T his section describes how to configure Red Hat Enterprise Virtualization Management according to the
requirements appropriate to your enterprise. T he basic parameters of the system are set up in a default
configuration that you can change, or leave untouched until necessary.
T he data center consists of servers, storage and networking in an optimum configuration that is secure,
highly available and scalable. Every implementation is likely to be unique as it must meet the needs of
the enterprise. It is beyond the scope of this document to describe the architecture of your virtualized
enterprise. It is assumed that your solution architects have defined this before installation and that you
have a successful installation of Red Hat Enterprise Virtualization platform.
In general it is recommended that you accept the basic preconfigured parameters if you are setting up
the system for the first time. However, in every instance you must set the domain name, active directory
and user name accurately.
13.1. Using the Configuration Tool
During installation, defaults are automatically entered for most of the required values. You can change
these default values with the Red Hat Enterprise Virtualization configuration tool.
From a Windows 2003 Console or RDP click Start → Program s → Red Hat → RHEV Manager →
Configuration T ool. T he Configuration T ool displays.
Figure 13.1. T he Configuration T ool
T he Configuration tool consists of a number of tabs that allow you to configure vital parameters such as
policies, setup and security of the data centre. Each tab displays the basic parameters, you can
configure advanced features by clicking Switch to Advanced Mode to display additional fields on
the tab. Click Switch to Sim ple Mode to display the basic options only. If you have changed fields,
click the revert button to revert to the original values. Althought the figures in this section show the
Advanced Mode, the default display is Sim ple Mode.
213
Red Hat Enterprise Virtualization for Servers 2.2 Administration Guide
Note:
It is recommended that you take due care when you change the options that are described in this
section.
13.1.1. Database Connection
Use the Database Connection tab to define database connection information. All fields are
mandatory, and are populated with the values set up during installation. You may change them if
required.
Figure 13.2. Database Connection
Option
Description
Server Nam e
Name of the database server.
Login
Login name of the user of the database.
Password
T he password for the database.
13.1.2. Directory Services
Use the Active Directory tab to define directory services. All fields are mandatory, and are
populated with the values set up during installation. You may change them if required.
Option
Authentication Method
Description
Active Directory
Local Authentication
NetBios Dom ain Nam e
Domain Name that Red Hat
Enterprise Virtualization uses to
authenticate users for
administration and web portal.
T his name must be resolvable.
AD User Nam e
Red Hat Enterprise
Virtualization platform uses the
214
Notes
Select the appropriate option.
Only one option can be
selected.
Chapter 13. Configuring Red Hat Enterprise Virtualization Management
User Name to query the Active
Directory (AD) for credentials
and to add default computer
accounts to domains used in the
templating process.
AD User Password
T he required password for
above account.
User Refresh Rate
T he refresh rate for the user.
Important: Active Directory username and password
T he username and password set on the Directory Services tab are used to fetch data from Active
Directory periodically. T he authentication tokens provided must be for a valid username and
password combination that exists within Active Directory.
13.1.3. Setting Local Variables for Sys prep
Use the Sys Prep tab to set the local variables for the automated sysprep process. T he local
parameters and variables are used by the Sysprep process to automate the creation of a Windows
virtual machine from a template.
Figure 13.3. Sysprep Configuration Pane
Option
Description
Local Adm in Password
Administrator Password used to automatically
login Windows during final Sysprep process to
run third party setup.
Default Workgroup
Used during Sysprep process.
Virtual Machine Dom ain Nam e
Default Storage Domain where virtual machines
are created.
SysPrep..Path
Location of sysprep files for supported versions
of Windows, they are variously available
atC:\Program
Files\RedHat\RHEVManager\Service\sys
prep\. Sysprep uses the values from these files
215
Red Hat Enterprise Virtualization for Servers 2.2 Administration Guide
in place of user input during installation.
ProductId/ProductKey
[Supported Windows] Microsoft License Key used
when deploying new desktops.
13.1.4. Configuring Storage
Use the Storage Pool Manager tab to set storage access, thresholds, time-outs and other
parameters.
Option
Description
Free Disk Space - Low %
Percentage of free disk space considered to be
the low threshold.
Free Disk Space - Critical Low %
Percentage of free disk space considered to be
the critical low threshold.
Storage Manager polling rate
T he Storage manager polling rate.
Storage Manager Attem pts before
Failover
Number of attempts before failover.
Storage Manager com m and failover
retries
Enter the default test rate.
Async T ask Polling rate
T he polling rate for asynchronous tasks.
Storage Dom ain failure tim eout
T he timeout for a storage domain failure.
13.1.5. Setting the Host Parameters
Use the Host tab to set general parameters for the host on which the Red Hat Enterprise Virtualization
Hypervisor is running.
Option
Description
Host Connection T im eout
T imeout in seconds when attempting to connect
to the Host.
Host Reboot T im eout
T imeout in seconds when rebooting the Host.
Host Polling Rate
T he number of times in a second that the host is
polled.
Max Host Mem ory OverCom m it(Desktops)
Percentage of memory over-subscription allowed.
T he default of 150% is used but can be set to
500%.
Higher values of memory over-commitment are
possible; however, more CPU is used for the
background KSM process. If virtual machines are
not reasonably similar, the possibility of
excessive swapping can occur.
Max Host Mem ory Over-Com m it(Servers)
Percentage of memory over-subscription allowed.
T he default of 150% is used but can be set to
500%.
Higher values of memory over-commitment are
possible; however, more CPU is used for the
background KSM process. If virtual machines are
not reasonably similar, the possibility of
excessive swapping can occur.
216
Chapter 13. Configuring Red Hat Enterprise Virtualization Management
Enable USB as Default
Default USB Policy is true. T his setting enables
USB devices to be used by virtual machines.
Use Secure Connection with Hosts
T he default setting is T rue.
Host Recovery T im eout
Default time to allow for host recovery
Attem pts before reset Host
Number of attempts before the host is reset.
T im eout before reset Host
T imeout in seconds before the host is reset.
RHEV-H install files path
T he path for the install files for RHEV Hypervisor.
Host Bootstrap Script URL
T he complete path for the bootstrap script. T he
address at which the executables for Red Hat
Enterprise Hypervisor are available.
Host swap percentage threshold for
scheduling
Percentage of host's swap memory to be used for
scheduling.
Net Console Port
Enter the port on the domain.
13.1.6. Securing the System
Use the Security tab to set security parameters for the system. T his is can usually be left untouched,
except in the case of a change in security requirements.
Warning
Security changes affect the security of your enterprise. Use due caution before making any
changes that may compromise the security of your system.
Figure 13.4 . Securing the System
Option
Description
Notes
Certificate File Nam e
T he file name of the certificate
file as entered in the installation.
-
Certificate Password
T his is usually left blank at
installation.
-
Certificate Finger
T he hexadecimal number
-
217
Red Hat Enterprise Virtualization for Servers 2.2 Administration Guide
Print
provided by the CA.
CA Base Directory
T he name of the CA base
directory.
Rhevm key path
T he path to the keys for the
Manager.
T rue is the default.
SSH Inactivity T im eout
in Seconds
T he number of seconds before
a timeout in case of a break in
SSH connectivity.
-
SPICE SSL Enabled
Set to either T rue or False.
T rue is the default.
SPICE Secure Channels
Select from list of secure
channels for SPICE.
T he channels are, Control,
Keyboard, Mouse, Audio,
Record, Display.
13.1.7. Setting the Load Balancing Policy
Use the Load Balancing tab to set the load balancing and power saving policies at the system level.
T hese can also be set at the Cluster and Host levels.
Load balancing and powersaving are key criteria in ensuring optimal performance of a virtualized
environment. Red Hat Enterprise Virtualization platform allows you to define policies per Server Cluster
to specify the usage and distribution of Guests between the available Hosts. At any given time in a
virtualized environment, virtual machines are starting, stopping or resuming. In its simplest form, it is the
rules in the policy engine that determine the selection of the specific host on which a virtual machine
runs. T he policy engine decides which server will host the next virtual machine based on whether loadbalancing or power-saving criteria have been defined.
T he limits for both of these can also be set very precisely in the New or Edit Cluster dialog boxes. See
Chapter 3, Managing Data Centers. T hese can be during the planning and set up stage, or later as
requirements change, resources are added or removed. Power management policies can also be set at
the host level. Refer Section 5.5.1.1, “Using Power Management”.
Option
Description
Enable Host Load Balancing
T rue or False. False is the default.
Load Balancing Interval
T he intervals at which load balancing is to occur.
High Utilization for Even
Distribution
Maximum utilization for a evenly distributed load.
High Utilization for Power Save
Policy
Maximum utilization for power saving.
Low Utilization for Power Save
Policy
Minimum utilization for power saving.
Utilization T hreshold in Percent
T he threshold stated as a percentage. 80 is the
default.
High Utilization T hreshold Duration
T he duration of time in seconds for which the cpu
may be overcommitted.
SPM Vcpu Consum ption
T he duration of time in seconds for which the
SPM Vcpu may be overcommitted.
13.1.8. Miscellaneous
T he Miscellaneous tab enables you to control sundry aspects of the way in which the virtual platform
operates.
218
Chapter 13. Configuring Red Hat Enterprise Virtualization Management
Option
Description
Red Hat Enterprise VirtualizationManagem ent Version
T he version number of the installed product.
Search Result Lim its
Maximum number of return values from search.
Log XML-RPC Data
Select true or false. T he default is false.
MAC Addresses Pool Range
Network MAC Address Ranges for Virtual
Desktops. T his must be unique to your
environment.
Maxim um MAC Addresses count in Pool
T he maximum MAC addresses permitted in a
Pool.
Custom Actions T im eout
T he number of seconds after which a custom
action or script should time out. T he default is 60.
Custom Actions Directory Path
T he directory in which custom actions or scripts
are stored.
Valid Num bers of Monitors
1, 2, or 4 monitors can be used.
Valid Num bers of Virtual Server CPUs
1,2,3,4,...,16 in a comma-delimited list. Upto 16
CPUs can be used.
Virtual Machine Graceful Shutdown
Message
Message to be displayed during graceful
shutdown of a virtual machine.
SPICE Release Cursor Keys
Key combination to release cursor from the SPICE
window. T he default is Shift+F12.
SPICE T oggle Full Screen Keys
Key combination to maximize SPICE window. T he
default is Shift+F11.
SPICE USB Auto-share
Select true or false. T he default is true.
RDP login with FQN
Select true or false. T he default is true.
Host CPU flags types
T he CPU flag types valid for the platform.
VNC Keyboard Layout
T he keyboard layout for a VNC connection. T he
default is en-US.
Max size of newly created disk (in
GB)
T he maximum size at creation of a virtual disk.
Max Num bers of Sockets per Virtual
Machine
Upto 16 sockets can be used.
Max Num bers CPU per Socket
Upto 16 CPUs per socket can be used.
Audit Log Cleanup T im e
T he amount of time for which an audit log will be
preserved.
Num ber of failed runs on Host
T he number of times a virtual machine can fail on
a host.
T im e to reduce failed run on Host
T ime in seconds to reduce failed runs of a virtual
machine on a host.
Max Virtual Machine Rerun Attem pts
on Host
Maximum number of times a virtual machine can
attempt to run on a host..
Num ber of Virtual Machine Refreshes
before Save
Number of times a virtual machine will be
refreshed before being saved.
13.1.9. Setting up Event Notification
219
Red Hat Enterprise Virtualization for Servers 2.2 Administration Guide
Red Hat Enterprise Virtualization provides excellent event and performance monitoring in real time.
However, a system administrator can set up filters to generate an email when specified events occur.
For example, a user may wish to be informed by email if a specific alert is generated outside business
hours. In most instances, notifications include both the problem and the solution, and can be set up to
avoid sending emails for recurring events.
Use the Event Notifications tab to set up email notifications for the system. T his is can usually be left
untouched, except in the case of a change in security requirements.
Figure 13.5. Setting up event notifications
Option
Description
Mail Server
T he fully qualified domain name of the mail
server.
Mail Port
T he port used to send mail to the server.
Mail Sender
T he email address from which the mails originate
Mail Sender Dom ain
T he fully qualified domain name of the mail
sender
Use HT ML
Set to either true or false. T he default setting is
true.
Enable SSL
Set to either true or false. T he default setting is
true.
Use Default Credentials
Set to either true or false. T he default setting is
false.
13.2. Configuring USB Device Policy
T he USB Filter Editor can be run on any Windows desktop, however the resultant usbfilter.txt file
must reside on the Red Hat Enterprise Virtualization Manager server. Once you have completed the
configuration of the USB Filter Editor, you must export the saved configuration in usbfilter.txt to the
Red Hat Enterprise Virtualization Manager server.
T he default policy controls USB access to Mass Storage and Printers only.
T o configure USB Device Policies:
220
Chapter 13. Configuring Red Hat Enterprise Virtualization Management
1. Click Start > All Program s > Red Hat > RHEV Manager > USB Filter Editor.
T he Red Hat USB Filter Editor displays the current USB policies. T he permitted devices
display with an Allow Action, the blocked devices display with a Block Action.
Figure 13.6. Red Hat USB Filter Editor
2. For each USB device, the Class, Vendor, Product, Revision and Action displays.
3. You can Add, Rem ove, Search, Im port, Export devices that your virtual machines can have
access to.
T he Up and Down buttons enable you to move devices higher or lower in the list.
T able 13.1. USB Editor Fields
Name
Description
Class
T ype of USB device; for example, printers, mass
storage controllers.
Vendor
T he manufacturer of the selected T ype of device.
Product
T he specific USB device model.
Revision
T he revision of the product
Action
Allow or Block the specified device
13.2.1. Adding a USB Policy
Click Start > All Program s > Red Hat > USB Filter Editor. T he Red Hat USB Filter
Editor displays the current USB policies. Refer Figure 13.6, “Red Hat USB Filter Editor”. You can
specify the USB device, and whether virtual machines can use them or not by adding a new policy.
T o add a new policy, on the Red Hat USB Editor:
Click Add. T he Edit USB Criteria dialog displays:
221
Red Hat Enterprise Virtualization for Servers 2.2 Administration Guide
Figure 13.7. Edit USB Criteria
Any combination of USB devices, products and/or vendors can be added using the USB Class,
Vendor ID, Product ID and Revision check boxes and lists.
T o allow virtual machines to use the specified USB device, click the Allow button. Or to block virtual
machines from using the specified USB device, click the Block button.
T he following is an example of how to add USB Class Audio from Manufacturer Sharp for any USB
device.
Figure 13.8. Edit USB Criteria Sample
T o save the new policy, click the Close button on the dialog box. A message displays, prompting you
to save the changes.
Figure 13.9. Edit USB Criteria Sample
13.2.2. Removing a USB Policy
Click Start > All Program s > Red Hat > USB Filter Editor. T he Red Hat USB Filter
Editor displays the current USB policies.
T o remove a policy, on the Red Hat USB Editor:
Select the policy to be removed.
Figure 13.10. Select USB Policy
Click Rem ove. A message displays prompting you to confirm the removal.
Figure 13.11. Edit USB Criteria
222
Chapter 13. Configuring Red Hat Enterprise Virtualization Management
Click OK to confirm the removal.
T o save the changes, click the Close button on the dialog box. A message displays, prompting you to
save the changes.
Figure 13.12. Edit USB Criteria Sample
13.2.3. Searching for USB device Policies
You can search for policies using the Search feature of the Red Hat USB Filter Editor.
Click Start > All Program s > Red Hat > USB Filter Editor. T he Red Hat USB Filter
Editor displays the current USB policies.
T o search for a policy, on the Red Hat USB Editor:
Click Search. T he Attached USB Devices dialog box displays a list of all the attached devices.
Figure 13.13. Attached USB Devices
Select the device and click the Allow or Block button as appropriate. Click the Close button on the
dialog box to close.
T o save the changes, click the Close button on the Red Hat USB Filter Editor. A message
displays, prompting you to save the changes.
Figure 13.14 . Edit USB Criteria Sample
13.2.4. Export a USB Policy
Click Start > All Program s > Red Hat > USB Filter Editor. T he Red Hat USB Filter
Editor displays the current USB policies.
Figure 13.15. Edit USB Criteria
223
Red Hat Enterprise Virtualization for Servers 2.2 Administration Guide
You can specify the USB device, and whether virtual machines can use them or not by adding a new
policy. Once you have completed configuring the USB device policy, you must export it to a specified
location on the Red Hat Enterprise Virtualization Manager server.
T o export the policy, on the Red Hat USB Editor:
Click Export. T he Save As dialog displays:
Figure 13.16. Select USB Policy
Save the file with a filename of usbfilter.txt in one of the locations as appropriate to your
system:
On a Windows 2008 server:
C:\Program Files (x86)\RedHat\RHEVManager\UserPortal\Consoles\Spice
On a Windows 2003 server:
C\Program Files\RedHat\RHEVManager\UserPortal\Consoles\Spice
Restart IIS on the server.
T he USB Device policy will now be implemented on virtual machines running on the system.
13.2.5. Import USB Policy
If the USB device policy already exists you can import it into specified location on the Red Hat Enterprise
Virtualization Manager server.
Click Start > All Program s > Red Hat > USB Filter Editor. T he Red Hat USB Filter
Editor displays the current USB policies. Refer Figure 13.15, “Edit USB Criteria”.
T o import an existing policy, on the Red Hat USB Editor:
Click Im port. T he Open dialog displays:
Figure 13.17. Select USB Policy
Open the file with a filename of usbfilter.txt in one of the locations as appropriate to your
system:
On a Windows 2008 server:
C:\Program Files (x86)\RedHat\RHEVManager\UserPortal\Consoles\Spice
On a Windows 2003 server:
C\Program Files\RedHat\RHEVManager\UserPortal\Consoles\Spice
Restart IIS on the server.
T he USB Device policy will now be implemented on virtual machines running on the system.
224
Chapter 14. Upgrading Red Hat Enterprise Virtualization
Chapter 14. Upgrading Red Hat Enterprise Virtualization
T his chapter describes how to upgrade Red Hat Enterprise Virtualization Manager, the hosts and the
virtual machines, for regular minor updates, and between versions. T he following instructions assume a
systems administrator audience. Consequently, typical system administration tasks such as file
downloading and file extraction, are not described in detail. While this chapter focusses on upgrading
Red Hat Enterprise Virtualization Manager, some information is also provided on upgrading hosts,
databases and other requirements.
14.1. Prerequisites
Before you start upgrading:
1. Subscribe to the Red Hat Enterprise Virtualization Manager channel and its appropriate child
channels, Red Hat Enterprise Virtualization Manager for Desktops 2 and Red Hat Enterprise
Virtualization Manager for Servers 2. For more information on how to use Red Hat Network, refer
to the Red Hat Network Reference Guide.
2. Acquire the updated Red Hat Enterprise Virtualization Manager executable file. T he typical way is
to download this using Red Hat Network.
3. Copy the .exe file to the server running Red Hat Enterprise Virtualization Manager server.
4. Close all applications that are running on the Red Hat Enterprise Virtualization Manager server.
5. Ensure that you have a correctly installed and running version of Red Hat Enterprise Virtualization
Manager. If you need to install Red Hat Enterprise Virtualization Manager for the first time, refer to
the Red Hat Enterprise Virtualization Installation Guide.
6. Uninstall Powershell 1.0 and install Powershell 2.0 before attempting to upgrade Red Hat
Enterprise Virtualization Manager. T his is described later in detail.
7. It is recommended that you back up the Red Hat Enterprise Virtualization database.
14.1.1. Installing Powershell 2.0
T his section describes how to uninstall Powershell 1.0, and reinstall Powershell 2.0. You will only need
this section if you previously installed Red Hat Enterprise Virtualization 2.1. If you have a higher version,
you can ignore this section.
Uninstalling 1.0 and Installing Powershell 2.0
Uninstall Powershell 1.0:
Click Start->Control panel->Add or Rem ove Program s. Select the Show Updates check
box.
Select the Windows Server 2003 - Software updates. Select the following update for
removal: Hotfix for Windows Server 2003 (KB 926139 )
Note
T his item should appear with the Powershell icon , if not, you can remove the update using it's
name and KB number.
Browse to http://support.microsoft.com/kb/968929 and install Windows Management Framework
which includes Windows PowerShell 2.0, and WinRM 2.0. For systems running Windows Server 2008
R2 the package also includes BIT S 4.0. Choose the appropriate package for your Host platform.
225
Red Hat Enterprise Virtualization for Servers 2.2 Administration Guide
14.1.2. Backup the Red Hat Enterprise Virtualization Manager database
T his is a recommended practice, however this is not mandatory.
Back up the Database
1. Backup the Red Hat Enterprise Virtualization Manager database on the server running the
database. T his could be the internal database running on the Red Hat Enterprise Virtualization
Manager server, or it could be an external server. T he default database installed with Red Hat
Enterprise Virtualization Manager can be found at %Program Files%\Microsoft SQL
Server\MSSQL.1\MSSQL\Data\rhevm . One method of backing up the internal database is
outlined below:
On the server running Red Hat Enterprise Virtualization Manager, click All Program s >
Red Hat > RHEV Manager > Log Collector.
T he Log Collector dialog box displays.
Figure 14 .1. Log Collector - Configuration
In the RHEVM Server group, select the Back up database check box. Click Collect.
T he Browse for Folder dialog prompts for a folder to save the files. Select a folder or
create a new folder, as required. Click OK.
226
Chapter 14. Upgrading Red Hat Enterprise Virtualization
Figure 14 .2. Log Collector - Configuration
T he Output tab displays the progress of the log collection and backup.
Figure 14 .3. Log Collector - Configuration
Follow the progress of the updation in the Output tab, when it is complete, click Exit.
Navigate to the folder location, and extract the log file. T he file RHEVM.bak is the backup file.
You can use SQL Server Management Studio Express to restore the database if required.
14.2. Upgrading the Red Hat Enterprise Virtualization Manager
Red Hat Enterprise Virtualization Manager provides you with regular upgrades that are easily installed,
227
Red Hat Enterprise Virtualization for Servers 2.2 Administration Guide
without cumbersome and dangerous shutdown procedures, using Red Hat Network. Ensure that the
prerequisites described in the previous section have been met.
T o upgrade a Red Hat Enterprise Virtualization Manager:
1. On the desktop of the Red Hat Enterprise Virtualization Manager server double-click the Red Hat
Enterprise Virtualization Manager executable file. T he Welcome screen displays. Note that the
message indicates that you are upgrading and not installing. Click Next.
Figure 14 .4 . Welcome to the Upgrade
2. T he End User License page displays. Read the license and click Yes to agree to the terms and
continue. You can also Print the license for your reference.
Figure 14 .5. Welcome to the Upgrade
228
Chapter 14. Upgrading Red Hat Enterprise Virtualization
3. T he Current Settings are displayed. Check the settings, and click Next to continue.
Figure 14 .6. Current Settings
T he settings include the SQL Database name, the Red Hat Enterprise Virtualization Manager
service path, and the Installation directory.
Figure 14 .7. Current Settings Close up
4. A series of screens similar to the illustration display the progress of the upgrade.
229
Red Hat Enterprise Virtualization for Servers 2.2 Administration Guide
Figure 14 .8. Configuring
5. When the process is complete, the Installshield Wizard Complete dialog displays. Click Finish to
complete the upgrade.
Figure 14 .9. Completing the Installation
14.3. Upgrading to Red Hat Enterprise Virtualization 2.2
Use this section to upgrade your installation of Red Hat Enterprise Virtualization 2.1 running on
Windows Server 2003, to Red Hat Enterprise Virtualization 2.2 running on Windows Server 2003. T his
section provides complete instructions on upgrading all aspects of the system.
230
Chapter 14. Upgrading Red Hat Enterprise Virtualization
14.3.1. Preparing to Upgrade
Before you can upgrade, check the requirements described in Section 14.1, “Prerequisites” have been
fulfilled, and then follow these preparatory steps.
Acquire the executables
1. Log into Red Hat Network and select the Red Hat Enterprise Virtualization Manager channel and
its appropriate child channels, Red Hat Enterprise Virtualization Manager for Desktops 2 and Red
Hat Enterprise Virtualization Manager for Servers 2. For more information on how to use Red Hat
Network, refer to the Red Hat Network Reference Guide.
2. Download the Red Hat Enterprise Virtualization Manager 2.2 executable and the RHEV-T ools 2.1
and 2.2 executables from the Red Hat Network onto the server running Red Hat Enterprise
Virtualization Manager 2.1.
3. Download the Red Hat Enterprise Virtualization Hypervisor ISO 5.5-2.2. Copy the ISO file into the
C:\Program Files\RedHat\RHEVManager\Service\RHEV-H Installer\ directory on
the Manager server. T his will make it available to the hypervisor hosts.
4. Ensure all Red Hat Enterprise Linux 5.4 and higher hosts are registered to Red Hat Network and
subscribed to the Red Hat Enterprise Virtualization Manager child channel. T his ensures that your
system automatically receives packages that are needed for the upgrade.
Perform Backups
1. Backup the Red Hat Enterprise Virtualization Manager database on the server running the
database. T his could be the internal database running on the Red Hat Enterprise Virtualization
Manager server, or it could be an external server. T he default database installed with Red Hat
Enterprise Virtualization Manager can be found at %Program Files%\Microsoft SQL
Server\MSSQL.1\MSSQL\Data\rhevm . Refer Section 14.1.2, “Backup the Red Hat Enterprise
Virtualization Manager database”.
2. Save the CA folder on the server running Red Hat Enterprise Virtualization Manager. T his can be
found at C:/%Program Files%/Redhat/RHEVManager/Service/CA/Certs
14.3.2. Performing a Live Upgrade
In this procedure you will perform a live upgrade of the Red Hat Enterprise Virtualization Manager, the
Red Hat Enterprise Virtualization Hypervisor hosts, as well as any Red Hat Enterprise Linux 5.4 and
higher hosts that exist in the system. Because this is a live upgrade, it is recommended that the hosts
be upgraded gradually. Do not attempt to upgrade all the hosts in a single operation. T he procedures
described in this section apply to a live upgrade without service disruptions.
Note
At the beginning of an upgrade, if any templates have been changed, a backup folder is created
under Service\sysprep, and all templates from the original folder are copied into it. If no
templates were changed, no backup folder is created.
14 .3.2.1. Upgrading Red Hat Enterprise Virtualization Manager
In this section use the Red Hat Enterprise Virtualization Manager 2.2 executable to upgrade the Red Hat
Enterprise Virtualization Manager. Ensure that the Red Hat Enterprise Virtualization Manager 2.1
Administrator Portal is closed.
1. On the server running Red Hat Enterprise Virtualization Manager 2.1, click the Red Hat Enterprise
231
Red Hat Enterprise Virtualization for Servers 2.2 Administration Guide
Virtualization Manager 2.2 executable (for example this could be on the server's desktop) to start
the upgrade.
2. Follow the prompts and accept the default options. At the end of the process you should have
successfully upgraded to Red Hat Enterprise Virtualization Manager 2.2.
Figure 14 .10. Upgrade Host
14 .3.2.2. Upgrading the Hosts, Clusters and Data Center
In this section, the hosts, clusters and data center are upgraded to Red Hat Enterprise Virtualization 2.2
mode.
Before you upgrade a host to Red Hat Enterprise Virtualization 2.2, ensure that your host’s management
network name is rhevm. Red Hat Enterprise Virtualization Manager 2.2 assumes that the rhevm network
exists.
1. Log into Red Hat Enterprise Virtualization Manager 2.2. On the Hosts tab, select the host to be
upgraded and click the Maintenance button.
Figure 14 .11. Upgrade Host
T he status of the RHEV Hypervisor host changes as it powers down and virtual machines are
automatically migrated off the host. When the host status is Down, the General tab on the Hosts
page provides you with a clickable link to re-install or upgrade the host.
232
Chapter 14. Upgrading Red Hat Enterprise Virtualization
Figure 14 .12. Select Host
Important
Ensure the cluster contains more than one host before performing an upgrade. Do not
attempt to re-install or upgrade all the hosts at the same time. One host must remain
available to perform SPM tasks.
If the host is a Red Hat Enterprise Virtualization Hypervisor, click Upgrade on the General
tab of the Hosts Detail pane. T he host will be upgraded (using the ISO downloaded in the
preparatory steps), to Red Hat Enterprise Virtualization Hypervisor 5.5-2.2.
If the host is a Red Hat Enterprise Linux 5.4 host, click Re-install on the General tab of
the Hosts Detail pane. T he host will be upgraded and rebooted using the standard RHN
upgrade procedure. T his may take a while. In case of errors, for example, with the network
connection, use the manual procedure for Red Hat Enterprise Linux host, and then reboot the
host.
For more details, refer to the Red Hat Enterprise Linux or Red Hat Enterprise Virtualization
documentation suite.
2. Once the host has been upgraded and is has been rebooted and is back up, it displays on the
Hosts tab.
Note:
Note that the Cluster is still working in 2.1 mode, so hosts with the upgraded version are
working in 2.1 compatibility mode.
3. Repeat the above procedure until all the hosts in the cluster have been upgraded; the Red Hat
Enterprise Virtualization Hypervisor hosts to 5.5-2.2, and the Red Hat Enterprise Linux 5.4 hosts
to 5.5.
4. When all the hosts have been upgraded, change the cluster level to 2.2 mode as follows. On the
Red Hat Enterprise Virtualization Manager Administrator portal, select the cluster and click the
Edit button. T he Edit Cluster dialog box displays. Select 2.2 on the Com patibility
Version list. Click OK. T he cluster of hosts is now operating in Red Hat Enterprise Virtualization
Manager 2.2 mode.
233
Red Hat Enterprise Virtualization for Servers 2.2 Administration Guide
Figure 14 .13. Change Compatibility Version
5. Repeat the above procedure to upgrade all the clusters until all clusters in the data center are
operating in Red Hat Enterprise Virtualization Manager 2.2 mode.
6. With all the hosts and all the clusters upgraded to 2.2 mode, the data center can be moved to 2.2
mode. Change the data center level to 2.2 as follows. On the Red Hat Enterprise Virtualization
Manager Administrator portal, select the data center and click the Edit button. T he Edit Data
Centerdialog box displays. Select 2.2 on the Com patibility Version list. Click OK. T he data
center is now operating in Red Hat Enterprise Virtualization Manager 2.2 mode.
Figure 14 .14 . Change Data Center Compatibility Version
T he data center, its clusters and hosts are now upgraded to Red Hat Enterprise Virtualization
Manager 2.2.
14 .3.2.3. Upgrading the Virtual Machines
T his section is intended for Red Hat Enterprise Virtualization systems that are running RHEV-T ools. If
the system is not running RHEV-T ools, the virtual machines do not need to be upgraded, and you need
not follow the procedures outlined below.
For full details on how to work with virtual machines and templates refer to the Red Hat Enterprise
Virtualization documentation suite. Refer http://www.redhat.com/docs/enUS/Red_Hat_Enterprise_Virtualization/.
234
Chapter 14. Upgrading Red Hat Enterprise Virtualization
Before beginning to upgrade Windows virtual machines, use the ISO Uploader to upload the 2.1 and 2.2
versions of RHEV-T ools and RHEV-APT into the ISO directory.
14 .3.2.3.1. Updating Virtual Machines without RHEV-APT
If RHEV-T ools was installed manually (that is, without using RHEV/APT ) on the virtual machines;
manually update the virtual machines with the new RHEV-T ools as follows:
Login into the virtual machine.
Attach the new version of RHEV-T ools.
Run the virtual machine.
14 .3.2.3.2. Updating Virtual Machines with RHEV-APT
If RHEV-APT /RHEV tools were used in 2.1, the virtual machines need to be upgraded to use the new
versions of the tools as described below.
1. Update each virtual machine with the new APT and tools as follows:
Login to the virtual machine.
Attach RHEV-APT CD and manually run it.
Attach RHEV-T ools CD and manually run it.
T he virtual machine reboots automatically.
2. Create new templates that include the new version of RHEV-APT .
Create a new virtual machine.
Run the virtual machine and login to it.
Attach RHEV-APT CD to the virtual machine.
Seal the virtual machine and create a template from it.
235
Red Hat Enterprise Virtualization for Servers 2.2 Administration Guide
Importing virtual machines with virt-v2v
Red Hat Enterprise Virtualization provides the virt-v2v tool, enabling you to convert and import virtual
machines created on other systems such as Xen, KVM and VMware ESX. virt-v2v is available on Red
Hat Network (RHN) in the Red Hat Enterprise Virt V2V T ool (v.5 for x86_64 ) channel.
T o install virt-v2v from RHN, ensure the system is subscribed to the appropriate channel, then run:
yum install virt-v2v
Run virt-v2v as the root user from a Linux shell.
A.1. Converting a Virtual Machine
virt-v2v converts virtual machines from a foreign hypervisor to run on Red Hat Enterprise
Virtualization 2.2 or later. It automatically packages the virtual machines as OVF files and uploads them
to a Red Hat Enterprise Virtualization export storage domain. For more information on export storage
domains, see Section 4.3.3, “Attaching an Export Storage Domain”. virt-v2v always makes a copy of
storage before conversion.
Figure A.1. Converting a virtual machine
From the export storage domain, the OVF files can be imported into Red Hat Enterprise Virtualization
using the administration portal. virt-v2v can currently convert Red Hat Enterprise Linux 4, Red Hat
Enterprise Linux 5, Windows XP, Windows Vista, Windows 7, Windows Server 2003 and Windows
Server 2008 virtual machines running on Xen, KVM and VMware ESX. It will enable VirtIO drivers in the
converted virtual machine if possible.
236
Importing virtual machines with virt-v2v
Figure A.2. Importing a virtual machine
A.1.1. Preparing to Convert a Virtual Machine
Before a virtual machine can be converted, ensure that the following steps are completed.
1. Create an NFS Export domain. virt-v2v can transfer the converted VM directly to an NFS export
storage domain. From the export storage domain, the VM can be imported into a Red Hat
Enterprise Virtualization Data Center. T he storage domain must be mountable by the machine
running virt-v2v. When exporting to a Red Hat Enterprise Virtualization export domain, virtv2v must run as root.
NFS Communication
T he export storage domain is accessed as an NFS share. T o enable NFS access, the
portm ap service must be running on the host used to run virt-v2v. T he network must
also be configured to allow NFS access to the storage server.
2. Specify network mappings in virt-v2v.conf. T his step is optional, and is not required for most
use cases.
If your virtual machine has multiple network interfaces, /etc/virt-v2v.conf must be edited to
specify the network mapping for all interfaces. You can specify an alternative virt-v2v.conf file
with the -f parameter.
If your virtual machine only has a single network interface, it is simpler to use the --network or -bridge parameters, rather than modifying virt-v2v.conf.
Preparing to convert a virtual machine running Linux
T he following is required when converting virtual machines which run Linux, regardless of which
hypervisor they are being converted from.
1. Obtain the software
As part of the conversion process, virt-v2v may install a new kernel and drivers on the virtual
machine. If the virtual machine being converted is registered to Red Hat Network (RHN), the
required packages will be automatically downloaded. If the virtual machine is not registered to
RHN, the virt-v2v.conf file ships with a list of RPMs used for this purpose. T he RPMs
relevant to your virtual machine must be downloaded manually from RHN and made available on
the host running virt-v2v. T he RPMs should be saved in the directory specified by the pathroot configuration element, which by default is /var/lib/virt-v2v/software/. An error
similar to Example A.1, “Missing Package error” will be displayed by virt-v2v if software it
depends upon for a particular conversion is not available.
237
Red Hat Enterprise Virtualization for Servers 2.2 Administration Guide
Example A.1. Missing Package error
virt-v2v: Installation failed because the following files referenced in the
configuration file are required, but missing:
rhel/5/kernel-2.6.18-128.el5.x86_64.rpm
rhel/5/ecryptfs-utils-56-8.el5.x86_64.rpm
rhel/5/ecryptfs-utils-56-8.el5.i386.rpm
T o obtain the relevent RPMs for your environment, repeat these steps for each missing package:
a. Login to Red Hat Network
b. Select Channels
c. Use the Filter by Product Channel function to select the channel for the version of
Red Hat Enterprise Linux running on the virtual machine. In the case of the example shown
in Example A.1, “Missing Package error”, the channel is Red Hat Enterprise Linux
Server 5.3.
d. Select the Packages tab
e. Use the Filter by Package function to locate the missing package
f. Select the package exactly matching the one shown in the error message. For the example
shown in Example A.1, “Missing Package error”, the first package is kernel-2.6.18128.el5.x86_64
g. Select Download Package at the bottom of the package details page
h. Save the downloaded package to the appropriate directory in /var/lib/virtv2v/software. For Red Hat Enterprise Linux 5, the directory is /var/lib/virtv2v/software/rhel/5
Preparing to convert a virtual machine running Windows
T he following is required when converting virtual machines which run Windows, regardless of which
hypervisor they are being converted from.
1. Obtain the Guest T ools ISO
As part of the conversion process for virtual machines running Windows, the Manager will install
drivers using the Guest T ools ISO. See Section A.1.4.2, “Configuration Changes for Windows
Virtual Machines” for details of the process. T he Guest T ools ISO is obtained as follows:
a. From the Manager, Login to Red Hat Network
b. Click on Download Software
c. Select the Red Hat Enterprise Virtualization (x86-64 ) channel
d. Select the Red Hat Enterprise Virt Manager for Desktops (v.2 x86) or Red
Hat Enterprise Virt Manager for Desktops (v.2 x86) channel, as appropriate
for your subscription.
e. Download Guest T ools ISO for 2.2 and save it locally
2. Upload the Guest T ools ISO to the Manager
Upload the Guest T ools ISO using the ISO Uploader. See Section 4.3.2.1, “Uploading ISO Images
using the ISO Uploader” for instructions.
Preparing to convert a local Xen virtual machine
T he following is required when converting virtual machines on a host which used to run Xen, but has
been updated to run KVM. It is not required when converting a Xen virtual machine imported directly from
238
Importing virtual machines with virt-v2v
a running libvirt/Xen instance.
1. Obtain the XML for the virtual machine
virt-v2v uses a libvirt domain description to determine the current configuration of the virtual
machine, including the location of its storage. Before starting the conversion, obtain this from the
host running the virtual machine with the following command:
virsh dumpxml vm-name > vm-name.xml
T his will require booting into a Xen kernel to obtain the XML, as libvirt needs to connect to a
running Xen hypervisor to obtain its metadata. T he conversion process is optimized for KVM, so
obtaining domain data while running a Xen kernel, then performing the conversion using a KVM
kernel will be more efficient than running the conversion on a Xen kernel.
A.1.2. Converting Virtual Machines
Once you have prepared to convert the virtual machines, use virt-v2v to perform the actual
conversions. T his section provides the steps to convert the virtual machines, and the reference table for
virt-v2v. Note that conversions are resource intensive processes, involving copying the whole disk
image for a virtual machine over the network. In typical environments, converting a single virtual machine
takes approximately 5-10 minutes.
A.1.2.1. virt-v2v
virt-v2v converts virtual machines from a foreign hypervisor to run on KVM, managed by libvirt.
virt-v2v -i libvirtxml -o rhev -osd storage.example.com:/exportdomain --network
rhevm vm-name.xml
virt-v2v -o rhev -osd storage.example.com:/exportdomain --network rhevm vm-name
virt-v2v -ic esx://esx.example.com/?no_verify=1 -o rhev -osd
storage.example.com:/exportdomain --network rhevm vm-name
Parameters
-i input
Specifies the input method to obtain the guest for conversion. T he
default is libvirt. Supported options are:
libvirt Guest argument is the name of a libvirt domain.
libvirtxm l Guest argument is the path to an XML file containing
a libvirt domain.
-ic URI
Specifies the connection to use when using the libvirt input method. If
omitted, this defaults to qemu:///system. virt-v2v can currently
automatically obtain guest storage from local libvirt connections, ESX
connections, and connections over SSH. Other types of connection are
not supported.
-o m ethod
Specifies the output method. If no output method is specified, the default
is libvirt. Supported output methods are:
libvirt, create a libvirt guest. See the -oc and -op options. -op
must be specified for the libvirt output method.
rhev, create a guest on a Red Hat Enterprise Virtualization Export
storage domain, which can later be imported using the manager.
T he -osd or Export storage domain must be specified for the rhev
output method.
239
Red Hat Enterprise Virtualization for Servers 2.2 Administration Guide
-oc URI
Specifies the libvirt connection to use to create the converted guest. If
ommitted, this defaults to qemu:///system. Note that virt-v2v must be
able to write directly to storage described by this libvirt connection. T his
makes writing to a remote connection impractical at present.
-op pool
Specifies the pool which will be used to create new storage for the
converted guest.
-osd dom ain
Specifies the path to an existing Red Hat Enterprise Virtualization
Export storage domain.
T he domain must be in the format <host > <path>; for example,
storage.exam ple.com :/rhev/export. T he nfs export must be
mountable and writable by the machine running virt-v2v.
-f file | --config
file
Load the virt-v2v configuration from file. Defaults to /etc/virt-v2v.conf if it
exists.
-n network | -network network
Map all guest bridges or networks which don't have a mapping in the
configuration file to the specified network.
T his option cannot be used in conjunction with --bridge.
-b bridge | --bridge
bridge
Map all guest bridges or networks which don't have a mapping in the
configuration file to the specified bridge.
T his option cannot be used in conjunction with --network.
--help
Display brief help.
--version
Display version number and exit.
A.1.2.2. Converting a Local Xen Virtual Machine
Ensure that the virtual machine's XML is available locally, and that the storage referred to in the XML is
available locally at the same paths.
T o convert the virtual machine from an XML file, run:
virt-v2v -i libvirtxml -o rhev -osd storage.example.com:/exportdomain --network
rhevm vm-name.xml
Where vm -nam e.xm l is the path to the virtual machine's exported xml, and
storage.exam ple.com :/exportdom ain is the export storage domain. You may also use the -network parameter to connect to a locally managed network, or specify multiple mappings in
/etc/virt-v2v.conf.
T o convert the virtual machine from a running Xen hypervisor, run:
virt-v2v -ic xen:/// -o rhev -osd storage.example.com:/exportdomain --network
rhevm vm-name
Where vm -nam e is the domain of the Xen virtual machine and
storage.exam ple.com :/exportdom ain is the export storage domain. You may also use the -network parameter to connect to a locally managed network, or specify multiple mappings in
/etc/virt-v2v.conf.
If your guest uses a Xen para-virtualized kernel (it would be called something like kernel-xen or kernel-
24 0
Importing virtual machines with virt-v2v
xenU), virt-v2v will attempt to install a new kernel during the conversion process. You can avoid this
requirement by installing a regular kernel, which won't reference a hypervisor in its name, alongside the
Xen kernel prior to conversion. You should not make this newly installed kernel your default kernel,
because Xen will not boot it. virt-v2v will make it the default during conversion.
A.1.2.3. Converting a Remote Xen Virtual Machine
Xen virtual machines can be converted remotely via SSH. Ensure that the host running the virtual
machine is accessible via SSH.
T o convert the virtual machine, run:
virt-v2v -o rhev -ic xen+ssh://[email protected] -osd
storage.example.com:/exportdomain --network rhevm vm-name
Where vm host.exam ple.com is the host running the virtual machine, vm -nam e is the domain of the
Xen virtual machine, and storage.exam ple.com :/exportdom ain is the export storage domain.
You may also use the --network parameter to connect to a locally managed network, or specify multiple
mappings in /etc/virt-v2v.conf.
If your guest uses a Xen para-virtualized kernel (it would be called something like kernel-xen or kernelxenU), virt-v2v will attempt to install a new kernel during the conversion process. You can avoid this
requirement by installing a regular kernel, which won't reference a hypervisor in its name, alongside the
Xen kernel prior to conversion. You should not make this newly installed kernel your default kernel,
because Xen will not boot it. virt-v2v will make it the default during conversion.
A.1.2.4 . Converting a Local KVM Virtual Machine
Ensure that the virtual machine is stopped prior to running the v2v process.
T o convert the virtual machine, run:
virt-v2v -o rhev -osd storage.example.com:/exportdomain --network rhevm vm-name
Where vm -nam e is the domain of the KVM virtual machine, and
storage.exam ple.com :/exportdom ain is the export storage domain. You may also use the -network parameter to connect to a locally managed network, or specify multiple mappings in
/etc/virt-v2v.conf.
A.1.2.5. Converting a VMware ESX Virtual Machine
Ensure that the virtual machine is stopped prior to running the v2v process.
T o convert the virtual machine, run:
virt-v2v -ic esx://esx.example.com/ -o rhev -osd
storage.example.com:/exportdomain --network rhevm vm-name
Where vm -nam e is the name of the virtual machine, and storage.exam ple.com :/exportdom ain
is the export storage domain. You may also use the --network parameter to connect to a locally
managed network, or specify multiple mappings in /etc/virt-v2v.conf.
Authenticating to the ESX server
Connecting to the ESX server will require authentication. virt-v2v supports password authentication
when connecting to ESX. It reads passwords from $HOME/.netrc. T he format of this file is described in
24 1
Red Hat Enterprise Virtualization for Servers 2.2 Administration Guide
netrc(5). An example entry is:
machine esx.example.com login root password s3cr3t
.netrc permissions
T he .netrc file must have a permission mask of 0600 to be read correctly by virt-v2v
Connecting to an ESX server with an invalid certificate
In non-production environments, the ESX server may have a non-valid certificate, for example a selfsigned certificate. In this case, certificate checking can be explicitly disabled by adding '?no_verify=1' to
the connection URI as shown below:
... -ic esx://esx.example.com/?no_verify=1 ...
A.1.3. Importing and running the Converted Virtual Machine
On successful completion, virt-v2v will upload the exported virtual machine to the specified export
domain. T o import and run the converted virtual machine:
1. In the Red Hat Enterprise Virtualization administration portal, select the export domain from the
Storage tab.
2. Open the VM Im port tab, select the appropriate virtual machine and click Im port.
3. T he Im port Virtual Machine(s) dialog will display. Select the appropriate Destination
Cluster and Destination Storage, then click OK. T he import process will run in the background and
may take several minutes. While it is running, the imported virtual machine will appear in the
Virtual Machines tab with a status of Image Locked.
4. When the import completes, the status will move to Down and the VM can be manually started.
For more information on importing virtual machines, see Section 6.8.3, “Importing Virtual Machines into
the Destination Data Center”.
Network Configuration
virt-v2v cannot currently reconfigure a virtual machine's network configuration. If the converted virtual
machine is not connected to the same subnet as the source, its network configuration may have to be
updated.
A.1.4. Configuration Changes
virt-v2v will make certain changes to a virtual machine to enable it to run on a KVM hypervisor either
with or without virtio drivers. T hese changes are specific to the virtual machine operating system. T he
details specified here pertain to supported Red Hat based Linux distributions and Windows.
A.1.4 .1. Configuration Changes for Linux Virtual Machines
24 2
Importing virtual machines with virt-v2v
T able A.1. virt-v2v Changes to Linux Virtual Machines
Change
Description
Kernel
Un-bootable, i.e. xen paravirtualised, kernels will
be uninstalled. No new kernel will be installed if
there is a remaining kernel which supports virtio.
If no remaining kernel supports virtio and the
configuration file specifies a new kernel it will be
installed and configured as the default.
X reconfiguration
If the virtual machine has X configured, its display
driver will be updated. See GUEST DRIVERS for
which driver will be used.
Rename block devices
If changes have caused block devices to change
name, these changes will be reflected in /etc/fstab
Configure device drivers
Whether virtio or non-virtio drivers are configured,
virt-v2v will ensure that the correct network and
block drivers are specified in the modprobe
configuration.
initrd
virt-v2v will ensure that the initrd for the default
kernel supports booting the root device, whether
it is using virtio or not.
SELinux
virt-v2v will initiate a relabel of the virtual machine
on the next boot. T his ensures that any changes
it has made are correctly labelled according to the
virtual machine's local policy.
Virt-v2v will configure the following drivers in a Linux virtual machine:
T able A.2. Configured Drivers in a Linux Virtual Machine
VirtIO
X display
cirrus
Block
virtio_blk
Network
virtio_net
In addition, initrd will preload the virtio_pci driver
Non-Virtio
X display
cirrus
Block
IDE
Network
e1000
A.1.4 .2. Configuration Changes for Windows Virtual Machines
virt-v2v can convert virtual machines running Windows XP, Windows Vista, Windows 7, Windows
Server 2003 and Windows Server 2008. T he conversion process for virtual machines running Windows
is slightly to different to the process for virtual machines running Linux. Windows virtual machine images
are converted as follows:
1. virt-v2v installs virtio block drivers.
2. virt-v2v installs the CDUpgrader utility.
24 3
Red Hat Enterprise Virtualization for Servers 2.2 Administration Guide
3. virt-v2v makes registry changes to include the virtio block drivers in the CriticalDeviceDatabase
section of the registry, and ensure the CDUpgrader service is started at the next boot.
At this point, virt-v2v has completed the conversion. T he converted virtual machine is now bootable,
but does not yet have all the drivers installed necessary to function correctly. T he conversion must be
finished by the Red Hat Enterprise Virtualization Manager. T he Manager performs the following steps:
1. T he virtual machine is imported and run on the Manager. See Section A.1.3, “Importing and running
the Converted Virtual Machine” for details.
Important
T he first boot stage can take several minutes to run, and must not be interrupted. It will run
automatically without any administrator intervention other than starting the virtual machine.
T o ensure the process is not interrupted, no user should login to the virtual machine until it
has quiesced. You can check for this in the Manager GUI.
2. T he Manager attaches the Guest T ools CD to the virtual machine.
Note
T he Guest T ools ISO must be uploaded using the ISO Uploader for this step to succeed.
See Preparing to convert a virtual machine running Windows for instructions.
3. CDUpgrader detects the Guest T ools CD and installs all the virtio drivers from it, including a reinstall of the virtio block drivers.
A.1.5. Scripting the v2v process
T he entire v2v process can be scripted, enabling the automated batch processing of a large number of
virtual machines. T he process is broken up into two steps, which must be run on separate hosts.
1. Use virt-v2v to convert the virtual machines and copy them to the export storage domain. T his
step must be run on a Linux host. T he process is detailed in Section A.1.2, “Converting Virtual
Machines”.
2. Once the conversion is complete, use the Red Hat Enterprise Virtualization Powershell API to
import the virtual machines from the export storage domain. T his step must be run on the Red Hat
Enterprise Virtualization Manager server. T he Im port-Vm command performs the import
process, and must be run once per virtual machine.
24 4
Importing virtual machines with virt-v2v
Example A.2. Importing all VMs from the export storage domain to the DataStore
storage domain on the Default Data Center
$exportdomain = Get-StorageDomain | ? {$_.Name -eq "export"}
$datadomain = Get-StorageDomain | ? {$_.Name -eq "DataStore"}
$dc = Select-DataCenter Name=Default
$cluster = Select-Cluster Name=Default
$candidates = Get-VmImportCandidates -StorageDomainId
$exportdomain.StorageDomainId -DataCenterId $dc.DataCenterId
foreach ($candidate in $candidates)
{
Import-Vm -DataCenterId $dc.DataCenterId -SourceDomainId
$exportdomain.StorageDomainId -DestDomainId $datadomain.StorageDomainId ClusterID $cluster.ClusterID -VmId $candidate.VmId
}
Detailed documentation for the Powershell API is available in the Red Hat Enterprise Virtualization
API Guide.
A.1.6. Scripted bulk v2v process
For bulk import scenarios, it is advantageous to be able to perform the scripted v2v process from a
single host. By utilizing the mechanism for remotely accessing the API from Linux clients described
Appendix A of the Red Hat Enterprise Virtualization API Guide, it is possible to run both steps of the
process from a single script on a single Linux host. Figure A.3, “Scripted bulk v2v process” illustrates the
steps performed by the script.
Figure A.3. Scripted bulk v2v process
T o configure and run the scripted bulk v2v process:
24 5
Red Hat Enterprise Virtualization for Servers 2.2 Administration Guide
1. Configure remote access to the Powershell API from your Linux host, using the instructions in
Appendix A of the Red Hat Enterprise Virtualization API Guide.
2. On the Red Hat Enterprise Virtualization Manager, create the file C:\Program
Files\RedHat\RHEVManager\RHEVM Scripting Library\Vm Im port.bat with the
following contents:
Example A.3. VM Import wrapper script
powershell -NonInteractive -command "& 'C:\Program
Files\RedHat\RHEVManager\RHEVM Scripting Library\VmImport.ps1' %1 "
3. On the manager, create the file C:\Program Files\RedHat\RHEVManager\RHEVM
Scripting Library\Vm Im port.ps1 with the following contents. Ensure you edit the script to
contain appropriate values for your environment.
Example A.4 . VM Import Powershell script
# Import all VMs from the export storage domain to the DataStore storage
domain
# Login to RHEV
Login-User rhevadmin password rhevmanager.example.com
# Get the storage domains
$exportdomain = Get-StorageDomain | ? {$_.DomainType -eq "export"}
$datadomain = Get-StorageDomain | ? {$_.Name -eq "DataStore"}
# Get the datacenter and cluster
$dc = Select-DataCenter Name=Default
$cluster = Select-Cluster Name=Default
# Iterate through all import candidates, importing each one
$candidates = Get-VmImportCandidates -StorageDomainId
$exportdomain.StorageDomainId -DataCenterId $dc.DataCenterId
foreach ($candidate in $candidates)
{
Import-Vm -DataCenterId $dc.DataCenterId -SourceDomainId
$exportdomain.StorageDomainId -DestDomainId $datadomain.StorageDomainId ClusterID $cluster.ClusterID -VmId $candidate.VmId
}
4. On the Linux client, create the file v2v.sh with the following contents. Ensure you edit the script to
contain appropriate values for your environment.
24 6
Importing virtual machines with virt-v2v
Example A.5. Single host v2v script
#!/bin/sh
# Declare all VMs to import
XENDOMAINS=("rhelxen" "rhel2")
KVMDOMAINS=("rhelkvm")
VMWAREVMS=("rhel54vmware")
# Iterate through each Xen domain, performing the conversion
for domain in ${XENDOMAINS[@]}
do
virt-v2v -ic xen:///localhost -o rhev -osd
storage.example.com:/exportdomain --network rhevm $domain
done
# Iterate through each KVM domain, performing the conversion
for domain in ${KVMDOMAINS[@]}
do
virt-v2v -o rhev -osd storage.example.com:/exportdomain --network
rhevm $domain
done
# Iterate through each VMware VM, performing the conversion
for vm in ${VMWAREVMS[@]}
do
virt-v2v -ic esx://esx.example.com/?no_verify=1 -o rhev -osd
storage.example.com:/exportdomain --network rhevm $vm
done
# Call the import VM procedure remotely on the RHEV Manager
ssh -f [email protected] "/cygdrive/c/Program\
Files/RedHat/RHEVManager/RHEVM\ Scripting\ Library/VmImport.bat"
5. Run the v2v.sh script. It can take several hours to convert and import a large number of virtual
machines.
24 7
Red Hat Enterprise Virtualization for Servers 2.2 Administration Guide
Red Hat Enterprise Linux Host Package and Port Requirements
T his section contains additional information if required for the addition of Red Hat Enterprise Linux 5.4
and higher Hosts.
B.1. Using Red Hat Network to Acquire the Required Packages for
Red Hat Enterprise Linux 5.4 and higher Hosts
Before you can add a Red Hat Enterprise Linux 5.4 and higher host to the Red Hat Enterprise
Virtualization platform, ensure that you have all the requisite virtualization packages. If your machine is
subscribed to Red Hat Network or has a yum repo with the Red Hat Enterprise Linux 5.4 and higher
media, the packages will be available automatically.
Note
If you do not have the appropriate subscription entitlements, contact Red Hat Customer Service.
Subscribe to the virtualization channels on RHN
1. Register the system with RHN (using the rhn_register command) if the system is not
registered.
2. Login to Red Hat Network.
3. Select Systems tab.
4. Click on the appropriate system.
5. Click on the link "Alter Channel Subscriptions"
6. Add the following channels:
Red Hat Enterprise Virt Management Agent (v.5 for x86_64)
RHEL Virtualization (v. 5 for 64-bit x86_64).
7. Save the channel subscriptions and repeat this for other systems as required.
T he following list of packages is not necessarily complete, as packages may be added or removed from
time to time. It is provided as a guideline, not a mandatory list.
List of Packages
kvm
kvm-qemu-img
kvm-tools
bridge-utils
iscsi-initiator-utils
mesa-libGLU
SDL
24 8
Red Hat Enterprise Linux Host Package and Port Requirements
sg3_utils-libs
sg3_utils-devel
sg3_utils
lm_sensors
net-snmp
net-snmp-utils
pexpect
OpenIPMI-tools
fence-agents
vdsm-reg
vdsm-cli
B.2. Required Ports
Various network ports are required to be open for management and other virtualization features. Host
ports are automatically configured for Red Hat Enterprise Virtualization Hypervisor hosts, but need to be
manually configured on Red Hat Enterprise Linux hosts. T his section also lists other ports that need to
be open.
Host Ports
ICMP requests must be accepted. vdsm-reg also performs some additional network tests using ICMP
(traceroute), so the Manager has to be able to accept ICMP requests for vdsm-reg to work properly,
or you can update vdsm .conf (on the host) with the MAC of the Manager.
Port 22 must be open for SSH access and the initial installation.
Ports 5634 to 6166 are used for virtual machine console access.
Ports 49152 to 49216 are used for migrations of virtual machines between hosts. Migration may use
any port in this range depending on the number of concurrent migrations occurring.
Port 54321 is used by default, by vdsm to accept connections from the Manager, and for storage and
inter-host communication. T his port can be modified.
Ports 5534 - 6166 must be open to accept SPICE or VNC connections from thin pcs or client
machines.
Red Hat Enterprise Virtualization Manager Ports
ICMP requests must be accepted by the Manager. Because vdsm-reg also performs some additional
network tests using ICMP (traceroute), the Manager must be able to accept ICMP requests.
By default, ports 80 or 443 (depending on the security settings on the Manager) are used by the
vdsm-reg service to communicate information about the host to the Manager. T hese ports must be
open on the Administrator and User portals on Red Hat Enterprise Virtualization Manager.
Ports 8006-8009 must be open on the Manager to accept WPF communications from the
Administrator Portal.
24 9
Red Hat Enterprise Virtualization for Servers 2.2 Administration Guide
KVM Virtual Machine Timing Management
Virtualization poses various challenges for virtual machine time keeping. Virtual machines which use the
T ime Stamp Counter (T SC) as a clock source may suffer timing issues as some CPUs do not have a
constant T ime Stamp Counter. Virtual machines running without accurate timekeeping can have serious
affects on some networked applications as your virtual machine will run faster or slower than the actual
time.
KVM works around this issue by providing virtual machines with a para-virtualized clock. T he KVM
pvclock provides a stable source of timing for KVM guests that support it. Alternatively, some virtual
machines may use other x86 clock sources for their timing in future versions of those operating
systems.
Presently, only Red Hat Enterprise Linux 5.4 and higher virtual machines fully support the paravirtualized clock.
Virtual machines can have several problems caused by inaccurate clocks and counters:
Clocks can fall out of synchronization with the actual time which invalidates sessions and affects
networks.
Virtual machines with slower clocks may have issues migrating.
T hese problems exist on other virtualization platforms and timing should always be tested.
NTP
T he Network T ime Protocol (NT P) daemon should be running on the host and the virtual
machines. Enable the ntpd service:
# service ntpd start
Add the ntpd service to the default startup sequence:
# chkconfig ntpd on
Using the ntpd service should minimize the affects of clock skew in all cases.
Determining if your CPU has the constant T ime Stamp Counter
Your CPU has a constant T ime Stamp Counter if the constant_tsc flag is present. T o determine if
your CPU has the constant_tsc flag run the following command:
$ cat /proc/cpuinfo | grep constant_tsc
If any output is given your CPU has the constant_tsc bit. If no output is given follow the instructions
below.
Configuring hosts without a constant T ime Stamp Counter
Systems without constant time stamp counters require additional configuration. Power management
features interfere with accurate time keeping and must be disabled for virtual machines to accurately
keep time with KVM.
250
KVM Virtual Machine Timing Management
Note
T hese instructions are for AMD revision F cpus only.
If the CPU lacks the constant_tsc bit, disable all power management features (BZ #513138). Each
system has several timers it uses to keep time. T he T SC is not stable on the host, which is sometimes
caused by cpufreq changes, deep C state, or migration to a host with a faster T SC. Deep C sleep
states can stop the T SC. T o prevent the kernel using deep C states append
"processor.m ax_cstate=1" to the kernel boot options in the grub.conf file on the host:
term Red Hat Enterprise Linux Server (2.6.18-159.el5)
root (hd0,0)
kernel /vmlinuz-2.6.18-159.el5 ro root=/dev/VolGroup00/LogVol00 rhgb quiet
processor.max_cstate=1
Disable cpufreq (only necessary on hosts without the constant_tsc) by editing the
/etc/sysconfig/cpuspeed configuration file and change the MIN_SPEED and MAX_SPEED variables
to the highest frequency available. Valid limits can be found in the
/sys/devices/system /cpu/cpu* /cpufreq/scaling_available_frequencies files.
Using the para-virtualized clock with Red Hat Enterprise Linux virtual machines
For certain Red Hat Enterprise Linux virtual machines, additional kernel parameters are required. T hese
parameters can be set by appending them to the end of the /kernel line in the /boot/grub/grub.conf file of
the virtual machine.
Note
T he process of configuring kernel parameters can be automated using the ktune package
T he ktune package provides an interactive Bourne shell script, fix_clock_drift.sh. When run as
the superuser, this script inspects various system parameters to determine if the virtual machine on
which it is run is susceptible to clock drift under load. If so, it then creates a new grub.conf.kvm file in
the /boot/grub/ directory. T his file contains a kernel boot line with additional kernel parameters that
allow the kernel to account for and prevent significant clock drift on the KVM virtual machine. After
running fix_clock_drift.sh as the superuser, and once the script has created the
grub.conf.kvm file, then the virtual machine's current grub.conf file should be backed up manually
by the system administrator, the new grub.conf.kvm file should be manually inspected to ensure that
it is identical to grub.conf with the exception of the additional boot line parameters, the
grub.conf.kvm file should finally be renamed grub.conf, and the virtual machine should be
rebooted.
T he table below lists versions of Red Hat Enterprise Linux and the parameters required for virtual
machines on systems without a constant T ime Stamp Counter.
Red Hat Enterprise Linux
Additional virtual machine kernel
parameters
5.4 AMD64/Intel 64 with the para-virtualized clock
Additional parameters are not required
5.4 AMD64/Intel 64 without the para-virtualized
clock
divider=10 notsc lpj=n
251
Red Hat Enterprise Virtualization for Servers 2.2 Administration Guide
5.4 x86 with the para-virtualized clock
Additional parameters are not required
5.4 x86 without the para-virtualized clock
divider=10 clocksource=acpi_pm lpj=n
5.3 AMD64/Intel 64
divider=10 notsc
5.3 x86
divider=10 clocksource=acpi_pm
4.8 AMD64/Intel 64
notsc divider=10
4.8 x86
clock=pmtmr divider=10
3.9 AMD64/Intel 64
Additional parameters are not required
3.9 x86
Additional parameters are not required
Using the Real-T ime Clock with Windows virtual machines
Windows uses the both the Real-T ime Clock (RT C) and the T ime Stamp Counter (T SC). For Windows
virtual machines the Real-T ime Clock can be used instead of the T SC for all time sources which
resolves virtual machine timing issues.
T o enable the Real-T ime Clock for the PMT IMER clocksource (the PMT IMER usually uses the T SC) add
the following line to the Windows boot settings. Windows boot settings are stored in the boot.ini file. Add
the following line to the boot.ini file:
/use pmtimer
For more information on Windows boot settings and the pmtimer option, refer to Available switch options
for the Windows XP and the Windows Server 2003 Boot.ini files.
252
Configuring Red Hat Enterprise Linux 5.4 or higher virtual machines to use SPICE
Configuring Red Hat Enterprise Linux 5.4 or higher virtual
machines to use SPICE
SPICE is a remote display protocol designed for virtual environments that enables you to view a
virtualized desktop or server. SPICE delivers a high quality user experience, keeps CPU consumption
low, and supports high quality video streaming.
Using SPICE on a Linux machine also significantly improves the movement of the mouse cursor on the
console of the virtual machine. T o use SPICE, the X-Windows system requires additional qxl drivers. T he
qxl drivers are provided with Red Hat Enterprise Linux 5.4 and higher. Older versions are not supported.
Installing SPICE on a virtual machine running Red Hat Enterprise Linux significantly improves the
performance of the GUI.
Note
T ypically, this is most useful for virtual desktops where the user requires the use of the GUI.
System administrators who are creating virtual servers may prefer not to configure SPICE if their
use of the GUI is minimal.
T o install the qxl drivers:
1. Log into the Red Hat Enterprise Linux virtual machine, open a terminal.
2. Run yum install xorg-x11-drv-qxl. T he qxl drivers are installed and ready for use. You
can use one of the following methods, use either Step 3 or Step 4.
3. Configure X-Windows to use the qxl drivers (with GNOME)
Click System->Administration->Display
Click the Hardware tab and click Video Cards Configure
Select qxl, and click OK
Click OK
4. Alternatively, edit the /etc/X11/xorg.conf file.
Backup /etc/X11/xorg.conf using the cp /etc/X11/xorg.conf
/etc/X11/xorg.conf.$$.backup command.
Make the following change to the Device Section, changing the Driver to qxl, from the existing,
for example, cirrus.
Section "Device"
Identifier "Videocard0"
Driver
"qxl".
EndSection
5. Log out and log back into the virtual machine to restart X-Windows.
Configuring the tablet and mouse to use SPICE
1. Verify that the tablet device is available on your guest:
/sbin/lsusb -v | grep 'QEMU USB Tablet'
If there is no output from the command, do not continue configuring the tablet.
2. Backup /etc/X11/xorg.conf using the cp /etc/X11/xorg.conf
253
Red Hat Enterprise Virtualization for Servers 2.2 Administration Guide
/etc/X11/xorg.conf.$$.backup command.
3. Make the following changes to /etc/X11/xorg.conf:
Section "ServerLayout"
Identifier
"single head configuration"
Screen
0 "Screen0" 0 0
InputDevice
"Keyboard0" "CoreKeyboard"
InputDevice
"Tablet" "SendCoreEvents"
InputDevice
"Mouse" "CorePointer"
EndSection
Section "InputDevice"
Identifier "Mouse"
Driver
"void"
#Option
"Device" "/dev/input/mice"
#Option
"Emulate3Buttons" "yes"
EndSection
Section "InputDevice"
Identifier "Tablet"
Driver
"evdev"
Option
"Device" "/dev/input/event2"
Option "CorePointer" "true"
EndSection
4. Log out and log back into the virtual machine to restart X-Windows.
254
Log Files
Log Files
T his section contains a complete list of log files from the Red Hat Enterprise Hypervisor, Red Hat
Enterprise Virtualization Manager, and other components or the platform.
E.1. Red Hat Enterprise Virtualization Hypervisor Logs
E.1.1. Log Files Lists
T able E.1. Installation Logs
Log File
Description
/var/log/ovirt.log
Contains a complete output of the hypervisor
installation process
/var/log/vdsm -reg/vdsm -reg.log
Hypervisor registration with the RHEV-M server
log.
/var/log/vdsm reg/vds_bootstrap_gen.log
Indicates whether the certificates and keys are
created for ssl communication with the RHEV-M
Server.
/var/log/vdsm reg/vds_bootstrap_com plete.log
A complete RHEV-H installation log, after it has
been registered on the RHEV-M.
T able E.2. Red Hat Enterprise Linux Logs
Log File
Description
/tm p/vds_installer
Contains a complete output of the RHEL
installation process
/tm p/vds_bootstrap
A complete RHEL installation log, after it has been
registered on RHEV-M.
T able E.3. VDSM Logs
Log File
Description
/var/vdsm /
T his directory contains all the running VM files,
such as .pid, .socket and .stdio.dump. T he dump
files contains a full stdio and stderr of each
running VM. It can be also a good indicator for
SPICE crashes.
/var/log/vdsm /vdsm .log
T he vdsm log file reflects all the vdsmd service
activity. T his is the main system activity log file.
/var/log/vdsm /spm -lock.log
T he Storage Pool Manager (SPM) uses the lease
lock algorithm for managing the storage. It works
as a regular lock, but time limited. T he spm-lock
logs this process.
/var/log/core
Contains the core dump files of KVM and VDSM.
E.1.2. Accessing Standard Linux system logs with sosreport
255
Red Hat Enterprise Virtualization for Servers 2.2 Administration Guide
For better debugging, use sosreport to collect system dump files and a wide collection of command
outputs.
T o use sosreport
1. Open a terminal as the root user and type sosreport.
2. Follow the prompts to complete.
3. Check the sosreport output archive in /tm p. VDSM related command outputs can be found at
/sos_com m ands/vdsm / in the sosreport archive.
E.2. Red Hat Enterprise Virtualization Manager Logs
T his is the list of logs on the Red Hat Enterprise Virtualization Manager.
T able E.4 . Red Hat Enterprise Virtualization Manager Installation Logs
Log File
Description
C:\Program
Files\RedHat\RHEVManager\InstallLogs
\* RHEVM.log
Reflects all RHEV-M installation processes.
T able E.5. Service Activity
Log File
Description
install_path\RHEVManager\Service\log
\vdc.log-nam e
Reflects all RHEV-Manager GUI crashes, Active
Directory look-ups, Database issues, and other
issues.
install_path\RHEVManager\Service\log
\vdc-history-log.txt
T he log for RHEV-M Data History Collection
Service.
install_path\RHEVManager\NetConsole\
logs\NetConsole.log
T his folder holds the Net Console log +
messages logged from the hosts ([hostIP].log).
install_path\RHEVManager\UserPortal\
log\web-log.txt
Contains all User Portal exceptions.
Using the Log Collector Utility
Red Hat Enterprise Virtualization manager provides a utility that collects all the logs and stores them in
an archive. On the server running Red Hat Enterprise Virtualization manager, click Start->All
Programs->RedHat->RHEVManager->Log Collector. All the system information, log and database
backup files are placed in one archive.
256
Log Files
T able E.6. Virtual Machine Logs
Log File
Description
c:\program
files\Redhat\RHEV\T ools\InstallLogs\
Contains all the Installation logs and reflects all of
the Guest T ools install process. T his directory
contains log files for each installed component of
the RHEV T ools and a log file of the T ools Setup
application.
install_path\RHEV\drivers\Agent\log\
RHEV-Agent
Agent log reflects the conversation between the
host and the vm.
T able E.7. SPICE Client Logs
Log File
Description
%tem p%/spice.log
Contains all the SPICE Client activity log and
indicates all the connection issues.
%tem p%/usbrdr.log
Contains USB Redirector logs.
257
Red Hat Enterprise Virtualization for Servers 2.2 Administration Guide
Red Hat Enterprise Virtualization Open Virtualization Files
Format
Red Hat Enterprise Virtualization Manager imports and exports virtual machine images and templates
using the industry-standard Open Virtualization Format (OVF). With this feature, customers can more
easily move virtual machine images between environments, publish templates or simply create backups
of their environment. T he OVF file format is a legal xml file representing either a Virtual Machine or a
T emplate. T he OVF represents the virtual machine in complete detail enabling the virtual machine to be
exported from one physical host and imported into another physical host. T he OVF contains the
following elements:
<ovf:Envelope >
<References / >
<Section xsi:type="ovf:NetworkSection_Type" / >
<Section xsi:type="ovf:DiskSection_Type" /
>
<Content />
</ovf:Envelope >
F.1. Envelope
T he Envelope element is the top level tag that contains all the metadata for the virtual machines
(including virtual hardware). It contains:
A version indication, defined by the XML namespace URIs.
A References element provides file references to all external files that are part of the OVF package,
typically virtual disk files, ISO images, and internationalization resources.
Section elements providing metadata. Section Network provides general network information. Section
disk provides information on each hard disk.
Content, description of the actual information on the virtual machine including network,cpu, memory,
monitor, usb devices and disk images.
A sample ovf file is shown below.
258
Red Hat Enterprise Virtualization Open Virtualization Files Format
<?xml version='1.0' encoding='UTF-8'?><ovf:Envelope
xmlns:ovf="http://schemas.dmtf.org/ovf/envelope/1/"
xmlns:rasd="http://schemas.dmtf.org/wbem/wscim/1/cimschema/2/CIM_ResourceAllocationSettingData"
xmlns:vssd="http://schemas.dmtf.org/wbem/wscim/1/cimschema/2/CIM_VirtualSystemSettingData" xmlns:xsi="http://www.w3.org/2001/XMLSchemainstance" ovf:version="0.9">
<References>
<File ovf:href="0a255a6b-11c1-48d6-bde6-7b7f3aade062/113782cb-2fad-433c-b537e2c026a86da2" ovf:id="113782cb-2fad-433c-b537-e2c026a86da2" ovf:size="1073741824"
ovf:description="_Undefined_Wed Apr 21 15:48:10 IDT 2010" />
</References>
<Section xsi:type="ovf:NetworkSection_Type">
<Info>List of networks</Info>
<Network ovf:name="Network 1" />
</Section>
<Section xsi:type="ovf:DiskSection_Type">
<Info>List of Virtual Disks</Info>
<Disk ovf:diskId="113782cb-2fad-433c-b537-e2c026a86da2" ovf:size="1"
ovf:actual_size="0" ovf:vm_snapshot_id="df2ef055-9c20-46c3-b1d3-725e93e26257"
ovf:parentRef="" ovf:fileRef="0a255a6b-11c1-48d6-bde6-7b7f3aade062/113782cb-2fad433c-b537-e2c026a86da2"
ovf:format="http://www.vmware.com/specifications/vmdk.html#sparse" ovf:volumeformat="RAW" ovf:volume-type="Sparse" ovf:disk-interface="VirtIO" ovf:disktype="System" ovf:boot="true" ovf:wipe-after-delete="false" />
</Section>
<Content ovf:id="out" xsi:type="ovf:VirtualSystem_Type">
<Name>vm1</Name>
<TemplateId>00000000-0000-0000-0000-000000000000</TemplateId>
<TemplateName>Blank</TemplateName>
<Description></Description>
<Domain></Domain>
<CreationDate>2010/04/21 12:48:00</CreationDate>
<IsInitilized>false</IsInitilized>
<IsAutoSuspend>false</IsAutoSuspend>
<TimeZone></TimeZone>
<IsStateless>false</IsStateless>
<Origin>0</Origin>
<VmType>0</VmType>
<DefaultDisplayType>1</DefaultDisplayType>
<Section ovf:id="ba5087ae-62d7-47f1-95bc-217bb0bef16f" ovf:required="false"
xsi:type="ovf:OperatingSystemSection_Type">
<Info>Guest Operating System</Info>
<Description>Unassigned</Description>
</Section>
<Section xsi:type="ovf:VirtualHardwareSection_Type">
<Info>1 CPU, 512 Memory</Info>
<System>
<vssd:VirtualSystemType>RHEVM 4.5.0.0</vssd:VirtualSystemType>
</System>
<Item>
<rasd:Caption>1 virtual cpu</rasd:Caption>
<rasd:Description>Number of virtual CPU</rasd:Description>
<rasd:InstanceId>1</rasd:InstanceId>
<rasd:ResourceType>3</rasd:ResourceType>
<rasd:num_of_sockets>1</rasd:num_of_sockets>
<rasd:cpu_per_socket>1</rasd:cpu_per_socket>
</Item>
<Item>
<rasd:Caption>512 MB of memory</rasd:Caption>
259
Red Hat Enterprise Virtualization for Servers 2.2 Administration Guide
<rasd:Description>Memory Size</rasd:Description>
<rasd:InstanceId>2</rasd:InstanceId>
<rasd:ResourceType>4</rasd:ResourceType>
<rasd:AllocationUnits>MegaBytes</rasd:AllocationUnits>
<rasd:VirtualQuantity>512</rasd:VirtualQuantity>
</Item>
<Item>
<rasd:Caption>Drive 1</rasd:Caption>
<rasd:InstanceId>113782cb-2fad-433c-b537-e2c026a86da2</rasd:InstanceId>
<rasd:ResourceType>17</rasd:ResourceType>
<rasd:HostResource>0a255a6b-11c1-48d6-bde6-7b7f3aade062/113782cb-2fad-433cb537-e2c026a86da2</rasd:HostResource>
<rasd:Parent>00000000-0000-0000-0000-000000000000</rasd:Parent>
<rasd:Template>00000000-0000-0000-0000-000000000000</rasd:Template>
<rasd:ApplicationList></rasd:ApplicationList>
<rasd:StorageId>2eb22a63-80b9-4acf-8d0a-49efb8b2dc40</rasd:StorageId>
<rasd:StoragePoolId>4303344b-8700-437f-9be0-e3e0f5f4490c</rasd:StoragePoolId>
<rasd:CreationDate>1970/01/07 05:55:51</rasd:CreationDate>
<rasd:LastModified>1970/01/07 05:55:51</rasd:LastModified>
<rasd:last_modified_date>1970/01/01 00:00:00</rasd:last_modified_date>
</Item>
<Item>
<rasd:Caption>Ethernet adapter on rhevm</rasd:Caption>
<rasd:InstanceId>3</rasd:InstanceId>
<rasd:ResourceType>10</rasd:ResourceType>
<rasd:ResourceSubType>3</rasd:ResourceSubType>
<rasd:Connection>rhevm</rasd:Connection>
<rasd:Name>eth0</rasd:Name>
<rasd:MACAddress>00:1a:4a:16:84:03</rasd:MACAddress>
</Item>
<Item>
<rasd:Caption>USB Controller</rasd:Caption>
<rasd:InstanceId>4</rasd:InstanceId>
<rasd:ResourceType>23</rasd:ResourceType>
<rasd:UsbPolicy>Enabled</rasd:UsbPolicy>
</Item>
<Item>
<rasd:Caption>Graphical Controller</rasd:Caption>
<rasd:InstanceId>5</rasd:InstanceId>
<rasd:ResourceType>20</rasd:ResourceType>
<rasd:VirtualQuantity>1</rasd:VirtualQuantity>
</Item>
</Section>
</Content>
</ovf:Envelope>
F.2. References Element
T he References element identifies all the virtual images(snapshots). Each image is defined by the
following attributes:
Href : a uniq id of the image in the pool ([Image Group Id]/[Image Id])
Id: Image guid
Size: Size in bytes
Description: General string description of the virtual image
260
Red Hat Enterprise Virtualization Open Virtualization Files Format
F.3. Network Section Elements
<Section xsi:type="ovf:NetworkSection_T ype"> provides general informaion of the network
requirements for the virtual machines. T he Network Section is defined by the following attributes:
Info: general information (currently not in use)
Network: general information (currently not in use)
F.4. Disk Section Elements
<Section xsi:type="ovf:DiskSection_T ype> provides general information of each disk
snapshot as defined by the following attributes:
Info: General information
Disk: Disk Attributes:
size: image size in GB
actual_size: Actual size in GB that is written to hard disk
Diskid: guid of the image
parentRef: parent snapshot id (can be empty)
fileRef:unique id of the image in the storage pool, it’s contains two guids separated by slash,
ie: [Image Group Id]/[Image Id]
Volum e-form at: one of the following: RAW, COW, Unassigned
Volum e-type: one of the following: Sparse, Preallocated, Unassigned
form at: information on the disk format (usually an url to the specification)
F.5. Section Content Elements
T he Content section represents the main virtual machine data. Content OS Section contains the
information on the oeprating system and Content Hardware section contains information on the virtual
hardware.
261
Red Hat Enterprise Virtualization for Servers 2.2 Administration Guide
T able F.1. Section Content
Attributes
Description
Name
T he name of the virtual machine in a friendly form.
T emplateID
Virtual machine template Guid (if the Vm doesn’t
have template use empty guid)
T emplateName
text for the template name (if the Vm doesn’t have
template use “Blank”)
Description
General description (can be empty)
Domain
Active directory domain(can be empty, future use)
CreationDate
Date om which the vm was created
IsInitialized:
Boolean value vm initialized
IsAutoSuspend
Boolean value represent if auto suspend
capability
T imeZ one
Vm time zone (can be empty)
IsStateless
Boolean value is vm stateless
Origin
the Vm Origin: Rhevm=0, VmWare=1, Xen=2
VmT ype
type of Vm: Desktop = 0, Server = 1
DefaultDisplayT ype
Display type: vnc = 0, qxl = 1
T able F.2. Content OS Section
<Section xsi:type="ovf:OperatingSystemSection_T ype>
Attribute
Element
Id
guid (we use the Vm id)
Info
Description
262
Description
general information (Not in use)
the Os name
Red Hat Enterprise Virtualization Open Virtualization Files Format
T able F.3. Content Hardware Section
<Section xsi:type="ovf:VirtualHardwareSection_T ype>
Elements
Description
Info
Number of CPUs, Memory size
in MB (separated by comma) - 1
CPU, 1024 Memory
System Elements
VirtualSystemT ype
information on the virtual system
(like kvm-solidice-4.3)
Caption
text information on the CPU (1
CPU)
Description
description of the CPU
InstanceId
Must be 1
ResourceT ype
Must be 3
num_of_sockets
Number of on board cpu
sockets
cpu_per_socket
number of cores for each socket
Caption
text information on the
memory(512 MB)
Description
text information on the Memory
InstanceId
Must be 2
ResourceT ype
Must be 4
AllocationUnits
can be Megabyte or
Gigabyte(RHEV uses Megabyte)
VirtualQuantity
Number of Memory in
AllocationUnits
Caption
information on the driver
(Usually “Drive 1”, “Drive 2”)
InstanceId
Guid of the Snapshot id
ResourceT ype
must be 17
HostResource
unique id of the image in the
storage pool, it’s contains two
guids separated by slash, ie:
[Image Group Id]/[Image Id]
parent
parent snapshot id (can be
empty)
T emplate
template Guid (if the image
doesn’t have template use
empty guid)
ApplicationList
comma separated string of
installed applications
StorageId
Storage Domain Id
Item (CPU) Elements
Item (Memory) Elements
Item (Drive) Elements (for each
disk snapshot)
263
Red Hat Enterprise Virtualization for Servers 2.2 Administration Guide
StoragePoolId
Storage Pool Id
CreationDate
date of creating the image
snapshot
LastModified
date of the images last modified
date (same as LastModified –
need to be removed)
Caption
text information on the Ethernet
(usually Ethernet adapter on
NetworkName)
InstanceId
Must be 3
ResourceT ype
Must be 10
ResourceSubT ype
Must be 2
Connection
the bridge name (br0, sw0)
Name
the interface name (eth0, eth1)
MACAddress
mac address (can be empty)
Caption
Caption for the USB controller
(can be any text)
InstanceId
Must be 5
ResourceT ype
Must be 23
ResourceSubT ype
Must be 2
USBPolicy
USB policy string (Enabled or
not)
Caption
Caption for the Graphics
controller (can be any text)
InstanceId
Must be 6
ResourceT ype
Must be 20
VirtualQuantity
number of PCI graphics slots
USBPolicy
USB policy string (Enabled or
not)
Item (Ethernet) Elements (for
each Ethernet):
Item (USB) Elements:
Item (Graphics) Elements:
264
Additional References
Additional References
T he following resources are available at http://www.redhat.com/docs/.
Red Hat Enterprise Virtualization Hypervisor Deployment Guide
A guide to the installation of Red Hat Enterprise Virtualization Hypervisors.
Red Hat Enterprise Linux Virtualization Guide
A guide to the installation, configuration, administration and troubleshooting of virtualization
technologies in Red Hat Enterprise Linux.
Red Hat Enterprise Linux 5 Installation Guide
A guide to the installation of Red Hat Enterprise Linux 5.
Red Hat Enterprise Linux 5 Deployment Guide
A guide to the deployment, configuration and administration of Red Hat Enterprise Linux 5.
Red Hat Enterprise Linux 5.5 Online Storage Reconfiguration Guide
A guide to reconfiguring iSCSI and Fibre Channel storage devices.
Red Hat Enterprise Linux DM-Multipath Guide
A guide to configuring and administering Device-Mapper Multipathing.
265
Red Hat Enterprise Virtualization for Servers 2.2 Administration Guide
Revision History
Revision 2-9.4 00
Rebuild with publican 4.0.0
2013-10-31
Rüdiger Landmann
Revision 2-9
2013-09-29
BZ #1007864 - s/Red Had/Red Hat/g
Z ac Dover
Revision 2-8
Rebuild for Publican 3.0
2012-07-18
Anthony T owns
Revision 6-0
Documentation Update
Monday Feb 14 2012
T im Hildred
Revision 5-0
Documentation Update
Monday March 14 2011
Stephen Gordon
Revision 4 -0
Wednesday July 14 2010
David Jorm
Added explanation of the need to configure the rhevm network before attaching a cluster, BZ #604650
Revision 3-0
Monday July 12 2010
Added Windows support for virt-v2v
David Jorm
Revision 2-0
T hursday June 24 2010
Removed reference to beta channel on RHN, BZ #607416
David Jorm
Revision 1-0
RHEV 2.2
General Availability
Susan Burgess
266
T hursday June 10 2010