1
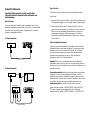
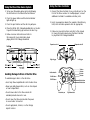
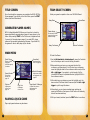
docs.com
http://www.replacement
Safety Information
TABLE OF CONTENTS
About Photosensitive Seizures
A very small percentage of people may experience a seizure when
exposed to certain visual images, including flashing lights or patterns
that may appear in video games. Even people who have no history of
seizures or epilepsy may have an undiagnosed condition that can
cause these “photosensitive epileptic seizures” while watching video
games. These seizures may have a variety of symptoms, including
lightheadedness, altered vision, eye or face twitching, jerking or
shaking of arms or legs, disorientation, confusion, or momentary loss
of awareness. Seizures may also cause loss of consciousness or
convulsions that can lead to injury from falling down or striking nearby
objects. Immediately stop playing and consult a doctor if you
experience any of these symptoms. Parents should watch for or ask
their children about the above symptoms—children and teenagers are
more likely than adults to experience these seizures. The risk of
photosensitive epileptic seizures may be reduced by sitting farther
from the television screen, using a smaller television screen, playing
in a well-lit room, and not playing when you are drowsy or fatigued. If
you or any of your relatives have a history of seizures or epilepsy,
consult a doctor before playing.
Other Important Health and Safety Information
The Xbox Instruction Manual contains important health and safety
information that you should read and understand before using this software.
Begin the Game . . . . . . . . . . . . . . . . . . . . . . . . . . . . . . . 6
Default Control Summary . . . . . . . . . . . . . . . . . . . . . . . . 6
Main Menu . . . . . . . . . . . . . . . . . . . . . . . . . . . . . . . . . . 8
Playing a Quick Game . . . . . . . . . . . . . . . . . . . . . . . . . . . 8
Selecting Teams . . . . . . . . . . . . . . . . . . . . . . . . . . . . 9
On the Court . . . . . . . . . . . . . . . . . . . . . . . . . . . . . . . . . 10
Pause Menu . . . . . . . . . . . . . . . . . . . . . . . . . . . . . . 15
Choosing a Game Mode . . . . . . . . . . . . . . . . . . . . . . . . . 20
Exhibition . . . . . . . . . . . . . . . . . . . . . . . . . . . . . . . . 21
Legacy . . . . . . . . . . . . . . . . . . . . . . . . . . . . . . . . . . 21
Season . . . . . . . . . . . . . . . . . . . . . . . . . . . . . . . . . . 34
Tournament . . . . . . . . . . . . . . . . . . . . . . . . . . . . . . 35
Practice . . . . . . . . . . . . . . . . . . . . . . . . . . . . . . . . . 39
Gym Rat . . . . . . . . . . . . . . . . . . . . . . . . . . . . . . . . . 40
Avoid Damage to Your Television
Options . . . . . . . . . . . . . . . . . . . . . . . . . . . . . . . . . . . . . 40
Do not use with certain televisions. Some televisions, especially frontor rear-projection types, can be damaged if any video games, including
Xbox games, are played on them. Static images presented during the
normal course of game play may “burn in” to the screen, causing a
permanent shadow of the static image to appear at all times, even
when video games are not being played. Similar damage may occur
from static images created when placing a video game on hold or
pause. Consult your television owner’s manual to determine if video
games can be played safely on your set. If you are unable to find this
information in the owner’s manual, contact your television dealer or
the manufacturer to determine if video games can be played safely on
your set.Unauthorized copying, reverse engineering, transmission,
public performance, rental, pay for play, or circumvention of copy
protection is strictly prohibited.
Save/Load . . . . . . . . . . . . . . . . . . . . . . . . . . . . . . . . . . . 42
Roster Manager . . . . . . . . . . . . . . . . . . . . . . . . . . . . . . . 43
Sega Sports Challenge . . . . . . . . . . . . . . . . . . . . . . . . . . 45
Play Live . . . . . . . . . . . . . . . . . . . . . . . . . . . . . . . . . . . . 47
1
Connect to Xbox Live
Step 2: Go Live
Important! Before using this product, read the Xbox
Instruction Manual for important safety information and
health warnings.
You’ll need to set up an Xbox Live account to play games online.
Here’s how:
1. Insert an Xbox Live Starter Kit disc or game disc into the disc tray.
Check game packaging to see if the game supports Xbox Live play.
Step 1: Connect
To connect your Xbox console directly to broadband, see A. Or, to
share your broadband connection with a PC, see B. For more details
and other home networking options, including Internet connection
sharing, see www.xbox.com/live.
A. Direct Connection
2. From within the game, select the option for Xbox Live. At this
point, the Xbox console will try to go online. If it works, create your
Xbox Live account by following the instructions on screen and
entering your subscription code when prompted. If the Xbox
console can’t go online automatically, you’ll get an error message.
Go on to Step 3.
Step 3: Configure (if necessary)
Cable/DSL modem
If you can’t go online automatically, use Network Setup in the Xbox
Dashboard to enter some network settings. You may need to enter
information such as a host name, MAC address, or an ISP user
name and password, which you received from your broadband
provider when you signed up for service. Once you have the
information, enter it in the Xbox Dashboard.
Ethernet cable (RJ-45)
Important! Xbox Live is a subscription service. You will need a
subscription code to set up an Xbox Live account and play online. To
find out how to get a subscription code, visit your local retailer or see
www.xbox.com/live.
B. Shared Connection
Cable/DSL modem
PC
If you need more help: Should you have any problems connecting to
the Xbox Live service, do not attempt to take apart, service, or
modify the Xbox console or peripherals in any way. Doing so could
present the risk of serious injury or death from electric shock or fire,
and will also void your warranty. For additional assistance see
www.xbox.com/live or call the Customer Support number:
Cable/DSL router
United States and Canada: 1-800-4MY-XBOX (1-800-469-9269)
TTY users (requires special equipment for hard of hearing):
United States and Canada: 1-866-740-9269 or 1-425-635-7102
WAN/Uplink
LAN Ports
RJ-45 network cables
Using the Xbox Video Game System
Using the Xbox Controller
1. Set up your Xbox video game system by following
the instructions in the Xbox Instruction Manual.
1. Connect the Xbox Controller to any controller port on the
front of the Xbox console. For multiple players, connect
additional controllers to available controller ports.
2. Press the power button and the status indicator
light will light up.
3. Press the eject button and the disc tray will open.
4. Place the NCAA 2K3 College Basketball disc on the disc
tray with the label facing up and close the disc tray.
5. Follow on-screen instructions and refer to
this manual for more information about
playing NCAA 2K3 College Basketball.
2. Insert any expansion devices (for example, Xbox Memory
Units) into controller expansion slots as appropriate.
3. Follow on-screen instructions and refer to this manual
for more information about using the Xbox Controller
to play NCAA 2K3 College Basketball.
Expansion slot A
Expansion slot B
Left trigger
Right trigger
Avoiding Damage to Discs or the Disc Drive
To avoid damage to discs or the disc drive
Y
Left thumbstick
BACK button
START button
X
B
A
BACK
Black button
White button
ST A R T
• Insert only Xbox-compatible discs into the disc drive.
• Never use oddly shaped discs, such as star-shaped
or heart-shaped discs.
• Do not leave a disc in the Xbox console for
extended periods when not in use.
• Do not move the Xbox console while the power
is on and a disc is inserted.
• Do not apply labels, stickers, or other foreign
objects to discs.
Y button
X button
B button
A button
Directional pad
Right thumbstick
BEGIN THE GAME
OFFENSE WITHOUT BALL
1. Turn OFF/ON the POWER Button on your Xbox™ video
game system.
A button . . . . . . . . . . . . . . . . . . . .Call for a pass
2. Make sure an Xbox Controller is plugged into the Xbox
video game system.
• If you’re playing against friends, plug additional Xbox Controllers
into the Xbox video game system.
• Save your game progress, to the Xbox hard disk or Xbox memory
unit inserted into Xbox controller expansion slots A or B.
3. Insert the NCAA College Basketball 2K3 game disc into the
optical disc drive.
Y button . . . . . . . . . . . . . . . . . . . .Set pick
X button . . . . . . . . . . . . . . . . . . . .Call for shot
B button . . . . . . . . . . . . . . . . . . . .Call for pick/Release pick
Left trigger . . . . . . . . . . . . . . . . . .Jump
Right trigger . . . . . . . . . . . . . . . . .Speed burst/Turbo
START button . . . . . . . . . . . . . . . .Pause
Left thumbstick or directional pad .Player control
4. Turn ON the POWER Button. The Xbox screen appears.
• If the Xbox screen does not appear, begin again at step 1.
FREE THROWS
Left and right triggers . . . . . . . . .Aim
DEFAULT CONTROL SUMMARY
OFFENSE WITH BALL
A button . . . . . . . . . . . . . . . . . . . .Pass
Y button . . . . . . . . . . . . . . . . . . . .Call play
X button . . . . . . . . . . . . . . . . . . . .Shoot
B button . . . . . . . . . . . . . . . . . . . .Dribble move
Left trigger . . . . . . . . . . . . . . . . . .Post up
Right trigger . . . . . . . . . . . . . . . . .Speed burst/Turbo
White button . . . . . . . . . . . . . . . .Call for pick
Black button . . . . . . . . . . . . . . . . .Pass to player closest to basket
START button . . . . . . . . . . . . . . . .Pause
Right thumbstick
. . . . . . . . . . . .Analog Passing
A, B, X, or Y buttons . . . . . . . . . .Shoot
DEFENSE
A button . . . . . . . . . . . . . . . . . . . .Switch to player closest to ball
Y button . . . . . . . . . . . . . . . . . . . .Call play
X button . . . . . . . . . . . . . . . . . . . .Jump for rebound/block
B button . . . . . . . . . . . . . . . . . . . .Steal
Left trigger . . . . . . . . . . . . . . . . . .Face up defender
Right trigger . . . . . . . . . . . . . . . . .Speed burst/Turbo
Black button . . . . . . . . . . . . . . . . .Intentional foul
START button . . . . . . . . . . . . . . . .Pause
Right thumbstick . . . . . . . . . . . . .Switch to player closest to basket
Left thumbstick or directional pad . .Player control
Left thumbstick or directional pad .Player control
6
7
TITLE SCREEN
TEAM SELECT SCREEN
Once the introduction sequences are complete, the NCAA 2K3 Title
Screen appears. To go directly to the Main Menu, press the START
button (see Main Menu below)
Select your game’s competitors from over 300 NCAA Teams!
Away Team
Home Team
GENERATED PLAYER NAMES
NCAA College Basketball 2K3 allows you the option to have the
game automatically generate player names for every player in the
nation. After pressing START on the Title Screen, the game will ask
if you wish to Generate player names. If you select YES, player
names will be randomly generated by the game. If you select NO,
the game will refer to each player by his number.
Team ratings
Shows team’s overall
strength, offense and
defense strength
Away Conference
Home Conference
MAIN MENU
To Select the Teams:
Quick Play
Save/Load
Playing a Quick
Play game
(exhibition game),
see below.
Save/Load Game
Files. See page 42
Roster Manager
Game Modes
Adjust team rosters
and playbooks, see
page 43
Enter Game
Modes, see
page 20
Options
Adjust game
options, see
page 40
Play Live
Challenge a
friend online
PLAYING A QUICK GAME
Sega Sports Challenge
Compete for prizes on
Segasports.com!
See page 45
1. Use the left thumbstick or directional pad to move the Controller
Icon to the side you wish to control during the match.
2. Before selecting your team, you may want to select the
conference your team plays in first. To select your conference,
move the highlight down to the conference section and pull the
left or right trigger. If you prefer to cycle through all of the
included NCAA teams in alphabetical order, highlight NCAA in
the conference section.
3. After selecting your conference, move the highlight up to the
team section of the Team Select Screen and pull the left or right
trigger to cycle through the teams.
4. Alternatively, you can choose random team matchups by
pressing the Y button. Each press of the Y button will randomly
select a new team matchup.
5. With your team(s) selected, press the START button to continue.
Play a quick game between any two teams.
8
9
Passing
ON THE COURT
As the players perform their warm up drills, ESPN’s John Ireland
and Tim Neverett welcome you to the game and send you
courtside for the player introductions.
The Tip-Off / Jump Ball
When the player introductions conclude, it’s on to the tip-off! Once
the players line up at center court, the referee will initiate the tip-off
by tossing the ball in the air. When the ball is near the top of its
upward travel, press the X button to jump. The winner of the tip-off
will start the game with possession of the ball.
Player Control
Indicator
Shot Clock
A shot clock
timer will appear
and count down
when only 5
seconds remain
on the shot clock.
• To pass the ball to the nearest player, simply press the A button.
This will initiate a pass to your nearest teammate.
• To pass the ball to a teammate of your choice, press the left
thumbstick or directional pad in the direction of the teammate
you want to pass to and then press the A button. This will initiate
a pass to the nearest teammate in the direction you pointed to.
Shooting
• To shoot a jump shot, press the X button and release the button
at the top of your jump. The type of shot is determined by your
current position on the court.
• To attempt a layup or dunk, dribble into the painted area of the
court and then press the X button with the left thumbstick or
directional pad pointed towards the basket. The type of layup or
dunk performed is determined by the layup and dunk rating of
the player. Keep in mind that using turbo (right trigger) will
increase the range of your lay-ups and dunks.
• To pump fake a shot, quickly tap the X button. The player will
make a quick shooting motion to fake out the defender, but will
hold onto the ball.
Time Remaining in Half
BASIC OFFENSE
• To pass out of a shot, press the X button to shoot and, without
letting go of the X button, quickly press the A button to pass
while in the middle of your jump. Your player will now pass while
in midair.
Dribbling
• To dribble the ball, move the left thumbstick or directional pad in
the direction you want to move.
• To get a speed burst, pull and hold the right trigger while moving
in any direction. When doing so, you will notice a green bar
appear beneath your player indicator. This green bar indicates the
amount of speed burst you have left at the moment. When this
speed burst indicator bar is depleted, you will no longer able to
speed burst for a short while.
• To perform a crossover move, press the B button. This is a handy
move to use when trying to get around a defender.
• To dribble with your back to the basket, pull and hold
the left trigger.
10
ADVANCED OFFENSE
Advanced Dribbling
• To fake a defender and perform a special crossover move, hold
left/right on the left thumbstick or directional pad after you tap B.
• To spin past a defender, run towards the defender, pull the right
trigger to speed boost and quickly press the B button. If done
properly, your player will perform a spin move.
Post Up Moves
• To initiate a post up move, first start by pulling and holding the
left trigger. Your ball handler will turn his back to the basket and
11
initiate a protect-the-ball style of dribble. Keep holding the left
trigger and push the left thumbstick or directional pad towards
the defender. As soon as you make contact with the defender,
your ball handler will initiate the post up.
• With strong post players, you may be able to get closer to the
basket by backing the defender in towards the basket. To do this,
move the left thumbstick or directional pad in the direction of the
basket while you hold down the left trigger. However, be careful
of the Closely Guarded Rule: If you spend too much time posting
up, you will be called for a penalty and turn the ball over to
the defense.
There are a few ways you can score with the post up.
• One way to score from the post is by shooting a face-up jumper
or a fade-away jumper. To shoot a face-up jumper, pull and hold
the left trigger, then, while holding the left trigger, press the left
thumbstick or directional pad to the right of the defender and
press the X button to shoot. To shoot a fade-away jumper, pull
and hold the left trigger, and, while holding the left trigger, press
the left thumbstick or directional pad away from the defender
and press the X button to shoot.
• The drop step move is the most effective way to score from the
post up. To perform a drop step, first post up your defender by
pulling and holding the left trigger. At any time during your post
up (with the left trigger still held down), move the left thumbstick
or directional pad in the direction you want to drop step to and
then release the left trigger. Your player will drop step and spin
towards the basket in the direction you selected. If the move is
successful, you will be able to get past your defender and are
now free to shoot a pull-up jumper or take it all the way to the
basket for an easy layup.
Advanced Passing
• To pass to the player nearest the basket, press the Black button.
This passing method is helpful for back door passes as well as for
advancing the ball on a fast break.
• Analog passing is the fastest way to pass to an open man. While
controlling the ball-handler, move the right thumbstick in the
direction that you want to pass and your player will automatically
pass to a teammate in that direction.
12
Play calling
Each team has twenty-one plays in its offensive playbook and
fifteen plays in its defensive playbook. Of these, four offensive
plays and four defensive plays can be accessed during gameplay
via the In-game Play Call Menu. If you’d like to customize the four
plays currently in use, select Coaching from the Pause Menu, and
select Offensive Plays or Defensive Plays (you can also set your
Offensive and Defensive Plays in Customize Mode).
• To bring up the Play Call Menu during gameplay, press the
Y button. Then press the corresponding button to run a
specific play.
• Can’t get free from a defender? Call for a pick! Having a
teammate set a pick for you is a great way to get free, especially
on the perimeter. To call for a pick, press the White button while in
control of the ball. Your nearest teammate will run up and set a
pick for you.
• To call an intentional foul while on defense, press the Black
button. The defender closest to the opposing ball handler will
intentionally foul him. Intentional fouls are useful in end of game
situations where you’re team is behind and you want to stop the
opposing team from running out the clock.
FREE THROW SHOOTING
Most games are won or lost at the free throw line. To shoot a
successful free throw, you’ll need to line up both green arrows
directly over the basket. To do so, pull the left trigger and the right
trigger to line up the arrows, then press the A, B, X, or Y button to
release the shot. Keep in mind that it’s best to move both the
arrows at the same time, as they are hard to keep over the basket.
Also, remember that you don’t have all day to shoot the free throw.
A clock will appear in the upper right corner of the screen to tell
you exactly how many seconds you have remaining. If you’re
having trouble shooting free throws, go to Practice Mode: Free
Throw to hone your free throw skills. (See page 39)
13
DEFENSE
Stealing
There are three basic ways to steal the ball in NCAA College
Basketball 2K3.
• To attempt to pick the ball handler’s dribble, press the B button.
Be careful not to overuse the steal button or to lunge for a steal
attempt when not in proper position. The referee will call a reachin foul if you overuse the steal and the defense will find ways to
burn your defender if you lunge and get too far out of position.
• To steal a pass, press the X button when the pass is on the way.
If you time it right, your defensive player will intercept the pass
in midair.
• For situations where you want to steal a pass but your closest
defenders is still too far away, you can try a lunging pass steal.
While running towards the passing lane, pull and hold the right
trigger for a speed boost and then press the X button. Your
defender will lunge for the steal. Be careful though, if you miss
the steal, your defender will be out of position and unable to
defend his man
Shot Blocking
To block a shot, press the X button as the ball handler releases
his shot.
Rebounding
• A fundamental part of good rebounding is boxing out your
opponent. To box out an opponent, position your rebounder close
to the basket and pull and hold the left trigger. By doing so, your
player will extend his arms to the side in an effort to keep any
nearby opponents behind him.
• To jump for a rebound, press the X button after the ball has
bounced off the rim.
• Once you have possession of the rebound, a useful strategy is to
perform a clear out move. In order to clear out the opponents
around you, jump and gain possession of the rebound and just as
your player is landing from his jump, tap the B button repeatedly.
As you tap the B button, your player will swing his elbows in an
14
effort to clear out. The clear out move is a very useful move when
rebounding because it minimizes the chance of the ball being
stolen from you.
Switching to the Player Closest to Ball
While on defense, press the A button to switch to the player closest
to the ball.
Switching to the Last Available Defender
While on defense, moving the right thumbstick at any time will put
you in control of the defender closest to the basket. This is a particularly useful button when you need to defend against the fast
break and is also helpful when you need to get control of one of
your low post defenders in a hurry.
Using the Defensive Stance
To prevent a perimeter ball handler from driving past you, the
most effective way to stay in front of your opponent is by using the
Defensive Stance. The Defensive Stance causes your defender to
crouch down in front of the offensive player with your arms and
legs spread, making your defender tougher to get around. While in
the Defensive Stance, your lateral (side to side) movement will be
more precise, but slower.
• To assume the Defensive Stance, pull and hold the left trigger.
PAUSE MENU
You can pause the game at any time to access the Pause Menu
options or just take a break from the action.
• To pause the game, press the START button at any time. The
Pause Menu appears.
• To return to the game from the Pause Menu, press the START
button again.
REPLAY
Step into the broadcast booth to run the film on the last play and
view the action from virtually every possible angle.
15
Left trigger:
Rewind
B button:
Zoom Out
A button:
Play
Y button:
Help Menu
Show/Hide
Both teams begin the game with six Timeouts that they can use
when in possession of the ball. With two minutes left in the
second half, both teams’ timeouts will be reduced to two timeouts
(if they have more than two left). If the game goes to Overtime,
each team will get an additional Timeout.
SUBSTITUTIONS
Right trigger:
Fast Forward
Left thumbstick:
Rotate Camera
Directional pad:
Move Locator Icon
X button:
Zoom In
• To return to the Pause Menu from the Replay Screen, press the
START button.
CONTROLLER
By default, substitutions are automatically performed for your team
when necessary. Should you wish to control your team’s substitutions, go to Coaching: Settings and switch Substitution to Manual.
Then return to the Pause Menu and select Substitutions.
To make substitutions:
1. Once in the Substitutions Screen, highlight the player you wish
to substitute out of the game and press the A button.
2. Highlight a bench player, indicated by the word “bench” next to
their name, and press the A button.
You can access the Controller Assign Screen during a game to
switch control from one team to the other or to allow newcomers
to join the game in progress.
3. Press the B button to proceed and return to Pause Menu.
1. To choose sides, move the Controller Icon to the side you wish to
control during the match.
You can also automatically select a preset lineup, using the left or
right trigger.
2. Press the B button to return to the Pause Menu.
COACHING
OPTIONS
(See Options on page 40)
The Coaching Menu is where you can assign plays, adjust your
strategy, change defensive assignments, assign double teams, and
much more.
Matchups
TIME OUT
You can take a Timeout if you need to make any substitutions or
give your players a breather.
To call a Timeout:
1. When in possession of the ball press START button to access the
Pause Menu.
This is the screen where you can assign defensive matchups. Each
of your players on the floor has an opposing player to guard. If
your team is getting beat by a hot player, change the matchup to
put a better defender on him. The players in the upper left of the
screen are your team’s defenders. The players in the upper right
are the opposing players that they are assigned to guard. The
bottom portion of the screen shows the player portrait and vital
information of the selected players.
2. Highlight Timeout on the Pause Menu and press the A button.
16
17
Pressure
This is where you can determine how much defensive pressure
each of your players should apply to the player they’re guarding.
The tighter the pressure, the closer your defender will defend his
assigned player. The looser the pressure, the further your defender
will stand from his assignment.
Settings
Coach Settings are options you can set to assume more control
over coaching duties such as calling timeouts and substitutions and
setting a game plan. Your Coaching options are:
Timeout: Choose MANUAL to call your own timeouts or AUTO to
have them automatically called when appropriate.
Substitutions: Set MANUAL to call for your own substitutions or
AUTO to have them called for you when necessary.
Zone Press: Selects when your team will initiate a zone
press defense.
Double Team
If your opponent has a player or two that is having a great game
against your team, then consider double-teaming them. By
default, the setting for each opposing player is set to Auto. Your
players will automatically double-team that offensive player when
he is in easy scoring position. If you set Double Team to Never,
your defenders will never double-team that opposing player. If
Double Team is set to In Paint, your defenders will double-team
that offensive player when he has the ball in the key. If you set
Double Team to Always, your defenders will always double-team
that player whenever he has the ball.
Offensive Plays/Defensive Plays
Zone Pressure Defense: Selects the type of zone defense your
team plays.
NCAA College Basketball 2K3 features 21 different offensive plays
and 15 different defensive plays per team. Use the Offensive or
Defensive Plays Screens to choose the four plays you want access
to on the court in the Offensive and Defensive Play Menus.
Offense Playcall: Set MANUAL to call your own offensive plays
(refer to page 19) or AUTO for automatically called plays. Select
W/MSG to display the name of the play being called onscreen, or
select w/o MSG to hide the play call from a human opponent.
Role Play: Enabling Role Play will let you take control of one player
on your team exclusively, regardless of who has possession of the
ball. When any of your CPU teammates have the ball with Role
Play enabled, you can make them shoot by pressing the X button.
Defense Playcall: Set MANUAL to call your own defensive plays
(refer to page 19) or AUTO for automatically called plays.
Stats: From the Game Stats Menu, you can access comprehensive
team and player stats, as well as an injury report for the current
game, at any time during the contest.
Late Game Fouling: Set MANUAL to call your own late game
intentional fouls, or AUTO for automatic intentional fouls
when necessary.
Game Tempo: Move the slider to the right for high tempo play.
Move the slider to the left if you prefer a more methodic
playing style.
Fast Break: For more fast break opportunities, move the Fast Break
slider to the right. Moving the slider to the left will result in less
fast breaks. However, this should result in your team pulling down
more defensive rebounds.
18
Crash Boards: To get more players on the glass, move the Crash
Boards slider to the right. Moving the slider to the left will cause
fewer players on your team to pursue the rebound and more
players to be in position for a fast break.
Teams: Compare the current game stats of the two teams in 23
categories including the number of timeouts remaining, free throw
percentage, points off the bench, team fouls, assists, blocks, and
much more.
Home and Away: The Player Stats Screen posts stats for both the
Home and Away teams in 19 categories including rebounds, field
goals, free throws, and three pointers.
Injury Report: The Injury Report lists any injuries sustained by
players during the game and informs you of how long the injured
player(s) will be out of the lineup.
19
CAMERA
Half Length: You can play with default 10-minute halves, or you
can adjust the length of each half from 1-20 minutes.
If you would prefer to specify the point of view while playing the
game, the camera settings can be adjusted on the Camera Screen.
Injuries: You can turn Injuries on or off.
To change camera settings:
Fatigue: Fatigued players don’t play as well and need to be subbed
out when tired. You can turn Player Fatigue on or off.
1. Use the left or right trigger to choose the general angle.
2. Highlight an option and use the A or Y buttons to cycle
forward or backward through the settings.
Zoom: Adjusts the magnification of the scene from the
camera’s position.
FOV: Adjusts how close or far away the camera is from the action.
Foul Out: Players normally foul out of the game after committing 5
personal fouls. Here you can turn foul outs on or off, or you can
reduce the number of fouls necessary to foul out to 1, 2, 3, or 4.
Use Default Rosters: With Default Rosters turned off; you will be
able to play a game with any roster changes you have made in
Roster Manager (see Roster Manager on page 43). With
Use Default Rosters set to on, the teams will play with their
default rosters.
Height: Adjusts how high up the camera is.
Key: With Key set to ON, the camera will zoom in each time a
player with the ball enters the key.
Reverse: With Reverse set to ON; the camera angle will be the
opposite of your settings.
Flip: With Flip set to ON, each time possession of the ball changes,
the camera will change angles to give the USER the a view facing
the basket.
EXHIBITION
Playing an Exhibition game is like playing a Quick Play Game with
a few more game options at your disposal. Select your desired
options and then advance to the Team Select Screen.
LEGACY
GAME MODES
To Choose a Game Mode:
1. In Main Menu, highlight Game Modes and press the A button.
2. On Game Modes Menu, use the left and right trigger to cycle
between the game modes: Exhibition, Season, Tournament,
Legacy, Practice, and Gym Rat.
3. Highlight an option and use the A or Y buttons to cycle between
settings, and then press the START button to advance.
Some common game mode options are:
Number of Users: Certain modes allow 1 to 4 users.
20
Here is your chance to take a school’s destiny into your hands and
lead them to a national championship. You're in control of every
aspect of your team. Scout out the talented high school players,
recruit them to your school, call the plays on the court, take the big
shots, and win national titles as you create your own Legacy that
will be talked about for generations to come.
The options that are specific to Legacy Mode on the Game
Modes Screen are:
Mode: You have the option of choosing an Open Legacy Mode or
Career Legacy Mode. Open Legacy allows you to select any team
and change teams every year if you wish. In Career Legacy,
you’ll start off at a small school and must work your way up the
national coaching ranks before you attain the coaching position
at an elite school.
21
Players Leaving Early for NBA: When set to YES, undergraduates
may declare early for the NBA draft at the end of every season.
When set to NO, your players will not leave your school for the
NBA draft until they use up all four years of their college eligibility.
Keep in mind, though, that players on your team who don’t receive
much playing time can still transfer to another school.
Coach Goals Screen (Career Legacy only)
On this screen, you will get a short note and some goals outlined
to you by your school’s athletic director for the upcoming season.
On the upper right part of the screen, you will be able to see a
graphical indicator of your job security as the coach of this school’s
basketball program.
Legacy Setup Screen
On the Legacy Setup Screen each USER chooses their team
and coach:
In Career Legacy Mode, your choice of schools to coach is limited
to a few small schools with coaching vacancies. You’ll have to
work your way up before you can coach for a powerhouse.
In Open Legacy Mode, the choice is yours. You can coach for any
of your favorite teams.
To choose your team and coach:
1. Highlight the conference, team, or coach.
Legacy Options is the main menu from which you can access your
schedule, play/simulate games, manage your rosters, assign
offensive and defensive plays from the playbook, and access
game options.
PRE-SEASON
2. Use the left or right trigger to cycle through selections.
The Pre-Season Menu allows you to alter your coaching style at
the beginning of each season as well as modify your team’s
schedule difficulty.
3. When selecting a coach, use the left or right trigger to select
your coach’s appearance and press the A button to bring up the
Enter Player Name Screen to name your coach.
Coaching Style
4. When using the Enter Player Name Screen, you can either select
a name from the list to the right of the screen, or type in your
own name. Use the right trigger to toggle between the First
Name Slot and the Last Name Slot. To select a name from the
list, press the Y button to switch the highlight to the name list.
Move the left thumbstick or directional pad up or down to
highlight a name and press the A button to select it. To type in
your own name, use the left thumbstick or directional pad to
highlight letters and characters, pull and hold the left trigger to
capitalize letters, and use the A button to select characters.
Highlight the left arrow and press the A button to backspace.
Coaching Attributes Screen
This screen allows you to customize your coaching style with seven
different attribute slider bars. To select an attribute slider, press up
or down on the left thumbstick or directional pad. To adjust the
slider, press left or right (depending on what type of coaching style
you want) on the left thumbstick or directional pad. The more you
set the slider to one direction, the more your coaching style
resembles the description.
22
LEGACY MAIN MENU
This screen allows you to alter your coaching style. For more
information on this screen, see the Coach Attributes Screen on
page 22
Schedule Difficulty
If you aspire to be a big-time college basketball powerhouse, you
have to prove yourself to the nation against the best competition
out there. Whether you think your given schedule is too easy or too
hard, you can always alter it here.
Press the Y button to bring up the Schedule Difficulty
Setting Overlay.
• If you want to increase or decrease the difficulty of your schedule,
select either the Increase or Decrease difficulty options and press
the A button. You will now notice that your schedule has been
changed and you will be playing against different competition.
You can repeat this process until you are satisfied with the
difficulty of your schedule.
23
• Selecting the Reset difficulty option will reset your schedule to the
original default schedule before any changes were made.
SEASON SCHEDULE
The Team Schedule Screen lists your upcoming games. You can use
this screen to check the scores of previously played games, and to
advance through the season by playing or simulating games.
• By default, the Team Schedule Screen lists your team’s schedule.
In order to view the schedule of other teams in your conference,
use the left or right trigger to cycle through team schedules. If
you wish to view the schedule for teams outside of your
conference, use the White or Black button to cycle through the
different conferences.
• If you are playing a season with more than one user, you can use
the right thumbstick to toggle between the different users’ team
schedules by pressing to the right or left.
• To play a game, it must be marked with a yellow arrow.
Unmarked games will be automatically simulated for you. To
mark or unmark a game, move the left thumbstick or directional
pad up or down to highlight the game, and press the A button.
• Once you’ve selected the games you wish to play, press the
START button. An Overlay will appear with the following options:
Simulate to first marked game, Simulate current week, and
Simulate all remaining games.
• If you wish to simulate the entire season without playing a
game, select Simulate all remaining games and press the
A button.
• If you want to simulate one week of the season (including
those games you have marked with a yellow arrow), select
Simulate current week and press the A button
• If you want to simulate to the first game you have marked to
play with a yellow arrow, select Simulate to first marked game,
and press the A button.
• An overlay will appear, labeled with the two teams
facing one another (for example, Clem @ Duke), and the
following options, Play this game, Simulate this game,
and Cancel.
24
• If you select Play this game, you will advance to the Team
Select Screen.
• If you select Simulate this game, the game will be simulated, and
you will return to the Team Schedule Screen.
The Season Schedule Screen allows you to see all of the games
played in a given week, on a certain day, or all of the games played
by the ESPN Top 25 Schools. To view the Season Schedule Screen,
press the Y button while on the Team Schedule Screen. Keep in
mind that marking, simulating, and playing games works the same
on this screen as on the Team Schedule Screen
• The Season Schedule Screen allows you to sort the games
viewed by three different categories: Game, Week, or Day. Game
allows you to sort whether you wish to view games played by all
teams, your team only, or games played by the ESPN Top 25
Schools. Week allows you to choose which week’s games you
wish to see. Day allows you to view only the games played on
one day of that week.
MANAGEMENT
This is where you can check rosters around the nation, set your
team lineup, assign offensive and defensive plays from your
playbook, get an injury report on players, and look at your
coach card.
• To switch between the users’ teams, move the right thumbstick
right or left.
Rosters: From the Roster Screen, you can view the team rosters of
every team in the nation. To cycle conferences, press the Black or
White button. To cycle between teams, pull the left or right trigger.
• If you used the Generate player names option when you first
started your Legacy mode, you have the option to rename your
players. (Open Legacy only) To rename your players, highlight
the player you wish to rename and press the Y button while on
the Roster Screen. You are now free to choose the first and last
name that you wish to rename this player to.
• Want to boost a player’s rating for a certain attribute? (Open
Legacy only) To edit Player Attributes, use the left thumbstick or
directional pad to highlight an attribute. Now, press the A button
to select it. Press left or right on the left thumbstick or directional
25
pad to increase or decrease a player’s rating for that attribute.
Press the A button again to unselect the player rating once you
have finished. Each team has 50 extra points to distribute as you
see fit. After that, if you want to boost a player’s rating in one
area, you’ll have to scavenge the points by decreasing another
player attribute.
Team Lineup: This is the screen where you can make team lineup
changes before you start your next game. The first five players on
the Team Lineup Screen are your starters. To move a player from
the starting lineup to the bench, highlight which starter you wish to
bench and press the A button. This will turn the selector arrow (to
the left of the player name) from white to yellow. With the starter
highlighted, select the bench player you want to start in his place
and then press the A button again to make the switch. Pull the left
or right trigger to scroll through and select a preset lineup.
Offensive Playbook/ Defensive Playbook: Refer to the Roster
Manager section of the manual on page 43 for how to set your
offensive and defensive playbook.
Scouting: The Scouting option will only appear after you have
completed the first 8 weeks of the season. In week 9, you are
allowed to access the Scouting option. After week 8, you are
allowed to scout 3 potential high school recruits a week to see if
they will be a good fit for your team. The HS All Stars game
becomes available to watch or play in week 12.
• Recruits: This screen shows you every eligible high school player
in the country from which you can select three players every
week to scout. There are four categories here, Rank, Players
name, Position, and Region. By default, this screen is sorted by
the ranking of the potential recruit, however you can sort each
column by the players you’ve already scouted, the position they
play, and the region they are from.
• Press the B button to return to the main Scouting Menu and
you can now select two more players whom you wish to scout
this week.
• Recruiting Map: The Recruiting Map Screen is a graphical
representation of the entire USA. Its purpose is to give you an
easy to read overview of which region the top prospects come
from and helps you concentrate your scouting on a particular
region. From this screen, you can select each region and each
state (highlighting the state is indicated by the light yellow color)
by moving the left thumbstick or directional pad. Once you have
selected a state, you can press the A button to view the potential
recruits from within that state and region.
• HS All Stars: Starting in week 12, the HS All Star games allow you
to play a new game each week with the top high school players
from around the nation. Each week, players from a different
region will go head to head, and you’ll have the chance to see
your future recruits in action. The Sega Sports HS All Star Game
stars the very best players in the nation. The schedule for the
games is as follows:
• Week 12: Western HS All Stars
• Week 13: Northern HS All Stars
• Week 14: Southern HS All Stars
• Week 15: Mid Eastern HS All Stars
• Week 16: South Eastern HS All Stars
• To sort, first move the left thumbstick or directional pad left or
right to highlight one of the four categories (RANK, PLAYERS,
POS, REGION).
• Week 17: North Eastern HS All Stars
• Then pull the left or right trigger to cycle through the options
when appropriate.
Once you have selected a game, the Scouting Options Screen
allows you to set your All Star game options before you advance to
the Team Select Screen. On the Team Select Screen, move the
Control Icon to the side of the team you wish to play as, and then
press the START button to begin the game.
• Once you have selected the player you want to scout, press the A
button to bring up his Player Card. If this is a player you have not
yet scouted, the Recruiting Notes will be left blank. Press the A
button again on the Player Card screen and confirm to scout
this player.
26
• Once you have scouted the player, you will come away with some
new recruiting notes and you can now see his player caliber (5
stars being the best), player type, overall rating and his offensive
and defensive rating.
• Week 18: Sega Sports HS All Stars
27
Injury Report: The Injury Report Screen shows you injuries from
around the nation.
Coach Card: On this screen, you will see your coach name, the
number of years as coach, your career win/loss record, a job
security indicator, as well as a summary of your team’s
performance this season.
STATS-STANDINGS-AWARDS
Team Stats: From this screen, you can view the team statistics of
each team in a conference.
Player Stats: This screen shows the stats for every player, team
by team.
Season Leaders: This is the screen where you can view the statistical leaders for the entire nation. Want to see who’s leading the
nation in scoring or rebounding? This is where you can find out.
Top 25: The Top 25 is where you can find the national rankings of
the top teams in the country. Every basketball powerhouse school
desires to be the number one ranked team in the country week
after week, and every small-time school aspires to become a
nationally ranked team and be a part of the Top 25.
The importance of being a nationally ranked team should not be
underestimated. Every year, only 65 teams make the NCAA
Tournament. A team that is consistently in the Top 25 rankings
week after week has a solid shot of being a part of the festivities in
the month of March.
There are three different polls, the Coaches Poll, RPI Poll, and
ESPN Poll. To cycle between the three types of polls, pull the left
or right trigger.
• Coaches Poll: Every week, a poll is conducted with a select
number of coaches. The overall number of votes per team
determines the ranking position of the top 25 teams across the
country.
• RPI Poll: The RPI Poll is a computer generated polling system that
takes into account the team record, its opponent’s record, and its
opponent’s opponents record. Generally, the RPI Poll becomes
more and more accurate as more games are played.
28
• ESPN Poll: The ESPN Poll is another poll made up of a set number
of Division I head coaches, all of whom belong on the National
Association of Basketball Coaches.
No matter which poll you reference, you will also be able to see the
ranking of the team, the team name, team record, number of
voting points each team received, and the ranking of each team on
the Top 25 from the previous poll conducted last week (indicated by
the PVS category).
Conference Standings: This is the screen where you can see the
team standings listed by conference. To switch between the user’s
team’s conferences, move the right thumbstick right or left. To
view the standings of teams outside of your own conference, pull
the left or right trigger to cycle through the other conferences. This
screen is broken down in two categories, the standings of each
team within the conference and the overall standing of that team.
Awards: Once you have completed the regular season, you can go
here to view the awards players and coaches have received.
Legacy Tournament
Once you’ve completed the regular season, the Season Awards
Screen appears, showing the top players and coach of the regular
season. Use the left or right trigger to view the various awards.
Then press the START button to return to the Team Schedule
Screen. Press the START button again and an overlay will appear
asking whether you wish to advance to the Conference
Tournaments. Highlight Yes and press the A button. You are now
in Tournament Mode and set to begin your Conference Tournament.
For more information on Tournament Mode, see Tournament Main
Menu on page 36.
Legacy Off Season
At the end of the college basketball season after the NCAA
Tournament, you’re job as a head coach is just beginning. Your
main tasks during the offseason is to recruit and replace your
graduating players, and you also have to consider any job offers
made to you over the summer.
Players Leaving
The first screen you’ll see after the NCAA Tournament is the Players
Leaving Screen. On this screen you can view the player name,
position, rating, and the reason for leaving. There are three reasons
a player may leave: a) Graduation: These are senior year players
29
who have used up all four years of their college eligibility. b) Not
enough playing time: Up-and-coming players who don’t get
enough playing time may choose to transfer from your school to
another university where playing time is more plentiful. c) Going
Pro: Undergraduate players who still have eligibility remaining but
who have chosen to leave school early to play professionally.
attributes on the Legacy Setup Screen and the Coach Attributes
Screen (see Legacy page 22 for more information on these
screens). If you do elect to switch schools, you will take over
that team during the offseason and your first job as the new
head coach is recruiting for your new team (see recruiting
section below).
Saving Players for Export to NBA 2K3
NCAA College Basketball 2K3 gives you the option to save the
departing college players for export to the Sega Sports Title
NBA 2K3. If the players have what it takes, they’ll qualify for
the NBA Draft.
• NBA 2K3 allows you to import your NCAA College Basketball 2K3
graduating seniors into NBA 2K3’s Franchise mode. If you own
both games, you can watch your graduating seniors enter the
NBA draft and maybe one day become NBA superstars. Check
your NBA 2K3 manual (page 32) for instructions on how to import
your NCAA College Basketball 2K3 graduates roster.
CAREER LEGACY
Coach Recap
Have fulfilled your schools hopes and achieved the goals set out
for you? This screen is your report card for the past season.
Job Offers
If you coach well, and your team consistently exceeds expectations, then, after a few seasons, you may receive offers to coach
for other schools. However, coach poorly, and other teams will
lose interest, and you may even be fired. If you do receive offers
you will be given the option to view them on the Job Offers
Screen.
OPEN LEGACY
Change Teams
If you are playing in Open Legacy Mode, you are free to switch to
any team you choose once the offseason arrives. Should you
choose to change teams, you will select your team and coach
30
OFFSEASON MAIN MENU
Offseason Options is the main menu of Legacy’s Offseason Mode.
From here you can review team and player stats, check out your
team’s needs, and recruit new players.
RECRUITING
The Recruiting Screen is where you will compete for the top high
school players in the nation.
Before you make any moves, it’s a good idea to assess what type
of player your team needs most. Press the Y button to view your
current roster on the Team Roster Screen. Empty player slots show
the needed player positions. When you’re done, press the B button
to return to the Recruiting Screen.
With 1500 high school prospects to choose from, it can be helpful
specify what type of player you’re looking for. You can sort the
listed players by Status, Position, Caliber, Region, or Interest. By
default, all players are listed in order of their rating, or Caliber.
1. To sort, first move the left thumbstick or directional pad to
highlight one of the five sorting categories.
2. Then, pull the left or right trigger to cycle through the options.
The five sorting categories are:
• PLAYERS: Allows you to sort players by their current status (All,
Targets, Available, Recruited, Scouted, and Yours). All lists every
recruit. Targets lists players that you have contacted. Available
lists every player that has not yet signed to any school. Recruited
lists every player who has already signed to a school. Scouted
shows the players who you scouted during the course of the past
season (see SCOUTING on page 26). Committed shows the
players who wish to play for your school.
31
• POS (Position): Allows you to sort players by their position
(G, C, F, PG, SG, SF, PF).
• CALIBER: Allows you to sort players by their rating (Top 100, 5
Star, 4 Star, 3 Star, 2 Star, 1 Star). Top 100 lists the players rated
as the top 100 prospects. Players are rated from 1 to 5 Stars (5
being the best). 5 Star, 4 Star, 3 Star, 2 Star, and 1 Star each list
the players who have been assigned that respective rating.
• REG (Region): Allows you to sort players by what State they
live in.
• INT (Interest): Allows you to sort players by their level of interest
in playing for your school (Very High, High, Medium, and Low).
The Recruiting Map provides another way to sort the players
by Region.
1. Press the START button to access the Recruiting Options Overlay.
2. Select Advance to Next Week.
3. The Recruiting Recap Screen appears.
4. Pull the left or right trigger to select the new player status
categories (Ready to Commit, Committed, Recruited, and
Targets). Ready to Commit lists the players who have decided
that they want to play for your school. Committed lists the
players who you have signed to your school. Recruited lists the
players who have already joined a school. Targets lists players
that you have contacted.
5. If a player appears in the Ready to Commit Category, press the
A button to call up his Player Card, then press the A button again
to place the player on your team.
1. To view the Recruiting Map Screen, press the White Button.
2. Use the left thumbstick or directional pad to highlight a State.
TEAM ROSTER
3. Press the A button to view the recruits from that State.
This screen shows an overview of the players on your team. It also
shows the position vacancies left by your departing players
When you find a player that you want on you team, you need to
get in touch with him.
1. First, highlight that player and press the A button to bring up his
Player Card.
2. To recruit the player, press the A button.
3. The Recruit Overlay should appear, with the following options:
Head coach visit (25), Assistant coach visit (15), Head coach call
(10) and Assistant coach call (5). The number next to each option
represents its cost in Recruiting Points. You have a total of 100
Recruiting Points. Note that the Head coach visit and Assistant
coach visit selections will appear grayed out. This is because
you must call a player before you can visit him (After all, it
would be impolite to show up unannounced.).
4. To select an option, highlight the option and press the A button
to select it.
5. Then, highlight Apply and press the A button to confirm the
option selected.
Once you have used all of your Recruiting Points, you’re done
for the week.
32
STATS
This Stats Menu is the same as the Stats Menu in Legacy’s Season
Mode (see page 28) with the exception of the new statistic, Career
Player Stats.
Career Player Stats: This screen shows each player’s college career
average for each statistic.
OPTIONS
(See Options on page 40)
SAVE
(See Save/Load on page 42)
33
SEASON
MANAGEMENT
This is your chance to experience a single season at the helm of
you favorite team. Have you got what it takes to guide them from
Game 1 to the top of the NCAA tournament?
This is where you can check rosters around the nation, set your
team lineup, assign offensive and defensive plays from your
playbook, and get an injury report. (For more information on this
screen, see Legacy Management on page 25)
Season Setup
On the Season Setup Screen each USER chooses their team and
coach. (For more information on this screen, see Legacy Setup on
page 22)
STATS-STANDINGS-AWARDS
(See Legacy: Stats/Standings/Awards on page 28)
Coaching Attributes
The Coaches Attributes Screen is where you can strengthen certain
game strategies to best fit your style of play. (For more information
on this screen see Legacy: Coach Attributes on page 22).
SEASON MAIN MENU
Season Options is the main menu from which you can access your
schedule, play/simulate games, manage your rosters, assign
offensive and defensive plays from the playbook, and access
game options.
Once you’ve completed the regular season, the Season Awards
Screen appears, showing the top players and coach of the regular
season. Use the left or right trigger to view the various awards.
Then press the START button to return to the Team Schedule
Screen. Press the START button again and an overlay will appear
asking whether you wish to advance to the Conference
Tournaments. Highlight Yes and press the A button. You are now
in Tournament Mode and set to begin your Conference Tournament.
For more information on Tournament Mode, see Tournament Main
Menu on page 36.
OPTIONS
(See Options on page 40)
PRE-SEASON
The Pre-Season Menu allows you to alter your coaching style at the
beginning of each season as well as modify your team’s schedule
difficulty. (See Legacy: Pre-Season on page 23)
SEASON SCHEDULE
The Team Schedule Screen lists your upcoming games. You can use
this screen to check the scores of previously played games, and to
advance through the season by playing or simulating games. (For
more information on this screen, see Legacy: Season Schedule on
page 24)
SAVE
(See Save/Load on page 42)
TOURNAMENT
If you would rather cut to the chase and experience the excitement
of NCAA Tournament play then Tournament is the mode for you. In
Tournament mode, you can pick the conference and teams you
wish to pit against one another in competition for the NCAA
Championship.
The option that is specific to Tournament Mode on the Game
Modes Screen is:
34
35
Tournament: You can choose to begin the playoffs with a
conference tournament, or select Full NCAA to begin at start
of the NCAA Tournament.
Tournament Setup
On the Tournament Setup Screen each USER chooses their team
and coach. (For more information on this screen, see Legacy Setup
on page 22) Please note that in multiplayer Tournament Mode,
both user’s teams must be in the same conference.
Coaching Attributes
The Coaches Attributes Screen is where you can strengthen certain
game strategies to best fit your style of play. (For more information
on this screen see Legacy: Coach Attributes on page 22).
TOURNAMENT MAIN MENU
Tournament Options is the main menu of Tournament Mode. From
this menu, you can access the Tournament Tree, manage your team,
peruse stats, tweak options, and save or load games.
TOURNAMENT TREE
The Tournament Tree is where all match-ups are made and all
games are played.
To place game markers:
1. Use the left thumbstick or directional pad to highlight any
match-up on the Tournament tree.
2. Press the A button to add a marker to that match-up.
To change the highlighted matchup:
1. Use the left or right trigger to cycle through teams in the
top slot.
1. Use the White or Black button to cycle through teams in the
bottom slot.
Start Button Overlay
There are more options available to help you manage the
tournament tree and simulate games. These options are available
by pressing the START button. To select a particular option, use the
left thumbstick or directional pad to highlight an option and press
the A button to activate it.
• Start Round: Begins simulation of a single round of
tournament games.
• Mark All: Places a game marker next to all games in
the tournament.
• Mark None: Removes all game markers from the tournament tree.
• Mark User: Marks all games in which a user’s team is playing.
• Randomize Teams: Places teams in random match-ups.
CONFERENCE TOURNAMENT TREE
If you selected a specific conference for the Tournament Option
on the Game Mode Menu, you will begin your playoffs campaign
at your Conference’s Tournament and then advance to the
NCAA Tournament.
Tournament mode lets you choose whether to play or to simulate
individual games. Mark the games you wish to play with
yellow arrows.
• Simulate All: Simulates to the first marked game on the
tournament tree.
When you are ready to begin your Tournament, press the START
button and select Simulate All. When the simulation arrives at a
marked game, the Tournament Match Overlay will appear with the
following options: Play Game, Simulate Game, and Cancel.
• If you select Play this game, you will advance to the Team Select
Screen. On the Team Select Screen, move the Control Icon to the
side of the team you wish to play as, and then press the START
button to begin the game.
• If you select Simulate this game, the game will simulate forward
to the next marked game.
36
37
• If you select Cancel, the overlay will disappear, and you will
return to the Tournament Tree Screen.
STATS-AWARDS
Team Stats: From this screen, you can view the team stats for
every team in the Tournament.
TOURNAMENT RECAP
When the Conference Tournament ends, the Tournament Recap
Screen appears. This screen displays the winning school as well as
the Tournament MVP.
When you wish to advance to the NCAA Tournament, press the
START button to return to the Conference Tournament Screen.
Press the START button again and confirm Yes to simulate the
remaining Conference Tournaments and advance to the Tournament
Options Menu. Select Tournament Tree to advance to the NCAA
Tournament Play In Game.
NCAA TOURNAMENT PLAY IN GAME
The Tournament Play In Game pits two of the weakest teams to win
their conference against each other. Press the START button to
bring up the Play-In Game Overlay and select whether you wish to
Play or Simulate the game.
Player Stats: This screen shows the stats for every player, team
by team.
Tournament Leaders: This is the screen where you can view the
Tournament’s statistical leaders. Want to see who’s leading in
scoring or rebounding? This is where you can find out.
Awards: Awards allows you to view the Tournament Recap Screen
again at the end of the Conference or NCAA Tournament.
OPTIONS
(See OPTIONS on page 40)
SAVE
(See SAVE/LOAD on page 42)
Press the START button to return to the Tournament Options Menu.
PRACTICE
NCAA TOURNAMENT TREE
This is what it all comes down to. 32 teams compete. Only
one team can be the NCAA Champion. The NCAA Tournament
Tree functions the same as the Conference Tree. For more
information on this screen’s controls, see Conference
Tournament Tree on page 36).
Practice mode gives you the opportunity to work on game basics,
advanced moves and play calling.
The option that is specific to Practice Mode on the Game Modes
Screen is:
Practice Modes
• Standard: Practice your shot timing and special moves.
MANAGEMENT
For more information on Management see Legacy Management
on page 25.
38
• Scrimmage: Use this mode to practice the different offensive
plays in your playbook. Scrimmage mode will walk you through
each play you call. A cursor will appear on the ground indicating
where your player is supposed to move. Once you move the
player to the designated location, an arrow will appear over the
play you need to pass to. This way, you can learn how each
play functions.
39
• Free Throw: Lack of free throw ability can cost you games.
Practice them here.
GYM RAT
Some college players just never leave the gym. Gym Rat mode
allows you to play the pick-up games that a “Gym Rat” player
lives for.
The options that are specific to Gym Rat Mode on the Game Modes
Screen are:
Mode: Choose the type of game played. Select any number of
players per team between 2 on 2 and 5 on 5.
Game Point: Select the amount of points the game will be played
to: between 7 and 21.
Win By: Choose the amount of points the leading team must win
by for the victory: 1 point or 2.
OPTIONS
Customize the way you play NCAA College Basketball 2K3 before
or during the game to give yourself total control over your game.
The Options Screen features four different option categories: Rules,
Game Play, Presentation, Controller Setup, and Credits. Use the
left trigger or right trigger to cycle though the Options Categories.
Highlight an option and then press the A or Y button to cycle
through the option settings. Most of the option settings are selfexplanatory, the others are listed below.
Game Play
Play Mode : SIMULATION is as close as you can get to a real NCAA
College Basketball game. ARCADE mode has more forgiving game
play defaults, players do not get tired or injured and all the rules
are OFF except for OUT OF BOUNDS and TRAVELING.
Difficulty: Set the skill level and intensity of computer players to
one of three different levels: STARTER (easier), ALL CONFERENCE,
and ALL AMERICAN (difficult).
Game Speed: Set the player movement and overall pace of the
game to SLOW, NORMAL, or FAST.
Half Length: You can adjust the half-length in one-minute
increments from 1-20 MINUTES. By default, the halves are set to
10 MINUTES.
Pass Tag Icon: When ON, you can display player icons above each
player on your team for accurate passing. When OFF, the feature is
active, but the icons are not visible.
Player Energy: When ON, players grow tired during the course of
games. When OFF, players never grow tired.
Injuries: When ON, players are susceptible to injuries that could
keep them out for a half, the game, or even several weeks.
Ball Handler Auto Switch: When ON, you always control the ball
handler on offense. When OFF, you can switch to an offensive
player without the ball.
Defense Auto Guard On Inbounding: When ON, the game automatically switches you to a player who is in position to guard against
the inbound pass.
Presentation
Rules
Player Intros: When ON, each team’s starting five is introduced
before the tip off. When OFF, intros are skipped.
Every rule in the game can be turned ON or OFF, and fouls can be
adjusted from ALL, MOST, or NONE.
Action Replay: When ON, replays are shown automatically
following great plays to highlight the action.
Possession Switch / Action Freeze: When ON, during the change
of possession the action freezes as the camera rotates behind
the offensive team. When OFF, the action will continue as the
camera rotates.
40
41
Free Throw Routines: When ON, players preparing for a free throw
take more time to focus and loosen up. When OFF, players step up
to the line and take their shots immediately. Note: This option has
no direct effect on free throw accuracy.
SAVE SETTINGS AND GAME DATA
Go to the Save Screen to save files to your Hard Disk or
Memory Unit.
Statistic Overlays: When ON, overlays will appear during the game
that illustrate team and player statistics.
Ball Holder Text: Set the identifying text that will appear under
your player’s feet. NAME, NUMBER & POSITION, NAME &
POSITION, or NONE.
Vibration: When ON, your control pad vibrates in your hands
when the player you’re controlling takes the charge or slams a
monster dunk.
Audio Presentation: Choose one of four pre-set audio presentations. Notice that the audio sliders adjust to create the desired
audio effect.
Audio Sliders: If you want to customize the audio presentation, you
can adjust the audio sliders in any combination. Move the slider to
the right to increase or to the left to decrease volume.
DELETE
Free up some space on your memory card by deleting files you no
longer want.
ROSTER MANAGER
Roster manager gives you the ability change and customize any
team to your preference. You can edit the ratings of each player’s
attributes, switch up plays in your offensive and defensive
playbooks and even create your own player.
Team Rosters
Controller Setup
Here is where you can edit the attributes of each player on every
playable team. For more info, see Legacy Management on page 25.
In addition to the default controller setup, NCAA College Basketball
2K3 offers five alternate configurations. Choose the setup that fits
best with your game using the Black or White button.
Create Player
Credits
Displays the Credits for NCAA College Basketball 2K3.
In Create Player Mode, you can select a player’s position, physical
appearance, accessories and attributes. The possibilities are
endless. Highlight Create a new player and press the A button
to advance.
Player Edit Screen
SAVE/LOAD
LOAD
Go to the Load Screen to access any game or settings files you
have saved for NCAA College Basketball 2K3
42
Here is where you can edit each and every facet of your future
basketball player. Use the left or right trigger to cycle through each
of the areas of the Player Edit Screen: Edit, Appearance,
Accessories and Attributes. You can rotate the player model at any
time by pressing left or right on the directional pad. Move the left
thumbstick or directional pad up or down to highlight your desired
appearance option. Use the A or Y buttons to alter the option
43
Edit
First Name: Press A button to bring up the Enter Player Name
Screen. Proceed to enter you chosen name here, then press the
START button to return to menu.
Last Name: Press A button to bring up the Enter Player Name
Screen. Proceed to enter you chosen name here, then press the
START button to return to menu.
This will take you to the Add Players Screen. Select a team for your
player and let him work his magic.
To add your player to a roster:
1. Use White or Black button to cycle through Conferences. Use left
or right trigger to cycle teams.
2. Select the player who will be replaced by your created player
and press the A button.
Position: Use the A or Y button to cycle through the Positions:
PG, SG, SF, PF and C.
3. When asked for confirmation, select YES and press the A button.
Jersey Number: Use the A or Y button to cycle through jersey
numbers: 00 to 99.
Congratulations! You now have a created player on the team of
your choice.
Height: Use the A or Y buttons to select your player’s height: from
4’6” to 7’6”
Offensive Playbooks
Best Hand: Use the A or Y buttons to select which hand your player
will be best with: Left or right.
Appearance
Here is where you decide all the bodily dimensions and other
physical attributes for your player.
Accessories
Add a variety of headbands, wristbands, knee braces and more, to
add a unique style to your created player.
Attributes
Attributes are, of course, the most important editable qualities of
your created player. You have complete control over the amount of
points (between 0 and 100) in each attribute.
When completed with the player creation process, press the START
button to advance. This will take you back to the Create Player
Screen. From here you can assign your newly created player to any
team you choose.
To get to the Add Players Screen:
1. Use the left thumbstick or directional pad to highlight the
created player you want to assign to a team.
Each school has an entire playbook for you to pick and choose
plays from. In the Offensive Playbook Screen you can find the
plays that will capitalize on your strengths and minimize your
weaknesses.
Defensive Playbook
Through the course of game most teams will use a variety of
defensive play, depending on the situation. In the Defensive
Playbook Screen, you can choose the defenses that work best
for you.
Reset Rosters
Reset Roster will undo any of the changes you have made to teams
rosters; and will return them to their default settings. In addition,
all created players will become unassigned. If you have created
changes in rosters you wish to keep, make sure you save it before
selecting Reset Roster.
SEGA SPORTS CHALLENGE
Sega Sports Challenge is an exciting new mode of play that takes
the competition to the next level. In SSC, you can record your
personal stats, then post ‘em online at SEGASPORTS.COM to see
where you rank against the world’s best. Prizes and bragging
rights await!
2. Press the Y button to add highlighted player to roster.
44
45
After you complete an SSC game, return to the Sega Sports
Challenge Screen to receive your Challenge Codes. You will earn
codes for Per Game Averages and Single Game Records – one
code for Per Game Average and one code for each Singe Game
Record category.
Go to SEGASPORTS.COM and enter your codes to immediately see
where you rank and find out if you qualify to win. Each time you
enter a code, your chances increase. Good Luck!
USER RECORDS
Enter your name in order to compile and save your personal NCAA
College Basketball 2K3 stats. These are the numbers you’ll pit
against other NCAA 2K3 ballers in the SSC. To enter a user name:
• To use this user name in a game, at the Team Select Screen, after
choosing a team, press the White or Black button until the user
name appears on your control pad icon, then press the START
button to proceed.
ENABLE CHALLENGE
To begin the Sega Sports Challenge, select Enable Challenge. This
sets all rosters and settings to their defaults so that you are playing
the same game as all other SSC participants.
• When in Sega Sports Challenge Mode, this option becomes
Disable Challenge.
• To exit Sega Sports Challenge Mode, select Disable Challenge to
exit Sega Sports Challenge mode.
PER GAME AVERAGE BOARD
As you play multiple games in Sega Sports Challenge mode, your
statistics are calculated over time to show your per game average
in 11 key categories.
SINGLE GAME RECORD BOARD
The Single Game Records board displays your best performance
in each of 11 categories along with a Challenge Code for each
record category.
SAVE CHALLENGE RECORDS
Make sure you save before you power down in order to keep your
stats up-to-date.
PLAY LIVE
NCAA College Basketball 2K3 supports Online Gaming through the
Xbox Live network. Please register for an Xbox Live account before
using this feature.
Select Play Live from the Main Menu once you have your Xbox
Live account activated. Login and advance to the Online Menu
at the Online Sign In screen by entering your user name
and password.
Quick Match is the fastest way to challenge an opponent.
It is intended for players to easily find and enter a game.
OptiMatch allows you to search for games based on type
(Ranked or Scrimmage), difficulty, or quarter length.
Create Match is where you decide exactly what kind of game you
want to play by choosing to host a game with your settings.
User Options allows you to add friends to your friend list and view
players you’ve recently played. The user can also hide from other
players by selecting Appear Offline in the User Options.
Leaderboard will download the current leaders from the server
complete with their records.
Downloads will download the latest NCA rosters to keep
your game up to date with the pros.
Sign Out will log the user off.
46
47
NOTES
48