1
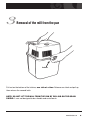
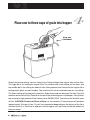
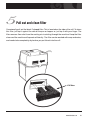
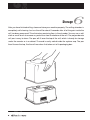
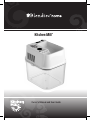
® Kitchen Mill
Owner’s Manual and User Guide
PLEASE READ THESE
IMPORTANT SAFEGUARDS
Basic safety precautions should always be followed:
1. Read all instructions before using the appliance.
2. Do not subject the unit to water. Never submerge the unit in water or other liquid.
3. Close supervision is necessary when used by or near children.
4. Unplug from electrical outlet when not in use, before putting on or taking off parts, and
before cleaning.
5. Avoid direct contact with moving parts.
6. Do not operate any appliance it the cord or plug appears to be damaged, or after the
appliance malfunctions, or is dropped or damaged in any manner.
7. Do not use outdoors.
8. Do not let the cord hang over the edge of a table or counter, or touch hot surfaces.
9. Check grain and hopper for the presence of foreign objects before using.
Before you turn the machine on...
Please take a moment to read the instructions in this booklet. It is important to first attach the
cyclone-cup to the base of the mill. This is easy to do (See page 3). Make sure the mill fits
firmly on the flour pan and the two hold-down latches have snapped into place. Please
be sure any grain you put in your Kitchen Mill™ is clean. Your warranty does not cover foreign
objects like nails or other pieces of metal that could enter and cause damage to your mill.
The first cup of grain you run through your machine may contain a black fine dust. Discard this flour
and continue to mill.
SAVE THESE INSTRUCTIONS
Congratulations...
You own the world’s most advanced electric flour mill designed for home use. Using your
Kitchen Mill™ will enable you to create delicious homemade breads and pastries.
The Kitchen Mill™ is the result of thousands of hours of research and years of constant testing.
Now you can enjoy the great taste of natural, whole grain flour any time. It is always ready in an
instant. Your new Kitchen Mill™ is compact, powerful, and built to last for years to come.
Discover the great taste of freshly milled grains. Try milling different kinds of grains like whole
wheat, rye, oats, rice, buckwheat, millet, corn, soybeans, barley, triticale and others. You will
be delighted with the results.
Included with your Kitchen Mill™:
Owner's Manual and User Guide
Mill Motor Base
Mill Pan
Cyclone Cup
F-Filter (2 each)
Warranty and Repair Procedure
The Blendtec Kitchen Mill™ has a 6-year warranty on the motor and a lifetime warranty on the
milling chamber and mill pan. F-Filter and gasket items are not covered by warranty. Hard
foreign objects like nails and other pieces of metal can cause severe damage to the mill. This
type of damage is not covered by the warranty.
Before returning any product for repair service, call 1-800-748-5400 from 9am5pm Mountain Time, Monday-Friday (excluding holidays) to speak with a customer
service representative. Many problems can be resolved by troubleshooting over
the phone. If repairs are necessary the customer service representative will give
you instructions on how to return the product. The warranty status of your product
will also be reviewed and your options will be explained.
Repairs performed by persons other than Blendtec™ service representatives void the
warranty. Opening the machine casing or otherwise tampering will also void the
warranty.
www.blendtec.com
1
Enjoy better health and living
with your Kitchen Mill™
100% of nature’s goodness
Whole grains are more nutritious than refined grains.
Natural kernels of whole wheat, for example, contain
16 minerals, 10 essential vitamins, and at least 4
other vitamin factors generally found in bran and
wheat germ. White flour, however, is refined from the
endosperm and consists mostly of starch and a small
amount of protein. It contains very little vitamins or
minerals. Nutrition experts have joined in praise of the
Kitchen Mill™ as a way to use 100% of nature’s goodness to improve your health and nutrition.
If you make homemade breads and
pastries, you know what a tasty treat
they are. When the flour is fresh, the
taste is better. We suggest you try
several new recipes and enjoy the
flavor and texture of fresh-milled flour
in your cooking.
An easy way to add fiber to your diet
Whole grains contain natural fiber. Diets containing adequate amounts of fiber help you stay
slim and avoid many of the diseases caused by fiber deficiency.
Saving money
You can save money by milling your own flour and baking your own breads. Buying grain in
bulk can add to your savings. In this way the Kitchen Mill™ will easily pay for itself. To find
whole grains in your area, try several approaches. Call large health food stores and bakery
services. You can also call a local bakery and ask the name of their supplier.
A quality investment
The Kitchen Mill™ is made of the highest quality materials. The heart of the mill is a patented,
stainless steel, Micronetic™ milling chamber. The mill is the most advanced way to mill grain.
It has all the advantages of the old stone mills but none of their problems. There’s no gumming, jamming or glazing. Your Kitchen Mill™ will not overheat. Each mill uses a 1.8 peak
horsepower, 120 volt motor. It is permanently lubricated. It will provide years of trouble-free
service.
2
Operating Instructions
1
Attach cup and position as shown
Cyclone cup
Micronetic™ Milling Chamber
Micronizer Unit consists of:
Rotor
Stator
Turn the mill upside down and attach the cyclone cup to the bottom of the mill. Align the
handle of the cup in the position shown. Be sure to empty the cyclone cup after each milling
session. Any flour you find in the cup is perfectly good and should be used. The function of the
cyclone cup is to separate the flour from the air as it passes through the mill.
www.blendtec.com
3
Attach the mill to pan and make
sure grain is clean
2
With the cyclone cup in place, turn the mill right side up and place it on the mill pan. Latch one
side at a time. Make sure the latches snap over the edge of the pan. After latching the sides in
place, push down on the top to make sure the mill and the pan are snugly together.
Note: BE SURE TO USE ONLY CLEAN GRAIN. Hard foreign objects like nails and other
pieces of metal can cause severe damage to the mill. This type of damage is not covered
by the warranty. Inspect your grain to make certain it is clean before milling. Make sure the
power cord is plugged into a grounded receptacle.
Mill Motor
with Gasket
Assembly
Mill Pan
4
3
Removal of the mill from the pan
Latch
.
Pull out on the bottom of the latches, one side at a time. Release one latch and pull up,
then release the second latch.
NOTE: DO NOT LIFT THE MILL FROM THE PAN BY PULLING ON THE GRAIN
SHIELD. It was not designed to be a handle and could break.
www.blendtec.com
5
Place one to three cups of grain into hopper
4
Cup not
included
Select the texture setting. You can select any of three settings from regular flour to fine flour.
The large dot is the setting for regular flour, the smallest dot is the setting for fine flour, and
the middle dot is the setting for medium flour. Many people have found that the regular flour
setting works great for most recipes. The machine will not do cracked wheat on any setting.
The finest setting will create pastry-fine flour. Experiment and see what you like best. Turn the
machine on to start milling. Place up to 3 cups of the selected grain in the hopper. You will hear
the sound of a high speed mill that rotates up to 28,000 R.P.M. The mill pan will hold 24 cups
of flour. CAUTION: Do not overfill the mill pan. As an example; 12 cups of grain will produce
approximately 18 cups of flour. This will vary somewhat depending on the texture of the flour
and how moist it is. Continue to add grain to the hopper until you have milled the amount of
flour you need.
6
5
Pull out and clean filter
Occasionally pull out the black F-shaped filter. This is located on the side of the mill. To clean
this filter, just tap it against the side of the pan or hopper or, just tap it with your finger. The
filter removes flour dust from the cooling air circulating through the machine. Keep the filter
clean and the machine will operate efficiently. The filter can be washed with soap and water,
and needs to be completely dry before you put it back into the mill.
F-Filter
www.blendtec.com
7
6
Storage
After you have finished milling, clean and store your machine properly. The milling chamber is
completely self cleaning. Just run the mill for about 5 seconds after all of the grain inside the
mill has been processed. This eliminates remaining flour in the chamber. You can use a soft
cloth or small brush to remove any extra flour from the bottom of the mill. The polycarbonate
mill pan is easy to clean. The pan will fit over the top of the mill, which is handy for storage
under the counter or in a cabinet. The cord is easily coiled inside the cyclone cup. The pan
then fits over the top, like the mill was when first taken out of its packaging box.
8
Remember...
1. If the mill slows down, the pan may be too full, the filter may need
cleaning, or the cyclone cup may be full or positioned incorrectly. Make sure the Fshaped filter is properly placed.
2. Do not attempt to overfill the pan. It is a simple matter to empty the contents and
continue your milling.
3. Do not attempt to run wet wheat or other wet grain through the mill. The Kitchen
Mill™ is not designed to mill wet grain. Moisture content of grain should not exceed
15%. Check the back of this manual for a list of approved grains.
4. The mill is designed for household use only. Commercial use will void the warranty.
5. The mill is fast, efficient, and easy to use. It is not, however, intended to be a metal
grinder. Some grains do contain pieces of metal like BeeBees, nails, staples, etc. We
suggest you use only double or triple cleaned grain. Your warranty excludes foreign
objects that are introduced into the mill.
6. The mill is designed to mill grains, not herbs or seeds. Do not place sunflower or
sesame seeds, coffee or peanuts in the mill, as they may gum up the mill. Oil content
should not exceed 15%.
7. Never immerse the milling unit in water.
8. Do not attempt to repair your Kitchen Mill™. If you suspect that repairs are necessary, follow the repair procedure listed on page 1 of this manual.
9. The mill has been equipped with a circuit breaker next to the power switch to prevent the motor from electrical overload. In the event the breaker is activated, the mill
will automatically shut off. Unplug the mill and allow it to cool for 5-10 min. Plug the
mill in and simply reset it by depressing the white button located on the top of your
mill. If the breaker is activated again, contact the Blendtec™ service department,
800-748-5400
www.blendtec.com
The Blendtec® Kitchen Mill
The Kitchen Mill™ will mill the following:
Wheat (hard & soft) Dried pinto beans
Dried green peas
Dried sweet corn
Sorghum (milo)
Buckwheat
Triticale
Popcorn
Barley
Millet
Oats
Rice
Do NOT mill the following:
Sugar Sunflower seeds Nuts (all types)
Dried fruits (including dates and raisins)
Small dried garbanzo beans
Dried beans (most types)
Legumes
Dried mung beans
Dried pinto beans
Feed/Field corn
Oyster shells
Dried lentils
Chickpeas
Split Peas
Soybeans
Rye
Sesame seeds
Coffee beans
Peanuts
Spices
Avoid items that contain high oil or moisture content.
Please fill out and save for reference.
1206 South 1680 West Orem, Utah 84058
(800) 253-6383
(801) 222-0888
Fax (801) 802-8584
Kitchen Mill Serial # ___________________________________
Date of Purchase ______________________________________
Copyright Blendtec - Division of K-TEC - 2007
OWN-RE-026 Manual, Kitchen Mill, Rev02 Apr 2007