1
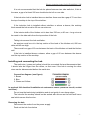
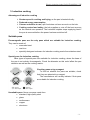
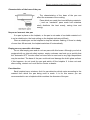
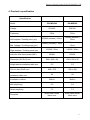
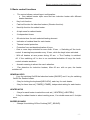
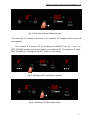
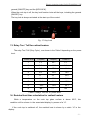
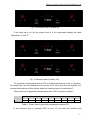
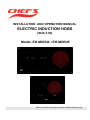
INSTALLATION AND OPERATION MANUAL
ELECTRIC INDUCTION HOBS
(BUILT-IN)
Model: EH-MIX544 / EH-MIX545
Please read the instruction manual carefully before using
Electric Induction hobs Chef’s EH-MIX544 / 545
TABLE OF CONTENTS
PREFACE
1. SAFETY INSTRUCTION.. ……………………………………………………………………
2. INSTALLATION INSTRUCION ……………………………………………………………...
3. INDUCTION COOKING ………………………………………………………………………
4. PRODUCT SPECIFICTION ………………………………………………………………….
5. BASIC CONTROL FUNCTIONS ....................................................................................
6. SWITCHING ON/OFF THE COOKTOP .........................................................................
7. SELECTING A POWER LEVEL FOR A HEATER .........................................................
8. FAST BOIL (BOOSTER) FUNCTION.............................................................................
9. SWITCHING OFF A HEATER .......................................................................................
10. ENABLE / DISABLE DOUBLE ZONE FOR RADIANT HEATERS ..............................
11. HEAT-UP FUNCTION FOR RADIANT HEATERS.......................................................
12. KEY LOCK ................................................................................................................ ..
13. RELAY TON/ TOFF FOR RADIANT HEATERS ....................................................... ..
14. RESIDUAL HEAT TIME CALCULATION FOR RADIANT HEATERS ........................
15. AUTOMATIC SAFETY OFF.........................................................................................
16. OPERATING THE TIMER ............................................................................................
17. DISPLAYING SOFTWARE VERSIONS.......................................................................
18. DISPLAYING SPECIAL STATUSES ..........................................................................
19. ERRORS/ALARMS .....................................................................................................
-2-
Electric Induction hobs Chef’s EH-MIX544 / 545
Preface
Thank you for choosing CHEF’S cooking appliances.
Read this instructions carefully. Only after doing this will you be able to operate
your appliance properly.
Keep this Instructions in a safe place. If the appliance is given to another person,
ensure the appliance documentation is also included.
Any defects and losses caused by ignoring the mentioned items and cautions
mentioned in the operation and installation instruction are not covered by our warranty
and any liability. Please keep all document in a safety place for future reference. If you
have any doubt, please contact our local customer service center or dealer.
Check the appliance after removing it from the packaging. If you find the induction
hob (built-in) is visibly damaged, do not use it.
Contact your local Customer Service or dealer immediately.
-3-
Electric Induction hobs Chef’s EH-MIX544 / 545
1. Safety Instructions
The induction hob (built-in) is designed for domestic use only. Only use the
induction hob for food preparation so that it should be installed in the kitchen.
Safe operation:
To use this appliance safely, adults and children who as a result of
* physical, sensory or mental disability
* or lack of experience or knowledge are not capable of using this appliance
should not do.
Children must be supervised to ensure that they do not play with the appliance.
Overheated oil, butter or margarine:
Overheated oil or butter (margarine) can quickly ignite. It may cause a fire!
Ensure that you keep a constant watch when cooking foods with oil or butter.
In the event that the oil or butter catches fire, never use water to put it out. Put the
fire out quickly by covering the pan with a cover or dish. Switch off the hotplate.
Not to add additional timer or remote control to control the hob.
Hot cooking hob
Risk of burns! Do not touch the hot areas of the hob. It is imperative that children
keep away from the appliance. The residual heat Indicator tells you if the hotplates are
hot (See “Residual heat warning light” section ).
It may cause a fire! Never rest flammable objects on the cooking hob.
It may cause a fire! If there is a drawer below the induction hob, this should not be
used to store any flammable objects or sprays.
Wet hotplates and pan bases
Risk of injuries! If there is any liquid between the base of the
pan and the hotplate this could generate steam pressure. As a
result, the pan could jump unexpectedly.
Always ensure that the hotplate and the base of the pan are
kept dry.
Cracks in the hob
Risk of electrocution! Disconnect the appliance from the mains if the induction hob
is broken or cracked. Contact Local Customer Service or Dealer.
-4-
Electric Induction hobs Chef’s EH-MIX544 / 545
The hotplate heats up but the visual indication does not work
Risk of burns! Disconnect the hotplate if the indicator does not work. Contact Local
Customer Service or dealer.
Do not place metal objects on the Induction hob
Risk of burns! Do not leave cutlery, lids or other metal
objects on the hob as they can heat up very quickly.
Taking care of the cooling fan
This induction hob is fitted with a fan in the lower section.
Risk of malfunction! If a drawer is fitted beneath the hob you must not keep small
objects or paper in it as, if they are Picked up, they could damage the cooling fan or
affect the cooling system.
Please, note: there should be a minimum distance of 2 cm between the drawer
contents and the cooling fan.
Incorrect repairs
Risk of electric shock! Incorrect repairs can be dangerous.
Repairs may only be carried out by the Customer Service.
Power cable
Any work on the appliance, including replacing the power Cable must be carried out
by the Customer Service.
The power cable of the appliance must not touch the hot areas of the hob. The
cable insulation and hob can be damaged.
This appliance complies with current safety regulations and electromagnetic
compatibility regulations.
Nevertheless, people with a peacemaker should not use this appliance.
It is impossible to guarantee that all such devices found on the market comply with
current safety regulations and electromagnetic compatibility regulations, and that
dangerous interference will not occur. It is also possible that people with other types of
device, such as hearing aid, could experience some discomfort.
Switching the hob off
Always switch the hob using the main switch of the Control Panel after each use.
Do not wait until the hob switches off automatically when the pan is removed.
-5-
Electric Induction hobs Chef’s EH-MIX544 / 545
Causes of damage:
The base of the pans
The rough bases of pans may scratch the hob.
Avoid leaving empty pans on the hotplates. These may
cause damage.
Hot pans
Never rest hot pans on the control panel, the indicator area or the hob surround.
Salt, sugar and sand
salt, sugar and sand may scratch the ceran glass.
Do not lean on the hob or use it as work surface.
Hard and pointed objects
Hard or pointed objects may cause damage if they fall onto the hob.
Spilt food
Sugar and other similar products may damage the hob.
These products should be removed immediately using a
glass scraper.
Inappropriate cleaning products
Discolorations in the metal are caused by using unsuitable cleaning products and
wear as a result of contact with pans.
Plastic and foil
Aluminum foil and plastic containers will melt if placed on the hot areas of the hob
Advice on saving energy
Use a pan with thick flat base. Curved bases increase
energy consumption.
Place a ruler on the base of the pan, if there are no
gaps, the base of the pan is completely flat.
The diameter of the base of the pan should fit the
size of the hotplate.
Check if the manufacturer has indicated the upper diameter of the pan. In general,
this is greater than the diameter of the base of the pan.
If the diameter of the pan does not fit the diameter of the hotplate, you are
recommended to use a pan which is larger than the size of the hotplate, or else about
half the energy will be lost.
-6-
Electric Induction hobs Chef’s EH-MIX544 / 545
Choose pans which are the right size for the amount of food to be prepared. A large
pan which is half full will consume a lot of energy.
Always centre the pan on the hotplate and always cover the pan with the matching
lid. Cooking without using the lid quadruples energy consumption.
Cook using small amounts of water. This will save energy and will also help green
vegetables retain their vitamins and minerals.
During their cooking, food such as stews, soups may heat up too quickly without
any indication, spilling out of the cookware.
It is therefore advisable to heat this type of food gently, selecting a suitable power
level and stirring the contents before and during cooking.
We recommend not to use for Induction hob pots that have been used in a gas hob
fire can deform the flatness of bottom). In case of use, check that bottom is flat.
2. Installation instructions
EH-MIX544 Cut-out Dimension
-7-
Electric Induction hobs Chef’s EH-MIX544 / 545
EH-MIX545 Cut-out Dimension
Preparing the Kitchen
The worktop should be flat and horizontal. The aperture should be cut before the
appliance is installed. Remove any shavings, as these can affect the operation of the
electrical components. When the cutting has been completed, the unit’s stability should
be checked again.
Surfaces which have been cut should be sealed so that they are heat resistant and
so that they do not swell when moist.
The kitchen units to be fitted must resist temperatures of up to 90oC.
The gap between the aperture and the side wall must be at least: 40 mm
-8-
Electric Induction hobs Chef’s EH-MIX544 / 545
It is not recommended that the hob be placed between two side walls but, if this is
the case, a gap of at least 200 mm should also be left on one side.
If the induction hob is installed above a sterilizer there must be a gap of 70 mm from
the top of worktop to the top of the sterilizer.
If the induction hob is installed without sterilizer or above a drawer, the worktop
thick around the hob must be 20 mm as minimum.
If the interior width of the kitchen unit is less than 700 mm, a 80 mm – long cut must
be made in the side walls from the top section of the hob.
Taking into account the hob ventilation:
An aperture must be cut in the top section of the back of the kitchen unit, 680 mm
wide and 45 mm high.
There must be a gap of 20 mm between the back of the kitchen unit and the kitchen
wall.
if the hob is installed above a drawer, allow a gap of 65 mm between the drawer
and the top section of the worktop.
Installing and connecting the hob
The earth wire ( green and yellow) should be connected first and disconnected last.
It should also be longer than the others, so that even if the hob is moving the other
wires can be disconnected before the earth wire.
Connection diagram ( see figure)
1. Brown
2. Blue
3. Green and Yellow
Is required 16A electrical installation at customer’s house (electrical circuit, socket
and fuse ).
Do not trap the lead during installation and do not guide it over sharp edges.
The hob and the worktop should not be sealed with silicone as the hob itself has a
seal which serves this function.
Removing the hob
Disconnect the cooker from the power supply.
Push out the hob from below
-9-
Electric Induction hobs Chef’s EH-MIX544 / 545
3. Induction cooking
Advantages of induction cooking
Ø Greater speed in cooking and frying; as the pan is heated directly.
Ø Reduced energy consumption
Ø Cleaner and easier to use; spilt food does not burn as much on the hob.
Ø Cooking control and safety; the hob supplies or cuts off the heat as soon
as the controls are operated. The Induction hotplate stops supplying heat if
the pan is removed before the power has been switched off.
Suitable pans
Ferromagnetic pans are the only pans which are suitable for induction cooking.
They can be made of:
·
enameled steel
·
cast iron
·
specially designed cookware for induction cooking made from stainless steel
Special pans for induction cooking.
Other types of special pans are available for induction cooking, where the base of
the pan is not entirely ferromagnetic. Check the diameter as this could affect the pan
detection as well as the cooking results.
Checking pans using a magnet
To find out whether the pans are suitable, check
that they are attracted to a magnet.
The manufacturer will usually indicate if their pans
are suitable for induction cooking.
Unsuitable pans. Never use pans made from:
·
standard, high quality steel
·
glass
·
earthenware
·
copper
·
aluminum
- 10 -
Electric Induction hobs Chef’s EH-MIX544 / 545
Characteristics of the base of the pan
The characteristics of the base of the pan can
affect the evenness of the cooking.
Pans which are made from heat-diffusing materials
( such as “sandwich” pans made from stainless
steel) distribute the heat evenly, saving time and
energy.
No pan or incorrect size pan
If no pan is place on the hotplate, or the pan is not made of a suitable material or it
is not a suitable size, the heat setting on the hotplate indicator will flash.
Place a suitable pan on the hotplate to stop the indicator flashing. If there is a delay
of more than 90 seconds, the hotplate switches off automatically.
Empty pans or pans with a thin base
Do not heat empty pans and do not use pans with thin bases. Although your hob is
equipped with an internal safety system, empty cookware can heat up so quickly that
the “automatic OFF” function does not have time to react and a very high temperature
may be reached. The base of the pan could melt and damage the hob’s glass surface.
If this happens, do not touch the pan and switch off the hotplate. If it does not work
after cooling, contact our Local Service Center or dealer.
Pan detection
Each hotplate has a minimum limit for pan detection which varies according to the
material from which the pan being used is made. It is for this reason you are
recommended to use a hotplate which matches the diameter of the pan.
- 11 -
Electric Induction hobs Chef’s EH-MIX544 / 545
4. Product’s specification
Specification
Model
EH-MIX544
EH-MIX545
220VAC
220VAC
50Hz
50Hz
2000W (booster) / 22cm
2000W (booster) /
22cm
1600W ( booster) / 14cm
1600W ( booster) /
14cm
2300W / 25cm
2300W / 25cm
5500W
5500W
860 x 430 x 60
630 x 520 x 60
5.5
5.5
800 x 370
580 x 490
20
20
Built-in
Built-in
Net weight (kg)
6.0
6.0
Gross weight kg
7.5
7.5
Shott caran Glass,
Shott caran Glass,
black color
black color
Voltage
Frequency
Individual Induction power (kW)
Left hotplate / Cooking zone (cm)
Individual Induction power (kW)
Mid. hotplate / Cooking zone (cm)
Individual Electric power (kW)
Right hotplate / Cooking zone (cm)
Induction total rated power (KW)
Dimension (W×D×H) mm
Height above installation table mm
Cut-out size (W×D) mm
Minimum thickness of
installation table mm
Installation method
Faceplate
- 12 -
Electric Induction hobs Chef’s EH-MIX544 / 545
5. Basic control functions
•
The control allows a mixed layout configuration:
o One radiant heater triple zone and two induction heater with different
heater diameters.
•
Key Lock function.
•
Fast boil function for induction heaters ( Booster function).
•
Heat-Up function for radiant heater.
•
A triple zone for radiant heater
•
2 independent timers
•
99-minute timer for each selected heating element.
•
Indication of residual heat for each heater.
•
Thermal control protection.
•
Protection from accidental activation of keys:
- One or more keys activated for more than 10 sec. -> Switching off the touch
control. A warning beep sounds every 10 sec., while the key/s is/are activated.
- With all heaters at zero power during 30 sec. -> The Cooktop is switched
off. If the switching off is due to an accidental activation of keys, the touch
control actuates as above.
•
Acoustic warning to attract the user’s attention.
•
Pan detection for induction heaters; After 60 sec. with no pan, the heater
switches off.
GENERAL KEYS
- 1 key for switching On/Off the Induction heater [ON/OFF] and 1 key for switching
On/Off the Radiant heater.
-
2 key for locking the keyboard [KEYLOCK], each key for each heater.
-
2 key for timer time set [-TIMER] [+TIMER], independent setting for each heater.
HEATER KEYS
-
2 keys for each heater to select the cook set [- HEATERx] [+HEATERx].
- 2 Key for radiant heater to select cooking zone, 1 for double zone and 1 for triple
zone.
BUZZER SOUNDS
-
3 beeps for switching Off the Cooktop [OFF_SOUND].
- 13 -
Electric Induction hobs Chef’s EH-MIX544 / 545
Fig. 1: User Interfase complete configuration for Induction heater
Fig. 2: User Interfase complete configuration for Radiant heater
6. Switching On/Off the Cooktop
The Cooktop is switched ON by touching the [ON/OFF] key for 1 sec. A beep sounds
and all the heater displays show a number “0”
Fig. 3: Switching ON the Induction heaters
- 14 -
Electric Induction hobs Chef’s EH-MIX544 / 545
Fig. 4: Switching ON the Radiant heaters
If the selection of a heater is not done in 10 seconds, the cooktop will be turned off
automatically.
The cooktop is switched Off by touching the [ON/OFF] key for 1 sec. An
[OFF_SOUND] sounds and all the heaters are switched Off. The purpose of these
[OFF_SOUND] is to distinguish the OFF action over all others
Fig.5: Switching OFF the induction heaters
Fig.6: Switching OFF the radiant heater
- 15 -
Electric Induction hobs Chef’s EH-MIX544 / 545
The (ON/OFF) key will be locked to switch On the cooktop:
* if the key lock is activated (KEYLOCK LED on),
* or if there is any appliance error.
7. Selecting a power level for a heater
When the Cooktop is on, the power level for a heater can be selected by
touching the heater [-] [+] keys. In each increase/ decrease a beep sounds and the
corresponding display shows the new power level.
The touch sends the new power level to the Induction Control Unit.
The [-] [+] keys will be locked:
o If the Cooktop is off, or
o if the key lock is activated (KEYLOCK LED on), or
o if there is any heater error or appliance error.
If the finger is held down on the key, the action is repeated twice every second.
The [+] key raises the cooking level to 9, whereas the [-] key reduces the cooking
level to 0.
Fig. 7: Select cookset for heaters.
With the heater at power level 0, the [-] key raises the cooking level to 9.
- 16 -
Electric Induction hobs Chef’s EH-MIX544 / 545
Fig. 8: Selected cookset 9 from 0.
8. Fast Boil (Booster) Function on Induction heaters
With the heater at power level 9, the [+] key raises the cooking level to Booster
level a beep sounds and the heater display shows “P”.
With the heater at Booster level, if the [+] key is Touched an error beep sounds and
the cook set doesn’t change.
Fig. 9: Selected Booster function for a heater.
With the heater at Booster level, if the [-] key is Touched a beep sounds and the cook
set is reduced to 9.
Fig. 10: Cancelling Booster function for a heater.
The heater will work at maximum power level ( booster level) for 10 minutes. After
these 10 minutes a beep sounds and the heater will return to level “9”.
- 17 -
Electric Induction hobs Chef’s EH-MIX544 / 545
9. Switching Off a Heater
When a heater is on, the heater can be switched off by touching the heater [-] and
[+] keys simultaneously. A beep sounds and the corresponding display shows “0”.
Fig. 11: Switching OFF a heater with the [+] end [-] keys.
10. Enable / Disable double zone / triple zone for radiant heaters
When a heater is on, the double zone of the radiant heater can be enabled/
disabled by pressing [DOUBLE ZONE HEATER] key
. A beep sounds and the
double zone LED switched ON if the double zone is enabled.
Fig.12: Enable double zone by press double zone key for radiant heater .
The triple zone of the radiant heater can be enabled/ disabled by pressing
[TRIPLE ZONE HEATER] key
. A beep sounds and the triple zone LED
switched ON if the double zone is enabled.
Noted: Double zone must be selected before to active triple zone.
- 18 -
Electric Induction hobs Chef’s EH-MIX544 / 545
Fig.13: Enable triple zone by press triple zone key for radiant heater .
The zone can be enabled/ disabled after selecting the power level when the heater is on.
11. Heat-up function for radiant heaters
11.1. Activating the heat-up function
This function takes the cooking level to maximum power for a defined time.
The heat-up function is activated selecting the power level 9, and touching the
[+] key. The decimal point of the display blinks for 10 seconds.
Fig.14: Activate Heat Up function
During these 10 seconds the desired power level must be selected (between 1
and 8). After this time a beep sounds, and the decimal point remains fixed, indicating
the heat-up function is ON. If the power level is 0 or 9, the heat-up function is
cancelled.
Fig.15: Select power level
- 19 -
Electric Induction hobs Chef’s EH-MIX544 / 545
Fig.16: Heat Up function activated.
If the heat-up function is activated, pressing the heater [+] key, the duration of
the heat-up function will be the duration for the new power level; if the new level is 9,
the heat up function is cancelled.
Power level
Time(sec.)
1
1’12’’
2
2’44”
3
4’48”
4
5’28”
5
6’30”
6
1’12”
7
2’44”
8
2’44”
Table 1: Heat Up function time
11.2. Cancelling the heat-up function
The Heat-up function can be cancelled either automatically, when the time expires,
or when the user wishes.
When the heat-up function is cancelled automatically, a beep sounds, the
decimal point of the display turns out, and the power level of the heater remains the
selected power level.
If we press the [-] key when the heat-up function is activated, the function is
cancelled
12. Key lock
There are 2 [KEYLOCK] key for the cooktop. 1 key to lock the control keys of
inductions heater and the other to lock of radiant heater control keys.
Touching the [KEYLOCK] key for 1 second, the key lock function is activated and
deactivated. If the LED associated to the key lock key is on, the keyboard is locked.
The locking function can be activated when the heaters are on or when the cook
top is off. If the cook top is on, the key lock function locks all the keys except the
- 20 -
Electric Induction hobs Chef’s EH-MIX544 / 545
general [ON/OFF] key and the [KEYLOCK].
When the cook top is off, the key lock function locks all the keys, including the general
[ON/OFF] key.
The key-lock is always activated at the start up of the control.
Fig. 17: Key Lock
13. Relay Ton / Toff for radiant heaters
The relay Ton/ Toff (Duty Cycle) , are shown in the Table.2 depending on the power
level.
Power level
Ton(sec)
Toff(sec)
Power %
1
1.3
42.7
3.1
2
2.8
41.2
6.3
3
6.2
37.8
14.1
4
8.2
35.8
18.6
5
11
33
25.0
6
13.8
30.2
31.3
7
19.9
24.1
45.3
8
28.2
15.8
64.1
9
44 “
-----
100
Table 2: Relays Ton/Toff vs. power level
14. Residual heat time calculation for radiant heaters
While a temperature on the cook top glass surface is above 65ºC, this
condition will be shown in the associated display, by means of a “H”.
If the cook top is switched off, the residual heat is shown by a static “H” in the
display.
- 21 -
Electric Induction hobs Chef’s EH-MIX544 / 545
Fig. 18:Residual Heat (Cooktop off)
If the cook top is on, but the power level is 0, the associated display will show
alternately “H” and “0”.
Fig. 19:Residual Heat (Cooktop On)
To generate a temperature above 65ºC a heating element has to be in operation
for certain time, this time depends on the power level. Once this time has expired, the
residual heat warning will be shown when the heating element is switched off.
The preset time to generate a temperature above 65ºC is shown in table 4.
T(sec.)
1
7˜
2
7˜
3
7˜
4
7˜
Power
5
7˜
6
7˜
7
7˜
8
7˜
9
7˜
Table 3: Preset time to generate a temperature above 65ºC
If the minimum time to generate 65ºC is over 15”, the time the residual heat
- 22 -
Electric Induction hobs Chef’s EH-MIX544 / 545
indication remains, depends on the time the heater has been switched on in a certain
power level.
Power Level
Heater On
Time (seg)
>= 7
>=15
>=30
>=45
>=60
>= 120
>= 180
>= 240
>= 300
1
2
3
4
5
6
7
8
9
10
30
60
150
180
300
360
360
360
30
50
60
150
180
360
360
600
750
60
90
150
180
300
360
480
720
900
150
210
240
420
480
670
900
1200
120
210
300
450
540
780
900
1200
1500
120
300
600
600
960
1200
1500
1500
1800
180
540
720
900
1200
1200
1500
1500
1800
480
720
900
900
1200
1200
1500
1500
1800
600
720
900
900
1200
1200
1500
1500
1800
90
Table 4: Residual heat indication time
15. Automatic safety off
If the power level is not changed during a preset time, the corresponding heater
turns off automatically.
The maximum time a heater can stay on, depends on the selected cooking level.
Power level
1
2
3
4
5
6
7
8
9
Max. time on (hours)
10
5
5
4
3
2
2
2
1
Table5: Heater Auto switch off
- 23 -
Electric Induction hobs Chef’s EH-MIX544 / 545
16. Operating the timer
There are 2 timer that working independency. One is for induction heaters and the
other for radiant heater.
The timer is activated by pressing the timer keys [+] or [-]. The timer value can
be selected between 1 and 99 minutes, and can be modified at any time.
To cancel the operation of the timer, select a timer value of <00> using the
sensor [-], or switch off the timer by pressing the corresponding sensors [+] and [-] at
the same time.
16.1. Initial default setting of the timer
With the timer off, it is activated by pressing the timer keys [+] or [-]. If the
sensor [-] is pressed, the initial value is 99 min., whereas if the sensor [+] is pressed,
the initial value is 00 min by default (configurable).
Fig. 20: Timer activation
16.2. Heater on timer
This can be any of the touch-control heaters. When the timer value runs out,
the heater associated with the timer switches off.
The user can select the heater on which the timer function is to operate. The
selection of a new heater disables the previous selection in such a way that the timer
only operates on one heater each time.
The heater must always be selected before the time is set; otherwise, the timer
will switch off. If, after selecting the heater, the time is not defined (T=00) in 10 sec.,
24
Electric Induction hobs Chef’s EH-MIX544 / 545
the timer switches off.
It is possible for the user to time a heater at power 0 .
16.3. Indication of the heater on timer with Led
The touch control indicates the heater on which the timer is operating. This
indication consists of a LED next to the double display of the heater on timer. Also the
dot of the timer display is lighted.
Fig. 21: Heater Selection for Timer
16.4. Increasing the value of the timer
If the sensor [+] or [-] associated with the timer is held down, the value
increases/decreases automatically. This makes it possible to reach the desired timer
setting more quickly. From the tenth consecutive increase/decrease of the timer
setting, the speed at which the value changes increases. The quick time increase is
made in intervals of 1 minute
Fig. 22: Timer Value Selection
16.5. Duration of the alarm
When the time set on the timer has run out, a beep sounds for 1 minute, and the
timer displays flash the indication <00>
25
Electric Induction hobs Chef’s EH-MIX544 / 545
After 1 minute from when the timer alarm starts, the beep stops. The timer displays
continue to flash with the indication
The alarm can be cancelled by the user at any time, even during the first minute of
the alarm, by pressing any sensor on the touch control
Fig. 23: Alarm of Timer
16.6. Autokey-lock
When all the heaters are not powered, and one heater is temporized at zero
power level, the key-lock function is activated after 1 minute
17. Displaying software versions
The sequence to show the software version is:
•
During the first 30 seconds after plugging the appliance
•
The Touch has to be unlocked and all Heaters Off
User interface’s software version is shown by pressing at the same time the left
and right end heaters [-] keys and the Key-Lock key.
Fig. 24: User Interfase software version
26
Electric Induction hobs Chef’s EH-MIX544 / 545
Induction microcontroller software version is shown by pressing at the same time
the left and right end heaters [+] keys and the Key-Lock key.
Fig. 25: Induction microcontroller software version
A beep sounds and the heater displays show the software version. Software
version is composed of two parts: functional part and safety part. To distinguish
between the two parts, when safety version is shown the dots of the displays are
activated.
The message is kept for 10 seconds or until any key or combination of keys is
touched. When the message disappears a beep sounds and the user can continue with
normal operation.
18. Displaying Special Statuses
The corresponding heater display alternates between two
Characters depending on the status.
27
Electric Induction hobs Chef’s EH-MIX544 / 545
Special status
(Visualization
Priority Order)
Heater without
suitable pan or
without pan
Induction heater
overtemperature
Start
conditions
No pan or not
suitable pan
End
Action
conditions
Suitable pan
over the heater
over the heater
Heater
Heater
Display
Display
fore
back
On
‘Power’
‘υ’
Off
‘ ’ or
Heater
status
After 1
minute
Heater off
COIL
COIL
No power
TEMPERATURE
> T1 (1)
TEMPERATURE
< T2 (1)
is
‘C’
‘H’
delivered
to the
On
‘Power’
heater
Induction
generator
HEATSINK
HEATSINK
No power
TEMPERATURE
> T3 (1)
TEMPERATURE
> T4 (1)
is
overtemperature
Off
‘ ’ or
‘H’
‘c’
delivered
to the
On
‘Power’
heater
Hot glass over a
COIL
COIL
heater
TEMPERATURE
> T5 (1)
TEMPERATURE
< T6 (1)
(residual heat)
(1)
----------
Off
‘H’
For T1, T2, T3, T4, T5 and T6 values see the corresponding drawing.
Due to some kinds of overvoltage disturbances in the mains that can damage
internal electronic, the ecook system includes an overvoltage protection circuit to
protect itself. The protection circuit disables the power circuit to cut the absorved
power of the induction.
So the way to visualize this protection activation in the Touch control:
Protection
Right side activated
Right one displays
“U”
This “U” message is the same as the Not Pan Detection situation.
28
Electric Induction hobs Chef’s EH-MIX544 / 545
Normally, in a normal cooking, the disturbance takes a few seconds. The ECOOK
includes a filter to don’t show the “U” so easily, this means, the protection actuates
but “U” is not showed just with one short disturbance. The decision to show “U” is
taken after a defined nº of disturbance pulses.
19. Errors/Alarms
When an error is detected, the whole appliance or the heater/s are switched off,
a beep sounds (only if one or more heaters are active) and all displays show a ‘F’
letter and the error code alternately.
While in error status the keys of the corresponding heaters are not operative.
Except EEPROM and microcontroller errors, all errors are recoverable. That is,
when the cause of the error disappears all displays are deactivated and the cooktop
returns to normal operation.
Fault/Error
(Visualization
Priority Order)
Heater
Displays (fore
0.5 sec./ back
0.5 sec)
Efect in
the
Normal status
recovery
applian
ce
Microcontroller fault
F0
App. off
-
On/Off key emitter fault
FA
App. off
When the fault
dissapears
On/Off key receiver fault
FC
App. off
When the fault
dissapears
User interface temperature sensor
short-circuit
FE
App. off
When the fault
dissapears
User interface temperature sensor
open-circuit
Ft
App. off
When the fault
dissapears
User interface overtemperature
Fc
App. off
When user interface
temperature < T
EEPROM fault
FH
App. off
-------
29
Electric Induction hobs Chef’s EH-MIX544 / 545
Microcontroller A/D converter
multiplexer fault
FJ
App. off
When the fault
dissapears
Ambient Light fault
FL
App. off
When satisfactory
ambient lighting is
detected
Microcontroller A/D converter
conversion fault
FU
App. off
When the fault
dissapears
Communication fault
F5
Heater/s off
When the fault
dissapears
Heater temperature sensor shortcircuit
F1
Heater/s off
When the fault
dissapears
Heater temperature sensor opencircuit
F2
Heater/s off
When the fault
dissapears
Heater temperature sensor error 1
F7
Heater/s off
When the fault
dissapears
Heater temperature sensor error 2
F8
Heater/s off
When the fault
dissapears
Heater voltage fault
F9
Heater/s off
When the fault
dissapears
Power unit temperature sensor
short-circuit
F3
Heater/s off
When the fault
issapears
Power unit temperature sensor
open-circuit
F4
Heater/s off
When the fault
dissapears
Mains zero crossing loss
F6
Heater/s off
When the fault
dissapears
EUROPEAN HOME APPLIANCE JSC
www.chefs.com.vn
Email: [email protected]
30