1
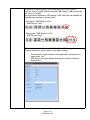
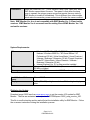
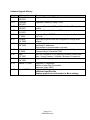
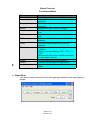
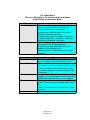
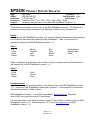
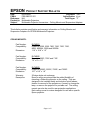
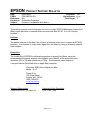
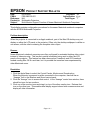
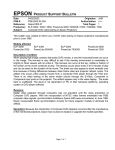
EPSON
Date:
PSB #:
Reference:
Product(s):
Subject:
PRODUCT SUPPORT BULLETIN
04/20/2009
Originator: JAM
PSB.2009.06.001
Authorization:
TI 09-05e Rev. A/B
Total Pages: 5
PowerLite 735c / Cinema 500 / 737c / 745c / 755c / 765c / 830p / 835p /
1705c / 1715c / 6100i / 6110i / 7800p / 7850p / 7900NL / 8300i / 8300i with
EasyMP.net module / 9300NL / 1815p / 1825 / 822p / 83c / 822+ / 83+ /
G5000 / Pro G5150 / Pro G5350 / Pro G5200W / 1725 / 1735W / 400W /
410W / 84 / 85 / 825 / 826W
PowerLite 61p / 81p / 82c / 821p / 1810 / 260d (Latin America) / 280d (Latin
America) with TCP/IP to Serial converter
Release of EMP Monitor for Windows version 4.30
This bulletin was created to inform you of the release of the new version 4.30 of the Epson
EMP Monitor software utility.
Description of Change:
Improvements have been made to the EMP Monitor software utility.
Note: For the PowerLite 61p / 81p / 82c / 821p / 1810 / 260d (Latin America) / 280d (Latin
America) models, a serial to TCP/IP conversion adapter is necessary. The function of Auto
Update does not work for these models. You need to manually click on refresh to get an
updated status of projectors.
Reason:
The improved points of version 4.30 are as follows:
Application
Version
upgraded
Improved
points
EMP Monitor
Version 4.22 Æ Version 4.30
(1) Addition of 7 new languages
- Indonesian, Croat, Slovak, Bulgarian, Malay, Vietnamese, and
Hebrew
Existing 27 languages
- Chinese (Traditional), Netherlands, Danish, Polish, Hungarian,
Czech, Romanian, Slovene, Norwegian, Swedish, Finnish, Russian,
Ukrainian, Greek, Turkish, Arabic (Windows NT4 does not support),
English, Japanese, French, German, Italy, Spanish, Portuguese,
Chinese (Simplified), Korean, Catalan, Thai
Page 1 of 4
PSB.2009.06.001
(2) Addition of Input Source (Only PowerLite 84 / 85 / 825 / 826W)
Previous version of EMP Monitor included USB Display, USB and LAN as
one source: EasyMP.
The input source buttons for USB display, USB, and LAN are available as
separate input sources as shown below:
- Old version - EMP Monitor V4.22
EMP Monitor V4.22
- New version - EMP Monitor V4.30
EMP Monitor V4.30
.
(3) New feature for the PowerLite 84 / 85 / 825 / 826W.
Displays projector’s serial number in the Menu settings
-
The projector’s serial number is now displayed in the projector’s
menu under “info”,
EMP Monitor can also display the projector’s serial number as
shown below:
Page 2 of 4
PSB.2009.06.001
Limitations
When the PowerLite1725 / 1735W exhibit a Lamp Cover Open error state,
EMP Monitor cannot detect the error. The reason is that when the lamp
cover is opened, the primary power source that reports the error state to
EMP Monitor is turned off immediately. This is different from other models
which make the secondary power source turn off under the same condition.
Note: EMP Monitor Ver. 4.xx is not compatible with EMP Monitor Ver. 3.05 and earlier
versions. EMP Monitor Ver. 4.xx cannot read the setting files of EMP Monitor Ver. 3.05
and earlier versions.
System Requirements:
OS
CPU
Memory
Available hard disk
space
Display
•
Windows 98 SE / Me / NT 4.0 (SP6) *Except Arabic and
Hebrew / Windows 2000 Pro / XP Home Edition / XP
Professional (32 bit) / Vista Home Basic / Home Premium /
Ultimate / Business / Enterprise (32 bit) *Except Ukrainian /
Vista SP1 Home Basic / Home Premium / Ultimate /
Business / Enterprise (32 bit)
• Internet Explorer Ver. 5.0 or later must be installed
Minimum: Pentium MMX 166 MHz (Recommended: Pentium II
233 MHz or higher)
At least 64 MB (Recommended: 128 MB or above)
At least 50 MB
SVGA (800×600) or higher resolution, 32 bit or higher display
color
Obtaining the Update:
Download epson13055.exe from www.epson.com to get the version 4.30 update for EMP
Monitor. The files are extracted and copied to C:\EPSON\epson13055_emp_monitor_430.
This file is a self-extracting archive and will start the installation utility for EMP Monitor. Follow
the on-screen instructions during the installation process.
Page 3 of 4
PSB.2009.06.001
Software Upgrade History:
Version Release date
3.00
December
25,2002
3.01
February
26,2003
3.02
April
18,2003
3.03
November
21,2003
3.04
April
1, 2004
4.01
October
18, 2004
4.02
August
29, 2005
4.10
4.22
May
8, 2006
May
15, 2007
September
26, 2007
March 31, 2008
4.30
April 3, 2009
4.20
4.21
Remarks
Supported PowerLite 735c
Supported PowerLite 7800p / 8300i
Supported PowerLite 7850p / 8300i with EasyMP.net option
module
Supported PowerLite Cinema 500
Supported Serial -TCP/IP conversion adapter for PowerLite
61p / 81p
Supported projectors that are configured on a large-scale
network.
Addition of timer function and auto search function by
specifying IP addresses.
Improvement of communication logs size.
Addition of new functions, Improvement of usability, and
Corresponding to PowerLite 6100i.
EMP NS Connection V2.20 supports Windows Vista (Home
Basic / Home Premium / Ultimate / Business / Enterprise).
Supported 25 languages
Supported 27 languages
Addition of new Error Information
Supported Video (BNC)
Supported 34 languages
Additional Input Sources
Displays projector’s serial number in Menu settings
Page 4 of 4
PSB.2009.06.001
EPSON
Date:
PSB #:
Reference:
Product(s):
Subject:
PRODUCT SUPPORT BULLETIN
09/25/2007
Originator: DJS
PSB.2007.09.001
Authorization:
TI 06-91e Rev. B
Total Pages: 5
PowerLite 755c / 765c / 835p / 1705c / 1715c / 1815p
EPSON Projector control for Win V.1.00 release
This bulletin was created to inform you on the release of the new Epson Projector Control
software version 1.00.
Description:
EPSON Projector Control lets you control the projector from your computer with a one-on-one
connection between your computer and the projector over a network. It allows you to perform
operations, such as turning the projector on/off and switching sources, from your computer
without using the projector’s remote control.
Function:
EPSON Projector Control has 2 modes: Advanced Mode and Simple Mode.
Although there is a difference in main display layouts between the two modes, their operation
procedures are almost the same. The difference is as follows:
Advanced Mode: Each source has each source button. Therefore source can be selected
by clicking each source button directly.
Simple Mode:
Source buttons are toggle-type. Therefore source can be switched every
time the toggle-type button is pressed.
[1] Advanced Mode
The main display is larger than that of Simple Mode. Each source has a source button,
so the source can be selected by clicking the applicable source button directly.
Page 1 of 5
PSB.2007.09.001
Button Functions
For Advanced Mode
Button
Power
Computer1
Computer2
EasyMP
Video
S-Video
A/VMute
Freeze
CC
Volume
Volume
[2]
Function
Turns the projector power on/off.
Switches the input source to the Computer1
input port.
Switches the input source to the Computer2
input port.
Switches the input source to EasyMP.
Switches the input source to the Video input
port.
Switches the input source to the S-Video input
port.
Turns the A/V Mute function on/off on the
projector.
Turns the Freeze function on/off on the
projector.
Displays the selection menu for Closed
Caption.
Select one of the following: "OFF," “CC1,” or
“CC2."
This function may not be available depending
on the projector models.
Turns the volume up on the projector.
Turns the volume down on the projector.
Switches between Advanced Mode and Simple
Mode.
Simple Mode
• You need to switch sources by using the toggle-type button but the main display is
simpler.
Page 2 of 5
PSB.2007.09.001
For Simple Mode
There is a difference in the following buttons between
Simple Mode and Advanced Mode.
Button
Computer
Video
Item
Register at startup
Projector IP Address
Monitor Password
OK
Cancel
Function
Switches the input sources among the Computer
input port, the Computer1 input port, the
Computer2 input port, and EasyMP.
Every time you click the button, the source
changes in the following order.
Computer input port or Computer1 input port->
Computer2 input port→ EasyMP-> Computer
input port or Computer1 input port…
Switches the input sources between the Video
input port and the S-Video input port.
Every time you click the button, the source
changes in the following order.
Video input port-> S-Video input port-> Video
input port
Function
Check this for EPSON Projector Control to start
up automatically when the computer starts.
Enter the IP address for the projector to be
connected. You need to do this only when you
make a connection for the first time or when
you want to change to another projector to be
connected.
Enter the Monitor Password that is set on the
projector. You do not need to do this when the
Monitor Password is not set on the projector.
Click this to reflect the setting changes that you
made. The setting screen is saved and closed.
Or
Click × on the title bar not to reflect the setting
changes.
Click this to abort the setting changes.
Page 3 of 5
PSB.2007.09.001
Settings Display
Uncheck the boxes for
the buttons that you do
not want to display in
Simple Mode.
Uncheck the boxes for the buttons
that you do not want to display in
Advanced Mode.
[3] How to set up EPSON Projector Control software
[Note] Be sure to set the projector to Network ON in Standby Mode in the Extended Menu.
1) Download “Epson12378.exe” from Epson website. This file contains
“ProjectorControlSetup.exe” which is used to install EPSON Projector Control for
Windows V.1.00 on the computer.
2) Set up your computer and the projector to connect over a network.
3) Start the EPSON Projector Control software as follows: “Start”Æ“Program”Æ“EPSON
Projector”Æ“Projector Control V1.00.” Then the main screen is displayed. Click
“Tool”Æ“Settings” on the main screen. The setting screen is displayed.
4) Enter the Projector IP Address, click “OK” to save, and close the setting screen.
Page 4 of 5
PSB.2007.09.001
Operation Environment
[EPSON Projector Control V.1.00]
Operation Environment:
OS
Windows 2000 SP4 / XP SP2 32-bit (Professional / Home) /
Vista 32-bit (Business / Enterprise / Home Basic / Home
Premium / Ultimate)
CPU
At least Pentium MMX 166MHz
(Pentium II 233MHz or later recommended)
Memory
At least 64MB
HDD space
At least 50MB
Display
SVGA (800×600) or higher resolution / At least 32-bit color
Additional Note:
Other Epson projector models supported:
PowerLite 6100i / 830p / 83c / 822p
Projector models not supported:
PowerLite 735c / 732c / 737c / 745c / 7800p / 7850p / 7900p / 8300i with the
EasyMP.net Option Module installed/ 9300i
Page 5 of 5
PSB.2007.09.001
EPSON
Date:
PSB #:
Reference:
Product(s):
Subject:
PRODUCT SUPPORT BULLETIN
04/20/2006
Originator: AP
PSB.2006.04.002
Authorization:
TI 05-95e Rev. A
Total Pages: 1
PowerLite 735c / 737c / 745c / 755c / 765c / 835p / 7850p
Animation converter issue found with EMP SlideMaker2 version 1.12
This bulletin was created to inform users of the EMP SlideMaker2 version 1.12 software of a
problem converting certain animations from Microsoft PowerPoint into a Scenario file.
Details:
In the previous EMP SlideMaker2 version 1.11, certain PowerPoint animations were supported
in the Scenario files which are created by EMP SlideMaker2. Table 1 shows the list of
animations supported in EMP SlideMaker2 version 1.11:
Table 1
- Fly
- Crawl
- Spiral
- Swivel
- Blinds
- Dissolve
- Split
- Wipe
- Box
- Peek
- Stretch
- Zoom
- Checkerboard
- Random Bars
- Strips
Table 2 shows the list of animations from Table 1 that will not be ported from PowerPoint into
the Scenario file by EMP SlideMaker2 version 1.12:
Table 2
- Crawl
- Spiral
- Swivel
- Peek
- Stretch
- Zoom
Countermeasure:
If it is necessary to use these animations in the Scenario files, use EMP SlideMaker2 version
1.11. Versions of EMP SlideMaker2 subsequent to version 1.12 are expected to incorporate
the animations shown in Table 1 above.
EMP SlideMaker2 version 1.11 may be downloaded at www.epson.com. Download
epson10855.exe to get this version of the software.
If it is not necessary to use these animations listed in Table 2 above, continue to use the EMP
SlideMaker2 version 1.12. Download epson11217.exe at www.epson.com for EMP
SlideMaker2 version 1.12.
Page 1 of 1
PSB.2006.04.002
EPSON
Date:
PSB #:
Reference:
Product(s):
Subject:
PRODUCT SUPPORT BULLETIN
06/30/2000
Originator: ESC
PSB.2000.07.001
Authorization:
N/A
Total Pages: 2
Multimedia Projectors
Multimedia Projector Accessories – Ceiling Mounts and Suspension Adapters
This bulletin provides specification and warranty information on Ceiling Mounts and
Suspension Adapters for EPSON Multimedia Projectors:
CEILING MOUNTS:
Part Number:
Compatibility:
Dimension:
ELPMB31
PowerLite 5300, 5350, 7200, 7250, 7300, 7350,
8000i, 8000NL, 9000i and 9000NL
11.6” x 10.8” x 1.5”
Part Number:
Compatibility:
Dimension:
ELPMB32
PowerLite 500C, 700C and 710C
7.2” x 9” x 1.5”
Part Number:
Compatibility:
Dimension:
ELPMB33
PowerLite 5500C, 5550C, 7500C, and 7550C
10.7” x 9.6” x 1.8”
Warranty:
Description:
30-days whole unit exchange
Epson’s ceiling mounts provide the added flexibility of
mounting a PowerLite projector on the ceiling. They are
designed to be installed easily and include a quick release
feature for removal of the projector so it’s easy to change the
lamp, or remove the projector for portable use. The ceiling
mounts can also be used for rear projection applications.
Each ceiling mount is custom designed for use with a specific
Epson projector.
Page 1 of 2
SUSPENSION ADAPTERS:
Part Number:
Compatibility:
Dimension:
ELPMBAST
ELPMB31, ELPMB32 and ELPMB33
1 l/2” Pipe
Part Number:
Compatibility:
Dimensions:
ELPMBAPS
ELPMB32 and ELPMB33
1” Pipe
Warranty:
Description:
30-days whole unit exchange
Adjustable tubing extensions to increase the distance from the
ceiling to the projector—adjustable from 12” to 46”.
Page 2 of 2
EPSON
Date:
PSB #:
Reference:
Product(s):
Subject:
PRODUCT SUPPORT BULLETIN
06/02/2000
PSB.2000.06.001
N/A
Multimedia Projectors
Projector Compatibility with iMac’s
Originator: ESC
Authorization:
Total Pages: 1
This bulletin provides useful information on how to connect EPSON Multimedia Projectors to
iMac models that have no external video port and have Mac OS 8.1, 8.5 or 8.6 factory
installed.
Problem:
The earlier versions of the iMac’s do not have an external video port to connect an EPSON
projector. It is possible to output video signal from the iMacs by using a third party external
video adapter.
Resolution:
The current line of EPSON's multimedia projectors do support the iMacs, using the
recommended third party external video adapter from PowerR, at the supported video
resolution 1024 x 768 with refresh rate of 75Hz. The iPresenter video adapter is
a compact device that installs into an Apple iMac computer.
iPresenter RGB Video Adapter for iMac
Model: iP-10
Power R Inc.
756 Aloha Street
Seattle, WA. 98109
(800) 729-6970
www.powerr.com
Supports iMac version:
Versions A,B,C,D – no video out
Supported Video Resolution
1024 x 768, 75Hz
Page 1 of 1
EPSON
Date:
PSB #:
Reference:
Product(s):
Subject:
PRODUCT SUPPORT BULLETIN
05/18/2000
Originator: AP
PSB.2000.05.001
Authorization:
N/A
Total Pages: 1
Multimedia Projectors
Multi-Monitor Support Function of Newer Macintosh Notebook Computers
This bulletin provides configuration procedures for the newer Macintosh notebook computers
with the EPSON Multimedia Projectors.
Problem description:
When the projector is connected to an Apple notebook, part of the Mac OS desktop may not
display on either the LCD panel or the projector. Often, only the desktop wallpaper is visible on
one screen, with the other containing the complete video output.
Reason:
Newer Macintosh notebook computers are often configured for extended desktop video output
instead of video mirroring. This results in partial information being sent to either the LCD
panel or the projector. This feature has been observed on Powerbook and G3 Powerbook
models running Mac OS 8.x and later, but it is possible the issue has been experienced by
other Macintosh users.
Resolution:
1. Click the Apple Menu to select the Control Panels, Monitors and Sound option.
When the projector is powered on while connected to the computer, there will be an
“Arrange” icon in the Monitors and Sound control panel.
2. Click the “Arrange” icon to access that control. In the “Arrange” control view window, there
should be icons for two monitors.
3. Click one of the monitor icons and drag it on top of the other monitor icon. Release that
icon on the other icon. This enables dual display support where both screens receive and
display all video information.
Page 1 of 1