1
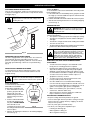
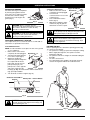
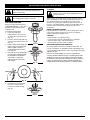
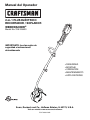
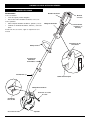
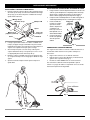
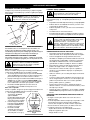
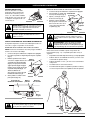
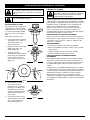
Operator’s Manual
®
2-in-1 PLUS ELECTRIC
TRIMMER / BLOWER
WEEDWACKER®
Model No. 316.745400
CAUTION: Before using this
product, read this manual and
follow all safety rules and
operating instructions.
• SAFETY
• ASSEMBLY
• OPERATION
• MAINTENANCE
• ESPAÑOL, P. E1
Sears, Roebuck and Co., Hoffman Estates, IL 60179, U.S.A.
Visit our website: www.sears.com/craftsman
769-02184A
RULES FOR SAFE OPERATION
TABLE OF CONTENTS
Safety Rules . . . . . . . . . . . . . . . . . . . . . . . . . . . . . . . . . . . .2
Warranty . . . . . . . . . . . . . . . . . . . . . . . . . . . . . . . . . . . . . . .4
Know Yur Unit . . . . . . . . . . . . . . . . . . . . . . . . . . . . . . . . . .5
Assembly Instructions . . . . . . . . . . . . . . . . . . . . . . . . . . . .6
Operating Instructions . . . . . . . . . . . . . . . . . . . . . . . . . . . .7
Maintenance and Repair Instructions . . . . . . . . . . . . . . . .9
Troubleshooting Chart . . . . . . . . . . . . . . . . . . . . . . . . . . .10
Specifications . . . . . . . . . . . . . . . . . . . . . . . . . . . . . . . . .10
Service Numbers . . . . . . . . . . . . . . . . . . . . . . . .Back Cover
WARNING: When using the unit, you must follow
the safety rules. Please read these instructions
before operating the unit in order to ensure the safety
of the operator and any bystanders. Please keep
these instructions for later use.
All information, illustrations, and specifications in this manual
are based on the latest product information available at the
time of printing. We reserve the right to make changes at any
time without notice.
• IMPORTANT SAFETY INSTRUCTIONS •
READ ALL INSTRUCTIONS BEFORE OPERATING
WARNING: When using electric gardening
appliances, basic safety precautions should always
be followed to reduce the risk of fire, electric shock,
and personal injury, including the following:
• Read the instructions carefully. Be familiar with the controls
and proper use of the unit.
• Carefully read and understand the entire manual’s instructions
before operating the unit in order to ensure the safety of the
operator and any bystanders. Pay close attention to the
operating instructions and safety warnings. Please keep these
instructions for later use.
• Use only as described in this manual.
• Use only genuine original equipment manufacturer replacement
parts and accessories as specified in this manual. These are
available from your authorized service dealer. Use of any nonoriginal parts or accessories could lead to serious injury to the
user, or damage to the unit, and void your warranty.
• Stay alert – Do not operate this unit when tired, ill, or under
the influence of alcohol, drugs, or medication.
• Keep Children Away – Clear the area to be cut before each use.
Remove rocks, broken glass, nails, wire, string and other objects
which may be thrown or become entangled in the cutting attachment. Clear the area of children, bystanders and pets; keep them
outside a 50-foot (15 m.) radius, at a minimum. Even then, they
are still at risk from thrown objects. Encourage bystanders to wear
eye protection. If you are approached, stop the unit immediately.
• Children and teens under the age of 15 must not use the unit,
except for teens guided by an adult.
• Do not allow unit to be used as a toy. Close attention is
necessary when used by or near children.
• Do not leave appliance when plugged in. Unplug from outlet
when not in use.
• Do not use with damaged cord or plug. If appliance is not
working as it should, has been damaged, left outdoors or
dropped into water, return it to a service center.
• Do not abuse the power cord. Never carry the unit by the cord, use
cord as a handle, close a door on cord, or pull cord around sharp
edges or corners. Keep cord away from heat surfaces and oil.
• Do not yank or pull the cord to disconnect from receptacle. To
unplug, grasp the plug, not the cord.
• Avoid Dangerous Environment to reduce the risk of electric shock,
never operate your unit on wet surfaces or damp locations.
• Do not expose or use in rain. Moisture can increase risk of shock.
• Do not handle the plug or the unit with wet hands.
• Do not put any object into openings. Do not use with any
opening blocked - keep free of dust, lint, hair and anything
that may reduce airflow.
• Dress properly – Do not wear loose clothing or jewelry, they
can be caught in moving parts. Wear protective hair covering
to contain long hair. Do not wear short pants, sandals or go
barefoot. Use of rubber gloves and substantial footwear is
recommended when working outdoors.
• Use extra care when cleaning on stairs.
• Wear safety glasses or goggles that are marked as meeting ANSI
2
Z87.1-1989 standards. Safety glasses are available at your
Craftsman retailer or local hardware store. Also wear ear/hearing
protection when operating this unit. Wear a face or dust mask if
the operation is dusty. Long sleeve shirts are recommended.
• Use the right tool. Only use this tool for its intended purpose.
• Turn off all controls before unplugging.
• Store the unit indoors. Lock up the unit to prevent unauthorized
use or damage and to keep out of the reach of children.
ELECTRICAL SAFETY WARNINGS
• Since the tool is double-insulated, a 2-wire extension cord (an
extension cord without a ground) may be used. A 3-wire
extension cord (an extension cord with a ground) that uses a
NEMA-type connector (parallel blade, U ground) is recommended. Extension cords are available from your local retailer. Use
only round-jacketed extension cords approved for outdoor use.
• This tool is double-insulated. Repair or replace damaged cords.
• To reduce the risk of electrical shock, this appliance has a
polarized plug (one blade is wider than the other) and will require
the use of a polarized extension cord. The appliance plug will fit
into a polarized extension cord only one way. If the plug does
not fit fully into the extension cord, reverse the plug. If the plug
still does not fit, obtain a correct polarized extension cord. A
polarized extension cord will require the use of a polarized wall
outlet. This plug will fit into the polarized wall outlet only one
way. If the plug does not fit fully into the wall outlet, reverse the
plug. If the plug still does not fit, contact a qualified electrician to
install the proper wall outlet. Do not change the equipment plug,
extension cord receptacle, or extension cord plug in any way.
WARNING: To reduce the risk of electrical shock,
use only SW-A, SOW-A, STW-A, STOW-A, SJW-A,
SJOW-A, SJTW-W or SJTOW-A cord types.
• In a double-insulated appliance, two systems of insulation are
provided instead of grounding. No grounding means is
provided on a double-insulated appliance, nor should a means
for grounding be added to the appliance. Servicing a doubleinsulated appliance requires extreme care and knowledge of
the system and should be done only by qualified service
personnel. Replacement parts for a double-insulated appliance
must be identical to the parts they replace.
MINIMUM WIRE SIZE FOR EXTENSION CORDS FOR
120 VOLT APPLIANCES USING 0-12 AMPS*
Cord length (ft.)
25
50
100
150
Wire size (AWG)*
16
16
14
12
*The wire size (AWG) for appliances using 12 to 16 amps is
14 AWG for 25 feet, 12 AWG for 50 feet, and not
recommended for 100 or 150 feet.
• CORD SETS: Make sure your cord set is in good condition, with
a cord that is heavy enough to carry the current that your unit will
draw. An undersized cord set will cause a drop in line voltage
resulting in a loss of power, as well as overheating. The table
shown above illustrates the correct size to use depending on the
RULES FOR SAFE OPERATION
cord length and nameplate amperage rating. If in doubt, use the
next heavier size line gauge. The smaller the gauge number, the
heavier the cord. To prevent the cord from disconnecting from
the unit, use the cord hook shown in the Operating Instructions.
• A nameplate on your unit indicates the voltage used. Never
connect the unit to an AC voltage that differs from this voltage.
• Inspect all extension cords and the unit power connection
periodically. Look closely for deterioration, cuts or cracks in the
insulation. Also inspect the connections for damage. Repair or
replace the cords if any defects appear.
• Ground Fault Circuit Interrupter (GFCI) protection should be
provided on the circuit(s) or outlet(s) that will be used for the
unit. Use receptacles with built-in GFCI protection for an
extra measure of safety.
OTHER SAFETY WARNINGS
• Inspect the unit before use. Replace damaged parts. Make
sure all fasteners are in place and secure. Replace cutting
attachment parts that are cracked, chipped or damaged in
any way. Make sure the cutting attachment is properly
installed and securely fastened. Be sure that the cutting
attachment shield is properly attached, and positioned as
recommended. Failure to do so can result in personal injury to
the operator and bystanders, as well as damage to the unit.
• This unit was not designed to be used as a brushcutter. Do not
attach or operate this unit with any type of brushcutting blade or
brushcutting attachment. The use of any other accessory or
attachment may increase the risk of injury when used with this unit.
• Use only yellow Hassle Free IV™ XTRA QUIET Spiral Line.
Never use metal-reinforced line, wire, chain or rope. These can
break off and become dangerous projectiles.
• Be aware of risk of injury to the head, hands and feet.
• Be sure to secure the unit while transporting.
• Never douse or squirt the unit with water or any other liquid.
Keep handles dry, clean and free from debris. Clean after each
use. See the Cleaning and Storage instructions.
• Keep these instructions. Refer to them often and use them to
instruct other users. If you loan someone this unit, also loan
them these instructions.
WHILE OPERATING
• The cutting attachment shield must always be in place while
operating the unit. Do not operate unit without both trimming
lines extended, and the proper line installed. Do not extend the
trimming line beyond the length of the shield.
• Adjust the D-handle to your size to provide the best grip.
• Be sure the cutting attachment is not in contact with anything
before starting the unit.
• Use the unit only in daylight or good artificial light.
• Avoid accidental starting. Do not carry around a unit that is
plugged in with your finger on the trigger switch. Be sure the
switch is in the off position when plugging in the unit.
• Do not overreach. Always keep proper footing and balance.
• Always hold the unit with both hands when operating. Keep a
firm grip on both handles or grips.
• Keep hands, face, and feet at a distance from all moving parts. Do
not touch or try to stop the cutting attachment when it rotates.
• Always stop the motor when cutting is delayed or when
walking from one cutting location to another.
• If you strike or become entangled with a foreign object, stop
the motor immediately and check for damage. Do not
operate before repairing damage. Do not operate the unit
with loose or damaged parts.
• Stop the unit and unplug it for maintenance or repair.
• Keep unit clean of vegetation and other materials. They may
become lodged between the cutting attachment and shield.
• Do not force appliance-It will do the job better and with less
likelihood of a risk of injury at the rate for which if was designed.
SAVE THESE INSTRUCTIONS
• SAFETY & INTERNATIONAL SYMBOLS •
This operator's manual describes safety and international symbols and pictographs that may appear on this product. Read the
operator's manual for complete safety, assembly, operating and maintenance and repair information.
SYMBOL
MEANING
SYMBOL
MEANING
• SAFETY ALERT SYMBOL
Indicates danger, warning or caution. May be used
in conjunction with other symbols or pictographs.
• KEEP BYSTANDERS AWAY
WARNING: Keep all bystanders, especially
children and pets, at least 50 feet (15 m) from
the operating area.
• WARNING - READ OPERATOR'S MANUAL
Read the operator’s manual(s) and follow all warnings
and safety instructions. Failure to do so can result in
serious injury to the operator and/or bystanders.
• THROWN OBJECTS AND ROTATING
CUTTER CAN CAUSE SEVERE INJURY
WARNING: Do not operate without the cutting
attachment shield in place. Keep away from the
rotating cutting attachment.
• WEAR EYE AND HEARING PROTECTION
WARNING: Thrown objects and loud noise can
cause severe eye injury and hearing loss. Wear
eye protection meeting ANSI Z87.1 standards
and ear protection when operating this unit. Use
a full face shield when needed.
• DOUBLE INSULATED
• THROTTLE CONTROL
Indicates “HIGH” or “FASTEST” speed.
• THROTTLE CONTROL
Two systems of insulation are provided in stead of
grounding. There is no grounding provided and no
means of grounding should be added to this unit.
• SHARP BLADE
WARNING: Sharp blade on cutting attachment
shield. To prevent serious injury, do not touch
the line cutting blade.
• BLOWERS
WARNING: Stop the motor and allow the
impeller to stop and unplug before cleaning or
performing any maintenance.
Indicates “IDLE,” “LOW,” or “SLOWEST” speed.
3
WARRANTY STATEMENT
ONE YEAR FULL WARRANTY ON CRAFTSMAN ELECTRIC TRIMMER
When used and maintained according to the operator’s manual, if this trimmer fails due to a defect in material or workmanship within
one year from the date of purchase, return it to any Sears store, other Craftsman outlet, or Sears Parts & Repair Center in the United
States for free replacement. This warranty excludes cutting line, which is an expendable part that can wear out from normal use in
less than one year. This warranty applies for only 30 days from the date of purchase if this trimmer is used for commercial or rental
purposes. This warranty gives you specific legal rights, and you may also have other rights which vary from state to state.
Sears, Roebuck and Co., Hoffman Estates, IL 60179
Manufacturer’s Warranty Coverage
• The warranty period begins on the date the engine or equipment is delivered to the retail purchaser.
• The manufacturer warrants to the initial owner and each subsequent purchaser, that the engine is free from defects in material and
workmanship which cause the failure of a warranted part for a period of one year.
• Repair and replacement of warranted part will be performed at no charge to the owner at an authorized Sears service center. For
the nearest location please contact Sears at: 1-800-4-MY-HOME®.
• Any warranted part which is not scheduled for replacement, as required maintenance or which is scheduled only for regular
inspection to the effect of “Repair or Replace as Necessary” is warranted for the period. Any warranted part which is scheduled for
replacement as required maintenance will be warranted for the period of time up to the first scheduled replacement point for that
part.
• The owner will not be charged for diagnostic labor which leads to the determination that a warranted part is defective if the
diagnostic work is performed at an authorized Sears Service Center.
• The manufacturer is liable for damages to other engine components caused by the failure of a warranted part still under warranty.
• Failures caused by abuse, neglect or improper maintenance are not covered under warranty.
• The use of add-on or modified parts can be grounds for disallowing a warranty claim. The manufacturer is not liable to cover failures
of warranted parts caused by the use of add-on or modified parts.
• In order to file a claim, go to your nearest authorized Sears Service Center. Warranty service or repairs will be provided at all
authorized Sears Service Centers.
• Any manufacturer approved replacement part may be used in the performance of any warranty maintenance or repair of emission
related parts and will be provided without charge to the owner. Any replacement part that is equivalent in performance or durability
may be used in non-warranty maintenance or repair and will not reduce the warranty obligations of the manufacturer.
• The following components are included in the emission related warranty: engine, air filter, carburetor, primer, fuel lines, fuel pick
up/fuel filter, ignition module, spark plug and muffler.
4
RULES FOR SAFE OPERATION
KNOW YOUR UNIT
APPLICATIONS
As a trimmer:
Motor Housing
Recessed
Plug
• Cutting grass and light weeds
• Decorative trimming around trees, fences, etc.
Cord
Retention
(not shown)
As a blower:
Shaft Grip
• Clean around buildings, walls, and fences
• Clearing leaves and grass from around trees, shrubs, and
flower beds
Other optional accessories may be used with this
trimmer/blower, as specified in this manual.
Two Speed
Switch
D-Handle
Craftsman
Convertible®
Coupler
Shaft
Switch Trigger
Shift Handle
Cutting Attachment
Shield
Line Cutting Blade
Cutting Attachment
Blower
5
ASSEMBLY INSTRUCTIONS
INSTALL AND ADJUST THE D-HANDLE
1.
Push the D-handle down onto the shaft so that the handle
slants towards the shaft grip (Fig. 1). The squared bolt hole
in the handle is to the right.
Shaft Grip
Shaft
D-Handle
Tighten
Minimum 6 inches
(15.24 cm)
Wing Nut
Washer
Bolt
INSTALLING CUTTING ATTACHMENT SHIELD
1. Place the narrow end of the cutting attachment shield over the
shield bracket and position it so that the circular cut-out slips
over the guard assembly peg (Fig. 3).
2. Place the locking nut
Guard
into the hexagonal hole
Assembly
on the left side of the
Peg
guard and hold in place.
3. Insert the assembly
screw into the hole on
the right side of the
guard and screw it
into the nut on the left
side using a Phillipshead screwdriver.
Shield
4. Make sure the screw
Bracket
is tight before
operating the unit.
Fig. 1
2.
3.
4.
5.
Insert the shoulder bolt into the squared hole in the handle
and push through. On the left side of the handle, place the
washer on the bolt, then screw the wing nut onto the bolt.
Do not tighten until you make the handle adjustment.
Rotate the D-handle above the top of the shaft as shown in
Figure 1. Place it a minimum of 6 inches (15.24 cm) from
the base of the shaft grip.
While holding the unit in the operating position (Fig. 2),
position the D-handle to the location that provides you the
best grip.
Tighten the wing nut until the D-handle is secure.
Fig. 3
CONNECTING THE CORD
Use the cord hook when connecting the extension cord to the
power cord outlet. This helps prevent any disconnection.
1.
Make a narrow loop with the extension cord.
2.
Push the loop through the opening and move it onto the
hook on the motor housing (Fig. 4).
3.
Plug the cord properly into the socket.
Only use outdoor-approved extension cords. Cord sets are
specified in the Important Safety Information section.
Fig. 4
Fig. 2
6
OPERATING INSTRUCTIONS
STARTING/STOPPING INSTRUCTIONS
Once the unit is plugged in, stand in the operating position (Fig.
2). Squeeze the trigger to start the unit. To stop the unit, release
the trigger (Fig. 5).
WARNING: Always wear eye, hearing, foot and
body protection to reduce the risk of injury when
operating this unit.
To Use the Blower
To use the blower, make sure the shift handle is in the UP position
before starting the unit.
1. If the shift handle is in the DOWN position, grasp the red shift
latch (Fig. 6) on the shift handle and squeeze until the internal
locking mechanism releases.
2. Pull the shift handle UP until the red shift latch locks into place.
3. Start the unit following the directions in the Starting/Stopping
Instructions (p. 7).
HOLDING THE UNIT
WARNING: Always wear eye, hearing, foot and
body protection to reduce the risk of injury when
operating this unit.
Trigger
Before operating the unit, stand in the operating position (Fig. 2).
Check for the following:
•
The operator is wearing eye protection and proper clothing.
•
The right arm is slightly bent, and the hand is holding the
shaft grip.
•
The left arm is straight, and the hand is holding the D-handle.
•
The unit is at waist level.
•
The trimmer/blower attachment is parallel to the ground and is
positioned so debris is blown away from operator.
WARNING: To prevent serious injury to yourself or
others, or possible damage to property, never point
the blower in the direction of people or pets, or in
the direction of windows. Always direct the blowing
debris away from people, animals, and windows.
Use extra caution when blowing debris near solid
objects such as trees, automobiles, walls, etc.
Fig. 5
OPERATING THE TWO-SPEED SWITCH
This unit is equipped with a two-speed switch. The switch has
a powerful high speed for demanding yard work, and a
precision low speed for light-duty yard work. Push the switch
up for high speed trimming or down for low speed trimming
(Fig. 5).
SELECTING THE TRIMMER OR BLOWER
To switch between the trimmer and blower functions of this
unit, make sure that the unit is turned off and the motor has
stopped running.
WARNING: To avoid serious personal injury or
damage to the unit, DO NOT attempt to shift between
the trimmer and the blower while the unit is operating.
To Use the Trimmer
To use the trimmer, make sure the
shift handle is in the DOWN
position before starting the unit.
1. If the shift handle is in the UP
Shift Latch
position, grasp the red shift
latch (Fig. 6) on the shift
handle and squeeze until the
internal locking mechanism
releases.
2. Push the shift handle DOWN
until the red shift latch locks
into place. DO NOT FORCE.
Shift Handle
If the latch fails to lock
Fig. 6
completely into position, rotate
the cutting head until the latch
locks into place.
3. Start the unit following the directions in the Starting/Stopping
Instructions (p. 7).
®
OPERATING TIPS WHEN USING TRIMMER/BLOWER
ATTACHMENT
•
To reduce the risk of hearing loss associated with sound
level(s), the use of hearing protection is required.
•
Operate power equipment only at reasonable hours—not
early in the morning or late at night when people might be
disturbed. Comply with time listed in local ordinance. Usual
recommendations are 9:00 am to 5:00 pm, Mon. through Sat.
•
To reduce noise levels, limit the number of pieces of
equipment used at any one time.
•
To reduce noise levels, operate power blowers at the
lowest possible speed to do the job.
•
Use rakes and brooms to loosen debris before blowing.
•
Conserve water by using power blowers instead of hoses for
many lawn and garden applications, including areas such as
gutters, screens, patios, grills, porches, and gardens.
•
Watch out for children, pets, open windows, or freshly
washed cars, and blow debris away.
•
After using blowers and other equipment, CLEAN UP!
Dispose of debris in trash receptacles.
TIPS FOR BEST TRIMMING RESULTS
• Keep the cutting attachment parallel to the ground.
• Cut from left to right whenever possible. Cutting to the right
improves the unit's cutting efficiency. Clippings are thrown
away from the operator.
• Trim only when grass and weeds are dry.
• The life of your cutting line is dependent upon:
- Following the trimming tips
- What vegetation is being cut
- Where vegetation is being cut
7
OPERATING INSTRUCTIONS
DECORATIVE TRIMMING
Decorative trimming is accomplished
by removing all vegetation around
trees, posts, fences and more. Rotate
the whole unit so that the cutting
30º
attachment is at a 30° angle to the
ground (Fig. 7).
Fig. 7
WARNING: Before you begin using any
attachment, read and understand the manual that
came with the attachment. Follow all safety
information contained within.
WARNING: To avoid serious personal injury and
Upper Shaft Boom
To Remove Attachments
1. Make sure the unit is turned
Attachment
completely off and unplugged.
Coupler
2. Turn the knob
counterclockwise to loosen the
coupler (Fig. 8).
3. Press and hold the release
button (Fig. 9).
4. While firmly holding the upper
shaft boom (Fig. 10), pull the
Knob
attachment out of the coupler.
Fig. 10
CAUTION: These attachments are to be snapped
into the primary hole only. Using the wrong hole could
lead to personal injury or damage to the unit.
damage to the unit, shut the unit off before
removing or installing attachments.
CRAFTSMAN CONVERTIBLE™ FEATURE
The coupler allows you to convert this unit for use with add-on
attachments as specified in this manual.
To Install Attachments
NOTE: To make installation easier, place the unit on the ground
or on a workbench.
1. Make sure the unit is turned
Attachment
completely off and unplugged.
2. Turn the knob counterclockwise
Coupler
to loosen the coupler (Fig. 8).
3. While firmly holding the
attachment, push it straight into
the coupler until the release
button (Fig. 9) snaps into the
Knob
primary hole (Fig. 9). The
primary hole is on the opposite
Fig. 8
side of the coupler from the
knob (Fig. 9). Align the release button with the Guide Recess
(Fig. 9) to help installation.
4. Turn the knob clockwise to tighten (Fig. 10).
Craftsman Convertible™
Primary Hole
Coupler
CAUTION: Before operating this unit, be sure
that the release button is fully snapped into the
primary hole (Fig. 9), and that the knob (Fig. 10) is
securely tightened.
HOLDING THE UNIT
Before operating the unit, stand in the operating position (Fig.
11). Check for the following:
• The operator is wearing eye protection and proper clothing
• With a slightly-bent right arm, the operator’s hand is
holding the shaft grip
• The operator’s left arm is straight, the left hand holding the
D-handle
• The unit is at waist level
• The cutting attachment is parallel to the ground and easily
contacts the vegetation without the need to bend over
Release Button
Guide
Recess
Knob
Fig. 9
CAUTION: Lock the release button in the primary
hole (Fig. 9) and securely tighten the knob (Fig. 10)
before operating this unit.
Fig. 11
8
MAINTENANCE AND REPAIR INSTRUCTIONS
WARNING: Never use metal-reinforced line, wire,
chain, or rope. These can break off and become
dangerous projectiles.
CLEANING
WARNING: To avoid serious personal injury,
always turn your unit off and unplug it before you
clean or service it.
WARNING: Always use the correct line length
when installing trimming line on the unit.
INSTALLING FIXED LINE
Always use yellow Hassle Free IV™
XTRA QUIET Spiral Line. Lines other
than this one may make the motor
overheat or fail.
To install the trimming line:
1. Insert each end of the
replacement line into the holes
on either side of retention hook
(Fig. 12).
2. Push the ends through until they
stick out of the sides of the head
(Fig. 13).
3. Pull the ends through making sure
that the ends are of equal length
and the middle of the line is
centered between the insertion
holes (Fig. 14).
4. If the ends are not of equal length,
push the longer end back through
the head part way and pull the
shorter end to compensate.
Repeat until both ends are the
same length.
Fig. 12
Switch off the unit and disconnect it from the power source.
Use a small brush to clean off the outside of the unit. Do not
use strong detergents. Household cleaners that contain
aromatic oils such as pine and lemon, and solvents such as
kerosene, can damage plastic housing or handle. Wipe off any
moisture with a soft cloth. Also keep the air vents free of
obstructions.
INSPECT EXTENSION CORDS
Inspect all extension cords. Look closely for deterioration, cuts or
cracks in the insulation. Inspect the connectors for damage.
Replace a damaged or defective cord.
STORAGE
• Allow the unit to cool before storing.
• Lock the unit to prevent unauthorized use or damage.
• Store the unit in a dry, well-ventilated area.
• Store the unit out of the reach of children.
SERVICING DOUBLE INSULATED UNITS
This unit is double-insulated. In a double-insulated unit, two
systems of insulation are provided instead of grounding. There
is no grounding provided and no means of grounding should be
added to this unit.
Fig. 13
Extreme care and knowledge of the system is required when
servicing a double-insulated unit. Service should be performed by
qualified service personnel only. Replacement parts for a doubleinsulated unit must be identical to the parts they replace. Refer any
repair to an authorized service dealer. A double-insulated unit is
marked with the words “double insulation” or “double insulated.”
Fig. 14
5.
Push the trimmer line behind
the hook to secure it from
coming loose while running
(Fig. 15).
Fig. 15
9
TROUBLESHOOTING
MOTOR WILL NOT START
CAUSE
ACTION
Unit is unplugged
Check cord to make sure it is still plugged into an electrical outlet
Breaker switch has tripped
Reset breaker switch in home electrical panel
CUTTING ATTACHMENT WILL NOT CUT
CAUSE
Cutting attachment bound with grass
Cutting attachment line is broken
ACTION
Stop the engine and clean cutting attachment
Refill with new line
NOTE: For repairs beyond the minor adjustments listed above, contact your nearest Sears Parts & Repair center (1-800-4-MY-HOME®)
or other qualified service dealer.
SPECIFICATIONS
MOTOR
Motor type ................................................................................................................................................................A.C.,120 Volts Electric
Operating RPM .................................................................................................................................................................. up to 7,400 rpm
On/Off Switch................................................................................................................................................................................... Trigger
Amperage ........................................................................................................................................................................................ 7 amps
DRIVE SHAFT AND CUTTING HEAD
Drive Shaft ...................................................................................................................................................Steel, Craftsman Convertible®
Unit Weight (With trimmer/blower attachment, cutting attachment shield and D-handle) ...................................................13 lbs. (5.9 kg)
Cutting Mechanism .......................................................................................................................................................... Fixed Line Head
Line Type ..........................................................................................................................Yellow Hassle Free IV™ XTRA QUIET Spiral Line
Cutting Swath ..................................................................................................................................................................15.5 Inches (39.37 cm)
10
NOTES
11
NOTES
12
Manual del Operador
®
2-in-1 PLUS ELÉCTRICO
RECORTADOR / SOPLADOR
WEEDWACKER®
Model No. 316.745400
IMPORTANTE: Lea las reglas de
seguridad e instrucciones
detenidamente
• SEGURIDAD
• MONTAJE
• OPERACIÓN
• MANTENIMIENTO
• LISTA DE PIEZAS
Sears, Roebuck and Co., Hoffman Estates, IL 60179, U.S.A.
Visit our website: www.sears.com/craftsman
P/N 769-02184A
NORMAS PARA UNA OPERACION SEGURA
INDICE DE CONTENIDOS
Normas para una operación segura . . . . . . . . . . . . . . . .E2
Garantia . . . . . . . . . . . . . . . . . . . . . . . . . . . . . . . . . . . . . .E4
Conozca su unidad . . . . . . . . . . . . . . . . . . . . . . . . . . . . .E5
Instrucciones de ensamble . . . . . . . . . . . . . . . . . . . . . . .E6
Instrucciones de operación . . . . . . . . . . . . . . . . . . . . . . .E8
Instrucciones de mantenimiento y reparación . . . . . . . .E9
Cuadro de solución de problemas . . . . . . . . . . . . . . . .E10
Especificaciones . . . . . . . . . . . . . . . . . . . . . . . . . . . . . .E10
Números de Servicio . . . . . . . . . . . . . . . . . .Contraportada
ADVERTENCIA: Al utilizar la unidad, debe observar
las reglas de seguridad. Lea estas instrucciones antes de
operar la unidad a fin de garantizar la seguridad del
operador y cualquier transeúnte. Guarde estas
instrucciones para uso posterior.
Toda la información, las ilustraciones y las especificaciones
contenidas en este manual se basan en la información más
reciente disponible en el momento de impresión del manual.
Nos reservamos el derecho de hacer cambios en cualquier
momento sin aviso previo.
• IMPORTANTE INFORMACION DE SEGURIDAD •
LEA TODAS LAS INSTRUCCIONES ANTES DE LA OPERACIÓN
ADVERTENCIA: Cuando use artefactos eléctricos
de jardinería, siempre debe tomar precauciones
básicas de seguridad para reducir el riesgo de
incendio, de descarga eléctrica y de lesiones
personales, Incluyendo lo siguiente:
• Lea todas las instrucciones con cuidado. Conozca bien los
controles y el uso correcto de la unidad.
• Lea con cuidado y comprenda las instrucciones de todo el manual
antes de hacer funcionar la unidad para garantizar la seguridad del
operador y de las personas en los alrededores. Preste mucha
atención a las instrucciones de operación y los avisos de
seguridad. Conserve estas instrucciones para uso posterior.
• Úselo solamente como se describe en este manual.
• Use sólo piezas y accesorios de repuesto fabricante del equipo
original para esta unidad. Estas piezas están disponibles en su
distribuidor autorizado. No use piezas, accesorios ni auxiliares
que no hayan sido diseñados para esta unidad. Su uso puede
conducir a que el usuario sufra graves lesiones o al daño de la
unidad y a la invalidación de su garantía.
• Manténgase alerta: No opere esta unidad si está cansado,
enfermo, o bajo los efectos del alcohol, drogas o medicamentos.
• Mantenga alejados a los niños: Limpie el área de corte antes de
cada uso. Retire todos los objetos como rocas, vidrios rotos,
clavos, alambre o cuerda los cuales pueden ser despedidos o
enredarse en el accesorio de corte. Aleje a todos los niños,
espectadores y animales domésticos. Mantenga todos los
niños, espectadores y animales domésticos a un radio de por lo
menos 15 m (50 pies); aún así puede existir un riesgo de objetos
despedidos contra los espectadores. Los espectadores deben
usar protección para sus ojos. Si alguien se le acerca, pare el
motor y el accesorio de corte de inmediato.
• Los niños y los adolescentes menores de 15 años no deben
operar las unidades, excepto por los adolescentes guiados
por un adulto.
• No permita que la unidad se use para jugar. Es necesario
estar muy atento cuando es usada por niños o cerca de ellos.
• No deje el equipo cuando esté enchufado. Desenchúfelo
cuando no se esté usando.
• No lo use con un cordón o enchufe dañado. Si no funciona
como debe, se ha dañado, se ha dejado a la intemperie o
caído en agua, devuélvalo al centro de servicio.
• No maltrate el cordón eléctrico. Nunca debe transportar la
unidad por el cordón, usar el cordón como un agarre, cerrar
una puerta sobre el cordón o halarlo alrededor de ángulos o
bordes cortantes. Mantenga el cordón alejado de superficies
calientes y aceite.
• No hale ni dé tirones al cordón para desconectarlo del receptáculo. Para desenchufarlo, agarre el enchufe, en vez del cordón.
• Evite Entornos Peligrosos para reducir el peligro de descarga
eléctrica; nunca opere su unidad sobre superficies mojadas o
sitios húmedos.
• No lo exponga a la lluvia ni lo use cuando llueve. La
humedad puede aumentar el peligro de descarga eléctrica.
• No toque el enchufe o la unidad con las manos mojadas.
• No ponga ningún objeto en las aberturas. No lo use cuando alguna
abertura esté bloqueada: manténgala libre de polvo, pelusas, pelos
o cualquier cosa que pudiera reducir el flujo del aire.
• Vístase adecuadamente: No use ropa ni joyas demasiado sueltas,
ya que pudieran trabarse con las piezas móviles. Póngase una
redecilla para contener el cabello largo. No use pantalones cortos,
E2
sandalias, ni ande descalzo. Se recomienda el uso de guantes de
goma y zapatos adecuados cuando se trabaja a la intemperie.
• Tenga cuidado especial al limpiar en escaleras.
• Use anteojos o gafas de protección que indiquen que cumplen
con las normas ANSI Z87.1, y use protección para sus oídos y
audición cuando opere esta unidad. Use una pantalla facial o
una máscara para polvo si la operación levanta polvo.
• Use la herramienta adecuada. No use esta unidad para
ninguna tarea para la cual no ha sido diseñada.
• Apague todos los controles antes de desenchufar.
• Guarde la unidad bajo techo a puerta cerrada. Cierre con
llave para evitar el uso no autorizado o daño y para
mantenerla fuera del alcance de niños.
ADVERTENCIAS DE SEGURIDAD ELECTRICA
• Puede utilizar un cable de extensión de 2 alambres (o sea, sin
alambre de tierra), ya que la herramienta tiene doble aislación.
Sin embargo, puede usarse también un cable de extensión de
3 alambres (un cable de extensión con alambre de tierra) que
utilice un conector tipo NEMA (patillas paralelas, tierra en "U").
Puede adquirir cables de extensión en su comercio local.
Utilice únicamente cables de extensión de camisa cilíndrica
aprobados para uso al aire libre.
• Esta herramienta tiene doble aislación. Repare o sustituya
los cables dañados.
• Para reducir el riesgo de choques eléctricos, esta unidad tiene
un enchufe polarizado (una patilla es más ancha que la otra).
Esta unidad calza en un enchufe polarizado de una sola
manera. Si el enchufe no calza totalmente en la unidad,
inviértalo. Si tampo calza así, utilice un cable con la conexión
correcta. No modifique el cable ni la unidad de manera alguna.
ADVERTENCIA: Para reducir el riesgo de choque
eléctrico, utilice únicamente cables de extensión
aprobados para uso al aire libre, por ejemplo un
cable tipo SW-A, SOW-A, STW-A, STOW-A, SJWA, SJOW-A, SJTW-W, o SJTOW-A.
• En un equipo con doble aislamiento, se proporcionan dos
sistemas de aislamiento en vez de la conexión a tierra. No se
proporcionan medios de conexión a tierra en los equipos con
doble aislamiento, ni se debe añadir un medio de conexión a
tierra al equipo. Para dar servicio a un equipo de doble
aislamiento se requiere un cuidado extremo, así como
conocimiento del sistema, y solo debe realizarlo personal de
servicio calificado. Las piezas de repuesto para un equipo con
doble aislamiento deben ser idénticas a las que sustituyen.
TAMAÑO MINIMO DE ALAMBRE PARA LOS CABLES
DE EXTENSION PARA APARATOS DE 120 VOLTIOS
QUE UTILIZAN 0-6 AMPERIOS*
Long. de cable (pies)
25
50
100
150
Cal. del alambre (AWG)*
16
16
16
14
*El calibre del cable (AWG) para la capacidad nominal en
amperios de 12 a 16 amperios es de 14 AWG para 25 pies, 12
AWG para 50 pies y no se recomienda para 100 o 150 pies.
• CABLES DE EXTENSION: Verifique que el cable esté en buenas
condiciones. Cuando utilice un cable de extensión, verifique que
el mismo sea lo suficientemente pesado para conducir la
corriente consumida por la unidad. Si utiliza un cable demasiado
liviano, esto ocasionará una caída de voltaje de la línea, y en
consecuencia una pérdida de potencia y un sobrecalentamiento.
NORMAS PARA UNA OPERACION SEGURA
La tabla siguiente muestra cuál es el tamaño correcto a usar, de
acuerdo con la longitud del cable y el amperaje nominal que
aparece en la placa de datos de la máquina. Si está en duda,
utilice el siguiente tamaño más pesado. Cuanto menor es el
calibre, más pesado es el cable. Para reducir la posibilidad de
que la unidad se desconecte del cable de extensión durante el
uso, vea la Instrucciones de Operacion.
• La placa de datos de la unidad indica qué voltaje utiliza la misma.
Nunca conecte la unidad a un voltaje de corriente alterna diferente.
• Inspeccione periódicamente todos los cables de extensión y la
conexión de la unidad a la corriente. Revise el cable con cuidado
para ver si hay deterioros, cortes, o grietas en la aislación.
Inspeccione también las conexiones para ver si han sufrido
daños. Si observa algún defecto, repare o reemplace los cables.
• Debe proveerse protección de interrupción de circuito accionada
por corriente de pérdida a tierra (GFCI) para el/los circuito(s) o
toma(s) que se utilizarán para esta unidad. Existen receptáculos
disponibles que tienen protección GFCI incorporada y pueden
ser utilizados para esta medida de seguridad.
OTRAS ADVERTENCIAS DE SEGURIDAD
• Inspeccione la unidad antes de utilizarla. Cambie las partes
dañadas. Asegúrese de que los sujetadores estén bien
colocados y asegurados. Cambie las partes accesorias de corte
que estén quebradas, cascadas o dañadas de cualquier forma.
Asegúrese de que el accesorio de corte está bien instalado y
ajustado con firmeza. Asegúrese de que la protección accesoria
de corte esté bien conectada y colocada según se recomienda.
• Esta unidad no fue diseñada para ser usada como
cortamalezas. No conecte ni opere esta unidad con ningún
tipo de cuchilla ni accesorio para cortar malezas.
• Use sólo línea el amarillo Hassle Free IV™ XTRA QUIET Spiral
Line. No use nunca línea reforzada con metal, alambre,
cadena ni soga, etc. Estas pueden desprenderse y convertirse
en un proyectil peligroso.
• Tenga en cuenta el riesgo de lesiones en la cabeza, manos y pies.
• Asegúrese de sujetar la unidad mientras la transporta.
• Nunca remoje o chorree la unidad con agua o cualquier otro
líquido. Mantenga los mangos secos, limpios y libres de
escombros. Límpiela después de cada uso, vea las
Instrucciones de Limpieza y Almacenamiento.
• Conserve estas instrucciones. Consúltelas con frecuencia y
úselas para instruir a otros usuarios. Si le presta esta unidad
a otras personas, también incluya las instrucciones.
DURANTE LA OPERACION
• El protector accesorio de corte debe estar siempre colocado
en su lugar mientras opere la unidad como recortador. No
opere la unidad con las dos líneas de corte extendidas, y la
línea correcta instalada. No extienda la línea de corte más
allá de la longitud de la protección.
• Ajuste la manija en D a su medida para brindarle el mejor agarre.
• Asegúrese de que el accesorio de corte no está en contacto
con ningún objeto antes de arrancar la unidad.
• Use la unidad únicamente con la luz del día o con buena luz
artificial.
• Evite los arranques accidentales. No transporte la unidad
enchufada con su dedo en el interruptor. Verifique que el
interruptor esté apagado cuando enchufe la unidad.
• No se estire demasiado. Mantenga siempre una posición y
equilibrio adecuados.
• Sostenga siempre la unidad con ambas manos mientras
esté en funcionamiento. Sostenga con firmeza tanto el
mango como la manija auxiliar.
• Mantenga las manos, la cara y los pies lejos de todas las
partes móviles. No intente tocar ni detener el accesorio de
corte mientras gira.
• Apague siempre la unidad cuando la operación se demore o
mientras camina entre zonas de corte.
• Si golpea o se enreda con un objeto extraño, apague la
unidad de inmediato y verifique si existen daños. Repare
todos los daños antes de volver a intentar operar la unidad.
No opere la unidad si tiene piezas flojas o dañadas.
• Apague y desenchufe la unidad para realizar mantenimiento,
reparaciones, o para cambiar el accesorio de corte u otros
accesorios.
• Mantenga la unidad libre de vegetación y otros materiales.
Pueden alojarse entre el accesorio de corte y la protección.
• No fuerce la unidad. Hará una mejor labor y con menos probabilidad de riesgo si se usa a la velocidad para la cual fue diseñada.
CONSERVE ESTAS INSTRUCCIONES
• SIMBOLOS DE SEGURIDAD E INTERNACIONALES •
Este manual del operador describe los símbolos y figuras de seguridad e internacionales que pueden aparecer en este producto. Lea el manual del
operador para obtener información completa acerca de la seguridad, ensamble, operación y mantenimiento y reparación.
SIMBOLO
SIGNIFICADO
• SIMBOLO DE ALERTA DE SEGURIDAD
Indica peligro, advertencia o precaución. Puede ser
utilizado junto con otros símbolos o figuras.
• ADVERTENCIA - LEA EL MANUAL DEL OPERADOR
Lea el manual del operador y siga todas las
advertencias e instrucciones de seguridad. De no
hacerlo, el operador y/o los espectadores pueden
sufrir graves lesiones
• USE PROTECCION OCULAR Y AUDITIVA
ADVERTENCIA: Los objetos arrojados por la unidad
y el ruido fuerte pueden causar graves lesiones
oculares y pérdida auditiva. Utilice protección ocular
que cumpla con las normas ANSI Z87.1 y protección
auditiva cuando opere esta unidad. Use una careta
completa cuando la necesite.
• INTERRUPTOR DE VELOCIDAD O REGULADOR
Indica la velocidad "ALTA" o "MAXIMA".
• INTERRUPTOR DE VELOCIDAD O REGULADOR
Indica velocidad "BAJA" o "MINIMA".
SIMBOLO
SIGNIFICADO
• MANTENGA ALEJADOS A LOS ESPECTADORES
ADVERTENCIA: Mantenga a todos los espectadores, en especial a niños y animales domésticos
a por lo menos 50 pies (15 m) del área de corte.
• LOS OBJETOS DESPEDIDOS Y LA CUCHILLA
ROTATIVA PUEDEN CAUSAR GRAVES LESIONES
ADVERTENCIA: No opere esta unidad si la protección plástica de línea no está colocada en su lugar.
Manténgase alejado del accesorio de corte giratorio.
• DOBLE AISLAMIENTO
Existen dos sistemas de aislamiento en vez de conexión
a tierra. No se proporciona ningún medio de conexión a
tierra en una unidad de aislamiento doble, ni deben
agregarse medios de conexión a tierra a esta unidad.
• CUCHILLA AFILADA
ADVERTENCIA : La protección del accesorio de
corte contiene una cuchilla afilada. Para prevenir
graves lesiones, no toque la cuchilla.
• SOPLADORAS
ADVERTENCIA: Detenga el motor y permita
que pare el propulsor y desenchúfelo antes de
limpiarlo o realizar algún mantenimiento.
E3
GARANTÍA
UN AÑO DE GARANTÍA COMPLETA EN EL RECORTADOR ELÉCTRICO CRAFTSMAN
Cuando se use y se le dé mantenimiento según el manual del operador, si este recortador se rompe debido a un defecto en los
materiales o la mano de obra en un plazo de un año de la fecha de compra, devuélvalo a cualquier tienda Sears, otro establecimiento
Craftsman o a un Centro de Piezas y Reparaciones de Sears en los Estados Unidos y se reemplazará gratis. Esta garantía excluye la
línea de corte, que es una pieza que se gasta debido al uso normal en menos de un año. Esta garantía tiene vigencia solamente por
30 días a partir de la fecha de compra si el recortador se usa para fines comerciales o de alquiler. Esta garantía le concede a usted
derechos legales específicos, y usted pudiera tener otros derechos que varían de un estado a otro.
Sears, Roebuck and Co.., Hoffman Estates, IL. 60179
Cobertura de la Garantía del Fabricante
• El período de garantía empieza en la fecha que el motor o equio se le entrega al comprador al detalle.
• El fabricante le garantiza al propierario original y a cada comprador posterior que el motor no tiene defectos en cuanto a su
material omano de obra, los cuales causen la falla de una pieza garantizada durante un período de un año.
• La reparación o sustitución de una pieza garantizada se hará sin costo alguno para el propietario, en un centro de servicio autorizado
Sears . Por favor contacte a Sears para informarse sobre el lugar más cercano. 1-800-4-MY-HOME®.
• Cualquier pieza garantizada cuya sustitución no esté programada, como mantenimiento requerido o que únicamente esté
programada para una inspección regular para “Arreglar o cambiar según sea necesario”, está garantizada durante el período de
garantía. Cualquier pieza garantizada cuya sustitución esté programada como mantenimiento requerido, será garantizada durante
el período de tiempo hasta el punto de la primera sustitución programada para esa pieza.
• No se le cobrará al propietario por el trabajo de diagnóstico que conduzca a la conclusión de que una pieza garantizada se
encuentra defectuosa, si el trabajo de diagnóstico lo hace un centro de servicio autorizado Sears.
• El fabricante es responsabl de los daños causados a otros componentes del motor cuando falle una pieza garantizada que aún esté
cubierta.
• Las fallas causadas por el abuso, negligencia o el mantenimiento inapropiado no están cubiertas bajo esta garantía.
• La utilización de accesorios o piezas modificadas puede ser la razón para no permitir una reclamación de garantía. El fabricante no
es responsable de la cobertura de fallas de piezas garantizadas causadas por el uso de piezas incorporadas o modificadas.
• Para presentar una reclamación, diríjase a su centro de servicio autorizado Sears cercana. Los servicios de garantía o de reparación
se prestarán en todos los centros de servicio autorizado Sears.
• Se puede usar cualquier pieza de sustitución aprobada por el fabricante cuado se haga cualquier mantenimiento de garantía o
reparación de piezas relacionadas con las emisiones, y se hará sin costo al propietario. Se usará cualquier pieza que sea
equivalente en rendimiento o durabilidad en e mantenimiento o reparación que no estén cubiertos por la garantía, lo cual no
reducirá las obligaciones de garantía del fabricante.
• Los siguientes componentes están includos en la garantía relaconada con las emisiones del motor, filtro de aire, carburador,
cebador, líneas de combustible, toma de combustible, /filtro de combustible, módulo de encendido. bujía y silenciador.
E4
NORMAS PARA UNA OPERACION SEGURA
CONOZCA SU UNIDAD
APLICACIONES
Como recortadora:
•
Corte de césped y hierbas delgadas
•
Recorte decorativo alrededor de árboles, cercos, etc.
Como sopladora:
•
Utilice a limpiar alrededor de edificios, paredes y cercas.
•
Bastidor del motor
Enchufe
cóncavo
Mango del bastidor
Retención del
cordón (no se
muestra)
También uso alrededor de árboles, arbustos, y camas de
la flor.
Puede usar otros accesorios, según se especifica en este
manual.
Interruptor de dos
velocidades
Manija en D
Acoplador de
Craftsman
Convertible™
Bastidor del eje
Gatillo del interruptor
Manija Posicionadora
Protector accesorio
de corte
Cuchilla de
corte de lína
Accesorio de corte
Soplador
E5
INSTRUCCIONES DE ENSAMBLE
INSTALACIÓN Y AJUSTE DE LA MANIJA EN D
1. Empuje la manija en D hacia abajo sobre el bastidor del eje
de modo que la manija se incline hacia adelante del mango
del eje (Fig. 1). El orificio del perno cuadrado de la manija
queda hacia la derecha.
Mango del eje
Bastidor del eje
Manija en D
Ajuste
Mínimo de 6
pulgadas (15.24 cm)
Tuerca de
mariposa
Perno
Arandela
Fig. 1
2.
3.
4.
5.
Coloque el perno del hombro en el orificio cuadrado en la
manija y empújelo. Ponga la arandela en el perno al lado
izquierdo de la manija y enrosque la tuerca de mariposa en
el perno. No la apriete hasta que ajuste el mango.
Gire la manija en D para colocar el mango sobre la parte
superior del bastidor del eje. Colóquela a por lo menos 15,24
cm (6 pulgadas) del extremo del mango del eje.
Mientras sostiene la unidad en posición de operación (Fig.
2), coloque la manija en D en el lugar que le brinde el mejor
agarre.
Ajuste la tuerca de mariposa hasta que la manija en D
quede firme.
INSTALACIÓN DEL PROTECTOR DEL ACCESORIO DE CORTE
1. Ponga el extremo estrecho del protector del accesorio de corte
sobre el soporte del protector en la parte posterior del cuerpo
del accesorio y colóquelo de modo que el corte circular se
deslice sobre la espiga del conjunto del protector (Fig. 3).
2. Coloque la tuerca autobloqueante en el orificio hexagonal en
el lado izquierdo del protector y manténgala en su lugar.
3. Inserte el tornillo de
Espiga del
montaje en el orificio
conjunto
protector
que está en el lado
derecho del protector
y atorníllelo en la
tuerca que está en el
lado izquierdo con un
destornillador Phillips.
4. Cerciórese de que el
tornillo esté apretado
Soporte del
antes de operar la
protector
unidad.
Fig. 3
CONEXION DEL CORDON DE ENERGIA
Use el gancho del cordón al conectar el cable de extensión al
enchufe del cordón eléctrico. Esto ayuda a evitar que se
desconecte.
1. Haga un lazo estrecho con el cable de extensión.
2. Empuje el lazo a través de la abertura y muévalo hacia el
gancho de la caja del motor (Fig. 4).
3. Enchufe el cordón debidamente en el tomacorriente.
Use únicamente cables de extensión aprobados para el
exterior. Los juegos de cables se especifican en la sección de
Información Importante de Seguridad.
Fig. 4
Fig. 2
E6
INSTRUCCIONES DE ENSAMBLE
ARRANQUE/ APAGADO DE LA UNIDAD
Colóquese en posición de operación (Fig. 2). Oprima el gatillo
para arrancar el recortador (Fig. 5). Suelte el gatillo para apagar
el recortador.
ADVERTENCIA: Siempre ojo del desgaste, el oír,
protección del pie y del cuerpo para reducir el
riesgo de lesión al funcionar esta unidad.
Gatillo
Fig. 5
OPERACION DEL INTERRUPTOR DE DOS VELOCIDADES
Esta unidad cuenta con un interruptor de dos velocidades, una
poderosa alta velocidad para el trabajo arduo de jardín, y una
velocidad baja de precisión para el trabajo ligero de jardín. Empuje el
interruptor hacia abajo para recortar a baja velocidad (Fig. 5).
SELECCIONANDO EL CORTADOR O SOPLADOR
Para cambiar entre la función de cortador y soplador en esta unidad,
asegurese que la unidad este apagada y el motor ha parado de correr.
ADVERTENCIA: Para evitar serios daños
personales o daño a la unidad, NO TRATE de
cambiar entre el modo de cortador y soplador
mientras la unidad esta operando.
Para usar el cortador
Al usar el cortador, asegurese que el manija posicionadora este
en la posición de ABAJO antes de encender la unidad.
1. Si la manija posicionadora esta en la posición de ARRIBA,
agarre la aldabilla posicionadora roja de la manija (Fig. 6) y
presionela hasta que el mecanismo interno se libere.
2. Empuje la manija posicionadora hacia ABAJO hasta que la
aldabilla roja se trabe en su lugar. NO LA FORCE. Si el
pestillo no queda por completo en la posición de trabado,
rote el cabezal de corte hasta que el pestillo se trabe.
3. Encienda la unidad siguiendo las instrucciones de
encendido (p. 7) y la unidad esta lista para su uso.
Para usar el soplador
Al usar el soplador, asegurese que la manija posicionadora este
en la posición de ARRIBA antes de encender la unidad.
1. Si la manija posicionadora esta
en la posición de ABAJO,
agarre la aldabilla
posicionadora roja de la manija
(Fig. 6) y presionela hasta que
Aldabilla
posicionadora roja
el mecanismo interno se libere.
2. Hale la manija posicionadora
hacia la posición de ARRIBA
hasta que la aldabilla roja se
posicione en su lugar.
3. Encienda la unidad
siguiendo las instrucciones
de encendido y la unidad
Manija posicionadora
esta lista para su uso (p. 7).
Fig. 6
®
LLEVAR A CABO LA UNIDAD
ADVERTENCIA: Siempre ojo del desgaste, el oír,
protección del pie y del cuerpo para reducir el
riesgo de lesión al funcionar esta unidad.
Antes de funcionar la unidad, soporte en la posición de
funcionamiento (Figs. 2). Compruebe para saber si hay el
siguiente:
•
El operador está usando la protección de ojo y la ropa apropiada.
•
El brazo derecho está doblado levemente, y la mano está
sosteniendo el apretón del eje.
•
El brazo izquierdo es recto, y la mano está sosteniendo la
manija en D.
•
La unidad está en el nivel de la cintura.
•
El condensador de ajuste/ el soplador es paralelo a la tierra y
se coloca así que la ruina está soplada ausente de operador.
ADVERTENCIA: Para prevenir lesión seria a se o
a otros, o daño a los bienes posible, nunca señale
el soplador en la dirección de la gente o de
animales domésticos, o en la dirección de
ventanas. Dirija siempre la ruina que sopla ausente
de la gente, animales, y ventanas. Tenga cuidado
adicional al soplar la ruina cerca de objetos sólidos
tales como árboles, automóviles, paredes, etc.
EXTREMIDADES DE FUNCIONAMIENTO AL USAR EL
CONDENSADOR DE AJUSTE/ SOPLADOR
•
Para reducir el riesgo de la pérdida de oído se asoció a los
niveles de sonido, el uso de la protección de oído se requiere.
•
Funcione el equipo de la energía solamente en las horas
razonables, no temprano por la mañana o tarde en la noche en
que la gente pudo ser disturbada. Confórmese con el tiempo
enumerado en ordenanzas locales. Las recomendaciones
generalmente son 9:00 a.m. a 5:00 p.m., De lunes a sábado.
•
Para reducir los niveles de ruido, limite el número de los
pedazos de equipo usados en cualquier una hora.
•
Para reducir los niveles de ruido, opere los sopladores
eléctricos a la velocidad más baja que sea posible para
hacer el trabajo.
•
Utilice los rastrillos y las escobas para aflojar la ruina antes
de soplarla.
•
Conserve el agua usando sopladores de la energía en vez
de las mangueras para muchos los usos del césped y del
jardín, incluyendo áreas tales como canales, pantallas,
patios, parrillas, pórticos, y jardines.
•
Reloj hacia fuera para los niños, animales domésticos,
abra las ventanas, o coches recientemente lavados, y ruina
del soplo lejos de ellos.
•
Después de usar los sopladores y el otro equipo, ¡CLIMPIE
PARA ARRIBA! Disponga de la ruina en receptáculos de la
basura.
CONSEJOS PARA OBTENER MEJORES RESULTADOS AL
RECORTAR
• El ángulo correcto para ubicar el accesorio de corte es
paralelo al suelo.
• Corte de izquierda a derecha siempre que sea posible. Cortar
hacia la derecha mejora la eficiencia de la unidad. Los
recortes salen arrojados en sentido contrario al operador.
• Recorte únicamente cuando el pasto y las hierbas estén secas.
• La vida de su línea de corte depende de:
- Seguir todas las técnicas de corte indicadas anteriormente
- El tipo de vegetación que corte
- El lugar donde se corta
E7
INSTRUCCIONES DE OPERACION
RECORTE DECORATIVO
El recorte decorativo se realiza
eliminando toda la vegetación de
alrededor de los árboles, postes,
cercos, etc. Gire toda la unidad a
modo de que el accesorio de corte
se ubique a un ángulo de 30° con
el suelo (Fig. 7).
Remoción del accesorio de corte u otros accesorios
1. Cerciórese de que la unidad esté completamente apagada.
2. Gire la perilla en sentido anti- Bastidor del
horario para aflojarla (Fig. 8). eje inferior
3. Opima y sostenga el botón
Acoplador
de desconexión (Fig. 9).
4.
Fig. 7
ADVERTENCIA: Antes de comenzar a usar este
accesorio, lea y comprenda el manual que viene
con el accesorio. Siga toda la información de
seguridad contenida en el mismo.
ADVERTENCIA: Para evitar graves lesiones
personales, apague la unidad antes de sacar o
instalar accesorios.
CON LA CARACTERISTICA CRAFTSMAN CONVERTIBLE™
El acoplador le permite convertir esta unidad para usarla con
accesorios, según se especifica en este manual.
Instalación del accesorio de corte u otros accesorios
NOTA: Para hacer la instalación más fácil, ponga la unidad en
la tierra o en un banco de trabajo.
1. Cerciórese de que la unidad esté completamente apagada.
2. De vuelta a la perilla a la izquierda para aflojar el acoplador
(Fig. 8).
3. Mientras que firmemente sostiene
Orificio
el accesorio, empújelo derecho en el lateral 90˚
acoplador hasta el botón liberador
(Fig. 9) se encaja a presión hacia el
Acoplador
agujero primario (Fig. 9). El agujero
primario está en el lado opuesto del
acoplador de la perilla (Fig. 9). La
alineación del botón de
desconexión con el hueco de guia
Perilla
facilitará la instalación (Fig. 9).
4. Gire la perilla en sentido horario
Fig. 8
para ajustarla (Fig. 10).
Acoplador de
Craftsman Convertible™
Orificio
primario
Mientras sostiene el bastidor
del eje superior con firmeza, tire
del accesorio de corte o accesorio en línea recta fuera del
acoplador (Fig. 10).
Perilla
Fig. 10
PRECAUCIÓN: Los accesorios deben ser usados
en el orificio primario. El usar el orificio incorrecto
puede conducir a lesiones personales o daño de la
unidad.
PRECAUCION : Antes de operar esta unidad,
cerciórese de que el botón de desenganche esté
completamente trancado en el orificio primario (Fig. 9),
y que la perilla (Fig. 10) esté suficientemente apretada.
LLEVAR A CABO LA UNIDAD
Antes de funcionar la unidad, soporte en la posición de
funcionamiento (Figs. 11). Compruebe para saber si hay el
siguiente:
•
El operador está usando la protección de ojo y la ropa apropiada.
•
El brazo derecho está doblado levemente, y la mano está
sosteniendo el apretón del eje.
•
El brazo izquierdo es recto, y la mano está sosteniendo la
manija en D.
•
La unidad está en el nivel de la cintura.
•
El condensador de ajuste/ el soplador es paralelo a la tierra y
se coloca así que la ruina está soplada ausente de operador.
Botón de
desconexión
Hueco
de guía
Perilla
Fig. 9
PRECAUCION : Trabe el botón de desconexión
en el orificio primario (Fig. 9) y ajuste bien la perilla
(Fig.10) antes de operar esta unidad.
Fig. 11
E8
Bastidor
del eje
superior
INSTRUCCIONES DE MANTENIMIENTO Y REPARACION
ADVERTENCIA: No use nunca línea reforzada con
metal, alambre, cadena ni soga, etc. Estos elementos
pueden desprenderse y convertirse en un proyectil
peligroso.
ADVERTENCIA: No saque ni altere el ensamble
de la cuchilla limitadora de línea.
INSTALACIÓN DE LA LÍNEA
Use siempre línea de reemplazo de
el amarillo Hassle Free IV™ XTRA
QUIET Spiral Line. Otras líneas que
no sean las especificadas pueden
hacer que el motor se recaliente o
falle.
Para instalar la línea de corte:
1.
Inserte cada extremo de la línea
de reemplazo en los orificios a
cada lado del gancho de
retención (Figura 12).
2.
Empuje los extremos hasta que
salgan por los lados del
cabezal (Figura 13).
3.
Tire de los extremos
asegurándose de que tengan el
mismo largo y que la mitad de
la línea quede en el centro
entre los orificios de inserción
(Figura 14).
Fig. 12
Fig. 13
Fig. 14
4.
Si los extremos no tienen el
mismo largo, vuelva a
introducir un poco el extremo
más largo en el cabeza y tire
del extremo más corto para
compensar. Repita hasta que
ambos extremos tengan el
mismo largo.
5.
Coloque la línea de corte por
detrás del gancho para evitar
que se suelte cuando está
funcionando (Figura 15).
LIMPIEZA DE LA UNIDAD
ADVERTENCIA: Para evitar graves lesiones
personales, verifique que la unidad esté apagada y
desenchufada antes de limpiarla o de realizar
cualquier tipo de mantenimiento.
Apague la unidad y desconecte de la fuente de energía. Use un
cepillo pequeño o la descarga de aire del cepillo de un aspirador
para mantener los respiraderos libres de obstrucciones. No use
detergentes fuertes en el bastidor o en los componentes de
plástico. Estos pueden dañarse con ciertos limpiadores
domésticos que contienen aceites aromáticos como pino y
limón, y con solventes como el queroseno o acetona. La
humedad también puede crear un peligro de descarga eléctrica.
Seque toda la humedad con un paño suave.
INSPECCION DE LOS CABLES DE EXTENSION
Inspeccione todos los cables de extensión. Observe bien si no
existe deterioro, cortes o grietas en el aislamiento. Inspeccione
si hay daños en los conectores. Cambie los cables si están
defectuosos o dañados.
ALMACENAMIENTO
• Permita que la unidad se enfríe antes de guardarla.
• Bloquee la unidad para evitar que se dañe o que sea usada
sin autorización.
• Guarde la unidad en un área seca y bien ventilada.
• Guarde la unidad fuera del alcance de niños.
PARA DAR SERVICIO A UN EQUIPO DE DOBLE
AISLAMIENTO
Esta unidad tiene doble aislamiento. En una unidad con doble
aislamiento, se proporcionan dos sistemas de aislamiento, en
vez de la conexión a tierra. No se proporciona conexión a tierra
ni se debe añadir ningún medio de conexión a tierra a esta
unidad.
Para dar servicio a una unidad de doble aislamiento se requiere
un cuidado extremo. El servicio solo debe realizarlo personal de
servicio calificado. Las piezas de repuesto para una unidad con
doble aislamiento deben ser idénticas a las que sustituyen.
Mande a hacer las reparaciones a una agencia de servicio
autorizada. Las unidades con doble aislamiento están marcadas
con las palabras “double insulation” o “double insulated” (doble
aislamiento).
Fig. 15
E9
RESOLUCION DE PROBLEMAS
EL MOTOR NO ARRANCA
CAUSA
El motor se detiene, o la unidad está desenchufada
El interruptor de protección de sobrecarga ha saltado
ACCIÓN
Revise el cable para ver si está enchufado a un tomacorriente
Reajuste el interruptor de protección de sobrecarga
LA CABEZA DE CORTE NO HACE AVANZAR LINEA
CAUSA
El accesorio de corte está atascado de hierba
El accesorio de corte no tiene línea
ACCIÓN
Pare el motor y limpie el accesorio de corte
Coloque una línea nueva
NOTA: Para reparaciones que sobrepasen los ajustes mínimos recién indicados, comuníquese con su centro más cercano de Piezas
y Reparaciones de Sears (1-800-4-MY-HOME®) o con otra agencia de servicio que esté calificada.
ESPECIFICACIONES
MOTOR
Tipo de motor........................................................................................................................................................Eléctrico CA 120 voltios
RPM de operación .................................................................................................................................................................. < 7,400 rpm
Interruptor de encendido ...........................................................................................................................Interruptor de gatillo transitorio
Amperaje .................................................................................................................................................................................. 7 Amperios
EJE IMPULSOR Y ACCESORIO DE CORTE
Bastidor del eje impulsor ........................................................................................................... Tubo de acero, Craftsman Convertible®
Peso de la unidad (con el accesorio de corte, el protector accesorio de corte y la manija en D) .................................... 5,9 kg (13 lbs.)
Mecanismo de corte .................................................................................................................................................Cabezal de Linea Fija
Bobina de la línea......................................................................................................El Amarillo Hassle Free IV™ XTRA QUIET Spiral Line
Diámetro de la trayectoria de corte .......................................................................................................................... 39,37 cm (15.5 pulg)
E10
NOTAS
E11
Get it fixed, at your home or ours!
Your Home
For repair—in your home—of all major brand appliances,
lawn and garden equipment, or heating and cooling systems,
no matter who made it, no matter who sold it!
For the replacement parts, accessories and
owner’s manuals that you need to do-it-yourself.
For Sears professional installation of home appliances
and items like garage door openers and water heaters.
1–800–4–MY–HOME®
(1–800–469–4663)
Call anytime, day or night (U.S.A. and Canada)
www.sears.com
www.sears.ca
Our Home
For repair of carry-in items like vacuums, lawn equipment,
and electronics, call or go on-line for the location of your nearest
Sears Parts & Repair Center
1–800–488–1222
Call any time, day or night (U.S.A. only)
www.sears.com
To purchase a protection agreement (U.S.A.)
or maintenance agreement (Canada) on a product serviced by Sears:
1–800–827–6655 (U.S.A.)
1–800–361–6665 (Canada)
Para peclir servicio de reparacíon
a domicilio, y para ordenar piezas:
Au Canada pour service en français:
1–800–SU–HOGAR®
(1–800–533–6937)
www.sears.ca
(1–888–784–6427)
® Registered Trademark / TM Trademark / SM Service Mark of Sears Brands, LLC
® Marca Registrada / TM Marca de Fábrica / SM Marca de Servicio de Sears Brands, LLC
MC Marque de commerce / MC Marque déposée de Sears Brands, LLC
E12
1–800–LE–FOYERMC
© Sears Brands, LLC