1
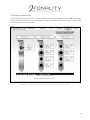
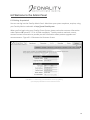
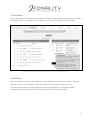
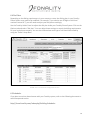
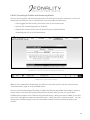
Fonality Phone System Installation Guide Thank you for choosing Fonality’s Phone System from Dell! The partnership between Dell and Fonality means that your award‐winning Fonality Phone System now runs on Dell’s industry‐leading hardware. The following pages will guide you through the installation process for your Fonality Phone System and IP phones. Please review this entire document carefully before proceeding with installation. Phone System To further assist you, Fonality manages an online Knowledgebase/Wiki that will answer most of your questions regarding the configuration, administration, and feature‐set of your new Fonality Phone System. This documentation is available online at: http://learn.fonality.com We also maintain a copy of this installation guide on our knowledge base. You can reference the information in this guide anytime online at: http://learn.fonality.com/Fonality_Installation_Guide 2 Contents 1.0 Things You’ll Need Prior to Installation.......................................................................................................................... 5 1.1 Required Tools ........................................................................................................................................................... 5 1.2 Internet Connection................................................................................................................................................... 5 1.3 Warnings about Firewalls........................................................................................................................................... 6 1.4 Firewall Configuration................................................................................................................................................ 6 2.0 Preparing to Install......................................................................................................................................................... 7 2.1 Test your Network ..................................................................................................................................................... 7 2.2 Unpacking your Phone System .................................................................................................................................. 7 2.3 Visual Inspection ........................................................................................................................................................ 7 3.0 Installation – Let’s Get Started! ..................................................................................................................................... 8 3.1 Ideal Phone System Location ..................................................................................................................................... 8 3.2 Configuring Network Settings .................................................................................................................................... 8 3.2.1 Identifying an Available IP Address ..................................................................................................................... 9 3.2.2 Obtaining Additional Network Information ........................................................................................................ 9 3.2.3 Availability of DNS Service .................................................................................................................................. 9 3.3 Powering On your System........................................................................................................................................ 10 3.4 Completing your Installation.................................................................................................................................... 10 3.5 Logging into the Admin Panel for the First Time ..................................................................................................... 10 4.0 Connecting your IP Phones .......................................................................................................................................... 11 4.1 Phone Provisioning .................................................................................................................................................. 11 4.1.1 Aastra Phone Provisioning ................................................................................................................................ 11 4.1.2 Polycom Phone Provisioning............................................................................................................................. 12 4.1.3 Installing Softphones......................................................................................................................................... 13 4.2 Remote Phones........................................................................................................................................................ 14 4.3 Testing IP Phones ..................................................................................................................................................... 14 4.4 Supported IP Phones................................................................................................................................................ 14 5.0 Connecting your Trunks ............................................................................................................................................... 15 5.0.1 SIP & IAX2: Pure Voice‐over‐IP.......................................................................................................................... 15 5.0.2 PRI: Voice T1 ..................................................................................................................................................... 15 5.0.3 Analog Lines – Old Friends ................................................................................................................................ 15 5.2 Connecting Analog lines........................................................................................................................................... 15 5.2.1 Connecting your Analog Phones ....................................................................................................................... 16 5.2.2 Connecting Analog Lines in the Correct Order! ................................................................................................ 16 5.2.3 Vacant Phone Line Ports will cause Problems................................................................................................... 16 5.3 Faxing (optional) ...................................................................................................................................................... 17 5.4 Connecting T1 Lines ................................................................................................................................................. 18 5.5 Setting up VoIP Accounts ......................................................................................................................................... 18 5.5 Verifying Connectivity .............................................................................................................................................. 19 3 6.0 Welcome to the Admin Panel ...................................................................................................................................... 20 6.1 Getting Acquainted .................................................................................................................................................. 20 6.2. Help Mode .............................................................................................................................................................. 21 6.3 Call Menus ............................................................................................................................................................... 21 6.4 Dial Plans.................................................................................................................................................................. 22 6.5 Scheduler ................................................................................................................................................................. 22 6.6 Blast Groups............................................................................................................................................................. 23 6.7 Conference Bridges .................................................................................................................................................. 23 6.8 Call Forwarding ........................................................................................................................................................ 24 7.0 Fonality Call Center: Advanced Features ..................................................................................................................... 27 8.0 User Panel .................................................................................................................................................................... 29 9.0 Getting Started with HUD ............................................................................................................................................ 30 9.1 Disabling HUD for Extensions (Optional) ................................................................................................................. 30 9.2 HUD Rights ............................................................................................................................................................... 30 9.2.1. Understanding Rights....................................................................................................................................... 30 9.2.2 Configuring Rights in HUD................................................................................................................................. 30 9.3 Installing HUD .......................................................................................................................................................... 30 10.0 Installation Appointment ........................................................................................................................................... 31 11.0 Fonality Support......................................................................................................................................................... 32 12.0 Troubleshooting......................................................................................................................................................... 34 12.1 Troubleshooting your Connection ......................................................................................................................... 34 12.2 Getting Rid of Echo ................................................................................................................................................ 34 13.0. Appendices ............................................................................................................................................................... 35 13.1 Use the IP Address Wizard (optional) .................................................................................................................... 35 13.2 Additional Articles Available Online:...................................................................................................................... 37 4 1.0 Things You’ll Need Prior to Installation Prior to installing your Phone System, please schedule an installation appointment with our Installation Team. Fonality will dedicate a technical support resource to help you setup and configure your Fonality Phone System should you have any issues with the installation process.. If you have not received an email from the Fonality Installation Team, follow the steps outlined in Section 10 to contact us before you proceed with the installation! It is critical that you follow the steps in this guide exactly in order for your system to function properly. Once you complete the steps outlined in this guide you will be able to make and receive calls, use HUD, and perform moves, adds, and changes using the Fonality Admin Panel. Please review the following requirements before installing your Fonality Phone System: 1.1 Required Tools In order to perform a complete installation, you will need the following tools: 1. USB Keyboard 2. VGA Monitor 3. Phillips Screwdriver 4. Computer with web browser and Internet access 1.2 Internet Connection You must have an ”always‐on” Internet connection where you install the Fonality Phone System. Even if you are not using VoIP, your Fonality Phone System needs to receive moves, adds, and changes (MACs) made via the Fonality Admin Panel through your Internet connection. Please note: if your Internet connection fails, you will not be able to use the Fonality Admin Panel to make configuration changes; however, your Fonality Phone System will be able to make and receive calls via a dedicated PRI or analog lines even without your Internet connection. 5 1.3 Warnings about Firewalls If you plan on using remote phones or a 3rd party VoIP connection, you will need to make changes to your firewall. Many popular firewalls and routers are incompatible or unreliable with remote phones and 3rd party VoIP connections. The following devices may not be SIP‐compliant; Fonality recommends that you AVOID using: • • • Microsoft ISA Router(s) / Firewall(s) Linksys / Cisco WRT54G series routers Netgear FVX538 Fonality customers report great success with the following firewall devices: • • • • • Edgewater Networks EdgeMarc 4200 series Fortinet Fortigate 50 (remote telecommuter) Fortinet Fortigate 60 (main office) Cisco router with QoS capability (2600 series, etc.) Linksys BEFSR81 (remote telecommuter) While Fonality recommends the above devices, we *do not* support them. Please contact your vendor or networking specialist for assistance configuring the device(s) to work with your Fonality Phone System. 1.4 Firewall Configuration If you plan to provide softphones or home phones to telecommuters, or if you are going to be using a 3rd party VoIP connection, open the following ports on your firewall ahead of time: • • • UDP 5060 (for phone registration) UDP 10000‐20000 (for audio traffic) TCP 6600 (for remote HUD) If you have a hardware or software VPN solution between the telecommuter’s location and your main office, you do NOT need to open any of the ports above. 6 2.0 Preparing to Install 2.1 Test your Network You should test all network cables and equipment you plan on using with your Fonality Phone System. Use the new cables supplied with your Fonality Phone System and IP phones whenever possible. Please test and certify any additional wiring necessary before installing your system. 2.2 Unpacking your Phone System Your Fonality Phone System comes with a packet of documents. Please reference the Fonality confirmation e‐mail to obtain your administrative login credentials for the Fonality Admin Panel. Be sure to print and/or keep this information in a safe place. You will be reusing these credentials to log onto your Admin Panel. If you ordered a Fonality system with analog interfaces, yellow phone cables are included with the system. These cables are custom and required for installation and are specific to your Fonality analog card. *Do not discard them*. 2.3 Visual Inspection Take a moment to open the system case and look at the components inside. Components can sometimes shake loose during shipping. Verify all PCI cards and memory modules are properly seated and securely fastened. When you are finished, close the case and proceed with system installation. Figure 2.3.1 illustrates the location of PCI slots. FIGURE 2.3.1 7 3.0 Installation – Let’s Get Started! 3.1 Ideal Phone System Location Installing your Fonality Phone System in the appropriate location on your network will ensure optimal system performance. The Fonality Phone System should be placed on the same LAN segment as your IP phones (excluding telecommuters) as described in Figure 3.1.1. FIGURE 3.1.1: Proper (top) and improper (bottom) placement of a Fonality server on an example network 3.2 Configuring Network Settings Before you boot your Fonality Phone System, you will need to configure your network settings. A static IP address should be manually assigned to the Phone System to avoid unexpected IP address changes that may result in a loss of connectivity. You should avoid DHCP. CAUTION: Failure to use a DHCP reservation or a static IP address for your Fonality Phone System can result in the IP address of the server changing unexpectedly, interrupting the connection between your server and your IP phones. You will be unable to make or receive calls during this time. 8 3.2.1 Identifying an Available IP Address To set a static IP address, first identify an IP address outside the range of IP addresses assigned by your DHCP server. This range is known as the ”DHCP Scope”. 3.2.2 Obtaining Additional Network Information Once an IP address has been identified, confirm that you have all the required network information: Subnet Mask – The subnet mask defines the network and host portions of your IP address. For example, the default Class C subnet mask is 255.255.255.0. Default Gateway– The default gateway allows communication to travel from one network or subnet to another. A default gateway is usually the IP address of a router or firewall. Network Address– A network address defines the IP address of your entire network. It is usually the first IP address on a given network or subnet. A typical Class C network address is 192.168.1.0. Broadcast Address– A broadcast address is the IP address used to broadcast a message to every host on a given network. It is usually the last IP address on any given subnet. DNS Server– This server resolves fully qualified domain names to IP addresses. Local DNS Servers are the best option. Public DNS servers reside on the Internet. One example for the public IP address of a DNS Server is 4.2.2.1. IP Address Subnet Mask Default Gateway Network Address Broadcast Address 192.168.1.190 255.255.255.0 192.168.1.1 192.168.1.0 192.168.1.255 The network configuration example on the left is for informational purposes only. 3.2.3 Availability of DNS Service If your network does not have a functional DNS server, or the DNS configuration manually programmed into the Fonality Phone System is invalid, the Fonality Phone System will not be able to connect to Fonality’s Data Center. You can resolve this issue by using the IP address of a locally available DNS server or a public DNS server in your configuration (i.e. 4.2.2.2 or 4.2.2.1). Your phones must use the Fonality Phone System as their Primary DNS Server. Configure your DHCP server to distribute the IP address of the Fonality Phone System as the Primary DNS server. If you are unable to set the Fonality Phone System as the primary DNS server, your phones will not function properly. For in‐depth information regarding this requirement, please see the following article: http://learn.fonality.com/Primary_DNS_Server_Requirement 9 3.3 Powering On your System When you first power on your Fonality Phone System, make sure that a monitor, keyboard, and Ethernet cable with an active Internet connection are attached. Allow your Fonality Phone System to boot up until you see an ‘inactive’ prompt. Type ‘activate’ to continue. 3.4 Completing your Installation After entering your network settings, you will be prompted to enter your username and password. These are the Fonality Admin Panel credentials e‐mailed to you by Fonality. This will complete your activation and the configuration of your Fonality system. Once prompted to, press Enter to complete the installation. 3.5 Logging into the Admin Panel for the First Time From another PC with Internet access (DO NOT use your Fonality Phone System) connect to http://panel.fonality.com and log in using your Fonality Admin Panel credentials. If you see a Welcome Message, you are ready to proceed to the next step. Figure 3.5.1 illustrates a successful logon attempt. FIGURE 3.5.1: A successful login to Fonality’s Data Center 10 4.0 Connecting your IP Phones Once you confirm that your Fonality Phone System is properly connected to the Fonality Data Center, connect your IP phones to your network. By default, Fonality pre‐configures all phones to obtain an IP address via DHCP. **You must provision all IP phones on the same LAN as your Fonality Phone System. Failure to do so will keep your phones from working. Once you have auto‐provisioned your IP phones, they are ready to be used either on your LAN or remotely.** 4.1 Phone Provisioning Setup instructions differ between phone models. The following sections provide you with instructions on setting up your Aastra and Polycom phones. To ensure proper provisioning, you must place your phones on the same network as your Fonality Phone System. 4.1.1 Aastra Phone Provisioning When you first connect any Aastra phone to the same network as your Fonality Phone System, the Fonality system attempts to locate the phone, create an extension, create configuration files, and make the files available for download to the phone. If the phone fails to grab its configuration the first time, please reboot the phone once more. If this fails, please use the instructions below for the appropriate model of Aastra phone: Should you have any trouble registering an Aastra phone, please refer to the following wiki article for instructions about how to flash an Aastra phone: http://learn.fonality.com/Flashing_Your_Phone#Flashing_Aastra_Phones All of the Aastra model phones that Fonality sells are listed with phone‐specific instructions for flashing. Please pay careful attention to your Aastra phone model as the instructions will differ. 11 4.1.2 Polycom Phone Provisioning Other than the Polycom IP4000 which needs to be manually provisioned with the instructions below, when you first plug in your Polycom IP phones, the Fonality Phone System attempts to locate the phone, create an extension, create configuration files, and make the files available for download by the phone. If the phone fails to grab its configuration the first time, please reboot the phone once more. If this fails, please use the instructions below for your Polycom phone(s): Polycom IP4000 Manual Provision Instructions 1) Press "Menu" 2) Use the arrows to highlight "Settings" and press "Select" 3) Use the arrows to highlight "Advanced" and press "Select" 4) Enter password “456” and press “Select” 5) Use the arrows to highlight "Admin settings" and press "Select" 6) Use the arrows to highlight "Network configuration" and press "Select" 7) Use the arrows to highlight "Server menu" and press "Select" 8) Use the arrows to highlight "Server address" and press "Select" 9) Press "1/A/a" 10) Set the IP address to <FONALITY SERVER INTERNAL IP>, use * for "." 11) Press "Select" 12) Press "exit" 13) Press "exit" 14) Use the arrows to highlight "Save Config" and press "Select" 15) Press "exit" until you reach the default display showing the time 19) Remove the cable from the phone 20) Plug the cable back in 12 4.1.3 Installing Softphones Softphones are software clients installed on a computer that can function as regular desk phones. If you purchased softphone licenses with your Fonality Phone System, please use the following instructions to register the softphone with your Fonality system: 1) Log into the Fonality Admin Web Interface at http://panel.fonality.com using your server’s administrative username and password 2) Hover over the "Extensions" tab and click on "devices" in the sub‐menu 3) Select "Fonality Softphone" from the Vendor drop‐down. You will notice that the MAC field is auto‐populated with "SOFTPHONE” 4) Now, click "Add Device". Assuming you have enough licenses to add this device, you will now see it in the table at the bottom of the page 5) Make a note of the SIP username (SOFTPHONE*) 6) Next, click the “Extensions” tab, and locate the extension you want to change. Click on the extension number and make note of the User Panel username (and password if you know it). If you wish to add this softphone for a new user, click "add extension" instead of viewing an existing extension 7) Now that you're either editing an existing extension or creating a new one, locate the "Phones/Devices" drop‐down menu. It is the last setting in the "Viewing extension" box to the top‐left. Set the “Phones/Devices” selection to the device that you just added (it will be the same name as the one you noted in step “5” 8) Click “Apply all changes” once you have selected all of your desired settings. This will associate your new softphone with this extension 9) Run the Fonality softphone installer. You can also can find it at: http://panel.fonality.com/softphone 10) When the program starts, you will be asked to enter your username and password. At the “Login Username” prompt enter the setting you used for the “Web Username” (User Panel username) in step 6. 11) After your username and password is validated, you will be asked to enter your softphone license key. This key was e‐mailed to you when you purchased your Fonality Softphone 12) When you complete the installation wizard, your phone will be fully configured with the correct extension and device information **Please note, the softphone is supported neither natively nor emulated on Mac OS X.** 13 4.2 Remote Phones Your Fonality system supports remote IP phones that work and act exactly like phones on the LAN. However, before you start using your IP phones remotely, you must first plug in the phones on the same LAN as your Fonality Phone System so they can download their configuration files. Fonality recommends that you place your Fonality Phone System on your firewall’s DMZ port either physically or via an administrative setting within your firewall. Registering remote phones with your Fonality system requires the following changes: 1. The Server Address on the phone must be changed from sNNNN.pbx.fonality.com to sNNNNx.pbx.fonality.com. 2. The following ports must be opened if your Fonality Phone System sits behind a firewall: a. UDP 5060 (for registration) b. UDP 10000‐20000 (for RTP audio) Detailed instructions for each type of supported IP phone can be found at: http://learn.fonality.com/Setting_Up_Remote_Phones 4.3 Testing IP Phones Verify that each phone can communicate with the Fonality Phone System by lifting the handset and dialing ”0”. You should hear the default auto attendant greeting. This is the same greeting your callers will hear when your Fonality Phone System answers incoming calls. You can see the status of each IP phone using the Extensions tab in the Fonality Admin Panel. View the IP address of each registered phone by ”mousing‐over” the pulsing, green icon. If the icon is flashing red, the phone will not be able to place or receive calls. 4.4 Supported IP Phones The Fonality Phone System only supports IP phones qualified by Fonality and sold by Dell. You cannot provision “used” or “new” IP phones or phones from a previous phone system or another vendor. This limitation exists in order to ensure compatibility today and for all future upgrades to the Fonality Phone System. 14 5.0 Connecting your Trunks Trunks can be any of: Analog lines, PRI, or a T1 with a SIP connection. Details of each type are briefly discussed below: 5.0.1 SIP & IAX2: Pure Voice‐over‐IP SIP trunks are available in most areas of the country from a variety of reputable companies. IAX2 is another VoIP protocol available from many of the same providers who sell SIP services. If possible, please have your prospective SIP/IAX2 provider perform quality tests with you before committing to a contract. Fonality Phone Systems are compatible with nearly all SIP provider services. 5.0.2 PRI: Voice T1 PRIs can be leased from any number of telecom companies. PRIs are “Voice T1” connections that have been provisioned with a standard 23 voice channels and 1 data/signaling channel (North America only). PRIs offer superior voice quality and features like Caller ID. 5.0.3 Analog Lines – Old Friends Analog trunks are, of course, the most common type of connection to the PSTN (Public Switched Telephone Network). The Fonality Phone System works with all standard analog circuits. 5.2 Connecting Analog lines You should now connect all analog lines to the analog line ports on the back of your Fonality Phone System. Be sure to use the colored analog line cables provided with your Fonality Phone System. Normal analog phone cables will not work. 15 5.2.1 Connecting your Analog Phones WARNING! Please make sure that you review all documentation and pictures before connecting any devices, or phone lines, to your Dell / Fonality Phone System as you might damage your hardware if not done properly. If you are using Analog phone lines, and you purchased a Dell bundle with an Analog port card, please make sure to plug the custom analog cables that shipped with your Fonality Phone System into the ports lighted RED. If you purchased an FXS port card bundle from Dell, and you are plugging in your analog phones, overhead paging system, or a fax machine, please plug these devices into GREEN ports only. Figure 5.2.1.1 Demonstrates connecting analog lines and analog phones to the Sangoma card 5.2.2 Connecting Analog Lines in the Correct Order! When connecting analog phone lines to your system, you must connect them in reverse hunting order. Connect your busiest incoming lines to your highest port numbers. The Fonality Phone System dials out from the lowest port numbers first. Failure to connect your lines properly may result in placing an outbound call at the same time an inbound call arrives. 5.2.3 Vacant Phone Line Ports will cause Problems Do not leave any analog phone ports vacant. Problems will arise when you try to dial out if all other lines are busy. You will hear your own voice echo back to you and your call will not connect. To deactivate vacant ports, use the Options cards page in the Fonality Admin Panel, or contact Support by following the instructions outlined in Section 10. 16 5.3 Faxing (optional) If you would like to use your Fonality Phone System for faxing, there are a couple of important points you need to know: 1. In order to fax, you must have an Analog card a. T1/PRI card b. Analog card with GREEN lighted ports (when powered) 2. You must specify in the Options cards page which analog ports are ‘fax’ ports. 3. Each fax machine must be configured on your Fonality Phone System as an extension. 4. You must configure ‘go to submenu/extension by number dialed’ to point your fax number at your fax port via the appropriate extension. Fax ports will light up green on the back of your Fonality Phone System. Do not connect any other type of analog device to green ports. Reliable faxing requires a very efficient timing source. Your Fonality Phone System gets internal timing from the T1/PRI card. The analog card installed for faxing has been specially configured to connect to the T1/PRI card via a jumper cable. For this reason, the T1/PRI card must be installed in the first PCI/PCIe slot and the analog card installed in the second PCI/PCIe slot. Fax ports are unique and cannot be configured as any other type of port (e.g. analog phone or overhead paging system). Please refer to Figure 5.2.1.1 when connecting your fax machines and analog phones to a fax‐ready Fonality Phone System. 17 5.4 Connecting T1 Lines If you ordered a T1 card, it is preconfigured to use the most common T1 settings. However, the configuration options may need to be changed depending on the configuration of your carrier. Obtain a cut sheet from your carrier and make sure that the configuration settings in the Fonality Admin Panel match that of your carrier. You can configure your T1 card in the Options cards page of the Fonality Admin Panel. 5.5 Setting up VoIP Accounts If you have an account with a 3rd party VoIP provider, you will need to use the Options VoIP page of the Fonality Admin Panel to configure the VoIP trunk. Many VoIP providers have templates with default settings pre‐configured located in the “Provider” drop down menu. FIGURE 5.4.1 The VoIP Trunk page. Many providers are listed in the drop‐down 18 5.5 Verifying Connectivity Once you have setup your trunks, you can verify connectivity by viewing the Status trunks page of the Fonality Admin Panel. You will see each of your cards and their status. You can “mouse‐over” each connection to see its status. FIGURE 5.5.1 Single T1 Line and two Analog Cards connected to a Fonality system 19 6.0 Welcome to the Admin Panel 6.1 Getting Acquainted You can now log into the Fonality Admin Panel. Administer your system anywhere, anytime, using your Fonality Admin credentials at http://panel.fonality.com When you first begin using your Fonality Phone System, please review the customer information under Options customer. Fill in all fields completely. Fonality needs to maintain current, accurate contact information to provide you with information about product upgrades and announcements. Figure 6.1.1 illustrates the Customer Screen: FIGURE 6.1.1: Please keep your information current by updating your company information on the customer screen. 20 6.2. Help Mode The Fonality Admin Panel offers cursor rollover assistance. Simply mouse‐over any item to launch a brief explanation in a small pop‐up. This feature can also be turned off in the options tab. FIGURE 6.2.1:An example of the Help Mode functionality of the Admin Panel. 6.3 Call Menus The Auto Attendant answers all calls placed to your Fonality Phone System by default. The auto attendant allows you to configure how your Fonality Phone System answers each call. Use the Fonality Admin Panel to adjust your call menu configuration. To modify the Auto Attendant, login to the Admin Panel and click on AutoAnswer edit call menu. 21 6.4 Dial Plans Depending on the dialing requirements in your country or state, the dialing plan in your Fonality Phone System may need to be modified. For example, if you need to use 10 digits to dial local numbers instead of 7, you will need to adjust your dial plan accordingly. Use the Fonality Admin Panel to adjust the dial plan inside your Fonality Phone System. Click on the Options tab and select ”dial plan”. You can adjust these settings to match the dialing requirements for your local phone company. You can also indicate how each type of call should be routed by using the ”Route” drop down. FIGURE 6.4.1: The Dial Plan Configuration Screen. 6.5 Scheduler If you plan to use time‐based menus with your Fonality system, refer to the following document to avoid unexpected results. http://learn.fonality.com/index.php/Building‐Schedules 22 6.6 Blast Groups The Fonality system contains a feature called “Blast Groups” that allow a call to ring multiple phones simultaneously. All phones stop ringing as soon as somebody answers the call. You can configure the system to play music‐on‐hold or ringing to the caller while they wait. Each Fonality Phone System includes one Blast Group. Additional groups cannot be added. You can add phones to the blast group on an extension‐by‐extension basis in the Extensions view extensions page in the Fonality Admin Panel. For each extension you want to include in the Blast Group, edit the extension and enable the ”In Blast Group” option. You can quickly see who is in the Blast Group on the view extensions page by reviewing the ”Blast” column. 6.7 Conference Bridges You can use the conference bridge feature from the Call Menu in the Fonality Admin Panel under the tab labeled ”AutoAnswer”. You can choose to password‐protect these conference bridges (Enterprise and Call Center only) by adding ”Enter Password to Continue” from the ”Add New Sequence” menu at the lower‐left. A password‐protected conference bridge is shown below. FIGURE 6.7.1: The Conference Bridge feature in the Admin Panel Conference bridges are custom pre‐defined extensions that any number of users can call to connect with each other. **Please note that Fonality Small Office does not include any conference bridges. However, Fonality Enterprise includes 3 Conference Bridges at extensions 8505, 8506, and 8507, and Fonality Call Center includes 5 Conference Bridges at extensions 8505, 8506, 8507, 8508, and 8509.** 23 6.8 Call Forwarding & FindMe with Boomerang Mobile You can use the regular call forwarding feature to forward calls to another extension or to an off‐ network phone (like your cell or home phone). You can enable this feature by: 1. Once logged into the Fonality User Panel, click on the Features tab 2. Set the Call Forwarding option to “Enabled” 3. Specify the amount of time the call should ring the extension before forwarding the call to its final destination FIGURE 6.8.1: Fonality User Panel for setting up forwarding FIGURE 6.8.2: A forwarding extension When a user’s extension is forwarding, you will see a red check mark in the last column on the ”view extensions” page as in the example above. You can also take advantage of Fonality’s FindMe with Boomerang Mobile technology in order to create custom rules that the Fonality Phone System follows when you are not at your desk. FindMe options appear in the Features tab (pictured below). When you setup FindMe for the first time, some call sequence steps are assumed such as “notify the caller I’m being located”. You can change your FindMe settings at any time and add a virtually unlimited number of steps if you choose. 24 To change your FindMe settings, select a different option from any of the drop-down menus shown. If you would like to add a step, click “Add” and the step appears at the bottom of the list. Please pay careful attention to which steps say “And then:” and which steps say “At the same time:”. Certain actions cannot be performed at the same time as other actions. FindMe also includes a White List and a VIP List that enhance the overall functionality of this technology. Using the White List, you can configure exactly who is able to find you. Using the VIP list, if you decide to use FindMe in conjunction with a business-week schedule, your VIPs are able to find you at any time of day or night. FIGURE 6.8.3: Default FindMe Settings. 25 FIGURE 6.8.4: FindMe’s White List and VIP List. 26 7.0 Fonality Call Center: Advanced Features Fonality Call Center brings the power of a traditional Call Center to your Phone System. From the ACD tab, you can create new queues, view call reports, and configure the system to automatically record inbound queue calls for later review. The following screen shots show three powerful features included with Fonality Call Center. FIGURE 7.0.1: View your queues. See who is online and who is away from their desk. Login users with a click of your mouse. 27 FIGURE 7.0.2: View accurate call reports by queue, agent, Complete vs. Abandoned, and many more! FIGURE 7.0.3: Automatically record incoming queue calls per agent. Select the user, file type, and number of calls to record and you’re good to go. 28 8.0 User Panel The Fonality User Panel allows individual users to monitor and control the options associated with their phones. The User Panel interface does not allow them system‐wide administrative access of any kind. You can give users rights to use the Fonality User Panel within the Fonality Admin Panel by clicking the extensions tab and selecting the extension. You can then set the ”Web Username” and ”Web Password” for this user. The user will then be able to log into the Fonality User Panel with the credentials you’ve configured at: http://panel.fonality.com FIGURE 8.0.1: A basic view of the Fonality User Panel 29 9.0 Getting Started with HUD HUD is a visual operator switchboard for every member of your company. Through HUD, employees can call, instant message, and view the call status of their peers making inter‐office communication highly efficient. Before using the HUD application, familiarize yourself with HUD rights and configuration options. 9.1 Disabling HUD for Extensions (Optional) WARNING: By default, all extensions are ”in HUD”. Your users will be able to log into HUD, using their username and password assigned to their extension, unless you disable this option in the user’s extensions page. Begin by logging into the Fonality Admin Panel. Once you are logged in, click on the “Extensions” tab. For each extension you want to remove from HUD, edit the extension and disable the “In HUD” option by setting it to ”no”. See which users are ”in HUD” on the ”view extensions” page. Users ”in HUD” have a red checkmark under ”in HUD”. 9.2 HUD Rights This feature is available only for customers who have purchased Fonality Call Center or Fonality Enterprise. 9.2.1. Understanding Rights Extension numbers belong to groups. While Fonality provides default groups, we suggest you create groups that represent the departments in your company (sales, support, managers, etc.). Once you define your own groups, and add extensions (users) to them, you can assign rights to each group. Every member of the group gets the same rights. 9.2.2 Configuring Rights in HUD The ”Rights” assigned to each extension determine what HUD features are available to users. Allow your managers to ”barge” (listen in) to employee calls. Don’t allow agents to record the calls of other agents. It’s entirely up to you. Configure rights by group using the ”groups” submenu under the ”Extensions” tab in the Fonality Admin Panel. 9.3 Installing HUD You will need to install the HUD client application on each employee’s computer for every user marked ”in HUD”. To install HUD, go to http://app.fonality.com and enter your Fonality Admin Username. 30 10.0 Installation Appointment Fonality REQUIRES that you follow this guide carefully in its entirety. Once you’ve completed installation, you’re ready for an installation appointment. During your appointment, we will schedule one of our installation specialists to answer any remaining questions you have about your Fonality system. You should have received an appointment request via email from the Fonality Installation Team when your Fonality Phone System was shipped. While Fonality strives to accommodate installation appointment requests with as little as 24‐hours notice, our schedules fill‐up quickly. We may require a waiting period of up to 5 business days. Plan ahead and request your appointment in advance to ensure that we can accommodate your schedule. Also, please keep in mind that while we consider installing the Fonality Phone System an easy process, Fonality and Dell have a wide network of third party installers who can manage the process for you. If interested, please contact your Dell sales representative for a price quote. 31 11.0 Fonality Support You can contact Fonality Support any time using the Fonality Support Portal (Supportal) at panel.fonality.com/support. You will need to enter your Fonality Admin Panel credentials, your full name, and your email address. Fonality will reply the same or next business day. Be sure to include a contact phone number where we can reach you. The Fonality Support Scope of Service is outlined in our Terms and Conditions, and is published on our web site: http://www.fonality.com/terms_and_conditions.html FIGURE 11.0.1: Use the Fonality Supportal to contact support 32 Congratulations! You have installed Fonality’s Award‐Winning Phone System! We look forward to speaking with you during your scheduled installation appointment. If you have any remaining questions or issues, be sure to take note of them so that our Installation Team can address them for you during your scheduled appointment. Be sure to read through our knowledgebase for supplemental information. It is consistently updated with new information as we release new versions of the Fonality system and HUD software packages. Our knowledgebase can be found at http://learn.fonality.com/ Fonality, Inc. 200 Corporate Pointe #350 Los Angeles, CA 90230 866‐366‐2548 support.fonality.com 33 12.0 Troubleshooting 12.1 Troubleshooting your Connection If the Fonality Data Center is unable to establish a connection to your Fonality Phone System, you may need to adjust your firewall configuration to allow outbound access to the following ports from the Fonality Phone System: TCP/80 TCP/8000 TCP/9000 UDP/53 • • • • If you are unable to establish a connection to Fonality’s Data Center using the information above, you should consider the following alternative configuration changes: • • Create a rule allowing the IP address of the Fonality Phone System to make an outbound connection to any host on any port. It may be necessary to reboot the Fonality Phone System with CTRL+ALT+DEL from the system console in order to reinitiate a new connection to the Fonality Data Center. IMPORTANT! If you have a Watchguard firewall, or any firewall that examines the data payload of TCP/IP packets, you may need to disable this functionality in your firewall for traffic originating from the Fonality Phone System. Contact your firewall vendor for details about how to accomplish this configuration. 12.2 Getting Rid of Echo If you hear an echo when using analog phone lines, don’t worry. This is normal when installing a new phone system. You may need to calibrate the echo cancellation inside the Phone System to eliminate echo. The following documents provide you with additional information to help start this process: http://learn.fonality.com/How_do_I_get_rid_of_echo http://learn.fonality.com/Static/Echo_on_outbound_call http://learn.fonality.com/Various_types_of_echo You can contact our support group using the instructions in Section 11 if you need additional assistance regarding echo. 34 13.0. Appendices 13.1 Use the IP Address Wizard (optional) After activation, you may change your IP address settings at any time with the “IP” menu. To do so, temporarily connect a keyboard and monitor to your Fonality Phone System and log in at the “login:” prompt using these case‐sensitive credentials. Note that your password is not displayed on your monitor. Username: ip Password: ip Select the “Set IP Address…” option from the menu. The wizard will display on the text screen. Follow its instructions to set the IP address using the information you gathered in section 3.4.2. Figures 13.1.1 and 13.1.2 give examples of setting the network configuration on a Fonality Phone System. NOTICE: By default, your Fonality Phone System will come configured via DHCP. You must change this configuration and assign your networking information statically. Network Config/Troubleshooter 1. Set IP Address of this system 2. Show IP Address of this system 3. Run the PING utility 4. Run the TRACEROUTE utility 5. Display the DNS Nameserver configuration 6. Display the route table 7. Display the ARP table 8. Show Analog Phone Line voltage levels 9. Show T1 Status 10. Show Active Calls 11. Set 'root' password 12. Reboot system 13. Re-scan for PSTN cards 14. Scan for new phones FIGURE 13.1.1: This is the network configuration menu on your Fonality phone system Q. Quit and exit this tool 35 FIGURE 13.1.2 The output above is the actual output that you will see when choosing option 2 from the Troubleshooting menu. The ‘inet addr:’ is the internal IP address of the Fonality system. 36 13.2 Additional Articles Available Online: Networking Primary DNS Server Requirement http://learn.fonality.com/Primary_DNS_Server_Requirement Planning Your Network for VoIP http://learn.fonality.com/Planning_Your_Network_for_VoIP Setting Up Remote Phones http://learn.fonality.com/Setting_Up_Remote_Phones Suggested Routers http://learn.fonality.com/Suggested_Routers How‐To Setting Caller‐ID http://learn.fonality.com/Setting_Caller‐ID How to change Caller‐ID Information: http://learn.fonality.com/How_to_change_Caller‐ID_Information How to use Call Queues http://learn.fonality.com/How_to_use_Call_Queues How to add multiple Auto‐Attendants http://learn.fonality.com/How_to_add_multiple_Auto‐Attendants How to change extension numbers http://learn.fonality.com/How_to_change_extension_numbers How do I change the volume level? http://learn.fonality.com/How_do_I_change_the_volume_level Other Tips for security and Performance http://learn.fonality.com/Tips_for_security_and_Performance Fonality System and 911 http://learn.fonality.com/Fonality_System_and_911 GPL Software Notice Some portions of the Dell Fonality system are open source software licensed under the General Public License (GPL) or other open source license. The source code for all open source software is available for download, free of charge, at http://yum.trixbox.com/centos/4/fonality/SRPMS/ DLM080718 37