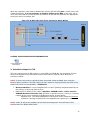
1
U-verse IPDSL HSIA with cVoIP: New Project is being deployed in early 4th quarter 2011 to add U-verse Voice to existing HSIA IP-DSL consumer customers across the 22 state footprint. Voice offering will include the same features and product capabilities as AT&T U-verse Voice, excluding TV Interactive capabilities (e.g., Caller ID on TV). There will be 2 suppliers for the CPE. A single box solution that will need a Belkin Battery Back Up (BBU). The two devices are: Motorola - NVG510 – Sole Device CPE Battery Backup – BBU – for VoIP Pace/2Wire – 5111NV IMPORTANT: This Pace 5111NV device will not be fully launched until end of 2012 This service will be based on the use of the Motorola NVG510 gateways. This model supports high speed internet access (HSIA) and VoIP, but not IPTV. An existing HSIA over IP-DSL customer, currently using a 2Wire/Pace 2701 gateway or a Motorola 2210 modem, who wants to add CVoIP will be required to upgrade to the Motorola NVG510 gateway. The will be provided with a battery backup (BBU) which will supply backup power to the gateway during an A/C power outage. The BBU is only intended to support the continued operation of CVoIP for the specified number of hours. 1.1. IP DSL CVoIP Network Architecture The diagram below shows how a CVoIP over IPDSLAM customer is connected to the CVoIP IMS platform via the ADSL network. The diagram also shows the difference between voice and CVoIP over IPDSLAM. As shown, the difference is where the serving IPDSLAMs are located. For CVoIP over IPDSLAM service, the IPDSLAMs are located in the central office. We currently have not launched in IP-DSL RT areas. Below is a diagram that shows the differences between VDSL (on bottom Left) and IP-DSL HSIA/VoIP (bottom right) Figure 19.IPDSL - VoIP Network 1 1.2. IP DSL CVoIP Service Features Service features will mirror the current U-verse Voice over VDSL service. This means that the same features available to U-verse Voice (VDSL) customers will generally be available to the CVoIP over IP-DSL customers with the exception of TV integration. The following features integrated with U-verse IP TV will not be available to CVoIP over IDPSLAM subscribers: Call Logs and Click-to-Call on IPTV Caller ID on IPTV Message Waiting Indication (MWI) on IPTV For customers with special accessibility needs including vision, hearing, mobility and speech concerns, the following considerations are currently supported on U-verse Voice and will be extended to CVoIP over IP-DSL subscribers: Directory and Operator Assistance Exemption TDD/TTY support Web portal compatibility with common screen readers (JAWS etc.) Integration and support of 711 Relay Service The installation process will be the same as for U-verse Voice. Customer self install (CSI) will be the primary method of installation. Customers will be able to select a full tech install for a fee. This product allows customers in an IPDSLAM footprint to order CVoIP with HSIA (new provide) or add cVOIP to an existing HSIA service (change order). If a CPE swap is required, follow the BAU CPE Swap Process for IP-DSL outlined in this document. 1.3. IP DSL Speed and VoIP Line Matrix At the launch of this product, CVoIP service will be provided to the customers only based on the HSIA speed tier subscribed to by the customer, not by the actual HSIA bandwidth available to the customer. CVoIP service will be offered to IPDSL/HSIA service customers in the following configurations. VoIP service will not be available on Basic and Express HSIA Speeds.(less than 3meg) HSIA SPEED Downstream and Upstream speeds Maximum CVoIP lines offered Pro 1568 – 3008 kbps X 384 – 512 kbps 1 Elite 3104 – 6016 kbps X 512 – 768 kbps 2 Max 6.112– 12.0 Mbps X 512 – 1024kbps 2 Max Plus 12.128 – 18.016M X 512 – 1024kbps 2 2 Max Turbo (24Mbps) will be available only after bonded pair service is available. Bonded Pair service will be offered a maximum of 2 CVoIP lines. (Tentative sometime in 2013) 1.3.1. Troubleshooting CVoIP Service - Maintenance Tickets CVoIP is not available bundled with any speed tier below 3M – that means Express (1.5M) or Basic (768k). If the technician cannot establish VoIP on the requested speed and has tested the possibility of lower speeds and the minimum threshold for Pro service cannot be installed, the technician is supposed to downgrade (with customer consent) to Express or Basic. Since a customer cannot have CVoIP below Pro HSIA speed, the technician would also need to cancel or adjust VoIP lines on the CVoIP portion of the order depending on the service determination by calling the OMC at 1-888-525-1971. Failed Self Install billing rates are the same as current IPDSL. 1.3.2. Troubleshooting CVoIP Service - Helper Ticket NOTE: RUN TESTS (NHQC TESTING MATRIX) AND CALL BEFORE CLOSE: National Helper Ticket Quality Center (NHQC) In an effort to drive quality service for our customers, CORE IM technicians working on U-verse BANs will call the National Helper Ticket Quality Center (NHQC) at 888-901-4324 prior to close. The purpose of this call is to verify that a clean circuit is handed off to the UFO organization through Lightspeed Broadband Tools (LSBBT) testing. CORE IM technicians in all regions (MW, SW, SE, and W) will be required to call when closing any Helper Ticket or Dash-O order with the exception of FTTP Dash-O orders. This includes IP DSL Helper Tickets. ECOCOMP technicians need to run the LSBBT Tests first, then need to call NHQC prior to JEPPING any job. Prior to calling the NHQC, technicians will be expected to run required LSBBT tests. Due to the evolving technology of the U-verse circuit, these required tests can change periodically. Below are the current testing expectations for the CORE IM technicians before contacting the NHQC. Link to the LSBBT NHQC test information: NHQC LSBBT Testing IMPORTANT!!! To enable the links within the document, REVIEW IN FULL SCREEN MODE!! 1.3.3. Enabling the ATA Port when installing CVoIP (if it becomes necessary) NOTE: This is for Consumer customers only. If you cannot get all GREEN lights on a CVoIP Install, check which version firmware your modem is on. Firmware version can be seen in the GUI when plugged into a PC. Firmware version should be displayed in the top right corner of the GUI web page. If it is the D34 version, it is suppose to auto-update to the CVoIP enabled D48 or LYRA firmware automatically. Sometimes this update will not initiate. Reboot the RG to see if that initiates the upgrade. If not, swap the RG and mark the original as Defective for return. Then you will likely have to perform an ATA Enable in SCANR to get dial tone to the RG. See below for instructions on how to enable the ATA. Analogue Terminal Adapter (ATA) connects an analogue telephone to a VoIP network. It is sometimes referred to as VoIP Gateways, or TA (Terminal Adapter). It is usually enabled by default. But if you are not getting dial tone out of the ATA Port(s) and the ATA GUI field is disabled (grayed out) on the gateway, Follow the steps below for each telephone number that is not enabled. It is not necessary to call Care to enable the ATA port! 3 Steps to activate the ATA port (if it becomes necessary) Step 1: From the home screen of SCANR, click the drop down for U-verse Voice under the Related Troubleshooting Utilities heading. Then Click ATA Enable Disable. Figure 20.Enable ATA - Step 1 Step 2: On the next screen, ensure you have the correct phone number and click the enable option. Figure 21.Enable ATA Step - 2 Step 3: After you have enabled the ATA, you will get a confirmation screen. Click the Exit button, and test the customer’s phone line. Figure 22.Enable ATA Step - 3 4 1.4. Restrictions & Exceptions Due to DSL bandwidth limitations, some customers may not be offered service, and some may be offered only one VoIP line. Customers with Monitored Home Alarms will not be allowed to order CSI installation. The service will not be offered to AT&T HSIA customers who are served by ATM based DSLAMs. Due to E911 complexities, this service will be offered only for in-home use where the AT&T DSL connectivity is delivered. CPE cannot be transferred to any other location without having IPDSL connected. CVoIP will not be available in 100% of the IPDSLAM footprint, because of the following special condition: Areas where full E911 support is not provided by the local Public Safety Answering Point (PSAP). Preliminary feedback shows approximately 30 CLLIs meet this condition, impacting fewer than 50K Living Units. This number is subject to change IP-DSL CPE Devices CANNOT be placed into Bridge Mode 1.5. Identifying the IPDSL VoIP Order The UVDC manages the JEPs in the Premises Technician areas and the NDC manages the JEPS in the CIM areas. The 4th character of the job type indicates the type of IPDSLAM and the tech type. Details are provided below: F CIM Tech area with no VOIP on IPDSLAM W CIM Tech area with VOIP on IPDSLAM V ECO Tech area with VOIP on IPDSLAM 1.6. CPE Similar to the current U-verse Voice service, the CVoIP over IP-DSL service will be offered only for in-home use at the service location that the IPDSL connectivity is delivered to. A user can NOT disconnect the CPE from the DSL line at home, take the CPE to another location, connect it to another DSL line and attempt to obtain service. 1.6.1. The Motorola NVG510 Gateway 5 The Motorola NVG510 is a voice integrated 802.11n Wi-Fi gateway designed specifically for the delivery of Voice and Data services. The NVG510 combines an ADSL2+ modem, support for two FXS lines, a four-port 10/100 Ethernet switch, and 802.11b/g/n Wi-Fi radio, as listed below: PID # 316110352 KIT – AIM – 9 States: ADSL2/2+ WAN, RJ-11 802.11g/b/n Wi-Fi Four-Port 10/100 Ethernet Switch, RJ-45 Two-Port Voice FXS , RJ-14 Below are the front and back views of the Motorola NVG510 gateway. Figure 23.IPDSL - VoIP Moto 510.bmp The Motorola NVG510 gateway will also be managed by the 2Wire/Pace CMS management system. CMS 3.X is required for this service. The Motorola NVG510 will also support IPv6 rapid deployment (i.e. 6rd). For detailed information on this device click on the link below to review the Motorola NVG510 Installation Guide: NVG510 Wireless Gateway Installation Guide.pdf ISSUE WITH NVG510 REDIRECT PAGE: When the message is displayed, there is almost always a valid reason. The filter detection is based on the impact an unfiltered device has on the broadband capacity of the loop. The device has no knowledge of what rate the customer has subscribed to. EXAMPLE: The DSL line may be capable of 8 meg, but due to an unfiltered device, it can only get 4 meg. This would be noticeable to a 6 meg customer and not for a 3 or 1.5 meg customer, but the redirect message will still be displayed. However, there are known issues listed below that are associated with the Redirect Page. 6 Issue with NVG510 Redirect Page.pdf 1.6.2. Belkin Battery Back Up The CPE for IPDSL VoIP will need Battery Backup to continue to operate and support the CVoIP service during an A/C power outage. The current plan is to use the same BBU as deployed in the U-verse Voice service today. The power supply and battery are provided to the customer at no additional charge. After installation, it is the customers responsibility to maintain it. We currently use the Belkin battery backup unit revision B (BBU Rev B), which uses a 2-prong A/C plug. PID INFORMATION: Belkin RG CVOIP BATTERY BACKUP 12V 310122031. A picture of the Belkin BBU Rev B is shown below. Figure 24.IPDSL - VoIP BBU.bmp When installing the BBU, an extension cord can be used to reach an electrical outlet; however, do not use a power strip or a surge protector for these units. It is the customer’s responsibility to contact Belkin International at 866 539 5791 if problems arise after installation or for sealed lead battery replacement or recycling. This information is provided in the Belkin User’s manual that MUST be left with the customer upon installation. The user’s manual also contains troubleshooting information. Below is a diagram of all the connections to the CPE with the BBU included: Figure 25.IPDSL - VoIP BBU Connections.gif 7 STEP 1: INITIAL SET UP 1. Connect the green data cable from the Wireless Gateway’s DSL Broadband port to the wall jack. 2. Connect the yellow Ethernet cable from the Wireless Gateway’s Ethernet port to the computer’s Ethernet port. 3. Connect the Battery Backup Unit (BBU) to the Wireless Gateway’s Power port. Plug the BBU into a standard electrical outlet only. Wait until step 2 to power up the BBU. NOTE: Initial setup requires physically connecting the Ethernet cable to the computer. After registering the service in step 3, you can enable wireless connectivity. 4. Plug one end of the phone cable into the Wireless Gateway’s Phone Lines 1 & 2 port and the other end into a standard phone or cordless base station. STEP 2: POWER UP 1. Move the switch on the back of the BBU to the “on” position. Note: The BBU must be charged to be fully operational; however, installation of the service may continue while charging the BBU. When the BBU is first plugged in, it may emit a beeping sound. Charging the BBU will take approximately 18 hours. 2. The Wireless Gateway is now powering up. During this time, the Broadband light will turn red. Wait up to five minutes for the indicator lights for Broadband and Service to turn solid green and the Ethernet indicator light to start blinking green. During this time, do not unplug the BBU or green data cable, as this can damage the Gateway. 3. If the Broadband and Service lights do not turn solid green after 10 minutes, verify that all of your inside wiring and connections to CPE are good. If all connections and wiring are good, power down and power up the equipment. Be sure to shut down the customer’s computer, and unplug the Battery Backup Unit and any other devices from the back of the Gateway. Wait 15 seconds and then plug devices back in, making sure the Gateway’s Power light is on. You should see a solid green Power light indicating a successful power connection (if the light is not on, try another electrical outlet). Then turn the computer back on. IMPORTANT: You will have a dial tone after completing this POWER UP section, but will only be able to make emergency and toll-free calls until you activate your service in the final step 8 STEP 3: ACTIVATION NOTE: You must complete both activation steps in order to activate the customers Internet and Voice services. 1. To activate high-speed Internet: Open an Internet browser (e.g., Internet Explorer®, Safari®, etc.). The online registration process will start automatically to assist in activating the Internet and Voice services. If it does not, enter lsreg.att.net into the address bar. Continue with online registration using the customer’s 4-digit passcode they created when the customer placed the order. A copy of this 4 digit passcode was mailed to the customer separately. NOTE: If the customer does not recall the 4 digit PIN or has lost the letter with the PIN, technicians can access SCANR https://scanr-g.it.att.com/isaac to find the customers PIN. 2. To activate the Voice service so the customer can make calls dial the phone number displayed during the online registration process. Whole Home wiring will be addressed later in this document. o Customer Voice Activation Number: (For CSI customers) - 1.877.377.0016 o Technician Voice Activation Number: 1.866.315.5832 IMPORTANT: You will have a dial tone, but will only be able to make emergency and toll-free calls until you activate the customers service by calling the number listed in this step. STEP 4: ADDING WIRELESS DEVICES This information for the customer to add wireless devices is on the side of the Wireless Gateway. The Network Name consists of “ATT” plus the last three digits of the Gateway’s serial number. Be sure to advise the customer to record this information somewhere safe. The Steps to configure a wireless device are listed below. 1. 2. 3. 4. Go to the computer’s “Wireless Network Settings” and refresh the network list. Select the correct Network Name (SSID) from the list. You may need to scroll through the list to find the correct SSID Enter the 10-digit Wireless Network Key (WPA) in the Password field to connect to the network. Technicians can provide the customer with two PC connections (wired or wireless). Additional PC connections that have not previously been connected will incur a charge of $55.00 each per additional AT&T PC outlet or wireless adapter. Anything over 2 would require billing or a ConnecTech technician visit. 1.6.3. Inside Wiring The Preferred inside wiring would be CAT5 wiring but CAT3 is acceptable. A Homerun wire should be run to the CPE in order to assure that the customer has a quality installation and service. Providing a Home Run will also make it easier for the technician or the customer to reuse the inhome wiring to distribute the CVoIP service throughout the home. All inside distributive voice wiring MUST BE ISOLATED from the home run feed to the CPE. Therefore the Primary pair that is already terminated to the customer phone jacks can be easily back fed from the jack at the CPE 9 location. If the customer has a POTS line as the primary residential line, the technician should bill to rewire or run new wiring or jacks for the VoIP line. There are several different types of wiring scenarios: Series - Sometimes called Daisy Chain because it loops in and out of each jack Hub and Spoke - This is sometimes call Star wiring but there is an Indoor wiring panel or Jack where all IW's are terminated. Homerun - Homerun wiring goes from each jack out to the NID or terminal Figure 26.IPDSL - VoIP Wiring Scenarios U-verse VoIP wiring can be accomplished in the same way regular dial tone is distributed in the home. The only difference is that the source for the dial tone comes from the CPE. Plug an RJ11 cord into the line VoIP port. Plug the other end into the modular jack. Terminate a pair of wires in the Cat 5 to the modular jack that will feed back to the NID to be connected with other jack wiring or connect the other side of the wiring that distributes to the rest of the home. Ensure that the Homerun pair of wires you provided from the NID to the CPE is a different pair of wires with no other jacks connected to it. Dial Tone must be distributed throughout the house on a separate pair(s). Using an RJ-14 cord, you can distribute 2 phone lines (inner/outer pairs) throughout the home. If it is a single telephone line, an RJ-11 cord can be used. Connect the appropriate IW wiring at the jack to distribute U-verse Voice signal throughout the home. See diagram below for wiring details. IMPORTANT: If a technician is going to backfeed VoIP dial tone from the CPE Port into the jacks, be sure to disconnect the wiring at the NID TDM module and cap the ends so that the voltage from the VoIP wiring does not feed back into our network. Figure 27.IPDSL -Voip CPE. 10 See the section 1.8 below, “NID and Inside Wiring” for details on IPDSL Wring practices. NOTE: Rewiring of any existing jacks for the CVoIP service is billable. 1.7. Registration To activate high-speed Internet and register the customer, open any Internet browser (e.g., Internet Explorer®, Safari®, etc.). The online registration process will start automatically to assist in activating the Internet and Voice services. If it does not start, enter lsreg.att.net into the address bar. Continue with online registration using the customer’s 4-digit passcode they created when the customer placed the order. A copy of this 4 digit passcode was mailed to the customer separately. NOTE: If the customer does not recall the 4 digit PIN or has lost the letter with the PIN, technicians can access SCANR https://scanr-g.it.att.com/isaac to find the customers PIN. Technicians should make every effort to have the customer perform the registration on with the customers PC. However, if the customers PC is not available, registration can be done using the technicians Laptop however it must not be performed using the company LAN. Ensure that the customer can SURF the internet prior to leaving and that the registration was successful. – Complete ticket in GCAS 1.8. CVoIP Support Groups SUPPORT GROUP DESCRIPTION NUMBER Tier 2 For Troubleshooting and upstream issues and HSIA Speed downgrades. Changes to CPE – to amend the order, no surf troubleshooting issues 1- 855-525-1841 Use 4 Digit Code of the month Order Management Center (OMC) To execute order changes 1- 855-525-1971 UMLAC (GNAC) Facility issues 1- 866-341-2662 * Starting 3-11-13 New TN# 888509-9399 CRC Residential-requesting due date changes, cancel and re-issue, number or address corrections 1-800-928-6878 Business Cancel Desk CRC Business - requesting due date changes, cancel and re-issue, number or address corrections 1-855-435-7881 11 Customer Care If customer on CSI order advises they have not received their CPE they can overnight the CPE to the customer 1-800-288-2020 1.9. Setting Up Voice Mail (Informational Only) Setting up your AT&T U-verse MessagingSM voice mailbox only takes a few minutes. 1. Dial *98 from the customers home phone. 2. Follow the prompts to set up a mailbox. 3. After creating the PIN, be sure to have the customer set up an authentication code. This will allow them to reset your PIN over the phone if forgotten. When prompted to set up the PIN, the technician will hand the phone to the customer and let the customer set up the PIN. To protect the customer’s privacy, technicians will not have any knowledge of customer’s voicemail PIN. NOTE: Make certain the techs are handing the 911 stickers and the copy of the 911 Acknowledgement form to the customer. The User Guide is to be left with the customer as well. They will have dialtone (emergency only) 4. If customer requested voicemail, you will need to activate AT&T Voicemail Viewer software. 5. The customer must have an AT&T U-verse Voice account and AT&T U-verse Voicemail mailbox set up and activated (BAU for technicians) in order to use the VM Viewer application. 6. Adobe Flash Player is required for message playback. If the customer’s computer does not have Flash, go to http://get.adobe.com/flashplayer/to download and install the software on the computer. 7. The following operating systems and internet browsers are compatible: 8. Windows Vista with Internet Explorer 7, 8, 9 or with Firefox 4.0 and above 9. Windows 7 with Internet Explorer 8, 9 or with Firefox 4.0 and above 10. Mac OS X 10.6 and above with Safari 5.0 and above or Firefox 4.0 and above 11. Note: Windows XP and iGoogle are out of scope for field tech installation of VM Viewer 12. If customer does not remember the PIN or other Questions: 13. For security reasons, there is a limit to the number of login attempts allowed. If limit is exceeded, voicemail access through the gadget/widget and through the Web will lock temporarily. 14. Resetting U-verse Messaging PIN – refer to FAQ’s on: (Support): http://www.att.com/esupport/vmviewer/ 1.8. NID and Inside Wiring on Full Tech Installs (FTI) The technician should make a pre-call to the customer to verify arrival time and review the service order. At the customer’s location, greet the customer and locate the NID. Perform all hazardous voltage testing before working at the NID. Check to ensure that inside wiring is terminated properly. If the customer has POTS service, the technician can verify that there is dial tone on the wiring. Inside wiring that is terminated on a TDM module can remain in place. IPDSL modems for HSIA Speeds up to 6MB do not require a dedicated home run CAT5 wire; however, if faults are detected on the inside wire feeding the modem CIM should replace this wiring. If DSL filters are installed at any location where a telephone device exists, it will not 12 affect the performance of the modem. Without these DSL filters, the modem will emit a high pitched signal on the customer’s telephone service. A list of 'In Home” type filters are listed in the table below: PID Description Cost 400182028 DSL FILTER SINGLE LINE DSL Z-330PJ $0.01 400182044 DSL FILTER WALL MOUNT Wall Mount DSL Filter - Single Line $0.01 Note: Ordered via AIM – 9 States 1.9 HOME RUNS and NID SPLITTERS Customers with HSIA Speeds of 12 or 18MB must be installed with a home run dedicated pair of wires that do not multiple with any other locations. There must also be a NID Splitter installed on these 12/18MB services. The Benefits of this are listed below: Eliminating “inside bridged tap” will allow AT&T to serve customers who may be at longer loops. NID splitter isolates DSL Home Run from other possible bridged tap wires inside the premise Eliminates the use of multiple in-line filters which adds loop length The use of the Home Run ‘pair’ or IW and NID splitter helps achieve maximum effectiveness of the circuit Existing wire can be used as long as it does not bridge to other locations in the customers premise and is not “non-standard wire”. Home Runs and NID splitters can also be used for other HSIA speeds to improve customer service but are not mandatory. NOTE: If the customer does NOT have POTS, it is not necessary to install a NID Splitter. But it is highly recommended that you dedicate a single pair (Home Run) for the ADSL (IP DSL) signal to the Gateway CPE. Home Run is defined as the following: A pair in new CAT 5 wiring jacket (or existing CAT3 or better jacket) that runs directly from the NID to the jack serving the modem. This pair does not appear in any other jack and has no bridged tap in the home. A low-pass filter (commonly denoted as a NID splitter) mounted in, or adjacent to, the NID. The use of a micro filter here is not adequate, and the micro filter is not designed for use in a NID. All wire pairs, other than the wire pair extending to the jack serving the modem, are wired through the filter. The wire pair, extending to the jack serving the modem, is connected to the CO (protector) side of the filter. Most NID splitters have a built-in port for this connection. Below is a picture of the most commonly used NID Splitter. 95S-1-11. Figure 28.IPDSL NID Splitter 95S-1-11.gif 13 Data IDU that will be used for the home run to the modem IDU’s that can be used for POT’s connections Below is a wiring diagram for the most commonly used NID Splitter, TELCO SALES 95S-1-11: Figure 29.IPDSL - NID Splitter Wiring.gif NOTE: With the new MAX and MAX PLUS speeds (12/18 Mbps), you will be required to provide a dedicated pair of wires to the modem home run to avoid the potential for “in home bridge tap” or faults caused by other equipment in the home. A NID Splitter must also be installed. Existing wire can be used as long as it does not bridge to other locations in the home and is not “non standard wire”. 14 Figure 30.IP-DSL - Splitters 12-18M.gif NOTE: 9 State PID: CIM order through existing DSL AIM order system process – PID not needed for NID Splitter or the Telco Sales – 0009A adapter. If the wire that is being use for the connection to the modem is determined defective, replacement may be needed no matter what HSIA Speed it is. If performing installations using existing home wiring the wire type recommendations are listed below in order of preference. 1. CAT5 or better. 2. CAT3 3. Use of Quad wire or any NON Standard wiring will be dependent HSIA speed and performance testing. All wiring charges are applicable as they are with U-verse service. Billing screens in GCAS will prompt the technician at closeout. IP-DSL Interferers at NID The following items may affect data performance on IP-DSL service and should be removed if found. Half-Ringers at Network Interface Device (NID) MTU at NID IMPORTANT: NOTE: * Half-Ringers and/or MTUs should be removed on installation/repair field visits. 2.1. Alarms 15 When performing a full tech install on a customer that has a monitored alarm system, technicians should ensure they install the appropriate equipment so the IP-DSL and the alarm system function properly. The SEICOR splitter with adjunct box manufactured by Corning, or the Splitter, with adjunct box manufactured by Suttle can be used for this application when the customer has IP DSL HSIA and POTS. See Figure 31 Figure 31.IP DSL with POTS: Monitored Alarm Wiring Figure 32.Corning Alarm Filter Figure 33.Suttle Alarm Filter 16 When the customer’s order calls for Double Play services (IP DSL HSIA plus U-verse Voice) with a Motorola NVG510, it is not necessary to install a splitter at the NID. In this case, the Uverse Voice will need to be back fed from the NVG510 to the NID and spliced to the appropriate wiring from the RJ-31X alarm jack. Figure 35.IP DSL HSIA with Voice: Monitored Alarm Wiring U-VERSE VOICE ALARM SYSTEM INFORMATION: U-verse VOICE Alarm Contract.docx 3. Installation Steps for CPE There are several types of CPE used for U-verse HSIA over IPDSLAM. The placement of these devices will depend on the HSIA speed and wireless features ordered and by Business or Consumer request. NOTE: A power strip may be required if there are limited outlets available when using the tethered device scenarios. The PID number for the 6 outlet AC surge protected strip with circuit breaker with built-in reset capability : 310093174. Motorola NVG510 is a voice integrated 802.11n Wi-Fi gateway designed specifically for the delivery of Voice and Data services. Motorola 2210 (IPDSL)/2310 (vDSL)+EdgeMarc 250AEW router - will be used for VDNASB Business customers only (provides no wireless service). However, a wireless network device can be tethered to the Motorola device as listed below: o EdgeMarc 250 - this Motorola/Edgemarc tethered kit will be needed for Business customers requiring wireless/multi-user capabilities for speeds up to 18M. NOTE: Static IP will not be available via this tethered arrangement. See CPE listed under sections above for IPDSL HSIA/CVoIP. 17 The process for stock replenishment is described in the CPE Replenishment section below. The IP-DSL CPE equipment will be owned by the customer instead of leased. CPE descriptions for peripherals and installations steps are listed below for each device. IMPORTANT: CPE that the customer used for ATM DSL service is not compatible with U-verse HSIA over IPDSLAM. Tips to identify differences for the Motorola 2210-02-1att is that the IP-DSL modem is black and the ATM DSL model is silver. The IP-DSL 2Wire 2701HGV-B device can be differentiated by the extra VoIP port on the back and 2 extra VoIP LED lights on the front of the unit. 3.1.2. EdgeMarc 250AEW Wireless Device - Business Two new speeds will be available for our Lineshare and Dry Loop Business HSI Uverse/IP-DSL customers. Max (12M) and Max Plus (18M) will be available to new and existing customers. For multi-user/WiFi capabilities, a new Motorola/Edgemarc tethered kit will be introduced to support these products. This tethered kit replaces the current 2Wire 2701 HGV-B Gateway. IMPORTANT: Until 1/19/2011, CIM technicians will install an Edgemarc 250AEW wireless gateway on EVERY Business FTI (Full Tech Install) order; unless customer specifically states they did not order wireless/multi-user capabilities. IT solution on 1/19 will provide visibility into exactly what equipment / solution customer ordered. EdgeMarc 250AEW Wireless Network Gateway -PID # 316090398 Figure 40.IP-DSL - Edgemarc.png Technicians can identify a business accounts via a B (Business) on the second character of the Job Type (JT) on the service order; example: IBJF**. If “ROUTR ROUTER/ TERMS Purchase MAKE Edgewater” and “Model 2210-02-1ATT” are on the order, the technician must install an EdgeMarc 250AEW router with the IP-DSL Motorola 2210 modem. 18 Figure 41.IP-DSL - Edgemarc order.gif (9 State Process) Technicians will not have to report CPE usage or replenishment until GCAS enhancements for 9 states are implemented. NOTE: AIM site managers will have to manually order all IP-DSL CPE through the AIM ordering system. 4. Registration U-verse HSIA (IP-DSL) accounts that are provisioned under the Lightspeed Platform (LSP) must be registered via the U-verse Registration web site https://lsreg.att.net. Technicians will need to input the customers BAN number or the customers Member ID (email address) in the screen provided. See the example below. Figure 45.IP-DSL Registration 19 IMPORTANT: If the customer has existing DSL service and is adding U-verse HSIA over IPDSL, the Member ID (email address) used during registration must be different than the existing DSL Member ID. Using the existing Member ID will deactivate the existing DSL Modems account. Review the job aid in the link below for more details on registration: http://dataservices.sbc.com/lps/Job%20Aids/INSTALL_REPAIR/Uverse%20HSIA%20Registration.pdf IPDSL with VoIP service registration process: http://ops.netops.att.com/uverse/Job%20Aids/install_repair/Uverse%20Registration%20and%2 0Setup.pdf 4. Support Groups and IP-DSL Technicians in all regions will call U-verse Tier 2 support group at 855-525-1841 These jobs will have a Job Type identifier of “J” in the 3rd character and “F” in the 4th character and “O” in the 5th character to identify the job as a IP-DSL and will also display a GCAS Modal. For additional information on JOB TYPES refer to section 3.0 in this document. Figure 46.IP-DSL - GCAS Pop-Up-PLS 20 For facility changes support, refer to section 11 on this document. 5.2. Resolving Order Issues Customer Cancel or Reschedule - Call The CRC (Customer Relations Center) When to call the Customer Relationship Center (CRC): You will need to call the CRC when on the premise and the customer is available under the following circumstances: The customer requests to cancel or reschedule the service order, or the customer wants to remove a U-verse product, such as CVoIP, from the order. An installation or repair order needs to be rescheduled. 1. Call the CRC at (800) 928-6878 and have the customer available (do not provide the customer with the direct number to the CRC) 2. Techs are never to advise the customer to call the CRC and then leave the premises. 3. Give the CRC Rep your ATTUID and Get the ATTUID of the CRC Rep upfront. 4. CRC Rep will make certain the Due Date does not change when removing CVoIP or any other U-Verse product. NOTE: If the Due Date does change, it will be incumbent upon the CRC Rep to fix the order to enable the tech to complete the install for the customer. 5. If the CRC Rep refuses to help, ask for a manager. If the CRC Rep tells you a manager is unavailable, go to the U-Manage web site and input the information and then recall the CRC to get a Rep that will assist you: U-Manage Web Site Example below: Figure 48.U_Manage Web Site 21 Figure 49.CRC - Info.gif For support in any languages other than English or Spanish: Contact the CRC at (800) 928-6878 and the customer will be transferred to the appropriate Language Center by the CRC agent. 5.2.1. Dry Loop to Lineshare - Business and Residence WHEN TO CALL OMC: 22 If the CIM Technician is on the customers premise and the customer requests Lineshare and were placed on Dry Loop in error, call the Order Management Center (OMC). Technician can call the OMC Escalations at (888) 519- 1151: o From Dry Loop to Lineshare - if the order is pending, request an AMEND. NOTE: If amend order cannot be completed by CO on Due Date, the Technicians should verify all wiring is in place at the home and advise the customer of the delay and they should be able to register within 24 business hours. o If the order is completed, Business or Residence, the OMC escalation center will perform a Cease and Provide order. Always advise the customer that there will be a service outage due to the cease and provide order. NOTE: On Cease and Provide orders, advise the customers they will receive a FINAL BILL for the Dry Loop order, then a NEW BILL for the Lineshare order. Question the customer to be certain which type of service they have requested. If the customer does not request the order be changed to Lineshare, install as dry loop. If you are on a Business Maintenance or Helper Ticket, technicians must call the OMC to make these changes. 5.2.2. Changes on CPE Technicians should install the CPE equipment that is indicated on the order unless there are conflicts or changes with what the service that the customer requested. If for any reason, a change needs to be made to the CPE, contact Tier 2 to amend the order. 855-525-1841. If on a CSI order and the customer informs you they have not received the CPE, advise them to call the Customer Care number 1 800 288 2020 and they will overnight the CPE. 6. Testing and Troubleshooting U-verse HSIA over IPDSLAM When dispatched on a maintenance ticket or -O order for IP-DSL U-verse HSIA, CIM Technicians will be responsible for clearing any faults on the copper facilities up to the Central Office (CO BASED) or RT (RT BASED). U-verse HSIA over IPDSLAM troubleshooting will be similar to DSL in that service affecting bridged tap and load coils should be removed. NOTE: Unlike U-verse HSIA, IPDSLAM facilities are NOT pre-conditioned by C&E via the Project Light Speed process. SYNC/NO SURF - If technicians have good SYNC but cannot SURF, they should call the U-verse Tier 2 special support number, 866 757 9808 for assistance in troubleshooting and registration. When available, use the customers PC to register the customer from the Modem. If using technicians Laptop, connected to the CPE, do not register through the company LAN. Occasionally the available Queues in G2 are full and there could be a delay of up to 4 hours for registration to fully complete. Facility Changes - If the technician needs to perform a pair change, GCAS can be used business as usual to perform this change. To obtain facility help a call can be made to the UMLAC. Coordination with the Central Office is needed for all LST's that require central office work. 23 Port Changes - If port change is needed or there are problems with the assignment or missing assignment, a call may need to be made to the UMLAC - 866 341-2662 New TN# starting 311-13 GNAC will be: 888-509-9399 Bridged Tap- While bridged tap is known to sometimes negatively affect ADSL performance, it is possible for service to work with a certain amount of bridged tap. CIM may remove service affecting bridged tap. Always advise your supervisor prior to returning tickets to cable qualified technicians for Bridged Tap removal. C&E will not remove Bridged Tap on IPDSL service. The following rules are implemented for IP-DSL Tap removal in LSBBT. If Tap is detected via LSBBT and one of the following conditions is found, the bridged tap should be removed: Line Status in QC test = “fail”, (CV>5/minute or FEC>100/minute) Downstream NMR < 12 dB for 12Mbps and 18Mbps lines, or < 9 dB for other lines Upstream speed (CURBR) < 128 Kbps 9 State “ADSL Good Pair” document: https://cim.lno.att.com/National/SubSite/TIOTS/docs/ADSL%20Circuit%20Standards%20(9s%2 0v2-1).pdf Load Coils - If the CIM tech finds a load coil that is located below 18000 feet, technicians can attempt to remove the load or change the customer to a pair that is not loaded. If the load coil is inaccessible or all pairs are loaded, the technician must refer the customer to the CRC (Customer Retention Group) to provide other service offers to the customer. If the loaded pair is over 18,000 feet, C&E will not de-load the pair. NOTE: The Premises Technician or ECOCOMP will now call into the CO directly to have them test for sync leaving the CO if there is No Sync at the NID/SAI. If Sync is leaving the CO, a Helper Ticket will be created for CIM assistance. (They can utilize the CO Assist Tool to create a ticket to CO prior to JEPPING TO CO) DOWNGRADING /UPGRADE SPEED PROFILE Every effort should be made to condition the customer’s facilities to support the highest speed possible. DOWNGRADING THE SPEED PROFILE SHOULD BE THE LAST RESORT! If all facilities issues have been resolved and the customer speed profile needs to be Upgraded or Downgraded, contact the Tier 2 special team at 855-525-1841 BAN/WTN Look Up Tool If the customer has a working telephone number and the technician needs to find out the BAN number, use the BAN/WTN look up tool via this link: http://uconnect.lno.att.com/?switch_pid=14# Figure 51.BAN WTN Lookup Tool 24 LSBBT TESTING TOOLS AVAILABLE Lightspeed Broadband Tool (LSBBT) - The ADSL BBT is not compatible for testing IP-DSL circuits. I&M technicians must use the LSBBT for trouble analysis or installation threshold results when the customer's DSL is serviced by IPDSLAM. LSBBT cannot be run using the customer's DSL Telephone Number (TN), instead, a valid AT&T CAIC (Customer Account Indicator Code) / BAN (Billing Account Number) or the registered CPE serial number must be entered in order to run the LSBBT. Copy and paste the following URL into a web browser to access LSBBT: http://lsbbt.sbc.com. In the past, when working on an IP-DSL circuit, the only tools in LSBBT that were available were located under IP-DSL Tools. Today, the LSBBT team has executed changes allowing testing on IP-DSL circuits throughout all of the suites of tools within the LSBBT main menu. The execution of these changes allows technicians to perform the following LSBBT tests when troubleshooting issues on IPDSLAM service. NOTE: Like any Helper Ticket, I&M Technicians should perform LSBBT Quality Check or NID Check tool testing with PASSING results prior to close. o o o o o o o o o o o Real Time LPA: IPDSLAM support, DSLAM+ port searching capability, improved views of Real Time Neighbor check by DSLAM and by Card. SAI Check: IPDSLAM support, DSLAM+ port searching capability. NID Check: IPDSLAM support, DSLAM+ port searching capability Sync-up Check: IPDSLAM support, DSLAM+ port searching capability. Real Time Inventory Alarm Tool: IPDSLAM support, the link to LPA tool is changed to query with DSLAM + port to allow checking status of non-provisioned port. Port Admin Tool: IPDSLAM support. Quality Check Tool: IPDSLAM support. Sam Real Time Tool: IPDSLAM, support. CPE Real Time Tool: IPDSLAM, support. Show RF: IPDSLAM support. Neighbor Line Search Tool: IPDSLAM support. 25 o o o o o o Trouble Analysis Tool: IPDSLAM support. Multiple BAN Search Tool: IPDSLAM support. 7330 Historical Trending tool: IPDSLAM support. 7330 Error Summary Tool: IPDSLAM support. ISAAC/SCANR: IPDSLAM support. IPDSLAM - CO Connectivity Tool 7.1. Test Meters Below is a list of existing test meters in the field today and a description of them and whether they will work on IPDSLAM platform. ITEX Card - The ITEX card manufacturer has ceased production and no longer supports the product. ITEX card is not IPDSLAM or IFD CF-30 compatible. Motorola 3342NTT Pocket Modem - This is an older version of the pocket modem. This unit's full downstream reading is set to approximately 11MB, thus not allowing for higher maximum attainable bit rate. However, this unit can be used to prove sync with ATM IPDSLAM circuits. WARNING: The Motorola Pocket Modem is not compatible with PTM mode. NOTE: Even though the Maximum bit rate will not display on the Pocket Modem, these readings can be seen using LSBBT. All other parameters will be viewable on the pocket modem display. Motorola 3342N-TST Pocket Modem - The ADSL2+ chipset in the new style pocket modem allows the accurate reading of the 25MB maximum attainable levels from the 7330/VRAD. Sunrise Telecom Test Set - The current ADSL1 chipset used by I&M technicians is able to read maximum attainable level of approximately 8128KB. It is able to read sync levels although the results are not accurate, they were accurate enough to prove sync in order to verify the provisioning of the ports. WARNING: The Sunrise Test Set is not compatible with PTM mode. JDSU/Acterna Test Set - Sync readings will be dependant on what chip set is on the test set. See JDSU detailed section below. NOTE: With IPDSLAM, surf testing will not be able to be performed unless the customers registered CPE is being used. 7.1.1. JDSU - HST-3000 Quick Start Guide The purpose of this test is to verify synch and confirm signal is within limits to support the ADSL/ADSL2+ service. The following statistics should be captured and analyzed: Current Bit Rate, Max Attainable Bit Rate, Relative Capacity, Noise Margin, Attenuation and Line Errors. It is recommended that the testing be run for 5-minutes. ADSL testing (signal / synch & stats test) should be conducted at 26 the SAI and MPOE at a minimum. The specific testing procedure and required measurement criteria for testing at each of these locations is provided at the end of this section. Figure 52.IP-DSL - HST 3KTest Interface.gif Figure 53.IP-DSL - HST 3K Test Steps.gif 27 To store test results at any time, press the Results soft key and select Save Results and press OK. A pop-up window will appear to provide entry of the file name to be saved. Enter the desired file name using the keypad and press the OK to store the file. Stored files can be reviewed by using the File Manager function located by pressing the System navigation key to go to the system window and then pressing the Tools soft key. The following document will cover performing testing on IP-DSL customers service. Job Aid HST 3000 ADSL2+ Testing 7.2. ATM DSL Restoral When Installation Fails When a customer migrates from DSL to the U-verse platform (IPDSLAM / Installation fails) and we are not able to deliver the requested speed, the technician should always attempt to deliver the next lower speed (or any speed) over the same IPDSLAM transport. To lower HSIA Speed, call the U-verse Tier 2 special team at 866–757–9808. Care will issue the order for the speed change and will waive the CPE charges for the customer. If moving to lowest speed on the U-verse IPDSLAM platform does not work, then we will move the customer back to DSL. This should always be the last resort and every attempt should be made to condition the facilities to provide the highest speed possible before moving the customer back to ATM DSL. Both the 13 State and the 9 State ATM DSL Restoral procedures have been simplified. The technicians simply go to the CRT Portal Tool and submit an online form. Click either the 9 State or 13 State Legacy ATM DSL Restoral Procedure link below to get step-by-step instructions. Technician accesses CRT Form via Broadband Portal: http://moecaixprod4.asi.sbc.com/dashboard/prov/portal/portal.cgi Click on the appropriate link below for the detailed procedures: 9 State Legacy ATM DSL Restoral Procedure 7.3. Helper Ticket Completion Process IP DSL HELPER TICKETS On Helper Tickets from Premises Technician areas, the CIM Technician should read the Helper Ticket narrative for information regarding service problems and contact the Premises Technician to discuss testing and/or status and give estimated arrival time. Notes should be placed in the narrative of the Helper Ticket by the Premises Technician that will also describe issues and indicate that it is U-verse HSIA “IP DLS” service. The Premises or ECO Technician UID and phone number should be provided in the Helper Ticket. Upon completion of the Helper Ticket the CIM technician must perform a LSBBT Quality Check or Sync Up Check prior to close. Always, if access is available, check sync to the customers CPE. If Premises or ECO Technicians identify that facility work is needed on an IP-DSL install or repair, they will create a Helper Ticket. Using the proper U32 JEP Code for Referring to CIM for Facilities:When the CORE IM technician receives a IP DSL Helper Ticket 28 related to either a UFO Full Tech Install (FTI) or a UFO Fielded Customer Self Install (CSI), The CORE IM Tech will make every effort to eliminate a potential subsequent UFO Prem Tech dispatch whenever possible. I&M TECHNICIAN Responsibilities on Helper Tickets: 1. 2. 3. 4. If the customer is available, always make contact and keep the customer informed. Remove all affecting bridge tap, metallic faults, etc. from the outside plant Verify good sync to the NID with a NID Check. If sync is good to NID and customer is not home, COMPLETE the ticket and leave a Door Tag. Do not NO ACCESS. 5. If multiple problems were fixed on a customers line and it cannot be determined what affected the service the most, close the Helper Ticket to the disposition code for the problem that was fixed that is closest to the CO. 6. If dig up needed or delay for facility work, JEP the Helper Ticket to the appropriate code. 7. If the loop will not support IP DSL and the customer was migrating from legacy DSL, refer to Section 12.2 above. When the Helper Ticket is closed the UVDC will close the Premises Technician ticket/order. If not closed or problems still exist, UVDC will either dispatch back out to Premises Technician or refer customers to Tier 2 support. IMPORTANT: The CORE IM Tech will make every effort to eliminate a potential subsequent UFO Prem Tech dispatch whenever possible. In addition to all of the above, follow the procedures below for IP DSL FTI or CSI orders: 1. UFO Full Tech Install (FTI) and a Helper Ticket is generated and the customer is home: Verify sync is good to the jack and verify the customer’s CPE has green lights Perform a Quality Check Then complete the registration process for the Full Tech Install and note in the narrative that there it is not necessary to re-dispatch the UFO Prem Tech If CORE IM technician encounters a problem with the CPE, follow the Refer to Premises Technician Process by calling the UVDC JEP team at 866-341-2662. 1. UFO Fielded Customer Self Install (CSI) and a Helper Ticket is generated and the customer is home: Verify sync is good to the jack. If the customer has their CPE, plug in the CPE, verify the customer’s CPE has green lights and perform a Quality Check. Advise the customer to proceed with the registration process. More than 15 minutes of work repairing IW or jacks should be billed unless the customer has an Inside Wire plan. The charge for a failed CSI is $99. If regionally appropriate, drop work will also be performed. FIND CIRCUIT ID USING Q LISTENER A simple way of finding the circuit ID, if you cannot find the information on your order, is to use a system called Q Listener that is available for download into your Q messenger. Using Q 29 listener, Technicians can type in the word BAN, then enter the Ban number. Information about the order will be displayed with the Circuit ID. FIND CIRCUIT ID USING LSBBT A simple way of finding the circuit ID is to open the “Real Time LPA” tool in LSBBT. Enter the BAN and submit. The circuit ID will be displayed within the results. 8.1. CIM Technician Responsibilities for Central Office Issues When encountering suspected defective facility (Port) assignment, CIM Technicians will contact the Central Office to test for SYNC leaving the CO. When working with Central Office Technicians you will need to provide them with the Ckt id in order to perform work on DLSAM issues. The CO agent cannot use the 9 digit BAN number to locate the DSLAM equipment. To find the Ckt id on the order select the radeo button in GCAS for “Veiw Service Order Image” The Circuit ID will be displayed in the S&E section and also in the ASGM section of the full view of the order. NOTE: When ECOCOMP technician need to refer to CO for sync issues need to submit ticket using the Circuit ID, provide SELT reading in LSBBT, provide whether LineShare or Dry Loop. Using the Proper JEP CODES: U64 – Install – Refer to CO for NO SYNC R15 – Repair – Refer to CO for NO SYNC NOTE: In some regions I&M technicians are allowed to perform work in the Central Office. Be sure to follow local practices for this process. Example Circuit ID is: CLS A6/ACXP/000364//WT The customers Ckt id can also be found by opening SCANR and reviewing the ACTIVE SERVICES section of the order. See Section 12.4 below for additional information on SCANR tool and the M&P. Copy and paste the URL below into your browser to access SCANR: https://scanrg.it.att.com/isaac NOTE: The Premises or ECO Technician will now call into the CO or perform a CO Connectivity test to test for sync leaving the CO when there is No Sync at the NID/SAI. If Sync is leaving the CO, a Helper Ticket will be created for CIM assistance. Figure 55.Circuit ID in GCAS 30 Below is information that may be needed when speaking to the CO technician. CLLI codes can be used to find information in the Central Office Look up tool in the sections below. Figure 56.IP-DSL Clli 2.gif Follow these steps to test with the Central Office Technician If the CO is manned o Always contact the CO (Central Office, a.k.a. the Frame) first Request joint testing to further isolate and clear the trouble. COT (Central Office Technician) will perform a “sync” test at the DSLAM port to verify proper sync. 31 After all testing is performed if the port is deemed defective the CIM Technician will place a call to the UMLAC to perform “port cut”. The UMLAC will perform the cut and provide an order to the CO for the port change. (Similar to an F1 pair change). After the COT wires the new port re-test for sync from customer’s NID. If there is no additional trouble and/or CPE work required, close the ticket with proper codes and a detailed closeout narrative. (9 States) - Disposition Code 0576 - ADSL/PC DATA miscellaneous equipment located in the Central Office not associated with Central Office Switch or Carrier. Cause Code 300 - Plant Or Equipment If on a Helper Ticket for a Premises Technician area, if the Premises Technician is still available a call should be made to advise that the work is complete. Be sure to notify the customer of status. A door hanger may be necessary. If Premises Technician is no longer available, the CIM Technician will close the Helper Ticket with appropriate notes regarding the trouble cleared. The UVDC will monitor the re-dispatches the original ticket back to the Premises Technician to complete work. 9.1.1. LSBBT - IPDSLAM CO Connectivity Tool The IPDSLAM CO Connectivity Tool has been merged with SELT in LSBBT for CO ‘opens’ testing and is now available for technician use. This tool will run a capacitance test on the assigned port to identify whether or not the port is physically wired to the field from the Central Office. This test will look out 1000 ft. from the CO. This test is an intrusive test which interrupts service and should only be run in cases where the technician encounters a ‘NO SYNC’ condition during an installation or repair. 1. From the Home Page of LSBBT select MORE TOOLS>> 2. Select “IPDSLAM CO CONNECTIVITY TOOL” 3. Next input the customer BAN or DSLAM ID (Exp of DSLAM ID: SNRMCAMP--00CEV113A,DLLSTXRNO0A001001081) 4. There are 3 options available (Start Testing, Get Previous Test results, Port Reset). If you select Start testing the following message will be displayed: Figure 57.IPDSLAM - CO Connect Msg.gif If customer is not in service click ok to proceed - Results usually take about 1-2 minutes. 5. Results Below display a test that Passed (No open condition detected within 1000ft of DSLAM) 32 Figure 58.IPDSLAM - CO Connectivity-Pass.gif Results Below display a test that Failed (Open within 100ft of DSLAM) Figure 59.IPDSLAM - CO Connectivity - Fail.gif 6. “Get Previous Test results” will provide the last successful tests. 7. “Port Reset” will reset a port that may have inadvertently locked during a test. When a failed test is displayed, contact the central office to attempt to resolve the wiring issue. If it is unmanned or the CO cannot resolve immediately, follow the process below to refer the ticket into the CO. 9.1.2. Referrals to CO When a CIM Technician isolates trouble to the CO and the problem can not be cleared by the Central office technician the ticket will need to be referred to the Central Office. This would include scenarios where it is an Unmanned CO and the CO Rover cannot get to the CO until the following day. Technician uses the appropriate codes below which will send a No Sync maintenance helper ticket into the CO. o Referral to CO JEP code U64 (Installations) and R15 (Repair/Helper) in GCAS. Technicians MUST also include the following information in the narrative of the ticket: o Check Sync o Open found “X” ft (input SELT test result footage) o Lineshare or Dry Loop o Cable pair (F1 facility) IMPORTANT: If this information is not in the remarks/narrative when the job is JEP'd, the CO will not be able to complete the work and will close out the ticket for insufficient information. 33 The CO JEP goes to Exception Manager where it is visible to UVDC/NDC. After the CO fixes the No Sync issue, they close the tickets which will status to handle code UCS (CO cleared). The ticket will go to Exception Manager with notes of what was done. Completion routes to NDC/UVDC NDC/UVDC either re-dispatch a Technician or Contact Customer to Close the ticket 9.1.3. When to Call CO on RT IPDSLAM Service In areas served by RT IPDSLAM, the following matrix will help technicians know when to call the CO on facility changes: You can identify a whether an order is Integrated, Universal or Electronic by viewing the F1 assignment for the PSCG - designation. (NOTE THIS IS FOR CIM ROLE) Figure 60.Universal -1.gif Universal (PSCG = U) Pair is physically wired in CO Office Equipment (OE). A call is required to the Central Office. In addition, a call may be required to - 9 States (RCMAC) Integrated (PSCG = I) Software driven to IRAD. No Call necessary to CO but need to call RCMAC or NOC. Electronic (PSCG = E) Electronic cross connect Figure 61.IPDSLAM RT - CO Involvement .gif 34 9.1.4. Central Office Look Up Tool Click on the link below or cut and paste into a browser to open a site that will allow you to review information about central offices. Searches can be performed using the wire center CLLI code or a list can be pulled by providing Region and State. Once the results list is returned, click on the CLLI code link as shown below, to display information. This link will assist in identifying if you are working in a manned or un-manned CO by entering in the region and CLLI code: http://co.sbc.com/admin/locations/search.cfc? See example below: Figure 62.IPDSLAM CO Dashboard.gif 35 Select the CLLI for the location needed. Figure 63.IP-DSL - CO Selections.gif Figure 64.IP-DSL CO - Manned Y-N.gif Scroll further down the page for a list of contact information. 36 9.2. Central Office Process For manned COs, COTs will accept calls from CIM Technicians and assist the technician for joint testing and port cut to clear troubles as needed. For unmanned COs, - The CIM Technician will need to perform the process listed above in the section above “Referrals to CO” to refer a ticket into the CO. COTs will perform needed testing and follow existing procedures to process and complete port cut assignments as needed. 9.3. UMLAC(GNAC) Process Once joint testing has been performed with the CO, if a port is found to be defective, the CIM Technician must call the UMLAC for port assignment. UMLAC personnel will assign/provision new port assignment. Once the port is provisioned, an order will be generated via SWITCH FOMS. The order will flow to the CO for wiring change. o For manned COs, the CIM Technician should wait for the wiring change to be completed by COT. CIM Technician should then verify and complete the repair/install. o For unmanned COs, the CIM Technician should attempt to contact the roving CO tester for faster resolution. If not known you can use the Central Office Look Up tool above. If a roving CO technician cannot accommodate the request on due date, use the process in the section above called “Referrals to CO” to refer the ticket to the CO. 9.4. SCANR Tools - IP-DSL CIM Technicians can now use Simplified Customer Account Navigation and Resolution (SCANR) tool. This tool was designed to be a single interface for troubleshooting U-verse customer service issues. SCANR was originally designed for customer care groups to assist customers and technicians but has now been made available to outside field forces so that calls to these care groups may be avoided. SCANR uses Global Login and passwords however, access must be requested from the link in the SCANR M&P listed at the bottom of this section. Some of the useful tools specific to IP-DSL troubleshooting are listed below. Open the link provided below to review the SCANR for I&M M&P. Service Order Information Order Status Tool Active Services Alerts - Shows CO-IPDSLAM outage Network Map – Can see if there are line issues or home issues and CO - DSLAM Configuration (wiring issue in CO) PORT Bounce/Lock/Test PIN / PASSWORD Resets Remote RG Reboot – Can be used when gateway needs reboot after profile changes or software updates, cable throws/splicing activity. SCANR/BBExpress for I&M Technicians M&P: 37 BBEXPRESS LINK: http://bbnms-ls.it.att.com/premtech/index.jsp SCANR LINK: https://scanr-g.it.att.com/isaac SCANR and BBEXPRESS v3.ppt 10. Static IP The 2701 2wire router will be the only CPE that will support static IP for speeds up to 6M on the IPDSLAM architecture platform, and it will not be offered with 12/18M for consumer or business. Static IP will be limited on the IPDSLAM platform, but if an order is requested, it will be set up in the field like the 3800 RG used in U-verse, since the procedure and setup is the same. Click on the following link for referencing the static quick start guide and M&P - Configuring 2Wire 2701 HGV-B Residential Gateway for Static IP Service: ATT-TELCO-ASI-JA-000-001-944 NOTE: When swapping out CPE for a Static IP customer, ensure that the new CPE is configured for Static IP service. Below is a document that should be given to customers at installation who have Static IP service that will allow them to write down the IP addresses for future reference for their service. Customer STATIC PREMISE FORM.pdf 11. Closing the Job IP-DSL U-verse HSIA maintenance tickets will be closed using the same Disposition and Cause Codes, Return Codes and JEP codes in GCAS that are associated today with U-verse products. These codes are Job Type driven and will appear in the drop down menu. Any Job Type with the 3rd character of “J” drives all the U-verse codes to appear in GCAS. The link below provides a complete list of U-verse Return codes: U-verse Return Codes for the Premises Technicians.pdf DISPOSITION CODES (22 States) - Use current U-verse disposition codes from the GCAS drop down for IP-DSL jobs. IMPORTANT: 38 (22 States) - If the Terms of Service (TOS) or e911 agreement appears on the screen, click both documents, enter customer name, select 'paper copy = No, then click on Acknowledge. IP-DSL Uverse HSIA customers do not need to acknowledge these agreements and the GCAS team is working on removing this step in our close out process. 11.1. How to add Notes in EDGE – LOAD CONTROL MANAGERS – EDC ECOCOMP For areas converted to FORCE they must add notes in EDGE when important information needs to be added to the ticket for other groups to view. Areas still on WFADO will add notes in OSSLOG when appropriate. Managers in areas converted to FORCE can add notes using Edge by performing a search for the work request on the Force Query Report tab, using the JOB menu, select NOTES or REMARKS from the drop down options. Add Estimated Completion Date (ECD) or any other information needed and when done click OK or Submit. Follow the link below to review the detailed steps for the EDGE process. How to Add Notes or Remarks in EDGE.pdf Verification: 1. Verify if the number to be installed as a U-verse Voice number is currently their POTS phone number or a newly assigned number. (If it is a POTS number, currently assigned, this will require U-verse Voice number activation via the IVR. This activity will disrupt the phone service during the installation and no outgoing & incoming calls will be received until the work is complete, to include the disabling of the alarm system and POTS voicemail. This will need to be explained to the customer.) 2. For SFU only, verify if the U-verse Voice number is to be the only number within the residence providing phone service, thus no POTS lines. If the U-verse Voice number is a secondary line and there is a POTS line as the primary line for the home you will need to verify the location that the U-verse Voice number is to appear and wire accordingly. For these instances you will not be using Pair 1 to distribute U-verse Voice phone service. You will need to identify an alternate spare pair for the distribution of the U-Verse Voice phone service. Note: If the only location within the residence is the room that the RG is located, you may plug a phone directly into the L1L2 port of the RG (labeled "LINES 1 & 2" on the RG - see Reference 7), provided this location is agreeable to the customer. Else 39 refer to “Note 11”, Section 4. This will work for wireless phones that have base stations as well. 3. Verify if there is a Monitored Home Alarm system at the customer location. (If it is a stand alone system that only uses a local alarm and does not report to an alarm company or the police/fire, the telephone service will not impact its operation.) 4. Verify that the customer has contacted their Monitored Alarm Service provider, the Monitored Home Alarm is to be serviced by U-verse Voice and the Monitored Alarm Service Provider has confirmed compatibility with U-verse Voice. Also, remind the customer they will need to contact their Monitored Alarm Service Provider after the installation of U-verse Voice to ensure the alarm is functioning properly. Testing for U-verse VoIP Note 1: This is for information purposes only. Do not touch any wiring connected to the Alarm Panel. Correct installation of the Alarm Panel is the job of the Monitored Home Alarm Service Provider. If a Monitored Home Alarm Service is to be supported by U-verse Voice, it must be installed such that the Alarm Panel is the first device connected to the RG/NID. All other jacks, phones or other analog CPE must be connected after the Alarm Panel. Note 2: Please allow 15 minutes from the time the activation success message has been received before beginning the test calls. This is important because you may get a false success from the SAVL IVR.) NO DIAL TONE ISSUE – CVoIP No Dial Tone issue during Full Tech Installation: Failed Firmware Update • • • • As of July 11 2012, the NVG510 gateway will be on firmware version 9.0.6h2d21, otherwise known as firmware LYRA 1.2.3. The NVG510 you install may need to upgrade to this version. Sometimes this automatic upgrade will fail and you will not get dial tone for the U-verse Voice service. If no dial tone, check the firmware version via the gateway GUI. It can be seen in the GUI when plugged into a PC. Firmware version should be displayed in the top right corner of the GUI web page. It should read 9.0.6h2d21. You can also validate the firmware version via CPE Real Time Tool in LSBBT. If you are not on the current firmware version 9.0.6h2d21, power cycles the modem to get the update. If the update still fails, swap the NVG510. Important: If the update is successful and you still do not have dial tone, perform the ATA Enable procedure in SCANR outlined below: CVoIP NOT ACTIVATED – FOC MISMATCH 40 An order to port a customer’s phone number to U-verse Voice can make it into Assigned Products without the number being ported when certain ordering trouble caused the Point of No Return to be reached before certain ordering procedures were completed. Specifically, an order to port the number reached the Handle Subscription Activation step without an FOC (Firm Order Commitment) date. To correct this, perform the procedure below. 1. Contact tier 2 via the IVR and have them perform a dummy port-out for the phone number you’re trying to port in. This will properly remove the Voice component from Assigned Products. 2. Once the dummy port-out is complete, check to see if the customer has working phone service. a) If the customer has no working phone service, or the customer wants U-verse Voice dial tone now, offer to provide them with a new temporary phone number they can use until the number porting is complete. If the customer agrees to a temporary number, have an order written to add a brand new (native) phone number to the account. That order will flow to completion. b) If the customer does not want a temporary number, proceed to the next step. 3. VOM will write the order to port the customer’s phone number to U-verse. This will take the standard 3 business days (Telco number) or 7 business days (CLEC) to complete, so make sure to advise the customer of the due date. NOTE: The technician may need to reconnect the POTS service if the customer declined the temporary number. • 4. The technician who returns on the C-order to port the number on the due date calls OMC (order management center) to have the temporary number removed from the account. The technician needs to remain at the premise until the temporary number is removed to ensure that the port-in number works on Line 1 of the RG. 8.2. Steps to Test & Verify U-verse Voice Follow these steps to test/verify that U-verse Voice is working correctly: 1. Ensure the that the home wiring is connected to the RG 2. Verify Dial Tone at each jack as appropriate. A. If all appropriate jacks have dial tone, proceed Step 3. 1. If not, resolve wiring issues within home and go back to Step 2, repeat. 3. Begin Test Calls A. Make a test call from your cell phone to the number in the home that is now a Uverse Voice number. 1. If the call completed proceed Step 3-A-2. A. If not, check the RG for U-verse Voice in sync status (Reference 4). 1. If status is positive then proceed Step 3-A and repeat steps. 41 A. If not, contact Installation Support Tier Two Team and report trouble. Once it is resolved proceed to Step 3-A and repeat steps. 2. Verify that the call quality is acceptable. A. If quality is good, proceed Step 3-A-3. 1. If the quality is not acceptable, contact Installation Support Tier Two Team and report trouble. Once it is resolved proceed Step 3-A and repeat steps. 3. Verify Caller ID with Name is correct. (This test will only be valid on calls made to the U-verse Voice phone. Any calls made from the U-verse Voice phone to any other may not display the customers' name at this time due to provisioning limitations. Skip this test if you are making an outbound call test and proceed to Step 3-C). A. If correct proceed to 3-B. 1. If incorrect obtain the data (if any) and make a note of it for reporting to Installation Support Tier Two Team for resolution. Once it is resolved proceed 3-A and repeat steps. B. Make a call from the U-verse Voice number to your cell phone and repeat the steps found listed under Step 3-A. 1. Once complete proceed Step 3-C. C. If the customer has U-verse Messaging, make a call from your cell phone to the U-verse Voice number and let it go to voicemail. Else, proceed to Step 4. 1. Verify that the voicemail platform responds with the following message: ”The person you have dialed cannot take your call now." If correct proceed Step 4. A. If this response is not received verify that the number activated is the Primary number for the account. 1. If the number that has been activated is the Primary number and the voicemail response did not match, contact Installation Support Tier Two Team and report the trouble. Once it is resolved proceed Step 3-C and repeat steps. (You may need to verify the Voicemail settings via the WebPortal with Tier 2.). A. If the number that has been activated is not the Primary number you must activate the Primary number. Go back to Step 1 and follow all the appropriate steps. 1. If the voicemail response is still not received, contact Installation Support Tier Two Team and report the trouble. Once it is resolved proceed Step 5-C and repeat steps. 4. Verify Battery Back Up (BBU) - (see Reference 3) A. Make sure the audible alarm switch on the front of the BBU is switched to the “Not muted” (upper) position; B. Unplug the A/C cord from the wall outlet; C. The “On Battery” LED on the front of the BBU should display solid yellow, and an audible alarm should sound every 5 seconds; D. Place the audible alarm switch in the “Muted” (down) position to silence the audible alarm. Verify the alarm is silenced; E. Plug the A/C cord into the wall outlet; F. The “On Battery” LED should go out, and the “On A/C” LED should display solid green. G. Place the audible alarm switch to the “Not mute” (upper) position. These conclude the test and if all tests passed proceed to step 5. 42 5. 6. 7. 8. 9. 1. If not, replace the unit with a new one, mark the bad unit as defective and update inventory via GCAS, and proceed Step 4 and repeat steps. If U-verse Voice is not the only service being installed refer back to (ATT-TELCO-IS-002300-034) in order to complete the remaining work activity, up to and including the order completion, then return to Step 6. A. If U-verse Voice is the only service being installed then proceed directly to Step 6. If installing all new U-verse products, wait until the entire installation has been complete before performing this test. Else, proceed with the test. A. Make a test call to from your cell phone to the U-verse Voice number that has been installed. B. Verify that the Caller ID via IPTV is functioning correctly. 1. If it is, proceed Step 7. A. If not, verify that the option is turned on via the WebPortal and then proceed Step 7 and repeat steps. 1. If the Caller ID via IPTV is still not working correctly contact Installation Support Tier Two Team and report the trouble. Once it is resolved proceed to Step 6 and repeat steps. Demonstrate to the customer the WebPortal access and Help Screens. At this time you should also establish U-verse Messaging with the customer if they have chosen that UM as part of their Service Package. There are linked documents in Section 11 that will provide direction on this activity. It is also recommended that you demonstrate the Video Self Help channel (411) on IPTV as an alternate source of information. Then proceed Step 8. Ensure that the following items have been discussed and/or provided to the customer: their BAN as well as the and then proceed to Step 9. A. The customer's BAN (should be found on the installation order) B. U-verse Voice and Battery Backup educational material 1. NOTE: You should explain to the customer that it takes approximately 18 hours to charge a new, fully depleted battery at normal indoor temperatures. If a power outage occurs before the battery is fully charged, the battery-backup time will be reduced. Therefore, the customer should not rely on battery-backup power for at least 18 hours after your RG Battery Backup is initially installed or a replacement battery is thereafter installed. During these periods especially, and at all other times in general, the customer should ensure that they have an alternative means of dialing 911, such as via a cellular telephone. Your AT&T U-verse Voice service, including 911 dialing, will not function without electrical or battery-backup power. C. They should contact their Monitored Home Alarm provider to test the Monitored Home Alarm. D. Review with the customer the significance of not removing the line from the RG L1L2 Port of the RG to the Wall Plate and/or Dual-port jack. If it is removed their phone service will be disrupted and will not function, to include such things as Monitored Home Alarms, 911 dialing, etc. E. Remember that you need to warn customers that have Monitored Home Alarms against performing factory resets as this action will nullify the “Service Outage Detect” parameter. If this action is performed they should contact AT&T for assistance in restoring this parameter. Complete order in GCAS. BBU = Battery Backup acknowledgement • Provide customer the E911 collateral kit, User Manual, Stickers. • Then have customer acknowledge Form BEFORE the technician performs the Install! 43 A Battery Back-Up Unit (BBU) should always be installed when connecting U-verse Voice for a customer. The BBU will enable the U-verse Voice service to continue working in the event of a power outage for up to 4 additional hours. The technician MUST have the customer sign the E911 Acknowledgement Form before leaving the premise and closing the ticket. By signing the form, the customer acknowledges that during a power outage, they will not be able to make or receive calls, including 911 calls, unless they have a functioning backup battery for the RG. NOTE: If customer refuses to sign, CIM is to call CRC folks and have the order amended to remove the VOIP portion of the order that is not going to be installed. A POP-UP reminder will be displayed in GCAS to remind the technician about the E911 Form: • Pop-Up reminder in GCAS: • The technician can access the E911 form via GCAS under the Sales & Billing heading and then look under TOS (see below) and have the customer electronically sign the document or print out a paper copy if necessary: 44 • If needed, here is a copy of the form that can be printed: • https://cim.lno.att.com/National/SubSite/CIM_Handbooks/docs/911%20Ackn owled Installation Steps for BBU and EXAMPLES of ACTIVATION: 45 SAVL IVR User Interface Call Example: 46 12.2. Call Example 2: Technician wants to activate a TN, multiple TN’s awaiting activation are returned, activation is processed successfully Figure 44.Call Example 2 47 12.3. Call Example 3: Customer wants to activate a TN, multiple TN’s awaiting activation are returned, activation returns a partial success, customer retries activation, after 3rd failure customer is transferred to an agent Figure 45.Call Example 3 12.4. Call Example 4: Technician wants to activate a TN, multiple TN’s awaiting activation are returned, activation returns a failure, technician declines to retry activation, technician enters second TN for activation, one TN awaiting activation is returned, activation is processed successfully Figure 46.Call Example 4 48 12.5. Call Example 5: Technician wants to activate a TN, multiple TN’s awaiting activation are returned, customer chooses to activate one TN at a time, activation is processed successfully Figure 47.Call Example 5 49 12.6. Call Example 6: Technician wants to activate a TN, multiple TN’s already activated are returned Figure 48.Call Example 6 12.7. Call Example 7: Technician wants to activate a TN, multiple TN’s (none of which are awaiting activation) are returned, technician asks for status messages to be repeated, technician is transferred to an agent 50 Figure 49.Call Example 7 U-VERSE RETURN CODES: • If Business or Residential customer wants to cancel or if the CRC or Business Desk is closed: DO NOT COMPLETE THE ORDER!!!! • For Business call the Business Cancel Desk • For Residence call the CRC To remove portion of the order that customer did not request such as VoIP: Contact CRC (If order was issued as a Double Play (HSIA & VoIP). CRC will make sure to the due date is not changed to a future due date, if it does they will update and correct the due date. DO NOT JEP ORDER!!!! Removing CVoIP portion off the FTI: https://cim.lno.att.com/National/SubSite/TIOTS/docs/Removing%20CVoIP%20from %20%20FTI%20Order.pdf • If SAVL has not been conducted at all, confirm that customer still has dial tone on their existing POTS. • If customer had existing VoIP but wants to cancel or the POTS were disconnected already, reach the BACKOFFICE so that a new order is issued for POTS service. 51 Installation Section for Single Family Unite (SFU) Installation Section for Multi-Dwelling Units (MDU) Related Documents: UFO Training Processes for IP-DSL, HSIA only IP-DSL MPUverse.pdf Helpful Tips when creating Helper Tickets: Creating Helper tickets: UFO - Responsibilities facilities and you are within the maximum and minimum downstream rates of your assigned speed (see figure 1). If a helper ticket is being created, every attempt should also be made to determine which IW pair has the CPE tied to it, the drop should be tied down to the IW that is connected to the CPE. The IW should always be tagged at the NID. Terminal (used in the MW and SW only), or IN SYNC/Errors on line. o o o o IP-DSL, HSIA or Double pack (HSIA only with VoIP) Customer Self Install (CSI) or Full Tech Install (FTI) Line Share or Dry Loop Call back number for the technician creating the helper ticket 52 regions will use jep codes U32 (Installation), R06 (Maintenance) when creating Helper Tickets. No Access Procedures - CSI o If there is no access to AT&T facilities (i.e. equipment room, terminal locations, wire closets, found in MDU’s where jumpers need to be placed), the technician will attempt to retrieve other access numbers for gaining access into our AT&T facility rooms. If access cannot be arranged, the technician should instruct the customer to make arrangements for access into our AT&T facilities by leaving a customer status door hanger. The door hanger will need to instruct the customer to contact the appropriate department listed to make new access arrangements. The technician will notify their manager and return the work request. The appropriate return codes for this scenario would be: Maintenance – R01, Installation U01 On a SFU where the customer is in control of the demarcation point (NID) for gaining access to a locked gate, bad dog in yard, etc., before closing your job follow the bullet points below. o If faults are found toward the home from the terminal or SAI, leave a door tag instructing the customer of an issue towards the home. o If you’re unable to gain access, always try to test for the CPE and run a successful QC to verify if the jumpers have been connected inside the locked room, fence, closet, etc., if so, you can close your ticket with confidence that the customer will have a successful install. Otherwise you will still need to perform a NID check. o Technician should always provide detailed narratives where access is needed. region), ensure there are no faults on the IW towards the customers premise. If all metallic tests towards the home pass and you can detect the CPE with your butt set, terminate connections at serving terminal run a QC and close your order. o Perform a LSBBT NID check o Terminate sync to the primary pair (IW) o If primary pair is being used, terminate sync to the next in sequence pair in the IW and install external splitter. o Tag at NID, place door tag, and close your job General Notes Bottom line is that when you are dispatched on an installation or maintenance ticket, you own it, and it’s your responsibility to give the customer the best customer experience. Points to remember when you own the ticket: – This will allow you to verify you have a good circuit. 53 Billing If you are able to gain access into the customer’s home, and you have tested and isolated faulty IW issues from the NID towards the customers CPE, billing will apply for the jack/wiring work ($55). If the customer wants you to complete the install, you will need to amend the order to FTI before closing your job (see note below). Make the following disclosure to the customers before entering the residence, if access is available: o “Mr. /Mrs. customer, I have completed the outside work for the installation of your AT&T Broadband service that you have ordered. I have detected a problem within your home, and while I’m here, I would be glad to check your wiring, telephone jack and CPE, to ensure that your service will work correctly for a charge of $55”. Work should not be performed inside the premises unless the customer agrees to the charges. (additional charges could apply depending on what the customer request). o If the customer does not wish you to enter the premises to complete the installation, ensure them that their service is tagged and terminated to the primary Inside Wire. Inform them that if they experience any difficulties with their installation to call the number included with their equipment and that the same charges would apply. o Completion of inside jack/wiring work and adding the billing USOC will add additional MSOC time to your completed job. o When rescheduling with the customer; if customer requests a different due date, do not use Saturday/Sunday. NOTE: If the customer requests you assist them with their Customer Self Install, you need to advise them that they will be billed $149 for a Full Tech Install. If the customer agrees with the charge, you will need to amend the order from CSI to a FTI by calling Tier 2 (DO NOT COMPLETE YOUR CSI ORDER). This will give you the correct earned time to complete the FTI and the order will reflect FTI charges be billed to the customer, so you will not need to bill for the failed CSI. Southeast Region The work described in this job aid will be region specific due to contractual agreements. It is mandatory to run the LSBBT NID check or Quality check in all regions, and a passing test is required to complete your order. If you’re unable to receive a good signal at the NID per this job aid, you may need to create a helper ticket for I&M to correct the facilities. As stated in this job aid you will also test the inside wire, notify the customer of faults if they are home or leave a door tag, connect the IW to the protector, perform Quality check if CPE is found or NID Check, and complete your job. Full Tech install/Maintenance tickets o For the best possible service, try to provide a “Homerun” pair of wires to the CPE, with an external splitter. For HSIA speeds of 12M and above, a homerun is required. o Ensure there is good sync at the jack where the customer’s CPE is connected and perform a passing QC before the job is closed. o Assist the customer with registration completion. 54 o If a helper ticket is required, perform testing on Inside Wire, testing from NID to Jack or terminal to Jack and install CPE, leave CPE plugged in, and leave all customer collateral for CPE and Customer Care contact numbers and jep your job using the appropriate codes. Maintenance Dispatches o Responsibilities will be the same as on a full installation jobs. We will be responsible for testing at the SAI and NID and performing a QC, all related inside work, and if needed, making sure cross connects have been placed correctly. o On maintenance dispatches, CARE will reaffirm with the customer that the modem is plugged in and turned on. This will be noted on the trouble narrative of the ticket 55